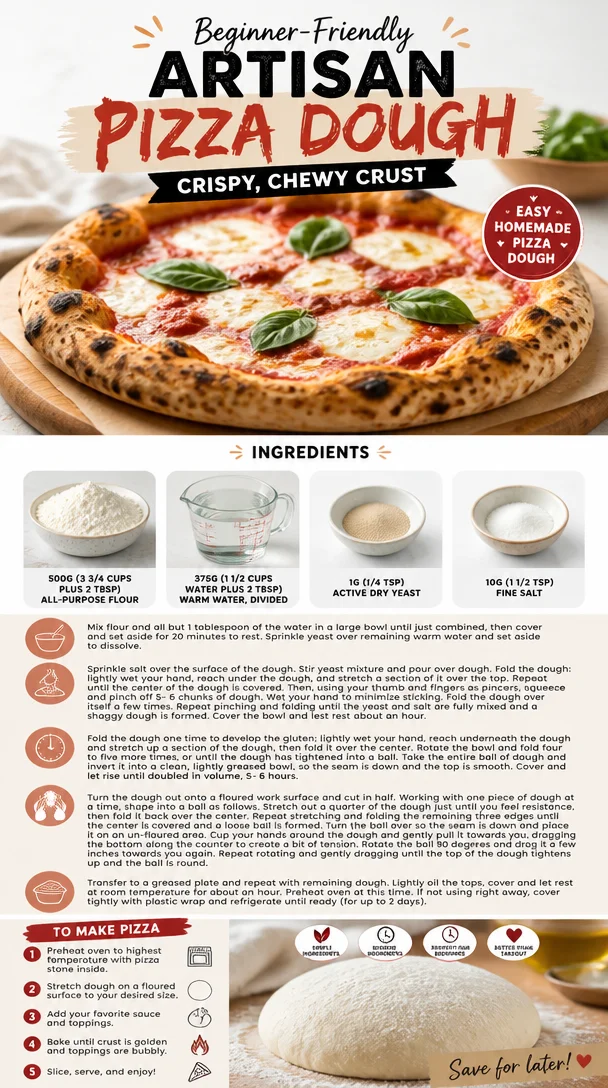
Beginner-Friendly Artisan Pizza Dough: Crispy, Chewy Crust
The Quest for the Perfect Artisan Pizza Dough: Crispy, Chewy, Bubbly Crust Awaits!
Hello, fellow food lovers! If there’s one thing we can all agree on, it’s that nothing brings people together quite like a pizza party. And while everyone has their favorite toppings (anchovies, anyone?), the star of the show is undoubtedly the crust. Today, I’m thrilled to take you on a journey to create the perfect artisan pizza dough right in your own kitchen. With a crispy exterior and a chewy, bubbly interior, this crust will have you saying goodbye to takeout and hello to homemade goodness!
Now, I know what you might be thinking: "Making pizza dough sounds complicated." But let me assure you, it’s easier than it seems! I created this recipe to showcase the joy of creating something delicious at home with just a handful of simple ingredients. So roll up your sleeves, and let’s dive into the delightful world of pizza!
A Slice of Nostalgia
Before we start kneading, let me share a little story that might just resonate with you. Reflecting on my childhood, I remember weekends spent at my grandma’s house, where the air would be filled with the cozy aroma of rising dough and garlic-infused tomato sauce. She had this old wooden pizza peel and a cozy red-checkered tablecloth, and we’d gather ‘round as she expertly spun the dough into the air. Each pizza topped with whatever fresh ingredients we could scrounge up from her garden—fresh basil, juicy tomatoes, and ooey-gooey mozzarella.
That sense of connection, creativity, and love stands as the foundation for my passion for cooking. That magic moment of pulling a bubbling, golden pie from the oven is something everyone deserves to experience. So let’s bring a little of that magic into your kitchen with this artisan pizza dough recipe!
Ingredients
Let’s talk about the star players in our pizza dough. Here’s what you’ll need:
-
500g (3 3/4 cups plus 2 tbsp) all-purpose flour: This is the backbone of your crust. All-purpose flour gives a great balance of chewiness and crispiness. If you’re looking for a healthier twist, you can substitute half of the flour with whole wheat flour for a nuttier flavor and added fiber!
-
375g (1 1/2 cups water plus 2 tbsp), divided: Water brings the dough together. Using warm water (about 105°F) helps activate the yeast to rise. Remember, too hot, and you’ll kill the yeast; too cold, and it won’t activate properly.
-
1g (1/4 tsp) active dry yeast: This tiny powerhouse works wonders! It’s what gives your dough that lovely rise. If you have instant yeast, you can use it in the same quantity; it’s super convenient and requires no proofing!
-
10g (1 1/2 tsp) fine salt: Salt enhances flavor and strengthens the dough’s structure. If you prefer a lower-sodium option, feel free to cut back a little—but keep in mind, salt is essential for flavor!
Now that you have your ingredients ready, let’s get onto the fun part!
Step-by-Step Instructions
-
Activate the yeast: In a small bowl, combine 80g (1/3 cup) of warm water and the active dry yeast. Let this mixture sit for about 5-10 minutes until it’s frothy and bubbly. This means your yeast is alive and ready to work its magic!
-
Mix the dry ingredients: In a large mixing bowl, add the flour and fine salt. Whisk them together to ensure that the salt is evenly distributed throughout the flour.
-
Combine wet and dry: Create a well in the center of the flour mixture and pour in the activated yeast and the remaining warm water. Start mixing with a wooden spoon or your hands until everything comes together into a shaggy dough. Don’t worry if it looks a bit messy—that’s normal!
-
Knead the dough: Transfer the dough to a lightly floured work surface. Knead the dough for about 10-12 minutes until it becomes smooth and elastic. A great way to know it’s ready is when the dough springs back after pressing it with your finger. Pro tip: If it sticks, add a dusting of flour—but avoid adding too much, as it can make the dough tough.
-
First rise: Form the kneaded dough into a ball and place it in a lightly greased bowl, turning it to coat. Cover the bowl with a damp kitchen towel or plastic wrap and let it rise in a warm spot for about 1-2 hours, or until the dough has doubled in size. You can also let it rise slower in the refrigerator overnight for even better flavor development!
-
Shape the dough: Punch down the risen dough to release the air. Turn it out onto a floured surface and divide it into 2 equal pieces (for large pizzas) or keep it whole for one giant pizza night! Shape into balls and let them rest for about 30 minutes under a damp towel.
-
Stretch and shape: Now comes the fun part—shaping the dough! Using your fingers, gently stretch the dough ball from the center outwards, working your way around. Avoid using a rolling pin, as you want to preserve those lovely air bubbles that will create a light, airy crust. If you’re feeling adventurous, give it a little toss in the air—just be sure the dough isn’t flying across the kitchen!
-
Pre-bake the crust: Preheat your oven to the highest setting (usually around 475°F to 500°F). To achieve that perfect crispy crust, it’s best to use a pizza stone or steel. Place your shaped dough on a parchment-lined baking sheet or directly onto the hot stone for about 5-7 minutes to form a light, pre-baked crust.
-
Top and bake: Remove the crust, add your favorite sauce, cheese, and toppings, and pop it back in the oven until the cheese is bubbly and the crust is golden, around 8-12 minutes.
-
Slice and serve: Once out of the oven, let your pizza cool for a couple of minutes, then slice it up and enjoy!
Serving Suggestions
Pizza is best enjoyed fresh out of the oven! For an added touch, drizzle a little extra virgin olive oil over the top, sprinkle on some fresh basil leaves, and serve with a side salad. Pizza night is all about sharing, so bring everyone together and indulge in this homemade goodness!
Recipe Variations
Feeling creative? Here are a few fun twists for your artisan pizza dough:
-
Herb-Infused Dough: Add a tablespoon of your favorite dried herbs (like oregano or basil) to the flour for an aromatic kick.
-
Garlic Lover’s Delight: Mix in some minced garlic or garlic powder to the dough for a savory burst of flavor.
-
Cheesy Dough: Incorporate grated Parmesan cheese into your dough for a hint of cheesy flavor in every bite.
-
Gluten-Free Option: Use a gluten-free flour blend and add a tablespoon of xanthan gum to help mimic the elasticity found in gluten-based dough.
-
Whole Wheat Wonderland: Swap half the flour for whole wheat flour for a heartier, nutty crust.
Chef’s Notes
Creating this dough has become a cherished ritual for me. It’s a great way to blow off steam after a long day and dive into something creative. I’ve played with various flours, herbs, and toppings over the years, and every iteration has its own charm. My favorite story? Once, when I was testing this recipe, I accidentally spilled a whole bottle of oregano into the dough. Thinking it was a disaster, I ended up with a standout pizza that had everyone begging for the “secret” ingredient. Turns out, culinary accidents can be delicious!
FAQs and Troubleshooting
1. My pizza dough didn’t rise! What went wrong?
- If your dough hasn’t risen, it could be that your yeast was dead or the water was too hot or too cold. Always check the expiration date on your yeast before using it, and make sure the water temperature is just right—warm but not scalding.
2. Why is my crust too tough?
- Overworking the dough can make it tough. Be gentle during kneading and stretching. Remember, a little stickiness is okay!
3. What if my dough is too sticky?
- If the dough is sticky, try dusting it with a small amount of flour during kneading. But don’t overdo it—too much flour can lead to a dry dough.
4. Can I make the dough ahead of time?
- Absolutely! You can let the dough rise in the fridge overnight or make it a few days in advance. Just pull it out, let it come to room temperature, and shape as directed.
Nutritional Info (Optional)
(Note: Nutritional information can vary based on specific brands and quantities used. Always consult a nutritionist for accurate dietary advice.)
- Servings: 2
- Calories per serving: Approximately 250 calories (without toppings)
- Protein: 8g
- Carbohydrates: 50g
- Fat: 1g
There you have it! Your ultimate guide to crafting the perfect artisan pizza dough with a crispy, chewy, bubbly crust. Whether you’re hosting a casual pizza night or indulging in a solo pizza binge, this dough will elevate every bite! So gather those ingredients, get your hands doughy, and let the pizza-making adventure begin. Remember, it’s all about the love you put into it, and I can’t wait for you to share your delicious creations! Happy cooking, friends!
PrintPerfect Artisan Pizza Dough

Create the perfect artisan pizza dough with a crispy, chewy, and bubbly crust that’s easy to make at home.
- Prep Time: 20 minutes
- Cook Time: 20 minutes
- Total Time: 40 minutes
- Yield: 2 servings 1x
- Category: Main Course
- Method: Baking
- Cuisine: Italian
- Diet: Vegetarian
Ingredients
- 500g (3 3/4 cups plus 2 tbsp) all-purpose flour
- 375g (1 1/2 cups plus 2 tbsp) warm water, divided
- 1g (1/4 tsp) active dry yeast
- 10g (1 1/2 tsp) fine salt
Instructions
- Activate the yeast: In a small bowl, combine 80g (1/3 cup) of warm water and the active dry yeast. Let this mixture sit for about 5-10 minutes until it’s frothy and bubbly.
- Mix the dry ingredients: In a large mixing bowl, add the flour and fine salt. Whisk them together.
- Combine wet and dry: Create a well in the center of the flour mixture and pour in the activated yeast and remaining warm water. Mix until it forms a shaggy dough.
- Knead the dough: Transfer the dough to a floured surface and knead for about 10-12 minutes until smooth and elastic.
- First rise: Place the dough in a greased bowl, cover it, and let it rise for about 1-2 hours until doubled in size.
- Shape the dough: Punch down the risen dough, divide it into pieces, shape into balls, and let rest for 30 minutes.
- Stretch and shape: Gently stretch the dough from the center outwards into your desired shape.
- Pre-bake the crust: Preheat oven to 475°F-500°F. Pre-bake the shaped dough for 5-7 minutes.
- Top and bake: Add toppings and bake until cheese is bubbly and crust is golden, about 8-12 minutes.
- Slice and serve: Let cool for a couple of minutes, then slice and enjoy!
Notes
Drizzle extra virgin olive oil and sprinkle fresh basil before serving.
Nutrition
- Serving Size: 1 serving
- Calories: 250
- Sugar: 1g
- Sodium: 400mg
- Fat: 1g
- Saturated Fat: 0g
- Unsaturated Fat: 0g
- Trans Fat: 0g
- Carbohydrates: 50g
- Fiber: 2g
- Protein: 8g
- Cholesterol: 0mg
Keywords: pizza dough, artisan pizza, homemade pizza
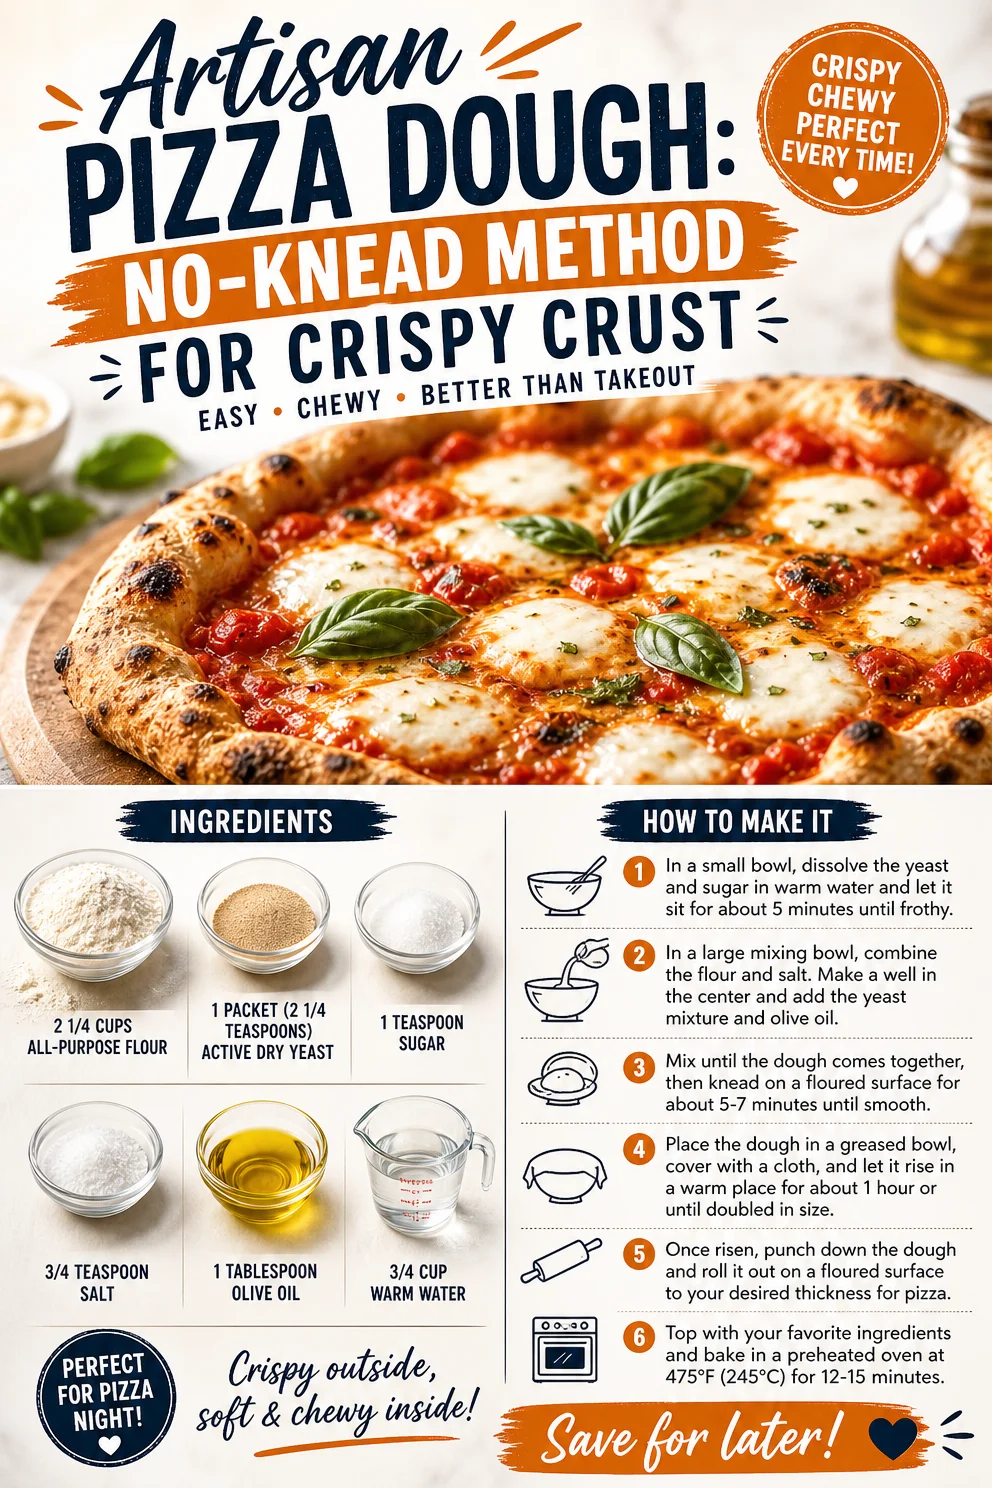
Artisan Pizza Dough: No-Knead Method for Crispy Crust
The Art of Crafting Your Own Artisan Pizza Dough
Welcome to a delicious adventure with me, Ava Carter, in the cozy world of artisan pizza dough! If you’ve ever savored a slice of freshly baked pizza and wondered how to recreate that chewy, crispy goodness at home, you’re in for a treat. Making your own pizza dough at home not only allows you to control the ingredients but also gives you a chance to express your culinary creativity. It’s a hands-on craft that brings satisfaction with each knead and fold, and today, I’m excited to guide you through every step of the process.
Picture a sunny Saturday afternoon. The aroma of warm, yeasty dough fills the kitchen, and the kids are bustling around, eagerly awaiting their personal pizzas topped with their favorite delights. I’ll never forget those carefree moments spent in my grandmother’s kitchen, where pizza night was a cherished ritual. We would gather around the table, flour dusting our faces, as we tossed dough and layered on toppings, sharing laughs and stories. It was in those moments that I discovered the magic of food—how it brings us together and creates lasting memories.
So, let’s roll up our sleeves, warm up our hearts, and dive into the delightful process of making artisan pizza dough from scratch!
Ingredients
-
2 1/4 cups all-purpose flour
This is the backbone of our dough, giving it structure and chewiness. For a whole wheat version, you can substitute half of this flour with whole wheat flour for added nutrients. -
1 packet (2 1/4 teaspoons) active dry yeast
Yeast is what makes the dough rise, creating that delightful airy texture. If you have instant yeast, you can use that without proofing, but it’s always good to check the expiration date to ensure it’s active! -
1 teaspoon sugar
Sugar isn’t just for sweetness; it also gives the yeast a boost during fermentation. If you’d rather skip the sugar, honey or maple syrup can be great substitutes! -
3/4 teaspoon salt
Salt is essential for flavor and helps to control yeast activity. If you’re watching your sodium intake, feel free to reduce this amount—just remember, salt enhances the natural flavors! -
1 tablespoon olive oil
Olive oil adds richness and helps prevent the dough from sticking. You can experiment with flavored oils too, like garlic or rosemary-infused for an aromatic touch. -
3/4 cup warm water
Water activates the yeast. Make sure it’s warm (about 110°F); too hot will kill the yeast, and too cold won’t activate it properly. If you ever find yourself without warm water, you can use vegetable broth for added flavor!
Step-by-Step Instructions
-
Activate the Yeast:
Start by pouring 3/4 cup of warm water into a small bowl. Sprinkle the packet of active dry yeast and the teaspoon of sugar over the water. Let it sit for about 5–10 minutes, or until it becomes frothy. This is a crucial step—think of it like waking up the yeast! -
Mix the Dry Ingredients:
In a large mixing bowl, combine 2 1/4 cups of all-purpose flour and 3/4 teaspoon of salt. Give it a gentle whisk to combine things nicely. This helps to distribute the salt evenly, which is key for flavor. -
Combine Wet and Dry Ingredients:
Once your yeast is frothy, add in 1 tablespoon of olive oil and then pour the yeast mixture into the bowl with the dry ingredients. Using a wooden spoon, mix until a shaggy dough forms. Don’t worry about it being perfect at this stage; we’ll work it out in the next step! -
Knead the Dough:
Dump the dough onto a lightly floured surface. Knead it for about 5–7 minutes. This is where the magic happens! You’ll want to stretch and fold the dough—don’t be shy, let out your inner bread ninja! The dough is ready when it’s smooth and elastic. If it feels too sticky, sprinkle just a bit more flour as needed. -
First Rise:
Form the dough into a ball and place it in a lightly greased bowl, turning it to coat all sides with oil. Cover it with a clean kitchen towel or plastic wrap. Let it rise in a warm place until it doubles in size, usually about 1 hour. Pro tip: If you can find a warm sunny spot in your kitchen, let your dough sit there—it’ll rise like a champ! -
Shape Your Dough:
Once your dough has risen, punch it down to release any air bubbles (don’t worry, it’s not a crime!). Turn it out onto a floured surface and divide it into two equal pieces. Shape each piece into a ball. Allow them to rest for about 15 minutes before shaping them into your pizzas. This resting period helps relax the gluten, making it easier to stretch. -
Preheat the Oven:
While the dough is resting, preheat your oven to 475°F (245°C). If you have a pizza stone, place it in the oven to preheat as well. This will give you that crispy crust magic! -
Shape the Pizza:
Take one ball of dough and begin to gently stretch it with your hands, or use a rolling pin if you prefer a more uniform shape. Aim for a thickness of about 1/4 inch. Transfer it to a floured pizza peel or a baking sheet lined with parchment paper. -
Top and Bake:
Now comes the fun part! Top your dough with your favorite sauces, cheeses, and toppings. Slide your pizza onto the hot pizza stone or place your baking sheet in the oven. Bake for about 12–15 minutes or until the crust is golden brown and crispy. -
Enjoy!
Once baked, remove your pizza from the oven and let it cool for a couple of minutes before slicing. Serve hot, and don’t forget to share the love (and slices) with your friends and family!
Serving Suggestions
For an impressive presentation, serve your artisan pizza on a wooden cutting board or a beautiful pizza peel. Slice it with a pizza cutter and drizzle a little extra olive oil or balsamic glaze over the top for a gourmet touch. Pair with a fresh green salad for a balanced meal or enjoy it solo—either way, it’s sure to be a hit!
Recipe Variations
- Herbed Dough: Add a tablespoon of dried oregano, basil, or rosemary directly to the flour for an aromatic twist.
- Whole Wheat Option: Swap out half of the all-purpose flour with whole wheat flour for added texture and nutrition.
- Garlic Infusion: Incorporate minced garlic into the dough for an extra layer of flavor.
- Cheesy Crust: For a fun twist, roll small pieces of cheese into the dough before shaping your pizza!
- Cauliflower Crust: For a gluten-free version, try a cauliflower crust recipe, which can create a light, crispy alternative!
Chef’s Notes
I once attempted to make pizza dough during a storm, thinking it would be a cozy indoor activity. The power went out, and I had to knead the dough by candlelight! Funny how such moments create the best stories, even though the dough ended up a bit too airy—turns out, making it fun is the secret ingredient! Over time, I’ve learned that the key to pizza dough lies in knowing your ingredients and your environment. Whether you have high humidity or dry air, adjustments in your flour can make a big difference. Don’t let a little weather or a kitchen mishap stop you—embrace it, learn from it, and above all, enjoy the process!
FAQs and Troubleshooting
1. My dough didn’t rise! What did I do wrong?
This can happen if your yeast is expired or if the water was too hot or too cold. Always check the temperature and the date on your yeast packaging! A warm, draft-free spot aids in rising.
2. The dough is too sticky! What should I do?
A sticky dough means it likely needs a bit more flour. Sprinkle flour gradually while kneading until it feels smooth and elastic. Just avoid adding too much—balance is key!
3. Can I freeze the dough?
Absolutely! After the first rise, wrap the dough tightly in plastic wrap and place it in a freezer bag. It’ll keep for up to 3 months. Just remember to thaw it in the refrigerator overnight before using.
4. Can I make this in advance?
Yes! You can prepare this dough ahead of time and let it rise slowly in the refrigerator overnight. Just take it out about an hour before you’re ready to shape and bake so it can come to room temperature.
Nutritional Info
Making pizza dough at home allows you to understand exactly what goes into it. One serving can be around 150 calories, depending on your toppings! With fresh ingredients, you can experiment with healthier options and create a nourishing, satisfying meal.
And there you have it—your very own artisan pizza dough made from scratch! Embrace the art of pizza making, gather your loved ones, and let the dough adventures begin. I can’t wait to hear about the creative toppings and recipes you come up with! So, what are you waiting for? Let’s get baking!
PrintArtisan Pizza Dough

Craft your own artisan pizza dough from scratch for a delicious, homemade pizza experience.
- Prep Time: 15 minutes
- Cook Time: 15 minutes
- Total Time: 30 minutes
- Yield: 2 pizzas 1x
- Category: Main Course
- Method: Baking
- Cuisine: Italian
- Diet: Vegetarian
Ingredients
- 2 1/4 cups all-purpose flour
- 1 packet (2 1/4 teaspoons) active dry yeast
- 1 teaspoon sugar
- 3/4 teaspoon salt
- 1 tablespoon olive oil
- 3/4 cup warm water
Instructions
- Activate the yeast: In a bowl, combine warm water, yeast, and sugar. Let it sit until frothy.
- Mix the dry ingredients: In a bowl, whisk together flour and salt.
- Combine wet and dry ingredients: Add olive oil and the yeast mixture to the bowl and mix until shaggy dough forms.
- Knead the dough: On a floured surface, knead the dough for 5–7 minutes until smooth and elastic.
- First rise: Place the dough in a greased bowl, cover it, and let it rise until doubled in size (about 1 hour).
- Shape your dough: Punch down the dough, divide it into two pieces, and shape each into a ball. Rest for 15 minutes.
- Preheat the oven to 475°F (245°C).
- Shape the pizza: Stretch one ball of dough into a pizza shape and transfer it to a baking sheet.
- Top and bake: Add toppings and bake for 12–15 minutes until golden brown and crispy.
- Enjoy! Let the pizza cool for a couple of minutes before slicing.
Notes
Serve with a drizzle of olive oil or balsamic glaze for an added touch. Pair with a fresh green salad.
Nutrition
- Serving Size: 1/2 pizza
- Calories: 150
- Sugar: 1g
- Sodium: 250mg
- Fat: 5g
- Saturated Fat: 1g
- Unsaturated Fat: 3g
- Trans Fat: 0g
- Carbohydrates: 20g
- Fiber: 1g
- Protein: 4g
- Cholesterol: 0mg
Keywords: pizza dough, artisan pizza, homemade pizza