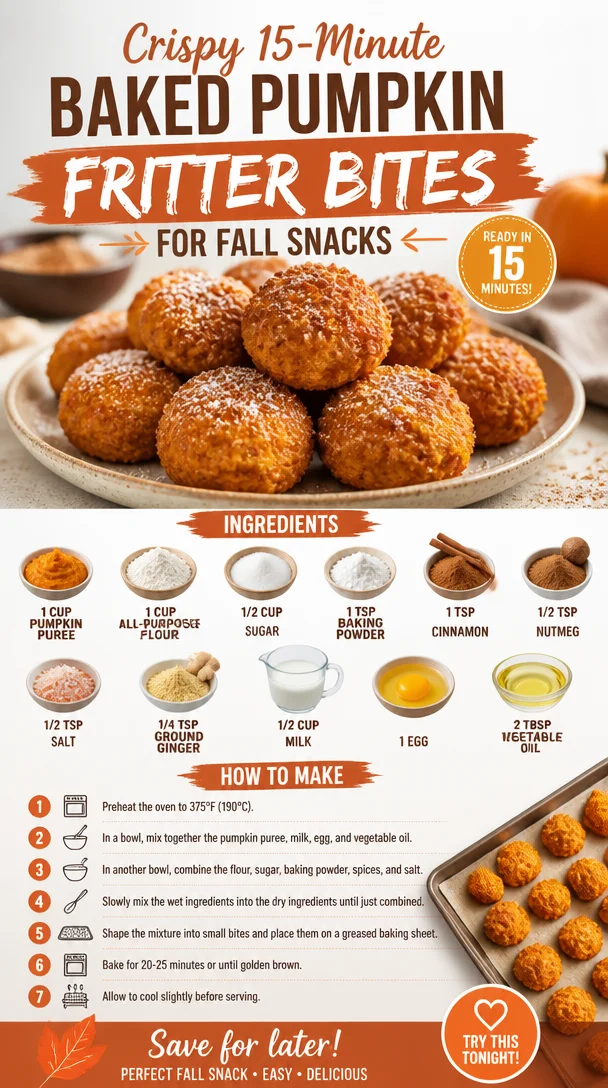
Crispy 15-Minute Baked Pumpkin Fritter Bites for Fall Snacks
Easy Baked Pumpkin Fritter Bites: A Flavorful Fall Twist
Welcome to another delicious adventure in the kitchen! Today, I’m excited to share a recipe that not only warms the heart but also captures the spirit of fall—Easy Baked Pumpkin Fritter Bites. As the leaves turn and the air gets crisper, there’s something truly magical about incorporating pumpkin into our meals. These little bites of joy are fluffy, slightly sweet, and delightful—all without the fuss of frying.
Now, you might be wondering why I’m raving about baked fritters when the traditional route takes the plunge into hot oil. Well, let me tell you, these baked beauties retain that comforting fritter experience while being lighter and healthier. Plus, they come together in a snap, making them perfect for busy mornings, afternoon snacks, or cozy gatherings with friends. Who doesn’t love a treat that’s both good for you and totally satisfying?
Join me as we embark on a culinary journey filled with warmth, nostalgia, and of course, flavor! I’ll share a personal story that’ll tickle your taste buds, walk you through the ingredients, and guide you every step of the way to ensure your fritters turn out deliciously perfect. So grab your apron, and let’s get started!
A Slice of My Culinary Memory
Let me take you back to my childhood, where the scent of pumpkin pie wafted through the air every autumn. My Grandma June had a way of making everything feel special, and during pumpkin season, her kitchen was the heart of our family gatherings. Each year, we’d huddle around the kids’ table, eagerly waiting to help her mix, pour, and taste test. The joy on her face when we “helped” was priceless—though we mostly just enjoyed sneaking spoonfuls of batter!
One of my fondest memories involves Grandma’s famous pumpkin fritters. She usually would whip them up as a post-harvest treat, and we’d devour them with warm maple syrup and a sprinkle of powdered sugar. I can still hear her laughter as we fought over the last bite. Fast forward to today, and I find myself recreating those moments with a healthy twist through these baked pumpkin fritter bites. They might not be as heavy or greasy as Grandma’s version, but they carry the essence of her warmth in every scrumptious bite.
Ingredients
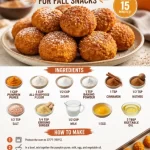
Let’s gather our ingredients for these Easy Baked Pumpkin Fritter Bites. Here’s what you’ll need:
-
1 cup pumpkin puree: The star of the show! This is what makes your fritters moist and flavorful. You can use canned puree or roast fresh pumpkin—both work beautifully.
-
1 cup all-purpose flour: The base of your batter. If you want to add a whole grain element, substitute half with whole wheat flour for added fiber.
-
1/2 cup sugar: This adds sweetness. For a healthier spin, consider using honey or maple syrup (just adjust the liquid content).
-
1 teaspoon baking powder: This gives your fritters that much-loved rise and fluffy texture.
-
1 teaspoon cinnamon: A warm spice that enhances the autumn vibe. Feel free to swap with pumpkin spice for an extra flavor punch!
-
1/2 teaspoon nutmeg: This adds a nuttiness and depth of flavor. It’s warming and pairs beautifully with the pumpkin.
-
1/2 teaspoon salt: A tiny helper to balance the sweetness and enhance every flavor.
-
1/4 teaspoon ground ginger: This adds a little zing! Ginger is optional, but it gives a nice, warm kick.
-
1/2 cup milk: Helps to moisten your batter. You can swap this with a plant-based alternative or even pumpkin spice latte for a fun twist!
-
1 egg: This helps hold everything together and adds richness. For a vegan option, you can replace it with a flax egg (1 tablespoon ground flaxseed mixed with 2.5 tablespoons water).
-
2 tablespoons vegetable oil: This keeps your fritters moist; feel free to use melted coconut oil or applesauce for a lighter version.
Step-by-Step Instructions
Now comes the fun part—let’s dive into making our Easy Baked Pumpkin Fritter Bites! Follow these steps, and let’s whip up some delightful treats that will have everyone coming back for seconds.
1. Preheat your oven
Start by preheating your oven to 400°F (200°C). This ensures that your fritters bake evenly and become perfectly golden. While the oven is warming up, line a baking sheet with parchment paper—it helps with easy clean-up and gives the fritters a nice, crisp texture.
2. Combine your dry ingredients
In a medium-sized mixing bowl, whisk together the flour, sugar, baking powder, cinnamon, nutmeg, salt, and ground ginger. Mixing your dry ingredients first helps evenly distribute the leavening agents and spices throughout the batter, ensuring that each bite is full of flavor!
3. Mix the wet ingredients
In a separate bowl, mix your pumpkin puree, milk, egg, and vegetable oil. If you’re using a flax egg for a vegan option, mix the flaxseed with water and let it sit for a few minutes before adding it to the mix. This little trick will give you that necessary binding effect!
4. Combine wet and dry ingredients
Now, pour your wet mixture into the dry ingredients. Gently fold them together with a spatula until just combined. Make sure not to overmix—this keeps your fritters light and fluffy! Trust me, a few lumps here and there are perfectly okay.
5. Scoop your batter onto the baking sheet
Using a cookie scoop or a spoon, drop rounded tablespoons of batter onto your prepared baking sheet, leaving a bit of space between each one. They don’t spread much, so be generous but not too crowded!
6. Bake until golden brown
Pop your sheet in the oven and bake for about 15-20 minutes or until the fritters are puffed up and golden. You can do the toothpick test—just poke one in the center; if it comes out clean, you’re good to go!
7. Cool and serve
Once baked, remove them from the oven and let them cool for a few minutes. Then, transfer to a wire rack to cool completely—if you can resist the temptation, that is!
Serving Suggestions
These Easy Baked Pumpkin Fritter Bites are perfect for sharing, so consider serving them warm. You can dust them with powdered sugar or dip them in maple syrup for an extra treat. For a more gourmet touch, drizzle some honey or a cream cheese glaze over the top and watch everyone swoon with delight!
Recipe Variations
Get creative with your fritters! Here are a few fun twists you can try:
-
Add-ins: Mix in chopped nuts like walnuts or pecans for a delightful crunch.
-
Dried fruits: Toss in some dried cranberries or raisins for sweetness and texture contrast.
-
Spices: Experiment with cardamom or allspice to add a new dimension to your flavors.
-
Cheese twist: Try incorporating mild cheese (like feta or goat cheese) for a savory twist!
-
Gluten-free: Swap out all-purpose flour for a gluten-free blend, and voila! You’ve got a gluten-free version!
Chef’s Notes
Oh, how I love this recipe! It has evolved from Grandma June’s deep-fried fritters to these lightened-up bites that everyone can enjoy. You know, the beauty of cooking lies in its ability to bring people together and create lasting memories. I’m always experimenting in the kitchen—I once tossed in some cranberries, and they were an instant hit! Cooking should be fun and flexible, so don’t hesitate to make this recipe your own.
If you have kids (or just sprinkle some whimsical joy in your life), let them help out! Mixing and scooping are easy tasks for little hands and a chance to create memories together, just like I did with Grandma.
FAQs and Troubleshooting
-
My fritters didn’t rise. What happened?
Ensure your baking powder is fresh. An expired baking powder will lead to flat fritters. Also, make sure not to overmix your batter; this can lead to dense fritters. -
Can I use fresh pumpkin instead of canned?
Absolutely! Just roast your pumpkin, scoop, and puree until smooth—it adds a wonderful fresh flavor that’s hard to beat! -
Why are my fritters too dry?
They might have baked too long, so keep an eye on them during the last few minutes. If they’re dry, consider adding a bit more milk next time or reducing the baking time slightly. -
Can these be made ahead?
Yes! You can prepare the batter ahead of time and refrigerate it for up to 24 hours before baking them fresh. They’re best enjoyed warm, straight from the oven!
Nutritional Info
One fritter (approximately 30g) consists of approximately:
- Calories: 80
- Protein: 1g
- Total Fat: 3g
- Saturated Fat: 0.5g
- Carbohydrates: 12g
- Fiber: 1g
- Sugar: 3g
Keep in mind that these values are just a ballpark, so adjust based on your ingredient swaps and serving size.
And there you have it—a delightful journey through my favorite baked pumpkin fritter bites! Remember, cooking is all about love, experimentation, and feeding your soul. I hope you enjoy making (and devouring) these treats as much as I do. Happy cooking, fellow foodies!
PrintEasy Baked Pumpkin Fritter Bites
These fluffy, slightly sweet pumpkin bites are a healthier twist on traditional fritters, perfect for fall gatherings or cozy snacking.
- Prep Time: 10 minutes
- Cook Time: 20 minutes
- Total Time: 30 minutes
- Yield: 4 servings 1x
- Category: Snack
- Method: Baking
- Cuisine: American
- Diet: Vegetarian
Ingredients
- 1 cup pumpkin puree
- 1 cup all-purpose flour
- 1/2 cup sugar
- 1 teaspoon baking powder
- 1 teaspoon cinnamon
- 1/2 teaspoon nutmeg
- 1/2 teaspoon salt
- 1/4 teaspoon ground ginger
- 1/2 cup milk
- 1 egg
- 2 tablespoons vegetable oil
Instructions
- Preheat your oven to 400°F (200°C) and line a baking sheet with parchment paper.
- Combine your dry ingredients: In a bowl, whisk together flour, sugar, baking powder, cinnamon, nutmeg, salt, and ginger.
- Mix your wet ingredients: In another bowl, mix pumpkin puree, milk, egg, and vegetable oil.
- Combine wet and dry ingredients until just mixed.
- Scoop batter onto the prepared baking sheet.
- Bake for 15-20 minutes until golden brown.
- Cool on a wire rack before serving.
Notes
Serve warm with powdered sugar or maple syrup. Kids can help with mixing and scooping!
Nutrition
- Serving Size: 1 fritter
- Calories: 80
- Sugar: 3g
- Sodium: 200mg
- Fat: 3g
- Saturated Fat: 0.5g
- Unsaturated Fat: 2g
- Trans Fat: 0g
- Carbohydrates: 12g
- Fiber: 1g
- Protein: 1g
- Cholesterol: 30mg
Keywords: pumpkin fritters, baked fritters, healthy snacks, fall recipes, vegetarian