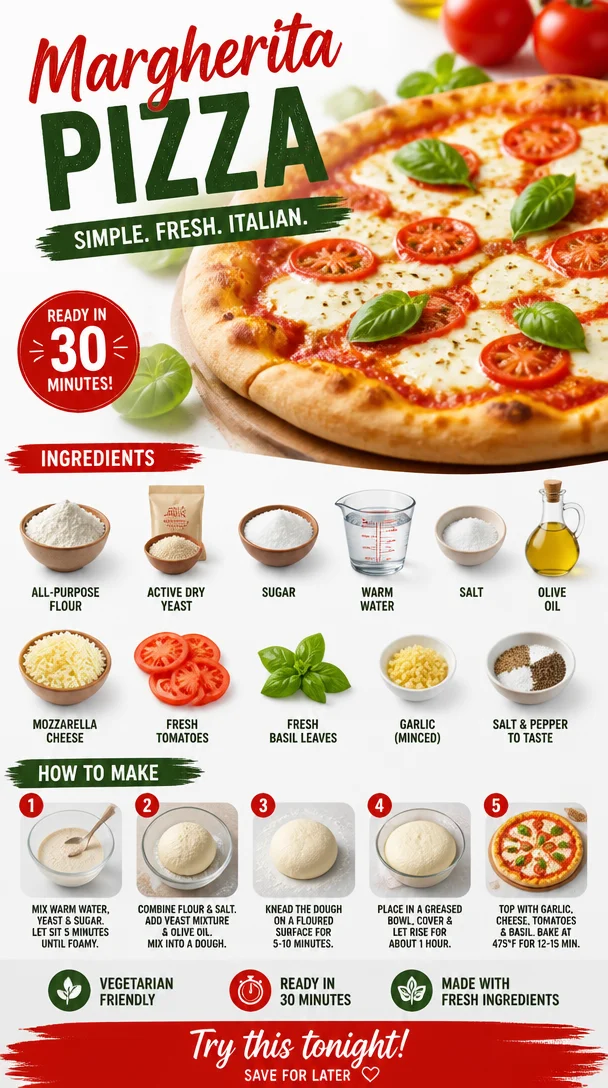
Margherita Pizza
Margherita Pizza: A Slice of Italy Right at Home!
Ah, pizza! The quintessential comfort food that sparks joy in millions around the globe. Today, we’re diving into one of the most celebrated varieties—the classic Margherita pizza. Picture this: a crispy golden crust topped with sweet, succulent tomatoes, creamy mozzarella, and fragrant basil. It’s simple yet sublime, and somehow, it feels just right whether you’re having a cozy night in or hosting friends for a weekend feast.
Why Margherita pizza, you ask? Well, there’s a rich history behind it, tied to the vibrant Italian culture. Legend has it that this pizza was created in honor of Queen Margherita of Savoy during her visit to Naples in the late 1800s. The colors of the ingredients—red tomatoes, white mozzarella, and green basil—symbolize the Italian flag. Eating it is like savoring a bite of Italian heritage!
But you don’t need to hop on a flight to Italy to enjoy a slice. You can create this masterpiece in your very own kitchen, filled with radiant flavors that celebrate fresh, quality ingredients. So grab your apron, roll up your sleeves, and let’s embark on a culinary adventure that turns your home into a pizzeria!
Ready? Let’s make some magic with the simple yet delightful Margherita pizza that’s bound to become a favorite in your home!
A Slice of Nostalgia: My First Margherita Pizza
I can still picture the first time I made a Margherita pizza. I was a wide-eyed culinary student, and my chef instructor handed out a sheet of dough, ingredients laid out like a painter’s palette. With my heart racing, I rolled out my dough, kneading and stretching it until it felt just right.
Then came the toppings—the fresh tomatoes, still warm from the summer sun, the mozzarella that glistened like tiny cheese diamonds, and the fragrant basil that filled the room with its herbal aroma. As I slid that pizza into the oven and waited anxiously, I couldn’t help but feel a mix of excitement and nervousness.
When it emerged, bubbling and golden, I tasted it as if I were experiencing magic for the first time. Each bite transported me to the cobblestone streets of Naples. From that day on, Margherita pizza has held a special place in my heart and my kitchen. It’s not just about the recipe; it’s a reminder of the joy and connection that cooking brings.
Essential Ingredients for Margherita Pizza
Let’s break down the ingredients you’ll need to create your own Margherita pizza masterpiece!
-
2 cups all-purpose flour: The backbone of your pizza crust! You can use bread flour for a chewier texture, or whole wheat flour for a nuttier flavor. Just remember, adjusting the water might be necessary depending on the flour type you choose.
-
1 packet active dry yeast: This tiny powerhouse is responsible for making your dough rise and giving it that delightful airy texture. Make sure your water is warm (not hot!) to help activate the yeast in the best way.
-
1 teaspoon sugar: Just a pinch to feed the yeast and promote fermentation. If you’re avoiding refined sugar, you can substitute honey or agave syrup.
-
3/4 cup warm water: The liquid love that brings all the dry ingredients together. Ensure it’s at about 110°F (43°C) for optimal yeast activation.
-
1 teaspoon salt: Essential for flavor enhancing! Feel free to experiment with sea salt or Himalayan pink salt for a unique twist.
-
2 tablespoons olive oil: Adds richness to your dough and helps achieve that lovely golden crust. Extra virgin olive oil is great for its fruity, vibrant flavor.
-
1 cup mozzarella cheese, shredded: The star of the show! Fresh mozzarella is preferred for its creaminess, but pre-shredded varieties work too. If you’re feeling adventurous, try burrata for a luscious touch.
-
1 cup fresh tomatoes, sliced: Go for ripe, seasonal tomatoes or even cherry tomatoes for a sweeter flavor. You can also use a delicious tomato sauce if you’re short on fresh produce.
-
1/4 cup fresh basil leaves: The aromatic touch that brightens up the dish! If basil isn’t available, consider using arugula or spinach for a different flavor profile.
-
1 clove garlic, minced: A hint of garlic adds depth to the flavor. If you’re not a fan, you can skip it or substitute with garlic powder.
-
Salt and pepper to taste: Essential for bringing all the flavors together. A sprinkle of freshly cracked black pepper elevates the dish beautifully!
Step-by-Step Instructions to Craft Your Margherita Pizza
Step 1: Mix It Up
In a large mixing bowl, combine the warm water, sugar, and yeast. Stir gently and let it sit for about 5-10 minutes until frothy. This means your yeast is alive and ready to work its magic! 🥳
Step 2: Create the Dough
Once the yeast mixture is frothy, it’s time to add in your flour, salt, and olive oil. Mix with a wooden spoon or your hands until a shaggy dough forms. Don’t stress about having a perfectly smooth dough at this stage—we just want it to come together!
Step 3: Knead and Flour Power
Flour a clean surface and transfer the dough onto it. Knead the dough for about 6-8 minutes until it’s smooth and elastic. You can even channel your inner chef and use a dough scraper to help! If the dough sticks too much, sprinkle a bit more flour on the surface—listening to your dough is key.
Step 4: Rise and Shine
Place the kneaded dough into a lightly oiled bowl, cover it with a damp cloth, and set it in a warm spot to rise for about 1 hour. Look for it to double in size—that’s the sign you’ve got a happy yeast.
Step 5: Shape Your Pizza
Once your dough has risen, preheat your oven to the highest setting (around 475°F or 245°C). Punch down the dough to release any air bubbles and turn it out onto your floured surface. Using your hands or a rolling pin, shape it into your desired pizza size. Thin crust? Go for it! A thicker crust? Absolutely!
Step 6: Assemble the Masterpiece
Transfer your shaped dough onto a baking sheet or a pizza stone. Now, spread a thin layer of tomato sauce (or your fresh tomato slices!) over the base. Scatter the shredded mozzarella generously atop the sauce, followed by sliced tomatoes, minced garlic, and a sprinkle of salt and pepper.
Step 7: Bake and Enjoy
Slide that beauty into the oven and bake for about 10-15 minutes, or until the crust is golden and the cheese is bubbly. There’s nothing quite like the aroma wafting through your kitchen at this point—pure bliss.
Step 8: The Fresh Finish
As soon as your pizza comes out, sprinkle it with fresh basil leaves. This brightens up the dish immensely and adds a pop of vibrant color. Let it set for a minute before slicing it up to share. Sigh There’s always something gratifying about slicing into a freshly made pizza!
Serving Suggestions: Let’s Plate It Up!
To serve, I love using a wooden pizza board for that rustic pizzeria feel. Arrange your sliced pizza on the board, and consider adding a small dish of balsamic glaze or olive oil for dipping. Pair with a simple arugula salad on the side drizzled in a light lemon vinaigrette for an extra fresh touch.
Recipe Variations: Make It Yours!
-
Add Your Favorite Toppings: Feel free to get creative! Go ahead and throw on some sautéed mushrooms, olives, or even prosciutto!
-
Veggie Delight: Use roasted vegetables like bell peppers, zucchini, or artichokes for a colorful twist.
-
Spicy Kick: Add red pepper flakes to your sauce for a spicy version that’ll warm you up.
-
Cheeseboard Style: Try mixing different cheeses—fontina or gouda could bring a delightful twist!
-
Gluten-Free: Substitute all-purpose flour with a gluten-free blend to enjoy a gluten-free take on this classic recipe.
Chef’s Notes: From My Kitchen to Yours
Over the years, my Margherita pizza has seen plenty of evolution! Initially, I stuck to the classic ingredients, but as I grew in my culinary journey, I started adding personal touches like a hint of honey in the dough for a touch of sweetness. One of my funniest moments in the kitchen was when I accidentally grabbed a bag of powdered sugar thinking it was flour. Let’s just say the sweetness was not the vibe for the pizza I was going for! But hey, every mistake taught me something valuable—and today, I embrace those little mishaps as part of the journey.
FAQs and Troubleshooting
1. Why didn’t my pizza crust rise?
If your crust didn’t rise, your yeast may have been inactive or the water was too hot. Always check the temperature and freshness of your yeast!
2. My pizza got soggy—what did I do wrong?
Sogginess can happen due to too many toppings or undercooked dough. Try pre-baking the crust for a few minutes before adding your toppings to ensure a crisp base.
3. Can I make the dough ahead of time?
Absolutely! You can make the dough a day in advance. Just let it rise, then refrigerate it after punching it down. Bring it back to room temperature before shaping it.
4. What if I want a thicker crust?
To achieve a thicker crust, after shaping the dough, allow it to rise again for about 30 minutes before topping it. You can also roll it out to be slightly thicker than usual.
Nutritional Info (if applicable)
- Serving Size: 1 slice (1/8 of pizza)
- Calories: Approx. 250
- Fat: 10g
- Carbohydrates: 30g
- Protein: 10g
Pizza is all about balance; enjoying a slice every now and then can certainly add joy to your meal!
So there you have it—your very own guide to crafting a delightful Margherita pizza from scratch. This isn’t just cooking; it’s a celebration, a story, a connection. I can’t wait for you to gather around the table with family and friends, digging into your freshly baked pizza, savoring each bite together. Let’s keep the kitchen adventures alive—happy cooking! 🍕✨
PrintMargherita Pizza
A classic Margherita pizza featuring a crispy crust topped with fresh tomatoes, mozzarella cheese, and fragrant basil.
- Prep Time: 15 minutes
- Cook Time: 15 minutes
- Total Time: 30 minutes
- Yield: 4 servings 1x
- Category: Main Course
- Method: Baking
- Cuisine: Italian
- Diet: Vegetarian
Ingredients
- 2 cups all-purpose flour
- 1 packet active dry yeast
- 1 teaspoon sugar
- 3/4 cup warm water
- 1 teaspoon salt
- 2 tablespoons olive oil
- 1 cup mozzarella cheese, shredded
- 1 cup fresh tomatoes, sliced
- 1/4 cup fresh basil leaves
- 1 clove garlic, minced
- Salt and pepper to taste
Instructions
- Mix the warm water, sugar, and yeast in a large mixing bowl, then let it sit for 5-10 minutes until frothy.
- Create the dough by adding flour, salt, and olive oil. Mix until a shaggy dough forms.
- Knead the dough for 6-8 minutes on a floured surface until smooth and elastic.
- Place the dough in a lightly oiled bowl, cover it, and let it rise in a warm spot for about 1 hour.
- Preheat your oven to 475°F (245°C).
- Shape the dough by punching it down and rolling it out on a floured surface.
- Assemble by spreading tomato sauce or fresh tomato slices, adding mozzarella, sliced tomatoes, minced garlic, and seasoning.
- Bake for 10-15 minutes until the crust is golden and the cheese is bubbly.
- Sprinkle fresh basil on top and let it set before slicing.
Notes
Creative variations include adding your favorite toppings, using roasted vegetables, or a gluten-free blend.
Nutrition
- Serving Size: 1 slice
- Calories: 250
- Sugar: 1g
- Sodium: 400mg
- Fat: 10g
- Saturated Fat: 3g
- Unsaturated Fat: 5g
- Trans Fat: 0g
- Carbohydrates: 30g
- Fiber: 2g
- Protein: 10g
- Cholesterol: 15mg
Keywords: pizza, Margherita pizza, Italian recipe
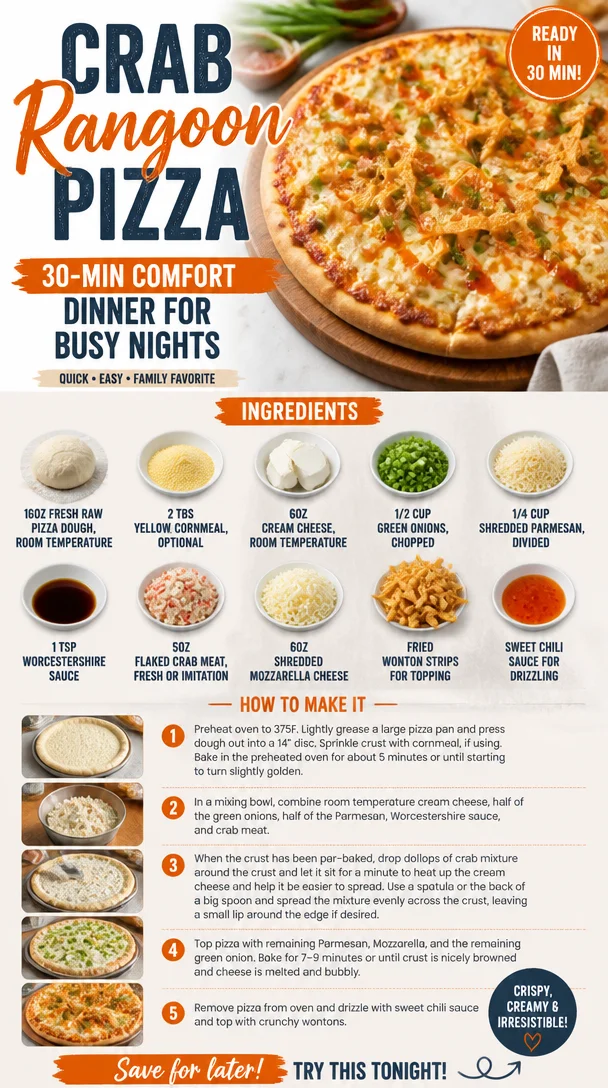
Crab Rangoon Pizza: 30-Min Comfort Dinner for Busy Nights
Crab Rangoon Pizza: A Delicious Fusion of Flavors and Fun
Oh, pizza! The ultimate comfort food that brings a smile to our faces on days that need a little extra love. But what if I told you there’s a way to take your pizza game to an entirely new level? Enter Crab Rangoon Pizza, where the crispy, creamy delight of crab rangoon meets the cheesy, doughy goodness of pizza. It’s a fun twist that combines two beloved dishes, and if you’re like me, you’re positively itching to pull it off your baking stone and take a big, cheesy bite.
Imagine the joy this dish will bring not just to your taste buds but also to your friends and family. Perfect for a cozy pizza night, festive gatherings, or just whenever the craving strikes—you’re going to want to keep this recipe in your back pocket. We’re talking about a creamy, cheesy masterpiece topped with crumbled crab, fresh scallions, and that delightful crunch that makes crab rangoon so addictive. With a drizzle of sweet chili sauce to finish it off, every bite is an experience! So, grab your apron, turn up the music, and let’s get cooking!
A Personal Story About Crab Rangoon
Growing up, I had a love affair with takeout food, and crab rangoon was always high on my list of favorites. The crispy little packages filled with creamy goodness and flaked crab meat would disappear before I even had a chance to savor them. My best friend and I would plan our Saturday movie marathons around our takeout spree, and the highlight was always wolfing down crab rangoon with our favorite dipping sauces.
Years later, as I started experimenting with my own recipes, I thought, why not marry that nostalgic flavor with one of my ultimate comfort foods, pizza? After some trial and error (a few failed crusts and an eruption of cheese in the oven later), Crab Rangoon Pizza was born! This recipe not only captures all that creamy, crabby magic but also lets you share it with others, making it a part of your own cherished memories. There’s something so special about creating a dish that combines nostalgia with a new twist, and when I serve this pizza, it’s like I’m inviting everyone into a warm kitchen filled with laughter and flavors that are oh-so-comforting.
Ingredients
Here’s everything you need to whip up this flavorful pizza masterpiece:
-
16oz fresh raw pizza dough, room temperature
This is the foundation of your pizza paradise. You can use store-bought or homemade dough. If you’re short on time, feel free to grab some from your favorite pizzeria! -
2 TBS yellow cornmeal (optional)
This gives your pizza base a delightful crunch and slightly nutty flavor. If you don’t have cornmeal, semolina or even a dusting of flour will work just fine. -
6oz cream cheese, room temperature
Cream cheese provides that classic creaminess we associate with crab rangoon. You can substitute this with ricotta or a plant-based cream cheese for a dairy-free option. -
1/2 cup green onions, chopped
These aromatic beauties not only enhance the pizza with their fresh flavor but also add a pop of color. If you’re not a fan, chives make a great alternative. -
1/4 cup shredded Parmesan, divided
Parmesan adds a savory depth to your pizza. If you’re avoiding dairy, nutritional yeast can provide a cheesy flavor without the actual cheese. -
1 tsp Worcestershire sauce
This powerful ingredient enhances the umami flavor of the crab. It’s also quite flexible; if you’re vegan, you might look into a plant-based Worcestershire sauce. -
5oz flaked crab meat (fresh or imitation)
No crab rangoon (or pizza) is complete without it! I recommend fresh crab meat for the best flavor, but imitation crab is a budget-friendly option that works surprisingly well. -
6oz shredded mozzarella cheese
Standard pizza fare! Mozzarella is the classic choice here, but feel free to mix it up with provolone or even a vegan cheese for a dairy-free option. -
Fried wonton strips (for topping)
These will add that delightful crunch we love in crab rangoon. If you’re short on time, store-bought wonton strips work perfectly, and you can even make your own if you’re feeling adventurous! -
Sweet chili sauce (for drizzling)
Drizzling this sweet-savory sauce ties the whole pizza together, shifting your taste buds into that perfect balance of flavor. It’s a staple in Asian cuisine, and you can easily find it in most grocery stores.
Step-by-Step Instructions
Now, let’s dive into the fun part—putting everything together! Follow these steps closely, and remember to enjoy the process. Cooking is as much about the journey as it is about the destination.
-
Preheat Your Oven
Preheat your oven to 475°F (245°C). A hot oven is key for a crispy crust! -
Prepare Your Workspace
Dust your counter or a baking sheet with the two tablespoons of cornmeal (if you’re using it). This will help the pizza slide easily when it’s done. -
Roll Out the Dough
Take your pizza dough and stretch it out into a flat circle (or rectangle, if that’s your jam) about 12 inches in diameter. Don’t worry about making it perfect—rustic is perfectly beautiful! Use your hands, or a rolling pin if you prefer. -
Layer the Cream Cheese Mixture
In a medium bowl, mix your softened cream cheese, chopped green onions, half of the shredded Parmesan, and Worcestershire sauce. Give it a good stir until everything is well combined. Spread this mixture evenly over the pizza dough, leaving a small border around the edges for the crust. This is where the cheesy magic begins! -
Add the Crab
Sprinkle the flaked crab meat across the cream cheese layer evenly. Remember, you want that crab flavor to burst through each slice, so don’t skimp! -
Top It with Cheese
Now it’s time for the mozzarella! Sprinkle it generously over the crab layer, making sure to cover evenly. Finish it off by adding the remaining Parmesan for an extra cheesy crust. -
Bake the Pizza
Carefully transfer your pizza onto the preheated oven (use a pizza stone or a baking sheet if you like). Bake for about 12-15 minutes, or until the crust is golden brown and the cheese is bubbling and slightly browned. Keep an eye on it—oven temperatures can vary! -
Add the Wontons
In the last minute of baking, toss those fried wonton strips on top to give them a little warmth and crisp them up just slightly. -
Drizzle with Sweet Chili Sauce
Once your pizza is done, remove it from the oven and let it rest for a few minutes. Then, drizzle sweet chili sauce over the entire pizza. This adds the perfect, glistening finish! -
Slice and Serve
Use a pizza cutter to slice it up and serve it hot. If you want, feel free to sprinkle a few extra green onions on top for that fresh crunch!
Serving Suggestions
Plating is key when it comes to a dish that’s as visually enticing as this! Serve your Crab Rangoon Pizza hot from the oven on a wooden cutting board or in a fun pizza pan. Pair it with a refreshing cucumber salad on the side or some steamed edamame for a full Asian-inspired feast. For a fun twist, set out some extra sweet chili sauce and soy sauce for dipping. Trust me; you’ll want to keep the flavor party going!
Recipe Variations
Now that you have the classic Crab Rangoon Pizza down, let’s talk variations. Here are a few creative twists to keep things fun:
- Spicy Crab Rangoon Pizza: Add red pepper flakes or sriracha to the cream cheese mixture for a kick!
- Vegetable Delight: Add bell peppers, mushrooms, or spinach for a veggie-rich option that’s still decadent.
- Buffalo Crab Rangoon Pizza: Toss the crab in some buffalo sauce before layering it on the pizza for a zesty flavor explosion.
- Gluten-Free Option: Use a gluten-free pizza crust or cauliflower crust for those avoiding gluten.
- Cheesy Bacon Version: Mix in crispy crumbled bacon for an irresistible salty crunch atop this cheesy delight.
Chef’s Notes
I’ve made this pizza for parties, cozy nights in, and even brunches—you wouldn’t believe how quickly it disappears! One time, I invited friends over for a “pizza challenge,” where we all brought a unique pizza recipe to share. I thought mine’d be the star, but to my surprise, everyone was equally charmed by their creations! It just goes to show that when you get creative in the kitchen, you can surprise even yourself! Remember, this dish has evolved over time for me. Don’t be afraid to tinker with the recipe, omit what you don’t love, and inject your personality into the dish.
FAQs and Troubleshooting
-
My pizza dough doesn’t stretch easily! What do I do?
If your dough is too cold or too tough, let it sit at room temperature for a bit longer. A little bit of patience can do wonders! -
What if I don’t have crab meat?
You can easily swap the crab for cooked chicken, shrimp, or even chickpeas for a vegetarian version! -
My crust isn’t crispy! What happened?
Ensure your oven is fully preheated and consider baking directly on a pizza stone for optimal heat transfer. If using a baking sheet, try preheating it in the oven before placing the pizza. -
Can I prepare the pizza in advance?
Yes! You can assemble the pizza up to 24 hours in advance and store it in the refrigerator before baking. Just don’t add the fried wontons until you’re ready to bake.
Nutritional Info
While I’m all about balance and enjoying food, here’s a rough estimate per slice (based on 8 slices):
- Calories: 320
- Protein: 14g
- Carbohydrates: 30g
- Fat: 15g
- Fiber: 1g
Now that you’re armed with this delicious and engaging Crab Rangoon Pizza recipe, it’s time to gather your ingredients and get your bake on! Trust me, you’re going to love every cheesy, satisfying bite. Enjoy!
PrintCrab Rangoon Pizza
A delicious fusion of crab rangoon and pizza, featuring creamy crab, fresh scallions, and topped with crispy wonton strips and sweet chili sauce.
- Prep Time: 15 minutes
- Cook Time: 15 minutes
- Total Time: 30 minutes
- Yield: 8 servings 1x
- Category: Main Course
- Method: Baking
- Cuisine: Asian Fusion
- Diet: Pescatarian
Ingredients
- 16oz fresh raw pizza dough, room temperature
- 2 TBS yellow cornmeal (optional)
- 6oz cream cheese, room temperature
- 1/2 cup green onions, chopped
- 1/4 cup shredded Parmesan, divided
- 1 tsp Worcestershire sauce
- 5oz flaked crab meat (fresh or imitation)
- 6oz shredded mozzarella cheese
- Fried wonton strips (for topping)
- Sweet chili sauce (for drizzling)
Instructions
- Preheat your oven to 475°F (245°C).
- Dust your counter or a baking sheet with the cornmeal.
- Roll out the pizza dough into a flat circle about 12 inches in diameter.
- Mix cream cheese, green onions, half the Parmesan, and Worcestershire sauce in a bowl.
- Spread the cream cheese mixture over the pizza dough.
- Sprinkle the flaked crab meat evenly across the cream cheese layer.
- Cover with shredded mozzarella and the remaining Parmesan.
- Bake the pizza for about 12-15 minutes until golden brown.
- Add fried wonton strips on top in the last minute of baking.
- Drizzle with sweet chili sauce and let it rest before slicing and serving.
Notes
Serve hot with extra sweet chili sauce and enjoy the fusion of flavors!
Nutrition
- Serving Size: 1 slice
- Calories: 320
- Sugar: 4g
- Sodium: 500mg
- Fat: 15g
- Saturated Fat: 7g
- Unsaturated Fat: 6g
- Trans Fat: 0g
- Carbohydrates: 30g
- Fiber: 1g
- Protein: 14g
- Cholesterol: 30mg
Keywords: Crab Rangoon, Pizza, Fusion Recipe
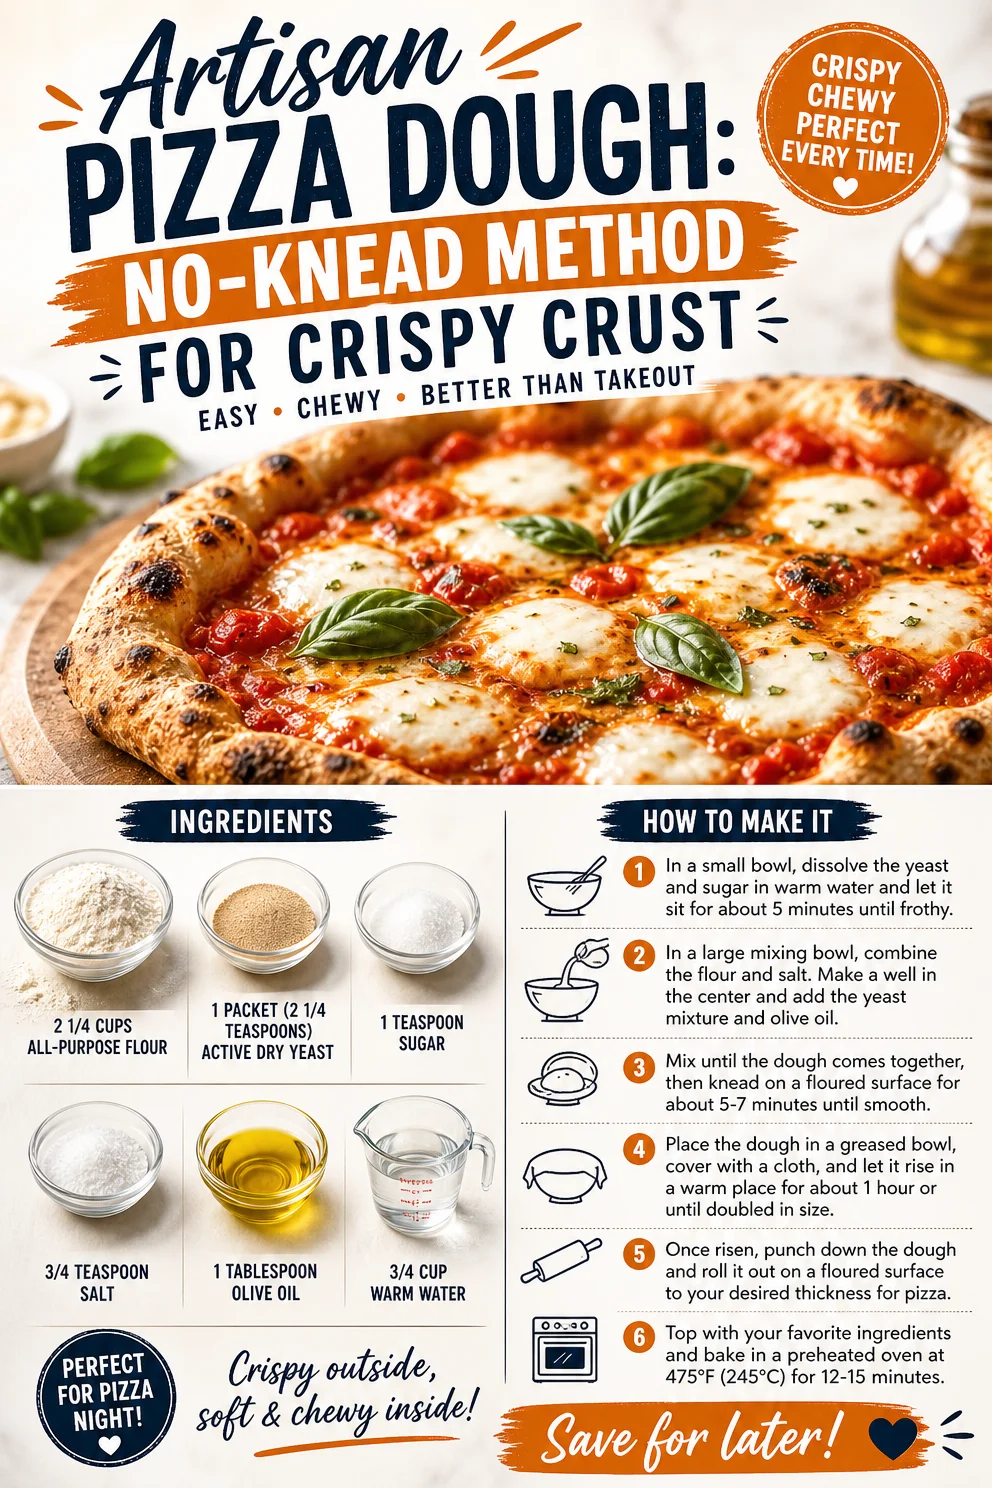
Artisan Pizza Dough: No-Knead Method for Crispy Crust
The Art of Crafting Your Own Artisan Pizza Dough
Welcome to a delicious adventure with me, Ava Carter, in the cozy world of artisan pizza dough! If you’ve ever savored a slice of freshly baked pizza and wondered how to recreate that chewy, crispy goodness at home, you’re in for a treat. Making your own pizza dough at home not only allows you to control the ingredients but also gives you a chance to express your culinary creativity. It’s a hands-on craft that brings satisfaction with each knead and fold, and today, I’m excited to guide you through every step of the process.
Picture a sunny Saturday afternoon. The aroma of warm, yeasty dough fills the kitchen, and the kids are bustling around, eagerly awaiting their personal pizzas topped with their favorite delights. I’ll never forget those carefree moments spent in my grandmother’s kitchen, where pizza night was a cherished ritual. We would gather around the table, flour dusting our faces, as we tossed dough and layered on toppings, sharing laughs and stories. It was in those moments that I discovered the magic of food—how it brings us together and creates lasting memories.
So, let’s roll up our sleeves, warm up our hearts, and dive into the delightful process of making artisan pizza dough from scratch!
Ingredients
-
2 1/4 cups all-purpose flour
This is the backbone of our dough, giving it structure and chewiness. For a whole wheat version, you can substitute half of this flour with whole wheat flour for added nutrients. -
1 packet (2 1/4 teaspoons) active dry yeast
Yeast is what makes the dough rise, creating that delightful airy texture. If you have instant yeast, you can use that without proofing, but it’s always good to check the expiration date to ensure it’s active! -
1 teaspoon sugar
Sugar isn’t just for sweetness; it also gives the yeast a boost during fermentation. If you’d rather skip the sugar, honey or maple syrup can be great substitutes! -
3/4 teaspoon salt
Salt is essential for flavor and helps to control yeast activity. If you’re watching your sodium intake, feel free to reduce this amount—just remember, salt enhances the natural flavors! -
1 tablespoon olive oil
Olive oil adds richness and helps prevent the dough from sticking. You can experiment with flavored oils too, like garlic or rosemary-infused for an aromatic touch. -
3/4 cup warm water
Water activates the yeast. Make sure it’s warm (about 110°F); too hot will kill the yeast, and too cold won’t activate it properly. If you ever find yourself without warm water, you can use vegetable broth for added flavor!
Step-by-Step Instructions
-
Activate the Yeast:
Start by pouring 3/4 cup of warm water into a small bowl. Sprinkle the packet of active dry yeast and the teaspoon of sugar over the water. Let it sit for about 5–10 minutes, or until it becomes frothy. This is a crucial step—think of it like waking up the yeast! -
Mix the Dry Ingredients:
In a large mixing bowl, combine 2 1/4 cups of all-purpose flour and 3/4 teaspoon of salt. Give it a gentle whisk to combine things nicely. This helps to distribute the salt evenly, which is key for flavor. -
Combine Wet and Dry Ingredients:
Once your yeast is frothy, add in 1 tablespoon of olive oil and then pour the yeast mixture into the bowl with the dry ingredients. Using a wooden spoon, mix until a shaggy dough forms. Don’t worry about it being perfect at this stage; we’ll work it out in the next step! -
Knead the Dough:
Dump the dough onto a lightly floured surface. Knead it for about 5–7 minutes. This is where the magic happens! You’ll want to stretch and fold the dough—don’t be shy, let out your inner bread ninja! The dough is ready when it’s smooth and elastic. If it feels too sticky, sprinkle just a bit more flour as needed. -
First Rise:
Form the dough into a ball and place it in a lightly greased bowl, turning it to coat all sides with oil. Cover it with a clean kitchen towel or plastic wrap. Let it rise in a warm place until it doubles in size, usually about 1 hour. Pro tip: If you can find a warm sunny spot in your kitchen, let your dough sit there—it’ll rise like a champ! -
Shape Your Dough:
Once your dough has risen, punch it down to release any air bubbles (don’t worry, it’s not a crime!). Turn it out onto a floured surface and divide it into two equal pieces. Shape each piece into a ball. Allow them to rest for about 15 minutes before shaping them into your pizzas. This resting period helps relax the gluten, making it easier to stretch. -
Preheat the Oven:
While the dough is resting, preheat your oven to 475°F (245°C). If you have a pizza stone, place it in the oven to preheat as well. This will give you that crispy crust magic! -
Shape the Pizza:
Take one ball of dough and begin to gently stretch it with your hands, or use a rolling pin if you prefer a more uniform shape. Aim for a thickness of about 1/4 inch. Transfer it to a floured pizza peel or a baking sheet lined with parchment paper. -
Top and Bake:
Now comes the fun part! Top your dough with your favorite sauces, cheeses, and toppings. Slide your pizza onto the hot pizza stone or place your baking sheet in the oven. Bake for about 12–15 minutes or until the crust is golden brown and crispy. -
Enjoy!
Once baked, remove your pizza from the oven and let it cool for a couple of minutes before slicing. Serve hot, and don’t forget to share the love (and slices) with your friends and family!
Serving Suggestions
For an impressive presentation, serve your artisan pizza on a wooden cutting board or a beautiful pizza peel. Slice it with a pizza cutter and drizzle a little extra olive oil or balsamic glaze over the top for a gourmet touch. Pair with a fresh green salad for a balanced meal or enjoy it solo—either way, it’s sure to be a hit!
Recipe Variations
- Herbed Dough: Add a tablespoon of dried oregano, basil, or rosemary directly to the flour for an aromatic twist.
- Whole Wheat Option: Swap out half of the all-purpose flour with whole wheat flour for added texture and nutrition.
- Garlic Infusion: Incorporate minced garlic into the dough for an extra layer of flavor.
- Cheesy Crust: For a fun twist, roll small pieces of cheese into the dough before shaping your pizza!
- Cauliflower Crust: For a gluten-free version, try a cauliflower crust recipe, which can create a light, crispy alternative!
Chef’s Notes
I once attempted to make pizza dough during a storm, thinking it would be a cozy indoor activity. The power went out, and I had to knead the dough by candlelight! Funny how such moments create the best stories, even though the dough ended up a bit too airy—turns out, making it fun is the secret ingredient! Over time, I’ve learned that the key to pizza dough lies in knowing your ingredients and your environment. Whether you have high humidity or dry air, adjustments in your flour can make a big difference. Don’t let a little weather or a kitchen mishap stop you—embrace it, learn from it, and above all, enjoy the process!
FAQs and Troubleshooting
1. My dough didn’t rise! What did I do wrong?
This can happen if your yeast is expired or if the water was too hot or too cold. Always check the temperature and the date on your yeast packaging! A warm, draft-free spot aids in rising.
2. The dough is too sticky! What should I do?
A sticky dough means it likely needs a bit more flour. Sprinkle flour gradually while kneading until it feels smooth and elastic. Just avoid adding too much—balance is key!
3. Can I freeze the dough?
Absolutely! After the first rise, wrap the dough tightly in plastic wrap and place it in a freezer bag. It’ll keep for up to 3 months. Just remember to thaw it in the refrigerator overnight before using.
4. Can I make this in advance?
Yes! You can prepare this dough ahead of time and let it rise slowly in the refrigerator overnight. Just take it out about an hour before you’re ready to shape and bake so it can come to room temperature.
Nutritional Info
Making pizza dough at home allows you to understand exactly what goes into it. One serving can be around 150 calories, depending on your toppings! With fresh ingredients, you can experiment with healthier options and create a nourishing, satisfying meal.
And there you have it—your very own artisan pizza dough made from scratch! Embrace the art of pizza making, gather your loved ones, and let the dough adventures begin. I can’t wait to hear about the creative toppings and recipes you come up with! So, what are you waiting for? Let’s get baking!
PrintArtisan Pizza Dough
Craft your own artisan pizza dough from scratch for a delicious, homemade pizza experience.
- Prep Time: 15 minutes
- Cook Time: 15 minutes
- Total Time: 30 minutes
- Yield: 2 pizzas 1x
- Category: Main Course
- Method: Baking
- Cuisine: Italian
- Diet: Vegetarian
Ingredients
- 2 1/4 cups all-purpose flour
- 1 packet (2 1/4 teaspoons) active dry yeast
- 1 teaspoon sugar
- 3/4 teaspoon salt
- 1 tablespoon olive oil
- 3/4 cup warm water
Instructions
- Activate the yeast: In a bowl, combine warm water, yeast, and sugar. Let it sit until frothy.
- Mix the dry ingredients: In a bowl, whisk together flour and salt.
- Combine wet and dry ingredients: Add olive oil and the yeast mixture to the bowl and mix until shaggy dough forms.
- Knead the dough: On a floured surface, knead the dough for 5–7 minutes until smooth and elastic.
- First rise: Place the dough in a greased bowl, cover it, and let it rise until doubled in size (about 1 hour).
- Shape your dough: Punch down the dough, divide it into two pieces, and shape each into a ball. Rest for 15 minutes.
- Preheat the oven to 475°F (245°C).
- Shape the pizza: Stretch one ball of dough into a pizza shape and transfer it to a baking sheet.
- Top and bake: Add toppings and bake for 12–15 minutes until golden brown and crispy.
- Enjoy! Let the pizza cool for a couple of minutes before slicing.
Notes
Serve with a drizzle of olive oil or balsamic glaze for an added touch. Pair with a fresh green salad.
Nutrition
- Serving Size: 1/2 pizza
- Calories: 150
- Sugar: 1g
- Sodium: 250mg
- Fat: 5g
- Saturated Fat: 1g
- Unsaturated Fat: 3g
- Trans Fat: 0g
- Carbohydrates: 20g
- Fiber: 1g
- Protein: 4g
- Cholesterol: 0mg
Keywords: pizza dough, artisan pizza, homemade pizza