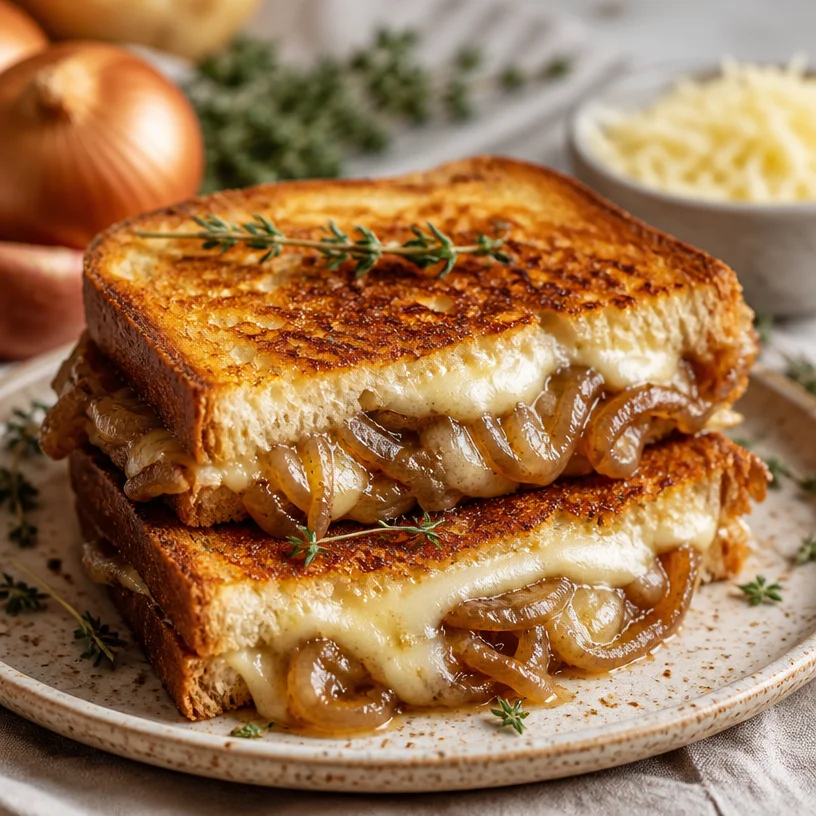
French Onion Grilled Cheese
French Onion Grilled Cheese: A Deliciously Comforting Twist on a Classic
Welcome back, food lovers! Today, we’re diving into one of my absolute favorite comfort foods: the French Onion Grilled Cheese. Now, I know what you might be thinking. How can grilled cheese get any better than it already is? But trust me on this one—this dish combines the gooey, cheesy goodness we all know and love with the rich, savory flavors of French onion soup. It’s a nostalgic flavor explosion that will warm your heart and delight your taste buds!
Picture it: a chilly evening, the first leaves of fall starting to turn, and the scent of buttery onions caramelizing in the pan filling your kitchen. This grilled cheese isn’t just a sandwich; it’s an experience, a memory in the making—one you’ll want to share with friends and family. Whether you’re cozying up at home or impressing guests, this recipe is here to take your grilled cheese game to the next level. So grab your apron, and let’s get cooking!
A Nostalgic Kitchen Memory
Growing up, my family had a tradition of weekly “grilled cheese night.” We would gather around the kitchen table, chatting and laughing as my mom created endless variations of our cheesy favorite. Each week, she’d add a surprise ingredient—a slice of tomato here, a sprinkle of chili flakes there—but nothing ever quite compared to the classic combination of crispy bread and melted cheese.
One evening, I remember her experimenting with caramelized onions. The moment my mom lifted the lid off the pot, a wave of sweet, savory aroma filled the air. She layered those golden, caramelized onions generously between buttery slices of toasted bread, and I was instantly hooked. That first bite was pure bliss—the crunch of the toast giving way to the gooey cheese and sweet onions was a moment I’ll never forget. It brought our family together in the best way, and that’s the essence I want to share with you today.
Ingredients
To whip up this delightful French Onion Grilled Cheese, you’ll need the following ingredients:
- Bread: Use a crusty sourdough, a robust whole grain, or even a classic white bread. Sourdough has a lovely tang that complements the savory onions beautifully. If you’re gluten-free, feel free to substitute with your favorite gluten-free bread!
- Onions: Sweet onions work best here—the natural sugars in onions will caramelize beautifully when cooked. You can also use yellow onions if that’s what you have on hand. Experimenting with red onions offers a slightly different flavor profile.
- Gruyère cheese: The melting capacity and nutty flavor of Gruyère is unparalleled. If you can’t find it or want to mix it up, try Emmental cheese for a similar taste, or even a sharp cheddar for an extra kick.
- Butter: You can’t make a great grilled cheese without good butter! It adds richness and helps to create that perfect, crispy crust. If you want to make it dairy-free, opt for vegan butter or even avocado oil for grilling.
Step-by-Step Instructions
Now that we have our ingredients ready, let’s get cooking! Follow these detailed steps to make your French Onion Grilled Cheese:
-
Caramelize the Onions:
- Heat a tablespoon of butter in a medium skillet over medium-low heat. Add 2-3 sliced onions and a pinch of salt.
- Keep it low and slow, allowing those onions to soften and caramelize for about 20-30 minutes, stirring occasionally.
- Chef tip: If your onions start to stick, add a splash of water or broth to help them along—don’t rush this step; it’s crucial for developing that rich flavor!
-
Prepare Your Bread and Cheese:
- While your onions are caramelizing, prepare the bread by spreading a thin layer of butter on one side of each slice.
- On the unbuttered side, layer on a generous mound of Gruyère cheese—don’t hold back here; you want gooeyness!
-
Layer the Good Stuff:
- Once your onions are beautifully caramelized and translucent, evenly distribute them on top of the cheese on one slice of bread, then top with a bit more cheese for extra gooeyness before placing the second slice of bread on top, buttered side out.
-
Heat the Skillet:
- Wipe the skillet clean, then heat it over medium heat. Place the sandwich in the skillet and cook for about 4-5 minutes until golden brown and crispy on one side.
- Chef hack: Use a spatula to press down on the sandwich slightly while it cooks to ensure even browning.
-
Flip and Finish:
- Carefully flip the sandwich and repeat. Once both sides are golden and the cheese is melty, remove it from the skillet and let it sit for a minute before slicing. Trust me; the wait will be worth it!
Serving Suggestions
To plate your French Onion Grilled Cheese, slice it diagonally for that classic presentation and serve on a rustic wooden board or a colorful plate. Pair it with a bowl of warm, brothy French onion soup for the ultimate flavor marriage and a sprinkle of fresh herbs like thyme or parsley for a pop of color!
Recipe Variations
- Herbed Capital: Add dried herbs like thyme or rosemary to the butter before spreading it on the bread for an aromatic twist.
- Bacon Bliss: Layer crispy bacon in between the cheese and onions for an added smokiness that takes this sandwich to the next level of indulgence.
- Vegetarian Delight: Swap out the bread for a veggie-based option like portobello mushrooms for a gluten-free, low-carb variation.
- Spicy Kick: Incorporate some sautéed jalapeños or a smear of spicy mustard to elevate your grilled cheese with some heat!
Chef’s Notes
Ah, the glorious evolution of the grilled cheese! This recipe came about as a way to merge my two favorite comfort foods: grilled cheese and French onion soup. Over the years, I’ve experimented with different cheeses, bread types, and even roasted garlic, and I can confidently say it’s a symphony of flavors that reminds me that cooking is a journey of exploration. Always remember that cooking is flexible—tweak this recipe until it’s your own masterpiece!
FAQs and Troubleshooting
-
What if my cheese doesn’t melt properly?
- Make sure your heat isn’t too high! Lower heat allows the bread to toast perfectly while giving the cheese time to melt. Also, if your cheese is too cold, let it sit out for a few minutes before using.
-
Can I make this in advance?
- I recommend enjoying it fresh, but you can prepare the caramelized onions ahead of time. Store them in the fridge for up to a week, and you’ll have a quick assembly ready to go!
-
What if my sandwich is too greasy?
- If your sandwich is too oily after cooking, try using less butter next time or wiping the pan excess grease before adding the sandwich.
-
How can I make this dairy-free?
- Opt for a dairy-free cheese and vegan butter for this recipe, ensuring you still get that meltiness without any dairy products!
Nutritional Info
This information can vary based on the exact ingredients used, but here’s a rough estimate for one sandwich:
- Calories: 350-400
- Protein: 15g
- Carbs: 30g
- Fat: 22g
Conclusion
There you have it—your ultimate guide to crafting a mouthwatering French Onion Grilled Cheese! Remember, cooking is all about joy, deliciousness, and the memories you build around the table. Drop me a comment below and let me know your thoughts, or share your own variations! I’d love to hear how this recipe becomes part of your culinary story. Happy cooking, foodies!
PrintFrench Onion Grilled Cheese

A deliciously comforting twist on a classic grilled cheese with rich, savory French onion flavors.
- Prep Time: 10 minutes
- Cook Time: 30 minutes
- Total Time: 40 minutes
- Yield: 1 serving 1x
- Category: Main Course
- Method: Grilling
- Cuisine: French
- Diet: Vegetarian
Ingredients
- Crusty sourdough or whole grain bread
- 2–3 sweet onions
- Gruyère cheese
- Butter
Instructions
- Heat a tablespoon of butter in a medium skillet over medium-low heat. Add the sliced onions and a pinch of salt.
- Cook for about 20-30 minutes, stirring occasionally, until onions are caramelized.
- Spread butter on one side of each slice of bread.
- Layer Gruyère cheese on the unbuttered side of one slice.
- Distribute caramelized onions on top of the cheese, then add more cheese before topping with the second slice of bread, buttered side out.
- Heat the skillet over medium heat and cook the sandwich for about 4-5 minutes until golden brown on one side.
- Flip the sandwich and repeat until both sides are golden and the cheese is melted.
- Let sit for a minute before slicing and serve.
Notes
Pair your grilled cheese with a bowl of warm French onion soup for a complete experience.
Nutrition
- Serving Size: 1 sandwich
- Calories: 375
- Sugar: 6g
- Sodium: 500mg
- Fat: 24g
- Saturated Fat: 12g
- Unsaturated Fat: 8g
- Trans Fat: 0g
- Carbohydrates: 40g
- Fiber: 2g
- Protein: 15g
- Cholesterol: 50mg
Keywords: grilled cheese, French onion, comfort food, sandwich
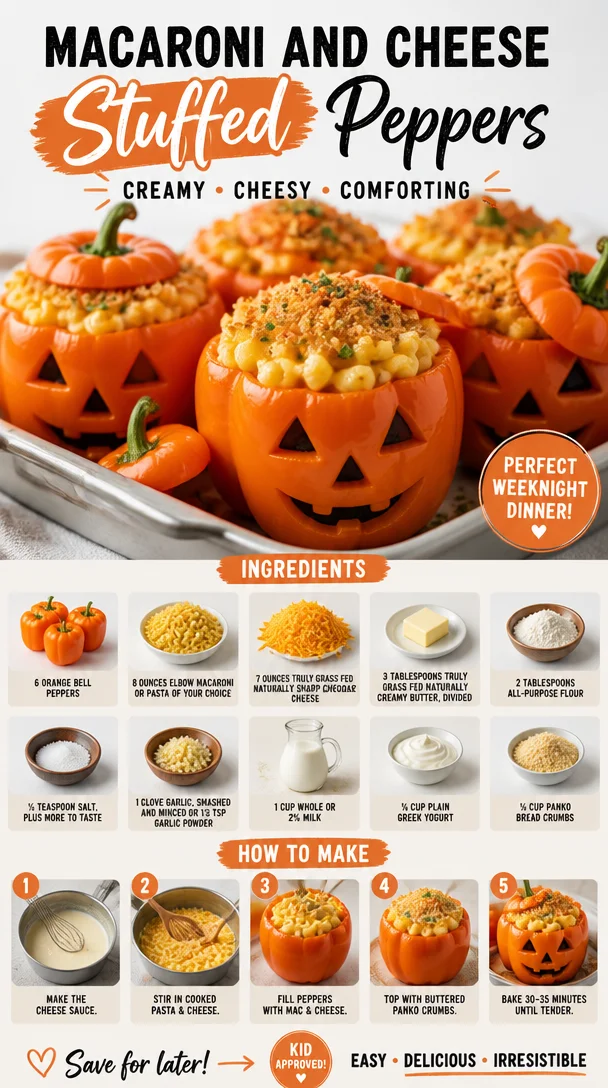
Macaroni and Cheese Stuffed Peppers
Macaroni and Cheese Stuffed Peppers: A Comfort Food Twist
Welcome to Clean Plate Cravings, foodie friends! Today, we’re diving into a dish that not only warms the soul but also puts a fun twist on a classic childhood favorite: Macaroni and Cheese Stuffed Peppers. Ah, macaroni and cheese—a comforting hug in bowl form that brings back cherry-red childhood memories of family dinners, movie nights, and lazy rainy days. Now, imagine elevating this comfort food by stuffing it into vibrant orange bell peppers. Intrigued? Let’s get cooking!
Personal Story
Growing up, my grandmother was the queen of macaroni and cheese. I still remember the sound of her old, creaky kitchen chair as she settled in for an afternoon of cooking. The walls would fill with the delicious aroma of bubbling cheese and buttery breadcrumbs. She’d whip up a giant casserole dish for my siblings and me, and we could hardly wait for it to cool before diving in. It was a dish that brought our family together, sparking laughter, stories, and the kind of bond that only comes from sharing delicious food.
One stormy weekend, she decided to get creative. We had a fridge full of bell peppers, and she suggested we stuff macaroni and cheese inside them—what a revelation! The combination of creamy pasta and soft roasted peppers made for a surprising yet delightful meal. Ever since that day, stuffed peppers have held a special place in my heart. Emulating Grandma’s creativity, I added my flair to the dish by mixing in Greek yogurt for creaminess and using a sharp cheddar that makes every bite a taste sensation. So, grab your apron—we’re about to dive into a recipe that marries nostalgia with vibrant flavor!
Ingredients
To create these delicious Macaroni and Cheese Stuffed Peppers, here’s what you’ll need:
-
6 Orange Bell Peppers: These vibrant beauties not only add a pop of color to your plate but also provide a sweet crunch. Feel free to swap them for green, red, or yellow if you prefer!
-
8 Ounces Elbow Macaroni (or pasta of your choice): Cook according to package directions. If you’re gluten-free, substitute with your favorite gluten-free pasta.
-
7 Ounces Truly Grass Fed Naturally Sharp Cheddar Cheese, shredded: This cheese is the star of the show. Its sharp flavor elevates the dish. If you need a dairy-free option, try a vegan cheese blend.
-
3 Tablespoons Truly Grass Fed Naturally Creamy Butter, divided: We’ll use this to create a rich, decadent roux. You can replace butter with olive oil for a dairy-free version.
-
2 Tablespoons All-Purpose Flour: This helps thicken our cheese sauce. If you want a gluten-free option, cornstarch or a gluten-free flour blend can work wonderfully!
-
½ Teaspoon Salt: A touch of salt enhances all the flavors. Add more to taste, but be careful, as the cheese will contribute some saltiness.
-
1 Clove Garlic, smashed and minced (or ½ tsp garlic powder): Fresh garlic brings an aromatic quality. Use garlic powder if you have it on hand.
-
1 Cup Whole or 2% Milk: This adds creaminess to your cheese sauce. Non-dairy milk (like almond or oat milk) can be used for a lighter option.
-
¼ Cup Plain Greek Yogurt: A secret ingredient for tang and health benefits! Swap it with sour cream for a similar taste.
-
½ Cup Panko Bread Crumbs: These add a fantastic crunch on top. For a unique twist, try Italian-seasoned bread crumbs for an extra boost of flavor.
Step-by-Step Instructions
Now that we have our ingredients lined up, let’s get cooking!
-
Preheat the Oven: Start by preheating your oven to 375°F (190°C). This ensures the peppers are tender and the cheese is bubbly!
-
Prep the Peppers: Cut the tops off your orange bell peppers, removing the seeds and membranes. Feel free to save those vibrant tops for a veggie stir-fry later! Place your peppers upright in a baking dish. (Tip: If they won’t stand, trim a small slice off the bottom to create a flat base.)
-
Cook the Pasta: Boil water in a large pot and cook the elbow macaroni according to the package directions until al dente. Drain and set aside—but hold onto a cup of pasta water, just in case!
-
Make the Roux: In a medium saucepan over medium heat, melt 2 tablespoons of butter. When it’s bubbling, add the flour and whisk constantly for 1-2 minutes until it’s golden and smells toasty—this is the base of your creamy cheese sauce!
-
Add Milk and Cheese: Gradually pour in the milk while whisking—no lumps allowed! Cook until the mixture thickens, which should take about 2-3 minutes. Lower the heat, then stir in the shredded Truly Grass Fed Naturally Sharp Cheddar Cheese until melted and smooth. (Chef’s hack: if the sauce is too thick, add a splash of that reserved pasta water!)
-
Flavor Boost: Stir in the minced garlic, Greek yogurt, and ½ teaspoon of salt. Taste and adjust seasoning as necessary. This creamy goodness should sing with flavor!
-
Combine Pasta and Sauce: Gently mix the cooked macaroni noodles with the cheese sauce, ensuring every noodle is coated with that cheesy goodness. It’s about to get even better!
-
Stuff the Peppers: Using a spoon, carefully fill each pepper with your macaroni and cheese mixture. Pile it high—trust me, it’ll be worth it!
-
Crunchy Topping: In a small bowl, mix together the panko breadcrumbs and the remaining tablespoon of melted butter. Sprinkle this crunchy mixture generously on top of the stuffed peppers for that golden finish.
-
Bake: Cover the dish with aluminum foil and pop it in the oven for 25 minutes. Remove the foil and bake for an additional 10-15 minutes until the tops are golden brown. Stand back and enjoy the aroma wafting through your kitchen!
Serving Suggestions
Once those beautiful peppers emerge from the oven, serve them hot for a delightful dinner. Garnish with fresh herbs, like parsley or chives, to elevate the presentation and freshness. Pair these stuffed peppers with a crisp green salad for a complete meal. You can also drizzle some hot sauce or ranch dressing on top for an extra kick—whatever tickles your taste buds!
Recipe Variations
Feeling adventurous? Here are some creative variations you can try out:
-
Meaty Option: Add cooked ground turkey, beef, or even shredded chicken into the macaroni and cheese mixture for added protein.
-
Veggie-Packed: Incorporate finely chopped spinach or kale into the cheese mixture for an extra nutrient boost.
-
Spicy Twist: Stir in diced jalapeños for a spicy kick, or top with a sprinkle of crushed red pepper flakes before serving.
-
Italian Flair: Mix in Italian seasoning or sun-dried tomatoes into the cheese sauce for a Mediterranean twist.
-
BBQ Chicken Stuffed Peppers: Swap the macaroni filling for leftover BBQ chicken and cheese for a smoky flavor punch.
Chef’s Notes
This recipe has come a long way since my grandmother’s initial creation. I love experimenting with different ingredients and flavors, which is why I’m always switching things up based on what’s in my fridge. You know what they say, a great recipe is only as good as the love and creativity you put into it!
One of my fondest kitchen memories involves a slight disaster: I forgot to cover the peppers during the first bake! The panko topping turned a dark brown, but once I tasted it, the toasty flavor was a hit! In the end, it became a favorite among my friends during dinner parties. So, embrace the kitchen chaos—it often leads to delicious surprises!
FAQs and Troubleshooting
Q: My cheese sauce turned out lumpy. What did I do wrong?
A: This can happen if the milk is added too quickly to the roux. Always add it slowly while whisking continuously to create a smooth sauce.
Q: How do I know when the peppers are done?
A: They should be tender and the tops golden brown. A fork should easily pierce through the pepper skin.
Q: Can I make this dish ahead of time?
A: Absolutely! You can prepare the stuffed peppers, cover them, and refrigerate. When ready to eat, just bake straight from the fridge, adding additional time to heat through.
Q: Do I need to pre-cook the peppers?
A: No need! The cooking time in the oven will tenderize the peppers while fluffing up the macaroni.
Nutritional Info (Optional)
While these stuffed peppers are a delightful indulgence, they can also be a source of nourishment! Here’s a rough estimate per stuffed pepper, making it a balanced meal option when paired with a side salad:
- Calories: 350
- Protein: 15g
- Carbohydrates: 40g
- Fat: 15g
Incorporating vibrant ingredients doesn’t just boost flavor; it keeps you feeling full and satisfied!
And there you have it—a cozy and delicious way to enjoy macaroni and cheese like never before! Remember, cooking is all about enjoying the process, so have fun experimenting with flavors and share it with loved ones. Happy cooking, and as always, keep those plates clean and cravings satisfied!
PrintMacaroni and Cheese Stuffed Peppers
A comforting twist on a classic favorite, these Macaroni and Cheese Stuffed Peppers marry nostalgia with vibrant flavor.
- Prep Time: 15 minutes
- Cook Time: 30 minutes
- Total Time: 45 minutes
- Yield: 4 servings 1x
- Category: Main Course
- Method: Baking
- Cuisine: American
- Diet: Vegetarian
Ingredients
- 6 Orange Bell Peppers
- 8 Ounces Elbow Macaroni
- 7 Ounces Truly Grass Fed Naturally Sharp Cheddar Cheese, shredded
- 3 Tablespoons Truly Grass Fed Naturally Creamy Butter, divided
- 2 Tablespoons All-Purpose Flour
- ½ Teaspoon Salt
- 1 Clove Garlic, smashed and minced
- 1 Cup Whole or 2% Milk
- ¼ Cup Plain Greek Yogurt
- ½ Cup Panko Bread Crumbs
Instructions
- Preheat the Oven: Start by preheating your oven to 375°F (190°C).
- Prep the Peppers: Cut the tops off your orange bell peppers, removing the seeds and membranes.
- Cook the Pasta: Boil water and cook the elbow macaroni until al dente. Drain and set aside.
- Make the Roux: In a medium saucepan, melt 2 tablespoons of butter and whisk in the flour.
- Add Milk and Cheese: Gradually pour in the milk while whisking until thickened, then stir in the cheese until melted.
- Flavor Boost: Stir in the garlic, Greek yogurt, and salt. Adjust seasoning as necessary.
- Combine Pasta and Sauce: Mix the cooked macaroni with the cheese sauce until coated.
- Stuff the Peppers: Fill each pepper with the macaroni and cheese mixture.
- Crunchy Topping: Mix panko breadcrumbs with the remaining butter and sprinkle on top.
- Bake: Cover with foil and bake for 25 minutes, then uncover and bake until tops are golden brown.
Notes
Serve garnished with fresh herbs and pair with a crisp green salad for a complete meal.
Nutrition
- Serving Size: 1 stuffed pepper
- Calories: 350
- Sugar: 2g
- Sodium: 400mg
- Fat: 15g
- Saturated Fat: 7g
- Unsaturated Fat: 6g
- Trans Fat: 0g
- Carbohydrates: 40g
- Fiber: 3g
- Protein: 15g
- Cholesterol: 30mg
Keywords: macaroni and cheese, stuffed peppers, comfort food, vegetarian recipe, family dinner