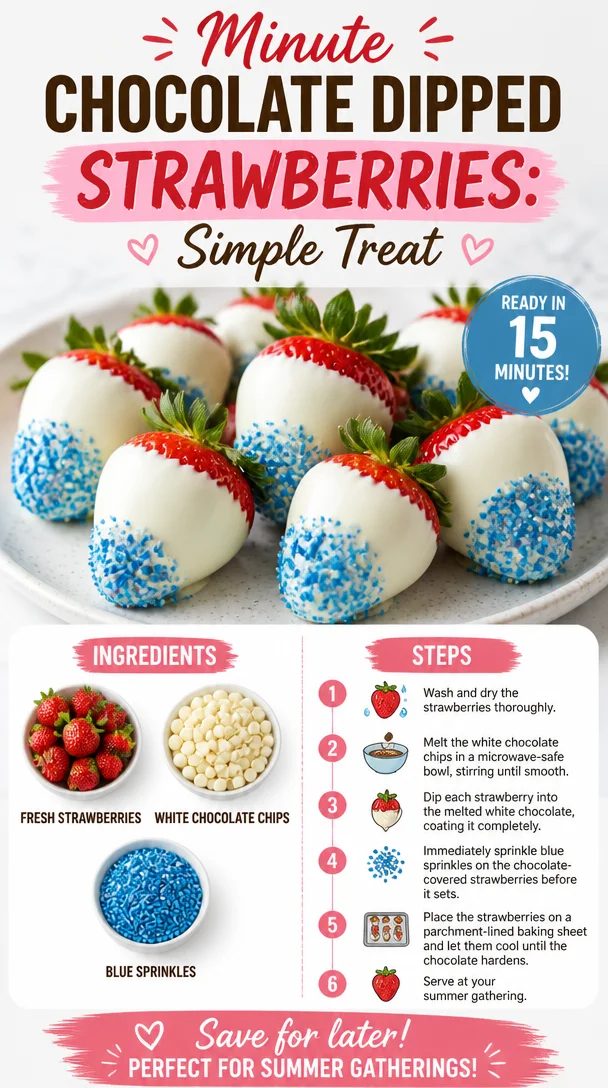
Minute Chocolate Dipped Strawberries: Simple Treat
Indulge in Bliss: The Ultimate Chocolate Dipped Strawberries Recipe
Hey there, fellow food lovers! If you’re looking for a sweet and simple treat that will wow your friends, loved ones, or even just yourself, let me introduce you to the delightful world of Chocolate Dipped Strawberries. These delectable bites are not just a dessert; they’re a moment of joy that can brighten your day, bringing a touch of fancy to any occasion without demanding too much of your precious time in the kitchen.
When I think of chocolate dipped strawberries, memories of summer days and festive gatherings come rushing back. Imagine this: the sun is shining, laughter fills the air, and all around you, friends are enjoying fresh strawberries dipped in creamy chocolate. It’s a scene that feels almost magical, isn’t it? Whether it’s a romantic date night, cozy movie session, or an extravagant dinner party, chocolate dipped strawberries have this incredible ability to bring smiles to faces, making every bite a little celebration.
A Sweet Trip Down Memory Lane
One of my fondest memories linked to this treat is from a small backyard picnic my family hosted a few years ago. My little niece, who was only four at the time, had picked some strawberries from our garden, her face lighting up like a Christmas tree every time she found a juicy one. We decided to dip them in chocolate as a little fun project together. I melted the chocolate while she enthusiastically helped by holding the strawberries and sprinkling blue edible sprinkles like a true artist. The giggles, the sticky fingers, and ecstatic “oooohs” and “aaaahs” she made with every strawberry pulled straight from the bowl to her mouth—those sweet moments are forever etched in my heart.
And while it’s easy to buy chocolate dipped strawberries pre-made, there’s just something so incredibly rewarding about making them yourself. It’s a delightful fusion of flavors that celebrates sweetness in every bite and will make your kitchen smell incredible too!
Gather Your Ingredients!
To embark on making these delightful treats, you’ll need the following simple ingredients:
-
Fresh Strawberries
The star of our show! Choose ripe, juicy strawberries that are firm and blemish-free. These beauties not only taste great but look gorgeous too. If fresh strawberries aren’t available, you can opt for frozen ones, but remember they won’t hold their shape quite as well once dipped. -
White Chocolate Chips
Smooth and creamy, the white chocolate complements the tartness of the strawberries beautifully. If you’re looking for a healthier option, consider using dark chocolate chips instead. And for those who might have a dairy intolerance, there are fantastic dairy-free chocolate chips available in the market! -
Blue Sprinkles
These are optional but add a delightful pop of color and crunch! You can get creative with any colors or shapes of sprinkles; they’ll make your strawberries look festive. Feel free to substitute with chopped nuts, coconut flakes, or even edible glitter if that’s more your style!
Step-by-Step Instructions to Chocolate Heaven
Now that you’ve assembled your ingredients, let’s dive into the process!
-
Prep Your Supplies:
Start by washing your strawberries gently under cold water, then pat them dry with a clean kitchen towel. This step is crucial! Moisture will cause the chocolate to not stick properly later. -
Melt the White Chocolate:
In a microwave-safe bowl, add your white chocolate chips. Microwave the chips in 30-second bursts, stirring in between until smooth and fully melted. Be sure to keep an eye on it to prevent burning. If it looks too thick, you can stir in a tiny bit of vegetable oil for a glossy finish. Pro tip: you can also melt chocolate using a double boiler for a more controlled approach! -
Dip the Strawberries:
Hold the green top (the stem) of each strawberry and dip it into the melted chocolate, swirling it around to ensure it’s fully coated. Let any excess chocolate drip off and place the strawberry upright on a parchment-lined baking tray. -
Add the Sprinkles:
Before the chocolate hardens, sprinkle your blue sprinkles over the dipped strawberries to make them pop! You can get creative here—use rainbow sprinkles, or even drizzle a little dark chocolate on top if you want to mix it up! -
Chill to Set:
Pop your tray into the fridge for about 30 minutes, or until the chocolate is fully set. This waiting period is the hardest part, I promise! -
Serve and Enjoy:
Once the chocolate has hardened, your scrumptious treats are ready to serve! You can arrange them on a beautiful plate or serve them right off the tray for a casual vibe.
Serving Suggestions
To make your presentation even more enchanting, you can arrange your chocolate dipped strawberries on a platter with fresh mint leaves for a touch of vibrant green. If you’re feeling extra fancy, consider drizzling more melted chocolate (maybe even in dark chocolate) in artistic patterns across the platter for a professional touch. These little tricks really elevate the overall look without adding much difficulty.
Recipe Variations to Spark Creativity!
Get creative! Here are a few fun twists on the classic chocolate dipped strawberry:
-
Dark Chocolate Delight: Swap white chocolate for dark chocolate for a richer flavor that pairs fantastically with the strawberries’ sweetness.
-
Nutty Bliss: After dipping, roll the strawberries in crushed nuts (like almonds or hazelnuts) instead of sprinkles for a crunchy texture that adds depth.
-
Zesty Citrus: Add a sprinkle of finely grated lemon or orange zest over the melted chocolate for a refreshing zing that’ll surprise your taste buds!
-
Dipped in Love: Mix some peanut butter into the melted chocolate for a nutty and creamy twist that’s simply to die for!
-
Gourmet Drizzle: After coating the strawberries, drizzle white and dark chocolate on top in a zigzag pattern for a stylish finish!
Chef’s Notes: A Journey of Flavor
These chocolate dipped strawberries have come a long way since their inception! The first time I whipped up a batch, I was so focused on getting the chocolate smooth that I didn’t think to really engage with the process. Now, I’ve learned that treating it as a fun activity—choosing sprinkles, calling friends over to join in, or even hosting a strawberry-dipping party—brings that joyful spark back to my kitchen. They’re not just a dessert… they’re a way to connect with those we love.
I still giggle when I recall my niece trying to sneak in a bite before we were done. And honestly, who could blame her? Just a little taste of that smooth chocolate and juicy strawberry combo can bring out the kid in anyone!
FAQs and Troubleshooting Your Chocolate Dipped Strawberries
1. Why didn’t the chocolate stick to my strawberries?
Make sure your strawberries are completely dry before dipping! Any water will create steam and cause the chocolate to slide right off.
2. Can I make these ahead of time?
Absolutely! Chocolate dipped strawberries can be prepared a few hours in advance and stored in the fridge. However, they are best enjoyed fresh—the texture and flavor shine at their peak!
3. What if my chocolate seizes up while melting?
Don’t panic! This can happen if moisture gets into the bowl. If it looks grainy, try adding a teaspoon of coconut oil and reheat gently while stirring, and it should smooth out.
4. How do I store leftover strawberries?
Store them in an airtight container in the fridge for 1-2 days. Just know they’re best eaten fresh, as the strawberries can release moisture which may affect the chocolate’s crispness over time.
Nutritional Info
While it might be hard to count the calories with how delicious these strawberries are, moderation is key! A single chocolate dipped strawberry typically contains approximately 60-80 calories, depending on the type of chocolate used. Plus, you’re getting in some antioxidants from the strawberries, so treat yourself guilt-free!
And there you have it, my lovely foodies! Chocolate dipped strawberries are more than just a treat; they’re a celebration of flavors and memories. With just a few ingredients and steps, you can create something that not only tastes heavenly but also brings warmth and joy into your kitchen and home. So, roll up those sleeves, get your fresh strawberries, and let the chocolate-dipping magic begin! Happy indulging!
PrintChocolate Dipped Strawberries
Deliciously sweet chocolate dipped strawberries that are perfect for any occasion.
- Prep Time: 15 minutes
- Cook Time: 5 minutes
- Total Time: 20 minutes
- Yield: 12 servings
- Category: Dessert
- Method: Dipping
- Cuisine: American
- Diet: Vegetarian
Ingredients
- Fresh Strawberries
- White Chocolate Chips
- Blue Sprinkles (optional)
Instructions
- Prep your supplies: Wash strawberries and pat them dry.
- Melt the white chocolate in a microwave-safe bowl in 30-second bursts.
- Dip the strawberries into the melted chocolate, swirling to coat.
- Add the sprinkles before the chocolate hardens.
- Chill for about 30 minutes until the chocolate is set.
- Serve and enjoy your treats!
Notes
For a richer flavor, consider using dark chocolate. Store leftovers in an airtight container in the fridge for 1-2 days.
Nutrition
- Serving Size: 1 strawberry
- Calories: 70
- Sugar: 8g
- Sodium: 15mg
- Fat: 4g
- Saturated Fat: 2g
- Unsaturated Fat: 2g
- Trans Fat: 0g
- Carbohydrates: 9g
- Fiber: 1g
- Protein: 1g
- Cholesterol: 0mg
Keywords: chocolate dipped strawberries, dessert, strawberries, chocolate, sweet treats

Gourmet Brownie Cookies
Gourmet Brownie Cookies: The Ultimate Treat for Chocoholics
Welcome back to Clean Plate Cravings, fellow food lovers! Today, I’m absolutely thrilled to share a recipe that’s guaranteed to make your sweet tooth sing: Gourmet Brownie Cookies. If you’re like me, dessert is a delightful end to the day, and these cookies are the perfect indulgence when you want a rich chocolate hit without the fuss of a traditional brownie.
Imagine biting into a warm, gooey cookie, the chocolate chips melting in your mouth, with that little crunch on the outside and a soft, brownie-like interior. Sounds heavenly, right? Let’s be honest: Brownies and cookies are two beloved treats that we often find ourselves choosing between. But why choose when we can have the best of both worlds?
What I love most about these Gourmet Brownie Cookies is how simple the ingredients are and how versatile the recipe can be. Whether you whip them up for a special occasion or just to satisfy that chocolate craving on a Tuesday evening, they never disappoint! So, grab your aprons, and let’s dive into the delicious world of cookies.
A Sweet Memory: The First Batch
Let me take you back to a sunny afternoon when I was about ten years old. My mom decided it was the perfect day to bake, and naturally, I was right in the kitchen, eager to help. She pulled out her trusty cookbook, and we stumbled upon a brownie recipe. But instead of making traditional brownies, we decided to experiment and create cookies!
As we stirred the ingredients, the warm, comforting smell of melted butter and chocolate filled the air. I distinctly remember sneaking spoonfuls of that rich batter and feeling like the luckiest kid in the world. When those cookies finally came out of the oven, golden brown and oozing chocolatey goodness, my entire family gathered around the kitchen. It was pure joy as we indulged in those warm cookies, giggling and sharing stories.
To this day, those moments serve as a foundation of my love for cooking and baking. Every time I make these Gourmet Brownie Cookies, I’m transported back to that kitchen, surrounded by laughter and a mouthful of chocolate. Now, let me share this indulgent recipe with you!
The Ingredients You’ll Need
Here’s what you’ll need to whip up these dreamy cookies:
-
1 cup unsalted butter, softened
This is your base for flavor and texture. Don’t forget to soften it—nobody wants a lumpy cookie dough! -
1 cup brown sugar, packed
This adds moisture and a slight caramel flavor. If you don’t have brown sugar on hand, you can substitute half with granulated sugar or mix in a tablespoon of molasses per cup to replicate the moisture and flavor. -
1/2 cup granulated sugar
For added sweetness and a touch of crispness. You can use coconut sugar for a less refined option. -
2 large eggs
Eggs bind the ingredients and add richness. If you’re vegan, try using flaxseed meal (1 tablespoon of flaxseed mixed with 2.5 tablespoons of water) as a great egg substitute. -
2 teaspoons vanilla extract
This elevates the flavor profile. If you’re out, almond extract can also lend a beautiful flavor twist, but use it sparingly! -
1 cup all-purpose flour
This is essential for structure. For a gluten-free option, try substituting with almond flour or a gluten-free flour blend. -
1/2 cup cocoa powder
The star of the show! It provides the deep chocolate flavor. Make sure you use unsweetened cocoa powder for the best results. -
1/2 teaspoon baking powder
This little ingredient helps the cookies rise a bit, giving them that perfect brownie-cookie texture. -
1/4 teaspoon salt
Just a pinch to enhance all the flavors. If you’re watching your sodium, you can omit it, but I wouldn’t recommend it! -
1 cup chocolate chips
Go for semi-sweet or dark chocolate for that rich contrast. Feeling adventurous? Try butterscotch or white chocolate chips for a fun twist!
Step-by-Step Instructions to Cookie Heaven
Now that you’ve gathered all your ingredients, it’s time to bake these delicious treats!
-
Preheat Your Oven
Start by preheating your oven to 350°F (175°C). This step is crucial as it ensures even baking, which is key for that perfect texture. While it’s heating up, let’s prepare the dough! -
Cream the Butter and Sugars
In a large mixing bowl, beat together the softened unsalted butter, packed brown sugar, and granulated sugar until smooth and creamy. This usually takes about 3-4 minutes with an electric mixer. The mixture should become lighter in color. This aeration is what helps create a tender cookie! -
Add the Eggs and Vanilla
Next, crack in those two large eggs and pour in the vanilla extract. Beat until well combined. Make sure not to overmix at this stage; you want a nice smooth blend, but a little lumpiness is okay. -
Sift in Dry Ingredients
Now, in a separate bowl, sift together the all-purpose flour, cocoa powder, baking powder, and salt. Sifting helps to break up any clumps and combines the dry ingredients evenly. Slowly add this dry mixture to your wet ingredients, stirring gently until just combined. -
Fold in Chocolate Chips
At this stage, it’s time to incorporate the chocolate chips. Use a spatula for this, folding gently to avoid breaking the chips. You want even distribution throughout the cookie dough! -
Chill the Dough (Optional)
If you have the time, refrigerate your dough for about 30 minutes. Chilling helps the flavors meld and can prevent the cookies from spreading too much during baking. But if you’re in a hurry, dive right in! -
Scoop and Bake
Using a cookie scoop or spoon, drop dough balls onto a parchment-lined baking sheet, spaced a couple of inches apart. This helps them bake evenly. Pop them into your preheated oven and bake for about 10-12 minutes. The edges should look firm, while the center may still appear soft. That’s perfect! -
Cool and Enjoy
Remove the cookies from the oven and allow them to cool on the baking sheet for about 5 minutes before transferring them to a wire rack. This waiting period allows them to set up perfectly—trust me, the temptation is real, but it’s worth the wait!
Serving Suggestions
For the ultimate sweet experience, serve these Gourmet Brownie Cookies slightly warm with a scoop of vanilla ice cream on top or drizzled with chocolate syrup. You can also dust them with powdered sugar or serve with a side of fresh berries to balance those rich flavors. Presentation is key, so don’t forget a beautiful plate or rustic wooden board to elevate your serving game!
Recipe Variations
Why stop at just one version? Here are a few fun variations you might try:
-
Mint Chocolate Brownie Cookies: Add 1 teaspoon of peppermint extract to the dough for a refreshing twist!
-
Spicy Brownie Cookies: Incorporate a pinch of cayenne pepper or cinnamon to the dough for a warm kick.
-
Nutty Brownie Cookies: Fold in some chopped walnuts or pecans to add a nice crunch and depth of flavor.
-
Double Chocolate Delight: Replace half the flour with more cocoa powder for an extra chocolatey treat.
-
Gluten-Free Option: Swap in a 1:1 gluten-free flour blend as mentioned, and voilà—you can enjoy these cookies without compromise!
Chef’s Notes
You know, every time I make these cookies, I like to reminisce about my childhood kitchen adventures. Sometimes, I’ll even invite friends over for a baking night, where we can munch on cookie dough and share our stories, just like I did with my mom. It’s funny how just one batch of cookies can create so much nostalgia and joy. Over the years, this recipe has evolved, influenced by seasonal flavors and whatever ingredients I have on hand. The important thing is to have fun with it!
FAQs and Troubleshooting
-
Why did my cookies spread too much?
If cookies spread too much, they might be too warm before they hit the oven. Try chilling the dough longer next time, or ensure your ingredients, particularly butter, are properly measured and at the right temperature. -
How do I store leftover cookies?
Store your cookies in an airtight container at room temperature for up to a week. If you want to keep them longer, freeze them in a zip-lock bag, and they’ll last for up to three months! -
My cookies came out cakey. What happened?
It may be due to overmixing the dough or too much flour. Make sure to scoop flour rather than packing it into the measuring cup when measuring. -
Can I add different types of chocolate chips?
Absolutely! Feel free to mix it up with milk chocolate, dark chocolate, or even white chocolate for a delightful taste sensation.
Nutritional Info
While I won’t delve into exact nutritional values for our delicious cookies, you can generally expect them to be a delightful treat that can fit into a balanced diet when enjoyed in moderation. After all, feeling good about what you eat is all part of the experience!
And there you have it! Your ticket to baking the most delectable Gourmet Brownie Cookies. Remember, it’s all about enjoying the process and the delicious end result. I’m so excited for you to make these, and I can’t wait to hear how they turn out. Happy baking, and may your kitchen always be filled with love and chocolate!
PrintGourmet Brownie Cookies
Indulge in these rich and gooey Gourmet Brownie Cookies, the perfect treat for chocolate lovers seeking a delightful combination of brownies and cookies.
- Prep Time: 15 minutes
- Cook Time: 12 minutes
- Total Time: 27 minutes
- Yield: 24 cookies 1x
- Category: Dessert
- Method: Baking
- Cuisine: American
- Diet: Vegetarian
Ingredients
- 1 cup unsalted butter, softened
- 1 cup brown sugar, packed
- 1/2 cup granulated sugar
- 2 large eggs
- 2 teaspoons vanilla extract
- 1 cup all-purpose flour
- 1/2 cup cocoa powder
- 1/2 teaspoon baking powder
- 1/4 teaspoon salt
- 1 cup chocolate chips
Instructions
- Preheat the oven to 350°F (175°C).
- Cream the softened unsalted butter, packed brown sugar, and granulated sugar together until smooth and creamy.
- Add the large eggs and vanilla extract and beat until well combined.
- Sift together the flour, cocoa powder, baking powder, and salt in a separate bowl.
- Slowly add the dry mixture to the wet ingredients, stirring gently until just combined.
- Fold in the chocolate chips gently.
- Chill the dough for about 30 minutes if desired.
- Scoop dough balls onto a parchment-lined baking sheet.
- Bake for 10-12 minutes until the edges are firm but the center is soft.
- Cool on the baking sheet for 5 minutes before transferring to a wire rack.
Notes
For an extra touch, serve with vanilla ice cream or drizzle with chocolate syrup. Chilling the dough can enhance flavor and control spreading.
Nutrition
- Serving Size: 1 cookie
- Calories: 180
- Sugar: 16g
- Sodium: 120mg
- Fat: 8g
- Saturated Fat: 5g
- Unsaturated Fat: 3g
- Trans Fat: 0g
- Carbohydrates: 25g
- Fiber: 1g
- Protein: 2g
- Cholesterol: 30mg
Keywords: brownie cookies, chocolate cookies, dessert recipes, baking, gourmet cookies