Beginner-Friendly 15-Min Strawberry Jam Recipe (No Pectin)
The Perfect Homemade Strawberry Jam: A Sweet and Simple Guide
Ah, strawberry season! The air is sweet with the scent of ripe berries, and the vibrant red fruits beckon from farmers’ market stalls and roadside stands. Is there anything better than exploring the kitchen with a bucket of fresh strawberries? Today, I want to invite you to join me on a culinary adventure that’s not only easy but surprisingly fun: making homemade strawberry jam. Trust me, if you’ve never made jam before, you’re in for a treat!
Pouring that vibrantly red, luscious jam into jars feels unbelievably rewarding. It’s the kind of kitchen therapy we all need once in a while. Plus, a spoonful of homemade strawberry jam spread on warm toast or swirled into yogurt turns any ordinary breakfast into a delight. And the best part? Whipping up this jam is not complicated at all!
I remember the first time I made strawberry jam. It was a rainy Saturday morning. As the rain drizzled outside, my mom and I decided to make something special with the strawberries we had just picked from the local farm. At that time, I was just a kid, and I remember thinking, “How can something so simple taste so good?” The smell of cooking strawberries combined with sugar wafting through our kitchen was magical. We laughed as we watched the jam bubble away in the pot and enjoyed every sticky, berry-filled moment. It transformed a dreary day into a festive one we reminisce about to this day. I still cherish that memory and now, I can’t wait to share my easy strawberry jam recipe with you so you can create your own flavorful moments!
Let’s dive into this deliciously rewarding adventure and bring a little sweetness into your kitchen!
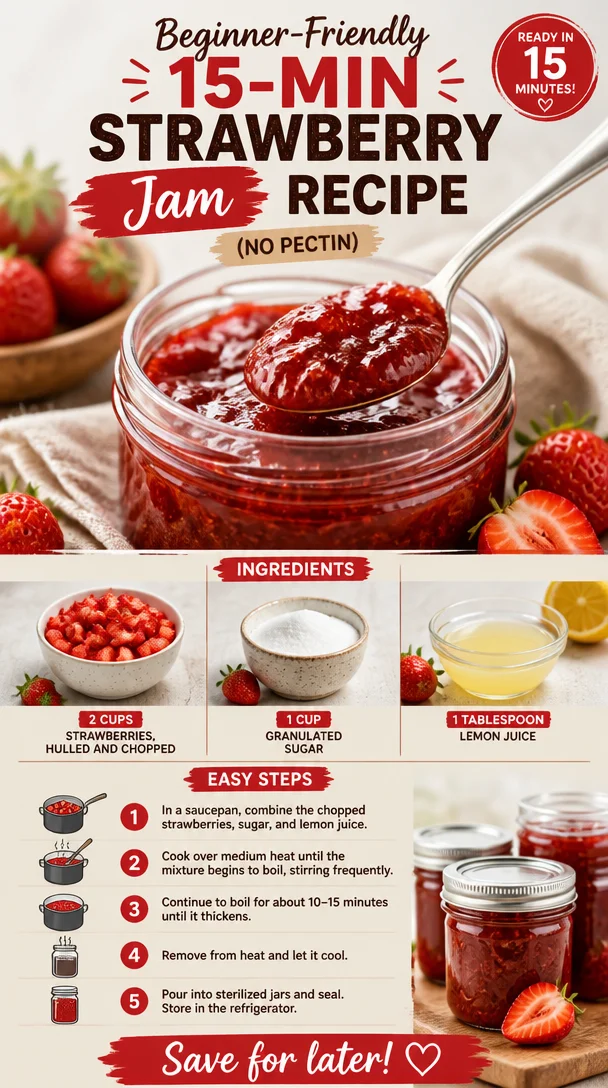
Ingredients
To make your homemade strawberry jam, you’ll need just a few simple ingredients. Here’s what you’ll need:
-
2 cups strawberries, hulled and chopped
Perfectly ripe strawberries are the heart of this jam. You can substitute with other berries like raspberries or blueberries if you prefer a mixed berry jam! -
1 cup granulated sugar
Sugar helps to preserve the jam and gives it that delightful sweetness. If you’re looking for a healthier option, you can substitute with honey or maple syrup; however, keep in mind the texture and sweetness will differ. -
1 tablespoon lemon juice
This tart addition balances the sweetness and enhances the strawberry flavor. If you’re out of lemons, you can use lime juice or even apple cider vinegar for a more unique flavor twist.
Step-by-Step Instructions
Now that we have our power trio of ingredients, it’s time to get cooking! Follow these simple steps for a smooth jam-making experience:
-
Prep the Strawberries
Start by hulking and chopping your strawberries. Make sure to wash them gently under cold water; they are delicate little gems! To hull, simply remove the green leafy tops with a paring knife, and chop them into smaller pieces for a more manageable cook. This will also help release the natural juices. Chef tip: If fresh strawberries aren’t available, you can also use frozen berries. Just thaw them and drain excess liquid before using. -
Combine the Ingredients
In your favorite large saucepan, add the chopped strawberries, granulated sugar, and lemon juice. Stir everything together gently, making sure each piece of strawberry is coated with the sugar. Let the mixture sit for about 10-15 minutes. This helps the strawberries release some of their juice. This initial step is crucial for achieving that succulent jam texture. Hint: The longer it sits, the more the sugars can draw out moisture. -
Cook it Down
Place the saucepan over medium heat. Stir occasionally until the mixture starts to bubble. This will typically take about 5-10 minutes. Keeping an eye on it is important here—once it starts bubbling, reduce the heat to low to prevent scorching. Pro tip: When the mixture coats the back of a spoon and leaves a trail, you’re ready to move on! You can also use a candy thermometer; the jam should reach about 220°F (104°C) for the perfect consistency. -
Jar It Up
Once your jam has reached the desired consistency, remove it from the heat. If you prefer a smoother jam, you can blend it for a few seconds with an immersion blender, but I love the chunkiness of traditional jam! Carefully ladle the hot jam into sterilized jars, leaving about ¼ inch of headspace. Seal them with lids while still hot to ensure a tight seal. That satisfying pop as they seal later is music to the ears! -
Cool and Store
Let the jars cool to room temperature before transferring them to the fridge. It’s crucial not to touch the lids until they’ve cooled; this allows the vacuum seal to form properly. Your homemade strawberry jam is now ready to be enjoyed! Store in the fridge for about 2-3 weeks or you can process them for longer storage. Chef’s hack: To enjoy your jam all year round, water bath can them and store in a cool, dark place!
Serving Suggestions
There’s no shortage of ways to enjoy your homemade strawberry jam! Spread generous spoonfuls on warm, buttered toast or try swirling it into a fluffy bowl of Greek yogurt for breakfast. Try drizzling it on pancakes, waffles, or filling your favorite pastries. There’s something about a dollop of jam that makes everything taste more special!
Recipe Variations
Now that you’ve mastered the basic recipe, let’s explore a few tasty variations to spice things up:
-
Strawberry-Basil Jam: Add a few chopped fresh basil leaves just as the jam begins to thicken for a sweet and savory twist.
-
Orange Strawberry Jam: Mix in a tablespoon of finely grated orange zest alongside the lemon juice for zesty extra flavor.
-
Spicy Strawberry Jam: For those who enjoy a kick, a pinch of red pepper flakes or minced fresh ginger can add great heat to the sweetness.
-
Coconut Strawberry Jam: Combine shredded coconut and a bit of coconut milk for a tropical flair.
Chef’s Notes
As I reminisce about my childhood jam-making days, I realize just how much this recipe has evolved over the years. What started as a fun weekend project with my mom has turned into a comforting ritual in my own kitchen. Now, I often invite friends over for a jam-making day—there’s nothing quite like sharing recipe secrets and catching up on life with a fun activity!
Cooking doesn’t need to be perfection; it’s about enjoying the process and connecting with flavors. Making jam is especially forgiving—you can adjust sugar levels, play with ingredients, and make it entirely your own.
FAQs and Troubleshooting
-
Why didn’t my jam thicken?
If your jam didn’t set, it may not have cooked long enough or you might have added too much fruit compared to sugar. A great fix is to return it to the heat and let it simmer longer until it reaches the right consistency. -
Can I use frozen strawberries?
Absolutely! Frozen strawberries are a great alternative when fresh ones aren’t in season. Make sure to drain off any excess liquid after thawing. -
How long will the jam last?
Once opened, store it in the refrigerator for about 2-3 weeks. If you process and seal them properly, they can last for about a year in a cool, dark place. -
What can I do with leftover jam?
Use any leftover jam in dressings, pair it with cheese platters, or fill pastries and tarts. You can even swirl it into homemade ice cream for a delightful treat!
Nutritional Info
Homemade strawberry jam can vary slightly in nutritional content, but here’s a rough breakdown per tablespoon:
- Calories: 50
- Carbohydrates: 14g
- Sugar: 12g
- Fiber: 0.5g
- Protein: 0g
Keep in mind, this is a special treat, and it’s all about balance!
There you go—a delightful journey into making homemade strawberry jam! I hope you’re feeling inspired to grab some fresh strawberries and get started. Benefits abound when you bring out your inner chef and create a treat that you can enjoy all year round. Enjoy the process and remember, cooking is a joy—a delicious way to let your creativity run wild. Happy jam-making!
PrintThe Perfect Homemade Strawberry Jam
A simple guide to making delicious homemade strawberry jam with fresh strawberries.
- Prep Time: 10 minutes
- Cook Time: 15 minutes
- Total Time: 25 minutes
- Yield: 2 cups 1x
- Category: Condiment
- Method: Cooking
- Cuisine: American
- Diet: Vegetarian
Ingredients
- 2 cups strawberries, hulled and chopped
- 1 cup granulated sugar
- 1 tablespoon lemon juice
Instructions
- Prep the strawberries by hulling and chopping them.
- Combine the strawberries, sugar, and lemon juice in a saucepan.
- Cook the mixture over medium heat until it starts to bubble.
- Jar the jam into sterilized jars, leaving headspace.
- Cool the jars to room temperature before storing in the fridge.
Notes
For variations, try adding fresh basil, orange zest, or shredded coconut to the jam.
Nutrition
- Serving Size: 1 tablespoon
- Calories: 50
- Sugar: 12g
- Sodium: 0mg
- Fat: 0g
- Saturated Fat: 0g
- Unsaturated Fat: 0g
- Trans Fat: 0g
- Carbohydrates: 14g
- Fiber: 0.5g
- Protein: 0g
- Cholesterol: 0mg
Keywords: strawberry jam, homemade jam, preserves, fruit preserve, sweet spreads