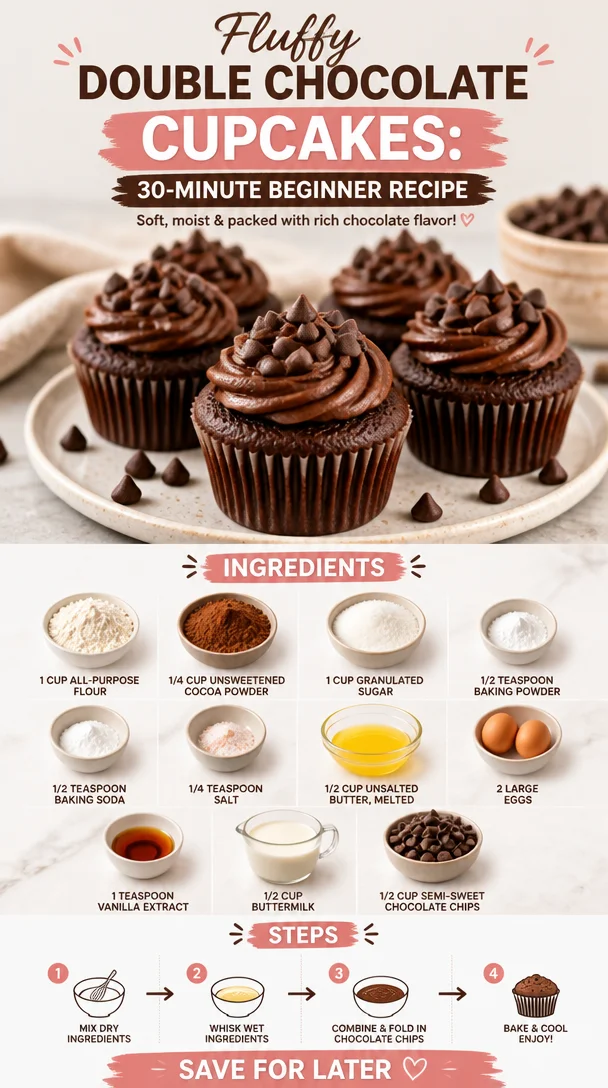
Fluffy Double Chocolate Cupcakes: 30-Minute Beginner Recipe
Indulge in Decadence: Double Chocolate Cupcakes Recipe
Welcome to another delicious adventure in the kitchen! Today, we’re diving into the world of rich, fudgy goodness with a recipe that will surely become your go-to treat: Double Chocolate Cupcakes. Now, I don’t know about you, but when I think of cupcakes, I can practically hear the whispers of sweet nostalgia mingling with the intoxicating aroma of chocolate wafting through my kitchen. So grab your apron, and let’s get those ovens fired up because these cupcakes are going to be a hit, whether it’s for a special occasion or just a weekday treat!
A Sweet Memory of Chocolate
There’s something so nostalgic about the scent of chocolate baking in the oven. It takes me back to family gatherings at my grandmother’s house, where laughter echoed off the walls and the kitchen was always filled with the sweet aroma of freshly baked goods. I remember distinctly the time we baked cupcakes together. She would skillfully measure out ingredients, while I impatiently waited to lick the bowl. Those moments weren’t just about enjoying dessert; they were about connecting, sharing stories, and simply being in the moment.
Fast forward to today, and I’m still relishing the joy that comes from baking with loved ones! These Double Chocolate Cupcakes are inspired by those heartwarming moments—a perfect way to bring a little nostalgia into your life while creating your own sweet memories. Let’s roll up our sleeves and make some magic happen in the kitchen together!
Ingredients
Before we get to the fun part, let’s check out the fabulous ingredients we need for our Double Chocolate Cupcakes.
-
1 cup all-purpose flour
A versatile base for our cupcakes; it helps create that perfect fluffy texture. Looking for a gluten-free option? You can use a 1:1 gluten-free flour blend as a fantastic substitute! -
1/4 cup unsweetened cocoa powder
This is where the chocolate magic begins! Unsweetened cocoa adds rich depth without added sugars. If you’re feeling adventurous, try using dark cocoa powder for an even more intense flavor. -
1 cup granulated sugar
Sweetness is essential in balance with the cocoa’s bitterness. If you prefer, coconut sugar or a sugar substitute can work here, but check the conversion ratio! -
1/2 teaspoon baking powder
This helps the cupcakes rise and become light and airy. Baking soda can be used as a substitute at half the amount—just make sure to balance it out with an acid! -
1/2 teaspoon baking soda
A crucial ingredient for leavening, ensuring our cupcakes won’t be dense. If you’re low on baking soda, you can omit it, but the rise may not be as high. -
1/4 teaspoon salt
Salt heightens flavors, even in sweet dishes. Don’t skip this! If you’re cutting back on sodium, reduce it slightly—your taste buds will guide you. -
1/2 cup unsalted butter, melted
Butter adds richness and moisture. If you’re vegan or dairy-free, swap this for melted coconut oil or a vegan butter alternative. -
2 large eggs
Eggs provide structure and moisture to our cupcakes. To make these egg-free, substitute two tablespoons of unsweetened applesauce or a flax egg for each egg. -
1 teaspoon vanilla extract
Vanilla adds warmth and depth to the flavor profile. Pure vanilla extract is always best, but imitation vanilla can suffice in a pinch. -
1/2 cup buttermilk
Buttermilk adds tanginess and keeps the cupcakes moist. If you’re out, just mix one tablespoon of vinegar or lemon juice with milk to create a quick substitute! -
1/2 cup semi-sweet chocolate chips
These are the ultimate treasure troves of melted chocolate goodness hidden within each cupcake. You could replace them with dark chocolate chips for a sophisticated flavor twist!
Step-by-Step Instructions
Now that we’ve gathered our ingredients, let’s dive into the cooking process! Follow along with my tips, and you’ll have a batch of irresistibly moist Double Chocolate Cupcakes in no time.
-
Preheat Your Oven
Preheat your oven to 350°F (175°C). This step is crucial as it ensures your cupcakes bake evenly. While you’re waiting, don’t forget to line a cupcake pan with paper liners—this makes for easy cleanup and adds a little pop of color! -
Mix Dry Ingredients
In a large mixing bowl, whisk together the flour, cocoa powder, sugar, baking powder, baking soda, and salt until everything is well blended. Pro tip: sift the cocoa powder before adding to remove any lumps for a smoother batter! -
Combine Wet Ingredients
In another bowl, whisk together the melted butter, eggs, vanilla extract, and buttermilk until smooth. I love using a handheld mixer for this, but a whisk works just fine too. Make sure your butter isn’t too hot, or it might cook the eggs! -
Blend Dry and Wet Mixtures
Gradually add the wet mixture to the dry ingredients. Use a spatula or a wooden spoon to gently fold the two together until just combined—it’s okay if a few lumps remain! Over-mixing can lead to tough cupcakes, and we want them to be as tender as a hug. -
Stir in the Chocolate Chips
Fold in those semi-sweet chocolate chips, ensuring they are evenly distributed throughout the batter. Can you smell that? Yum! -
Fill the Cupcake Liners
Use an ice cream scoop or a spoon to fill each liner about two-thirds full—this allows room for them to rise without overflowing. You can add a few extra chocolate chips on top for presentation if you’re feeling fancy! -
Bake
Pop the muffin pan into the preheated oven and bake for 18–20 minutes, or until a toothpick inserted into the center comes out clean (or with just a few crumbs—nothing wet!). -
Cool
Once baked, allow the cupcakes to cool in the pan for about 5 minutes before transferring them to a wire rack to cool completely. This step helps them retain moistness! -
Frost and Enjoy
Frost these beauties with your favorite chocolate frosting, or simply dust with powdered sugar for a lighter touch. My personal favorite is a fluffy chocolate buttercream, which complements the cupcakes beautifully.
Serving Suggestions
When it comes to serving your Double Chocolate Cupcakes, presentation is key! Arrange them on a colorful platter or a cute cake stand. Add some fresh berries or a sprinkle of chocolate shavings on top of the frosting for that extra wow factor. These cupcakes are perfect for birthdays, bake sales, or even just because it’s Tuesday and you deserve a treat!
Recipe Variations
Ready to get creative? Here are some fun ideas to switch things up:
- Minty Fresh: Add a teaspoon of peppermint extract to the batter for a mint-chocolate delight.
- Nutty Heaven: Fold in a half cup of chopped nuts—walnuts or macadamia nuts add fantastic crunch and flavor.
- Spicy Kick: A pinch of cayenne pepper or chili powder can give your chocolate an unexpected and delightful kick!
- Fruit Fusion: Incorporate a half cup of fresh raspberries into the batter for a chocolate-berry explosion of flavor.
Chef’s Notes
Every recipe tells a story, and this one is no different! Over time, I’ve adjusted my Double Chocolate Cupcake recipe so many times that it feels like a well-loved novel with a few plot twists. Initially, they were more of a cake than a cupcake, and I remember my first batch being so dense they could’ve doubled as doorstops. Trial and error in the kitchen is part of the fun, and it has led me to this fluffy, moist version you see today! Plus, I’ve always got a stash of chocolate chips—because let’s be real, you never know when a cupcake emergency will arise!
FAQs and Troubleshooting
1. Why are my cupcakes dense?
Over-mixing the batter or using stale baking powder/soda can cause dense cupcakes. Always measure your ingredients accurately and fold gently!
2. Can I make these in advance?
Absolutely! Cupcakes can be baked and stored in an airtight container for up to 3 days. Frost just before serving for the best texture.
3. What’s the best way to frost cupcakes?
Using a piping bag with your favorite tip will give you beautiful swirls and designs! If you don’t have one, a simple offset spatula works just fine for a casual touch.
4. Can I use different sweeteners?
Yes! You can use brown sugar or coconut sugar, but keep in mind it may slightly alter the flavor and texture.
Nutritional Info
For those minding their nutritional intake, here’s a rough estimate per cupcake (without frosting):
- Calories: 200
- Protein: 3g
- Carbohydrates: 27g
- Fat: 9g
- Sugar: 10g
These delightful Double Chocolate Cupcakes are a treat, and with the right adjustments, you can customize them to fit your lifestyle and preferences. Whether you’re making memories in your kitchen or enjoying a sweet moment alone, I hope these cupcakes bring you as much joy as they bring me. Happy baking, my fellow foodies! 🍫🧁
PrintDouble Chocolate Cupcakes
Indulge in these rich, fudgy Double Chocolate Cupcakes that are perfect for any occasion!
- Prep Time: 15 minutes
- Cook Time: 20 minutes
- Total Time: 35 minutes
- Yield: 12 servings 1x
- Category: Dessert
- Method: Baking
- Cuisine: American
- Diet: Vegetarian
Ingredients
- 1 cup all-purpose flour
- 1/4 cup unsweetened cocoa powder
- 1 cup granulated sugar
- 1/2 teaspoon baking powder
- 1/2 teaspoon baking soda
- 1/4 teaspoon salt
- 1/2 cup unsalted butter, melted
- 2 large eggs
- 1 teaspoon vanilla extract
- 1/2 cup buttermilk
- 1/2 cup semi-sweet chocolate chips
Instructions
- Preheat your oven to 350°F (175°C) and line a cupcake pan with paper liners.
- Mix the flour, cocoa powder, sugar, baking powder, baking soda, and salt in a bowl.
- Combine the melted butter, eggs, vanilla extract, and buttermilk in another bowl until smooth.
- Blend the wet mixture into the dry ingredients until just combined.
- Stir in the chocolate chips until evenly distributed.
- Fill each cupcake liner about two-thirds full.
- Bake for 18–20 minutes or until a toothpick comes out clean.
- Cool the cupcakes in the pan for 5 minutes, then transfer to a wire rack.
- Frost with your favorite chocolate frosting or dust with powdered sugar.
Notes
For a unique twist, try adding mint extract or folding in some nuts!
Nutrition
- Serving Size: 1 cupcake
- Calories: 200
- Sugar: 10g
- Sodium: 150mg
- Fat: 9g
- Saturated Fat: 5g
- Unsaturated Fat: 4g
- Trans Fat: 0g
- Carbohydrates: 27g
- Fiber: 1g
- Protein: 3g
- Cholesterol: 30mg
Keywords: chocolate, cupcakes, dessert, baking, sweet treat
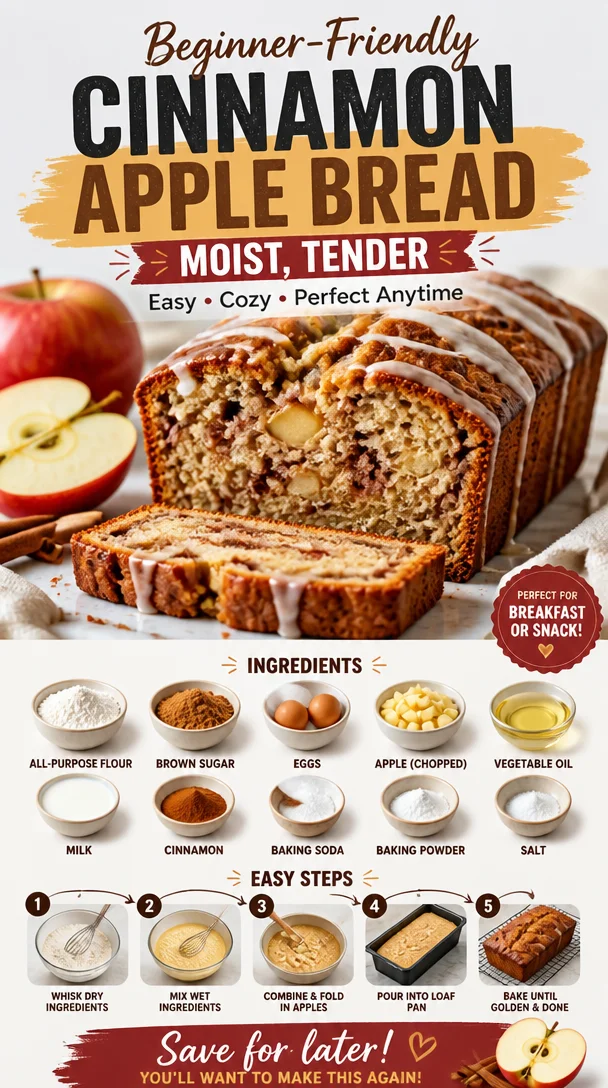
Beginner-Friendly Cinnamon Apple Bread: Moist, Tender
Moist and Tender Cinnamon Apple Bread: A Slice of Heaven
Welcome, fellow food lovers! Today, we’re diving into the delightful world of Moist and Tender Cinnamon Apple Bread. If you have ever walked into a bakery and been greeted by the warm, intoxicating aroma of freshly baked bread infused with cinnamon and warm apples, then you already know the kind of magic we’re talking about. This recipe captures that essence, transforming simple ingredients into an unforgettable experience that will make your taste buds dance!
In our fast-paced lives, the kitchen can sometimes feel like a chore, but I firmly believe it should be a joyful space where creativity flourishes. This cinnamon apple bread recipe is not just about indulging in nostalgic flavors; it’s about celebrating the joy of cooking and creating comfort food that brings people together. So, grab your apron and let’s get baking!
A Slice of Home: My Personal Story
I’ll always remember my grandmother’s kitchen in the fall—everything seemed like a scene from a cozy movie. It was bustling with warmth, love, and the incredible aroma of spices wafting through the air. One of my fondest memories is her whipping up a batch of cinnamon apple bread, and our family would gather around the kitchen table, eagerly waiting for that first slice to be revealed.
As I watched her carefully peel and chop apples while singing old tunes, I realized that cooking isn’t just about feeding our bodies; it’s about feeding our souls. Each ingredient she used seemed to carry a story, just like the hands that knead the dough. Fast forward to today, I still cherish those moments and replicate her cinnamon apple bread in my own kitchen, adding my little twists while holding on to the legacy she left me. Whenever I bake this bread now, it’s like wrapping myself in a warm hug, making memories all over again.
Ingredients: What You’ll Need
Let’s gather our ingredients! Here’s a breakdown of what you’ll need to create this delightful treat.
-
2 cups all-purpose flour
The backbone of this bread. You can swap with whole wheat flour for added nutrients or gluten-free all-purpose flour if you need a gluten-free option. Just remember, the texture might change slightly. -
1 tsp baking soda
This is your leavening agent that helps the bread rise to glorious heights. No substitutes here, as it’s crucial for the right texture! -
1 tsp baking powder
A little extra rise never hurts! For a gluten-free version, ensure your baking powder is also gluten-free—most are. -
1/2 tsp salt
Elevates flavors! Feel free to use sea salt or Himalayan salt for a gourmet touch. -
1 tsp ground cinnamon
The star of the show! If you want a spicier flavor profile, try adding a dash of nutmeg or allspice. -
1/2 cup unsalted butter, softened
This gives moisture and richness. If you’re looking for a dairy-free option, coconut oil is a great substitute, though it may slightly change the flavor. -
1 cup granulated sugar
Sweeten the deal! You could use brown sugar for a deeper flavor or coconut sugar for a more health-conscious choice. -
2 large eggs
Bind it all together! If you’re vegan, mashed bananas or unsweetened applesauce can work as substitutes; typically, 1/4 cup of either will replace one egg. -
1 tsp vanilla extract
Adds a lovely depth of flavor. Always opt for pure vanilla for the best taste! -
1 1/2 cups of peeled, diced apples
Fresh apples bring moisture and sweetness. Granny Smith are tart and perfect, but feel free to mix in your favorites like Honeycrisp or Fuji! -
1/2 cup chopped nuts (optional)
For a crunch! Walnuts or pecans are excellent choices. If you need it nut-free, simply omit them or add seeds like pumpkin or sunflower.
Step-by-Step Instructions: Let’s Bake!
Baking this Cinnamon Apple Bread is a breeze! Follow these easy steps, and I promise you’ll be left with a gorgeous loaf that will impress anyone.
-
Preheat your oven to 350°F (175°C). This step is crucial for getting that perfect bake, so don’t skip it!
-
Prepare your baking dish by greasing a 9×5 inch loaf pan with butter or non-stick spray. You can also line it with parchment paper for an easy release later—just make sure to leave some overhang for easy removal.
-
In a large bowl, whisk together the flour, baking soda, baking powder, salt, and cinnamon. This step is not just about mixing; it’s about awakening those aromas! As you whisk, breathe in that comforting scent!
-
In another bowl, cream together the softened butter and sugar until light and fluffy. This usually takes about 3-4 minutes. Want to feel like a pro? Use a hand mixer or stand mixer to make it easier. This step is vital for achieving a beautifully moist bread.
-
Add in the eggs, one at a time, mixing well after each addition. Follow this with the vanilla extract to bring that delightful flavor into the mix.
-
Gradually add the dry ingredient mixture into the wet mixture. Do this in three additions, stirring gently until just combined. Overmixing can lead to a denser texture—aim for a slightly lumpy consistency.
-
Fold in the diced apples and nuts if you’re using them. Imagine the crispy apples creating pockets of sweetness and freshness—it’s heavenly!
-
Pour the batter into your prepared loaf pan and use a spatula to smooth out the top.
-
Bake for 50-60 minutes, or until a toothpick inserted into the center comes out clean (or with just a few crumbs attached). Check around the 50-minute mark—nobody likes a dry loaf!
-
Once baked, let it cool in the pan for about 10 minutes before transferring it to a wire rack to cool completely. This helps to set the texture.
Now, how easy was that? Enjoy the sweet, spiced aroma filling your kitchen—trust me, the anticipation makes it all worth it!
Serving Suggestions: How to Present Your Bread
Once your loaf has cooled down, it’s time to slice and serve! I love to enjoy my cinnamon apple bread warm, slathered with a generous pat of butter or a drizzle of honey. For a fun twist, try toasting the slices just before serving; this adds a delightful crunch that makes each bite even more satisfying.
You can also dust powdered sugar on top for a touch of sophistication, or serve it alongside a scoop of vanilla ice cream for an indulgent dessert. The options are endless, and whatever you choose, it’ll look as good as it tastes!
Recipe Variations: Add Your Unique Twist
Now that you have the classic version perfected, let’s play around with some creative variations:
- Pumpkin Spice Twist: Add 1/2 cup of pumpkin puree for a fall-inspired version, adjusting the flour slightly to maintain consistency.
- Chocolate Chip Delight: Fold in 1/2 cup of chocolate chips—because who doesn’t love chocolate?
- Coconut Strudel: Add shredded coconut to the batter for a tropical flair, or sprinkle some on top before baking.
- Gluten-Free Goodness: Use a 1:1 gluten-free baking blend instead of all-purpose flour, making it great for those with gluten sensitivities.
- Nut-Free Alternative: Swap out nuts for seeds or simply leave them out completely—this doesn’t affect the overall flavor!
Get creative and make this recipe your own!
Chef’s Notes: My Kitchen Insights
Baking is a journey, and every recipe tells a story! This cinnamon apple bread has gone through various tweaks over the years. There was that one time I was in a hurry and forgot to cream the sugar and butter together—let me tell you, the texture was decidedly different! But you know what? It still tasted delicious, and that’s the beauty of cooking. Perfect doesn’t exist in my kitchen, only delicious.
So, if you find yourself overwhelmed or something doesn’t seem just right, don’t stress! The best meals often come from happy accidents. Life’s too short for perfect bread; it’s all about enjoying the process!
FAQs and Troubleshooting: Common Concerns
Q: My bread came out too dense. What did I do wrong?
A: This can happen if the batter is overmixed or the flour is packed too tightly. When incorporating dry ingredients, stir gently and only until combined.
Q: Can I use frozen apples?
A: Yes! Just make sure to thaw and drain excess moisture before adding them to your batter to avoid soggy bread.
Q: How do I store leftover bread?
A: Keeping the bread in an airtight container at room temperature will keep it fresh for 3-4 days. For longer storage, wrap it tightly in plastic wrap and freeze for up to 3 months. Just thaw at room temperature before enjoying!
Q: Can I halve this recipe?
A: Absolutely! Just follow the same steps but use a smaller loaf pan. You can also bake it in muffin tins for adorable mini breads!
Nutritional Info
While I encourage you to enjoy this delightful treat, it’s also good to be mindful of portions! Here’s a quick overview of what one serving (1 slice) contains (calculated on a typical loaf):
- Calories: 210
- Protein: 3g
- Fat: 8g
- Carbohydrates: 33g
- Fiber: 1g
- Sugar: 10g
Remember, these values can change based on ingredient substitutions.
Now you’re all set to make your very own Moist and Tender Cinnamon Apple Bread! I hope this delightful recipe brings as much joy to your kitchen as it has to mine over the years. So gather your ingredients, embrace the process, and most importantly—enjoy every bite! Happy baking!
PrintMoist and Tender Cinnamon Apple Bread
A delightful cinnamon apple bread filled with the nostalgic flavors of warm spices and sweet apples.
- Prep Time: 15 minutes
- Cook Time: 60 minutes
- Total Time: 75 minutes
- Yield: 8 servings 1x
- Category: Dessert
- Method: Baking
- Cuisine: American
- Diet: Vegetarian
Ingredients
- 2 cups all-purpose flour
- 1 tsp baking soda
- 1 tsp baking powder
- 1/2 tsp salt
- 1 tsp ground cinnamon
- 1/2 cup unsalted butter, softened
- 1 cup granulated sugar
- 2 large eggs
- 1 tsp vanilla extract
- 1 1/2 cups peeled, diced apples
- 1/2 cup chopped nuts (optional)
Instructions
- Preheat your oven to 350°F (175°C).
- Prepare your baking dish by greasing a 9×5 inch loaf pan with butter or non-stick spray.
- In a large bowl, whisk together the flour, baking soda, baking powder, salt, and cinnamon.
- In another bowl, cream together the softened butter and sugar until light and fluffy.
- Add in the eggs, one at a time, mixing well after each addition.
- Gradually add the dry ingredient mixture into the wet mixture.
- Fold in the diced apples and nuts if you’re using them.
- Pour the batter into your prepared loaf pan and smooth out the top.
- Bake for 50-60 minutes, or until a toothpick comes out clean.
- Once baked, let it cool in the pan for about 10 minutes before transferring it to a wire rack to cool completely.
Notes
Serve warm with butter or a drizzle of honey. Toasting slices adds a delightful crunch.
Nutrition
- Serving Size: 1 slice
- Calories: 210
- Sugar: 10g
- Sodium: 200mg
- Fat: 8g
- Saturated Fat: 5g
- Unsaturated Fat: 3g
- Trans Fat: 0g
- Carbohydrates: 33g
- Fiber: 1g
- Protein: 3g
- Cholesterol: 30mg
Keywords: cinnamon apple bread, dessert, baking, comfort food, fall recipes
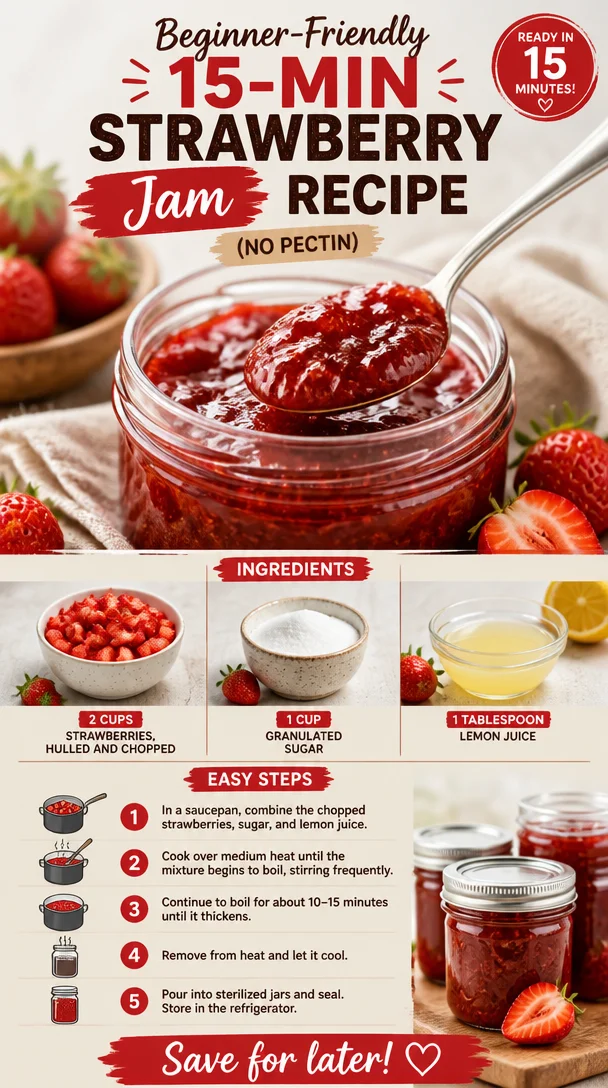
Beginner-Friendly 15-Min Strawberry Jam Recipe (No Pectin)
The Perfect Homemade Strawberry Jam: A Sweet and Simple Guide
Ah, strawberry season! The air is sweet with the scent of ripe berries, and the vibrant red fruits beckon from farmers’ market stalls and roadside stands. Is there anything better than exploring the kitchen with a bucket of fresh strawberries? Today, I want to invite you to join me on a culinary adventure that’s not only easy but surprisingly fun: making homemade strawberry jam. Trust me, if you’ve never made jam before, you’re in for a treat!
Pouring that vibrantly red, luscious jam into jars feels unbelievably rewarding. It’s the kind of kitchen therapy we all need once in a while. Plus, a spoonful of homemade strawberry jam spread on warm toast or swirled into yogurt turns any ordinary breakfast into a delight. And the best part? Whipping up this jam is not complicated at all!
I remember the first time I made strawberry jam. It was a rainy Saturday morning. As the rain drizzled outside, my mom and I decided to make something special with the strawberries we had just picked from the local farm. At that time, I was just a kid, and I remember thinking, “How can something so simple taste so good?” The smell of cooking strawberries combined with sugar wafting through our kitchen was magical. We laughed as we watched the jam bubble away in the pot and enjoyed every sticky, berry-filled moment. It transformed a dreary day into a festive one we reminisce about to this day. I still cherish that memory and now, I can’t wait to share my easy strawberry jam recipe with you so you can create your own flavorful moments!
Let’s dive into this deliciously rewarding adventure and bring a little sweetness into your kitchen!
Ingredients
To make your homemade strawberry jam, you’ll need just a few simple ingredients. Here’s what you’ll need:
-
2 cups strawberries, hulled and chopped
Perfectly ripe strawberries are the heart of this jam. You can substitute with other berries like raspberries or blueberries if you prefer a mixed berry jam! -
1 cup granulated sugar
Sugar helps to preserve the jam and gives it that delightful sweetness. If you’re looking for a healthier option, you can substitute with honey or maple syrup; however, keep in mind the texture and sweetness will differ. -
1 tablespoon lemon juice
This tart addition balances the sweetness and enhances the strawberry flavor. If you’re out of lemons, you can use lime juice or even apple cider vinegar for a more unique flavor twist.
Step-by-Step Instructions
Now that we have our power trio of ingredients, it’s time to get cooking! Follow these simple steps for a smooth jam-making experience:
-
Prep the Strawberries
Start by hulking and chopping your strawberries. Make sure to wash them gently under cold water; they are delicate little gems! To hull, simply remove the green leafy tops with a paring knife, and chop them into smaller pieces for a more manageable cook. This will also help release the natural juices. Chef tip: If fresh strawberries aren’t available, you can also use frozen berries. Just thaw them and drain excess liquid before using. -
Combine the Ingredients
In your favorite large saucepan, add the chopped strawberries, granulated sugar, and lemon juice. Stir everything together gently, making sure each piece of strawberry is coated with the sugar. Let the mixture sit for about 10-15 minutes. This helps the strawberries release some of their juice. This initial step is crucial for achieving that succulent jam texture. Hint: The longer it sits, the more the sugars can draw out moisture. -
Cook it Down
Place the saucepan over medium heat. Stir occasionally until the mixture starts to bubble. This will typically take about 5-10 minutes. Keeping an eye on it is important here—once it starts bubbling, reduce the heat to low to prevent scorching. Pro tip: When the mixture coats the back of a spoon and leaves a trail, you’re ready to move on! You can also use a candy thermometer; the jam should reach about 220°F (104°C) for the perfect consistency. -
Jar It Up
Once your jam has reached the desired consistency, remove it from the heat. If you prefer a smoother jam, you can blend it for a few seconds with an immersion blender, but I love the chunkiness of traditional jam! Carefully ladle the hot jam into sterilized jars, leaving about ¼ inch of headspace. Seal them with lids while still hot to ensure a tight seal. That satisfying pop as they seal later is music to the ears! -
Cool and Store
Let the jars cool to room temperature before transferring them to the fridge. It’s crucial not to touch the lids until they’ve cooled; this allows the vacuum seal to form properly. Your homemade strawberry jam is now ready to be enjoyed! Store in the fridge for about 2-3 weeks or you can process them for longer storage. Chef’s hack: To enjoy your jam all year round, water bath can them and store in a cool, dark place!
Serving Suggestions
There’s no shortage of ways to enjoy your homemade strawberry jam! Spread generous spoonfuls on warm, buttered toast or try swirling it into a fluffy bowl of Greek yogurt for breakfast. Try drizzling it on pancakes, waffles, or filling your favorite pastries. There’s something about a dollop of jam that makes everything taste more special!
Recipe Variations
Now that you’ve mastered the basic recipe, let’s explore a few tasty variations to spice things up:
-
Strawberry-Basil Jam: Add a few chopped fresh basil leaves just as the jam begins to thicken for a sweet and savory twist.
-
Orange Strawberry Jam: Mix in a tablespoon of finely grated orange zest alongside the lemon juice for zesty extra flavor.
-
Spicy Strawberry Jam: For those who enjoy a kick, a pinch of red pepper flakes or minced fresh ginger can add great heat to the sweetness.
-
Coconut Strawberry Jam: Combine shredded coconut and a bit of coconut milk for a tropical flair.
Chef’s Notes
As I reminisce about my childhood jam-making days, I realize just how much this recipe has evolved over the years. What started as a fun weekend project with my mom has turned into a comforting ritual in my own kitchen. Now, I often invite friends over for a jam-making day—there’s nothing quite like sharing recipe secrets and catching up on life with a fun activity!
Cooking doesn’t need to be perfection; it’s about enjoying the process and connecting with flavors. Making jam is especially forgiving—you can adjust sugar levels, play with ingredients, and make it entirely your own.
FAQs and Troubleshooting
-
Why didn’t my jam thicken?
If your jam didn’t set, it may not have cooked long enough or you might have added too much fruit compared to sugar. A great fix is to return it to the heat and let it simmer longer until it reaches the right consistency. -
Can I use frozen strawberries?
Absolutely! Frozen strawberries are a great alternative when fresh ones aren’t in season. Make sure to drain off any excess liquid after thawing. -
How long will the jam last?
Once opened, store it in the refrigerator for about 2-3 weeks. If you process and seal them properly, they can last for about a year in a cool, dark place. -
What can I do with leftover jam?
Use any leftover jam in dressings, pair it with cheese platters, or fill pastries and tarts. You can even swirl it into homemade ice cream for a delightful treat!
Nutritional Info
Homemade strawberry jam can vary slightly in nutritional content, but here’s a rough breakdown per tablespoon:
- Calories: 50
- Carbohydrates: 14g
- Sugar: 12g
- Fiber: 0.5g
- Protein: 0g
Keep in mind, this is a special treat, and it’s all about balance!
There you go—a delightful journey into making homemade strawberry jam! I hope you’re feeling inspired to grab some fresh strawberries and get started. Benefits abound when you bring out your inner chef and create a treat that you can enjoy all year round. Enjoy the process and remember, cooking is a joy—a delicious way to let your creativity run wild. Happy jam-making!
PrintThe Perfect Homemade Strawberry Jam
A simple guide to making delicious homemade strawberry jam with fresh strawberries.
- Prep Time: 10 minutes
- Cook Time: 15 minutes
- Total Time: 25 minutes
- Yield: 2 cups 1x
- Category: Condiment
- Method: Cooking
- Cuisine: American
- Diet: Vegetarian
Ingredients
- 2 cups strawberries, hulled and chopped
- 1 cup granulated sugar
- 1 tablespoon lemon juice
Instructions
- Prep the strawberries by hulling and chopping them.
- Combine the strawberries, sugar, and lemon juice in a saucepan.
- Cook the mixture over medium heat until it starts to bubble.
- Jar the jam into sterilized jars, leaving headspace.
- Cool the jars to room temperature before storing in the fridge.
Notes
For variations, try adding fresh basil, orange zest, or shredded coconut to the jam.
Nutrition
- Serving Size: 1 tablespoon
- Calories: 50
- Sugar: 12g
- Sodium: 0mg
- Fat: 0g
- Saturated Fat: 0g
- Unsaturated Fat: 0g
- Trans Fat: 0g
- Carbohydrates: 14g
- Fiber: 0.5g
- Protein: 0g
- Cholesterol: 0mg
Keywords: strawberry jam, homemade jam, preserves, fruit preserve, sweet spreads