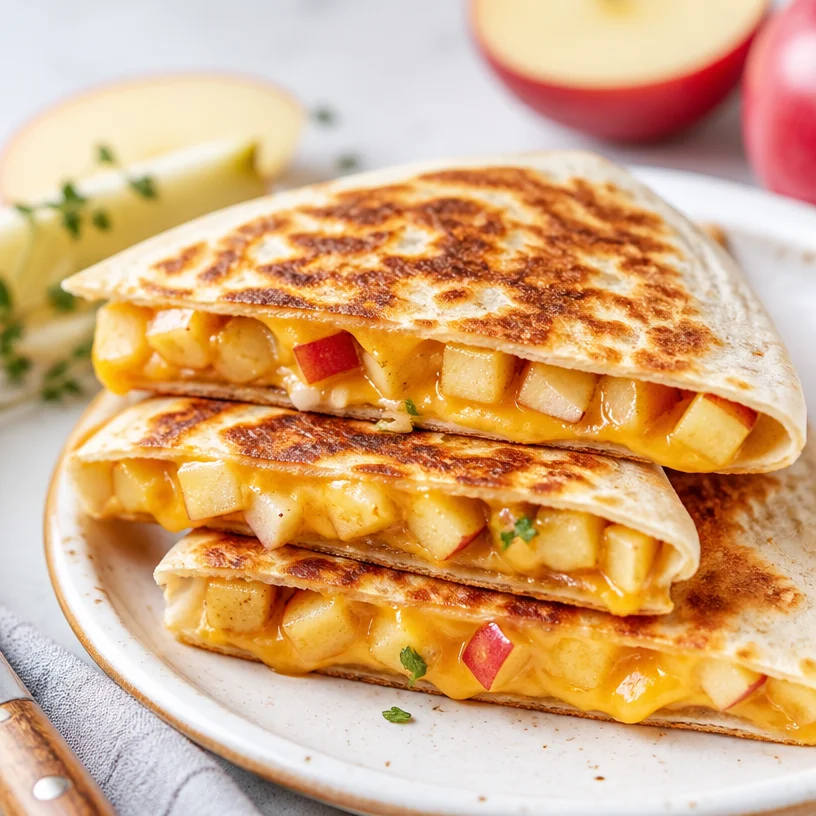
Minute Apple Cheddar Quesadilla (Crispy & Gooey)
Apple Cheddar Quesadilla: A Sweet and Savory Delight
Welcome to the delightful world of apple cheddar quesadillas, where sweet meets savory in the most mouthwatering way! If you’re anything like me, you adore dishes that combine unexpected flavors to create something truly special. This dish embodies that perfect harmony of sweetness from the apples and the sharp, melty goodness of cheddar cheese, all sandwiched between warm, crispy tortillas. It’s a comforting and satisfying meal or snack that’s as easy to whip up as it is delicious.
A Slice of Nostalgia
Growing up, my family often gathered in the kitchen on chilly autumn days to experiment with different flavors and recipes. One particular Saturday, my mom decided to challenge us to a quesadilla cook-off. Using leftover ingredients, we were to create the ultimate quesadilla. My sister went with the classic cheese and salsa duo, while my brother opted for a spicy chicken version. As I rummaged through the fridge, my eyes landed on a shiny red apple that seemed to shout, “Pick me!” And there it was—the birth of the apple cheddar quesadilla. I couldn’t help but feel a bit rebellious mixing cheese with fruit, but once I took that first crispy bite, I knew I had stumbled upon something magical. We proudly presented our creations, and my apple cheddar quesadilla won the hearts (and taste buds) of my family. This dish became a staple at our home, igniting memories of fun kitchen cook-offs and the thrill of flavor experimentation.
Ingredients
Here’s what you’ll need to create your own apple cheddar quesadilla masterpiece:
-
Apples (2 medium, any variety)
- I prefer using crisp, sweet varieties like Honeycrisp or Fuji for their juicy sweetness. You can use Granny Smith for a tart flavor instead; just balance it out with a little extra honey or maple syrup!
-
Cheddar Cheese (1 cup, shredded)
- Cheddar adds the perfect creamy, tangy profile. Feel free to swap it for Monterey Jack for a milder flavor or vegan cheese for a dairy-free option.
-
Tortillas (4 medium-sized)
- Flour or corn tortillas both work beautifully. Flour tortillas provide a softer texture, while corn tortillas are gluten-free and have a wonderful, slightly nutty taste.
-
Butter or Olive Oil (for cooking)
- Use butter for a rich flavor that makes everything taste even better, but olive oil works too—it’s a healthier option and adds a nice crispiness.
-
Optional Extras:
- Honey or Maple Syrup: To drizzle on top for added sweetness.
- Cinnamon: A sprinkle can elevate the flavor profile, adding a warm, cozy note.
Step-by-Step Instructions
Ready to make your tastebuds dance? Let’s dive into the cooking steps:
-
Prep Your Ingredients: Start by washing and slicing your apples into thin wedges, about 1/4-inch thick. If you’re using a tart apple variety like Granny Smith, consider tossing them with a sprinkle of cinnamon and a drizzle of honey to balance the flavors. Trust me, it’s a game-changer!
-
Cheese It Up: Grate your cheddar cheese if you haven’t done so already—freshly shredded cheese melts better than pre-shredded. About 1 cup is perfect, but feel free to go a little heavy if you’re a true cheese lover!
-
Heat Things Up: In a large skillet, heat about 1 tablespoon of butter or olive oil over medium heat until melted and bubbly. The pan should be hot but not smoking.
-
Assemble Your Quesadilla: Take one tortilla and place it in the hot skillet. Arrange a handful of apple slices evenly across the tortilla, followed by a generous sprinkle of cheddar cheese. Top with another tortilla—like a cheesy, apple-filled sandwich.
-
Cook It Right: Let the quesadilla cook for about 3-4 minutes, or until the bottom tortilla is golden brown and crispy. Here’s a little chef hack: press down with a spatula to ensure that the cheese melts evenly and everything sticks together.
-
Flip It!: Carefully flip the quesadilla with a spatula. Add another small pat of butter/olive oil to the skillet if needed, and cook for another 3-4 minutes until the second side is also perfectly golden and the cheese is gooey.
-
Slice and Serve: Transfer the quesadilla to a cutting board and let it rest for a minute. Slice it into wedges with a sharp knife or pizza cutter. This will help you retain all that melty goodness inside!
Serving Suggestions
To serve your apple cheddar quesadilla, arrange the crispy wedges on a colorful plate. Drizzle with a touch of honey or maple syrup for that extra burst of flavor! You might even want to serve it with a dollop of Greek yogurt or sour cream on the side for added creaminess. This dish is perfect as a snack, light lunch, or even a fun appetizer for your next gathering!
Recipe Variations
Feeling adventurous? Here are a few creative twists you can try:
- Add Protein: Add cooked chicken or turkey for a heartier meal.
- Spicy Kick: Toss in some sliced jalapeños or drizzle some sriracha for a sweet and spicy combo.
- Herbed Up: Sprinkle fresh herbs like thyme or rosemary on top for an aromatic twist.
- Fruit Mix: Experiment with other fruits—pears, peaches, or even dried cranberries could all be fantastic additions.
- Nutty Crunch: Try adding some crushed walnuts or pecans for added texture and healthy fats.
Chef’s Notes
This recipe has been my go-to for casual gatherings, and it’s fascinating to see how it evolves with each occasion! Sometimes I tweak the ingredients based on what I have on hand, and it never disappoints. Plus, it’s one of those dishes that is not just about eating; it’s about experimenting and having fun. I’ve lost track of the number of taste tests I’ve performed with friends, trying to find the perfect balance of sweet and cheesy. Each version has its charm, and I encourage you to make it your own! Share your stories and variations—I’d love to hear about your kitchen adventures!
FAQs and Troubleshooting
1. My quesadilla isn’t getting crispy! What’s wrong?
- Make sure your skillet is heated adequately. If it’s too low, the quesadilla will cook slowly without achieving that golden crisp.
2. What if my cheese isn’t melting?
- Using pre-shredded cheese can sometimes lead to less melty results. Opt for block cheese and shred it yourself for a better melting quality!
3. Can I make this ahead of time?
- You can prep the ingredients ahead of time, but I recommend cooking it fresh! If you do make them in advance, store them in airtight containers and reheat in a skillet for best results.
4. Can I freeze quesadillas?
- Absolutely! After cooking, let them cool completely, then wrap each one tightly in foil or plastic wrap, and store them in a freezer bag. They can last up to three months!
Nutritional Info (Optional)
While the nutritional info can vary based on specific ingredients and serving sizes, here’s a rough estimate for one serving (1 quesadilla without added toppings):
- Calories: 320
- Protein: 15g
- Fat: 15g
- Carbs: 40g
- Fiber: 3g
With each crisp bite of these apple cheddar quesadillas, you’ll not only indulge your taste buds but also tap into a world of flavor and creativity. So grab your ingredients, invite a friend into the kitchen, and let the flavor adventures begin. Happy cooking!
PrintApple Cheddar Quesadilla
A delightful combination of sweet apples and savory cheddar cheese, all cocooned in crispy tortillas.
- Prep Time: 10 minutes
- Cook Time: 8 minutes
- Total Time: 18 minutes
- Yield: 4 servings 1x
- Category: Main Course
- Method: Cooking
- Cuisine: American
- Diet: Vegetarian
Ingredients
- 2 medium Apples (any variety)
- 1 cup Cheddar Cheese, shredded
- 4 medium-sized Tortillas
- Butter or Olive Oil (for cooking)
- Optional: Honey or Maple Syrup (for drizzling)
- Optional: Cinnamon (for a sprinkle)
Instructions
- Prep your ingredients: Wash and slice apples into thin wedges. Toss with cinnamon and honey if using a tart variety.
- Grate your cheddar cheese if not already done.
- Heat about 1 tablespoon of butter or olive oil in a large skillet over medium heat until melted.
- Assemble your quesadilla: Place one tortilla in the skillet, top with apple slices and cheese, and add another tortilla on top.
- Cook for about 3-4 minutes until the bottom is golden brown and crispy.
- Flip carefully with a spatula, adding more butter/oil if needed, and cook for another 3-4 minutes.
- Transfer to a cutting board, let it rest, then slice into wedges.
Notes
For added sweetness, drizzle with honey or maple syrup when serving. This dish is versatile; feel free to experiment with different fruits and add-ins!
Nutrition
- Serving Size: 1 quesadilla
- Calories: 320
- Sugar: 5g
- Sodium: 350mg
- Fat: 15g
- Saturated Fat: 8g
- Unsaturated Fat: 7g
- Trans Fat: 0g
- Carbohydrates: 40g
- Fiber: 3g
- Protein: 15g
- Cholesterol: 30mg
Keywords: quesadilla, apple, cheddar, sweet and savory, easy recipe
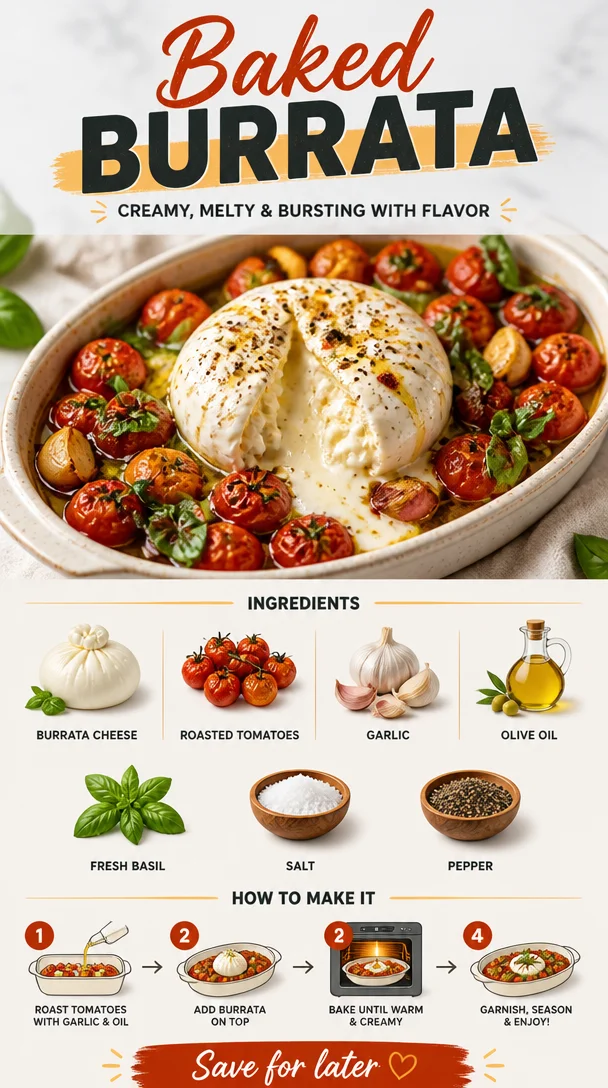
Baked Burrata
Baked Burrata: A Warm & Cheesy Hug in a Dish
Welcome to the cozy world of Clean Plate Cravings, where each recipe feels like a warm embrace! Today, we’re diving into a dish that epitomizes comfort food while keeping it fresh and vibrant—Baked Burrata. Picture it: creamy, dreamy burrata cheese wrapped in a crisp shell, complemented by luscious roasted tomatoes, aromatic garlic, and fragrant basil. It’s like a personal invitation to indulge without the side of guilt. So grab your apron and let’s get cooking!
A Story Behind The Dish
Baked burrata holds a special place in my heart, not just because it lights up any dinner table but also for the nostalgic memories it brings back. I recall a sun-soaked afternoon spent at a charming little café in Florence, Italy with friends. We had just spent the day wandering through narrow cobblestone streets, soaking in the sights, sounds, and of course, the mouthwatering smells wafting from every bakery and trattoria.
We settled down at this quaint café with cute, colorful plates and rustic wooden tables. We ordered a plate of baked burrata, blissfully unaware of how that dish would become a staple in my own kitchen. When it arrived, the cheese was bubbly and golden, surrounded by a medley of roasted tomatoes and fragrant herbs. The first bite—oh my! It was rich and creamy, a burst of flavor that seemed to sing with each mouthful. That day, I discovered the beauty of simple yet sumptuous creations.
Since then, I’ve made it my mission to recreate the magic of that meal. And here we are! Ready to bring a taste of Italy straight into your own kitchen. Let’s joyfully explore the flavors that make this dish a masterpiece.
Ingredients You’ll Need
Here’s what you need to whip up this creamy delight:
-
Burrata Cheese: This soft cheese is the star of the show! If you can’t find burrata, fresh mozzarella can be a decent substitute, although it won’t have that creamy center.
-
Roasted Tomatoes: Sweet, succulent, and bursting with flavor! Feel free to use cherry or grape tomatoes—they caramelize beautifully. You can roast them in advance and keep them in your fridge for quick meals!
-
Garlic: Freshly minced garlic adds depth and aromatic warmth. If you’re not a fan, roasted garlic is a sweeter alternative.
-
Olive Oil: Extra virgin olive oil not only enhances flavors but also adds richness when drizzled over the dish. Avocado oil can be a suitable substitute if you want a higher smoke point.
-
Fresh Basil: This fragrant herb elevates the dish with its distinct flavor. You can swap it for fresh parsley or even a sprinkle of dried basil in a pinch.
-
Salt & Pepper: These pantry staples are essential for seasoning. Use kosher salt for better control and fresh cracked black pepper for a more vibrant flavor.
Step-by-Step Instructions to Baked Burrata Bliss
Now, let’s dive into the cooking process. Follow these steps, and it will feel like a culinary hug with each bite.
-
Preheat the Oven: First off, turn your oven to 400°F (200°C). A hot oven is crucial for roasting those tomatoes to perfection and getting that burrata bubbly!
Chef Tip: Always preheat your oven. It ensures an even cooking temperature, which is key to wonderful roasted flavors.
-
Prepare the Tomatoes: Slice your cherry or grape tomatoes in half. Toss them on a baking sheet with a drizzle of olive oil, minced garlic, and season with salt and pepper.
Hacks: You could add a splash of balsamic vinegar or a sprinkle of sugar to enhance their sweetness.
-
Roast the Tomatoes: Place the baking sheet in the preheated oven and roast for about 20-25 minutes. You want them to become blistered and juicy—just watch for any that might start to burn!
Chef Insight: Roasting concentrates the tomatoes’ sweetness and deepens their flavors. Trust me; you don’t want to skip this step!
-
Add the Burrata: Once your tomatoes have caramelized beautifully, it’s time to introduce the burrata. Nestle the burrata in the center of the pan, gently pressing it into the tomatoes like making a little cheesy bed. Drizzle with more olive oil and a dash of salt and pepper.
-
Bake Again: Pop the tray back into the oven for another 10-15 minutes, just until the burrata begins to soften and ooze. The cheese should be melty and ever so slightly golden on the top.
Chef Hack: You can broil the top for the last couple of minutes for that golden color—just keep an eye on it!
-
Finish with Basil: Once you’ve pulled it out of the oven, tear fresh basil leaves on top. The heat from the dish will release the aromatic fragrance of the basil—pure heaven!
Happiness Tip: Don’t skimp on the basil; it’s what lifts this dish to new heights!
Serving Suggestions
Serving baked burrata is almost as fun as making it! I recommend plating it family-style, straight from the baking dish. Let your guests dig in—pair it with crusty bread for dipping, or serve it over a fresh arugula salad for a delightful contrast. You could also whip up a bruschetta topping using the baked burrata and tomatoes, spreading it generously over toasted crostini. It’s a versatile dish and sure to impress!
Recipe Variations
Let your creativity shine with these delicious twists on baked burrata:
-
Spicy Kick: Add red pepper flakes for a spicy touch! It beautifully balances the creaminess of burrata.
-
Mediterranean Vibes: Toss in olives and artichoke hearts before baking for extra depth of flavor.
-
Vegetable Medley: Mix in other roasted veggies like zucchini, bell peppers, or asparagus for a colorful addition.
-
Pest-o it Up: Incorporate dollops of pesto sauce before baking for a vibrant herbaceous note.
-
Add Nuts: Sprinkle some toasted pine nuts or walnuts on top for an added crunch and healthy fats!
Chef’s Notes
Cooking is always an adventure, right? When I first experimented with this recipe, I was a little hesitant about combining tomatoes directly with burrata. But from the moment I took that first bite of melting cheese fused with sweet, roasted tomatoes, I knew I hit the jackpot. I’ve since played around with flavors and ingredients, continuously evolving this simple dish. Sometimes it turns into a gorgeous summer salad; other times, it’s a comforting winter warmer.
FAQs and Troubleshooting
1. Why is my burrata not melting?
Burrata can be quite delicate. Ensure you’re using fresh burrata and fire up the heat in your oven! If it’s not melting after the suggested time, try checking for doneness—sometimes it just needs a bit more time.
2. Can I prepare this dish in advance?
Absolutely! You can roast the tomatoes ahead of time, store them in the fridge, and bake the burrata just before serving. It’s a great prep hack!
3. What should I do if my tomatoes burn?
If your tomatoes start to burn, reduce the heat. It’s better to roast for a longer time at lower heat than to char them in the oven.
4. Can I make this dish vegan?
Yes! While burrata is a dairy product, you could try vegan cheese alternatives, though flavors will vary. Try soft cashew cheese or a nut-based ricotta substitute for that creamy texture.
Nutritional Info (Optional)
While I always advocate for enjoying food without restriction, here’s a quick look at what’s in your delicious baked burrata per serving (calculated for 4 servings):
- Calories: 310
- Protein: 10g
- Carbohydrates: 6g
- Fats: 28g
Feel free to adjust servings based on your needs!
Thank you for joining this flavorful journey into the world of baked burrata! It’s a dish that’s perfect for gatherings or cozy nights in, and I can’t wait for you to experience the joy it brings. Happy cooking, friends! 🌿🍅🧀
PrintBaked Burrata
A warm and cheesy dish featuring creamy burrata cheese, roasted tomatoes, garlic, and fresh basil.
- Prep Time: 15 minutes
- Cook Time: 30 minutes
- Total Time: 45 minutes
- Yield: 4 servings
- Category: Main Course
- Method: Baking
- Cuisine: Italian
- Diet: Vegetarian
Ingredients
- Burrata Cheese
- Cherry or Grape Tomatoes
- Garlic
- Extra Virgin Olive Oil
- Fresh Basil
- Salt
- Pepper
Instructions
- Preheat the oven to 400°F (200°C).
- Prepare the tomatoes by slicing them in half and tossing them on a baking sheet with olive oil, minced garlic, salt, and pepper.
- Roast the tomatoes in the oven for about 20-25 minutes until blistered and juicy.
- Add the burrata to the center of the pan and drizzle with more olive oil, salt, and pepper.
- Bake again for 10-15 minutes until the burrata is softened and slightly golden.
- Finish by tearing fresh basil leaves on top before serving.
Notes
Pair with crusty bread or a fresh arugula salad for a delightful contrast.
Nutrition
- Serving Size: 1 serving
- Calories: 310
- Sugar: 4g
- Sodium: 300mg
- Fat: 28g
- Saturated Fat: 10g
- Unsaturated Fat: 16g
- Trans Fat: 0g
- Carbohydrates: 6g
- Fiber: 2g
- Protein: 10g
- Cholesterol: 30mg
Keywords: baked burrata, comfort food, Italian dish, creamy cheese, roasted tomatoes