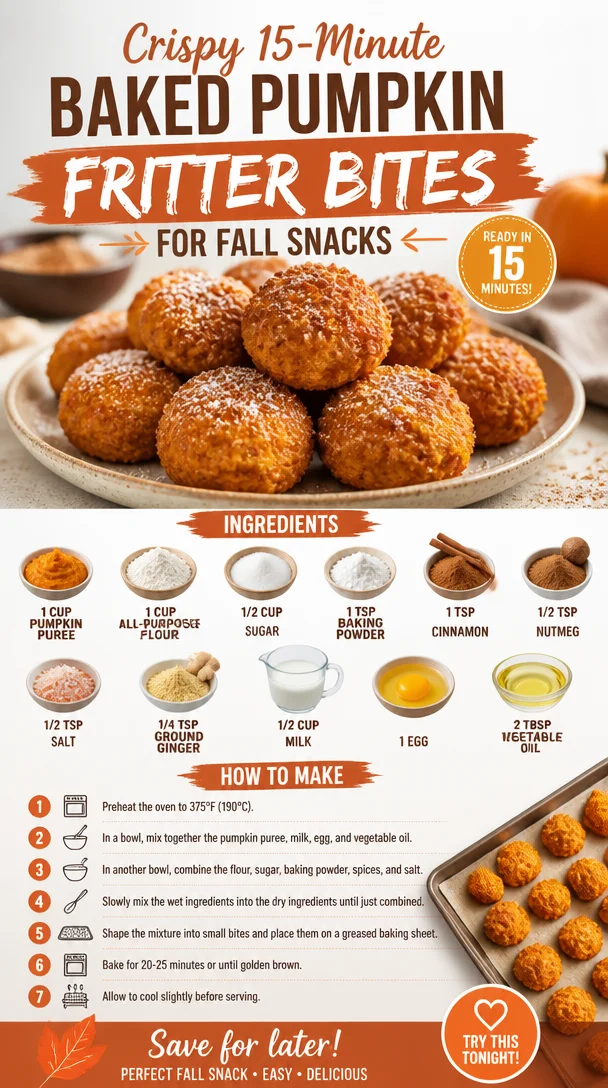
Crispy 15-Minute Baked Pumpkin Fritter Bites for Fall Snacks
Easy Baked Pumpkin Fritter Bites: A Flavorful Fall Twist
Welcome to another delicious adventure in the kitchen! Today, I’m excited to share a recipe that not only warms the heart but also captures the spirit of fall—Easy Baked Pumpkin Fritter Bites. As the leaves turn and the air gets crisper, there’s something truly magical about incorporating pumpkin into our meals. These little bites of joy are fluffy, slightly sweet, and delightful—all without the fuss of frying.
Now, you might be wondering why I’m raving about baked fritters when the traditional route takes the plunge into hot oil. Well, let me tell you, these baked beauties retain that comforting fritter experience while being lighter and healthier. Plus, they come together in a snap, making them perfect for busy mornings, afternoon snacks, or cozy gatherings with friends. Who doesn’t love a treat that’s both good for you and totally satisfying?
Join me as we embark on a culinary journey filled with warmth, nostalgia, and of course, flavor! I’ll share a personal story that’ll tickle your taste buds, walk you through the ingredients, and guide you every step of the way to ensure your fritters turn out deliciously perfect. So grab your apron, and let’s get started!
A Slice of My Culinary Memory
Let me take you back to my childhood, where the scent of pumpkin pie wafted through the air every autumn. My Grandma June had a way of making everything feel special, and during pumpkin season, her kitchen was the heart of our family gatherings. Each year, we’d huddle around the kids’ table, eagerly waiting to help her mix, pour, and taste test. The joy on her face when we “helped” was priceless—though we mostly just enjoyed sneaking spoonfuls of batter!
One of my fondest memories involves Grandma’s famous pumpkin fritters. She usually would whip them up as a post-harvest treat, and we’d devour them with warm maple syrup and a sprinkle of powdered sugar. I can still hear her laughter as we fought over the last bite. Fast forward to today, and I find myself recreating those moments with a healthy twist through these baked pumpkin fritter bites. They might not be as heavy or greasy as Grandma’s version, but they carry the essence of her warmth in every scrumptious bite.
Ingredients
Let’s gather our ingredients for these Easy Baked Pumpkin Fritter Bites. Here’s what you’ll need:
-
1 cup pumpkin puree: The star of the show! This is what makes your fritters moist and flavorful. You can use canned puree or roast fresh pumpkin—both work beautifully.
-
1 cup all-purpose flour: The base of your batter. If you want to add a whole grain element, substitute half with whole wheat flour for added fiber.
-
1/2 cup sugar: This adds sweetness. For a healthier spin, consider using honey or maple syrup (just adjust the liquid content).
-
1 teaspoon baking powder: This gives your fritters that much-loved rise and fluffy texture.
-
1 teaspoon cinnamon: A warm spice that enhances the autumn vibe. Feel free to swap with pumpkin spice for an extra flavor punch!
-
1/2 teaspoon nutmeg: This adds a nuttiness and depth of flavor. It’s warming and pairs beautifully with the pumpkin.
-
1/2 teaspoon salt: A tiny helper to balance the sweetness and enhance every flavor.
-
1/4 teaspoon ground ginger: This adds a little zing! Ginger is optional, but it gives a nice, warm kick.
-
1/2 cup milk: Helps to moisten your batter. You can swap this with a plant-based alternative or even pumpkin spice latte for a fun twist!
-
1 egg: This helps hold everything together and adds richness. For a vegan option, you can replace it with a flax egg (1 tablespoon ground flaxseed mixed with 2.5 tablespoons water).
-
2 tablespoons vegetable oil: This keeps your fritters moist; feel free to use melted coconut oil or applesauce for a lighter version.
Step-by-Step Instructions
Now comes the fun part—let’s dive into making our Easy Baked Pumpkin Fritter Bites! Follow these steps, and let’s whip up some delightful treats that will have everyone coming back for seconds.
1. Preheat your oven
Start by preheating your oven to 400°F (200°C). This ensures that your fritters bake evenly and become perfectly golden. While the oven is warming up, line a baking sheet with parchment paper—it helps with easy clean-up and gives the fritters a nice, crisp texture.
2. Combine your dry ingredients
In a medium-sized mixing bowl, whisk together the flour, sugar, baking powder, cinnamon, nutmeg, salt, and ground ginger. Mixing your dry ingredients first helps evenly distribute the leavening agents and spices throughout the batter, ensuring that each bite is full of flavor!
3. Mix the wet ingredients
In a separate bowl, mix your pumpkin puree, milk, egg, and vegetable oil. If you’re using a flax egg for a vegan option, mix the flaxseed with water and let it sit for a few minutes before adding it to the mix. This little trick will give you that necessary binding effect!
4. Combine wet and dry ingredients
Now, pour your wet mixture into the dry ingredients. Gently fold them together with a spatula until just combined. Make sure not to overmix—this keeps your fritters light and fluffy! Trust me, a few lumps here and there are perfectly okay.
5. Scoop your batter onto the baking sheet
Using a cookie scoop or a spoon, drop rounded tablespoons of batter onto your prepared baking sheet, leaving a bit of space between each one. They don’t spread much, so be generous but not too crowded!
6. Bake until golden brown
Pop your sheet in the oven and bake for about 15-20 minutes or until the fritters are puffed up and golden. You can do the toothpick test—just poke one in the center; if it comes out clean, you’re good to go!
7. Cool and serve
Once baked, remove them from the oven and let them cool for a few minutes. Then, transfer to a wire rack to cool completely—if you can resist the temptation, that is!
Serving Suggestions
These Easy Baked Pumpkin Fritter Bites are perfect for sharing, so consider serving them warm. You can dust them with powdered sugar or dip them in maple syrup for an extra treat. For a more gourmet touch, drizzle some honey or a cream cheese glaze over the top and watch everyone swoon with delight!
Recipe Variations
Get creative with your fritters! Here are a few fun twists you can try:
-
Add-ins: Mix in chopped nuts like walnuts or pecans for a delightful crunch.
-
Dried fruits: Toss in some dried cranberries or raisins for sweetness and texture contrast.
-
Spices: Experiment with cardamom or allspice to add a new dimension to your flavors.
-
Cheese twist: Try incorporating mild cheese (like feta or goat cheese) for a savory twist!
-
Gluten-free: Swap out all-purpose flour for a gluten-free blend, and voila! You’ve got a gluten-free version!
Chef’s Notes
Oh, how I love this recipe! It has evolved from Grandma June’s deep-fried fritters to these lightened-up bites that everyone can enjoy. You know, the beauty of cooking lies in its ability to bring people together and create lasting memories. I’m always experimenting in the kitchen—I once tossed in some cranberries, and they were an instant hit! Cooking should be fun and flexible, so don’t hesitate to make this recipe your own.
If you have kids (or just sprinkle some whimsical joy in your life), let them help out! Mixing and scooping are easy tasks for little hands and a chance to create memories together, just like I did with Grandma.
FAQs and Troubleshooting
-
My fritters didn’t rise. What happened?
Ensure your baking powder is fresh. An expired baking powder will lead to flat fritters. Also, make sure not to overmix your batter; this can lead to dense fritters. -
Can I use fresh pumpkin instead of canned?
Absolutely! Just roast your pumpkin, scoop, and puree until smooth—it adds a wonderful fresh flavor that’s hard to beat! -
Why are my fritters too dry?
They might have baked too long, so keep an eye on them during the last few minutes. If they’re dry, consider adding a bit more milk next time or reducing the baking time slightly. -
Can these be made ahead?
Yes! You can prepare the batter ahead of time and refrigerate it for up to 24 hours before baking them fresh. They’re best enjoyed warm, straight from the oven!
Nutritional Info
One fritter (approximately 30g) consists of approximately:
- Calories: 80
- Protein: 1g
- Total Fat: 3g
- Saturated Fat: 0.5g
- Carbohydrates: 12g
- Fiber: 1g
- Sugar: 3g
Keep in mind that these values are just a ballpark, so adjust based on your ingredient swaps and serving size.
And there you have it—a delightful journey through my favorite baked pumpkin fritter bites! Remember, cooking is all about love, experimentation, and feeding your soul. I hope you enjoy making (and devouring) these treats as much as I do. Happy cooking, fellow foodies!
PrintEasy Baked Pumpkin Fritter Bites
These fluffy, slightly sweet pumpkin bites are a healthier twist on traditional fritters, perfect for fall gatherings or cozy snacking.
- Prep Time: 10 minutes
- Cook Time: 20 minutes
- Total Time: 30 minutes
- Yield: 4 servings 1x
- Category: Snack
- Method: Baking
- Cuisine: American
- Diet: Vegetarian
Ingredients
- 1 cup pumpkin puree
- 1 cup all-purpose flour
- 1/2 cup sugar
- 1 teaspoon baking powder
- 1 teaspoon cinnamon
- 1/2 teaspoon nutmeg
- 1/2 teaspoon salt
- 1/4 teaspoon ground ginger
- 1/2 cup milk
- 1 egg
- 2 tablespoons vegetable oil
Instructions
- Preheat your oven to 400°F (200°C) and line a baking sheet with parchment paper.
- Combine your dry ingredients: In a bowl, whisk together flour, sugar, baking powder, cinnamon, nutmeg, salt, and ginger.
- Mix your wet ingredients: In another bowl, mix pumpkin puree, milk, egg, and vegetable oil.
- Combine wet and dry ingredients until just mixed.
- Scoop batter onto the prepared baking sheet.
- Bake for 15-20 minutes until golden brown.
- Cool on a wire rack before serving.
Notes
Serve warm with powdered sugar or maple syrup. Kids can help with mixing and scooping!
Nutrition
- Serving Size: 1 fritter
- Calories: 80
- Sugar: 3g
- Sodium: 200mg
- Fat: 3g
- Saturated Fat: 0.5g
- Unsaturated Fat: 2g
- Trans Fat: 0g
- Carbohydrates: 12g
- Fiber: 1g
- Protein: 1g
- Cholesterol: 30mg
Keywords: pumpkin fritters, baked fritters, healthy snacks, fall recipes, vegetarian
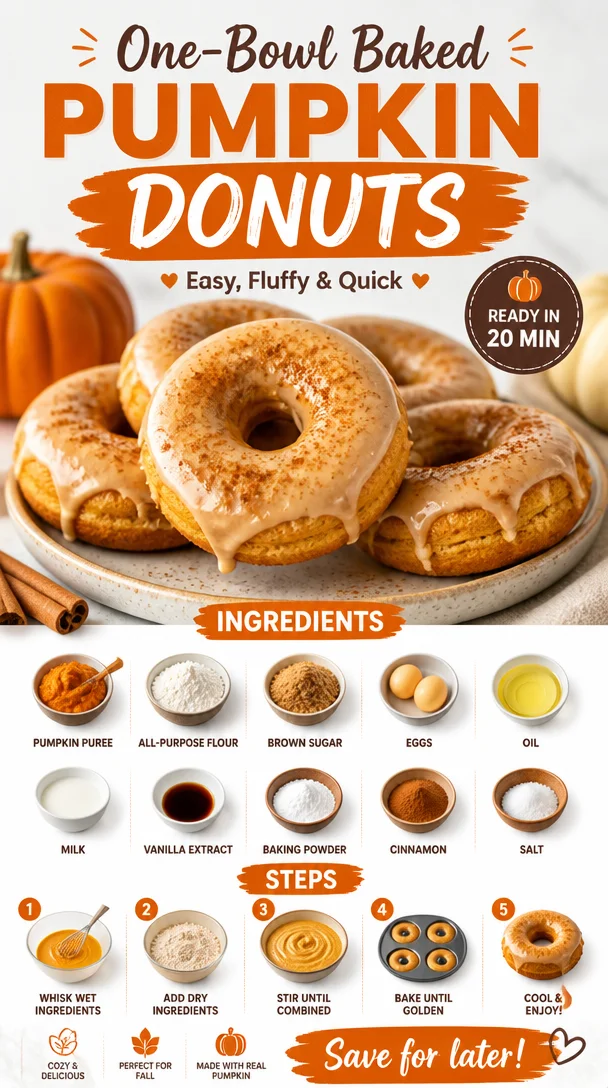
One-Bowl Baked Pumpkin Donuts: Easy, Fluffy & Quick
Delightfully Easy Baked Pumpkin Donuts: A Fall Favorite
Ah, fall! The season where the air turns crisp, leaves start to dance in shades of amber and gold, and pumpkin spice reigns supreme. If you’re like me, the aroma of freshly baked treats wafting through the kitchen is not just an indulgence; it’s a cherished ritual that brings cozy comfort to our busy lives. Today, I’m excited to share a recipe that will have your taste buds singing with joy—Baked Pumpkin Donuts!
These delightful donuts are not only easy to whip up but also a fun way to embrace the flavors of autumn. Forget about deep frying! I promise you, these baked beauties are moist, flavorful, and somehow manage to be both guilt-free and indulgent all at once. And the best part? They are made with wholesome ingredients that will leave you feeling satisfied without the sugar crash.
Whether you are hosting a brunch, looking for a delicious snack, or just want to treat yourself (because you deserve it!), this recipe is here to guide you toward bakery-style donuts right at home. Grab your apron, roll up your sleeves, and let’s make some magic in the kitchen with these deliciously easy baked pumpkin donuts!
A Slice of Nostalgia
I’ll never forget the first time I experienced the joy of pumpkin donuts. It was a crisp October morning, and my family decided to visit our local pumpkin patch. Between picking the perfect pumpkin and drinking apple cider, I found myself at a little stand that promised freshly made pumpkin donuts. One bite, and I was transported to “comfort food heaven.” The sweetness of the pumpkin, the hint of nutmeg, and the glaze that was almost too delicious to believe—it was pure joy wrapped in a donut!
From that day on, pumpkin donuts became a fall staple in my life. I went home determined to recreate that magical experience, and now, after countless experiments and joyful taste tests, I’ve settled upon a recipe that captures all that nostalgia—minus the frying and the guilt. Let me show you how to bring a piece of that pumpkin patch magic right to your own kitchen!
Ingredients
Here’s what you’ll need to whip up these scrumptious baked pumpkin donuts:
-
1 cup all-purpose flour
- The base of our donuts! If you’re looking for a gluten-free option, look for a 1:1 gluten-free flour blend that contains xanthan gum.
-
1 cup pumpkin puree
- Use canned for convenience, or roast fresh pumpkins for a richer flavor! Just make sure you use plain pumpkin puree, not pumpkin pie filling, for the best results.
-
½ cup brown sugar
- This will give our donuts a subtle depth of flavor. You can substitute with coconut sugar for a healthier alternative, though the flavor will differ slightly.
-
¼ cup granulated sugar
- A little extra sweetness never hurt anyone! You can reduce the amount for a less sweet donut if you prefer.
-
1/4 cup vegetable oil or melted coconut oil
- This helps keep the donuts moist. Feel free to use applesauce or unsweetened Greek yogurt as a light substitute.
-
2 large eggs
- They provide structure too! For an egg-free option, a flaxseed meal ‘egg’ works well—mix 1 tablespoon of flaxseed meal with 2.5 tablespoons of water and let it sit for a few minutes to thicken.
-
1 tsp vanilla extract
- This enhances the flavor beautifully. Always good to use pure vanilla extract for the best taste!
-
1 tsp baking powder
- This will help our donuts rise and become wonderfully fluffy.
-
1/2 tsp baking soda
- Together with the baking powder, this creates the perfect leavening. Do double-check their freshness before use!
-
1 tsp ground cinnamon
- The spice of fall! Feel free to use a homemade pumpkin spice blend for an extra warm flavor.
-
1/2 tsp ground nutmeg
- Adds a nice complexity; always fresher when you grate it yourself!
-
1/4 tsp salt
- It may seem small, but salt enhances all the flavors beautifully!
-
Optional: Glaze or cinnamon sugar for topping
- Use a simple mixture of powdered sugar and a splash of milk for a quick glaze or toss your baked donuts in a mixture of cinnamon and sugar while they’re still warm for a cozy finish!
Step-by-Step Instructions
Creating your own Baked Pumpkin Donuts is easy and fun! Here’s how to bring it all together:
-
Preheat Your Oven
Preheat your oven to 350°F (175°C) and grease a donut pan (or use a silicone pan) to ensure those beauties pop right out later! -
Combine Dry Ingredients
In a medium bowl, whisk together the flour, baking powder, baking soda, cinnamon, nutmeg, and salt. This will help distribute the leavening agents evenly through the batter, ensuring that each donut is perfectly risen. -
Mix Wet Ingredients
In another large bowl, mix the brown sugar, granulated sugar, and oil until well combined, then add the pumpkin puree and mix until smooth. The sugars will help incorporate air into the mixture, so you’re looking for a creamy consistency. -
Add Eggs and Vanilla
Crack in the eggs and pour in the vanilla extract, then whisk everything together until the mixture is wonderfully smooth and fluffy. -
Combine Dry and Wet Mixtures
Gradually add the dry ingredients to the wet mixture. Stir gently until just combined! Overmixing can create donuts that are dense instead of fluffy, so be careful here! -
Spoon Batter into the Pan
Using a piping bag or a zip-top bag with a corner cut off, fill the donut cavities about 2/3 full. This prevents overflow while still allowing enough room for rising. -
Bake to Perfection
Pop your pan in the preheated oven and bake for 10-12 minutes or until a toothpick inserted into the center comes out clean. Keep an eye on them; every oven is a little different! -
Cool and Decorate
Allow the donuts to cool in the pan for about 5 minutes, then transfer them to a wire rack to cool completely. Once cool, you can dip them in a delicious glaze or roll them in cinnamon sugar for that extra touch of magic.
Serving Suggestions
These baked pumpkin donuts are perfect for any occasion! Serve them warm with a piping hot cup of coffee or a spiced chai tea. For a festive brunch, stack them neatly on a cake stand, adding some additional decorative elements like autumn leaves or tiny pumpkins around the base. If you’re feeling fancy, drizzle some caramel sauce on top for an extra hit of sweetness!
Recipe Variations
Looking to switch things up? Here are some creative twists to consider:
- Chocolate Chip Delight: Toss in some mini chocolate chips for a decadent, chocolaty surprise!
- Nutty Crunch: Add chopped pecans or walnuts to the batter for a delightful crunch.
- Glazed Maple Wonder: Swap the sugar glaze for a maple glaze by mixing powdered sugar with maple syrup for a rich flavor.
- Spiced Apple Twist: Fold in finely chopped apples or apple sauce for a fruity take on the classic pumpkin flavor.
Chef’s Notes
Oh, the memories I have while perfecting this recipe! The kitchen is always a playground for experimentation, and I once accidentally mixed up baking soda and baking powder. Talk about a science experiment gone wrong! A mini explosion of failed donut density motivated me to keep testing until I got it right. Now, friends come knocking at my door the moment the leaves start falling, asking me to whip these up!
Remember, these donuts are more than just food; they are little nuggets of happiness that can brighten anyone’s day. Experiment, have fun, and make it your own!
FAQs and Troubleshooting
Q: Why are my donuts dense?
A: This usually happens from overmixing the batter or not using fresh leavening agents (baking powder and baking soda). Be sure to mix just until combined!
Q: Can I make these ahead of time?
A: Absolutely! You can store baked donuts in an airtight container for about 2-3 days. They also freeze well, so make extra batches to pull out on busy mornings!
Q: What can I do if I don’t have a donut pan?
A: No problem! You can use a muffin tin; just adjust the baking time and keep an eye out for doneness. They’ll be more like muffin tops but still delicious!
Q: How do I store leftover donuts?
A: Place your donuts in an airtight container at room temperature for a few days, or refrigerate for a longer shelf life. They can also be frozen for up to three months; just thaw before enjoying!
Nutritional Info
While I am not a nutritionist, I can tell you that these baked pumpkin donuts are made with wholesome ingredients that provide a satisfying treat without the guilt!
Conclusion
Baked pumpkin donuts are more than just a delicious treat—they are a celebration of flavors, memories, and the beauty of fall. So whether you’re treating yourself on a quiet morning or entertaining friends at brunch, this easy recipe is here to make your kitchen smell like the sweetest autumn dream.
Let’s keep that oven warm and those flavors fresh! Happy baking, my friends!
PrintDelightfully Easy Baked Pumpkin Donuts
These delightful baked pumpkin donuts capture the essence of fall with their moist, flavorful texture and guilt-free indulgence.
- Prep Time: 15 minutes
- Cook Time: 12 minutes
- Total Time: 27 minutes
- Yield: 12 servings 1x
- Category: Dessert
- Method: Baking
- Cuisine: American
- Diet: Vegetarian
Ingredients
- 1 cup all-purpose flour
- 1 cup pumpkin puree
- ½ cup brown sugar
- ¼ cup granulated sugar
- ¼ cup vegetable oil or melted coconut oil
- 2 large eggs
- 1 tsp vanilla extract
- 1 tsp baking powder
- ½ tsp baking soda
- 1 tsp ground cinnamon
- ½ tsp ground nutmeg
- ¼ tsp salt
- Optional: Glaze or cinnamon sugar for topping
Instructions
- Preheat your oven to 350°F (175°C) and grease a donut pan.
- Combine dry ingredients in a bowl.
- Mix brown sugar, granulated sugar, and oil until well combined, then add pumpkin puree and mix until smooth.
- Add eggs and vanilla, whisking until smooth and fluffy.
- Combine dry and wet mixtures gently to avoid overmixing.
- Spoon batter into the donut pan about 2/3 full.
- Bake for 10-12 minutes until a toothpick comes out clean.
- Cool for 5 minutes in the pan, then transfer to a wire rack to cool completely.
Notes
Experiment with toppings like a maple glaze or cinnamon sugar for added flavor.
Nutrition
- Serving Size: 1 donut
- Calories: 200
- Sugar: 10g
- Sodium: 150mg
- Fat: 8g
- Saturated Fat: 2g
- Unsaturated Fat: 6g
- Trans Fat: 0g
- Carbohydrates: 29g
- Fiber: 1g
- Protein: 2g
- Cholesterol: 30mg
Keywords: pumpkin donuts, baked donuts, fall recipes
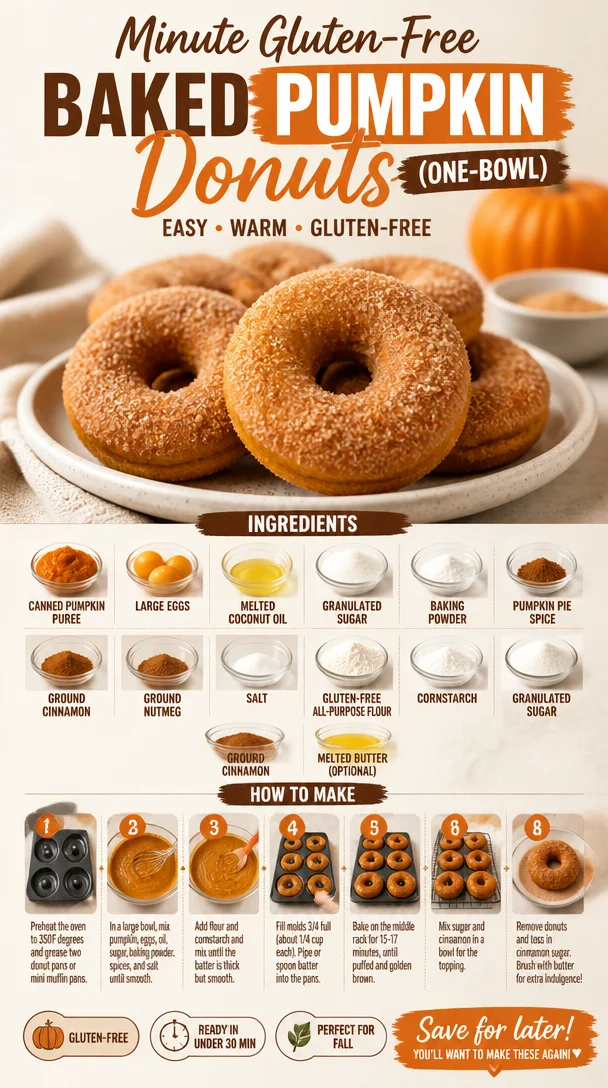
Minute Gluten-Free Baked Pumpkin Donuts (One-Bowl)
Baked Pumpkin Donuts – Gluten Free: A Delightful Fall Treat
Introduction
Hey there, food lovers! It’s Ava Carter here, and I can already smell the warm spices and sweet pumpkin wafting through my virtual kitchen as I write this! Today, I’m so excited to share with you my beloved recipe for Baked Pumpkin Donuts. Not only are these delectable bites gluten-free, but they are also bursting with that quintessential fall flavor that we all crave.
Did you know that donuts don’t have to be fried to be absolutely delicious? These baked pumpkin donuts are incredibly moist, tender, and just sweet enough to satisfy your cravings without feeling overly indulgent. Plus, what’s better than the aroma of fresh-baked donuts filling your home?
This recipe is more than just a treat; it’s an invitation to create experiences. You can whip them up for weekend brunch, cozy gatherings with friends, or even just a comforting snack for yourself after a long day. Trust me, your kitchen will become the star of the show when you serve these beauties!
Baking these pumpkin donuts is a chance to embrace the season, get creative with flavors, and most importantly, indulge in a little self-love through food. So grab your apron, let’s dive into this pumpkin-infused adventure, and don’t forget to save a few for a special someone—if you can resist the temptation!
Personal Story
I still remember the first time I had pumpkin donuts—oh, the bliss! It was a crisp October morning, and I was attending a local harvest festival with my family. There was a buzzing energy in the air, filled with laughter and the scent of cinnamon and nutmeg—a sensory overload! As we wandered through the stalls, one particular booth caught my eye: a charming little stand selling freshly made pumpkin donuts.
Naturally, we had to stop! The stand was adorned with colorful pumpkins and hay bales, creating the perfect autumn atmosphere. I remember taking that first bite of a warm donut, its fluffy texture melting in my mouth, perfectly paired with a sprinkle of cinnamon sugar on top. It was pure joy!
From that day on, pumpkin donuts became a beloved fall tradition in our household. We’d make them every year, creating our own little rituals: picking the freshest pumpkins at the local patch, gathering around the kitchen to bake, and making memories that linger like the flavors of those donuts.
Now, I want to bring that same joyous experience to your kitchen! Let’s create something nostalgic, flavorful, and oh-so-delicious together!
Ingredients
Here’s what you’ll need to whip up these delightful baked pumpkin donuts:
-
1.5 cups canned pumpkin puree
Be sure to grab pure pumpkin puree, not pumpkin pie filling! If you want to make your own, you can roast a sugar pumpkin until tender, scoop out the flesh, and blend it until smooth. -
4 large eggs (at room temperature)
Eggs help contribute moisture and structure to the donuts. Let them sit out for about 30 minutes before baking for best results. -
1/4 cup melted coconut oil
This adds a lovely tropical flavor and moisture. You can substitute with melted butter or another neutral oil if you prefer. -
1.5 cups granulated sugar
For sweetness, of course! If you want a healthier option, you can use coconut sugar or a sugar substitute like erythritol. -
1.5 teaspoons baking powder
This is what helps your donuts rise and become fluffy, creating that airy texture we love! -
1.5 teaspoons pumpkin pie spice
A blend of warm spices—including ginger, allspice, and cloves—this adds the unmistakable fall flavor. If you don’t have it on hand, a mix of cinnamon, nutmeg, and ginger works well too. -
1/2 teaspoon ground cinnamon
Cinnamon is a must for that warm, cozy flavor. Feel free to increase this amount if you’re a cinnamon fan! -
1/4 teaspoon ground nutmeg
This elevates the flavor profile, adding depth to your donuts. Just a little goes a long way! -
1/4 teaspoon salt
A pinch of salt enhances all the flavors and balances out the sweetness. Don’t skip it! -
1 + 3/4 cups gluten-free all-purpose flour
Make sure to use a blend that includes xanthan gum for the best texture. If you don’t have gluten-free flour, regular all-purpose works great too! -
1/2 teaspoon cornstarch
This helps create a light, tender crumb in your donuts! You can also use arrowroot powder if you prefer. -
1 cup granulated sugar (for cinnamon sugar topping)
This sugar will add a delicious crunch to your donuts once they’re baked! -
1/4 cup ground cinnamon (for cinnamon sugar topping)
This is the magic dust that takes your donuts to the next level! -
Melted butter (optional)
Brushing your donuts with melted butter before dipping in cinnamon sugar creates a beautiful golden glow and adds extra flavor!
Step-by-Step Instructions
Alright, let’s get cooking! Follow these step-by-step instructions, and soon you’ll have a batch of irresistible baked pumpkin donuts waiting to be devoured.
Step 1: Preheat the Oven
First things first, let’s preheat that oven to 350°F (175°C). This ensures that your donuts will bake evenly and perfectly golden brown. While that’s warming up, grease your donut pan or use silicone donut molds for super easy removal!
Step 2: Combine Wet Ingredients
In a large mixing bowl, combine your pumpkin puree, eggs, and melted coconut oil. Mix well until you have a smooth, velvety mixture. Here’s a chef tip: Make sure your eggs are at room temperature! This helps create a fluffier texture in your donuts since they will incorporate better with the other ingredients.
Step 3: Whisk in Sugar and Spices
Add in the granulated sugar, baking powder, pumpkin pie spice, ground cinnamon, ground nutmeg, and salt. Whisk until everything is well blended. The sugar will begin to dissolve, and the spices will create an aromatic hug around your mixture—heavenly!
Step 4: Mix the Dry Ingredients
In another bowl, combine the gluten-free all-purpose flour and cornstarch. Whisk to combine. Gradually fold the dry mixture into the wet ingredients. Use a spatula to gently mix until just combined. Be careful not to overmix, as this can lead to tough donuts. A few lumps are perfectly fine!
Step 5: Fill the Donut Pan
Spoon the batter into your greased donut pan, filling each cavity about 3/4 full to allow for rising. If you want a clean look, consider using a piping bag to fill the molds—it’s a little fun and makes for a beautiful presentation!
Step 6: Bake!
Pop those donuts in your preheated oven and bake for 15 to 18 minutes, or until a toothpick inserted comes out clean. While they’re baking, the kitchen will fill with that irresistible aroma, making the wait totally worth it!
Step 7: Make Cinnamon Sugar
While your donuts cool, mix together the granulated sugar and ground cinnamon in a small bowl for the topping. This is the moment when your kitchen begins to smell like a cozy autumn café!
Step 8: Coat the Donuts
Once the donuts have cooled for about 5 minutes, gently remove them from the pan. If you opted for melted butter, brush them lightly with the butter before rolling them in the cinnamon sugar. This coating adds the perfect sweet crunch, and who doesn’t love a little extra flavor?
Serving Suggestions
To serve these scrumptious baked pumpkin donuts, arrange them on a beautiful platter and consider adding a little drizzle of icing for an extra special touch. Enjoy them warm with a steaming cup of coffee or chai tea—perfect for those chilly fall mornings or any time you need a cozy moment.
Recipe Variations
Feel free to mix things up with these creative twists:
- Chai Spice Version: Replace pumpkin pie spice with your favorite chai spices for a whole new flavor experience!
- Chocolate Chip Surprise: Fold in some gluten-free chocolate chips for a delightful surprise in each bite.
- Maple Glaze: Drizzle a maple glaze over the donuts for an added layer of yumminess.
- Nutty Crunch: Add chopped pecans or walnuts to the batter for extra texture and a nutty flavor.
Chef’s Notes
As a chef, I believe that recipes are living entities—they evolve with each attempt! This baked pumpkin donut recipe has come a long way since I first started making them. Initially, I used to dip them in plain granulated sugar, but after a few rounds of taste tests, I stumbled upon the magic of cinnamon sugar! Now, it feels like the essence of fall in every bite.
And here’s a funny kitchen story: One year, I accidentally mixed up the all-purpose flour with an unusual gluten-free flour blend that had a strong flavor. Let’s just say, my family dubbed it the "Pumpkin Experiment Gone Wrong" and we all had a good laugh. Sometimes, those flops lead to the best memories!
FAQs and Troubleshooting
1. Can I use fresh pumpkin instead of canned?
Absolutely! Just roast a sugar pumpkin until tender, scoop it out, and blend it until smooth. It will add a lovely homemade touch!
2. My donuts are too dense. What went wrong?
Density often comes from overmixing or using too much flour. Make sure to fold the batter until just combined—lumps are okay!
3. Can I freeze these donuts?
Yes! Once completely cooled, wrap them tightly in plastic wrap and store them in an airtight container in the freezer. Just thaw and enjoy them when you’re ready!
4. What can I use instead of eggs for a vegan version?
You can substitute each egg with 1/4 cup of unsweetened applesauce or a flax egg (1 tablespoon ground flaxseed mixed with 3 tablespoons water).
Nutritional Info
While I don’t calculate nutrition for each recipe, baked donuts generally pack in vitamins from the pumpkin and are a healthier alternative to traditional fried donuts. Enjoy them as an occasional treat, and remember, balance is key!
I hope you enjoy baking these pumpkin donuts as much as I do! If you give them a try, let me know how they turn out and what variations you created. Remember, this is all about enjoying good food and creating lasting memories, so have fun in the kitchen! Happy baking!
PrintBaked Pumpkin Donuts – Gluten Free
Delightful baked pumpkin donuts that are gluten-free and filled with warm autumn spices.
- Prep Time: 15 minutes
- Cook Time: 18 minutes
- Total Time: 33 minutes
- Yield: 12 servings 1x
- Category: Dessert
- Method: Baking
- Cuisine: American
- Diet: Gluten-Free
Ingredients
- 1.5 cups canned pumpkin puree
- 4 large eggs (at room temperature)
- 1/4 cup melted coconut oil
- 1.5 cups granulated sugar
- 1.5 teaspoons baking powder
- 1.5 teaspoons pumpkin pie spice
- 1/2 teaspoon ground cinnamon
- 1/4 teaspoon ground nutmeg
- 1/4 teaspoon salt
- 1 + 3/4 cups gluten-free all-purpose flour
- 1/2 teaspoon cornstarch
- 1 cup granulated sugar (for cinnamon sugar topping)
- 1/4 cup ground cinnamon (for cinnamon sugar topping)
- Melted butter (optional)
Instructions
- Preheat the oven to 350°F (175°C).
- Combine pumpkin puree, eggs, and melted coconut oil in a large bowl.
- Whisk in granulated sugar, baking powder, pumpkin pie spice, ground cinnamon, ground nutmeg, and salt.
- Mix the gluten-free all-purpose flour and cornstarch in another bowl.
- Fold the dry ingredients into the wet ingredients until just combined.
- Fill each cavity of the greased donut pan about 3/4 full.
- Bake for 15 to 18 minutes, or until a toothpick comes out clean.
- Make cinnamon sugar by mixing granulated sugar and ground cinnamon in a bowl.
- Coat the cooled donuts in melted butter and then roll them in the cinnamon sugar.
Notes
These donuts can be frozen; just wrap them tightly and thaw when ready to enjoy.
Nutrition
- Serving Size: 1 donut
- Calories: 200
- Sugar: 18g
- Sodium: 250mg
- Fat: 7g
- Saturated Fat: 5g
- Unsaturated Fat: 2g
- Trans Fat: 0g
- Carbohydrates: 28g
- Fiber: 1g
- Protein: 3g
- Cholesterol: 40mg
Keywords: pumpkin donuts, gluten-free donuts, fall recipes, baked donuts
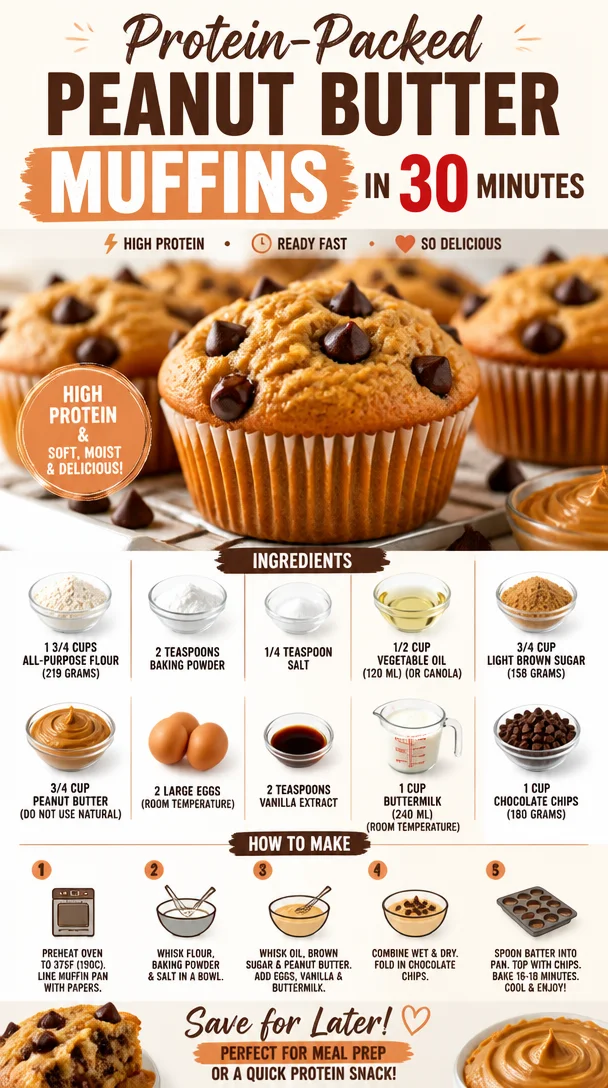
Protein-Packed Peanut Butter Muffins in 30 Minutes
Irresistible Peanut Butter Muffins: A Love Letter to Comfort and Flavor
Welcome to Clean Plate Cravings, where flavor and health go hand in hand. I’m Ava Carter, your friendly guide to a world of nourishing delights! Today, we’re diving into a recipe that is bound to make your mornings brighter and your taste buds dance—Peanut Butter Muffins. These little bites of joy are perfect for breakfast, snack time, or whenever that sweet (and slightly nutty) craving strikes.
You see, these muffins are more than just a treat; they’re a celebration of comfort, nostalgia, and the delightful simplicity of homemade food. I can’t wait to share my love for peanut butter baking and the irresistible aroma that fills the kitchen when these muffins are in the oven. Whether you’re a busy parent looking for easy breakfast ideas or a foodie like me who loves to whip up something delicious, you’re in the right spot!
A Whiff of Nostalgia
Growing up, my mornings revolved around the rich smell of peanut butter wafting through the house. My mom had a knack for transforming simple ingredients into incredible concoctions, and the star of the show was often her peanut butter cookies. While I adored those crispy treats, I soon discovered the joy of muffins—especially when they come infused with that creamy nutty goodness.
One particular Saturday, I recall standing by the kitchen counter, eagerly waiting to sneak a bite straight from the mixing bowl while my mom whipped up a batch of her famous peanut butter muffins. The excitement was palpable! We would sprinkle chocolate chips into the batter and giggle as we imagined the muffins being alive with warm, gooey pockets of chocolate. They never lasted long in our home, and I can still hear the muffled crunch as I bit into the soft, fluffy muffins, topped with a smear of peanut butter for good measure.
Fast forward to today, and I’ve crafted my own version of those beloved muffins, drawing inspiration from my childhood while adding my unique twist. Let’s embark on this delicious journey together!
Ingredients You’ll Need
Here’s what you’ll need to create these mouthwatering Peanut Butter Muffins:
-
1 3/4 cups all-purpose flour (219 grams): This is the foundation of your muffins. For a healthier alternative, consider using whole wheat flour, which will give your muffins a heartier texture and more fiber.
-
2 teaspoons baking powder: This is your trusty leavening agent, ensuring your muffins rise beautifully. Make sure it’s fresh for the best results!
-
1/4 teaspoon salt: Just a pinch enhances all the flavors in your muffins. If you’re watching your sodium intake, feel free to use a low-sodium option.
-
1/2 cup vegetable oil (120 ml) (or canola): This keeps your muffins moist and delicious. If you prefer a lighter touch, you can substitute with applesauce.
-
3/4 cup light brown sugar (158 grams): This adds sweetness and a hint of caramel flavor. If you’re looking for a lower-sugar option, coconut sugar is a great substitute.
-
3/4 cup peanut butter (do not use natural): Creamy and indulgent, this is the star of the show! Opt for classic, creamy peanut butter for the best texture.
-
2 large eggs (room temperature): Eggs provide structure and moisture; for an egg-free version, try using flaxseed meal mixed with water as a binder.
-
2 teaspoons vanilla extract: This is the magic ingredient that elevates the flavors. You can also try almond extract for a different taste profile.
-
1 cup buttermilk (240 ml) (room temperature): Buttermilk gives your muffins a tender crumb. If you don’t have any, you can create a quick version by adding a tablespoon of vinegar to regular milk and letting it sit for a few minutes.
-
1 cup chocolate chips (180 grams): Because who says we can’t indulge? Choose dark chocolate for a richer flavor or try butterscotch chips for a fun twist.
Step-by-Step Instructions
Now that we have our ingredients ready, let’s get cooking! Follow these simple steps to whip up your Peanut Butter Muffins:
-
Preheat the Oven: First things first, let’s get that oven preheating to 350°F (175°C). The even heat will help our muffins rise perfectly!
-
Prepare the Muffin Tin: While the oven warms up, generously grease a muffin tin with cooking spray or use paper liners for easy removal later. This makes cleanup a breeze!
-
Mix Dry Ingredients: In a large mixing bowl, whisk together the flour, baking powder, and salt. This step ensures even distribution of the baking powder, which is crucial for achieving that fluffy muffin texture.
-
Combine Wet Ingredients: In a separate bowl, mix the vegetable oil, brown sugar, and peanut butter until smooth. The combination might feel thick, but that’s totally normal! Add in the eggs one at a time, ensuring they are fully incorporated after each addition. Stir in the vanilla extract and buttermilk until everything is well combined.
-
Combine Wet and Dry Mixtures: Pour the wet mixture into the bowl with the dry ingredients. Gently fold them together until just combined—overmixing can lead to dense muffins, and we want fluffy, light treats!
-
Add the Chocolate Chips: Gently fold in the chocolate chips (or butterscotch chips if you’re feeling adventurous!). Reserve a handful to sprinkle on top before baking for that extra touch.
-
Fill the Muffin Tin: Using a cookie scoop or spoon, divide the batter evenly among the prepared muffin cups. Fill each cup about two-thirds full to allow room for the muffins to rise.
-
Bake: Pop your muffins into the preheated oven and bake for 18-20 minutes, or until a toothpick inserted into the center comes out clean. Inhale deeply—your kitchen will smell divine!
-
Cool and Enjoy: Once they’re baked, remove the muffins from the oven and allow them to cool in the tin for about 5 minutes. Transfer them to a wire rack to cool completely (if you can resist the temptation of warm muffins).
Serving Suggestions
When it comes to serving up these delightful Peanut Butter Muffins, the possibilities are endless! Enjoy them warm with a drizzle of honey or a sprinkle of sea salt for an extra pop of flavor. Pair your muffins with a fresh fruit salad or yogurt for a well-rounded breakfast or snack. You can even pack them in lunchboxes for a delightful treat that everyone will love!
Recipe Variations
Feeling creative? Here are a few fun variations to mix things up:
-
Nutty Banana Muffins: Mash a ripe banana into the batter for a fruity twist and a dose of natural sweetness.
-
Cocoa-Crazy Muffins: Add 1/4 cup of cocoa powder for a chocolate peanut butter experience that’s sure to satisfy your sweet tooth.
-
Crunchy Granola Muffins: Stir in some granola or chopped nuts for added texture and crunch.
-
Spiced Pumpkin Muffins: Swap out peanut butter for pumpkin puree and add warm spices like cinnamon, nutmeg, and cloves for a cozy fall treat.
-
Dairy-Free Option: Use almond milk instead of buttermilk and a vegan butter spread in place of regular butter for a dairy-free delight.
Chef’s Notes
These Peanut Butter Muffins are a recipe I’ve worked on and perfected over the years, and they hold a special place in my heart. I love tweaking the ingredients based on what I have on hand or experimenting with different mix-ins like dried fruit. The best part? They always turn out delicious!
Each time I make them, I’m reminded of those cherished mornings spent in the kitchen with my family. There’s nothing like the feeling of sharing something homemade with loved ones—so don’t be shy about topping these muffins with your favorite nut butter or even a dollop of jelly!
FAQs and Troubleshooting
Q1: Why did my muffins turn out dense?
A1: Densely packed muffins are often a result of overmixing the batter. Remember to gently fold the wet and dry ingredients together until just combined for a fluffy texture.
Q2: Can I use natural peanut butter instead?
A2: I recommend using creamy non-natural peanut butter for the best texture. Natural peanut butter can make the muffins too crumbly, as it has a different fat content.
Q3: How do I store these muffins?
A3: Store your muffins in an airtight container at room temperature for up to three days, or freeze them for up to three months. Just pop them in the microwave for a few seconds when you’re ready to enjoy!
Q4: What should I do if my muffins overflowed?
A4: No worries—muffins can be a bit unpredictable sometimes! Ensure you fill the muffin cups no more than two-thirds full next time. If they do overflow, simply trim the excess once they’re cooled—no one will know!
Nutritional Info (Optional)
Each muffin contains approximately:
- Calories: 250
- Protein: 6g
- Carbohydrates: 30g
- Fat: 12g
- Fiber: 2g
- Sugar: 12g
*Nutrition may vary based on ingredients used and portion sizes.
And there you have it—comforting, delicious Peanut Butter Muffins that are as fun to make as they are to eat! I can’t wait for you to try this recipe, breathe in those heavenly aromas, and share joyous moments around your table. Let’s keep it fresh, simple, and seriously delicious. Happy baking, friends!
PrintIrresistible Peanut Butter Muffins
Delicious Peanut Butter Muffins perfect for breakfast or snacks, infused with the comforting aroma of peanut butter and chocolate.
- Prep Time: 15 minutes
- Cook Time: 20 minutes
- Total Time: 35 minutes
- Yield: 12 servings 1x
- Category: Breakfast
- Method: Baking
- Cuisine: American
- Diet: Vegetarian
Ingredients
- 1 3/4 cups all-purpose flour (219 grams)
- 2 teaspoons baking powder
- 1/4 teaspoon salt
- 1/2 cup vegetable oil (120 ml)
- 3/4 cup light brown sugar (158 grams)
- 3/4 cup peanut butter (not natural)
- 2 large eggs (room temperature)
- 2 teaspoons vanilla extract
- 1 cup buttermilk (240 ml, room temperature)
- 1 cup chocolate chips (180 grams)
Instructions
- Preheat the oven to 350°F (175°C).
- Prepare the muffin tin with cooking spray or paper liners.
- Mix the flour, baking powder, and salt in a large bowl.
- Combine the vegetable oil, brown sugar, and peanut butter until smooth; add eggs, then vanilla and buttermilk.
- Combine the wet and dry mixtures until just blended.
- Add the chocolate chips, reserving some to sprinkle on top.
- Fill each muffin cup about two-thirds full with batter.
- Bake for 18-20 minutes, or until a toothpick comes out clean.
- Cool in the tin for 5 minutes then transfer to a wire rack.
Notes
Store muffins in an airtight container for up to 3 days or freeze for 3 months. Serve warm with honey or sea salt.
Nutrition
- Serving Size: 1 muffin
- Calories: 250
- Sugar: 12g
- Sodium: 200mg
- Fat: 12g
- Saturated Fat: 2g
- Unsaturated Fat: 8g
- Trans Fat: 0g
- Carbohydrates: 30g
- Fiber: 2g
- Protein: 6g
- Cholesterol: 30mg
Keywords: peanut butter muffins, breakfast muffins, easy muffins, chocolate chip muffins
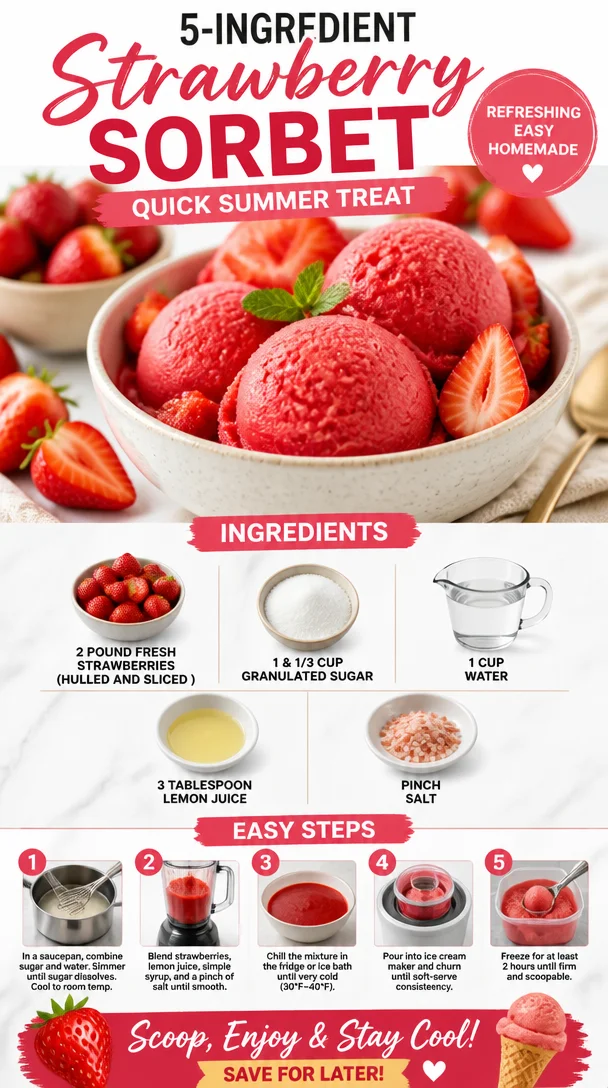
Ingredient Strawberry Sorbet: Quick Summer Treat
Hey there, fellow food lovers! If you’re looking for a refreshing treat that screams summer and brings back those nostalgic childhood memories, I’ve got just the recipe for you: delicious Strawberry Sorbet! Imagine juicy, ripe strawberries pureed into a smooth, icy delight, kissed with a touch of lemon to balance the sweetness. It’s that perfect, feel-good dessert that brings a smile to your face and a cool boost on a hot day.
Let me take you on a little journey back to a sun-soaked afternoon when I first learned to whip up this gem. I was just a kid, running around the backyard with my siblings and cousins, our hands sticky with melted popsicle drippings and our laughter filling the air. My grandmother, a culinary wizard who knew how to make magic with fresh fruits, decided to surprise us with a special treat—her homemade strawberry sorbet. With the intoxicating aroma of fresh strawberries wafting through the kitchen, I couldn’t resist sneaking spoonfuls straight from the blender!
Silly me, I thought making sorbet was a complex affair reserved for fancy ice cream parlors. But my grandma let me in on the secret: it’s as easy as blending, freezing, and enjoying! From that day on, strawberry sorbet became our go-to summer delight, and I knew I had to recreate that memory. Lucky for you, I’m here to share that very recipe, perfect for any occasion, whether you’re hosting a summer soiree, enjoying a cozy night in, or looking for a sweet indulgence that fits your clean eating goals.
So grab your favorite apron, and let’s dive into the colorful world of strawberries, sugar, and pure joy. I promise you, with just a few simple ingredients, you’ll be enjoying this delightful sorbet in no time!
Personal Story
Let me take you back to a sunny Saturday afternoon spent at my grandparents’ home in the countryside. Picture this: the sun starting to dip behind the trees, casting a warm golden glow on everything it touches. My grandma had just returned from a trip to the local farmer’s market with a basket brimming with the freshest strawberries you could ever imagine. Their sweet, vibrant aroma wafted through the kitchen as she began to prepare her famed strawberry sorbet.
As I sneaked into the kitchen, entranced by the sight of those luscious red berries, she caught my eye and grinned, “Want to help, Ava?” Of course, I jumped at the chance! We hulled and sliced those juicily ripe berries together while she shared stories of her childhood and how her mother used to make the same sorbet on hot summer days. I remember giggling as I pretended to be a professional chef, creating my own berry masterpieces, all the while stealing bites of the sweet fruit.
When the mixture was finally ready, my grandma poured it into a container, and we eagerly awaited—impatiently, I might add—the moment it would transform into frosty perfection. I can still hear the sound of that sorbet machine whirring; the anticipation was almost as delicious as the treat itself. Finally, when the time came, she spooned out the first serving, topping it off with a sprig of mint from her garden. That first bite was pure bliss, refreshing and bursting with flavor, and it instantly transported me to lazy summer days filled with laughter and joy.
Those moments in the kitchen with my grandma are memories I cherish deeply, and every time I make strawberry sorbet, I feel like I’m revisiting that special time. It’s a sweet reminder that cooking is so much more than just making food—it’s about creating connections, sharing stories, and enjoying life’s simple pleasures.
Ingredients
Here’s what you’ll need to create your own batch of heavenly Strawberry Sorbet:
-
2 pounds fresh strawberries (hulled and sliced)
The star of the show! Use ripe, juicy strawberries for the best flavor. If strawberries aren’t available, you can substitute with other berries, like raspberries or peaches. -
1 & 1/3 cups granulated sugar
This will sweeten the sorbet and help achieve the perfect texture. If you’re looking for a healthier alternative, consider using honey or agave syrup—just adjust the quantity to your taste as they are sweeter. -
1 cup water
This will help dissolve the sugar and create a smooth blend. If you want to infuse a different flavor, you can use fruit juice instead, like orange or lemonade! -
3 tablespoons lemon juice
A splash of freshness! This brightens the flavor of the strawberries. Freshly squeezed lemon juice is best, but bottled will do in a pinch. -
Pinch of salt
Adding a tiny bit of salt enhances the flavors and balances the sweetness. Don’t skip it!
And there you have it—simple and accessible ingredients that come together to create a delightful dessert. Now let’s get to the fun part!
Step-by-Step Instructions
Follow these easy steps, and you’ll have your sorbet chillin’ in no time. Are you ready? Let’s do this!
Step 1: Prepare Your Strawberries
Start by hulling and slicing your fresh strawberries. This is the fun part! Get your kids involved or turn on some music to enjoy while you work. When you’re done, place the sliced strawberries in a mixing bowl.
Chef Tip: Look for strawberries that are bright red and fragrant. If they are slightly overripe, that’s okay! They’ll still work beautifully in this recipe.
Step 2: Sweeten the Strawberries
Sprinkle the sugar over the strawberries, mixing gently to ensure they’re well coated. Let them sit for about 15-20 minutes to allow the sugar to draw out the natural juices.
Chef Insight: This process is known as maceration, and it enhances the flavor while creating a lovely syrup! You can use this trick on other fruits, too; it works magic for peaches or even mangoes!
Step 3: Blend It Up
After letting the strawberries macerate, transfer them into a blender or food processor. Add in the water, lemon juice, and a pinch of salt. Blend until you achieve a smooth, vibrant mixture.
Chef Hack: If you love a chunkier texture, leave a few berries whole or pulse the blender a few times rather than completely pureeing them.
Step 4: Taste Test
Now’s the moment of truth! Give your strawberry mixture a little taste. If it needs more sweetness, feel free to add a bit more sugar or a splash of honey. Remember, you want a refreshing flavor that burst in your mouth!
Chef Tip: Trust your taste buds! Feel free to adjust the sweetness and acidity to your liking.
Step 5: Chill It Down
Pour the mixture into a shallow, airtight container. Cover it and pop it into the freezer for about 4-6 hours, or until completely frozen. If you’re in a hurry, you can also use an ice cream maker to churn your sorbet!
Chef Secret: If using an ice cream maker, follow the manufacturer’s instructions. The process usually takes around 20-30 minutes for creamy results!
Step 6: Serve and Enjoy
Once your sorbet is nice and frozen, take it out and let it sit for a few minutes at room temperature to soften before scooping. It’ll make serving so much easier! Scoop it into bowls, garnish with fresh mint, and enjoy your delightful creation!
Serving Suggestion: For a touch of elegance, serve the sorbet in stylish dessert cups, and drizzle a little extra lemon juice or a berry compote on top for added flair.
Serving Suggestions
Strawberry Sorbet is effortlessly versatile. Serve it in bowls topped with a sprig of fresh mint for that perfect touch of color and freshness. You can also scoop it into a cone for a fun, ice cream-inspired treat. Feeling fancy? Pair it with slices of pound cake or alongside some dark chocolate for a decadent dessert experience. The vibrant red hue of the sorbet is not only a feast for the palate but also a visual delight!
Recipe Variations
- Berry Medley Sorbet: Combine strawberries with other berries like blueberries or raspberries for a mixed berry sorbet that’s bursting with flavor!
- Peachy Strawberry: Add ripe peaches to the mix for a delightful variation that brings a bit of Southern sweetness.
- Mango Tango: Swap half the strawberries for ripe mango for a tropical twist that takes you straight to paradise.
- Herbal Twist: Infuse a hint of mint or basil by blending a few leaves in with the strawberries before freezing, adding a refreshing herbal note.
- Coconut Cream Sorbet: For a creamy, tropical delight, add a cup of coconut cream to the mixture for a coconut-strawberry fusion.
Chef’s Notes
Over the years, this Strawberry Sorbet recipe has turned into a cherished family tradition. It’s been handed down through generations, and each summer, you’ll find my siblings and I gathering in the kitchen to rekindle those memories while creating new ones with our kids. The best part? Everyone makes it their own! Some add a splash of orange zest, while others like to experiment with different sweeteners. The variations are endless, but the laughter and joy remain constant.
And while you may think the recipe is perfection as it is, I’ve had my fair share of kitchen mishaps—like the time I accidentally grabbed cayenne pepper instead of salt (who knew sorbet could have a kick?). It’s all part of the culinary adventure, and believe me, every mistake teaches us something new. If you make the wrong turn, just laugh it off and try again. Cooking is just as much about joy as it is about satisfying your cravings!
FAQs and Troubleshooting
Q: Can I use frozen strawberries instead of fresh?
Absolutely! Frozen strawberries are a fantastic alternative. Just let them thaw slightly before blending, and you’re good to go.
Q: Why is my sorbet too hard to scoop?
If your sorbet becomes rock-solid, try letting it sit at room temperature for a bit before scooping. You can also mix in a bit more water or lemon juice to soften it up for next time!
Q: How long can I store the sorbet?
In an airtight container, your sorbet will last in the freezer for about a month. Just remember to cover it well to avoid freezer burn—nobody wants that!
Q: Can I make this sorbet without sugar?
You can attempt a sugar-free version using sugar substitutes like stevia or monk fruit. Adjust quantities to suit your taste buds, and enjoy guilt-free!
Nutritional Info (Optional)
For those of you interested in the numbers, this Strawberry Sorbet generally contains about 120 calories per half-cup serving, with a healthy dose of vitamin C and antioxidants from the strawberries!
And there you have it! A delightful, indulgent, and vibrant Strawberry Sorbet recipe that’s as fun to make as it is to eat. Each scoop transports you back to those sunny summer afternoons filled with laughter and love. So get in the kitchen, whip up a batch, and don’t forget to share your creations! Happy sorbet-making!
PrintStrawberry Sorbet
A refreshing and delightful strawberry sorbet that captures the essence of summer with ripe strawberries and a touch of lemon.
- Prep Time: 20 minutes
- Cook Time: 360 minutes
- Total Time: 380 minutes
- Yield: 6 servings 1x
- Category: Dessert
- Method: Blending & Freezing
- Cuisine: American
- Diet: Vegan
Ingredients
- 2 pounds fresh strawberries (hulled and sliced)
- 1 & 1/3 cups granulated sugar
- 1 cup water
- 3 tablespoons lemon juice
- Pinch of salt
Instructions
- Prepare your strawberries by hulling and slicing them, then place in a mixing bowl.
- Sprinkle the sugar over the strawberries and mix gently; let sit for 15-20 minutes.
- Transfer the strawberries into a blender, add water, lemon juice, and salt; blend until smooth.
- Taste the mixture and adjust sweetness as needed.
- Pour the mixture into a shallow container and freeze for 4-6 hours.
- Serve the sorbet in bowls garnished with fresh mint.
Notes
For variations, try adding other fruits like peaches or blending in mint for a refreshing twist.
Nutrition
- Serving Size: 1/2 cup
- Calories: 120
- Sugar: 25g
- Sodium: 5mg
- Fat: 0g
- Saturated Fat: 0g
- Unsaturated Fat: 0g
- Trans Fat: 0g
- Carbohydrates: 30g
- Fiber: 2g
- Protein: 1g
- Cholesterol: 0mg
Keywords: strawberry, sorbet, dessert, summer treat, vegan dessert
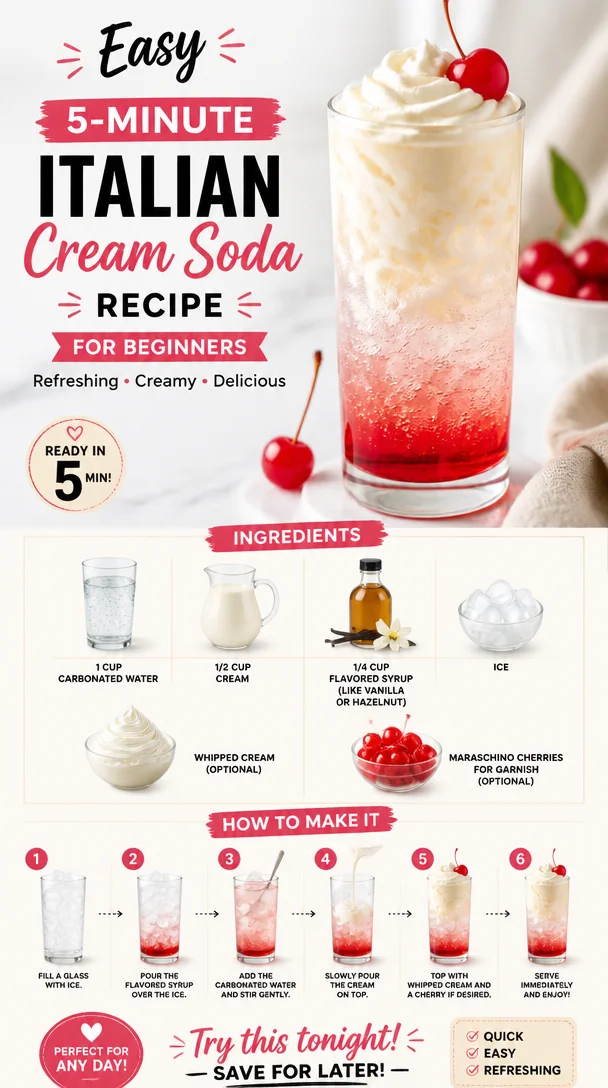
Easy 5-Minute Italian Cream Soda Recipe for Beginners
The Magic of Italian Cream Soda: A Sweet Sip of Nostalgia
Welcome to the delightful world of Italian Cream Soda, where bubbles dance and flavors mingle in the most refreshing way! If you’re like me, you probably have a fondness for those effervescent drinks that combine a creamy richness with a sweet syrupy charm. There’s something utterly delightful about sipping a fizzy treat like this, especially on a warm sunny day or during a cozy movie night.
Allow me to take you on a journey through the process of making this deliciously indulgent drink. It’s simple, yet invigorating and versatile enough to be a favorite among both children and adults alike! So get comfy, because we’re going to stir up some delightful memories and flavors together.
A Sweet Memory from My Childhood
I still remember the first time I had Italian Cream Soda. It was during my childhood at a small Italian café tucked away in a quaint corner of my hometown. The atmosphere inside was warm and inviting, filled with the aroma of fresh pastries and coffee. The moment the waitress set that beautiful glass before me, I was captivated. The layer of creamy foam glistened, and the deep, rich color of the syrup peeked through the fizzy bubbles.
As I took my first sip, the cool sweetness danced on my tongue, instantly transporting me to a sunny afternoon in Italy. That drink was not just a beverage; it was a doorway to memories of laughter, warmth, and the simple pleasures of life. I remember my parents letting me enjoy my own little glass while they savored their coffee — it felt like a rite of passage of sorts.
Now, making Italian Cream Soda at home carries that nostalgia, enabling me to recreate those joyful moments any time I want. Plus, it’s a fantastic way to share that happiness with friends and family. Let’s dive into creating our own delicious version of this delightful drink, shall we?
Ingredients
Here’s what you’ll need to whip up your very own Italian Cream Soda:
-
1 cup carbonated water
The star of the show! It adds a refreshing fizz and lightness to the drink. You can use flavored sparkling water for an extra kick or even a tonic water for a different twist. -
1/2 cup cream
This gives the cream soda its dreamy, velvety texture. You can substitute with half-and-half for a lighter option, or use coconut cream for a dairy-free alternative. -
1/4 cup flavored syrup (like vanilla or hazelnut)
Flavored syrups are what make this drink pop! You can go classic with vanilla, try hazelnut for a nutty depth, or experiment with raspberry or peach for something fruity. A homemade syrup is easy to whip up, too! -
Ice
Essential for keeping your drink nice and chilled. Use regular ice cubes or crushed ice for a more festive look. -
Whipped cream (optional)
For that extra touch of indulgence! Dollop some whipped cream on top, and feel free to use store-bought or make your own. -
Maraschino cherries (optional, for garnish)
Who can resist a cherry on top? It adds a lovely pop of color and sweetness to your drink.
Step-by-Step Instructions
Now that we’ve gathered our ingredients, let’s get to the fun part—making our Italian Cream Soda. Here’s how to do it step-by-step:
-
Fill a Glass with Ice
Start by filling a tall glass with ice cubes. About halfway full should do the trick! This ensures your drink stays cold and refreshing. The sound of ice clinking is already setting a cheerful mood! -
Pour in the Flavored Syrup
Add 1/4 cup of your chosen flavored syrup over the ice. This is where the magic begins! As you pour, watch the vibrant colors swirl together, creating a beautiful layer beneath the ice. Feel free to adjust the syrup amount according to your taste—more for a sweeter soda! -
Add the Carbonated Water
Slowly pour in 1 cup of carbonated water. Here’s a little chef hack: for the fizziest result, pour it gently down the side of the glass to keep that bubbly charm intact! You’ll see that delightful fizzing action as the syrup and soda mingle. -
Stir It Up
Take a spoon and give your drink a gentle stir to combine the syrup and bubbly water. You want to ensure every sip packs that flavored punch! -
Add the Cream
Next, drizzle in 1/2 cup of cream. You can pour this slowly on top, or mix it in—the choice is yours! I love seeing the cream create a beautiful marbled effect before it melds into the fizzy concoction. -
Finish with Whipped Cream and a Cherry
If you’re feeling extra fancy (and who wouldn’t?), top your drink with a generous dollop of whipped cream and a maraschino cherry on top. This last touch turns your Italian Cream Soda into a stunning drink that looks as good as it tastes! -
Serve and Enjoy!
Serve your delightful drink with a straw or spoon, and get ready to savor each fizzy sip! Take a moment to appreciate your creation before diving in — it’s a feast for both the eyes and taste buds.
Serving Suggestions
To make your Italian Cream Soda even more special, consider serving it alongside a light summer dessert like fruit tarts or fresh sorbet. You could also throw a DIY soda bar at your next gathering, allowing guests to customize their drinks with different flavored syrups and toppings. Adding some colorful straws or garnishes like mint leaves can elevate the presentation even further.
Recipe Variations
- Fruit-Infused Cream Soda: Replace the flavored syrup with a homemade fruit syrup using berries or citrus for a fresh twist.
- Iced Coffee Cream Soda: For coffee lovers, mix in a shot of your favorite espresso. The combination of coffee and cream is simply divine!
- Herbic Twist: Add some fresh basil or mint to your preparation for an aromatic burst that complements the sweet creaminess perfectly.
- Dairy-Free Delight: Swap out the cream for coconut milk or almond milk for a lighter, dairy-free version. Use plant-based whipped topping for a finished look.
- Chocolate Lover’s Soda: Use chocolate syrup instead of flavored syrup for a decadent treat that satisfies your sweet tooth.
Chef’s Notes
This recipe holds a special place in my heart, as it fuels the cozy nostalgia of family bonding and summertime fun. Over time, I’ve experimented with different syrups and flavors to keep things interesting. My kids love peach and raspberry variants, and I must admit, those fruity tweaks might now rival the classic vanilla.
Also, I once spilled a whole batch of syrup on my countertop while trying to pour it into a bottle—what a sticky situation that was! But it led to a sweet “kitchen dance party” with my kiddos to clean up the mess and enjoy our creation. Life in the kitchen is always an adventure, isn’t it?
FAQs and Troubleshooting
Q: Can I make this drink ahead of time?
A: I recommend making this drink fresh for the best fizz and creaminess. However, you can prep the syrup and have everything ready to mix!
Q: What is the best syrup to use?
A: It truly depends on your taste! Vanilla is classic, but hazelnut and fruity syrups like raspberry or peach can really elevate the drink.
Q: My cream soda tastes too sweet; what can I do?
A: If your drink is overly sweet, try adding a splash more carbonated water or a dash of lemon juice to balance the sweetness.
Q: Can I use non-carbonated water instead?
A: You can, but it won’t have the same refreshing effect! The fizz is essential to an authentic Italian Cream Soda experience.
Nutritional Info (Optional)
While I won’t dive deep into nutritional specifics, here’s a helpful overview: a standard Italian Cream Soda can range from about 200 to 300 calories depending on the syrup and cream used. It’s a delightful treat meant to be enjoyed, so don’t fret too much over the numbers. Play around with low-calorie syrups or lighter creams if you’re looking to cut back!
There you have it, my friend! Your very own Italian Cream Soda, worthy of all the sunshine-filled days and cozy gatherings ahead. Remember, every sip tells a story, so enjoy the process and share the joy of this bubbly delight with those you cherish! Cheers to delicious memories made in the kitchen!
PrintItalian Cream Soda

A delightful, fizzy drink combining cream and flavored syrup, perfect for warm days or cozy nights.
- Prep Time: 5 minutes
- Cook Time: 0 minutes
- Total Time: 5 minutes
- Yield: 1 serving 1x
- Category: Beverage
- Method: Mixing
- Cuisine: Italian
- Diet: Vegetarian
Ingredients
- 1 cup carbonated water
- 1/2 cup cream
- 1/4 cup flavored syrup (like vanilla or hazelnut)
- Ice
- Whipped cream (optional)
- Maraschino cherries (optional, for garnish)
Instructions
- Fill a tall glass with ice cubes.
- Pour in 1/4 cup of your chosen flavored syrup over the ice.
- Add 1 cup of carbonated water slowly.
- Stir gently to combine the syrup and bubbly water.
- Add 1/2 cup of cream.
- Finish with whipped cream and a maraschino cherry on top.
- Serve with a straw or spoon and enjoy!
Notes
For variations, try using homemade fruit syrups or adding coffee for a unique twist. Enjoy fresh for the best fizz.
Nutrition
- Serving Size: 1 serving
- Calories: 250
- Sugar: 30g
- Sodium: 10mg
- Fat: 12g
- Saturated Fat: 7g
- Unsaturated Fat: 5g
- Trans Fat: 0g
- Carbohydrates: 32g
- Fiber: 0g
- Protein: 2g
- Cholesterol: 40mg
Keywords: Italian Cream Soda, soda, refreshing drink, summer beverage
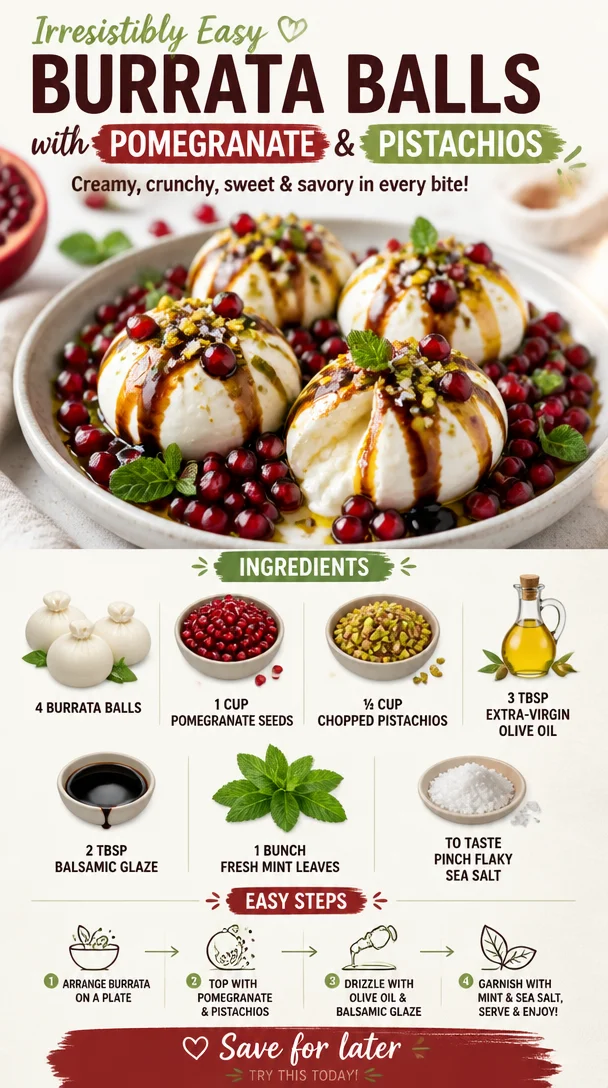
Irresistibly Easy Burrata Balls with Pomegranate & Pistachios
Irresistibly Easy Burrata Balls with Pomegranate & Pistachios
Welcome to a delightful journey of flavor! Today, I’m thrilled to share a recipe that has captured my heart (and my taste buds) like no other: Irresistibly Easy Burrata Balls with Pomegranate & Pistachios. If you’re looking for a dish that’s fresh, full of contrast, and oh-so-indulgent without the guilt, you’re in for a treat!
Picture this: You’ve just come home from a long day, and your thoughts drift to what’s for dinner. You want something quick but special, something to impress without a mountain of effort on your plate. That’s where these burrata balls come into play! Creamy, dreamy burrata cradling a sweet explosion of pomegranate seeds, paired with the rich crunch of pistachios and drizzled with fragrant olive oil—it’s the kind of dish that not only looks stunning but feels like a dream when you dive in.
This dish embodies simplicity and elegance—it’s perfect for setting the mood for a cozy dinner at home or dazzling guests at your next gathering. Plus, this combination of flavors is a crowd-pleaser, and you can whip it up in no time. Gather your ingredients, and let’s dive into this culinary adventure together!
A Personal Story
This recipe holds a special place in my heart, and it all began with a family celebration. I remember the summer of my childhood, bustling with laughter and family gatherings in the backyard. We’d gather around the grill, the scent of fresh herbs and grilled vegetables wafting through the air as we set up the picnic table. It became a tradition to have a casual yet remarkable cheese platter, and that’s where I first met burrata.
One summer evening, my cousin brought over some fresh burrata from an artisanal cheese shop. It was love at first bite! The creamy interior spilled out like liquid gold, and we paired it with whatever we could find—the sweetness of summertime fruits, fresh herbs from the garden, and crunchy nuts. Fast forward to the present day, and I’ve adapted that simple joy into this elegant dish. Each bite of these burrata balls conjures memories of laughter, warmth, and love shared over food. Trust me; once you try it, you’ll want to make it your go-to dish!
Ingredients
Let’s get ready to create some magic in the kitchen! Here’s what you’ll need for these Irresistibly Easy Burrata Balls:
-
4 pieces burrata balls
- The star of the dish! These creamy treasures melt in your mouth and do an incredible job of savoring all the surrounding flavors.
-
1 cup pomegranate seeds
- These juicy gems are like little bursts of sweetness! They not only add elegance but are packed with antioxidants. If you can’t find fresh pomegranates, you can swap with dried cranberries for a similar effect.
-
0.5 cup chopped pistachios
- The delightful crunch in this dish comes from these lovely green nuts. Not only do they impart a nutty flavor, but they also bring vibrant color. For a nut-free alternative, try sunflower seeds.
-
3 tablespoons extra-virgin olive oil
- A drizzle of high-quality olive oil enhances the richness and adds a lovely fruity note. Using a flavored olive oil, such as lemon or garlic, could be a great twist!
-
2 tablespoons balsamic glaze
- This sweet and tangy syrup elevates the entire dish. If you can’t find glaze, a drizzle of traditional balsamic vinegar adds a lovely touch—just let it reduce slightly on the stove for a richer flavor.
-
1 bunch fresh mint leaves
- They provide a refreshing contrast to the richness of the burrata. If mint isn’t your style, fresh basil or arugula makes a fantastic substitute!
-
To taste pinch flaky sea salt
- A sprinkle at the end elevates every single flavor—don’t skip this step!
Step-by-Step Instructions
Ready to whip up this masterpiece? Let’s do it together! Here’s how to bring these Irresistibly Easy Burrata Balls to life:
-
Gather Your Ingredients: First, set your kitchen up for success. Gather all your ingredients and get those pomegranate seeds ready. You can either buy them pre-packaged or cut open a fresh pomegranate; just be warned—things might get a bit messy!
-
Prep the Burrata: Gently place the burrata balls on a serving platter. Using a sharp knife (or even your hands!), make a few slits on the top of each ball. This will allow them to ooze out that luscious, creamy goodness when served.
-
Sprinkle on the Pomegranate Seeds: Next, generously scatter the pomegranate seeds over the burrata. The sweet, jewel-like seeds create a stunning contrast against the white cheese.
-
Add the Chopped Pistachios: Now, take those gorgeous green pistachios and sprinkle them on top. This adds a lovely crunch and pops of color that make the dish irresistible!
-
Drizzle with Olive Oil: Time for a lavish drizzle! Pour the extra-virgin olive oil over the top, allowing it to cascade over all those delightful ingredients. This step is crucial as it creates a silky sauce that ties everything together.
-
Top it with Balsamic Glaze: Next, take that balsamic glaze and drizzle it over the entire platter. You’ll want to be generous but not overwhelming. The glaze’s tangy sweetness perfectly balances the dish’s creaminess.
-
Finish with Mint and Salt: Finally, tear the fresh mint leaves and scatter them atop the burrata, adding a bright pop of color and freshness. Don’t forget that pinch of flaky sea salt to bring forth all the flavors!
-
Serve Immediately: This dish is best served fresh. Grab some crispy crostini, chips, or sliced baguette to pair alongside—it’s the perfect vehicle for carrying that creamy burrata and those delightful toppings!
Serving Suggestions
When it comes to serving these burrata balls, presentation is key! Plate the dish on a large, beautiful platter to showcase the vibrant colors. Surround the burrata with your favorite toasted bread or crostini, so it’s easy for guests to dig in. You can even tuck a few sprigs of mint around the platter for an extra touch of elegance. This dish is all about inviting everyone to share, so let it be the centerpiece of your table, sparking smiles and conversations over each delightful bite.
Recipe Variations
Now, let’s spice things up with a few variations to keep this dish fresh and exciting:
-
Mediterranean Twist: Add slices of ripe tomatoes and Kalamata olives for a classic Mediterranean flair!
-
Spicy Kick: Sprinkle a dash of red pepper flakes over the top for some zing that balances the creaminess of burrata.
-
Fruit Fusion: Switch things up by incorporating seasonal fruits like figs or peaches, which complement the burrata beautifully.
-
Herbed Delight: Mix up the herbs! Instead of mint, try fresh basil or even some zesty thyme for a different flavor profile.
-
Nut-Free Version: Swap out the pistachios for crunchy seeds like pumpkin or sunflower seeds to cater to nut allergies!
Chef’s Notes
This recipe has evolved with my seasonal inspirations and the ingredients I have on hand. A funny kitchen story that comes to mind—one time, I decided to host a last-minute gathering, and I completely forgot to buy pomegranate seeds! I dashed to the store only to discover they had run out of fresh ones but had frozen ones available. I thought, “Why not?” They added a different texture but tasted great! The moral of the story? Don’t be afraid to improvise, and remember that cooking is about exploration and fun.
FAQs and Troubleshooting
1. What if I can’t find burrata?
- Don’t worry! You can substitute it with fresh mozzarella for a similar taste experience, though it won’t be quite as creamy.
2. Can I prepare this dish in advance?
- While I recommend serving burrata fresh for the best flavor, you can prep the ingredients in advance. Just leave the assembly until right before serving.
3. How can I make this dish vegan?
- For a creamy vegan alternative, try using cashew cheese or a thick, herbed vegan cheese spread.
4. My balsamic glaze is too thick; how can I fix it?
- If the glaze has thickened too much, you can gently heat it with a splash of water to loosen it up, bringing it back to a drizzling consistency.
Nutritional Info
While this dish is undeniably delicious, it’s also packed with nutrients! The pomegranate seeds provide antioxidants, and pistachios offer healthy fats. This dish is a balanced blend of good-for-you ingredients and is perfect for a light snack or as part of a larger meal.
Now you’re ready to dive into the magic of these Irresistibly Easy Burrata Balls with Pomegranate & Pistachios. Enjoy, share with friends, and relish the joy that great food can bring. Happy cooking, foodies!
PrintIrresistibly Easy Burrata Balls with Pomegranate & Pistachios

A fresh and indulgent dish featuring creamy burrata balls with sweet pomegranate seeds, crunchy pistachios, and a drizzle of olive oil.
- Prep Time: 10 minutes
- Cook Time: 0 minutes
- Total Time: 10 minutes
- Yield: 4 servings 1x
- Category: Appetizer
- Method: No-cook
- Cuisine: Mediterranean
- Diet: Vegetarian
Ingredients
- 4 pieces burrata balls
- 1 cup pomegranate seeds
- 0.5 cup chopped pistachios
- 3 tablespoons extra-virgin olive oil
- 2 tablespoons balsamic glaze
- 1 bunch fresh mint leaves
- To taste pinch flaky sea salt
Instructions
- Gather your ingredients: First, set your kitchen up for success. Gather all your ingredients and get those pomegranate seeds ready.
- Prep the burrata: Gently place the burrata balls on a serving platter. Make a few slits on the top of each ball.
- Sprinkle on the pomegranate seeds: Generously scatter the pomegranate seeds over the burrata.
- Add the chopped pistachios: Sprinkle them on top for a lovely crunch and color.
- Drizzle with olive oil: Pour the extra-virgin olive oil over the top.
- Top it with balsamic glaze: Drizzle the balsamic glaze over the entire platter.
- Finish with mint and salt: Tear the fresh mint leaves and scatter them atop the burrata, then add a pinch of flaky sea salt.
- Serve immediately: Plate the dish with crispy crostini or sliced baguette.
Notes
This dish is best served fresh, and it pairs well with crispy bread for dipping.
Nutrition
- Serving Size: 1 serving
- Calories: 300
- Sugar: 10g
- Sodium: 150mg
- Fat: 20g
- Saturated Fat: 5g
- Unsaturated Fat: 15g
- Trans Fat: 0g
- Carbohydrates: 25g
- Fiber: 4g
- Protein: 9g
- Cholesterol: 20mg
Keywords: burrata, appetizer, Mediterranean, pomegranate, pistachios, easy recipe
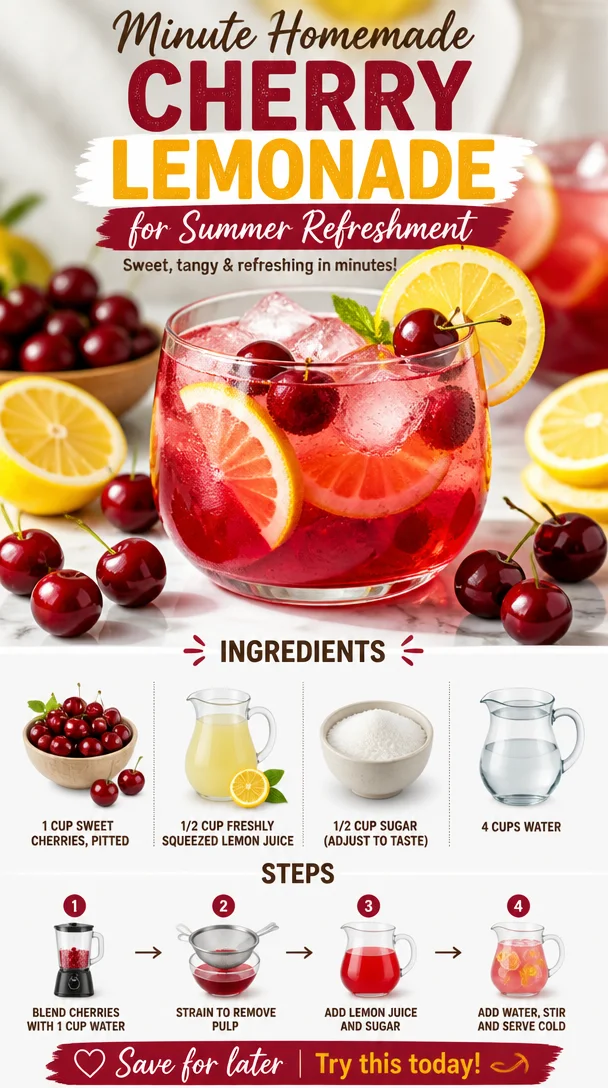
Minute Homemade Cherry Lemonade for Summer Refreshment
Homemade Cherry Lemonade: A Refreshing Twist on a Classic
Summer is here, and with it comes sunshine, picnics, and all the delicious flavors of the season! One sip of homemade cherry lemonade and you’ll be transported to sun-soaked afternoons spent lounging on a porch, surrounded by good friends and laughter. This delightful drink brings together the sweetness of fresh cherries and the tangy zing of lemons, creating a blissful harmony that’s hard to resist. Not only is this cherry lemonade bursting with flavor, but it’s also incredibly easy to make. So, grab your favorite pitcher and let’s dive into the refreshing world of cherry lemonade!
A Bit of Nostalgia
Growing up, summer meant lazy days filled with adventures in the backyard. I fondly remember one particular summer when I was around eight years old. My family had just planted a cherry tree in our backyard, and after months of tender care, it finally bore fruit. One afternoon, my little sister and I decided it was time to harvest the cherries. We excitedly picked bright, juicy cherries and ended up with a whole basketful!
My mom, ever the resourceful chef, decided that it was the perfect opportunity to whip up a batch of cherry lemonade. We crowded around her in the kitchen, our tiny hands helping out as much as possible. The moment she brought that vibrant pitcher to the table was magical—the colors, the aroma, and, of course, the taste. It instantly became a cherished family tradition, one that I look forward to every summer. So, let’s create those sweet memories together with this easy homemade cherry lemonade recipe!
Ingredients
To make this delicious homemade cherry lemonade, you’ll need just a few simple ingredients:
-
1 cup sweet cherries, pitted
These plump, juicy gems are the star of the show! Fresh sweet cherries provide that natural sweetness, but if you’re in a pinch, frozen cherries will work too. Just remember to let them thaw before blending! -
1/2 cup freshly squeezed lemon juice
Freshly squeezed lemons give this drink its zesty kick. Bottled lemon juice can be used in a hurry, but nothing beats the freshness of squeezing it yourself! You can also mix in some lime juice for a fun twist! -
1/2 cup sugar (adjust to taste)
This is where you can personalize the sweetness! Start with half a cup, then adjust based on your personal preference. If you’re looking for a healthier option, you can use honey, agave, or a sugar substitute like stevia. -
4 cups water
The base of your lemonade! You can use plain water, sparkling water for some fizz, or even herbal tea for extra flavor. Herbal teas like hibiscus or peppermint can create unique variations!
Step-by-Step Instructions
Now, let’s get to the fun part—making your cherry lemonade!
-
Prepare the Cherries
Start by washing your cherries thoroughly under cool running water. If you’re using fresh cherries, pit them with a cherry pitter (this gadget is a game-changer!) or carefully with a knife. It can be quite a fun activity! Toss the pitted cherries into your blender. -
Blend the Cherries
Add 1 cup of water to the blender with the pitted cherries. Blend until smooth. You want to create a lovely cherry puree that captures all those amazing flavors. If some cherry pieces remain, that’s totally fine! Strain the mixture through a fine-mesh sieve into a bowl, pressing the pulp to extract as much juice as possible. -
Juice the Lemons
Now it’s time to squeeze the lemons! Cut your lemons in half and use a citrus juicer to extract the juice into a measuring cup. Make sure to remove any seeds that may have fallen in. -
Mix It All Together
In a large pitcher, combine the cherry puree, freshly squeezed lemon juice, and the remaining 3 cups of water. Stir well to combine. Don’t forget to taste at this point! If you want it sweeter, gradually stir in your sugar until you reach your ideal sweetness. -
Chill Before Serving
Once everything is mixed, refrigerate your cherry lemonade for at least 30 minutes. This allows the flavors to meld beautifully and gives you that refreshing chill you crave on a hot day. -
Serve Over Ice
To serve, fill glasses with ice and pour in the cherry lemonade. For an added touch, garnish with fresh lemon slices and a sprig of mint for a lovely presentation!
Serving Suggestions
Homemade cherry lemonade is delightful on its own, but there are some fun ways to elevate your serving game! Consider using fancy glasses or even mason jars for a rustic vibe. You can also create a visually stunning drink by layering your lemonade with fizzy water or a splash of club soda for a sparkling effect. Add a few fresh cherries and lemon slices to each glass to make it pop!
Recipe Variations
Looking to switch things up? Here are a few creative twists for your cherry lemonade:
-
Berry Blend: Add in some strawberries or raspberries for a mixed-berry flavor. Simply blend them with the cherries for a fruity fusion.
-
Herbal Touch: Infuse your lemonade with fresh herbs like basil or mint. Just muddle them in the bottom of the pitcher before adding the liquids for a fresh herbal note.
-
Spiced Lemonade: For a warming twist, add a pinch of cinnamon or ginger. This will take your lemonade to a whole new level of flavor!
-
Cherry Lemonade Spritz: Make it bubbly by mixing in sparkling water or lemon-lime soda right before serving. The extra fizz makes it even more refreshing!
Chef’s Notes
As I’ve played around with this cherry lemonade recipe over the years, it has seen its fair share of transformations—from a simple, classic drink to a vibrant, fruity celebration. I remember one summer party when a friend of mine accidentally added jalapeño slices to the mix. The result? A spicy cherry lemonade that was surprisingly delightful! It turned into a hit at the barbecue. So don’t be afraid to experiment with flavors!
FAQs and Troubleshooting
-
Can I use other fruits instead of cherries?
Absolutely! You can replace cherries with any berry like strawberries, blueberries, or even peaches. Just adjust the sugar level based on the fruit’s sweetness. -
What if my lemonade is too sweet?
If your lemonade turns out too sweet, add a bit more lemon juice or water. Tasting throughout the process is key to achieving your desired balance. -
Can I make this ahead of time?
Yes, this cherry lemonade can be made a day in advance. Just keep it sealed in the refrigerator. However, it’s best served within 1-2 days for optimal freshness. -
How do I store leftover lemonade?
Store any leftover cherry lemonade in an airtight container in the fridge for up to three days. You may want to stir it again before serving, as some separation may occur.
Nutritional Info
While I like to keep things healthy, each serving of this homemade cherry lemonade is approximately:
- Calories: 120
- Sugar: Varies based on sweetener used
- Vitamin C: Rich due to the lemons
So there you have it—a delightful homemade cherry lemonade that’s perfect for summer days, family gatherings, or just a refreshing treat. Let the freshness of cherries and lemons brighten your day. Now, gather your friends, prepare this delicious drink, and make some wonderful memories together! Cheers!
PrintHomemade Cherry Lemonade

A refreshing twist on classic lemonade combining sweet cherries and tangy lemons.
- Prep Time: 15 minutes
- Cook Time: 0 minutes
- Total Time: 45 minutes
- Yield: 4 servings 1x
- Category: Beverage
- Method: Blending
- Cuisine: American
- Diet: Vegan
Ingredients
- 1 cup sweet cherries, pitted
- 1/2 cup freshly squeezed lemon juice
- 1/2 cup sugar (adjust to taste)
- 4 cups water
Instructions
- Prepare the cherries by washing them and pitting them.
- Blend the cherries with 1 cup of water until smooth.
- Strain the mixture through a fine-mesh sieve into a bowl.
- Juice the lemons using a citrus juicer and collect the juice.
- Mix the cherry puree, lemon juice, and remaining 3 cups of water in a large pitcher.
- Chill the mixture in the refrigerator for at least 30 minutes.
- Serve over ice and garnish with lemon slices and mint.
Notes
This lemonade can be customized with other fruits or herbs for a unique flavor twist.
Nutrition
- Serving Size: 1 serving
- Calories: 120
- Sugar: 25g
- Sodium: 5mg
- Fat: 0g
- Saturated Fat: 0g
- Unsaturated Fat: 0g
- Trans Fat: 0g
- Carbohydrates: 30g
- Fiber: 1g
- Protein: 1g
- Cholesterol: 0mg
Keywords: cherry lemonade, summer drink, refreshing beverage, homemade lemonade
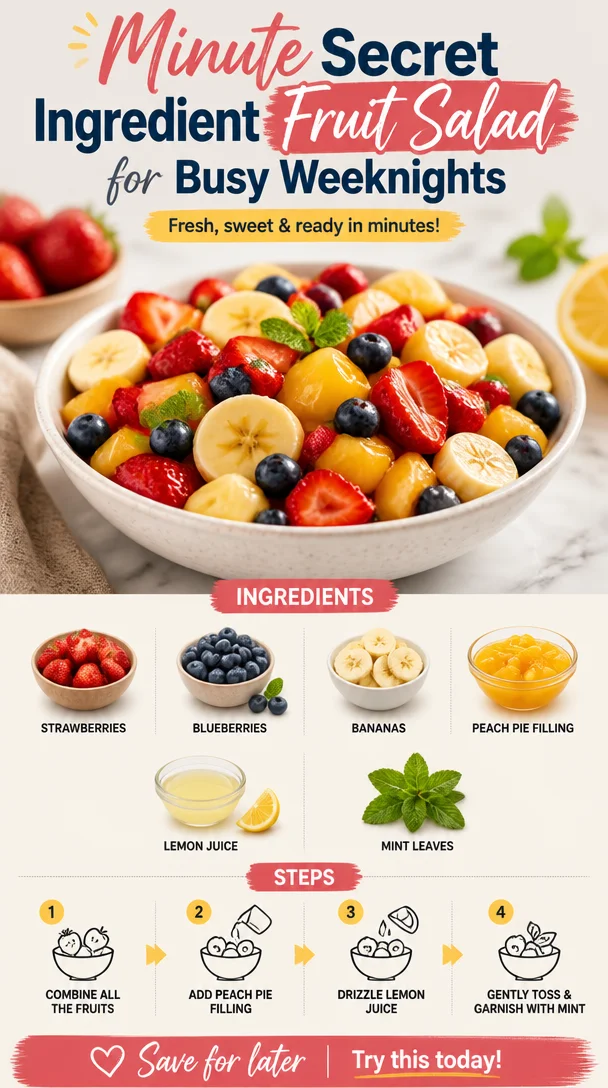
Minute Secret Ingredient Fruit Salad for Busy Weeknights
Secret Ingredient Fruit Salad: A Sweet Twist on a Classic
Welcome to Clean Plate Cravings! If you’re anything like me, a bright and colorful fruit salad can instantly lift your spirits, especially on a warm, sunny day. But what if I told you there’s a way to take that classic dish and elevate it with just one secret ingredient? Well, friends, that’s what we’re diving into today!
Imagine sitting outside on a lazy afternoon, surrounded by friends and family, and served with a bowl of the sweetest fruit salad imaginable. You take a bite and suddenly realize that there’s something special about it—something that makes it ridiculously delicious. This isn’t just fruit; it’s a harmonious blend of flavors that dances on your tongue!
Today, we’re going to explore the magical world of fruit salad with a twist. The secret? Peach pie filling. Yes, you heard that right! It adds a touch of sweetness and a creamy texture that transforms ordinary fruits into a symphony of flavors. Let’s jump into this fun kitchen adventure and create the perfect Secret Ingredient Fruit Salad that’s bound to impress your guests and keep you coming back for more!
A Little Kitchen Nostalgia
I remember the first time I ever experimented with adding something unexpected to a classic dish. I was about 12 years old, and my grandma was in the kitchen making her famous peach cobbler. One summer day, I decided to sneak a taste of the peach pie filling and accidentally spilled some into my fruit bowl of freshly washed strawberries and bananas. At first, I panicked! But then, as I took a taste, I was met with an explosion of flavor. The creaminess of the filling perfectly complemented the tartness of the strawberries and the sweetness of the bananas. That moment ignited a passion in me for playing with ingredients, experimenting, and turning simple dishes into something extraordinary.
Ever since then, I’ve been on a quest to find ways to reinvent simple recipes, celebrating the joy of cooking with fun, unexpected ingredients. So, today, we’re going to channel that same spirit of creativity and joy, transforming a typical fruit salad into something you’ll remember. Grab your favorite fruits and let’s get cooking!
Ingredients
To whip up this Secret Ingredient Fruit Salad, you’ll need the following components:
-
Fruit of Your Choice (e.g., strawberries, blueberries, bananas): Fresh fruits are the star of our show! Select your favorites or whatever is in season. For an extra flavor punch, feel free to mix tart and sweet fruits—like strawberries combined with sweet bananas.
-
Peach Pie Filling: This is the secret ingredient that adds a delightful sweetness and creamy texture. If you’re feeling adventurous, you could also use other pie fillings like cherry or apple for a different twist.
-
1 Tablespoon Lemon Juice: This adds a touch of brightness and balances out the sweetness. Lemon juice also helps prevent fruits like bananas from browning too quickly. If you prefer a different citrus flavor, feel free to swap it with lime juice!
-
Mint Leaves for Garnish: These fresh leaves not only add a pop of color but also a refreshing flavor touch. If mint isn’t your jam, consider using fresh basil or even edible flowers for a whimsical flair.
Step-by-Step Instructions
Ready to make this stunning fruit salad? Let’s break it down step by step!
-
Prepare Your Fruit: Begin by selecting the fruits you want to include. I love a vibrant mix of strawberries, blueberries, and bananas for a sweet and colorful combination. Wash your strawberries and blueberries thoroughly, and if you’re using bananas, slice them into bite-sized pieces. Pro tip: to keep your bananas from browning, only slice them just before assembling.
-
Gently Combine: In a large bowl, add your prepared fruits. Be gentle while mixing; we want to avoid mushing all that goodness together. A light toss will keep the fruits intact and looking fresh!
-
Add the Secret Ingredient: Here comes the magic! Spoon in the peach pie filling. Start with a couple of generous spoonfuls—it’s always easier to add more than to take it out. The filling should coat the fruit without overpowering it.
-
Squeeze in Lemon Juice: Drizzle in that tablespoon of lemon juice and give everything a gentle toss. The citrus will brighten up the flavors and meld everything together. It also adds a beautiful sheen to the fruit!
-
Taste Test: Now’s the fun part—taste your fruit salad! Does it need a little more pie filling? A bit of sugar or honey if you prefer it sweeter? Adjust to your liking!
-
Chill it Down: If you have time, cover the bowl and let your salad chill in the fridge for about 30 minutes before serving. This allows the flavors to marry and creates a refreshing treat.
-
Garnish: Just before serving, you can give your salad a final touch. Toss in some fresh mint leaves, or if you’re feeling fancy, arrange them artfully on top of the salad for a pop of color.
And voilà! Your Secret Ingredient Fruit Salad is ready to shine.
Serving Suggestions
Presentation is everything! When you’re ready to serve, consider using a clear glass bowl to showcase the vibrant colors of your fruit salad. You can serve it as a light dessert, a refreshing side at a summer barbecue, or even as a breakfast twist alongside pancakes or yogurt. If you want to elevate it even more, consider pairing it with a drizzle of honey or a scoop of vanilla ice cream for an indulgent treat!
Recipe Variations
Looking for ways to switch things up? Here are a few fun variations to consider:
- Tropical Twist: Swap your berries for tropical fruits like mangoes, kiwis, and pineapples for a sunny flavor explosion!
- Berry Medley: Use an all-berry mix—blueberries, raspberries, and blackberries—paired with the peach pie filling for a berry lover’s dream.
- Citrus Salad: Add segments of orange and grapefruit for a citrusy kick, pairing wonderfully with the peach flavor.
- Nutty Crunch: Toss in some chopped nuts, like pecans or almonds, for added texture, flavor, and a protein boost.
- Yogurt Parfait: Layer your salad with yogurt and granola for a delicious and satisfying parfait option!
Chef’s Notes
As a chef in this wonderful world of flavors, I’ve learned that recipes are never merely sharable instructions—they carry stories and memories. This fruit salad has been a staple in my gatherings, sparking laughter and joyful exchanges at every bite. While I always come back to the tried-and-true peach pie filling, I love to play around with other unexpected ingredients too; who knows—perhaps one day I’ll stumble upon the next delightful surprise! Every time I make this salad, I’m reminded of those summer afternoons spent with family, creativity flowing in the air, and joy found in every bowl.
FAQs and Troubleshooting
Here are some common questions you might have when making your Secret Ingredient Fruit Salad, along with helpful tips:
Q: What fruits work best in this salad?
A: Almost any fruit works well! Just make sure they’re ripe and fresh. I find that the best combinations happen with a mix of sweet and tart flavors. Don’t shy away from trying seasonal fruits!
Q: Can I prepare this salad in advance?
A: Absolutely! You can make it a few hours ahead of time, but I recommend adding delicate fruits like bananas only right before serving to avoid browning. Keep it refrigerated until you’re ready to enjoy!
Q: Can I use frozen fruit?
A: Yes, though fresh will give you a crisper texture. If you choose frozen fruit, make sure to thaw and drain it well, as excess liquid could make your salad more soupy than you’d like.
Q: Is this salad good for meal prep?
A: While this salad is best fresh to maintain texture, you can prepare the fruit the night before and mix everything the next day for a quick grab-and-go meal.
Nutritional Info
While the specific nutritional information can vary based on the fruits and pie filling used, generally, this salad is a nutritious choice packed with vitamins and antioxidants from the fresh fruits, along with some added sweetness from the pie filling. Enjoy this as a guilt-free treat!
So, whether you’re entertaining guests or simply looking to brighten your day, this Secret Ingredient Fruit Salad is an absolute must-try. With just a simple twist, you’ll create a dish that’s vibrant, delicious, and oh-so-memorable. Let’s get cooking and enjoy every delicious bite!
PrintSecret Ingredient Fruit Salad
A refreshing fruit salad elevated with the secret addition of peach pie filling for a creamy, sweet twist.
- Prep Time: 15 minutes
- Cook Time: 0 minutes
- Total Time: 15 minutes
- Yield: 4 servings 1x
- Category: Side Dish
- Method: No cooking required
- Cuisine: American
- Diet: Vegetarian
Ingredients
- Fruit of Your Choice (e.g., strawberries, blueberries, bananas)
- 1 cup Peach Pie Filling
- 1 Tablespoon Lemon Juice
- Mint Leaves for Garnish
Instructions
- Prepare your fruit: Select and wash the fruits you want to include, slicing bananas into bite-sized pieces just before assembling.
- Gently combine: In a large bowl, add your prepared fruits and toss gently to avoid mushing.
- Add the secret ingredient: Spoon in the peach pie filling and mix until the fruit is coated.
- Squeeze in lemon juice: Drizzle lemon juice over the fruit and give it a gentle toss.
- Taste test: Adjust sweetness if necessary by adding more pie filling, sugar, or honey.
- Chill it down: Cover and let the salad chill in the fridge for about 30 minutes.
- Garnish: Just before serving, toss in fresh mint leaves or arrange them on top.
Notes
Serve in a clear glass bowl to showcase the vibrant colors. Pairs well with honey or vanilla ice cream.
Nutrition
- Serving Size: 1 serving
- Calories: 180
- Sugar: 25g
- Sodium: 10mg
- Fat: 1g
- Saturated Fat: 0g
- Unsaturated Fat: 1g
- Trans Fat: 0g
- Carbohydrates: 43g
- Fiber: 3g
- Protein: 1g
- Cholesterol: 0mg
Keywords: fruit salad, summer recipe, peach pie filling, refreshing dessert
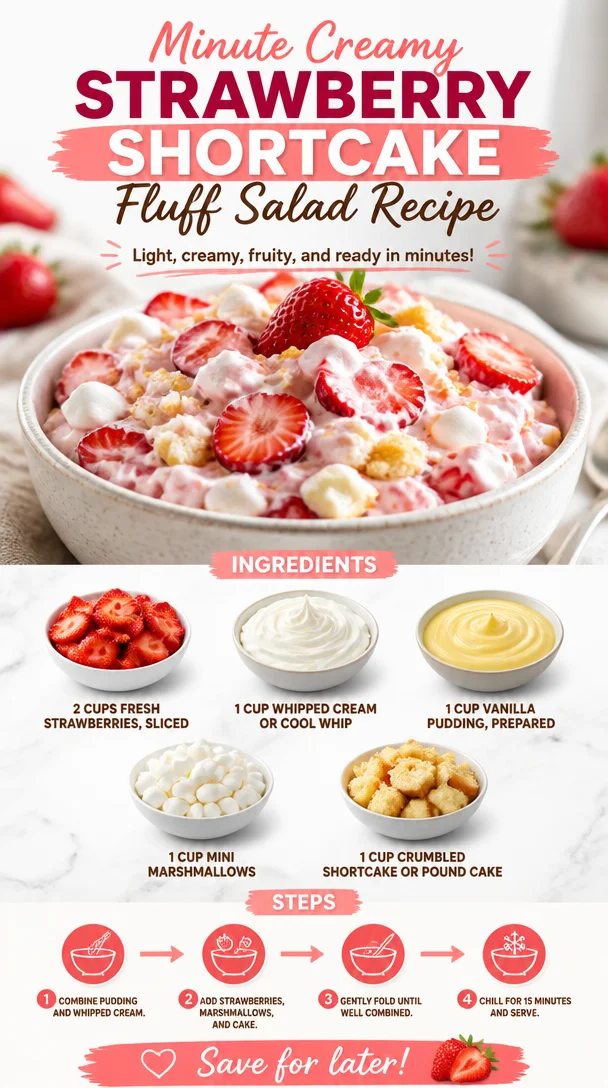
Minute Creamy Strawberry Shortcake Fluff Salad Recipe
Strawberry Shortcake Fluff Salad: A Sweet Symphony of Flavor
Welcome, friends, to a delightful culinary journey where fun flavors and wholesome ingredients come together in perfect harmony! Today, I’m excited to share a recipe that embodies everything I believe about cooking and eating—it’s simple, absolutely delicious, and brings a smile to your face. Say hello to my Strawberry Shortcake Fluff Salad! Perfect for summer gatherings, cozy family dinners, or even a treat for yourself, this dish is all about celebrating fresh, feel-good food.
Picture this: it’s a sun-kissed afternoon, and the tantalizing smell of strawberries wafts through the air. Family and friends are gathered, laughter lingers, and the table is bursting with colors and joyful energy. That’s the essence of summer, isn’t it? When I think back to my childhood summers, one of my fondest memories is the big family picnics in my grandparents’ backyard. My grandmother, a culinary wizard in her own right, would whip up this fluffy, sweet Strawberry Shortcake Fluff Salad that had us all clamoring for seconds. It was a refreshing treat on hot days—a glorious blend of flavors that paired beautifully with sunshine and smiles.
You’ll find this dish captures that nostalgia while adding a modern twist. The sweetness of ripe strawberries, combined with fluffy whipped cream, luscious vanilla pudding, soft mini marshmallows, and buttery shortcake crumbles, creates a delightful dessert that’s not just a feast for the palate but also a visual delight. Trust me, this Strawberry Shortcake Fluff Salad will become a staple in your home, bringing joy and vibrant flavors to your table. Let’s dive into the kitchen and create this masterpiece!
A Sweet Memory to Savor
As I reminisce about those cherished summer picnics, I can almost hear the laughter and see the smiles of my loved ones as they dug into my grandma’s creation. It wasn’t just food; it was a moment—a celebration of unity, love, and summer. She always had a knack for making the simplest ingredients shine. I still remember her saying, “A good dish is all about love and good quality ingredients.” This philosophy inspired me to keep my recipes approachable but flavorful.
One summer, I decided to help her in the kitchen while she prepared the salad. I was responsible for slicing strawberries and sneaking a few into my mouth when I thought she wasn’t looking! The vibrant red of the berries, the fluffy clouds of cream, and the golden shortcake crumbles stuck with me. Every spoonful was a harmony of textures, flavors, and memories, and we both knew that sharing food makes every experience richer and more meaningful. Today, I cherish those moments and hope to pass on that joy and love through my cooking.
Let’s bring a bit of that nostalgia into your home with my rendition of this delightful Strawberry Shortcake Fluff Salad!
Ingredients
Before we roll up our sleeves and get cooking, let’s gather our ingredients. This recipe is as simple as it is delicious. Here’s what you’ll need:
-
2 cups fresh strawberries, sliced
- Fresh strawberries are the star of this dish! When choosing berries, look for vibrant, plump ones without any bruises. If you can’t find fresh strawberries, feel free to use frozen strawberries. Just thaw them first and drain excess moisture to avoid a soggy fluff.
-
1 cup whipped cream or Cool Whip
- Whipped cream adds a light and airy texture. You can use store-bought Cool Whip for convenience, or make your own by whipping heavy cream until it forms soft peaks. The home-made version will taste fresher!
-
1 cup vanilla pudding, prepared
- This ingredient brings creaminess and sweetness. You can use instant pudding, but for a richer flavor, consider preparing it from scratch with milk, sugar, and vanilla.
-
1 cup mini marshmallows
- Mini marshmallows add a fun, chewy texture to the fluff salad. If you’re feeling adventurous, swap these out for flavored marshmallows, like strawberry or coconut, for a unique twist.
-
1 cup crumbled shortcake or pound cake
- Shortcake or pound cake provides a comforting, buttery base. If you’re looking for a gluten-free version, there are plenty of gluten-free cakes available that will work beautifully!
These ingredients come together to create a dish that not only tastes incredible but also brings back joyful memories of family gatherings and sunny days.
Step-by-Step Instructions
Now that we have our lovely ingredients lined up, let’s get into the fun part—creating our Strawberry Shortcake Fluff Salad! Here’s a step-by-step guide:
-
Prep the Strawberries:
- Take your fresh strawberries, remove the green tops, and slice them into thin pieces. Don’t be shy about tasting a few as you go—quality control is a must! Set them aside in a bowl.
- Tip: For added flavor, sprinkle the sliced strawberries with a little sugar and let them sit for about 15 minutes. This will create a syrupy sweetness that enhances the overall flavor!
-
Whip the Cream:
- If you’re making your own whipped cream, use a mixing bowl and an electric mixer to whip the heavy cream until it forms soft peaks. Add a tablespoon of powdered sugar for sweetness and a splash of vanilla extract for flavor.
- Chef Hack: Make sure your mixing bowl and beaters are cold to ensure the cream whips up perfectly!
-
Prepare the Pudding:
- If using instant pudding, follow the package instructions by mixing it with milk. If you’re making your own, combine milk, sugar, and a touch of vanilla in a saucepan, heat until warm, then stir in your cornstarch until thickened.
- Let the pudding cool slightly before folding it into the whipped cream.
-
Combine Whipped Cream and Pudding:
- In a large mixing bowl, gently fold the prepared whipped cream into the vanilla pudding using a spatula. Be gentle; we want to keep that lovely light texture!
- Pro Tip: Folding involves gently mixing without deflating the whipped cream, rotating the bowl while you scrape along the sides and bottom with the spatula.
-
Mix in the Marshmallows:
- Add the mini marshmallows to the cream and pudding mixture, incorporating them subtly. These will be little delightful bites in your salad!
-
Assemble the Fluff Salad:
- In a large serving bowl, layer the prepared strawberry slices, followed by a generous layer of the whipped cream and pudding mixture. Then add a layer of crumbled shortcake or pound cake. Repeat until you’ve used all ingredients, finishing with a layer of the whipped cream mixture on top.
- Presentation Tip: You can also serve this is individual cups for a beautiful display—perfect for parties!
-
Chill and Serve:
- Cover the bowl with plastic wrap and let it chill in the refrigerator for at least 1 hour. This step is crucial! Chilling allows the flavors to meld and gives the marshmallows time to soften for that perfect fluffiness.
- When you’re ready to serve, give it a gentle stir, and enjoy the beautiful blend of flavors and textures!
Serving Suggestions
When it comes to serving Strawberry Shortcake Fluff Salad, the sky’s the limit! The vibrant colors make for a stunning presentation. You can serve it right from the bowl or in individual dessert cups layered elegantly—what a treat!
Consider garnishing each serving with additional sliced strawberries or a sprinkle of crushed shortcake crumbs on top for that extra touch. If you’re feeling a bit indulgent, a drizzle of chocolate or caramel sauce wouldn’t hurt either!
Recipe Variations
Now, if you’re feeling adventurous and want to tweak this recipe, I’ve got some fun suggestions for you:
-
Berry Medley: Swap out the strawberries for a mix of your favorite berries—blueberries, raspberries, or blackberries can add an exciting twist to the flavor profile.
-
Chocolate Lovers: Add some mini chocolate chips or a drizzle of chocolate syrup when layering for a rich chocolate-strawberry flavor explosion!
-
Nutty Delight: Sprinkle a handful of chopped nuts (like pecans or almonds) between the layers for added crunch and flavor.
-
Cream Cheese Variation: For a richer texture, consider folding in a bit of softened cream cheese into the whipped cream and pudding mixture. It adds a delicious creaminess to the fluff!
-
Dairy-Free Version: Use coconut cream in place of whipped cream, cashew milk pudding, and gluten-free cake to convert this into a delightful dairy-free treat!
Chef’s Notes
As I reflect on this recipe, I can’t help but think about how it has evolved over time. My grandmother had a knack for making seasonal fruits shine in her desserts, and she effortlessly balanced richness with lightness. I’ve kept her spirit alive by ensuring my recipe is just as simple, yet bursting with flavor.
Funny story: One year, I decided to throw a summer BBQ and whipped this salad up as an impromptu dessert, only to find out that I was also serving it as an appetizer while everyone mingled! Who could resist such a delicious, fluffy treat right from the start?
I love seeing how different families interpret this recipe—each version reflecting personal tastes and memories. It’s what makes cooking so special.
FAQs and Troubleshooting
1. Can I make this salad ahead of time?
Absolutely! This salad actually tastes better after sitting in the fridge for a few hours as the flavors meld. Just be sure to cover it well to keep it fresh.
2. How do I prevent the strawberries from getting mushy?
As mentioned earlier, tossing the sliced strawberries with a little sugar helps them maintain their structure before adding them to the fluff. Also, avoid mixing them in too early.
3. Can I use a different type of cake?
Definitely! Any soft cake will work. Angel food cake is an excellent alternative if you want something lighter, or even a sponge cake!
4. The marshmallows are sticking together; what can I do?
If the mini marshmallows tend to clump up, toss them lightly in a bit of cornstarch before adding them to the mix. This will help keep them fluffy!
Nutritional Info
While this dish falls squarely in the dessert category, it brings with it a medley of fresh fruit. Generally, a serving can provide:
- Calories: Approximately 250
- Protein: 2g
- Fat: 10g
- Carbohydrates: 36g
- Dietary Fiber: 1g
Of course, nutritional values will vary based on ingredients and portions, but who’s counting when you’re having this much fun?
And there you have it! The Strawberry Shortcake Fluff Salad, a beautiful dish that brings joy, laughter, and a bit of nostalgia to your table. Whether you serve it at a celebration, family picnic, or simply enjoy it at home, it’s a dessert that’s sure to please everyone. Remember, food is about creating memories—so gather your loved ones and let the magic happen! Enjoy, friends!
PrintStrawberry Shortcake Fluff Salad
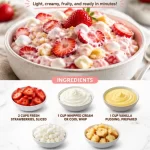
A delightful and fluffy dessert that brings together fresh strawberries, whipped cream, vanilla pudding, mini marshmallows, and shortcake crumbles for a refreshing treat perfect for summer.
- Prep Time: 15 minutes
- Cook Time: 0 minutes
- Total Time: 75 minutes
- Yield: 4 servings 1x
- Category: Dessert
- Method: No Cooking
- Cuisine: American
- Diet: Vegetarian
Ingredients
- 2 cups fresh strawberries, sliced
- 1 cup whipped cream or Cool Whip
- 1 cup vanilla pudding, prepared
- 1 cup mini marshmallows
- 1 cup crumbled shortcake or pound cake
Instructions
- Prep the strawberries: Remove the green tops and slice them thinly. Set aside.
- Whip the cream: Whip the heavy cream until soft peaks form, adding powdered sugar and vanilla to taste.
- Prepare the pudding: Mix instant pudding with milk or prepare it from scratch and let it cool.
- Combine the whipped cream and pudding gently to maintain the texture.
- Mix in the mini marshmallows to the cream mixture.
- Assemble the salad by layering strawberries, whipped cream mixture, and shortcake in a serving bowl.
- Chill in the refrigerator for at least 1 hour before serving.
Notes
Can be made ahead of time and tastes better after chilling. Serve in bowls or individual cups for a beautiful presentation.
Nutrition
- Serving Size: 1 serving
- Calories: 250
- Sugar: 20g
- Sodium: 200mg
- Fat: 10g
- Saturated Fat: 6g
- Unsaturated Fat: 4g
- Trans Fat: 0g
- Carbohydrates: 36g
- Fiber: 1g
- Protein: 2g
- Cholesterol: 30mg
Keywords: dessert, strawberry salad, fluff salad, summer dessert