Homemade Old Fashioned Ice Cream
Homemade Old Fashioned Ice Cream: A Creamy Delight
Ah, the sweet, nostalgic lure of homemade ice cream! It’s a summer tradition that takes me back to sun-soaked afternoons with my family, gathered around the old crank ice cream maker that seemed to be more of a workout than a kitchen tool! With each churn, the refreshing aroma of sweet cream filled the air, mixing with laughter and the occasional splash of melting ice. Making ice cream at home has a certain magic to it; it’s not just about satisfaction in a bowl—it’s about the memories we create while making it.
When I think of the perfect summertime treat, nothing beats the experience of sharing a scoop (or three!) of rich, creamy ice cream. It’s pure joy on a hot day, and there’s something wonderfully satisfying about crafting it from scratch, knowing just what goes into that heavenly mixture. Today, we’ll dive into the simple art of making old-fashioned vanilla ice cream, the classic that never goes out of style.
So, roll up your sleeves and let’s embark on this delicious journey together! Homemade ice cream isn’t just a treat; it’s a celebration of freshness, fun, and flavors that warm the heart.
A Whimsical Memory
Growing up, my family had a tradition every Fourth of July: we would transform our backyard into a mini carnival complete with homemade ice cream. Armed with a sun-hat, lots of ice, and an endless supply of enthusiasm, we’d usher in that sweet summer delight. My dad would take charge of the ice cream maker, and us kids would stand anxiously watching, ready to dive in once it was ready.
I can still picture it: walking around with our paper bowls, letting the sun warm our cheeks while we savored scoop after scoop of creamy goodness. My mom’s secret touch was a hint of vanilla bean, which elevated our humble bowl of ice cream to a whole new level. This yearly tradition was more than just a dessert; it was a lesson in patience, a bonding experience, and a taste of childhood delight. Now, whenever I whip up a batch of homemade ice cream, I’m instantly transported back to those roaring summers filled with joy, laughter, and, of course, ice cream!
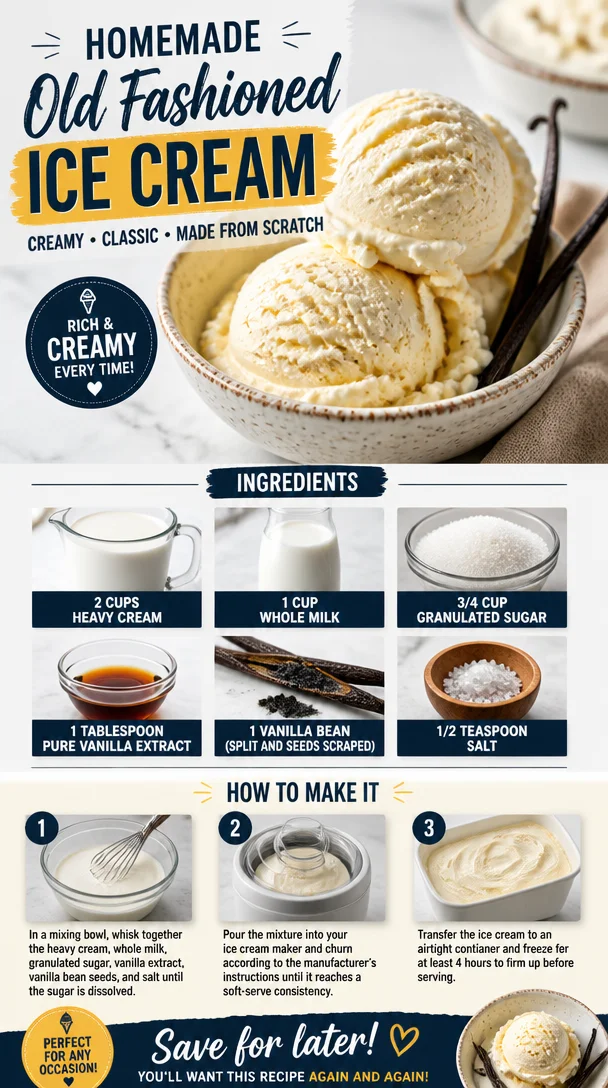
Ingredients
Here’s what you’ll need to create your very own homemade old-fashioned vanilla ice cream:
-
2 cups heavy cream
Rich and creamy, heavy cream provides the base for a luscious texture. You can substitute with coconut cream for a dairy-free option or use half and half for a lighter version. -
1 cup whole milk
Whole milk adds smoothness and richness to the ice cream. If you’re looking for a lower-fat option, feel free to use 1% or 2% milk, but remember it may change the creaminess. -
3/4 cup granulated sugar
Sweetness is key here! Organic cane sugar or coconut sugar works as a great alternative, though it may slightly alter the color and flavor. -
1 tablespoon pure vanilla extract
Pure vanilla extract adds that quintessential flavor we’re all familiar with. If you’re feeling adventurous, you can substitute with almond extract, but go easy on it—it’s stronger! -
1 vanilla bean (split and seeds scraped)
This is where the magic happens! The seeds contain flavor profiles that elevate your ice cream. If you don’t have a vanilla bean, just increase the pure vanilla extract by a teaspoon. -
1/2 teaspoon salt
A pinch of salt enhances all the flavors, balancing out the sweetness and giving a full-bodied taste.
Step-by-Step Instructions
Getting started is easy! Here’s how to make your homemade old-fashioned ice cream:
Step 1: Mix the Base
In a large mixing bowl, whisk together heavy cream, whole milk, and granulated sugar until the sugar is completely dissolved. This usually takes about 2-3 minutes. Chef Tip: If you want to speed things up, you can heat up the milk slightly on the stove, then mix in the sugar, but allow it to cool back down before adding in the cream.
Step 2: Add the Flavor
Now, add the pure vanilla extract and the seeds from the vanilla bean into the mixture. The aroma will hit you right away and infuse your mix with incredible flavor. Stir well to combine.
Step 3: Chill Out
Cover your mixture with plastic wrap and let it chill in the refrigerator for at least 2 hours, or overnight if you have the patience! This step allows the flavors to mingle and strengthens that dreamy vanilla essence. Chef Hack: Make this the night before your ice cream party for maximum flavor impact!
Step 4: Churn Away
Once chilled, pour the mixture into your ice cream maker, following the manufacturer’s instructions. Churn until it thickens (usually about 20-25 minutes). If you don’t have an ice cream maker, no worries! Pour the mixture into a shallow dish, freeze for an hour, whisk it to break up the ice crystals, and repeat every 30 minutes for about 2-3 hours. It’s a little more work, but trust me, it’s worth it!
Step 5: Freeze or Enjoy
Once the ice cream reaches a soft-serve consistency, you can either enjoy it right away or transfer it to an airtight container to freeze for later. Soft ice cream is amazing, but letting it freeze for a few hours in the container creates that iconic scoopable texture. Chef’s Tip: Place a piece of parchment paper directly on top of the ice cream before sealing it for an extra layer of protection!
Serving Suggestions
You can’t go wrong when it comes to serving this ice cream! For a stylish presentation, scoop into chilled bowls and sprinkle with a bit of chocolate sauce, fresh fruit, or crushed cookies. If you’re feeling festive, create an ice cream sundae bar with fun toppings like whipped cream, nuts, and sprinkles—let your guests customize their dream dessert!
Recipe Variations
Want to get creative? Here are a few twists on the classic recipe:
- Chocolate Chip Cookie Dough: Fold in chunks of cookie dough and chocolate chips after you churn but before you freeze. Yum!
- Minty Fresh: Add a few drops of peppermint extract and green food coloring for a refreshing mint flavor.
- Fruit Infusions: Puree your favorite fruits (strawberries, peaches, or bananas) and swirl them into the base after churning for a fruity twist.
- Espresso Delight: Mix in a shot of espresso for a coffee-flavored treat that’s perfect for caffeine lovers.
- Nutty Variations: Add chopped nuts or swirl in nut butter after churning for added crunch and flavor.
Chef’s Notes
Every ice cream-making experience is like a splash of creativity and personal flair! While I cherish the classic vanilla, I’ve had my fair share of culinary experiments—like the time I accidentally mistook cayenne pepper for cinnamon! Let’s just say some concoctions turned out a bit… interesting. Over the years, my homemade ice cream recipes have evolved into a blend of my fondest food memories and a sprinkle of adventurous spirit. With each batch, I encourage you to add your personal touch—whether that’s adjusting sweetness, tweaking flavoring, or adding your favorite mix-ins. After all, the kitchen is your canvas!
FAQs and Troubleshooting
Q: Why is my ice cream icy instead of creamy?
A: The key is to ensure the sugar is fully dissolved before churning. Also, frequent stirring during the freezing process (if not using a maker) helps break up ice crystals!
Q: Can I make this without an ice cream maker?
A: Absolutely! Just follow the whisking method mentioned above, and you’ll still achieve a delicious treat!
Q: Is it safe to eat raw eggs?
A: This recipe doesn’t contain raw eggs, so rest easy! Just make sure to use pasteurized ingredients.
Q: Can I use flavored extract other than vanilla?
A: Yes! You can customize flavors with almond, coconut, or even citrus extracts. Just remember to adjust the quantity to suit your taste.
Nutritional Info
(Your nutritional details can be included here if needed, keeping in mind serving sizes and adjustments based on variations made.)
Remember, cooking is all about making memories and enjoying the process! Dive into this homemade old-fashioned ice cream recipe and share the joy of cool, creamy goodness with family and friends. Cheers to summer, delicious treats, and good times ahead!
PrintHomemade Old Fashioned Ice Cream
A simple and nostalgic recipe for homemade old-fashioned vanilla ice cream, perfect for summer celebrations.
- Prep Time: 15 minutes
- Cook Time: 25 minutes
- Total Time: 140 minutes
- Yield: 4 servings 1x
- Category: Dessert
- Method: Churning
- Cuisine: American
- Diet: Vegetarian
Ingredients
- 2 cups heavy cream
- 1 cup whole milk
- 3/4 cup granulated sugar
- 1 tablespoon pure vanilla extract
- 1 vanilla bean (split and seeds scraped)
- 1/2 teaspoon salt
Instructions
- Mix the Base: In a large mixing bowl, whisk together heavy cream, whole milk, and granulated sugar until the sugar is completely dissolved.
- Add the Flavor: Now, add the pure vanilla extract and the seeds from the vanilla bean into the mixture.
- Chill Out: Cover your mixture with plastic wrap and let it chill in the refrigerator for at least 120 minutes, or overnight.
- Churn Away: Once chilled, pour the mixture into your ice cream maker, following the manufacturer’s instructions.
- Freeze or Enjoy: Once the ice cream reaches a soft-serve consistency, transfer it to an airtight container to freeze for later.
Notes
Chef’s Tip: Place a piece of parchment paper directly on top of the ice cream before sealing it for an extra layer of protection!
Nutrition
- Serving Size: 1 serving
- Calories: 350
- Sugar: 25g
- Sodium: 100mg
- Fat: 30g
- Saturated Fat: 18g
- Unsaturated Fat: 8g
- Trans Fat: 0g
- Carbohydrates: 30g
- Fiber: 0g
- Protein: 4g
- Cholesterol: 90mg
Keywords: ice cream, homemade ice cream, vanilla ice cream, summer dessert, old-fashioned ice cream