
Double Chocolate Espresso Muffins
Indulge in Decadence: Double Chocolate Espresso Muffins
Hey there, fellow food lovers! Today, we’re diving into a delicious treat that will make your taste buds dance with joy—Double Chocolate Espresso Muffins! If you’ve ever dreamt of a muffin that combines the rich depth of chocolate with the bold kick of espresso, then hold onto your mixing bowls, because this recipe is about to become your new favorite.
Now, I know what you’re thinking. Muffins for breakfast? They can’t possibly be healthy! But fear not; I’m here to prove that muffins can indeed be both delightful and nourishing. These Double Chocolate Espresso Muffins are packed with flavor and made from wholesome ingredients that will energize you for the day ahead. Who says healthy eating can’t include a little decadence?
Let’s take a moment to visualize that first warm muffin fresh from the oven. The aroma of coffee mingling with chocolate wafts through the air, creating a comforting embrace that will make every morning feel a little more special. Are you feeling it? I know I am! So grab your apron, and let’s get started on this mouthwatering journey.
A Taste of Nostalgia
As I dive into the world of baking, my mind drifts back to my childhood weekends spent in my grandmother’s kitchen. She was a baking wizard, always conjuring up something sweet that filled the house with warmth and love. But there’s one particular memory that stands out: the time she let me take the lead on my very first batch of chocolate muffins.
With flour dusting my nose and chocolate smeared on my cheek, I felt like a chef with the world at my fingertips. The mixer whirred, the scents swirled, and before I knew it, we had rich, chocolatey delights in the oven, waiting to rise to perfection. Each bite was pure bliss—a soft, warm hug made with love.
While my grandma’s muffins were delightful, I wanted to put my spin on that nostalgic recipe. With my love for the bold flavors of coffee, I decided to elevate my favorite treat to create Double Chocolate Espresso Muffins. They bring back the joy of those weekends in my grandma’s kitchen, but with a little adult twist that makes them oh-so-special. Ready to start your own baking adventure? Let’s get those ingredients together!
Ingredients
Here’s what you’ll need to whip up these dreamy muffins, along with some handy tips from your friendly chef:
-
1 cup all-purpose flour
The backbone of our muffins! If you’re looking for a gluten-free option, feel free to swap in a 1:1 gluten-free flour blend. -
1/2 cup cocoa powder
This is where the rich chocolate flavor comes to life! For a different take, consider using dark cocoa powder for an even deeper flavor. -
1 tsp baking powder
This little powerhouse helps our muffins rise beautifully. Don’t get it confused with baking soda—it’s essential for that perfect texture! -
1/2 tsp baking soda
Another leavener that complements the baking powder and helps create that delightfully fluffy texture. -
1/4 tsp salt
Salt enhances all the flavors in your baked goods. Don’t skip it, or your muffins might taste a bit flat! -
1/2 cup sugar
Classic granulated sugar helps balance the rich flavors. You can use coconut sugar for a more natural sweetener. -
1/4 cup brown sugar
Adding depth and moisture, brown sugar gives the muffins a chewy texture. Light or dark brown sugar work well here. -
1/2 cup brewed espresso or strong coffee, cooled
Ah, the magic ingredient! The coffee intensifies the chocolate flavor. If you’re not a coffee lover, you can replace it with milk, but the espresso is what takes these muffins to the next level! -
1/4 cup milk
Adds moisture and a tender crumb to our muffins. Any milk variety will do—almond or oat milk can work well here, too! -
1/4 cup melted butter
Butter adds richness and flavor. For a dairy-free option, you could try coconut oil or a plant-based butter. -
1 egg
Essential for binding our ingredients and giving the muffins structure. If you’re vegan, a flax egg (1 tbsp flaxseed meal + 2.5 tbsp water) works wonderfully! -
1 tsp vanilla extract
The aromatic element brings everything together. Fresh vanilla beans or vanilla bean paste can also add a lovely touch! -
1 cup chocolate chips
Go for semisweet or dark chocolate chips for an indulgent touch! If you’re up for it, try peanut butter or white chocolate chips for a twist!
Let’s Bake Those Muffins!
Now that we have our ingredients, let’s get mixing! Follow these simple steps to create a batch of Double Chocolate Espresso Muffins that will have everyone asking for seconds.
-
Preheat Oven:
Preheat your oven to 350°F (175°C) and line a muffin tin with paper liners or grease it with cooking spray. This ensures your muffins won’t stick and makes cleanup a breeze! -
Combine Dry Ingredients:
In a large bowl, whisk together the flour, cocoa powder, baking powder, baking soda, and salt until thoroughly mixed. This step is crucial for creating that perfect rise in your muffins. -
Mix Wet Ingredients:
In a separate bowl, combine the granulated sugar, brown sugar, cooled espresso, milk, melted butter, egg, and vanilla extract. Whisk until well blended. The sugars should be dissolved, and the mixture should be smooth. -
Merge Mixtures:
Gradually add the dry mixture to the wet mixture, stirring gently. This is a key moment—overmixing can lead to dense muffins. Combine until just moistened, and don’t worry if there are a few lumps! -
Fold in Chocolate Chips:
Now comes the fun part! Gently fold in the chocolate chips, making sure they are evenly distributed throughout the batter. Feel free to snag a few to snack on; I won’t tell anyone! -
Fill Muffin Tin:
Using a scoop or spoon, divide the batter among the muffin cups, filling each about 2/3 full. This allows the muffins to rise without overflowing. Trust me, they’ll be irresistible! -
Bake Them Up:
Place the muffin tin in the preheated oven and bake for 18–20 minutes or until a toothpick inserted into the center comes out clean. The smell of baking chocolate and coffee will waft through your kitchen, and you won’t be able to resist peeking! -
Cool and Enjoy:
Once baked, let the muffins cool in the tin for about 5 minutes before transferring them to a wire rack. They’ll be too hot to handle, but once they’re cool enough, dig in!
How to Serve
These Double Chocolate Espresso Muffins shine best warm from the oven or lightly toasted. A dusting of powdered sugar on top can elevate them for a brunch spread, or you can serve them alongside a cup of coffee or cold glass of almond milk for a delightful pairing. For those looking to treat themselves, a scoop of your favorite ice cream on top makes for a delicious dessert!
Recipe Variations
Feeling adventurous? Here are a few ideas to switch things up with your muffins:
- Mint Chocolate: Add a few drops of peppermint extract and some chopped dark chocolate mint candies for a refreshing twist.
- Nutty Delight: Mix in some chopped walnuts or pecans for a delightful crunch.
- Fruit Fusion: Add a handful of raspberries or chopped bananas for a fruity surprise.
- Spiced Up: Include a pinch of cinnamon or chili powder for a subtle kick that complements the chocolate.
- Vegan Version: Use flax eggs, oat milk, and your favorite dairy-free butter to make these muffins plant-based!
Chef’s Notes
As I experiment with flavors, these muffins have transformed since I first created them. I remember my first attempt was a little too dry—learning how to balance moisture was essential! It’s those trial-and-error moments that turn baking from a chore into a passionate journey. And while I adore these Double Chocolate Espresso Muffins, I find that each batch tells a different story. Sometimes the chocolate chips melt into glorious pockets of gooey goodness, while other times, they dot the muffins like jewels, waiting to be discovered.
But what remains constant is the joy they bring. Whether I’m baking for a cozy weekend brunch or prepping snacks for my busy week, these muffins are a delightful companion that never fails to impress.
FAQs and Troubleshooting
1. What if my muffins turn out too dry?
This can happen if you overmix the batter or if the flour was measured too densely. To avoid this, mix until just combined and fluff your flour before measuring!
2. Can I make these muffins ahead of time?
Absolutely! These muffins store well in an airtight container at room temperature for up to three days, or you can freeze them for up to three months. Just pop them in the microwave for a quick reheat!
3. How do I know when they’re done?
Use a toothpick to test—insert it into the center of a muffin, and if it comes out clean or with a few moist crumbs, they’re ready to come out of the oven!
4. What if I don’t have espresso?
No problem! Just use strong brewed coffee or even a mix of decaf coffee if that’s your thing. You can also replace it with additional milk for a milder flavor.
Nutritional Info
While this recipe is indulgent, it also brings some nutritional benefits! Each muffin contains protein from the egg, antioxidants from the cocoa powder, and energy from the sugars. Moderation is key, and enjoying these muffins as part of a balanced diet is sure to leave you feeling satisfied.
There you have it! Your ultimate guide to making scrumptious Double Chocolate Espresso Muffins. I hope you enjoy baking (and, of course, eating!) these delightful treats as much as I do. Remember, the kitchen is a place of creativity and joy. So embrace every moment, whip up these muffins, and share them with those you love. Happy baking!
PrintDouble Chocolate Espresso Muffins

Indulge in rich, chocolatey muffins with a bold espresso kick, perfect for breakfast or a sweet treat.
- Prep Time: 15 minutes
- Cook Time: 20 minutes
- Total Time: 35 minutes
- Yield: 12 servings 1x
- Category: Dessert
- Method: Baking
- Cuisine: American
- Diet: Vegetarian
Ingredients
- 1 cup all-purpose flour
- 1/2 cup cocoa powder
- 1 tsp baking powder
- 1/2 tsp baking soda
- 1/4 tsp salt
- 1/2 cup sugar
- 1/4 cup brown sugar
- 1/2 cup brewed espresso or strong coffee, cooled
- 1/4 cup milk
- 1/4 cup melted butter
- 1 egg
- 1 tsp vanilla extract
- 1 cup chocolate chips
Instructions
- Preheat your oven to 350°F (175°C) and line a muffin tin with paper liners or grease it with cooking spray.
- Combine dry ingredients: In a large bowl, whisk together the flour, cocoa powder, baking powder, baking soda, and salt.
- Mix wet ingredients: In a separate bowl, combine the granulated sugar, brown sugar, cooled espresso, milk, melted butter, egg, and vanilla extract. Whisk until well blended.
- Merge the dry mixture with the wet mixture, stirring gently until just moistened.
- Fold in the chocolate chips, ensuring they are evenly distributed.
- Fill the muffin tin with batter, dividing it evenly and filling about 2/3 full.
- Bake for 18–20 minutes or until a toothpick comes out clean.
- Cool in the tin for 5 minutes before transferring to a wire rack.
Notes
These muffins are best served warm. Feel free to add your favorite mix-ins or toppings for variety.
Nutrition
- Serving Size: 1 muffin
- Calories: 250
- Sugar: 18g
- Sodium: 200mg
- Fat: 10g
- Saturated Fat: 5g
- Unsaturated Fat: 4g
- Trans Fat: 0g
- Carbohydrates: 32g
- Fiber: 2g
- Protein: 4g
- Cholesterol: 30mg
Keywords: muffins, chocolate, espresso, dessert, baking
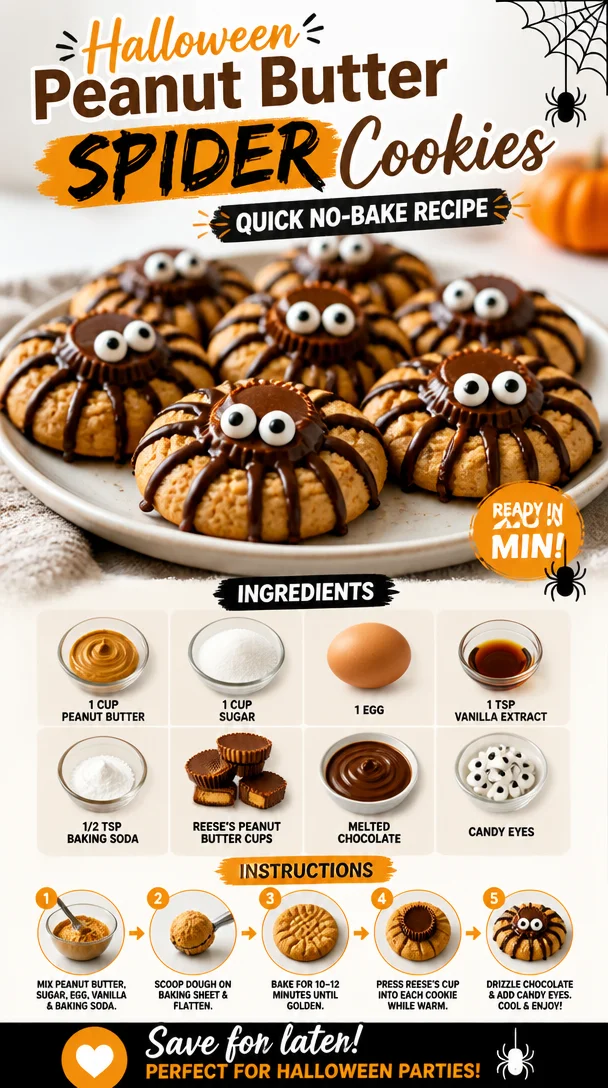
Halloween Peanut Butter Spider Cookies: Quick No-Bake Recipe
Peanut Butter Spider Cookies: A Fun Treat for All Ages
Welcome to the world of Peanut Butter Spider Cookies, where the joy of baking meets the playful side of culinary creativity! If you’re looking for a delightful treat that combines comfort and a dash of whimsy, you’ve landed in the right place. These cookies not only satisfy your sweet tooth but also bring that nostalgic childhood excitement back, making them perfect for parties, Halloween, or simply a fun baking session at home.
Now, as much as I adore gourmet meals, there’s something particularly magical about playful desserts that capture the imagination. Peanut Butter Spider Cookies are quick, easy, and come alive with character—literally! They’re the ultimate sweet treat for kids and adults alike, perfect for those moments when you need a little extra cheer. And trust me, the blend of rich peanut butter and sugary goodness is a flavor combination worth reaching for.
A Sweet Slice of Nostalgia
As a child, I remember my grandmother’s kitchen being an enchantingly warm place filled with the aroma of baked goods. Every Halloween, she would host a “spooky treats” party for the neighborhood kids, where we would don our costumes and help decorate cookies, cupcakes, and all manner of delectable goodies. One year, my job was to make spider cookies. I can still picture the fun of sticking candy eyes onto the cookies and drizzling them with warm chocolate, creating our own unique little monsters.
Those moments in the kitchen instilled a love for cooking that continues to this day. Each bite of these delectable Peanut Butter Spider Cookies reminds me of family bonding, laughter, and a carefree spirit. They brought a smile to kids’ faces, and now it’s your turn to create those joyful memories in your kitchen!
Ingredients
Here’s what you need to get started on making your own batch of Peanut Butter Spider Cookies:
-
1 cup peanut butter
This is the star of the show! Go for creamy peanut butter for a smooth texture, or chunky if you want a little nutty crunch. If you want a healthy alternative, almond or cashew butter makes a great swap. -
1 cup sugar
Regular granulated sugar gives these cookies their characteristic sweetness. If you want to experiment, you can substitute half of it with brown sugar for added richness. -
1 egg
This binds everything together, making your cookies soft and chewy. If you’re looking for an egg-free version, mashed banana or unsweetened applesauce can do the trick! -
1 tsp vanilla extract
A splash of vanilla elevates the flavor. If you’re out of vanilla, a dash of almond extract could add an interesting twist. -
1/2 tsp baking soda
This is the leavening agent that helps the cookies puff up a bit. If you’re out of baking soda, baking powder can be used but use twice the amount (1 tsp). -
Reese’s peanut butter cups (for topping)
These not only add a burst of flavor but also serve as the spider’s body! If you prefer, mini chocolate bars or other chocolate candies work just as well. -
Melted chocolate (for drizzling)
Dark or milk chocolate makes a rich drizzle for added decadence. White chocolate can be used too for a fun contrast. -
Candy eyes (for decoration)
The finishing touch for your spider cookies! Edible googly eyes can be found at most baking supply stores, or you can make your own with white chocolate and mini chocolate chips.
Step-by-Step Instructions
Now that we’ve gathered our ingredients, let’s get cooking! Here’s how to whip up your very own Peanut Butter Spider Cookies:
-
Prep Your Oven and Baking Sheets
Preheat your oven to 350°F (175°C). Line a baking sheet with parchment paper to ensure easy cleanup and prevent sticking. This step is key—working with non-stick surfaces makes everything more enjoyable! -
Mix Your Peanut Butter and Sugar
In a large mixing bowl, combine the peanut butter and sugar. Using an electric mixer or a sturdy whisk, beat them together until it’s creamy and well blended. You want it to have a smooth, spreadable consistency. If it feels too thick, a splash of almond milk can help loosen it up. -
Add the Egg and Vanilla
Crack the egg into your peanut butter-sugar mixture, followed by the vanilla extract. Beat it again until everything is combined. You’ll see it become lighter and fluffier—this is what you want for a beautifully textured cookie! -
Incorporate Baking Soda
Sprinkle in the baking soda. Give the dough a good stir until evenly mixed. If you see any lumps, don’t worry; it’ll all come together once you form the cookies. -
Scoop the Dough
Using a tablespoon or a cookie scoop, drop balls of dough onto your lined baking sheet, spacing them about 2 inches apart. If you want perfectly round cookies, roll the dough between your palms first—this is where the magic begins! -
Bake to Perfection
Pop them in the oven for about 10-12 minutes, or until they’re slightly golden around the edges. Keep a close eye on them because every oven is a bit different. -
Topping with Candy
Once baked, take the cookies out and immediately press a Reese’s peanut butter cup into the center of each cookie. Let them cool on the baking sheet for another 5 minutes—this will help the peanut butter cups stick beautifully! -
Drizzle with Chocolate
While your cookies are cooling, melt some chocolate in the microwave (or over a double boiler for you purists!). Once melted, using a fork or a piping bag, drizzle the melted chocolate over the cookies in a zig-zag pattern. -
Add Candy Eyes
While the chocolate is still warm, gently press the candy eyes into the chocolate drizzle—voila! Your spiders are coming to life! -
Cool Completely
Transfer the cookies to a wire rack to cool completely. This will set the chocolate and make them easy to handle when it’s time to indulge.
Serving Suggestions
When you’re ready to serve your Peanut Butter Spider Cookies, arrange them on a platter with a bit of flair! You can add spider webs made from melted white chocolate or scatter some mini chocolate chips around for added cuteness. Perfect for Halloween parties or any playful gathering!
Recipe Variations
Get creative with your Peanut Butter Spider Cookies! Here are a few fun twists you can try:
-
Nut-Free Option: Use sunflower seed butter in place of peanut butter for a nut-free version that’s just as delicious.
-
Gluten-Free Version: Swap in a gluten-free flour blend alongside the peanut butter for a cookie that’s friendly for gluten-sensitive folks.
-
White Chocolate Drizzle: Use white chocolate for drizzling instead of dark or milk chocolate to create a striking contrast with the peanut butter.
-
Chunky Add-Ins: Fold in mini chocolate chips or butterscotch chips into the dough for an extra treat in every bite!
-
Seasonal Spooks: Decorate with seasonal candies, like candy corn or pumpkin shapes for fall festivities.
Chef’s Notes
Every time I make these Peanut Butter Spider Cookies, I’m reminded of my grandmother’s warmth and how cooking can turn a simple gathering into something truly special. Over the years, I’ve modified this recipe to include some fun twists—like incorporating crushed pretzels for that salty-sweet balance! These cookies are also a fantastic way to get kids involved in the kitchen. Getting their hands sticky and creating their own cookie masterpieces is part of the fun!
FAQs and Troubleshooting
1. Why are my cookies too crumbly?
If your cookies are crumbling apart, there may not have been enough binding agent—check if you added the egg. Or you can always add a bit more peanut butter to the mix!
2. My cookies spread too much. What went wrong?
Cookies can spread a lot if the dough is too warm. If you’re in a warm climate, try chilling the dough in the fridge for 30 minutes before scooping.
3. Can I make the dough ahead of time?
Absolutely! You can make the dough, roll it into balls, and freeze them. Just bake from frozen, adding a couple of extra minutes to the baking time.
4. How do I store leftover cookies?
Store your Peanut Butter Spider Cookies in an airtight container at room temperature for up to a week, or refrigerate for longer freshness. They may lose a bit of their ‘spidey charm in the fridge but will still taste incredible!
Nutritional Info (Optional)
While the nutritional breakdown can vary, approximately one cookie (without alteration to the toppings) comes in around 150 calories, 7g fat, 21g carbs, and 4g protein. The richness of the peanut butter provides a satisfying energy boost, perfect for active days.
And there you have it—Peanut Butter Spider Cookies that are sure to enchant and delight anyone who takes a bite! Whether you’re baking with kids or treating yourself to a sweet moment, these cookies are a wonderful way to sprinkle a little magic into your life. So tie on that apron, gather your ingredients, and let’s make some fluttering, fun, and utterly delicious memories together!
PrintPeanut Butter Spider Cookies
A fun treat perfect for parties, Halloween, or simply a whimsical baking session at home.
- Prep Time: 15 minutes
- Cook Time: 12 minutes
- Total Time: 27 minutes
- Yield: 24 cookies 1x
- Category: Dessert
- Method: Baking
- Cuisine: American
- Diet: Vegetarian
Ingredients
- 1 cup creamy peanut butter
- 1 cup granulated sugar
- 1 egg
- 1 tsp vanilla extract
- 1/2 tsp baking soda
- Reese’s peanut butter cups (for topping)
- Melted chocolate (for drizzling)
- Candy eyes (for decoration)
Instructions
- Preheat your oven to 350°F (175°C) and line a baking sheet with parchment paper.
- Mix the peanut butter and sugar in a large mixing bowl until creamy and well blended.
- Add the egg and vanilla extract, mixing until combined.
- Incorporate the baking soda, stirring until evenly mixed.
- Scoop tablespoon-sized balls of dough onto the prepared baking sheet, spacing them about 2 inches apart.
- Bake for 10-12 minutes, until slightly golden around the edges.
- Topping them with Reese’s peanut butter cups immediately after baking.
- Drizzle melted chocolate over the cookies.
- Add candy eyes while the chocolate is still warm.
- Cool cookies completely on a wire rack.
Notes
For crispy edges, bake a bit longer; for softer cookies, reduce baking time. Customize with seasonal candies for holidays.
Nutrition
- Serving Size: 1 cookie
- Calories: 150
- Sugar: 21g
- Sodium: 50mg
- Fat: 7g
- Saturated Fat: 2g
- Unsaturated Fat: 5g
- Trans Fat: 0g
- Carbohydrates: 21g
- Fiber: 1g
- Protein: 4g
- Cholesterol: 30mg
Keywords: cookies, peanut butter, dessert, Halloween, treats
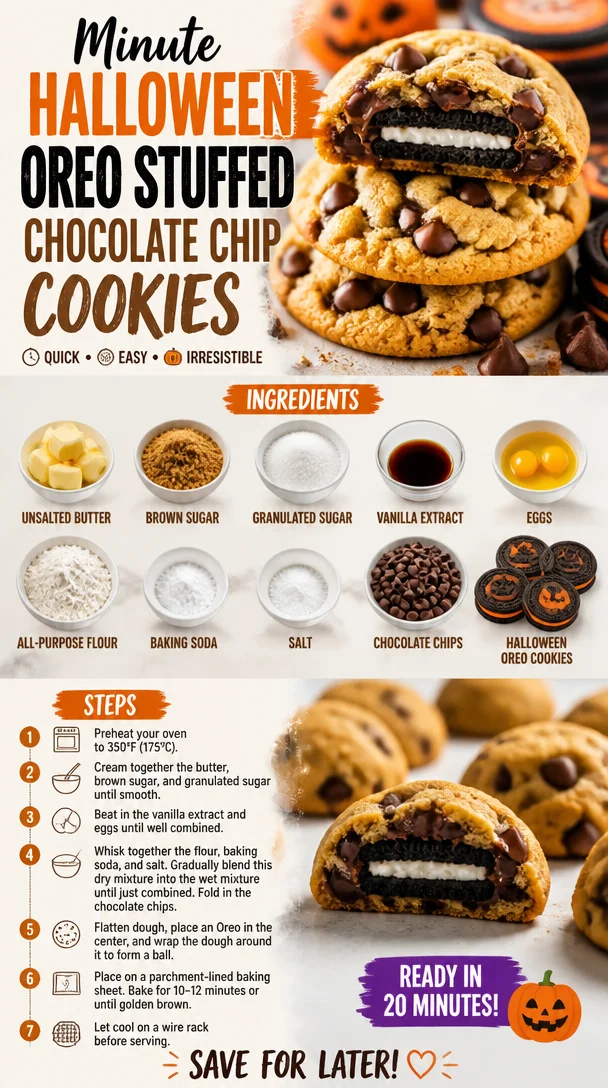
Minute Halloween Oreo Stuffed Chocolate Chip Cookies
Halloween Oreo Stuffed Chocolate Chip Cookies
Welcome to the spookiest time of the year—Halloween! It’s that magical season when the leaves crunch underfoot, pumpkin spice fills the air, and anything can be both adorable and eerie. As a food lover and self-proclaimed cookie aficionado, I think there’s no better way to celebrate than by baking something that combines the delightful flavors of chocolate and cookies. Enter Halloween Oreo Stuffed Chocolate Chip Cookies!
These cookies are a whimsical twist on the classic chocolate chip cookie, infused with the spirit of Halloween. Imagine biting into a soft, chewy chocolate chip cookie only to discover a surprise center of rich, creamy Oreo filling. It’s like an edible trick-or-treat! This fun recipe is perfect for kids, families, or anyone who wants to add a festive touch to their gatherings. Whether you’re throwing a Halloween party, looking to impress the little ghouls and goblins in your life, or simply craving something sweet, these cookies are guaranteed to bring a smile to your face and a dance in your step.
So grab your apron, a mixing bowl, and let’s conjure up a batch of these delicious treats together! Baking should be an enjoyable experience filled with laughter, spills, and a sprinkle of magic. So, let’s take a dive into the delicious world of Halloween Oreo Stuffed Chocolate Chip Cookies!
Personal Story
I still vividly remember the first time I made stuffed cookies. I was little Ava in a tiny kitchen, knee-high to the counter, standing on a stool, with flour dusting my cheeks like a magician’s cloak. My mom and I decided to experiment one rainy afternoon, and after a few tweaks and giggles, we created a version stuffed with peanut butter cups. The moment those warm cookies emerged from the oven, my heart raced as I pulled one apart to see the gooey surprise inside.
Fast forward to today, and I still channel that same excitement when I create sweet treats. Halloween has always been a favorite time of year for me, with all the imaginative costumes and spooky decorations. Transforming those nostalgic stuffed cookies into a Halloween special with Oreos felt like the perfect tribute to my childhood. Each bite brings back the warmth of those rainy afternoons, reminding me that cooking is not just about food; it’s about creating cherished memories. So, let’s bake these cookies and make some new ones!
Ingredients
Here’s what you’ll need to gather for our delightful Halloween Oreo Stuffed Chocolate Chip Cookies:
-
1 cup unsalted butter, softened
Tip: Make sure your butter is at room temperature. It should feel like a soft pillow! You can substitute with coconut oil for a dairy-free option, but your cookies might have a slight coconut flavor. -
3/4 cup brown sugar
Chef Insight: Brown sugar adds moisture and a deep, rich flavor to your cookies. You can use light or dark brown sugar—it’s up to your flavor preference! -
3/4 cup granulated sugar
Substitution: Feel free to swap in coconut sugar if you’re looking for a less refined sweet option. -
1 teaspoon vanilla extract
Insider Tip: Always opt for pure vanilla extract over imitation for a more nuanced flavor boost! -
2 large eggs
Helpful Hint: Ensure your eggs are at room temperature for better emulsification in your batter. You can substitute flaxseed eggs (1 tablespoon flaxseed meal mixed with 2.5 tablespoons water) for a vegan version. -
2 1/4 cups all-purpose flour
Tip: Spoon your flour into the measuring cup instead of scooping it directly; this prevents unnecessary packing. -
1 teaspoon baking soda
Insight: Baking soda acts as a leavening agent, making your cookies soft and chewy. -
1/2 teaspoon salt
Why It’s Important: Salt amplifies flavors, balancing the sweetness of your cookies beautifully. -
2 cups chocolate chips
Chef Note: Mix different types—dark, milk, and even white chocolate—for a fun flavor explosion. -
1 package Oreo cookies (Halloween-themed if available)
Fun Idea: Look for themed Oreos, like pumpkin or spooky designs, to make these cookies even more festive!
Step-by-Step Instructions
Now for the fun part! Here’s how to whip up these spooky cookies in your kitchen:
-
Preheat the Oven
Preheat your oven to 350°F (175°C). This step is key! A hot oven means your cookies bake evenly and rise beautifully. -
Cream the Butter and Sugars
In a large mixing bowl, combine the softened butter, brown sugar, and granulated sugar. Using an electric mixer, beat on medium speed until light and fluffy—about 2-3 minutes. This is when all that sugar goodness gets aerated, leading to the perfect texture! -
Add Vanilla and Eggs
Pour in the vanilla extract and add the eggs, one at a time, mixing well after each addition. You want those eggs thoroughly incorporated for a uniform batter. -
Mix Dry Ingredients
In another bowl, whisk together the all-purpose flour, baking soda, and salt. Gradually add these dry ingredients to the wet mixture, mixing just until combined. Avoid overmixing to keep your cookies soft and chewy! -
Fold in Chocolate Chips
With a spatula, gently fold in the chocolate chips. This is where you can get creative—feel free to add a splash of gluten-free chocolate chips for a gluten-free twist! -
Prepare Oreo Stuffing
Grab your Oreo cookies. For each cookie, take a tablespoon of cookie dough, flatten it in your palm, place an Oreo in the center, and cover it with another tablespoon of dough. Make sure to seal the edges well, so no Oreo is peeking out. -
Bake Your Cookies
Line your baking sheets with parchment paper and space your stuffed cookies about 2 inches apart. Bake in your preheated oven for 10-12 minutes, or until golden brown. They’ll look puffy but will sink slightly as they cool. -
Cool Down (If You Can Wait!)
Let your cookies cool on the baking sheet for 5 minutes, then transfer them to a wire rack to cool completely (if you can resist the warm gooeyness for that long!).
Serving Suggestions
Once your cookies are perfectly baked, it’s time to serve! These Halloween Oreo Stuffed Chocolate Chip Cookies are delightful on their own, but pair them with a glass of cold milk or warm pumpkin spice latte for an extra cozy treat. Arrange them on a fun Halloween-themed platter and sprinkle some spooky confetti or edible glitter around them to really set the mood!
Recipe Variations
Looking to switch things up? Here are a few fun twists you can try with this recipe:
- Pumpkin Spice Twist: Add 1 teaspoon of pumpkin spice to the dry ingredients for a fall flavor boost.
- Nutty Delight: Chop up some nuts like walnuts or pecans to fold in with the chocolate chips for added crunch.
- M&M’s Surprise: Swap half the chocolate chips for Halloween-themed M&M’s for extra color and fun.
- Peanut Butter Cup Stuffing: Switch out the Oreos and stuff the cookies with mini peanut butter cups for a rich, nutty flavor.
Chef’s Notes
Ah, cookies—the ultimate comfort food! This Halloween Oreo Stuffed Chocolate Chip Cookie recipe has transformed over the years. I originally created it with plain Oreos, but it’s always been in my heart to evolve and have some themed fun. Rather than making them just for kids, I’ve served them at adult Halloween parties, where they’ve been a huge hit! I often have a bit of a cookie competition amongst friends to see who can make the craziest stuffed cookie, and this recipe has certainly earned its place as a favorite.
FAQs and Troubleshooting
-
My cookies spread too much; what happened?
This can happen if your butter was too warm or you didn’t chill the dough. For next time, try chilling the dough for 30 minutes before baking. -
How should I store the cookies?
Keep them in an airtight container at room temperature for up to a week. They can also be frozen for longer storage; just make sure to layer them with parchment paper. -
Can I make the dough ahead of time?
Absolutely! You can make the dough a day in advance; just store it in the fridge until you’re ready to bake. -
What if I don’t have chocolate chips?
You could substitute with chunks of your favorite chocolate bar, white chocolate chips, or even dried fruit for a different flavor profile!
Nutritional Info
While indulging in these delights, you might want to keep an eye on the nutritional aspect. Each cookie is rich and satisfying, so enjoy them in moderation!
Calories: Approx. 200 per cookie (may vary)
Total Fat: 10g
Saturated Fat: 6g
Cholesterol: 30mg
Carbohydrates: 26g
Sugars: 15g
Protein: 2g
So, there you have it! A delightful journey into the world of Halloween Oreo Stuffed Chocolate Chip Cookies. With these delightful treats, you’re not just baking; you’re creating joy and magic right from your kitchen. Share them with your friends and family, and, most importantly, enjoy every gooey bite. Happy Halloween, and may your cookie adventures be as sweet as the treats you create!
PrintHalloween Oreo Stuffed Chocolate Chip Cookies

A whimsical twist on the classic chocolate chip cookie, featuring a surprise center of rich, creamy Oreo filling—perfect for Halloween celebrations!
- Prep Time: 15 minutes
- Cook Time: 12 minutes
- Total Time: 27 minutes
- Yield: 24 cookies 1x
- Category: Dessert
- Method: Baking
- Cuisine: American
- Diet: Vegetarian
Ingredients
- 1 cup unsalted butter, softened
- 3/4 cup brown sugar
- 3/4 cup granulated sugar
- 1 teaspoon vanilla extract
- 2 large eggs
- 2 1/4 cups all-purpose flour
- 1 teaspoon baking soda
- 1/2 teaspoon salt
- 2 cups chocolate chips
- 1 package Oreo cookies (Halloween-themed if available)
Instructions
- Preheat your oven to 350°F (175°C).
- Cream the softened butter, brown sugar, and granulated sugar in a large mixing bowl until light and fluffy—about 2-3 minutes.
- Add the vanilla extract and eggs, one at a time, mixing well after each addition.
- Mix together the all-purpose flour, baking soda, and salt in another bowl. Gradually add these dry ingredients to the wet mixture, mixing just until combined.
- Fold in the chocolate chips gently.
- Prepare each Oreo by taking a tablespoon of cookie dough, flattening it, placing an Oreo in the center, and covering it with another tablespoon of dough. Seal the edges well.
- Bake the stuffed cookies on parchment-lined baking sheets for 10-12 minutes, until golden brown.
- Cool on the baking sheet for 5 minutes before transferring to a wire rack.
Notes
These cookies pair perfectly with a glass of milk or warm pumpkin spice latte. For variations, try adding pumpkin spice, nuts, or even peanut butter cups as stuffing!
Nutrition
- Serving Size: 1 cookie
- Calories: 200
- Sugar: 15g
- Sodium: 200mg
- Fat: 10g
- Saturated Fat: 6g
- Unsaturated Fat: 2g
- Trans Fat: 0g
- Carbohydrates: 26g
- Fiber: 1g
- Protein: 2g
- Cholesterol: 30mg
Keywords: Halloween cookies, stuffed cookies, chocolate chip cookies, Oreo cookies
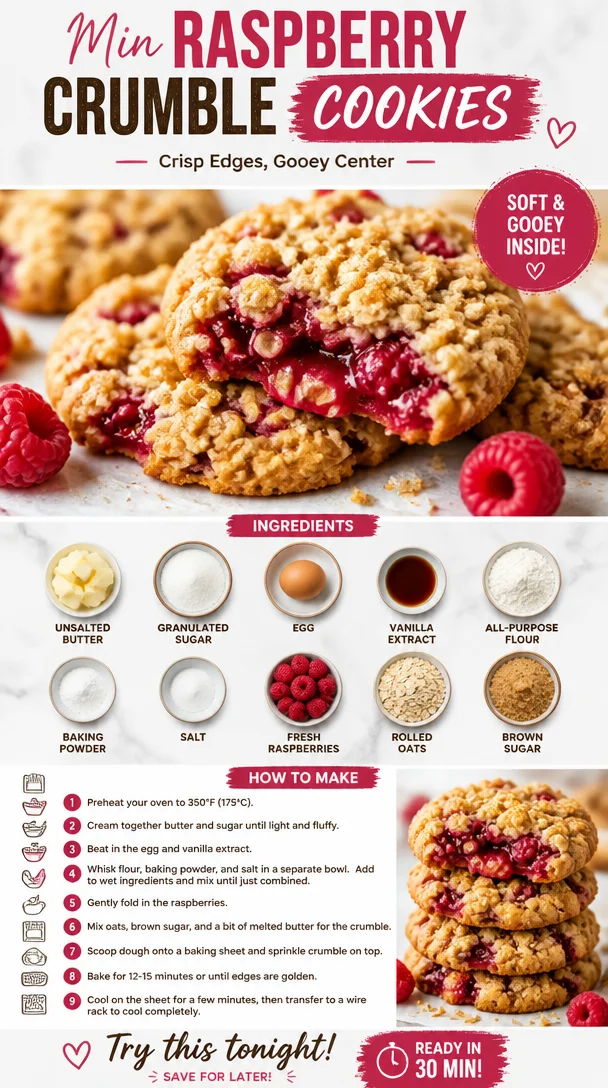
Min Raspberry Crumble Cookies: Crisp Edges, Gooey Center
Raspberry Crumble Cookies: A Sweet Collaboration of Tart and Sweet
Welcome to Clean Plate Cravings! I’m thrilled to share with you not just a recipe today, but an experience—the delicious journey of baking Raspberry Crumble Cookies. If you’re anything like me, you can appreciate that perfect combination of sweet and tart, especially when it’s nestled within the warm embrace of a cookie. These gems are crisp on the outside, chewy on the inside, and they burst with the vibrant flavor of fresh raspberries. Plus, they come together so quickly, making them the ultimate treat for any time of the day.
Baking is not just about the end result; it’s also about the memories created as you stir, mix, and taste! When I was a kid, weekends were reserved for baking sessions in my grandmother’s kitchen. The scent of cookies baking would waft through the house, warming every nook—and my heart. I remember standing on a stool, my little hands eagerly mixing the ingredients, while my grandma would share stories about her own childhood adventures. One of her specialties was a raspberry dessert that she made every summer when the berries were fresh and bursting with flavor. I can still picture the way she carefully folded those juicy gems into whatever delightful creation she was whipping up.
Today, Raspberry Crumble Cookies are a nod to those cherished memories. Each bite reminds me of those sunlit afternoons spent in the kitchen, and I can’t wait for you to create your own sweet memories with this recipe!
Ingredients
Let’s gather what you’ll need to create these delightful cookies. Here’s a breakdown:
-
1 cup unsalted butter, softened
This is your fat base that will give the cookies their rich flavor and tenderness. If you don’t have unsalted butter, you can use salted butter and just reduce the added salt in the recipe. -
1 cup granulated sugar
This will add sweetness to the dough. If you’re looking for a less sweet option, you could substitute some of the sugar with coconut sugar for a deeper flavor and a healthier twist. -
1 egg
Eggs act as a binder, helping to hold everything together. If you’re vegan or allergic, a flax egg (1 tablespoon ground flaxseed mixed with 2.5 tablespoons water) works great too. -
1 teaspoon vanilla extract
Pure vanilla enhances the flavor profile of these cookies. When possible, opt for pure vanilla extract rather than imitation for a richer taste. -
2 cups all-purpose flour
This is the main structure of your cookies! For gluten-free variations, try a 1:1 gluten-free flour blend. -
1 teaspoon baking powder
This leavening agent helps give the cookies a lovely lift. If you’re out, you can substitute with baking soda (just use about half a teaspoon). -
1/2 teaspoon salt
Salt amplifies flavors, making sweet treats even more delicious. Feel free to use kosher salt as it’s great for baking! -
1 cup fresh raspberries
The star ingredient! Fresh is key here for that burst of flavor, but if you’re in a pinch, frozen raspberries will work—just be sure to thaw and drain them first. -
1/2 cup rolled oats
These add a delightful chewiness and a bit of texture to the cookies. If you want them gluten-free, just ensure the oats are certified gluten-free. -
1/4 cup brown sugar
This adds a caramel-like depth to your cookies. Light or dark brown sugar can be used, depending on your personal preference.
Step-by-Step Instructions
-
Preheat the Oven: Start by preheating your oven to 350°F (175°C). This ensures that your cookies will bake evenly.
-
Cream the Butter and Sugars: In a large mixing bowl, combine the softened unsalted butter, granulated sugar, and brown sugar. Beat these together with a mixer on medium speed for about 2-3 minutes, until the mixture is light and fluffy. Here’s a pro tip: let your butter sit out for about 30 minutes before using it. This will soften it perfectly for creaming!
-
Add the Egg and Vanilla: Once you have that perfect fluffy texture, add in the egg and vanilla extract. Mix until combined—don’t overdo it, just a minute or so will suffice.
-
Mix Dry Ingredients: In a separate bowl, whisk together the flour, baking powder, and salt. Gradually add this dry mixture to your wet ingredients, mixing on low speed until just combined. You want to avoid overmixing, which can lead to tough cookies instead of tender ones!
-
Fold in Raspberries and Oats: At this point, fold in the fresh raspberries and rolled oats using a spatula. Be gentle; you want to keep those lovely berries intact! Remember this is your moment to add personality to your cookies—tricky but rewarding!
-
Scoop the Dough: Line a baking sheet with parchment paper for easy cleanup. Use a cookie scoop or two spoons to drop heaping tablespoons of dough onto the prepared sheet, spacing them about 2 inches apart.
-
Bake: Place the cookie sheets in the preheated oven and bake them for 12-15 minutes or until the edges are golden brown.
-
Cool and Enjoy: Once your cookies are out of the oven, let them cool on the baking sheet for about 5 minutes before transferring them to a wire rack to cool completely. This will give them a chance to set up a little more, making them perfect.
Serving Suggestions
These Raspberry Crumble Cookies can be served alone for a delightful snack or paired with a scoop of vanilla ice cream for an indulgent dessert. If you want to impress your friends, stack them on a cake stand and dust them with powdered sugar for a beautiful presentation!
Recipe Variations
Get creative with this basic cookie recipe! Here are a few delicious twists to consider:
-
Chocolate Chip Raspberry Cookies: Add a cup of semi-sweet or dark chocolate chips for a rich contrast to the tartness of the raspberries.
-
Nutty Oatmeal Raspberry Cookies: Toss in some chopped nuts—like almonds or walnuts—for added crunch and flavor.
-
Coconut Raspberry Cookies: Substitute half of the rolled oats with shredded coconut for a tropical twist.
-
Lemon-Raspberry Cookies: Add the zest of one lemon to the dough for a bright, citrusy flavor that complements the raspberries perfectly.
-
Vegan Raspberry Cookies: Replace the butter with coconut oil, the egg with a flax egg, and use vegan chocolate chips if you choose.
Chef’s Notes
As with any recipe, I feel it’s essential to experiment. Early on, I made these cookies with blueberries, and while they were a hit, nothing compares to the sheer delight of raspberries. The evolution of this cookie has been a delightful journey, from my grandmother’s classic recipes to the modern adaptations I enjoy today. Who knew something so tasty could hold so many memories?
FAQs and Troubleshooting
-
Why are my cookies spreading too much?
If your cookies spread excessively, it could be due to the butter being too warm during mixing, or you might not have used enough flour. Always measure your ingredients properly! -
Can I use frozen raspberries?
Absolutely! Just be sure to thaw and drain them to avoid excess moisture that could alter the dough’s consistency. -
How do I store these cookies?
Keep them in an airtight container at room temperature for up to a week. For longer storage, you can freeze them and enjoy them later! -
What if my dough is too dry?
If you find your dough is too crumbly, try adding a tablespoon of milk or water at a time until it reaches your desired consistency.
Nutritional Info
While I like to keep things flexible, it may be useful to know that each cookie has roughly 150 calories, with 7g of fat, 20g of carbs, and 1g of protein. These numbers can vary based on ingredient brands and any variations you make to the recipe!
I hope you’re as excited as I am to bake these Raspberry Crumble Cookies! Grab your apron and let the adventure begin—can’t wait to hear about your kitchen stories too! Happy baking!
PrintRaspberry Crumble Cookies

A delightful combination of sweet and tart, these Raspberry Crumble Cookies are crisp on the outside and chewy on the inside, bursting with fresh raspberry flavor.
- Prep Time: 15 minutes
- Cook Time: 15 minutes
- Total Time: 30 minutes
- Yield: 24 cookies 1x
- Category: Dessert
- Method: Baking
- Cuisine: American
- Diet: Vegetarian
Ingredients
- 1 cup unsalted butter, softened
- 1 cup granulated sugar
- 1 egg
- 1 teaspoon vanilla extract
- 2 cups all-purpose flour
- 1 teaspoon baking powder
- 1/2 teaspoon salt
- 1 cup fresh raspberries
- 1/2 cup rolled oats
- 1/4 cup brown sugar
Instructions
- Preheat the oven to 350°F (175°C).
- Cream the butter and sugars in a large mixing bowl for about 2-3 minutes until light and fluffy.
- Add the egg and vanilla extract, mixing until combined.
- Mix the flour, baking powder, and salt in a separate bowl, then gradually combine with the wet ingredients.
- Fold in the raspberries and oats gently.
- Scoop the dough onto a lined baking sheet, spacing them about 2 inches apart.
- Bake for 12-15 minutes until the edges are golden brown.
- Cool on the baking sheet for 5 minutes before transferring to a wire rack.
Notes
For a richer flavor, let the butter sit out to soften before using. Experiment with variations like adding nuts or chocolate chips for added texture.
Nutrition
- Serving Size: 1 cookie
- Calories: 150
- Sugar: 10g
- Sodium: 60mg
- Fat: 7g
- Saturated Fat: 4g
- Unsaturated Fat: 2g
- Trans Fat: 0g
- Carbohydrates: 20g
- Fiber: 1g
- Protein: 1g
- Cholesterol: 30mg
Keywords: raspberry cookies, dessert, baking, easy cookie recipe, crumble cookies