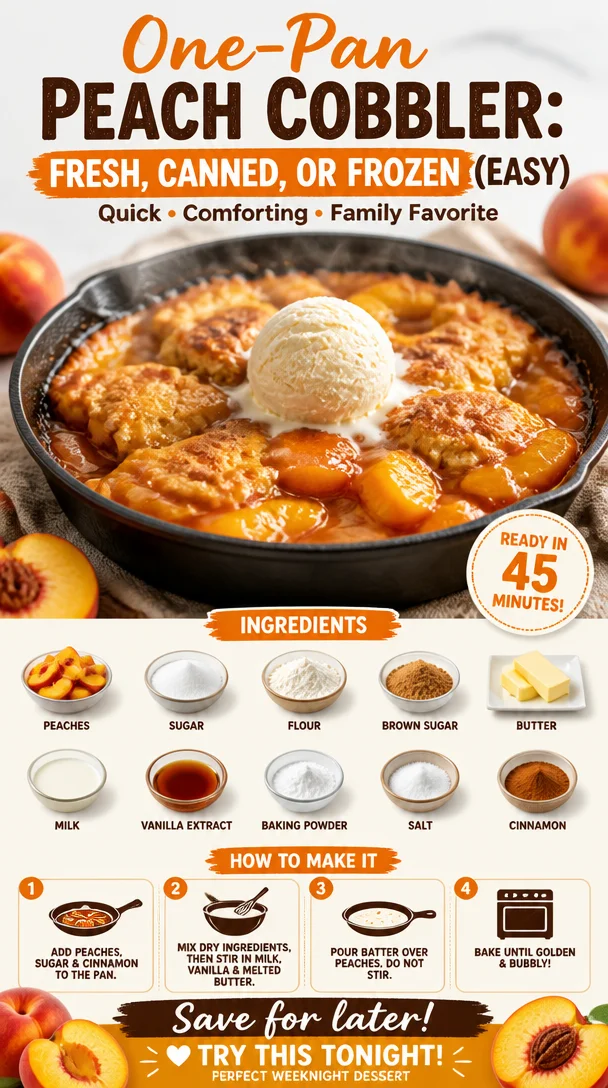
One-Pan Peach Cobbler: Fresh, Canned, or Frozen (Easy)
The Ultimate Homemade Peach Cobbler Recipe: A Sweet Slice of Nostalgia
Ah, peach cobbler. The very mention of it can transport you back to those sunny afternoons of your childhood, where the air was thick with laughter, sweet summer breezes, and the tantalizing aroma of baked peaches wafting through the kitchen. If your mouth is already watering, you’re in good company! Whether you’re using fresh, canned, or frozen peaches, this homemade peach cobbler recipe is a delightful way to embrace that nostalgia while creating a dish that will have everyone swooning.
Now, I can’t emphasize enough how this recipe is not just about throwing some peaches in a dish and slapping a crust on top. Oh no, my friends, this is about crafting a love letter to summer. My journey with peach cobbler started in my grandmother’s kitchen, where she would pull out her old, worn cookbook and remind me that the secret to a perfect cobbler is all about balance—sweetness, warmth, and that irresistible flaky crust that crumbles just right.
Some of my fondest memories are tied to helping her prepare this dish, learning the art of patience as we let those peaches marinate with a sprinkle of sugar, and watching them transform into a bubbling, golden masterpiece in the oven. So, while you’re mixing, baking, and savoring, know that you’re not just whipping up dessert; you’re creating memories, just like I did with my beloved grandma.
And here’s the best part: You can enjoy this peach cobbler no matter the season! Using fresh peaches in summer or those frozen gems straight out of your freezer makes it a year-round staple. Ready to dig into this deliciousness? Let me share the simple steps you need to create your own peach cobbler masterpiece!
Ingredients
-
Peaches (fresh, canned, or frozen): Use about 4 cups for this recipe. Fresh peaches are amazing in summer, but if you have canned or frozen on hand, they work just as well. If using frozen, let them thaw but don’t drain the juices—who doesn’t love a little extra peachy goodness?
-
Granulated sugar: About ¾ cup for sweetening the peaches and enhancing their natural flavors. You can adjust this based on the sweetness of your peaches or swap for coconut sugar for a healthier twist.
-
All-purpose flour: You’ll need 1 cup for the cobbler topping. Gluten-free flour blends can substitute here. Just be sure to check that they have xanthan gum for proper binding!
-
Baking powder: 2 teaspoons is what we’ll need to give our crust a nice rise. Make sure it’s fresh for the best results!
-
Salt: A pinch (about ¼ teaspoon) will enhance the flavors in both the peaches and the topping. It’s magic, I tell you!
-
Milk: ½ cup of milk (dairy or plant-based) will bring everything together in our cobbler batter. Almond or oat milk works beautifully if you’re dairy-free.
-
Butter: ½ cup (1 stick), melted. Butter makes everything better! If you prefer oil, coconut oil is a great alternative, just be sure it’s melted too.
-
Vanilla extract: 1 teaspoon adds that extra layer of flavor. Feel free to get creative with other extracts like almond or even a hint of cinnamon.
Step-by-Step Instructions
-
Preheat your oven: Start by preheating your oven to 375°F (190°C). This allows the peach cobbler to bake evenly and ensures you get that golden-brown crust.
-
Prepare the peaches: In a mixing bowl, toss your prepared peaches with ½ cup of sugar. If you’re using fresh peaches, peel, slice, and dice them. For frozen peaches, just let them thaw until they can be cut into manageable slices. Let this mixture sit while the sugar works its magic to draw out the juices—about 15 minutes is perfect.
-
Make the batter: In another bowl, whisk together the flour, remaining sugar, baking powder, and salt. This dry mix is the base of your topping. Then, gradually whisk in the milk and melted butter (and vanilla extract if you’re using it) until everything is smooth and combined. Don’t overmix; it’s okay if there are a few lumps!
-
Combine fruit and batter: Pour the peach mixture into a greased baking dish (about 9×13 inches works great) and then gently spoon your batter over the top. You want those bubbling juices to peek through the batter without completely mixing.
-
Bake it up: Slide your cobbler into the oven, and bake for about 30-40 minutes, or until the topping is golden brown and a toothpick inserted comes out clean. Keep an eye on it—if the edges start to darken too quickly, you can tent it with foil.
-
Cool and serve: Once it’s out of the oven, let it cool for about 15 minutes before serving. This helps the juices set a bit, but let’s be real—it’s hard to resist digging in right away!
Serving Suggestions
Serve this peach cobbler warm with a generous scoop of vanilla ice cream or a dollop of whipped cream for the ultimate indulgence. If you’re feeling fancy, sprinkle some toasted almonds or pecans on top for a lovely crunch. It’s also delightful with a drizzle of caramel sauce or a sprinkle of cinnamon for extra warmth!
Recipe Variations
-
Berry Peach Cobbler: Mix in some fresh or frozen blueberries or raspberries for a delightful burst of flavor.
-
Spicy Peach Cobbler: Add a teaspoon of cinnamon and a pinch of nutmeg to the peach mixture for a seasonal twist that warms up those cozy evenings.
-
Coconut Peach Cobbler: Substitute half the milk for coconut milk, and sprinkle shredded coconut on top for a tropical vibe.
-
Oat Topping: Swap half of the flour for rolled oats to create a chewy, hearty topping that adds texture and nutrition.
Chef’s Notes
This peach cobbler recipe has seen its fair share of evolution in my kitchen over the years. What started as a classic dish has transformed into a vehicle for creativity. I can’t tell you how many times I’ve mixed fruits or added unexpected spices just to see what would happen! Some experiments turned into instant favorites.
My funniest kitchen story with peach cobbler involves using lavender instead of vanilla once—I thought I was being inventive but ended up with a very floral dessert! It was a polite "no, thank you" from my friends that day. Now I stick with beloved flavors but still keep that spirit of experimentation alive.
FAQs and Troubleshooting
1. My cobbler topping is too dense. What went wrong?
- This could be due to overmixing the batter. Aim for a lumpy but uniform batter—mix just until you combine. Too much mixing can lead to gluten development, making your topping dense.
2. How do I know when it’s done?
- The cobbler is finished when the top is golden brown, and the juices are bubbling around the edges. A toothpick inserted into the center of the topping should come out clean or with a few moist crumbs (not wet batter).
3. Can I make this ahead?
- Yes! You can prepare it a few hours in advance and keep it covered in the fridge before baking. Just add about 5-10 minutes to the baking time if baking straight from the fridge.
4. What if I don’t have any peaches?
- No problem! You can substitute with almost any fruit you like, such as apples, cherries, or even mixed frozen berries. Just adjust the sugar according to the sweetness of the fruit.
Nutritional Info
While peach cobbler is definitely a treat, it can be made a bit healthier without losing any of its deliciousness! Each serving (assuming 9 servings from the above recipe) contains approximately:
- Calories: 250
- Protein: 3g
- Carbohydrates: 38g
- Fat: 10g
- Fiber: 2g
And there you have it—a sweet slice of nostalgia that’s easy to recreate no matter the time of year. So gather up those peaches, call your friends and family, and make some memories with this fabulous peach cobbler! Happy cooking! 🍑✨
PrintUltimate Homemade Peach Cobbler
A delightful and nostalgic peach cobbler recipe, perfect for any season using fresh, canned, or frozen peaches.
- Prep Time: 15 minutes
- Cook Time: 40 minutes
- Total Time: 55 minutes
- Yield: 9 servings 1x
- Category: Dessert
- Method: Baking
- Cuisine: American
- Diet: Vegetarian
Ingredients
- 4 cups peaches (fresh, canned, or frozen)
- ¾ cup granulated sugar
- 1 cup all-purpose flour
- 2 teaspoons baking powder
- ¼ teaspoon salt
- ½ cup milk (dairy or plant-based)
- ½ cup butter, melted
- 1 teaspoon vanilla extract
Instructions
- Preheat your oven to 375°F (190°C).
- Prepare the peaches by tossing them with ½ cup of sugar in a mixing bowl.
- Make the batter by whisking together flour, remaining sugar, baking powder, and salt, then gradually whisk in milk and melted butter.
- Combine the peach mixture with the batter by pouring the peaches into a greased baking dish and spooning the batter over the top.
- Bake for about 30-40 minutes or until the topping is golden brown.
- Cool for about 15 minutes before serving.
Notes
Serve warm with vanilla ice cream or whipped cream for the ultimate treat. Feel free to mix in other fruits or spices for variations.
Nutrition
- Serving Size: 1 serving
- Calories: 250
- Sugar: 10g
- Sodium: 150mg
- Fat: 10g
- Saturated Fat: 6g
- Unsaturated Fat: 3g
- Trans Fat: 0g
- Carbohydrates: 38g
- Fiber: 2g
- Protein: 3g
- Cholesterol: 30mg
Keywords: peach cobbler, dessert, summer recipe, baked dessert, nostalgic dessert
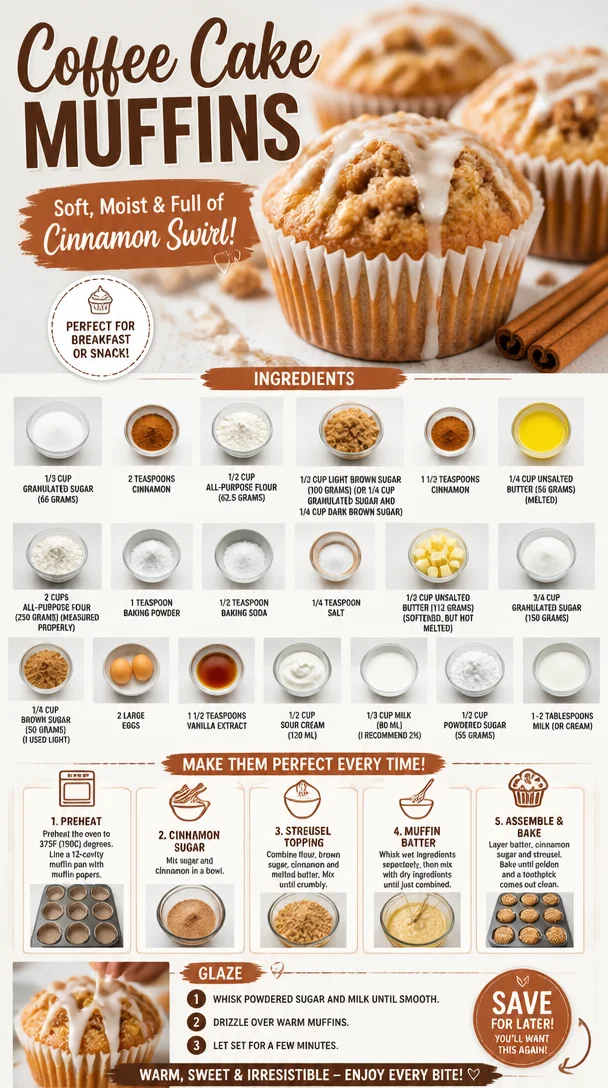
Coffee Cake Muffins
Coffee Cake Muffins: A Sweet Start to Your Day
Welcome to the cozy world of Clean Plate Cravings! Today, we’re diving into a delightful dish that brings joy to breakfast tables everywhere—Coffee Cake Muffins! These muffins encapsulate the perfect balance of flavor and texture, making them a beloved choice for those lazy Sunday mornings or a quick grab-and-go breakfast during the week.
What’s amazing about these muffins is how they echo that childhood nostalgia of enjoying something sweet with your morning brew. When I think about coffee cake, I can’t help but remember the times I’d visit my grandmother’s kitchen, watching her whip up a batch of fluffy muffins that would fill the house with the warm aroma of cinnamon and sugar. She always said her secret was to “fold in a little love” in every bite, and boy, did it work!
With rich buttery goodness, a hint of vanilla, and a crunchy cinnamon-sugar topping, these Coffee Cake Muffins are not just easy to make but also incredibly satisfying. Let’s get our aprons on and create these little delights that are sure to be a staple in your kitchen!
A Sweet Memory with Coffee Cake
Every food has a story, and mine with coffee cake muffins goes back to my childhood. I remember the sound of the mixer whirring in my grandmother’s cozy kitchen, a place filled with warmth and laughter. My siblings and I would race there every Saturday morning, eager to help and snack on the delicious treats that my Grandma made.
One of my fondest memories was the day we chose to experiment a little. We decided we’d make “the ultimate coffee cake,” which led us to raid her pantry for an array of spices, nuts, and chocolate chips. We ended up with this glorious, slightly messy creation that was less about perfection and more about joy. I can still picture Grandma watching us with a smile, her eyes twinkling with amusement as we debated whether to call it a “muffin” or “cake.” Whatever we decided, it was exactly what we needed—sweet, comforting, and made with a whole lot of love.
Let’s channel that nostalgic energy as we create our Coffee Cake Muffins, perfect for sharing or savoring all on your own!
Ingredients to Bring These Muffins to Life
Here’s what you’ll need for these Coffee Cake Muffins. Each ingredient plays a crucial role in developing the flavor and texture, so let’s break it down:
-
1/3 cup granulated sugar (66 grams): This adds sweetness to the muffins. You can substitute with coconut sugar for a healthier option!
-
2 teaspoons cinnamon: The warm spice that will fill your kitchen with a heavenly aroma. You can also try nutmeg or pumpkin spice for a twist!
-
1/2 cup all-purpose flour (62.5 grams): This is part of the crumb topping. Use whole wheat flour if you want a nuttier flavor and added health benefits.
-
1/2 cup light brown sugar (100 grams): It lends a rich, caramel-like flavor to both the muffins and the crumb topping. You can mix equal parts dark brown sugar for a deeper flavor profile.
-
1 1/2 teaspoons cinnamon (for topping): More of that glorious spice!
-
1/4 cup unsalted butter (56 grams, melted): Adds moisture and richness to the crumb topping. If you’re dairy-free, coconut oil works wonderfully here.
-
2 cups all-purpose flour (250 grams): The base for the muffin’s structure. If you’re gluten-free, you can use a 1:1 gluten-free flour blend.
-
1 teaspoon baking powder: This is your leavening agent that helps the muffins rise.
-
1/2 teaspoon baking soda: An additional leavening agent.
-
1/4 teaspoon salt: Balances the sweetness and enhances the overall flavor.
-
1/2 cup unsalted butter (112 grams, softened, not melted): A key player in creating that soft, fluffy texture. You can replace this with applesauce for a lighter option.
-
3/4 cup granulated sugar (150 grams): The main sweetener for the muffins.
-
1/4 cup brown sugar (50 grams, light): Further contributes to the moistness and flavor.
-
2 large eggs: They provide structure and moisture. If you want a vegan option, you can replace them with flaxseed meal or unsweetened applesauce.
-
1 1/2 teaspoons vanilla extract: This adds warmth and depth to the muffins.
-
1/2 cup sour cream (120 ml): This makes for incredibly moist muffins. Greek yogurt could be a great substitute!
-
1/3 cup milk (80 ml, I recommend 2%): Helps to incorporate all the ingredients smoothly; almond milk also works great for a dairy-free version.
-
1/2 cup powdered sugar (55 grams): For a final touch of sweetness on top!
-
1–2 tablespoons milk (or cream): For adjusting the consistency of your icing.
Step-by-Step Instructions for Deliciously Fluffy Muffins
1. Preheat Your Oven
Start by preheating your oven to 350°F (175°C). This is essential for a good bake. While the oven’s heating up, let’s set the scene for muffin magic!
2. Prepare Your Muffin Pan
Grease or line a muffin pan with paper liners. This will make it easier to get those muffins out after they’re baked without losing a crumb!
3. Make the Crumb Topping
In a medium bowl, mix together the 1/2 cup flour, 1/2 cup light brown sugar, 1/3 cup granulated sugar, and 2 teaspoons cinnamon. Melt 1/4 cup of unsalted butter and pour it into the dry ingredients. Use a fork or your hands to combine until crumbly. Set this aside while we whip up the muffin batter.
4. Whisk the Dry Ingredients
In a large bowl, whisk together 2 cups of all-purpose flour, 1 teaspoon baking powder, 1/2 teaspoon baking soda, and 1/4 teaspoon salt. Mixing these dry ingredients first ensures an even rise.
5. Cream the Butters and Sugars
In a separate large bowl, beat the 1/2 cup softened unsalted butter, 3/4 cup granulated sugar, and 1/4 cup brown sugar until it’s creamy and light. Don’t rush through this step—creaming your butter and sugars well incorporates air, making your muffins fluffy.
6. Add Eggs and Vanilla
Once your sugars and butter are creamy, add in 2 large eggs, one at a time, mixing well after each addition. Follow this with the 1 1/2 teaspoons vanilla extract—let that sweet aroma whisk you away!
7. Mix in the Sour Cream and Milk
Now it’s time to add the 1/2 cup sour cream and 1/3 cup milk to your mixture. Mix until just combined; the batter will be thick and luscious.
8. Combine Wet and Dry Ingredients
Carefully fold the dry ingredients into the wet. Do this gently with a spatula to avoid overmixing, which can lead to dense muffins. You want a few lumps—trust me!
9. Fill Your Muffin Pan
Spoon the batter into your prepared muffin pan, filling each cup about 2/3 full. This gives them room to rise without overflowing.
10. Crumble It Up!
Now, sprinkle that glorious crumb topping generously over each muffin. Don’t be shy; this is where the magic happens!
11. Bake to Perfection
Pop the muffin pan into your preheated oven and bake for about 18-22 minutes or until a toothpick inserted into the center comes out clean. You’ll know they’re ready when your kitchen is filled with the irresistible aroma of cinnamon!
12. Cool and Glaze
Once baked, allow the muffins to cool in the pan for about 5-10 minutes before transferring them to a wire rack. For an added touch of sweetness, mix 1/2 cup powdered sugar with 1-2 tablespoons milk to create a simple glaze and drizzle it over the muffins once cooled.
Serving Suggestions
These Coffee Cake Muffins are wonderful served warm out of the oven or at room temperature. They’re perfect for breakfast alongside a hot cup of coffee or tea. Feel free to present them on a rustic wooden board or in a cute muffin basket for a brunch vibe that guests (or your family) will adore!
Recipe Variations
Here are some fun variations to keep your muffins exciting every time:
-
Nutty Crunch: Add 1/2 cup chopped walnuts or pecans to the batter for an extra crunch.
-
Fruity Twist: Toss in 1/2 cup of blueberries or diced apples for a fruity version.
-
Chocolate Lovers: Replace half a cup of flour with cocoa powder for a chocolatey coffee cake experience.
-
Spiced Up: Add a dash of nutmeg or cardamom to the spices for a warm twist.
Chef’s Notes
Over the years, my Coffee Cake Muffins have evolved as I’ve experimented in the kitchen. I remember the early days, where they would sometimes be too dry or not rise enough. Come to find out, perfecting the right balance of wet and dry ingredients makes all the difference!
And of course, the greatest lesson? Don’t take it too seriously! Cooking should be fun, and if your muffins come out looking a little wonky, just call them “rustic”!
FAQs and Troubleshooting
1. Why are my muffins dense?
If your muffins are denser than expected, they might have been overmixed. Remember, only mix until just combined!
2. How do I know when my muffins are done?
Use a toothpick; if it comes out clean or with just a few crumbs, they are ready to come out.
3. Can I freeze these muffins?
Absolutely! Once cooled, store them in an airtight container or freezer bag, and they’ll be perfect for up to three months. Just pop them in the microwave or oven for a quick warm-up!
4. What if I don’t have sour cream?
Greek yogurt is a great alternative, or you can make your own by mixing plain yogurt with a splash of vinegar for tanginess.
Nutritional Info
While I am not providing the specific nutritional breakdown, these muffins are made with wholesome ingredients that balance enjoyment with nourishment.
There you have it—your guide to creating the most delightful Coffee Cake Muffins! Not only do they capture the essence of my cherished memories, but they also offer a sweet treat for your mornings. So, roll up your sleeves and get ready to unleash that love into your kitchen. Happy baking!
PrintCoffee Cake Muffins
Deliciously fluffy Coffee Cake Muffins filled with rich buttery goodness and topped with crunchy cinnamon-sugar, perfect for breakfast or a snack.
- Prep Time: 15 minutes
- Cook Time: 22 minutes
- Total Time: 37 minutes
- Yield: 12 muffins 1x
- Category: Snack
- Method: Baking
- Cuisine: American
- Diet: Vegetarian
Ingredients
- 1/3 cup granulated sugar (66 grams)
- 2 teaspoons cinnamon
- 1/2 cup all-purpose flour (62.5 grams)
- 1/2 cup light brown sugar (100 grams)
- 1 1/2 teaspoons cinnamon (for topping)
- 1/4 cup unsalted butter (56 grams, melted)
- 2 cups all-purpose flour (250 grams)
- 1 teaspoon baking powder
- 1/2 teaspoon baking soda
- 1/4 teaspoon salt
- 1/2 cup unsalted butter (112 grams, softened)
- 3/4 cup granulated sugar (150 grams)
- 1/4 cup brown sugar (50 grams, light)
- 2 large eggs
- 1 1/2 teaspoons vanilla extract
- 1/2 cup sour cream (120 ml)
- 1/3 cup milk (80 ml, 2% recommended)
- 1/2 cup powdered sugar (55 grams)
- 1–2 tablespoons milk (or cream)
Instructions
- Preheat your oven to 350°F (175°C).
- Prepare your muffin pan by greasing or lining it with paper liners.
- Make the crumb topping by mixing 1/2 cup flour, 1/2 cup light brown sugar, 1/3 cup granulated sugar, and 2 teaspoons cinnamon. Add melted butter and combine until crumbly. Set aside.
- Whisk together 2 cups of all-purpose flour, 1 teaspoon baking powder, 1/2 teaspoon baking soda, and 1/4 teaspoon salt.
- Cream the softened unsalted butter, 3/4 cup granulated sugar, and 1/4 cup brown sugar until creamy and light.
- Add in the eggs one at a time, mixing well after each addition, then add the vanilla extract.
- Mix in the sour cream and milk until just combined.
- Fold the dry ingredients into the wet mixture gently with a spatula.
- Fill each muffin cup about 2/3 full with the batter.
- Sprinkle the crumb topping generously over each muffin.
- Bake for about 18-22 minutes until a toothpick comes out clean.
- Cool in the pan for 5-10 minutes, then transfer to a wire rack. Drizzle glaze made of powdered sugar and milk on top.
Notes
Use whole wheat flour for a nuttier flavor or coconut sugar for a healthier alternative.
Nutrition
- Serving Size: 1 muffin
- Calories: 320
- Sugar: 20g
- Sodium: 300mg
- Fat: 14g
- Saturated Fat: 8g
- Unsaturated Fat: 4g
- Trans Fat: 0g
- Carbohydrates: 45g
- Fiber: 1g
- Protein: 4g
- Cholesterol: 60mg
Keywords: coffee cake, muffins, breakfast, dessert, cinnamon, sweet
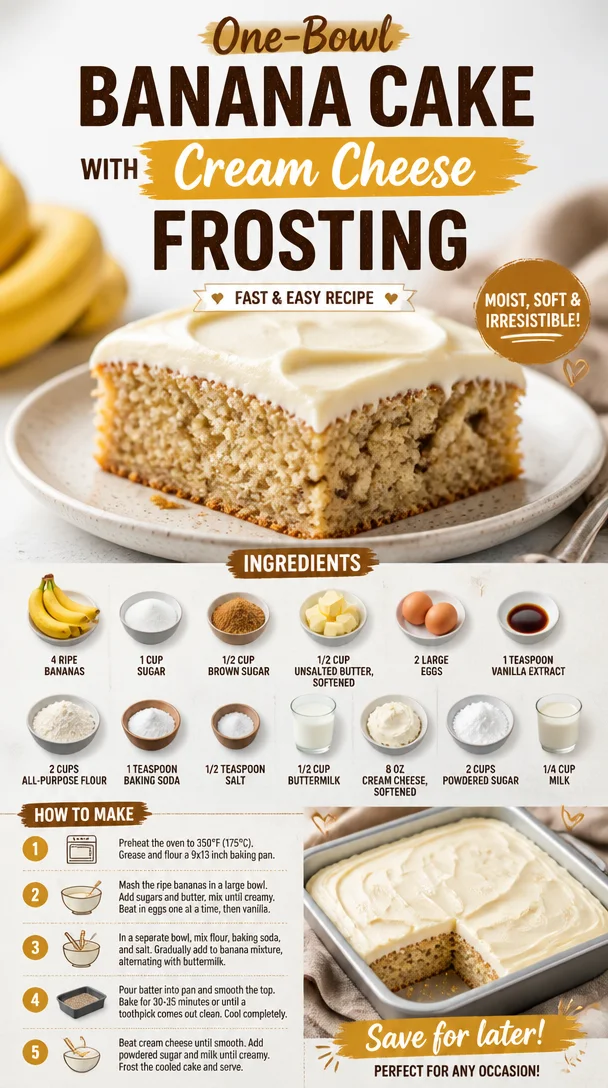
One-Bowl Banana Cake with Cream Cheese Frosting (Fast & Easy Recipe)
The Ultimate Comfort: Pioneer Woman Banana Cake with Cream Cheese Frosting
Introduction
Hey, food lovers! It’s Ava Carter here, and today we’re diving into a whimsical dessert that radiates warmth and nostalgia—Pioneer Woman Banana Cake with Cream Cheese Frosting. If you’re anything like me, you’ve got a special spot in your heart for bananas, whether they’re in a smoothie, on toast, or in this unforgettable cake.
Banana cake reminds me of lazy afternoons spent in my grandma’s kitchen, where the sun streamed through the window, and the sweet smell of ripe bananas filled the air. There was something magical about how her kitchen transformed ordinary ingredients into something extraordinary. This cake is one of those wonders that embodies both comfort and joy, making it perfect for any gathering—a birthday party, family dinner, or simply a treat for yourself!
This cake is fluffy, moist, and packed with the delightful sweetness of bananas, all topped with a silky cream cheese frosting that will make your taste buds dance. So grab your apron, roll up your sleeves, and let’s create something delicious together that will surely become a family favorite!
Personal Story
When I think of banana cake, I can’t help but be transported back to my childhood. I vividly remember stacking up overripe bananas on the kitchen counter, waiting for their day to shine in my grandma’s banana bread. But one day, she decided to whip up a cake instead—and oh, what a day that was! As the rich aroma wafted through the house, my siblings and I couldn’t contain our excitement.
After what felt like hours (in reality, it was only thirty minutes), the cake was finally ready, bringing us all together around the kitchen table. Each slice was a perfect blend of banana sweetness and a velvety cream cheese frosting that was out of this world. We licked our forks clean, of course, and nobody cared about the mess we made around the table. That day, I learned not just about baking, but the warmth of sharing a homemade treat with loved ones. It’s the kind of memory that sticks with you, don’t you think? It taught me to cherish each moment, especially when it’s accompanied by dessert!
Ingredients
Here’s what you’ll need to make this delightful cake, along with some helpful notes:
-
4 ripe bananas: The riper, the better! Brown spots mean more sweetness. If you’re out of bananas, you can try substituting with unsweetened applesauce—about 1 cup will do.
-
1 cup sugar: A standard granulated sugar provides the perfect sweetness. If you prefer, you can use coconut sugar as a healthier alternative, keeping in mind it will give a slightly caramel-like flavor.
-
1/2 cup brown sugar: This adds depth and moisture. Light brown is better, but dark brown works beautifully too if that’s what you have on hand.
-
1/2 cup unsalted butter, softened: This is essential for that to-die-for texture. You can swap it with coconut oil for a dairy-free option, or use vegan butter.
-
2 large eggs: They add structure and moisture. If you’re looking for an egg-free option, a flax egg (1 tablespoon flaxseed meal + 2.5 tablespoons water) works wonders!
-
1 teaspoon vanilla extract: A must-have for that aromatic flavor. Feel free to experiment with almond extract for a unique twist.
-
2 cups all-purpose flour: All-purpose gives us that light and fluffy texture. For a gluten-free version, use a 1:1 gluten-free baking flour.
-
1 teaspoon baking soda: This is the leavening agent that gives our cake rise. Make sure it’s fresh for the best results!
-
1/2 teaspoon salt: A pinch of salt enhances all the flavors. Feel free to use Kosher or sea salt.
-
1/2 cup buttermilk: Buttermilk makes the cake tender and moist. If you don’t have any, a simple substitute can be made by adding a tablespoon of vinegar to regular milk and letting it sit for a few minutes.
-
8 oz cream cheese, softened: The creamy base for our frosting. If you want a lighter version, you can use Neufchâtel cheese.
-
2 cups powdered sugar: This gives the frosting its sweetness and silky texture. You can reduce the sugar for a less sweet frosting if desired.
-
1/4 cup milk: To help with the consistency of the frosting. You can opt for almond or oat milk if you’re dairy-free.
Step-by-Step Instructions
Now that we have everything ready, let’s roll up our sleeves and get baking!
-
Preheat Your Oven
Start by preheating your oven to 350°F (175°C). This will ensure your cake bakes evenly and perfectly. Trust me; preheating is one of those steps you don’t want to skip! -
Prepare Your Pans
Grease and flour two 9-inch round cake pans—or if you’re feeling fancy, you could line them with parchment paper for easier removal! This step is crucial—nobody wants their cake to stick to the bottom. -
Mash the Bananas
In a mixing bowl, mash those ripe bananas until smooth. I love to use a fork for this—it’s easy and nostalgic, reminding me of my childhood baking sessions. -
Mix the Sugars and Butter
In a separate bowl (or your stand mixer), combine the granulated sugar, brown sugar, and softened butter. Beat until creamy and fluffy—that’s about 2-3 minutes. This is where the magic begins! -
Incorporate the Eggs and Vanilla
Add in the eggs one at a time, mixing well after each addition. Pour in that lovely vanilla extract, too; your kitchen is about to smell incredible! -
Combine Dry Ingredients
In another bowl, mix the all-purpose flour, baking soda, and salt. This step helps distribute the leavening agent evenly throughout the cake. -
Add Dry Ingredients and Buttermilk
Gradually add the dry mixture to the wet ingredients, alternating with the buttermilk, mixing just until combined. Avoid over-mixing to keep that cake light and fluffy! -
Fold in the Mashed Bananas
Carefully fold in those mashed bananas, ensuring they’re evenly distributed. You want every bite to be filled with banana goodness! -
Pour and Bake
Divide the batter evenly between the prepared pans. Pop them into your preheated oven and bake for about 25-30 minutes or until a toothpick inserted in the center comes out clean. -
Cool the Cakes
Once done, remove them from the oven and let them cool in the pans for about 10 minutes. Then, carefully remove them from the pans and transfer them to a wire rack to cool completely. This is where patience pays off! -
Prepare the Frosting
In a mixing bowl, beat the softened cream cheese and gradually add in the powdered sugar until smooth and creamy. Stir in the milk to reach your desired consistency. You want it spreadable, not too runny. -
Frost the Cake
Once the cakes are completely cooled, place one layer on your serving plate, spread a generous amount of frosting, then gently place the second layer on top and frost the top and sides. Get creative here; no need for perfection—rustic is so in!
Serving Suggestions
Slice the cake into generous portions and serve on a colorful plate, perhaps with a fresh banana slice on top for that extra flourish. A dollop of whipped cream or a scoop of ice cream on the side wouldn’t hurt either, am I right? This cake is suitable for any occasion, but it also makes a delightful afternoon treat with a cup of coffee or tea.
Recipe Variations
Now let’s get your creativity flowing! Here are a few twists you could try:
-
Chocolate Chip Banana Cake: Fold in 1 cup of semi-sweet chocolate chips into the batter for a delightful chocolatey flavor.
-
Nutty Banana Cake: Add 1 cup of chopped walnuts or pecans for a crunchy texture throughout the cake.
-
Spiced Banana Cake: Mix in a teaspoon of cinnamon or a pinch of nutmeg to add a warm, cozy flavor profile.
-
Banana Coconut Cake: Stir in 1/2 cup of shredded coconut to the batter for a tropical vibe.
-
Vegan Version: Replace eggs with flax eggs, use coconut oil instead of butter, and substitute with almond milk for buttermilk and vegan cream cheese for frosting.
Chef’s Notes
This banana cake has traveled with me through many kitchens and has adapted to various tastes and preferences. The beauty of this recipe is its incredible versatility. I once made it for a friend’s birthday party and added a layer of chocolate ganache on top of the cream cheese frosting—let me tell you, it was a hit! If you ever have overripe bananas staring at you from the counter, you know exactly what to do—it’s like a warm hug in dessert form.
FAQs and Troubleshooting
1. My cake is dense! What happened?
This often happens when the batter is over-mixed or if too much flour was added. Remember to mix just until combined, and spoon flour into your measuring cup rather than scooping it directly with the cup, which can pack it in.
2. How can I tell when my cake is done?
A toothpick inserted into the center should come out clean or with just a few moist crumbs. If it’s covered in batter, give it a few more minutes!
3. Can I make this cake ahead of time?
Absolutely! This cake stores well in the fridge for up to 5 days. You can also freeze the layers (wrapped in plastic wrap) for up to 3 months. Just thaw and frost when you’re ready!
4. My frosting is too runny. What do I do?
No worries! You can add a little more powdered sugar to thicken up the frosting. Conversely, if it’s too thick, a splash of milk will do the trick!
Nutritional Info
While indulgent, this cake is best enjoyed in moderation. Each slice is a lovely treat to brighten your day, and when you bake it with love, it’s an ingredient you can definitely feel good about!
So there you have it, friends—a delightful recipe for Pioneer Woman Banana Cake with Cream Cheese Frosting that’s sure to create not just a delicious treat but fantastic memories in your kitchen. Now go forth, bake up a storm, and savor every delightful bite! Happy baking! 🍌🍰
PrintPioneer Woman Banana Cake with Cream Cheese Frosting
A fluffy, moist banana cake topped with silky cream cheese frosting, perfect for any gathering.
- Prep Time: 15 minutes
- Cook Time: 30 minutes
- Total Time: 45 minutes
- Yield: 12 servings 1x
- Category: Dessert
- Method: Baking
- Cuisine: American
- Diet: Vegetarian
Ingredients
- 4 ripe bananas
- 1 cup granulated sugar
- 1/2 cup brown sugar
- 1/2 cup unsalted butter, softened
- 2 large eggs
- 1 teaspoon vanilla extract
- 2 cups all-purpose flour
- 1 teaspoon baking soda
- 1/2 teaspoon salt
- 1/2 cup buttermilk
- 8 oz cream cheese, softened
- 2 cups powdered sugar
- 1/4 cup milk
Instructions
- Preheat your oven to 350°F (175°C).
- Grease and flour two 9-inch round cake pans.
- Mash the bananas until smooth.
- Mix the granulated sugar, brown sugar, and softened butter until creamy.
- Incorporate the eggs one at a time and add the vanilla extract.
- Combine the flour, baking soda, and salt in another bowl.
- Add the dry mixture to the wet ingredients, alternating with buttermilk.
- Fold in the mashed bananas.
- Pour the batter into prepared pans and bake for 25-30 minutes.
- Cool the cakes in the pans for 10 minutes, then transfer to a wire rack.
- Prepare the frosting by beating cream cheese and powdered sugar until smooth and creamy; stir in milk.
- Frost the cooled cakes and serve.
Notes
This cake is versatile—try adding chocolate chips, nuts, or spices for variations.
Nutrition
- Serving Size: 1 slice
- Calories: 400
- Sugar: 30g
- Sodium: 300mg
- Fat: 15g
- Saturated Fat: 8g
- Unsaturated Fat: 5g
- Trans Fat: 0g
- Carbohydrates: 55g
- Fiber: 2g
- Protein: 5g
- Cholesterol: 60mg
Keywords: banana cake, cream cheese frosting, dessert, baking, comfort food
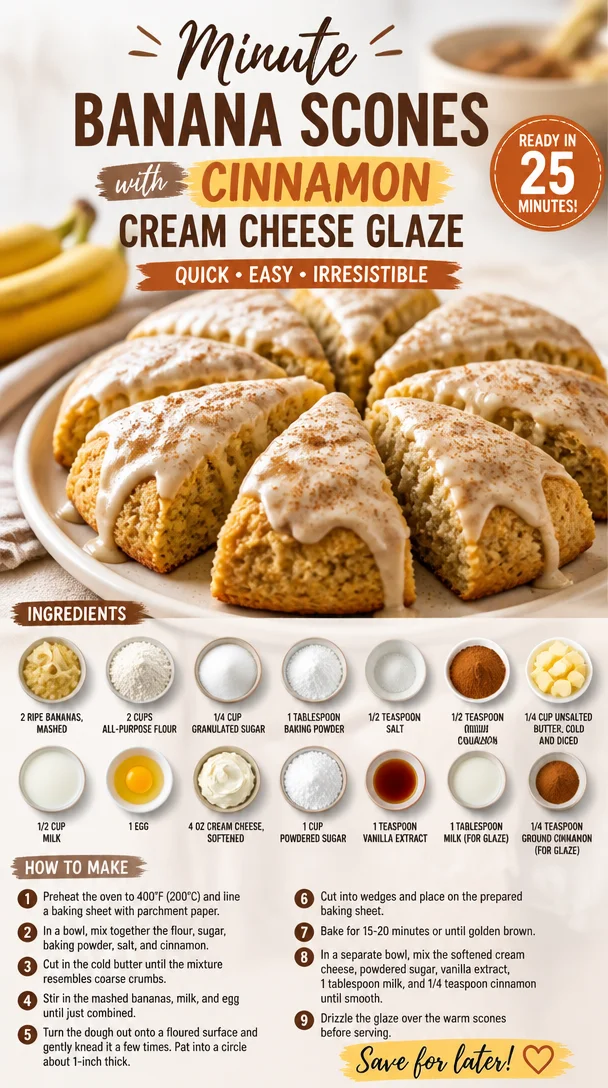
Minute Banana Scones with Cinnamon Cream Cheese Glaze
The Ultimate Banana Scones with Cinnamon Cream Cheese Glaze: A Delicious Twist on a Classic
Welcome, fellow food lovers! Today, we’re diving into the scrumptious world of Banana Scones with Cinnamon Cream Cheese Glaze, a recipe that holds a special place in my heart and my kitchen. If you’re anything like me, there’s something magical about the aroma of baked goods wafting through your home. And what could be better than combining the rich flavor of ripe bananas with the indulgence of creamy frosting? Trust me, these scones are the perfect blend of comfort and delight.
Growing up, the highlight of my Saturdays was visiting my grandma’s cozy kitchen. With flour dust dancing in the sunlight streaming through the window, we would whip up all kinds of treats, but it was her banana recipes that always stole the show. She had this magical way of turning ripe bananas into soft, fluffy desserts that seemed to melt in your mouth. I remember giggling as I mashed those bananas, and I always tried to sneak a taste of the batter before it made its way into the oven. That joyous experience is what inspired me to create these Banana Scones, to bring a taste of nostalgia back into my modern kitchen.
So, whether you’re looking for a delightful snack to share with friends or simply want to treat yourself to something special, these scones are calling your name. They’re light, fluffy, and topped with a creamy glaze that’ll make your taste buds sing. Let’s gather our ingredients and jump into making this deliciousness together!
Ingredients
Here’s what you’ll need to whip up these fabulous Banana Scones with Cinnamon Cream Cheese Glaze:
-
2 ripe bananas, mashed: The real star of the show! Ripe bananas are naturally sweet and full of moisture, giving your scones a wonderful flavor. If you’re in a pinch, you can substitute with unsweetened applesauce (1/2 cup) for a similar texture, though the flavor will differ.
-
2 cups all-purpose flour: This is our base, providing structure and fluffiness. If you need a gluten-free option, you can use a 1:1 gluten-free flour blend.
-
1/4 cup granulated sugar: Just a touch of sweetness for that perfect bite. For a healthier alternative, consider coconut sugar or a zero-calorie sweetener, adjusting according to your taste preferences.
-
1 tablespoon baking powder: This will help those scones rise beautifully in the oven. Ensure your baking powder is fresh for optimal fluffiness!
-
1/2 teaspoon salt: A crucial ingredient that enhances all the other flavors. If you’re watching your sodium intake, you can reduce this to a pinch.
-
1/2 teaspoon ground cinnamon: This adds warmth and flavor. If you love a little more spice, feel free to add an extra dash or combine with nutmeg for a unique twist.
-
1/4 cup unsalted butter, cold and diced: The secret to flaky scones! The cold butter creates little pockets of steam as it melts, making your scones tender. For a dairy-free option, you can swap in coconut oil.
-
1/2 cup milk: This hydrates our dry ingredients. You can use any non-dairy milk (like almond or oat milk) for a lactose-free version.
-
1 egg: A binding agent and a source of richness. To make it vegan, substitute with 1/4 cup of unsweetened applesauce.
-
4 oz cream cheese, softened: This creates the luscious glaze that takes these scones from good to drool-worthy. If you prefer a dairy-free version, vegan cream cheese can work just as well.
-
1 cup powdered sugar: For sweetness in our glaze. You can use coconut powdered sugar as an alternative for a healthier version.
-
1 teaspoon vanilla extract: This adds a delightful depth to the glaze. Feel free to experiment with almond extract for a different flavor profile.
-
1 tablespoon milk (for glaze): This helps adjust the consistency of the glaze to your liking.
-
1/4 teaspoon ground cinnamon (for glaze): A sprinkle of warmth and spice for the finishing touch!
Step-by-Step Instructions
Now, let’s dive into the baking process! Follow these steps, and you’ll soon be enjoying the fruits of your labor (pun intended!).
-
Preheat your oven to 400°F (200°C). This high temperature is key to a golden-brown scone, so don’t skip this step!
-
Mash the bananas in a large mixing bowl. Use a fork to get them nice and smooth. You want about 1 cup of banana puree, so grab those ripest bananas you can find! Remember, the riper they are, the sweeter they will be.
-
In another bowl, whisk together the flour, sugar, baking powder, salt, and ground cinnamon. This dry mix lays the foundation for your scones. Make sure to sift if your flour has lumps—that extra step goes a long way!
-
Add the diced cold butter to the flour mixture. Using a pastry cutter or your fingertips, cut the butter into the flour until it resembles coarse crumbs. You want to see tiny pea-sized pieces of butter scattered throughout. This step is crucial for achieving that flaky texture!
-
In a separate bowl, combine the milk, egg, and mashed bananas. Whisk until well blended.
-
Pour the wet ingredients into the dry ingredients. Gently mix with a spatula or wooden spoon until just combined. Be careful not to overmix—overworking the dough can lead to tough scones.
-
Turn the dough out onto a floured surface and gently pat it into a rectangle about 1 inch thick. For that rustic look, no need for perfection here!
-
Cut your scones into triangles (or use a round cutter if you’re feeling fancy!). Place them on a parchment-lined baking sheet. Give them a little space, as they’ll puff up during baking.
-
Bake in the preheated oven for 15-20 minutes or until golden brown. Keep an eye on them towards the end! The edges should turn a lovely amber hue, and your kitchen will smell heavenly.
-
While the scones are baking, let’s prepare the cinnamon cream cheese glaze! In a mixing bowl, combine the softened cream cheese, powdered sugar, vanilla extract, milk, and ground cinnamon. Whisk until smooth and creamy. Adjust the milk for your desired glaze consistency—more for a thinner glaze, less for drizzling.
-
Once the scones are done, let them cool on a wire rack for about 10 minutes. As they cool, you might be tempted to dive right in—resist the urge! The glaze is worth the wait.
-
Drizzle the glaze over the scones once they’ve cooled. I like to go wild with it, but feel free to be more controlled if you prefer. The sticky sweetness of the glaze will seep into every nook and cranny, elevating your scones to heavenly heights.
Serving Suggestions
To serve these Banana Scones, arrange them on a charming platter for a delightful brunch or afternoon tea. Pair with a cup of hot coffee or tea for a perfect pairing! You can even wedge some fresh banana slices or a sprinkle of chopped nuts, like pecans or walnuts, on the sides for a beautiful presentation.
Recipe Variations
Feel like customizing your scones further? Here are a few creative twists:
- Nutty Banana Scones: Toss in some chopped walnuts or pecans for an added crunch.
- Chocolate Chip Twist: Fold in half a cup of chocolate chips for a rich, sweet surprise in every bite.
- Berrylicious: Replace one banana with 1/2 cup of your favorite berries (strawberries or blueberries work beautifully).
- Coconut Flavored: Add shredded coconut to the dough and use coconut milk for a tropical flair.
- Spiced Up: Add a pinch of nutmeg or ginger for additional depth of flavor in both the scones and the glaze.
Chef’s Notes
Every time I make these scones, I can’t help but reminisce about my grandma’s kitchen and the laughs we shared. I’ve tried various incarnations of this recipe over the years, but none evoke the warmth as well as the classic banana and cinnamon combo. These scones have become a staple in my own home, loved by friends and family alike.
The best part? They freeze beautifully! Just bake, cool, and pop them in a freezer-safe bag. When you’re ready to enjoy, simply reheat in a toaster oven for a warm, fresh taste anytime.
FAQs and Troubleshooting
Q: My scones turned out too dry. What happened?
A: The most likely culprit is overmixing or possibly not enough moisture from the bananas. Be sure to mix until just combined and ensure your bananas are ripe enough to provide ample moisture.
Q: Can I make these scones ahead of time?
A: Absolutely! You can prepare the dough in advance and refrigerate it for up to 24 hours before baking. You can also bake them, cool, and store them in an airtight container for up to three days.
Q: Can I use other flavors in the glaze?
A: Definitely! Feel free to swap out the vanilla extract with almond extract or even a citrus zest for a refreshing twist.
Q: My glaze didn’t set properly. What can I do?
A: If your glaze is too thin, try adding more powdered sugar to thicken it. If too thick, a splash of milk can help loosen it up!
Nutritional Info
While indulgent, these scones are a delightful way to enjoy a treat with a side of nutrition from the bananas. Each scone provides a good dose of potassium and fiber, making them a more wholesome indulgence than your average dessert.
I hope this recipe brings as much joy to your kitchen as it does to mine. There’s nothing quite like baking something from scratch, especially when it’s shared with loved ones. So gather your ingredients, turn up the music, and enjoy every bite of these Banana Scones with Cinnamon Cream Cheese Glaze! Happy baking! 🥳
PrintUltimate Banana Scones with Cinnamon Cream Cheese Glaze
Delightful banana scones topped with a creamy cinnamon glaze, perfect for a comforting snack or brunch.
- Prep Time: 20 minutes
- Cook Time: 20 minutes
- Total Time: 40 minutes
- Yield: 8 servings 1x
- Category: Snack
- Method: Baking
- Cuisine: American
- Diet: Vegetarian
Ingredients
- 2 ripe bananas, mashed
- 2 cups all-purpose flour
- 1/4 cup granulated sugar
- 1 tablespoon baking powder
- 1/2 teaspoon salt
- 1/2 teaspoon ground cinnamon
- 1/4 cup unsalted butter, cold and diced
- 1/2 cup milk
- 1 egg
- 4 oz cream cheese, softened
- 1 cup powdered sugar
- 1 teaspoon vanilla extract
- 1 tablespoon milk (for glaze)
- 1/4 teaspoon ground cinnamon (for glaze)
Instructions
- Preheat your oven to 400°F (200°C).
- Mash the bananas in a large mixing bowl until smooth.
- Whisk together the flour, sugar, baking powder, salt, and ground cinnamon in another bowl.
- Add the diced cold butter to the flour mixture, cutting it in until it resembles coarse crumbs.
- Combine milk, egg, and mashed bananas in a separate bowl and whisk until blended.
- Pour the wet ingredients into the dry ingredients and gently mix until just combined.
- Turn the dough out onto a floured surface and pat it into a rectangle about 1 inch thick.
- Cut the dough into triangles and place them on a parchment-lined baking sheet.
- Bake for 15-20 minutes or until golden brown.
- Prepare the glaze by mixing cream cheese, powdered sugar, vanilla, milk, and ground cinnamon until smooth.
- Cool the scones on a wire rack for 10 minutes before drizzling with glaze.
Notes
These scones freeze beautifully; bake, cool, and store them in a freezer-safe bag.
Nutrition
- Serving Size: 1 scone
- Calories: 250
- Sugar: 15g
- Sodium: 200mg
- Fat: 10g
- Saturated Fat: 5g
- Unsaturated Fat: 5g
- Trans Fat: 0g
- Carbohydrates: 35g
- Fiber: 2g
- Protein: 4g
- Cholesterol: 50mg
Keywords: banana scones, cinnamon glaze, baked goods, brunch, snack
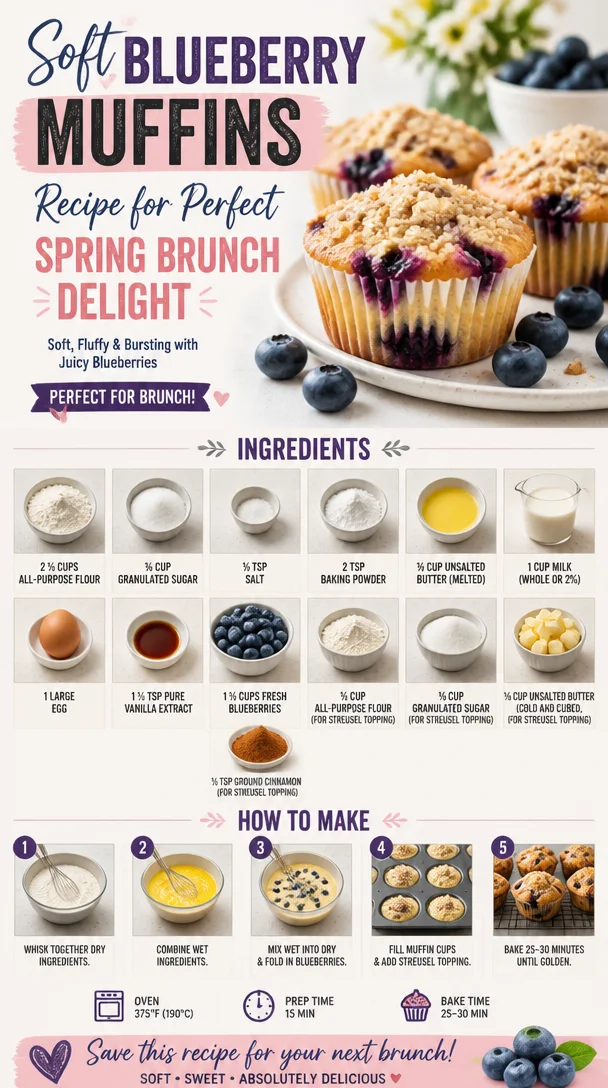
Soft Blueberry Muffins Recipe for Perfect Spring Brunch Delight
Soft Blueberry Muffins Recipe for Perfect Spring Brunch Delight
Welcome to Clean Plate Cravings! Today, I’m thrilled to share a recipe that not only celebrates the beauty of spring but also brings a warm, homemade touch to your brunch table. Blueberry muffins are the epitome of comfort food, and nothing says “spring delight” quite like the sweet-tart burst of fresh blueberries nestled in a soft, fluffy muffin. Let’s dive into creating the softest, most delicious blueberry muffins that will have everyone coming back for seconds—and thirds!
A Joyful Kitchen Memory
Growing up, my weekends were filled with the sweet aroma of baking wafting through my home, especially in the springtime. My mom had a magical way of transforming the simplest of ingredients into unforgettable family treats. One spring morning, I remember waking up to the sound of laughter and the clattering of mixing bowls in the kitchen. My mom had decided to whip up her famous blueberry muffins for brunch.
We had just returned from our local farmers’ market with pints of fresh blueberries, their deep hue promising a burst of flavor. As we mixed the batter, I snuck a few blueberries, their juicy sweetness exploding in my mouth. The anticipation was palpable as we brought the muffins out of the oven, golden and fragrant. These muffins became a tradition, a way to celebrate the arrival of spring while gathering around the table with family and friends. Every bite transported me back to those sunny mornings, a delicious reminder of love, laughter, and togetherness.
Ingredients
Let’s gather our ingredients! Here’s what you’ll need to make these delightful blueberry muffins:
-
2 ½ cups all-purpose flour
A must-have for achieving that perfect muffin texture. For a whole-grain twist, try using whole wheat flour, but you may want to adjust the liquid slightly. -
¾ cup granulated sugar
This sweetens our muffins beautifully. If you’re looking to cut back on sugar, feel free to reduce it to ½ cup or use coconut sugar for a different flavor profile. -
½ tsp salt
Salt is crucial; it enhances the flavors in the muffins. Don’t skip it! -
2 tsp baking powder
Our secret to fluffy muffins! Make sure your baking powder is fresh; if it’s been sitting in your pantry for more than six months, it may need replacing. -
⅓ cup unsalted butter (melted)
Adds richness and flavor. If you prefer a dairy-free option, coconut oil works wonders here! -
1 cup milk (whole or 2%)
The moisture in our muffins. Almond milk or oat milk can be excellent substitutes for a nut-free or dairy-free option. -
1 large egg
Acts as a binder. If you’re vegan, you can replace this with ¼ cup unsweetened applesauce. -
1 ½ tsp pure vanilla extract
For that lovely aromatic flavor. Always opt for pure extract over imitation for the best results! -
1 ½ cups fresh blueberries
The star of our show! Be sure to wash and pat them dry before folding them into the batter to prevent streaking. -
½ cup all-purpose flour (for streusel topping)
Adds texture and a lovely crunch. You can substitute it with oats for a heartier topping! -
⅓ cup granulated sugar (for streusel topping)
Just the right amount to sweeten the crunch! -
⅓ cup unsalted butter (cold and cubed, for streusel topping)
Key for making the streusel crumbly and delicious. If you’re dairy-free, try using a vegan butter substitute. -
½ tsp ground cinnamon (for streusel topping)
Adds a warm, cozy layer of flavor. You can also tweak it with nutmeg for a different taste.
Step-by-Step Instructions
Ready to get baking? Let’s whip up these delightful muffins step by step!
-
Preheat Your Oven
Preheat your oven to 375°F (190°C). This is a crucial step to ensure even baking. While your oven is warming up, gather your muffin pans—this recipe makes about 12 muffins, so grab two pans or bake in batches! -
Prepare the Muffin Pan
Grease your muffin pans with non-stick spray, or line them with muffin liners for easy removal. I love using liners; it gives my muffins a polished look and minimizes mess! -
Mix the Dry Ingredients
In a large mixing bowl, whisk together the flour, sugar, salt, and baking powder. This step is essential—mixing the dry ingredients first helps ensure that the baking powder is evenly distributed throughout the batter. -
Combine the Wet Ingredients
In a separate bowl, mix the melted butter, milk, egg, and vanilla extract. Whisk until well combined and smooth. I tend to let my melted butter cool a little before mixing it in; it helps prevent cooking the egg when combined! -
Combine Wet and Dry
Gently fold the wet ingredients into the dry ingredients using a spatula. Be careful not to overmix—this is key for fluffy muffins! It’s okay if there are a few lumps in the batter. -
Fold in the Blueberries
Now for the fun part! Fold in the fresh blueberries, being gentle to keep them intact. This is where those sweet bursts of flavor come in! -
Make the Streusel Topping
In a small bowl, combine the flour, sugar, cinnamon, and cold cubed butter. Use your fingers or a pastry cutter to mix until it resembles coarse crumbs. If you have little ones around, this step is a great way to get them involved—let them squish the butter into the dry ingredients! -
Fill the Muffin Cups
Using a cookie scoop or spoon, fill each muffin cup about 2/3 full with batter. Top each one generously with your streusel mixture—don’t be shy! This adds that perfect crunchy topping. -
Bake to Perfection
Place the muffin pans in the preheated oven and bake for 18-20 minutes or until golden brown and a toothpick inserted in the center comes out clean. The aroma wafting through your home will be absolutely heavenly! -
Cool and Serve
Once baked, remove your muffins from the oven and let them cool in the pans for about 5 minutes before transferring them to a wire rack to cool completely. Enjoy them warm or at room temperature—either way, they’re delicious!
Serving Suggestions
Serve your blueberry muffins warm with a pat of butter or a drizzle of honey. They’re perfect alongside a warm cup of coffee or a refreshing glass of iced tea. For a brunch spread, pair them with fresh fruit and yogurt for a wholesome touch!
Recipe Variations
Want to get creative? Here are some fun twists to this classic recipe:
- Lemon Blueberry Muffins: Add the zest of one lemon to the batter for a zesty flavor that pairs beautifully with blueberries.
- Chocolate Chip Blueberry Muffins: Fold in a handful of dark chocolate chips along with the blueberries for a sweet indulgence.
- Nutty Crunch: Add chopped walnuts or almond slivers to your batter or streusel for an extra crunch.
- Gluten-Free Muffins: Substitute all-purpose flour with a gluten-free blend, and make sure your baking powder is gluten-free as well!
- Vegan Option: Swap the egg for flaxseed meal and water mixture (1 tablespoon of flaxseed meal mixed with 2.5 tablespoons of water) and use plant-based milk and butter.
Chef’s Notes
Every kitchen has a personality, and mine surely loves blueberry muffins! This recipe has evolved over the years, starting from my mom’s classic version to a modern twist that embraces simplicity and fresh ingredients. I can still picture those sunny mornings filled with family chatter and laughter. What I love most about baking is that it brings people together and creates memories—so don’t hesitate to share your creations with loved ones!
FAQs and Troubleshooting
Q: My muffins came out dense. What happened?
A: Dense muffins are often a result of overmixing the batter. Remember to mix until just combined!
Q: Can I use frozen blueberries?
A: Absolutely! If using frozen blueberries, don’t thaw them—instead, fold them in directly from the freezer to help prevent the batter from turning blue.
Q: How do I store leftover muffins?
A: Store muffins in an airtight container at room temperature for up to three days. You can also freeze them for up to three months—just let them cool completely before freezing!
Q: My streusel topping didn’t crumble. What went wrong?
A: Make sure your butter is cold and cubed before mixing. If it’s too soft, the streusel won’t form those lovely crumbs we’re after!
Nutritional Info
While I love indulging in these muffins, they’re also about balance. Each muffin contains roughly:
- Calories: 200
- Protein: 3g
- Fat: 8g
- Carbohydrates: 32g
- Fiber: 1g
- Sugar: 10g
Remember, nutritional content may vary based on ingredients used and proportions, so feel free to adjust according to your needs!
There you have it—your guide to soft blueberry muffins that bring a touch of warmth and sweetness to your spring brunch. I hope this recipe becomes a cherished tradition in your home just like it is in mine! So, put on your apron, turn up your favorite tunes, and let’s bake some love into your kitchen! Happy baking! 🫐💙
PrintSoft Blueberry Muffins
Deliciously soft blueberry muffins perfect for spring brunch, bursting with fresh blueberries and topped with a delightful streusel.
- Prep Time: 15 minutes
- Cook Time: 20 minutes
- Total Time: 35 minutes
- Yield: 12 muffins 1x
- Category: Baked Goods
- Method: Baking
- Cuisine: American
- Diet: Vegetarian
Ingredients
- 2 ½ cups all-purpose flour
- ¾ cup granulated sugar
- ½ tsp salt
- 2 tsp baking powder
- ⅓ cup unsalted butter (melted)
- 1 cup milk (whole or 2%)
- 1 large egg
- 1 ½ tsp pure vanilla extract
- 1 ½ cups fresh blueberries
- ½ cup all-purpose flour (for streusel topping)
- ⅓ cup granulated sugar (for streusel topping)
- ⅓ cup unsalted butter (cold and cubed, for streusel topping)
- ½ tsp ground cinnamon (for streusel topping)
Instructions
- Preheat your oven to 375°F (190°C).
- Prepare your muffin pans by greasing them or using liners.
- Mix the dry ingredients: flour, sugar, salt, and baking powder.
- Combine the wet ingredients: melted butter, milk, egg, and vanilla extract.
- Combine the wet and dry ingredients gently.
- Fold in the fresh blueberries carefully.
- Make the streusel topping by combining flour, sugar, cinnamon, and cold butter.
- Fill each muffin cup about 2/3 full and top with streusel.
- Bake for 18-20 minutes, until golden brown and a toothpick comes out clean.
- Cool in pans for 5 minutes before transferring to a wire rack.
Notes
Serve warm with butter or honey, alongside coffee or iced tea for a delightful brunch experience.
Nutrition
- Serving Size: 1 muffin
- Calories: 200
- Sugar: 10g
- Sodium: 200mg
- Fat: 8g
- Saturated Fat: 5g
- Unsaturated Fat: 3g
- Trans Fat: 0g
- Carbohydrates: 32g
- Fiber: 1g
- Protein: 3g
- Cholesterol: 30mg
Keywords: blueberry muffins, spring baking, brunch recipes, easy muffins, homemade muffins
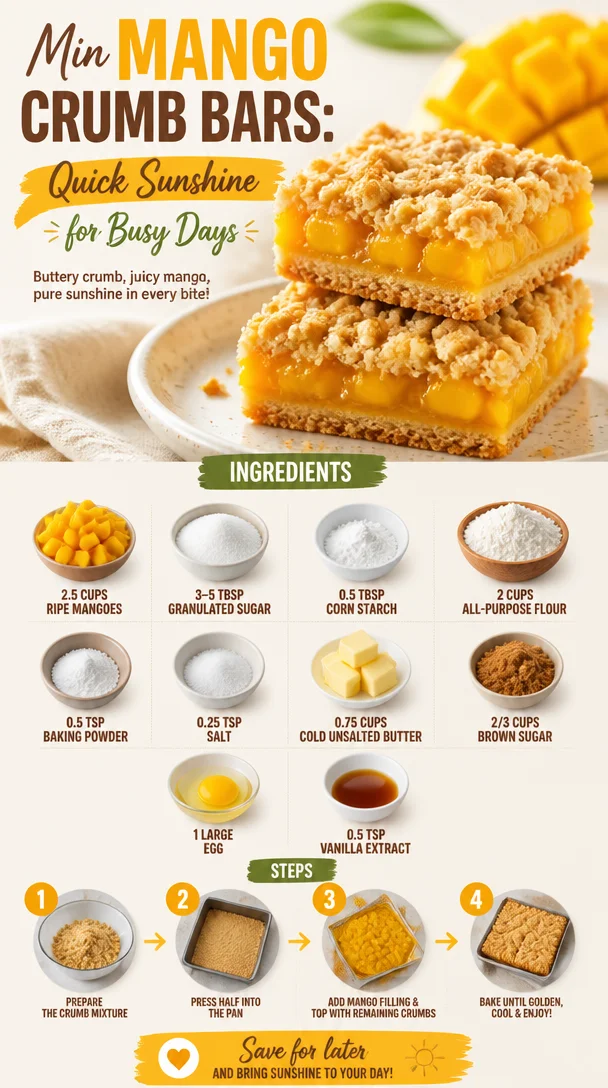
Min Mango Crumb Bars: Quick Sunshine for Busy Days
Irresistible Mango Crumb Bars That Brighten Your Day
Welcome to a slice of sunshine right in your kitchen! Today, we’re diving into a delightful treat that’s as vibrant as a day at the beach: Mango Crumb Bars. Picture this: a buttery, crumbly crust holding a luscious mango filling that dances on your taste buds with a burst of tropical goodness. It’s such a joy to bake with ripe, sweet mangoes, and when you combine them with a crumbly topping, you get a dessert that’s perfect for any occasion—be it a picnic, a potluck, or just a cozy afternoon at home.
These bars capture the essence of summer in every bite. They’re easy to make, and I promise you’ll want to whip them up over and over again! There’s nothing quite like that first bite—the sweetness of the mango combined with the buttery crust is simply heavenly. Whether you’re savoring them with your morning coffee or serving them at a gathering, these bars will brighten up your day.
So grab your apron, put on your favorite playlist, and let’s create something that will not only tantalize your taste buds but also warm your heart. Ready to make some mango magic? Let’s get started!
Personal Story
Let me take you back to my childhood. Every summer, my family would head to the local farmer’s market, and I would eagerly await the moment I could dive into a delicious mango. My mom would always buy a basketful of these golden gems, and she had this incredible knack for selecting the ripest ones. We’d sit in the backyard with the sun shining down, juices dripping from our fingers as we devoured those sweet, juicy mangoes.
One day, my mom and I decided to get creative and turned our favorite fruits into a dessert. We mixed the mango with some sugar and a touch of flour, and poured it over a crumbly base. Let me tell you, it was magic! That random kitchen adventure became a cherished memory and the spark for my love of baking. Every time I make these Mango Crumb Bars, I’m reminded of those lazy summer afternoons filled with laughter, family, and the irresistible aroma of fresh mangoes. It’s funny how one simple recipe can carry so much nostalgia and joy!
Ingredients
Here’s what you’ll need to make your own irresistible Mango Crumb Bars:
-
2.5 cups ripe mangoes
(The sweeter the mangoes, the more delightful the filling! Look for those soft, fragrant fruits for the best flavor.) -
3-5 tbsp granulated sugar
(Adjust based on the ripeness of your mangoes for a perfect sweet balance. Riper mangoes will need less sugar, while firmer ones may require a touch more.) -
0.5 tbsp corn starch
(This helps thicken the filling, ensuring it doesn’t run when baked. It’s like magic in your baking!) -
2 cups all-purpose flour
(The base for a sturdy yet soft crumb that holds everything together. For a gluten-free option, try using almond flour but adjust the liquid slightly.) -
0.5 tsp baking powder
(This ingredient gives your crust a light and airy texture—because who wants a dense crust?) -
0.25 tsp salt
(Salt enhances the overall flavor profile of the Mango Crumb Bars. Don’t skip it!) -
0.75 cups cold unsalted butter
(Cold butter creates that irresistibly flaky texture we all love. Try to keep it chilled until it’s time to mix!) -
2/3 cups brown sugar
(Adds a rich, caramel flavor that perfectly complements the mango filling. It’s the secret sauce of scrumptiousness!) -
1 large egg
(Binds the ingredients together while contributing to that tender crumb—no dry bars here!) -
0.5 tsp vanilla extract
(A touch of vanilla elevates the flavor to new heights. Because really, who can resist vanilla?)
Step-by-Step Instructions
-
Preheat your oven: Start by preheating your oven to 350°F (175°C). This way, when you’re done mixing, your oven is ready to bake those bars to golden perfection!
-
Prepare your pan: Line an 8×8 square baking pan with parchment paper, allowing some overhang on the sides. This makes for easy removal later—trust me, you’ll thank yourself!
-
Mix the filling: In a mixing bowl, combine your chopped ripe mangoes, 3 tablespoons of granulated sugar, and corn starch. Stir gently until the mangoes are well coated. Let this sit while you prepare the crust. This step ensures the fruit releases just a bit of juice, setting the stage for a delicious filling.
-
Make the crust: In a large bowl, whisk together the all-purpose flour, baking powder, and salt. In another bowl, cream the cold unsalted butter and brown sugar until light and fluffy—about 2 minutes. Adding the egg and vanilla extract, mix until combined.
-
Combine wet and dry: Add your flour mixture to the wet ingredients, stirring until crumbly and just combined. You want to retain some texture—overmixing can lead to tough bars!
-
Assemble the bars: Press about two-thirds of the crumb mixture into the prepared baking pan to form a crust. Use your hands and make sure it’s evenly distributed.
-
Pour in the filling: Carefully pour your mango mixture over the crust. Then sprinkle the remaining crumb mixture on top—it should be clumpy and not completely uniform for that lovely rustic look!
-
Bake: Bake in the preheated oven for about 30-35 minutes, or until the top is golden brown and the filling is bubbly. You’ll know they’re ready when your kitchen smells heavenly!
-
Cool and slice: Allow the bars to cool in the pan for at least 10 minutes before using the parchment overhang to lift them out. Transfer to a wire rack and let cool completely before slicing. Trust me, this will prevent the filling from oozing out.
Serving Suggestions
To serve these delightful Mango Crumb Bars, cut them into squares and dust a bit of powdered sugar on top for an elegant finish. Pair them with a scoop of vanilla ice cream or a dollop of whipped cream for an indulgent treat! A sprig of fresh mint as a garnish will add a pop of color and a fresh aroma. Enjoy them with a cup of tea or coffee, and let the flavors transport you to a tropical paradise!
Recipe Variations
-
Coconut Mango Crumb Bars: Incorporate shredded coconut into the crumb topping for a beachy twist.
-
Spicy Mango Crumb Bars: Add a pinch of cayenne pepper to the mango filling for a surprising kick that balances the sweetness.
-
Mixed Fruit Crumb Bars: Swap half of the mango for other fruit like peaches or berries for a delightful fruit medley.
-
Gluten-Free Option: Use an all-purpose gluten-free flour blend in place of regular flour for a gluten-free delight.
Chef’s Notes
As I’ve honed this recipe over time, I’ve played around with different fruits and toppings. You wouldn’t believe the fun I’ve had experimenting! One time, while brainstorming, I accidentally mixed in some cinnamon, and it became a family favorite! If you ever have an “oops” moment in the kitchen, embrace it! Some of my best recipes have come from happy accidents, so don’t be afraid to make this your own.
FAQs and Troubleshooting
1. Why are my crumb bars too crumbly?
If your crumb mixture is too dry, it could be that the butter wasn’t cold enough or you accidentally added too much flour. Always measure flour accurately—spoon it into your cup and level it off!
2. My mango filling is too runny. What’s wrong?
Make sure to use corn starch and allow the filling to sit for a few minutes before baking. If your mangoes are very juicy, you might need to adjust the amount of corn starch or try a thicker fruit next time.
3. Can I use frozen mangoes?
Yes, you can! Just ensure you thaw them, drain excess liquid, and chop them before use. Frozen mangoes can be a great backup when you don’t have fresh ones!
4. How do I store the leftover bars?
Keep them in an airtight container in the refrigerator for up to a week. They can also be frozen for up to three months, but let them cool completely before freezing.
Now that you have everything you need, it’s your turn to create these Mango Crumb Bars that are sure to brighten any day. Happy baking, and may your kitchen be filled with love and laughter!
PrintIrresistible Mango Crumb Bars
Delightful Mango Crumb Bars featuring a buttery crust and luscious mango filling, perfect for any occasion.
- Prep Time: 15 minutes
- Cook Time: 35 minutes
- Total Time: 50 minutes
- Yield: 16 servings 1x
- Category: Dessert
- Method: Baking
- Cuisine: American
- Diet: Vegetarian
Ingredients
- 2.5 cups ripe mangoes
- 3–5 tbsp granulated sugar
- 0.5 tbsp corn starch
- 2 cups all-purpose flour
- 0.5 tsp baking powder
- 0.25 tsp salt
- 0.75 cups cold unsalted butter
- 2/3 cups brown sugar
- 1 large egg
- 0.5 tsp vanilla extract
Instructions
- Preheat your oven to 350°F (175°C).
- Line an 8×8 square baking pan with parchment paper.
- Combine chopped ripe mangoes, 3 tablespoons of granulated sugar, and corn starch in a mixing bowl.
- Whisk together all-purpose flour, baking powder, and salt in a large bowl.
- Cream cold unsalted butter and brown sugar until light and fluffy.
- Add the egg and vanilla extract, mixing until combined.
- Stir the flour mixture into the wet ingredients until crumbly and just combined.
- Press two-thirds of the crumb mixture into the prepared baking pan to form a crust.
- Pour your mango mixture over the crust, then sprinkle the remaining crumb mixture on top.
- Bake for 30-35 minutes or until the top is golden brown and the filling is bubbly.
- Cool in the pan for at least 10 minutes before using the parchment overhang to lift them out.
- Let cool completely before slicing.
Notes
For a sweet twist, dust with powdered sugar before serving. Pair with vanilla ice cream for an extra treat!
Nutrition
- Serving Size: 1 square
- Calories: 250
- Sugar: 12g
- Sodium: 150mg
- Fat: 10g
- Saturated Fat: 6g
- Unsaturated Fat: 4g
- Trans Fat: 0g
- Carbohydrates: 33g
- Fiber: 2g
- Protein: 3g
- Cholesterol: 30mg
Keywords: Mango Crumb Bars, dessert recipe, summer treat, baking recipe

Blueberry Crisp
Indulge in Delight: Easy Blueberry Crisp Recipe
Welcome, fellow food lovers! Today, we’re diving deep into a dish that not only brings joy with each bite but also carries with it a spectrum of delightful memories—Blueberry Crisp. Picture this: a warm, bubbling layer of sweet blueberries, topped with a golden, crunchy, buttery crust that practically sings happiness. If that doesn’t sound like pure bliss, then I don’t know what does!
Blueberry Crisp is one of those desserts that feels like a big hug. It’s the kind of dish that makes any occasion special—whether you’re hosting friends for a summer barbecue, celebrating a casual family gathering, or simply treating yourself after a long week. The best part? It’s a breeze to whip up! I can’t wait to share this easy recipe with all of you, along with a sprinkle of my favorite kitchen stories and tips.
A Slice of Nostalgia
Growing up, my family had a tradition of going to our local farmers’ market every Saturday morning. The air was filled with the sweet scent of fresh fruit, and my siblings and I would dart toward the vibrant stalls bursting with colors. One fateful Saturday, I spotted a mountain of luscious blueberries—glossy, plump, and absolutely irresistible. I convinced my mom to get a few pints, and of course, I insisted we bake something special that afternoon.
Fast forward to our cozy kitchen, where we transformed those sweet blueberries into a delightful crisp. The sounds of bubbling fruit mixing with the crunchy topping filled the air while my mom expertly guided me through each step. I was blissfully covered in flour, with blueberry juice staining my messy apron. As that warm, comforting smell wafted through our home, it wasn’t just a dessert we were creating; it was a cherished memory—a cozy moment of love and laughter that I carry with me to this day.
And so began my love affair with Blueberry Crisp! It’s more than just a dessert; it’s a treasured experience, and every time I whip it up, I’m reminded of those carefree summer days filled with family, laughter, and, of course, mouth-watering treats.
Ingredients
Let’s gear up for our Blueberry Crisp! Here’s what you’ll need:
-
1 cup sifted all-purpose flour
This is the base of our crisp topping. Sifting ensures a lighter texture and a better rise. You can substitute whole wheat flour for added fiber or gluten-free flour for a GF version. -
½ cup unsalted butter
Butter is essential for that rich flavor and crispy texture. Ensure it’s at room temperature for easy mixing. If you’re looking for a lighter alternative, you could try coconut oil (just note that it’ll give a slightly different flavor). -
1 cup granulated sugar
Sugar brings sweetness to our blueberries and a delightful crunch to the topping. If you want a healthier option, consider using coconut sugar or honey (adjust the amount based on sweetness preference). -
½ teaspoon salt
A pinch of salt enhances the flavor and balances the sweetness. It’s a small but mighty ingredient! -
½ teaspoon vanilla extract
Vanilla elevates every dessert! If you’re out of vanilla, feel free to use almond extract for an interesting twist. -
½ teaspoon baking powder
This ingredient helps the crisp topping to rise and become light as air. -
4 cups fresh blueberries
The stars of our dish! Fresh blueberries are ideal for maximum flavor, but you can also use frozen; just be sure to thaw and drain them before baking. -
2 tablespoons flour (for blueberries)
This helps to thicken the juices released by the blueberries, making it less soupy. -
2 tablespoons granulated sugar (for blueberries)
We’re sweetening the fruit to balance their natural tartness. Adjust according to your taste!
Step-by-Step Instructions
Ready to get baking? Let’s make this scrumptious Blueberry Crisp together!
1. Preheat Your Oven
First things first, crank up that oven to 350°F (175°C). Preheating is crucial—it ensures that your crisp will bake evenly and achieve that desired golden color.
2. Prepare the Blueberries
In a medium bowl, combine 4 cups of fresh blueberries with 2 tablespoons of sugar and 2 tablespoons of flour. Give them a gentle toss. The sugar will coax out the blueberries’ natural sweetness, while the flour will help to thicken the juice as it bakes. Set this sweet mixture aside while you prepare the topping.
3. Make the Crisp Topping
In a separate large bowl, mix together 1 cup of sifted flour, ½ cup of softened butter, 1 cup of sugar, ½ teaspoon of salt, ½ teaspoon of vanilla extract, and ½ teaspoon of baking powder. Use your fingertips or a pastry blender to combine these ingredients until the mixture resembles coarse crumbs. Think of it as giving your butter a little massage until it’s all blended in!
Chef Tip: If you want an extra crunch, consider adding oats (about ½ cup) to the mixture for more texture.
4. Assemble the Crisp
Grab a baking dish (an 8×8-inch dish works wonderfully). Pour the blueberry mixture into the bottom of the dish, spreading it out evenly. Next, sprinkle the crumbly topping generously over the blueberries, ensuring every berry is covered with love.
5. Bake to Perfection
Place your assembled crisp in the preheated oven and bake for 30-35 minutes, or until the topping is golden and the blueberries are bubbling. You’ll know it’s ready when your kitchen fills with the delicious aroma of baked fruit and sweet sugary goodness.
Chef Hack: If the topping is browning too quickly, you can tent it with a piece of aluminum foil halfway through baking.
6. Let It Cool (If You Can!)
Once your Blueberry Crisp is baked, remove it from the oven and let it cool slightly—if you can wait! This cooling time allows the juices to thicken a bit more, but I won’t blame you for sneaking a spoonful while it’s still warm!
Serving Suggestions
To plate your Blueberry Crisp, scoop out a generous portion and serve it warm in a bowl. For a delightful indulgence, add a scoop of vanilla ice cream on top! The warm crisp with the cold ice cream is an irresistible combo that will have everyone coming back for seconds (and thirds!). Drizzle a touch of caramel sauce for an extra touch of elegance.
Recipe Variations
Feel like experimenting? Here are some creative twists on this classic:
- Peach & Blueberry Crisp: Replace half of the blueberries with fresh peaches for a juicy twist.
- Lemon-Basil Bliss: Add the zest of one lemon and chopped fresh basil to the blueberry mixture for a refreshing herbal hint.
- Nutty Delight: Mix in chopped nuts like almonds or pecans into the topping for an extra crunch.
- Spice It Up: Add a teaspoon of cinnamon or nutmeg to the topping for a warm, cozy flavor.
Chef’s Notes
This Blueberry Crisp has evolved over time in my kitchen. I remember the first time I made it; it was a bit of a mess! The blueberries erupted like a juicy volcano as I took my first scoop. But hey, that’s the beauty of cooking—it doesn’t have to be perfect! Your kitchen is your space, and mistakes just pave the way for new flavors. Now, I proudly whip up this recipe with confidence, knowing that whether it looks perfect or not, the taste will always be spot-on!
FAQs and Troubleshooting
1. My blueberries turned out too runny—what happened?
This can happen if the blueberries were too ripe or if you didn’t add enough flour to thicken the juices. Make sure to stir the flour in well with the blueberries to absorb excess moisture.
2. Can I use frozen blueberries?
Absolutely! Just make sure to thaw them thoroughly and drain any excess moisture before using. Frozen blueberries will likely create a juicier crisp, so don’t skip the flour!
3. Why is my topping too hard?
If your topping turns out overly hard, it may be due to overmixing. Gently mix until just combined to retain that crumbly texture.
4. Can I make this ahead of time?
Yes! You can prepare the blueberry mixture and the topping separately, then assemble them just before baking. You can also bake ahead and reheat it gently in the oven before serving.
Nutritional Info
This Blueberry Crisp is packed with flavor and mindfulness, making it a delightful treat! One serving has roughly:
- Calories: 270
- Fat: 11g
- Carbohydrates: 41g
- Fiber: 3g
- Sugar: 20g
Of course, adjust this based on your substitutions and serving sizes.
So there you have it! A warm and inviting Blueberry Crisp recipe that’s perfect for celebrating sweet moments in life. I hope this dish fills your kitchen with love and inspires you to create wonderful memories just like it did for me. Happy baking, and enjoy every delicious bite!
PrintEasy Blueberry Crisp
A delightful dessert featuring a warm layer of sweet blueberries topped with a crunchy, buttery crust, perfect for any occasion.
- Prep Time: 15 minutes
- Cook Time: 35 minutes
- Total Time: 50 minutes
- Yield: 8 servings 1x
- Category: Dessert
- Method: Baking
- Cuisine: American
- Diet: Vegetarian
Ingredients
- 1 cup sifted all-purpose flour
- ½ cup unsalted butter
- 1 cup granulated sugar
- ½ teaspoon salt
- ½ teaspoon vanilla extract
- ½ teaspoon baking powder
- 4 cups fresh blueberries
- 2 tablespoons flour (for blueberries)
- 2 tablespoons granulated sugar (for blueberries)
Instructions
- Preheat your oven to 350°F (175°C).
- In a medium bowl, combine the blueberries with sugar and flour and toss gently.
- In a separate bowl, mix the flour, butter, sugar, salt, vanilla, and baking powder until it resembles coarse crumbs.
- Pour the blueberry mixture into a baking dish and top with the crumbly mixture.
- Bake for 30-35 minutes, until the topping is golden and blueberries are bubbling.
- Let it cool slightly before serving.
Notes
Serve warm with vanilla ice cream and caramel sauce for an indulgent treat.
Nutrition
- Serving Size: 1 serving
- Calories: 270
- Sugar: 20g
- Sodium: 200mg
- Fat: 11g
- Saturated Fat: 7g
- Unsaturated Fat: 4g
- Trans Fat: 0g
- Carbohydrates: 41g
- Fiber: 3g
- Protein: 2g
- Cholesterol: 30mg
Keywords: blueberry crisp, dessert, easy recipe, baking, summer treat
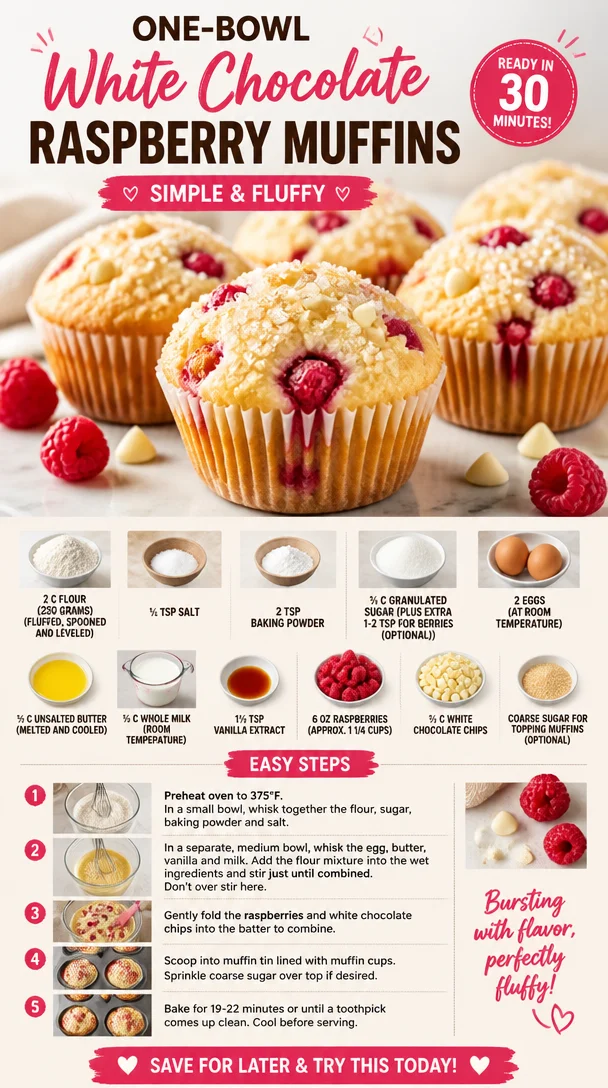
One-Bowl White Chocolate Raspberry Muffins: Simple & Fluffy
White Chocolate Raspberry Muffins: A Sweet Symphony of Flavor
Welcome back to Clean Plate Cravings, where we whip up delicious dishes that brighten your days! Today, let’s dive into a delightful recipe that’s sure to tickle your taste buds: White Chocolate Raspberry Muffins. These muffins are like a hug in a wrapper, combining the rich sweetness of white chocolate with the tartness of fresh raspberries. Trust me; your morning routine (or snack time) will thank you!
The Perfect Morning Treat
Imagine waking up to the smell of freshly baked muffins wafting through your kitchen—there’s something magical about that scent, isn’t there? These White Chocolate Raspberry Muffins are not just breakfast; they’re an experience that transforms ordinary mornings into something deliciously extraordinary. Whether it’s a lazy Sunday brunch or a quick grab-and-go snack, these muffins bring a splash of joy and tenderness to your day.
I first stumbled upon this combo during a lazy summer afternoon at my grandmother’s house. She would whip up her signature muffins, and I’d help her hunt down the ripe raspberries hidden among the garden vines. After a morning spent picking juicy berries, we would return to the kitchen, where the magic of baking would unfold. The anticipation of blending sweet white chocolate with the more tangy berry made it feel like we were creating a symphony of flavors and memories. I’ve cherished that moment ever since, and I want to share that love and joy through this recipe.
Ingredients
Before we dive into the cooking, let’s get acquainted with our key players—the ingredients that make these muffins sing!
-
2 cups all-purpose flour (250 grams): Flour is the backbone of our muffins! Make sure to fluff it up, spoon it into your measuring cup, and level it off for accuracy. If you’re feeling adventurous, consider swapping half of it for almond flour for a nutty twist.
-
½ teaspoon salt: Just a pinch! This tiny ingredient enhances the flavors and balances the sweetness. Don’t skip it!
-
2 teaspoons baking powder: This little powerhouse ensures your muffins rise beautifully. Make sure it’s fresh to keep your muffins nice and fluffy!
-
¾ cup granulated sugar: Sweetness is key here. Feel free to reduce it slightly if you prefer a less sweet muffin. You can also try using coconut sugar for a more caramel-like flavor.
-
2 large eggs (at room temperature): Eggs act as a binder and provide moisture. Room temperature eggs mix more easily into the batter, so take them out of the fridge ahead of time.
-
½ cup unsalted butter (melted and cooled): Butter adds richness and flavor. It’s essential to let it cool down; otherwise, it can scramble the eggs!
-
½ cup whole milk (room temperature): Milk contributes to a tender crumb. For a healthier version, swap it out for almond or oat milk!
-
1½ teaspoons vanilla extract: This is where the magic happens! Vanilla elevates the entire muffin’s flavor profile. Try using pure vanilla extract for the best taste.
-
6 oz raspberries (approximately 1 1/4 cups): Fresh or frozen raspberries work beautifully. If you’re using frozen, just toss them directly into the batter without thawing, and they’ll delightfully burst as they bake!
-
⅔ cup white chocolate chips: The star of the show! These sweet morsels melt into pockets of creamy goodness. If you’re feeling daring, you could use dark chocolate chips for a flavor contrast.
-
Coarse sugar for topping (optional): A sprinkle of coarse sugar adds a delightful crunch and sweetness on top. It’s all about that first bite!
Step-by-Step Instructions
Now that we have our ingredients ready, let’s get our hands dirty!
-
Preheat your oven: This is a crucial step! Set your oven to preheat at 375°F (190°C) and prepare your muffin tin by lining it with paper liners or gently greasing each cup. It’s time to make your kitchen smell amazing!
-
Mix the dry ingredients: In a medium bowl, whisk together the flour, salt, and baking powder. Whisking aerates the flour, ensuring your muffins will be light and fluffy.
-
Combine the wet ingredients: In a large bowl, combine the granulated sugar and melted butter. Use a whisk to blend them until smooth—this creates a lovely base! Now add the eggs, milk, and vanilla extract, mixing until everything is well incorporated.
Chef’s Hack: If you want to reduce dishes, you can also melt the butter in the same bowl used for the sugar. Just allow it to cool before adding the other wet ingredients!
-
Incorporate the dry ingredients: Gradually fold in the dry mixture into the wet ingredients using a spatula. Be gentle! Overmixing can lead to chewy muffins—yikes!
-
Add the raspberries and white chocolate chips: Gently fold in your beautiful raspberries and white chocolate chips. If you’re using fresh raspberries, toss them with a little flour beforehand to prevent them from sinking to the bottom. It’s all about those tasty bursts in every muffin!
-
Scoop and bake: Using an ice cream scoop or a generous spoon, divide the batter evenly among the muffin cups. Fill each cup about ¾ full for perfect rising. If you like, sprinkle the tops with coarse sugar for that extra sparkle. Slide them in the oven and bake for 18-22 minutes, or until they’re golden brown and a toothpick comes out clean from the center.
-
Cool and enjoy: Once baked, remove the muffins from the oven and allow them to cool in the tin for about 5 minutes before transferring them to a wire rack. Don’t rush this part; the aroma is worth taking a moment to savor!
Serving Suggestions
To serve these muffins, I suggest arranging them on a beautiful platter—maybe dusted with a sprinkle of powdered sugar for an elegant touch. Pair them with a steaming cup of coffee or tea for a cozy breakfast or snack experience. You can also slather a bit of butter or cream cheese on top for an extra indulgence.
Recipe Variations
Ready to jazz things up? Here are a few creative twists:
- Lemon Zest: Add a tablespoon of lemon zest to the batter for a citrusy pop to complement the raspberries.
- Oatmeal Crumble: Top your muffins with an oat crumble before baking for a tasty crunchy texture.
- Nutty Delight: Incorporate ½ cup of chopped nuts (like walnuts or pecans) for extra crunch.
- Peanut Butter Swirl: Create a delightful swirl by adding a spoonful of peanut butter into the batter before baking.
- Coconut Flakes: Toss in some unsweetened shredded coconut for a tropical vibe that pairs wonderfully with the raspberry!
Chef’s Notes
These muffins have evolved over the years in my kitchen! Initially, they were just a simple recipe I picked up from a friend. However, as my baking adventure continued, I started adding my personal touches—like fresh raspberries from my garden and fancy white chocolate chips. Each time I make them, I think of that sunny afternoon in my grandma’s kitchen. They’ve become a cherished recipe in my family and now a staple in yours!
FAQs and Troubleshooting
-
Why are my muffins dense?
- Dense muffins can often result from overmixing or using too much flour. Always spoon flour into your measuring cup and level it off!
-
How do I store my muffins?
- Store in an airtight container at room temperature for up to 3 days. For longer storage, freeze them in a ziplock bag for up to 3 months.
-
Can I use other berries?
- Absolutely! Blueberries, strawberries, or even blackberries work beautifully in this recipe. Just adjust the sweetness if needed!
-
What do I do if my muffins overflow?
- If this happens, it’s likely that your batter was overfilled. In the future, fill each cup about ¾ full to leave room for rising.
Nutritional Info (Optional)
While the nutritional info may vary based on your ingredient choices, each muffin is likely to contain roughly:
- Calories: 200
- Protein: 3g
- Carbohydrates: 28g
- Fat: 9g
- Sugar: 10g
Now that you have the recipe for these drool-worthy White Chocolate Raspberry Muffins, it’s time to gather those ingredients and get baking! I can’t wait for you to experience the joy and nostalgia they bring. Share your muffin-making adventures with me—I love hearing from fellow foodies! Happy baking!
PrintWhite Chocolate Raspberry Muffins
Delightful muffins that combine the rich sweetness of white chocolate with the tartness of fresh raspberries, perfect for breakfast or snack time.
- Prep Time: 15 minutes
- Cook Time: 22 minutes
- Total Time: 37 minutes
- Yield: 12 servings 1x
- Category: Dessert
- Method: Baking
- Cuisine: American
- Diet: Vegetarian
Ingredients
- 2 cups all-purpose flour (250 grams)
- ½ teaspoon salt
- 2 teaspoons baking powder
- ¾ cup granulated sugar
- 2 large eggs (at room temperature)
- ½ cup unsalted butter (melted and cooled)
- ½ cup whole milk (room temperature)
- 1½ teaspoons vanilla extract
- 6 oz raspberries (approximately 1 1/4 cups)
- ⅔ cup white chocolate chips
- Coarse sugar for topping (optional)
Instructions
- Preheat your oven to 375°F (190°C) and prepare your muffin tin by lining it with paper liners or greasing each cup.
- Mix the dry ingredients: In a medium bowl, whisk together the flour, salt, and baking powder.
- Combine the wet ingredients: In a large bowl, whisk the granulated sugar and melted butter until smooth, then add eggs, milk, and vanilla, mixing until incorporated.
- Incorporate the dry ingredients: Gradually fold the dry mixture into the wet ingredients using a spatula, being careful not to overmix.
- Add the raspberries and white chocolate chips, folding them in gently to avoid breaking the berries.
- Scoop the batter into muffin cups, filling each about ¾ full. If desired, sprinkle with coarse sugar.
- Bake for 18-22 minutes or until a toothpick comes out clean from the center.
- Cool in the tin for 5 minutes, then transfer to a wire rack to cool completely.
Notes
These muffins are best enjoyed fresh but can be stored in an airtight container for up to 3 days or frozen for up to 3 months.
Nutrition
- Serving Size: 1 muffin
- Calories: 200
- Sugar: 10g
- Sodium: 200mg
- Fat: 9g
- Saturated Fat: 5g
- Unsaturated Fat: 3g
- Trans Fat: 0g
- Carbohydrates: 28g
- Fiber: 1g
- Protein: 3g
- Cholesterol: 30mg
Keywords: muffins, dessert, raspberries, white chocolate, baking
Beginner French Macarons with Raspberry Lemon Buttercream
French Macarons with Raspberry Lemon Buttercream: A Sweet Adventure Awaits!
Welcome to a magical corner of the kitchen where delicate French pastries meet vibrant flavors—yes, I’m talking about macarons! If you’ve ever stood in awe of these colorful, airy delights, you’re not alone. My discovery of macarons was like unearthing a treasure chest filled with flavors, textures, and a sprinkle of culinary challenge. Today, I’m excited to share my favorite recipe for French macarons filled with a luscious raspberry lemon buttercream. Trust me, once you bite into these little beauties, you’ll feel like you’ve taken a trip to a quaint patisserie in Paris!
As you embark on this baking adventure, let’s talk about why making macarons is not just about following a recipe; it’s about creating memories. These little meringue-based sandwiches have a reputation for being finicky, but that’s part of their charm! If you’ve ever found yourself worrying about whether your macarons will have “feet” or if the weather might impact your egg whites, grab a whisk and join me. I promise you’ll gain confidence and fill your kitchen with delightful aromas and colors as we create something truly special!
A Sweet Memory
Let’s take a little trip down memory lane. I vividly remember the first time I tried my hand at making macarons. It was a rainy Sunday afternoon, the kind that calls for hot tea and sweet treats. With a handful of almond flour and some vibrant food coloring, I was ready to embark on my macaron journey! I was nervous, but the moment I piped those little rounds onto the silicone mat, my heart fluttered with excitement.
The first batch, I remember so clearly, had a few “oops” moments—some were slightly cracked, while others were perfect and round. But the taste! Oh, it was pure bliss. I filled them with a simple buttercream, tasting each one with glee and a sense of accomplishment. Those macarons sparked not only a love of baking but a quest to explore flavors and learn more. That rainy day turned into countless afternoons of experimentation, laughter, and tasty treats shared with friends. I can still picture the joy on my friends’ faces as they bit into those sweet surprises, and that feeling of creating happiness with food has fueled my passion ever since.
Ingredients List
Let’s gather our ingredients to make these dreamy macarons with raspberry lemon buttercream. Here’s what you need:
-
1 cup almond flour: The cornerstone of the macaron, almond flour gives these treats their signature texture. If you’re nut-free, you could try sunflower seed flour as a substitute, although the color may be slightly greenish.
-
1 3/4 cups powdered sugar: Sweetens and balances the almond flour. You can use store-bought or make your own by blending granulated sugar in a blender until fine.
-
4 large egg whites: The stars of the show! Aged egg whites (left uncovered in the fridge for a day) work best, as they create a better meringue. You can save the yolks for a custard or rich hollandaise sauce.
-
1/4 cup granulated sugar: This is added to stabilize the egg whites and create a shine. If you’re looking to reduce sugar, you could try using a natural sweetener like monk fruit, but it may impact texture.
-
1/2 teaspoon vanilla extract: A splash of flavor! While vanilla is classic, feel free to experiment with almond extract for a twist.
-
Food coloring (optional): Because who doesn’t love a pop of color in their treats? Gel food coloring works best, as liquid can alter the texture of your batter.
-
1/2 cup unsalted butter, softened: The base for our buttercream. Make sure it’s soft, not melted—room temperature is key for achieving a smooth texture.
-
1 cup powdered sugar (for buttercream): Sweetness again! This will ensure our buttercream is luscious and sweet enough to balance the tartness of the raspberry.
-
1/4 cup raspberry puree: Fresh or frozen raspberries blended to a smooth consistency. This adds a lovely fruitiness. If you don’t have raspberries, feel free to substitute with strawberry or passion fruit puree.
-
1 tablespoon lemon juice: For that zing! Freshly squeezed is best for maximum brightness, so go ahead and squeeze away.
Step-by-Step Instructions
Ready to make some macarons? Let’s dive into the process!
-
Prep your workspace: Start by preheating your oven to 300°F (150°C). Line two baking sheets with parchment paper or a silicone mat. Having everything organized will make the whole process smoother, so I recommend measuring out all your ingredients beforehand!
-
Sift your dry ingredients: In a mixing bowl, sift together the almond flour and powdered sugar. This eliminates clumps and creates a fine mixture, which is crucial for a smooth macaron shell. If you notice any large bits of almond flour, just discard them. Remember, the finer the better!
-
Whip your egg whites: In a clean, dry mixing bowl, start to beat the egg whites on medium speed until they become frothy. Gradually add the granulated sugar while continuing to whip them until soft peaks form. This usually takes around 3-4 minutes. If you’re feeling fancy, you can add in your food coloring at this point for a beautiful pastel hue.
-
Achieve stiff peaks: Increase the speed to high and whip until the egg whites reach stiff peaks—meaning that they stand straight up without drooping. Don’t overbeat, or your meringue can become dry.
-
Macaronage time: Gently fold the sifted almond flour and powdered sugar mixture into the whipped egg whites. Use a silicone spatula and fold carefully to maintain the airiness of the mixture. The batter should flow slowly, like lava, and create a smooth surface when piped. This step is crucial—overmix and your macarons will flatten; undermix and they won’t spread evenly.
-
Pipe those circles: Transfer your batter into a piping bag fitted with a round tip. Pipe small rounds onto your prepared baking sheets, leaving space between each—for macarons like personal space! Give the baking sheet a good tap on the counter to release any trapped air bubbles.
-
Let them rest: This is one of the most important parts of making macarons. Let the piped macarons rest for 30-60 minutes until they form a skin and are no longer sticky to touch. You can poke your finger gently to test; if it doesn’t stick to your finger, they’re ready for the oven!
-
Bake: Pop your trays into the preheated oven and bake for 15-20 minutes. Rotate the trays halfway through for even baking. You’ll know they’re done when they don’t wobble and have a lovely foot—a sign of a successful macaron!
-
Cool down: Once baked, let them cool completely on the trays before removing them. Trying to remove them too soon can lead to heartbreak and broken shells.
-
Whip up the buttercream: While cooling, let’s whip up that raspberry lemon buttercream! In a mixing bowl, beat the softened butter until creamy. Gradually add in the powdered sugar and beat until well combined. Then, add in the raspberry puree and lemon juice, mixing until everything is silky smooth. Taste it—if you want more zing, add a bit more lemon juice!
-
Assemble: Pair your macaron shells that are similar in size. Spoon or pipe a dollop of buttercream onto one shell and sandwich it with another. Press gently and voilà—you’ve got a beautifully filled macaron!
Serving Suggestions
When serving these delicious macarons, I like to display them on a rustic wooden platter or a cute cake stand. You can also pile them into a glass jar tied with twine for an adorable touch. Consider pairing them with a cup of tea or coffee, or even a refreshing glass of lemonade to complement the raspberry and lemon flavors. Don’t forget to snap a few pictures before devouring them—these treats are not only tasty but also stunning!
Recipe Variations
What’s that? You want to play with flavors? You got it! Here are a few creative twists to keep the macaron love alive:
-
Chocolate Hazelnut Buttercream: Swap the raspberry and lemon for a rich chocolate hazelnut spread—hello, Nutella!
-
Matcha Green Tea: Add matcha powder to your macaron batter and fill it with a smooth vanilla buttercream for a beautiful green treat!
-
Salted Caramel: Use homemade or store-bought salted caramel as a filling for a decadent touch.
-
Lavender Honey: Infuse your buttercream with lavender (use culinary-grade lavender) and honey for a floral twist.
-
Pistachio Coconut: Substitute some of the almond flour with pistachio flour, and use coconut extract in your buttercream for a tropical flavor.
Chef’s Notes
As with any recipe, macarons can evolve over time. I remember my early days of macaron-making when every batch was a surprise. I learned that the key is precision and patience. Each successful batch is a little victory, and even mistakes taught me invaluable lessons. And hey, with a bit of humor! Once, I accidentally baked a batch on a ridiculously humid day, and let’s just say they came out as lovely little puddles. I took it with a smile and turned that into a lesson on kitchen conditions!
Also, remember, practice makes perfect! After a few tries, you’ll not only gain skill but also discover flavors that become your personal favorites.
FAQs and Troubleshooting
-
Why didn’t my macarons have feet?
This could be due to overmixing the batter, underbaking, or not allowing them to rest before baking. Make sure you’re gentle when folding and tap the trays to release air. -
Why did my macarons crack?
Cracked shells often indicate that the oven temperature was too high or the macarons did not rest long enough before baking. Try reducing your oven temperature slightly and extending the resting time. -
Can I store macarons?
Absolutely! Store them in an airtight container in the fridge for up to a week, or freeze them for longer storage. Allow them to come to room temperature before serving. -
Can I use liquid food coloring?
While you can, it’s better to use gel food coloring to avoid altering the moisture content. If using liquid food coloring, adjust the dry ingredients slightly.
Nutritional Info
While I focus on enjoyment rather than strict nutritional values with treats like macarons, each one typically contains around 100 calories, depending on the filling and size. Remember, moderation is key—enjoy these delightful treats as part of a balanced lifestyle!
Making French macarons with raspberry lemon buttercream is a joyful experience filled with challenges, laughter, and most importantly, flavor. So, roll up your sleeves, invite a friend, and let’s create something beautiful in the kitchen that will fill your hearts and bellies. Happy baking, foodies!
PrintFrench Macarons with Raspberry Lemon Buttercream
Delicate French macarons filled with a luscious raspberry lemon buttercream, perfect for a sweet adventure.
- Prep Time: 30 minutes
- Cook Time: 20 minutes
- Total Time: 50 minutes
- Yield: 20 macarons 1x
- Category: Dessert
- Method: Baking
- Cuisine: French
- Diet: Vegetarian
Ingredients
- 1 cup almond flour
- 1 3/4 cups powdered sugar
- 4 large egg whites
- 1/4 cup granulated sugar
- 1/2 teaspoon vanilla extract
- Food coloring (optional)
- 1/2 cup unsalted butter, softened
- 1 cup powdered sugar (for buttercream)
- 1/4 cup raspberry puree
- 1 tablespoon lemon juice
Instructions
- Prep your workspace: Preheat your oven to 300°F (150°C) and line baking sheets with parchment paper.
- Sift your dry ingredients: Sift together the almond flour and powdered sugar.
- Whip your egg whites: Beat egg whites on medium speed, gradually adding granulated sugar until soft peaks form.
- Achieve stiff peaks: Increase speed to high and whip until stiff peaks form.
- Macaronage time: Gently fold the dry mixture into the egg whites.
- Pipe those circles: Transfer batter to a piping bag and pipe rounds onto baking sheets.
- Let them rest: Allow piped macarons to rest for 30-60 minutes.
- Bake: Bake for 15-20 minutes, rotating trays halfway through.
- Cool down: Let macarons cool completely before removing them from the sheets.
- Whip up the buttercream: Beat softened butter, then add powdered sugar, raspberry puree, and lemon juice.
- Assemble: Pair shells, fill with buttercream, and sandwich them together.
Notes
Practice makes perfect! Don’t be discouraged by initial challenges.
Nutrition
- Serving Size: 1 macaron
- Calories: 100
- Sugar: 12g
- Sodium: 50mg
- Fat: 4g
- Saturated Fat: 2g
- Unsaturated Fat: 2g
- Trans Fat: 0g
- Carbohydrates: 14g
- Fiber: 0g
- Protein: 2g
- Cholesterol: 10mg
Keywords: French macarons, raspberry lemon buttercream, dessert, baking, treats
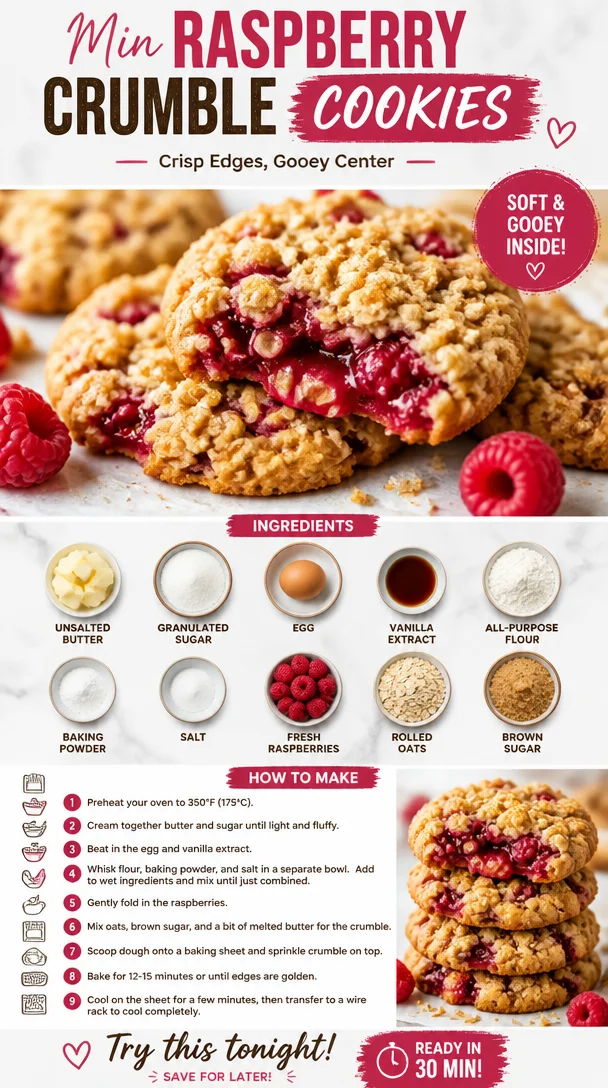
Min Raspberry Crumble Cookies: Crisp Edges, Gooey Center
Raspberry Crumble Cookies: A Sweet Collaboration of Tart and Sweet
Welcome to Clean Plate Cravings! I’m thrilled to share with you not just a recipe today, but an experience—the delicious journey of baking Raspberry Crumble Cookies. If you’re anything like me, you can appreciate that perfect combination of sweet and tart, especially when it’s nestled within the warm embrace of a cookie. These gems are crisp on the outside, chewy on the inside, and they burst with the vibrant flavor of fresh raspberries. Plus, they come together so quickly, making them the ultimate treat for any time of the day.
Baking is not just about the end result; it’s also about the memories created as you stir, mix, and taste! When I was a kid, weekends were reserved for baking sessions in my grandmother’s kitchen. The scent of cookies baking would waft through the house, warming every nook—and my heart. I remember standing on a stool, my little hands eagerly mixing the ingredients, while my grandma would share stories about her own childhood adventures. One of her specialties was a raspberry dessert that she made every summer when the berries were fresh and bursting with flavor. I can still picture the way she carefully folded those juicy gems into whatever delightful creation she was whipping up.
Today, Raspberry Crumble Cookies are a nod to those cherished memories. Each bite reminds me of those sunlit afternoons spent in the kitchen, and I can’t wait for you to create your own sweet memories with this recipe!
Ingredients
Let’s gather what you’ll need to create these delightful cookies. Here’s a breakdown:
-
1 cup unsalted butter, softened
This is your fat base that will give the cookies their rich flavor and tenderness. If you don’t have unsalted butter, you can use salted butter and just reduce the added salt in the recipe. -
1 cup granulated sugar
This will add sweetness to the dough. If you’re looking for a less sweet option, you could substitute some of the sugar with coconut sugar for a deeper flavor and a healthier twist. -
1 egg
Eggs act as a binder, helping to hold everything together. If you’re vegan or allergic, a flax egg (1 tablespoon ground flaxseed mixed with 2.5 tablespoons water) works great too. -
1 teaspoon vanilla extract
Pure vanilla enhances the flavor profile of these cookies. When possible, opt for pure vanilla extract rather than imitation for a richer taste. -
2 cups all-purpose flour
This is the main structure of your cookies! For gluten-free variations, try a 1:1 gluten-free flour blend. -
1 teaspoon baking powder
This leavening agent helps give the cookies a lovely lift. If you’re out, you can substitute with baking soda (just use about half a teaspoon). -
1/2 teaspoon salt
Salt amplifies flavors, making sweet treats even more delicious. Feel free to use kosher salt as it’s great for baking! -
1 cup fresh raspberries
The star ingredient! Fresh is key here for that burst of flavor, but if you’re in a pinch, frozen raspberries will work—just be sure to thaw and drain them first. -
1/2 cup rolled oats
These add a delightful chewiness and a bit of texture to the cookies. If you want them gluten-free, just ensure the oats are certified gluten-free. -
1/4 cup brown sugar
This adds a caramel-like depth to your cookies. Light or dark brown sugar can be used, depending on your personal preference.
Step-by-Step Instructions
-
Preheat the Oven: Start by preheating your oven to 350°F (175°C). This ensures that your cookies will bake evenly.
-
Cream the Butter and Sugars: In a large mixing bowl, combine the softened unsalted butter, granulated sugar, and brown sugar. Beat these together with a mixer on medium speed for about 2-3 minutes, until the mixture is light and fluffy. Here’s a pro tip: let your butter sit out for about 30 minutes before using it. This will soften it perfectly for creaming!
-
Add the Egg and Vanilla: Once you have that perfect fluffy texture, add in the egg and vanilla extract. Mix until combined—don’t overdo it, just a minute or so will suffice.
-
Mix Dry Ingredients: In a separate bowl, whisk together the flour, baking powder, and salt. Gradually add this dry mixture to your wet ingredients, mixing on low speed until just combined. You want to avoid overmixing, which can lead to tough cookies instead of tender ones!
-
Fold in Raspberries and Oats: At this point, fold in the fresh raspberries and rolled oats using a spatula. Be gentle; you want to keep those lovely berries intact! Remember this is your moment to add personality to your cookies—tricky but rewarding!
-
Scoop the Dough: Line a baking sheet with parchment paper for easy cleanup. Use a cookie scoop or two spoons to drop heaping tablespoons of dough onto the prepared sheet, spacing them about 2 inches apart.
-
Bake: Place the cookie sheets in the preheated oven and bake them for 12-15 minutes or until the edges are golden brown.
-
Cool and Enjoy: Once your cookies are out of the oven, let them cool on the baking sheet for about 5 minutes before transferring them to a wire rack to cool completely. This will give them a chance to set up a little more, making them perfect.
Serving Suggestions
These Raspberry Crumble Cookies can be served alone for a delightful snack or paired with a scoop of vanilla ice cream for an indulgent dessert. If you want to impress your friends, stack them on a cake stand and dust them with powdered sugar for a beautiful presentation!
Recipe Variations
Get creative with this basic cookie recipe! Here are a few delicious twists to consider:
-
Chocolate Chip Raspberry Cookies: Add a cup of semi-sweet or dark chocolate chips for a rich contrast to the tartness of the raspberries.
-
Nutty Oatmeal Raspberry Cookies: Toss in some chopped nuts—like almonds or walnuts—for added crunch and flavor.
-
Coconut Raspberry Cookies: Substitute half of the rolled oats with shredded coconut for a tropical twist.
-
Lemon-Raspberry Cookies: Add the zest of one lemon to the dough for a bright, citrusy flavor that complements the raspberries perfectly.
-
Vegan Raspberry Cookies: Replace the butter with coconut oil, the egg with a flax egg, and use vegan chocolate chips if you choose.
Chef’s Notes
As with any recipe, I feel it’s essential to experiment. Early on, I made these cookies with blueberries, and while they were a hit, nothing compares to the sheer delight of raspberries. The evolution of this cookie has been a delightful journey, from my grandmother’s classic recipes to the modern adaptations I enjoy today. Who knew something so tasty could hold so many memories?
FAQs and Troubleshooting
-
Why are my cookies spreading too much?
If your cookies spread excessively, it could be due to the butter being too warm during mixing, or you might not have used enough flour. Always measure your ingredients properly! -
Can I use frozen raspberries?
Absolutely! Just be sure to thaw and drain them to avoid excess moisture that could alter the dough’s consistency. -
How do I store these cookies?
Keep them in an airtight container at room temperature for up to a week. For longer storage, you can freeze them and enjoy them later! -
What if my dough is too dry?
If you find your dough is too crumbly, try adding a tablespoon of milk or water at a time until it reaches your desired consistency.
Nutritional Info
While I like to keep things flexible, it may be useful to know that each cookie has roughly 150 calories, with 7g of fat, 20g of carbs, and 1g of protein. These numbers can vary based on ingredient brands and any variations you make to the recipe!
I hope you’re as excited as I am to bake these Raspberry Crumble Cookies! Grab your apron and let the adventure begin—can’t wait to hear about your kitchen stories too! Happy baking!
PrintRaspberry Crumble Cookies
A delightful combination of sweet and tart, these Raspberry Crumble Cookies are crisp on the outside and chewy on the inside, bursting with fresh raspberry flavor.
- Prep Time: 15 minutes
- Cook Time: 15 minutes
- Total Time: 30 minutes
- Yield: 24 cookies 1x
- Category: Dessert
- Method: Baking
- Cuisine: American
- Diet: Vegetarian
Ingredients
- 1 cup unsalted butter, softened
- 1 cup granulated sugar
- 1 egg
- 1 teaspoon vanilla extract
- 2 cups all-purpose flour
- 1 teaspoon baking powder
- 1/2 teaspoon salt
- 1 cup fresh raspberries
- 1/2 cup rolled oats
- 1/4 cup brown sugar
Instructions
- Preheat the oven to 350°F (175°C).
- Cream the butter and sugars in a large mixing bowl for about 2-3 minutes until light and fluffy.
- Add the egg and vanilla extract, mixing until combined.
- Mix the flour, baking powder, and salt in a separate bowl, then gradually combine with the wet ingredients.
- Fold in the raspberries and oats gently.
- Scoop the dough onto a lined baking sheet, spacing them about 2 inches apart.
- Bake for 12-15 minutes until the edges are golden brown.
- Cool on the baking sheet for 5 minutes before transferring to a wire rack.
Notes
For a richer flavor, let the butter sit out to soften before using. Experiment with variations like adding nuts or chocolate chips for added texture.
Nutrition
- Serving Size: 1 cookie
- Calories: 150
- Sugar: 10g
- Sodium: 60mg
- Fat: 7g
- Saturated Fat: 4g
- Unsaturated Fat: 2g
- Trans Fat: 0g
- Carbohydrates: 20g
- Fiber: 1g
- Protein: 1g
- Cholesterol: 30mg
Keywords: raspberry cookies, dessert, baking, easy cookie recipe, crumble cookies