
Minute Crispy Zucchini Puffs for Busy Weeknights
The Ultimate Easy Zucchini Puffs: A Delightful Bites Experience
Welcome to Clean Plate Cravings! If you’re anything like me, you love hearty food that doesn’t just fill your belly but also warms your heart. Today, I’m super excited to share a gem of a recipe that’s perfect for any time of year: Easy Zucchini Puffs! These delightful savory bites are bursting with flavor, incredibly versatile, and oh-so-simple to whip up. Connecting our playful culinary adventures with nutrition and taste is what we’re all about, and these puffs hit that sweet spot like a home run!
Imagine the summer days of my childhood, running around the backyard, giggling with friends while the sweet smell of baked goodies wafted through the air. My grandma would be in the kitchen, making the most out of every vegetable she could find from the garden. Among her many creations were these little savory nuggets we lovingly called “zucchini puffs.” They were always the first to disappear at family gatherings, and I remember sneaking into the kitchen for just one more… and then another.
These puffs are a celebration of those crisp summer zucchinis, hugging together in a cheesy, savory embrace that brings smiles with every bite. They’re not just a snack – they bring back memories, connection, and joy. Ready to dive into this culinary adventure with me? Let’s do it!
Personal Story
Growing up, my summers were spent exploring my neighborhood and, of course, spending time with my grandma in her colorful garden. I can still visualize the delightful chaos of the vegetable patch – my tiny hands searching for plump zucchinis hidden beneath sprawling leaves. Whenever a batch came home, Grandma had a knack for turning them into the most mouthwatering dishes. One of my favorites was her famous zucchini puffs.
I can remember eagerly waiting by the kitchen counter, the aroma of cheesy goodness filling the air. It always amazed me how just a few simple ingredients could create such a zesty explosion of flavors! Watching her whisk, mix, and bake gave me a front-row seat to the magic of cooking, leaving me hooked for life. Today, I carry on that tradition, adding my own spin while cherishing the nostalgia. And lucky for you, I’m sharing the recipe that always reminds me of those golden afternoons spent with her.
Ingredients
Here’s what you’ll need to create these tasty Easy Zucchini Puffs:
-
¾ cup all-purpose flour
Essential for binding the puffs together. You can swap for whole wheat flour or a gluten-free mix if needed! -
¾ teaspoon baking powder
This is the magic ingredient that helps our puffs rise and become fluffy. Make sure it’s fresh for the best results! -
2 teaspoons Italian seasoning
A blend of herbs that adds a lovely aromatic touch. Feel free to customize this to your liking; oregano or thyme can be great substitutes! -
¾ cup milk
Milk helps keep our mixture moist. You can use almond milk or oat milk for a dairy-free version. -
1 large egg
This binds everything together. If you want a vegan option, replace it with a flax egg (1 tablespoon of ground flaxseeds mixed with 2.5 tablespoons of water, let it sit until it thickens). -
½ cup shredded cheddar cheese
Cheese provides that gooeyness and flavor. Try swapping with feta or mozzarella for a different twist! -
1 cup zucchini (grated)
The star of our recipe! You can also sneak in other veggies like carrots or squash for added nutrition and color.
Step-by-Step Instructions
-
Preheat Your Oven:
Preheat your oven to 375°F (190°C). This allows the puffs to rise beautifully while ensuring they turn golden brown. I always say, “A preheated oven is key to crispy puffs!” -
Prepare Your Zucchini:
Grate your zucchini and squeeze out excess moisture using a clean kitchen towel or cheesecloth. This step is crucial to prevent soggy puffs. Less water, more flavor! -
Mix the Dry Ingredients:
In a large bowl, combine flour, baking powder, and Italian seasoning. Whisk them together until evenly blended. Sifting can be a great way to add air, but honestly, a good whisk will do the trick! -
Combine Wet Ingredients:
In another bowl, whisk together the milk and egg until mixed. If you’re using a flax egg, this is the time to add that! Incorporating the wet ingredients into our dry mix is where the magic starts to happen! -
Fold in the Zucchini and Cheese:
Gently fold the grated zucchini and shredded cheese into the batter, making sure everything is uniformly coated. This is the fun part—watch the mixture become vibrant with green and yellow hues! -
Fill Your Muffin Tin:
Grease a muffin tin or line it with silicone cups. Spoon the mixture evenly into each cup; they should be about two-thirds full. Pro-tip: Using an ice cream scoop makes this step a breeze and keeps the portion sizes perfect! -
Bake to Perfection:
Slide your muffin tin into the preheated oven, and let those beauties bake for about 25-30 minutes or until they turn a lovely golden color. You’ll know they’re ready when a toothpick comes out clean. Don’t forget to check out that puffiness! -
Cool and Enjoy:
Once done, let them cool for a few minutes in the tin before transferring them to a wire rack. The aroma in your kitchen will have everyone begging for a taste!
Serving Suggestions
These Easy Zucchini Puffs are wonderfully versatile! You can treat them as appetizers, a fun snack, or even serve them as a side alongside a fresh salad or soup. Drizzle some homemade ranch or garlic aioli over the top for an extra flavor kick. Whether you’re chatting with friends at a gathering or enjoying a quiet evening in, these puffs are the perfect companion!
Recipe Variations
-
Spicy Zucchini Puffs: Add sliced jalapeños or a teaspoon of red pepper flakes for some heat!
-
Mediterranean Twist: Blend in sun-dried tomatoes and olives along with feta cheese for a Mediterranean twist.
-
Herbed Zucchini Puffs: Incorporate fresh herbs like basil or parsley for a burst of freshness.
-
Cheesy Bacon Zucchini Puffs: Add crumbled bacon and a mix of cheeses for a richer flavor profile.
-
Vegan Version: Simply replace the egg and milk with the flax egg and a plant-based milk to make them vegan!
Chef’s Notes
Every recipe carries a piece of our story, and these Easy Zucchini Puffs hold a special place in my kitchen. They have evolved over the years as I experimented with different ingredients. They weren’t always perfect; I recall a batch that was more like zucchini pancakes than puffs! But with every mishap comes learning. Cooking is personal, and I love how it allows us to express creativity while evoking memories and emotions.
Fun anecdote: Last summer, I made these puffs for a potluck, but they mysteriously vanished before I even made it into the party. Turns out, my friends thought they were irresistible and couldn’t resist sneaking bites while they were still cooling on the counter!
FAQs and Troubleshooting
Q: Why are my zucchini puffs soggy?
A: This often occurs when zucchini retains too much moisture. Make sure to squeeze out as much excess liquid as possible before mixing it into the batter!
Q: Can I make these puffs ahead of time?
A: Absolutely! You can make them a day in advance and store them in an airtight container in the fridge. Simply reheat in the oven for a few minutes before serving.
Q: How do I store leftovers?
A: Store any leftovers in an airtight container in the fridge for up to three days. They also freeze well! Just make sure to wrap them tightly.
Q: What can I serve with these puffs?
A: They pair beautifully with a tangy dipping sauce like tzatziki or marinara, or you can enjoy them alongside a fresh salad!
Nutritional Info
These Zucchini Puffs pack a balance of carbohydrates, protein, and healthy fats, making them a satisfying option! They are rich in vitamins thanks to the zucchini and provide a delightful cheesy flavor that’s hard to resist. Each puff is about 70 calories, making them a guilt-free treat that can be enjoyed without hesitation!
And there you have it, friends—the delightful journey of crafting your Easy Zucchini Puffs is complete! I hope you find as much joy making these in your kitchen as I did sharing this recipe with you. Remember, cooking is all about love, laughter, and plenty of flavor. Let’s keep these good vibes going, and enjoy every bite together! Happy cooking!
PrintEasy Zucchini Puffs

Delightful savory bites bursting with cheesy flavor, perfect for any occasion.
- Prep Time: 15 minutes
- Cook Time: 30 minutes
- Total Time: 45 minutes
- Yield: 4 servings 1x
- Category: Appetizer
- Method: Baking
- Cuisine: American
- Diet: Vegetarian
Ingredients
- ¾ cup all-purpose flour
- ¾ teaspoon baking powder
- 2 teaspoons Italian seasoning
- ¾ cup milk
- 1 large egg
- ½ cup shredded cheddar cheese
- 1 cup zucchini (grated)
Instructions
- Preheat your oven to 375°F (190°C).
- Grate your zucchini and squeeze out excess moisture.
- Combine flour, baking powder, and Italian seasoning in a large bowl.
- Whisk together the milk and egg in another bowl.
- Fold in the grated zucchini and shredded cheese into the batter.
- Grease a muffin tin and fill each cup about two-thirds full.
- Bake for 25-30 minutes until golden.
- Cool for a few minutes before transferring to a wire rack.
Notes
Serve as appetizers, snacks, or sides. Great with ranch or garlic aioli.
Nutrition
- Serving Size: 1 puff
- Calories: 70
- Sugar: 1g
- Sodium: 150mg
- Fat: 3g
- Saturated Fat: 1g
- Unsaturated Fat: 2g
- Trans Fat: 0g
- Carbohydrates: 10g
- Fiber: 1g
- Protein: 3g
- Cholesterol: 25mg
Keywords: zucchini, puffs, snack, appetizer, vegetarian
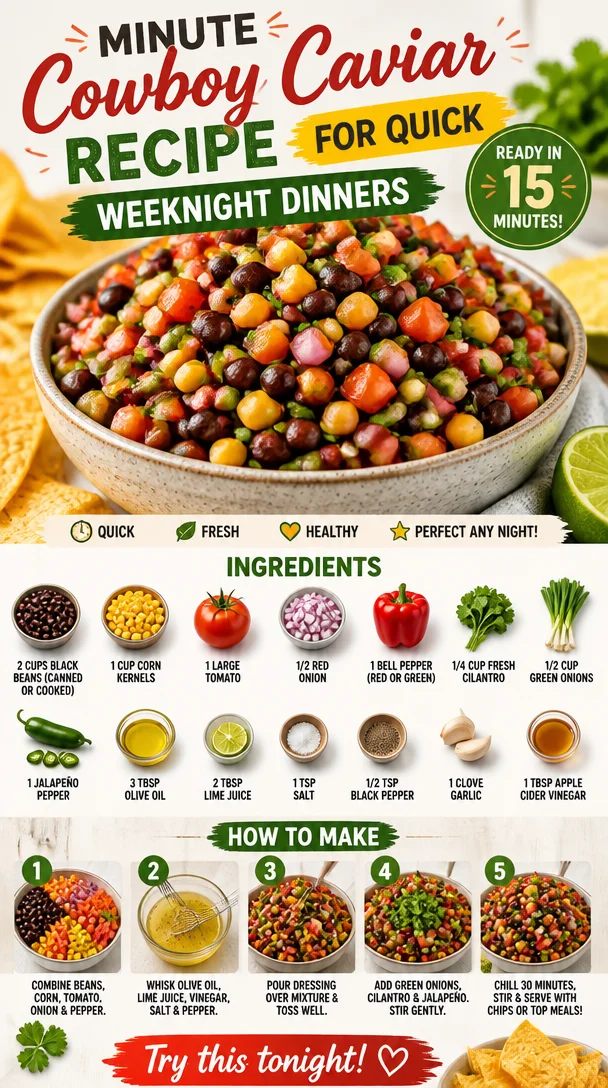
Minute Cowboy Caviar Recipe for Quick Weeknight Dinners
Cowboy Caviar: A Flavorful Fiesta in a Bowl
Welcome to the wild and wonderful world of Cowboy Caviar—where vibrant colors and bold flavors meet! If you’re looking for a dish that will not only tantalize your taste buds but also ignite your culinary creativity, you’re in the right spot. This zesty appetizer (or main dish, if you’re feeling adventurous) is the answer to all your snacking prayers. Picture a hearty blend of black beans, corn, fresh veggies, and a zesty dressing that’ll make your mouth water. It’s like a summer fiesta in your mouth, and trust me, you’ll want to dive right in!
So, what’s the story behind this drool-worthy dish? Cowboy Caviar is a classic appetizer with Tex-Mex roots, often served during gatherings, family cookouts, or at your neighbor’s BBQ. Each ingredient packs a punch, providing not just flavor, but plenty of nutrients to keep you feeling your best. And the best part? It’s incredibly versatile—great as a dip, a side salad, or even a topping for grilled meats or tacos. Let’s face it: once you make this dish, you’ll be the star of every potluck!
Now, roll up your sleeves, and let’s get cooking! Grab your ingredients, and get ready to whip up some Cowboy Caviar that even the cowboys would be proud of!
A Personal Story: The Perfect Summer Memory
Let me take you back to my childhood summers spent at my grandparents’ ranch in Texas. Nothing felt more liberating than spending long sunny days outside with family and friends, all while the smell of BBQ wafted through the air. In the center of it all? A giant bowl of Cowboy Caviar that my grandmother would make featuring fresh produce from her garden.
As kids, we would gather around, dipping crunchy tortilla chips into this rainbow of deliciousness while laughing and sharing stories. The freshness of every ingredient popped in our mouths—crunchy bell peppers, creamy black beans, and zesty jalapeños. It was a fiesta of flavors that always sparked joy. What I love most about Cowboy Caviar is that it reminds me of those carefree summer days, where we all connected over good food and laughter. Today, I still make this dish (with my own flair, of course), and every bite takes me right back to my grandmother’s kitchen.
Ingredients: Let’s Gather the Good Stuff
Here’s all you need to create your very own Cowboy Caviar masterpiece:
- 2 cups black beans (canned or cooked): A fabulous source of plant-based protein and fiber. For a twist, you can swap in pinto beans or kidney beans for a different flavor profile.
- 1 cup corn kernels: Fresh or frozen works great! You can also use canned corn; just be sure to rinse it well. Grilled corn adds a smoky flavor that’s to die for!
- 1 large tomato: Juicy and ripe, tomatoes are the star of the show. For a heartier version, you might try cherry tomatoes or even diced avocados for creaminess.
- 1/2 red onion: This onion adds a crunch and subtle sweetness. If red onion’s a bit too strong for you, use green onions or shallots as substitutes.
- 1 bell pepper (red or green): Use whichever you prefer! Red peppers give a sweeter taste, while green adds a nice bite. Feeling adventurous? Try a poblano pepper for a smoky flavor!
- 1/4 cup fresh cilantro: Bright and herbaceous, cilantro elevates the flavor. If you’re not a cilantro fan, parsley or even mint can work just as well.
- 1/2 cup green onions: These provide a delightful punch! Scallions can also be used here—just slice them thinly for a little zing!
- 1 jalapeño pepper: For heat! Adjust the amount depending on your spice tolerance. If you want it milder, remove the seeds and membranes.
- 3 tbsp olive oil: This is the base for your dressing, giving it a silky texture. Avocado oil works well too and provides a unique flavor.
- 2 tbsp lime juice: Freshly squeezed is best! It adds brightness. If you’re out of lime, lemon juice is a great substitute.
- 1 tsp salt: Season to your taste, but this enhances all the flavors.
- 1/2 tsp black pepper: A classic seasoning to round out the flavors.
- 1 clove garlic: Fresh garlic adds depth. Use garlic powder in a pinch, about 1/4 tsp.
- 1 tbsp apple cider vinegar: A splash of acidity that brightens everything up! Feel free to use red wine vinegar or even balsamic for a different twist.
Step-by-Step Instructions: Let’s Get Cooking!
-
Prepare Your Ingredients: Start by rinsing your black beans thoroughly if using canned ones. Drain the corn as well. Freshness is key, so if you’ve got time, you can cook your own beans and corn!
-
Chop, Chop!: Dice your tomatoes, red onion, and bell pepper into bite-sized pieces—it doesn’t have to be perfect. I love a rustic chop for that homemade feel! Gather your cilantro and green onions; both should be finely chopped for maximum flavor.
-
Handle the Heat: Time to tackle that jalapeño! Wearing gloves (trust me!), slice it in half, remove the seeds for less heat if desired, and finely chop. Here’s a chef hack: the seeds carry most of the spice, so adjust to your taste!
-
Mix It All Together: In a large mixing bowl, combine the black beans, corn, diced tomatoes, bell pepper, red onion, cilantro, green onions, and jalapeño. Feel free to get your hands in there and mix—it’s a labor of love!
-
Make the Dressing: In a smaller bowl, whisk together the olive oil, lime juice, apple cider vinegar, salt, black pepper, and minced garlic. Don’t skip the whisking—it helps emulsify everything into a glorious dressing!
-
Combine and Taste: Pour the dressing over your veggie mixture and stir gently to coat everything evenly. Here’s a pro tip: let the Cowboy Caviar sit for at least 30 minutes before serving to allow the flavors to meld together for a more harmonious taste.
-
Adjust and Enjoy: After chilling, taste it! You might need a pinch more salt or lime juice depending on your preference. It’s all about personalizing this dish to make it your own!
Serving Suggestions: How to Make It Shine
Presentation is key! Serve your Cowboy Caviar in a vibrant bowl, and garnish with extra cilantro for a pop of freshness. Pair it with crispy tortilla chips for dipping or even over a bed of greens for a light salad. Want to kick it up a notch? Serve it alongside grilled fish or chicken for a complete meal. It’s visually stunning and utterly scrumptious—perfect for impressing your guests!
Recipe Variations: Get Creative!
- Tropical Twist: Add diced mango or pineapple for a sweet and tangy flair that pairs beautifully with the spice.
- Mediterranean Style: Swap the black beans for chickpeas and add feta cheese, olives, and herbs like oregano.
- Superfood Boost: Toss in some quinoa or farro for added texture and nutrition—this transforms the Cowboy Caviar into a hearty main dish.
- Dairy-Free Creaminess: Add diced avocado right before serving for a rich, creamy finish that balances the heat.
- Spicy Sriracha Option: Drizzle a little Sriracha over the top if you want a real kick! The spice will dance with the freshness you’ve created.
Chef’s Notes: A Dash of History
My Cowboy Caviar recipe has evolved over the years as I’ve experimented with different ingredients. Growing up, I was simply a ‘don’t mess with a classic’ kind of chef. Over time, though, I’ve discovered that adding a touch of something unexpected (like that tropical mango surprise) keeps this dish fresh and exciting. Just like me, it has matured! And who doesn’t love a recipe that grows with you?
Have a little fun with it! Cooking is all about improvisation and creating memories. Whether it’s a family gathering or a cozy night in, I believe there’s magic in every bite.
FAQs and Troubleshooting: Let’s Clear It Up
1. Can I make Cowboy Caviar ahead of time?
Absolutely! In fact, I recommend letting it sit in the fridge for a few hours or overnight. This allows the flavors to meld beautifully. Just be sure to give it a stir before serving!
2. What do I do if it’s too spicy?
If you find your Cowboy Caviar has too much heat, try balancing it out with a little extra lime juice or even some diced avocado. Both will help tone things down!
3. Can I freeze Cowboy Caviar?
While you can freeze it, the texture of the veggies won’t hold up well when thawed. It’s best enjoyed fresh, but leftovers can be stored in an airtight container for about 3 days in the fridge.
4. I don’t like black beans—what can I use instead?
No problem! You can substitute any type of beans you prefer, like chickpeas or white beans. Just adjust the flavor to your liking—you’ll still have a delicious dish!
Nutritional Info (Optional)
For those counting nutrients, here’s a quick breakdown per serving (assuming about 1/2 cup):
- Calories: 120
- Protein: 4g
- Carbs: 20g
- Fiber: 6g
- Fat: 3g
Now you’re armed with everything you need to make the ultimate Cowboy Caviar! It’s fresh, flavorful, and fun to make. I can’t wait for you to take this recipe to your kitchen, so let’s whip up a bowl of joy, shall we? Happy cooking, foodies!
PrintCowboy Caviar
A vibrant and flavorful Tex-Mex appetizer made with black beans, corn, and fresh veggies, perfect for snacking or as a side dish.
- Prep Time: 15 minutes
- Cook Time: 0 minutes
- Total Time: 15 minutes
- Yield: 4 servings 1x
- Category: Appetizer
- Method: Mixing
- Cuisine: Tex-Mex
- Diet: Vegetarian
Ingredients
- 2 cups black beans (canned or cooked)
- 1 cup corn kernels (fresh or frozen)
- 1 large tomato, diced
- 1/2 red onion, chopped
- 1 bell pepper (red or green), chopped
- 1/4 cup fresh cilantro, chopped
- 1/2 cup green onions, chopped
- 1 jalapeño pepper, finely chopped
- 3 tbsp olive oil
- 2 tbsp lime juice
- 1 tsp salt
- 1/2 tsp black pepper
- 1 clove garlic, minced
- 1 tbsp apple cider vinegar
Instructions
- Prepare your ingredients by rinsing black beans and draining corn.
- Chop tomatoes, red onion, and bell pepper into bite-sized pieces.
- Handle the jalapeño, removing seeds if desired.
- Mix black beans, corn, tomatoes, bell pepper, red onion, cilantro, green onions, and jalapeño in a large bowl.
- Make the dressing by whisking together olive oil, lime juice, apple cider vinegar, salt, black pepper, and minced garlic.
- Combine the dressing with the veggie mixture and stir gently.
- Adjust seasoning as needed and let sit for 30 minutes before serving.
Notes
Great as a dip with tortilla chips or as a topping for grilled meats.
Nutrition
- Serving Size: 1/2 cup
- Calories: 120
- Sugar: 3g
- Sodium: 300mg
- Fat: 3g
- Saturated Fat: 0.5g
- Unsaturated Fat: 2.5g
- Trans Fat: 0g
- Carbohydrates: 20g
- Fiber: 6g
- Protein: 4g
- Cholesterol: 0mg
Keywords: Cowboy Caviar, Tex-Mex, appetizer, dip, salad, black beans, corn, fresh veggies