
One-Pan Creamy Cheesy Broccoli Rice Casserole for Weeknights
The Ultimate Cheesy Broccoli Rice Casserole: A Cozy Classic
Welcome, foodie friends! Today, we’re diving into the wonderfully creamy, cheesy world of Broccoli Rice Casserole. This dish is like a warm hug on a plate and an absolute family favorite. It’s comfort food at its best, packed with wholesome ingredients and delightful flavors, making it perfect for any occasion—from weeknight dinners to potlucks and holiday feasts.
A Nostalgic Bite: My Love for Casseroles
Growing up, my family had a tradition of “Casserole Sundays.” No matter where we were during the week, Sunday evenings were reserved for gathering around the dinner table, indulging in whatever delicious creation my mom whipped up. One dish that was always a star of the show was her Cheesy Broccoli Rice Casserole.
I can still picture the scene: the warmth of the kitchen, the tantalizing aroma wafting through the air, and the excitement as we impatiently waited for dinner. My brothers and I would race to the table, eager to dig into that gooey, cheesy goodness. Each bite felt like a celebration, not just of food but of family.
Now, as I make this casserole in my own kitchen, I find myself reminiscing about those moments and the joy that this dish brings. Cooking it is more than just preparing a meal; it’s an ode to my childhood, a connection to those precious family gatherings, and a beautiful reminder that food truly brings us together.
Ingredients for Cheesy Broccoli Rice Casserole
Let’s get started with what you need for this delightful dish! Here’s your shopping list:
-
Rice: Use long-grain white or brown rice for a nutty flavor or opt for instant rice for a quick cook. Brown rice adds a bit more fiber and nutrition as well.
-
Broccoli: Fresh broccoli is ideal, but if you’re short on time, frozen broccoli florets work just as well! Just make sure to thaw and squeeze out excess water to keep your casserole from getting soggy.
-
Cheddar Cheese: Sharp cheddar gives an extra kick of flavor, but feel free to mix it up with mild cheddar or even pepper jack if you’re feeling adventurous!
-
Milk: Whole milk enhances that creamy texture, but you can substitute with low-fat milk or plant-based milk for a dairy-free version.
-
Butter: Unsalted butter helps control the salt level in your dish. You can use olive oil or coconut oil for a dairy-free option.
-
Salt & Pepper: These simple seasonings elevate all the flavors. Adjust to taste, and consider adding garlic powder or onion powder for extra zing!
Step-by-Step Instructions
Now that we have our ingredients ready, let’s get cooking! Here’s how to make your very own Cheesy Broccoli Rice Casserole:
-
Preheat Your Oven: Set your oven to 350°F (175°C) and let it warm up while you prepare the casserole. This way, it’ll be perfectly heated when it’s time to bake!
-
Cook the Rice: In a medium saucepan, follow the package instructions to cook your rice. If you’re using brown rice, remember it takes a bit longer to cook, usually about 45 minutes. Once it’s soft and fluffy, set aside.
-
Blanch the Broccoli: While your rice is cooking, bring a small pot of salted water to a boil. Add the broccoli florets and cook for 2-3 minutes until bright green and tender. Immediately drain them and rinse under cold water to stop the cooking process. This keeps that vibrant color and crispy texture!
-
Prepare the Cheese Sauce: In a large mixing bowl, melt 3 tablespoons of butter in the microwave or a small saucepan. Whisk in the milk until smooth. Then add in 2 cups of shredded cheddar cheese, salt, and pepper. Keep whisking until the cheese is melted and the sauce is velvety!
-
Combine Rice, Broccoli, and Cheese: Add the cooked rice and blanched broccoli to the cheese sauce, stirring gently to combine. Make sure every piece of broccoli and grain of rice is coated in that delicious cheesy goodness.
-
Transfer to a Baking Dish: Lightly grease a 9×13 inch baking dish. Pour the mixture in, spreading it evenly. If you want to make it extra cheesy, sprinkle some additional cheese on top!
-
Bake: Pop your casserole in the oven and bake for about 25-30 minutes, or until the cheese is bubbly and golden brown on top. Your kitchen will smell amazing during this time!
-
Serve and Enjoy: Once baked, let it sit for a few minutes before diving in. This allows the casserole to firm up a bit, making it easier to scoop.
Serving Suggestions
When it’s time to serve, I love to plate this casserole in generous portions. Drizzle a bit of hot sauce on top for those who crave a little kick! Pair it with a simple side salad or some roasted veggies to balance out the richness. Your family will be raving about this dish long after the plates are empty!
Recipe Variations
Feel free to play with this recipe and make it your own! Here are a few fun variations:
-
Add Protein: For a heartier meal, stir in some cooked chicken, turkey, or even tofu for a veggie-packed option!
-
Get Spicy: Mix in some diced jalapeños or crushed red pepper flakes for a spicy twist.
-
Switch Up the Cheese: Try using a blend of mozzarella and gouda for a different flavor profile.
-
Vegan Version: Substitute dairy cheese with cashew cheese or a vegan cheese blend, and use almond milk instead of regular milk.
-
Extra Veggies: Toss in some cooked carrots or bell peppers for added color and nutrients!
Chef’s Notes
This casserole has evolved beautifully over time. I remember trying to make it healthier by adding quinoa instead of rice once—let’s just say it didn’t have the same comforting vibe! But it was a great experiment that taught me to keep this recipe classic. Every time I make it, I put my own little twist, whether it’s using up leftover veggies or changing the cheese; it’s always a surprise to see what combo will make a reappearance at our table.
And who could forget the time I accidentally spilled an entire cup of cheese in the mixing bowl? Let’s just say, the “extra cheesy” nickname stuck, and that night we had a castle of cheesy goodness!
FAQs and Troubleshooting
-
Why is my casserole watery?
Make sure to avoid overcooking your broccoli and draining it well if you’re using frozen. Also, if you add too much milk, it might become watery. Just tweak the liquid amounts next time! -
Can I prep this casserole ahead of time?
Absolutely! You can prepare everything up to the baking step, cover it, and store it in the fridge for 24 hours. When you’re ready to bake, let it sit at room temperature for about 30 minutes before popping it in the oven. -
What can I do with leftovers?
This casserole is fabulous for meal prep! Store in an airtight container in the fridge for up to 3–4 days. It also freezes well—just portion out your leftovers and freeze for those busy days when you need a quick meal! -
Can I make this without cheese?
You can! For a dairy-free option, skip the cheese and try a cashew cream or a creamy vegan sauce made with blended nuts and nutritional yeast for that cheesy flavor.
Nutritional Info
While the specific breakdown may vary based on ingredient choices, this Cheesy Broccoli Rice Casserole is generally a satisfying meal rich in fiber, vitamins, and minerals, making it a wholesome option for your table!
And there you have it, friends! This Cheesy Broccoli Rice Casserole is not just a recipe; it’s a chance to create memories that will last a lifetime. Gather around the table with your loved ones, dig in, and enjoy the cheesy goodness one delicious bite at a time. Happy cooking!
PrintThe Ultimate Cheesy Broccoli Rice Casserole

A wonderfully creamy and cheesy casserole, perfect for family dinners and gatherings.
- Prep Time: 15 minutes
- Cook Time: 30 minutes
- Total Time: 45 minutes
- Yield: 4 servings 1x
- Category: Main Course
- Method: Baking
- Cuisine: American
- Diet: Vegetarian
Ingredients
- 2 cups long-grain white or brown rice
- 2 cups fresh or frozen broccoli florets
- 2 cups shredded sharp cheddar cheese
- 1 cup whole milk
- 3 tablespoons unsalted butter
- Salt to taste
- Pepper to taste
Instructions
- Preheat your oven to 350°F (175°C).
- Cook the rice according to package instructions.
- Blanch the broccoli in salted boiling water for 2-3 minutes, then drain and rinse with cold water.
- Prepare the cheese sauce by melting butter and whisking in milk, then adding cheese, salt, and pepper.
- Combine cooked rice and broccoli with the cheese sauce.
- Transfer the mixture to a greased 9×13 inch baking dish.
- Bake for 25-30 minutes until cheese is bubbly and golden brown.
- Serve and enjoy after letting it sit for a few minutes.
Notes
You can prep this casserole ahead of time and bake it the next day. Drizzle with hot sauce for an added kick!
Nutrition
- Serving Size: 1 serving
- Calories: 350
- Sugar: 5g
- Sodium: 400mg
- Fat: 12g
- Saturated Fat: 4g
- Unsaturated Fat: 6g
- Trans Fat: 0g
- Carbohydrates: 45g
- Fiber: 3g
- Protein: 15g
- Cholesterol: 30mg
Keywords: broccoli casserole, cheesy rice, comfort food, vegetarian dish, family recipe
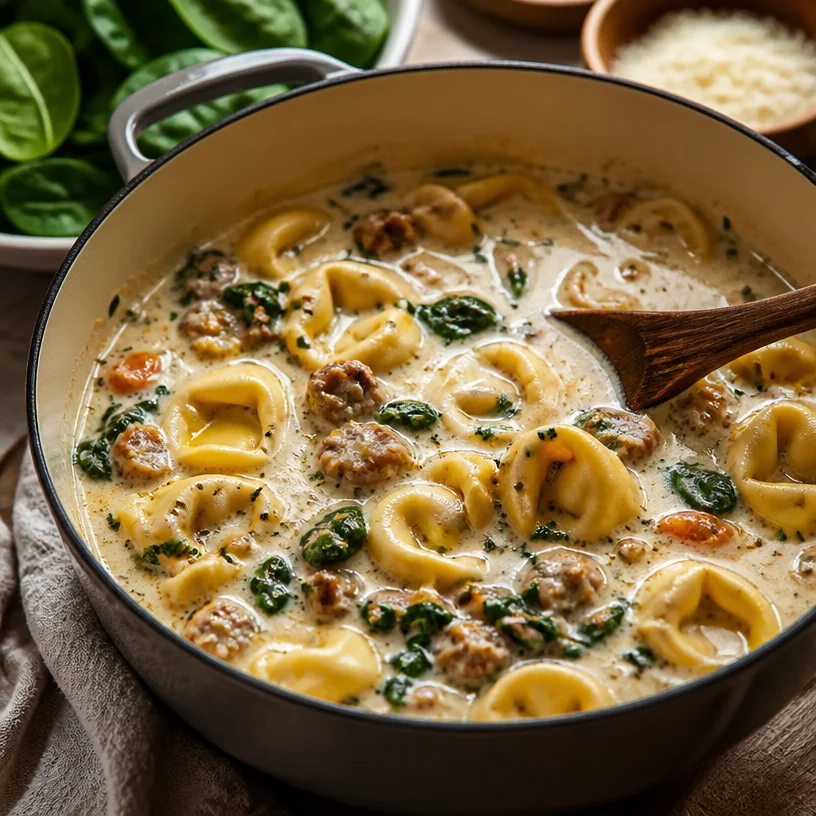
One-Pot Creamy Tortellini Soup for Easy Weeknight Dinners
Creamy Tortellini Soup: A Hug in a Bowl
Welcome to the warm and cozy world of Creamy Tortellini Soup, where every spoonful feels like a hug on a chilly day! I can’t wait to share this delectable recipe with you, because believe me, it’s not just delicious; it’s downright soul-soothing. Whether you’re looking to impress dinner guests or just need a comforting meal for yourself, this soup hits all the right notes.
Picture this: the aroma of sizzling sausage fills your kitchen, mingling with the earthy scent of fresh spinach, and the creamy broth bubbling blissfully in a pot—it’s pure magic! As the cheese tortellini dances around in the pot, you find yourself dreaming of cozy evenings spent with loved ones, sharing laughter and stories over a steaming bowl of this delightful soup.
The beauty of this recipe lies in its simplicity and heartiness. With minimal effort, you can create something that feels both luxurious and homey. Eating well shouldn’t be a chore; it should be a celebration of flavors, textures, and cherished moments. This Creamy Tortellini Soup embodies all these sentiments, and trust me, it’s a total crowd-pleaser!
On a busy weeknight or a chilled weekend afternoon, there’s nothing more satisfying than having a pot of this soup simmering on the stove. So grab your apron, and let’s dive into the process of creating this aromatic masterpiece together!
A Nostalgic Taste of Home
Every great recipe comes with a story, and this one is no exception. Growing up, my mom was a master of creating comfort food, and one of my all-time favorites was her tortellini soup. I can vividly remember coming home from school on rainy days, the sound of the rain pattering against the windows, and that unmistakable smell wafting from the kitchen. My siblings and I would race to the table, tummies rumbling in anticipation.
Mom’s soup was always made from whatever we had on hand, but three key ingredients stood out: smoky sausage, vibrant spinach, and tender cheese tortellini. With each bite, we savored not just the flavors, but the love and warmth that enveloped us like a soft blanket. It was a meal that required no formalities; we could slurp the broth and laugh wholeheartedly without a care in the world.
As I grew older, this recipe became a canvas for my culinary creativity. I’ve modified it over time, adding my twists and tips, but it always retains that comforting essence that brings me back home. Today, I’m thrilled to share my version with you, hoping it sparks similar memories of joy and togetherness.
Ingredients
Now let’s gather our ingredients! Here’s what you’ll need to whip up this delightful Creamy Tortellini Soup:
-
Cheese Tortellini
- The star of the show! You can use fresh or frozen varieties, depending on what you have on hand. If you can’t find tortellini, feel free to substitute with any kind of pasta; just keep an eye on the cooking time.
-
Sausage
- I often use Italian sausage for that savory punch, but turkey or chicken sausage works just as well! For a vegetarian version, skip the meat and add more veggies for depth of flavor.
-
Spinach
- Fresh spinach adds a pop of color and a nutritious boost. If you don’t have fresh on hand, you can substitute with frozen spinach—just be sure to thaw and drain it first.
-
Cream
- Heavy cream gives the soup its luscious texture. If you’re looking for a lighter option, swap it out for half-and-half or even coconut milk for a dairy-free alternative.
-
Broth
- Chicken or vegetable broth serves as the flavorful base of the soup. Homemade is ideal, but store-bought works just fine. When choosing broth, go for low-sodium options for more control over seasoning!
-
Seasonings (not listed above)
- Don’t forget the salt, pepper, garlic, and Italian herbs! These seasonings elevate the flavors to a whole new level. You could also experiment with red pepper flakes for a hint of spice!
Step-by-Step Instructions
Let’s get cooking! Here’s how to bring this delightful Creamy Tortellini Soup to life.
Step 1: Brown the Sausage
In a large pot or Dutch oven, heat a splash of olive oil over medium heat.
- Add the sausage and cook until browned, about 5-7 minutes. Break it up with a wooden spoon as it cooks. This not only ensures even cooking but also maximizes flavor as the edges get caramelized. Tip: If you like it spicy, go for hot Italian sausage—trust me, it’s worth it!
Step 2: Sauté the Veggies
Once the sausage is perfectly browned, toss in minced garlic (about 3 cloves) and sauté for another minute until fragrant.
- Next, add fresh spinach, stirring until it wilts down, which should only take a minute. Chef Hack: If you love garlic like I do, feel free to add an extra clove or two!
Step 3: Add Broth
Now, pour in about 4 cups of your broth of choice, stirring to combine.
- Bring the mixture to a gentle simmer. This step is so crucial! Letting it simmer allows all those delectable flavors to meld. Pro Tip: Use a wooden spoon to scrape up any brown bits from the bottom of the pot. That’s a ton of flavor waiting to be released!
Step 4: Stir in the Tortellini
Once your soup is simmering, it’s time to add the tortellini.
- Cook according to the package directions, usually around 3-5 minutes. These little pockets of goodness will soak up the broth and turn even more tender. Quick Note: If you’re using frozen tortellini, don’t defrost them—just toss them in straight from the freezer!
Step 5: Cream It Up!
After the tortellini has cooked, reduce the heat to low and stir in about 1 cup of heavy cream.
- Continuously stir until the soup is velvety and creamy. That silky texture will drown your taste buds in happiness! Cooking Tip: If you want it even creamier, go for a little extra! It never hurts to pamper yourself, right?
Step 6: Season to Taste
Now it’s time to taste and adjust! Add salt, pepper, and Italian seasonings (like oregano and basil) to elevate the soup and enhance the flavors just right.
- Just remember, a little goes a long way—taste as you go! Final Touch: Finish with a sprinkle of freshly grated Parmesan cheese for extra richness!
Serving Suggestions
Ladle this glorious soup into bowls and garnish with croutons or a sprinkle of fresh herbs. Serve it with a side of toasted crusty bread or a light salad for a delightful meal. The combination of creamy soup and crunchy bread will have you swooning and craving more!
Recipe Variations
The great thing about this soup is its versatility! Here are some fun variations worth exploring:
- Pasta Swap: Use gnocchi for a twist! They soak up the creamy broth beautifully.
- Veggie Boost: Load it up with additional veggies like carrots, zucchini, or bell peppers for more nutrition.
- Protein Options: Try shrimp or grilled chicken instead of sausage for a different protein boost!
- Herb Infusion: Experiment with fresh herbs like thyme or parsley for a brighter flavor.
- Spice It Up: Add a dash of red pepper flakes or a splash of hot sauce for a kick!
Chef’s Notes
I can’t emphasize enough how much this recipe has evolved over the years. I’ve tried numerous variations, and each time, it reminds me just how comforting cooking can be. One particularly funny memory that stands out is the time I decided to add kale, thinking I could be fancy. Let’s just say, my friends were not as impressed as I was! Now, I always keep my recipes straightforward and focused on what brings joy. Remember, cooking is about experimentation—don’t shy away from making it your own!
FAQs and Troubleshooting
1. My soup turned out too thick! What can I do?
No problem at all! Simply whisk in a bit more broth or water until you reach your desired consistency.
2. Can I make this soup in advance?
Absolutely! This soup stores well in the fridge for about 3-4 days. Just keep in mind that the tortellini may absorb some broth, so you might want to add a little extra liquid when reheating.
3. How can I make this soup vegan?
Substitute the sausage with plant-based meat or mushrooms, replace the cream with coconut milk, and use vegetable broth. You can add more veggies to enhance the flavor.
4. What’s the best way to store leftovers?
Store any leftovers in an airtight container in the refrigerator for up to four days. You can freeze portions in freezer-safe bags for up to three months!
Nutritional Information (Optional)
This Creamy Tortellini Soup is not only delicious but also falls into the comforting category of hearty meals. Here’s a quick breakdown of the nutrition per serving (estimate):
- Calories: 450
- Protein: 20g
- Carbohydrates: 50g
- Fat: 20g
- Fiber: 3g
Feel free to customize based on your dietary needs!
And there you have it—your go-to recipe for Creamy Tortellini Soup! I hope you have just as much fun making it as I do. So grab your loved ones, whip up a batch, and enjoy the cozy magic that only a bowl of homemade soup can bring. Happy cooking!
PrintCreamy Tortellini Soup

A warm and cozy Creamy Tortellini Soup that feels like a hug on a chilly day. Full of flavor with cheese tortellini, sausage, and fresh spinach.
- Prep Time: 10 minutes
- Cook Time: 20 minutes
- Total Time: 30 minutes
- Yield: 6 servings 1x
- Category: Soup
- Method: Stovetop
- Cuisine: Italian
- Diet: Non-Vegetarian
Ingredients
- 1 package Cheese Tortellini
- 1 lb Sausage (Italian, turkey, or chicken)
- 4 cups Fresh Spinach
- 1 cup Heavy Cream
- 4 cups Chicken or Vegetable Broth
- Salt and Pepper to taste
- 3 cloves Garlic, minced
- Italian herbs (Oregano, Basil) to taste
- Optional: Red pepper flakes for spice
Instructions
- Brown the sausage in a large pot or Dutch oven with a splash of olive oil over medium heat, about 5-7 minutes.
- Sauté minced garlic until fragrant, then add spinach and stir until wilted.
- Add the broth and bring to a gentle simmer.
- Stir in the tortellini and cook according to package directions, about 3-5 minutes.
- Cream it up by reducing the heat and adding heavy cream, stirring until velvety.
- Season to taste with salt, pepper, and Italian herbs.
Notes
Adjust the thickness of the soup by adding more broth or water if needed. Can be made in advance and stored for up to 4 days.
Nutrition
- Serving Size: 1 bowl
- Calories: 450
- Sugar: 5g
- Sodium: 700mg
- Fat: 20g
- Saturated Fat: 10g
- Unsaturated Fat: 7g
- Trans Fat: 0g
- Carbohydrates: 50g
- Fiber: 3g
- Protein: 20g
- Cholesterol: 60mg
Keywords: tortellini soup, creamy soup, comfort food, Italian recipe
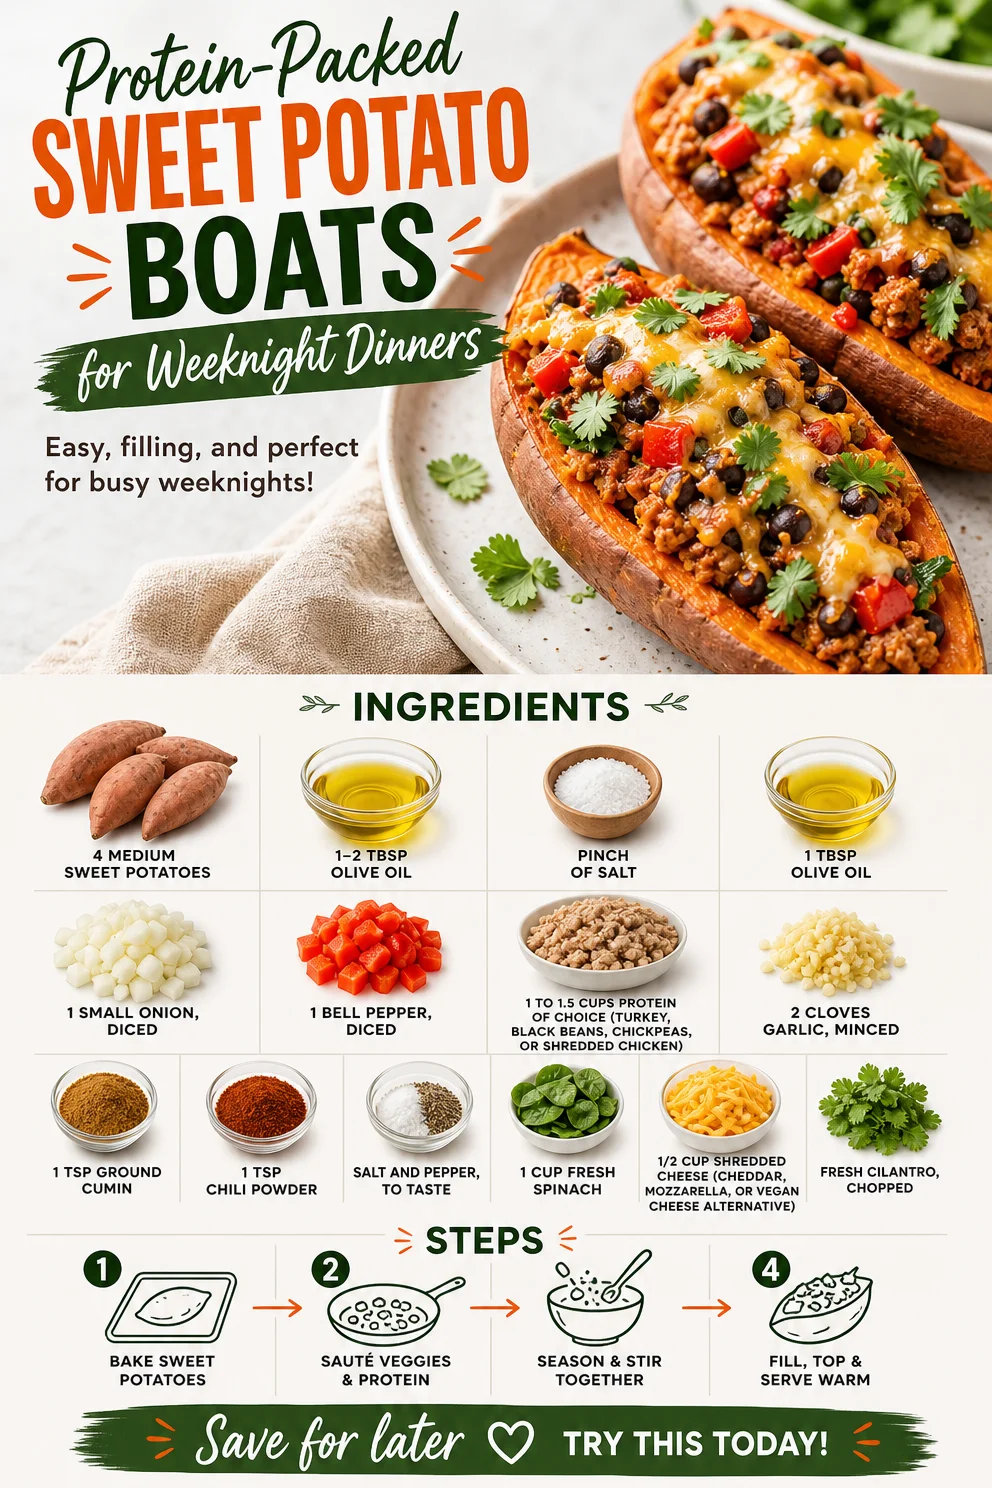
Protein-Packed Sweet Potato Boats for Weeknight Dinners
Protein Loaded Sweet Potato Boats: A Flavorful Journey to Wholesome Eating
Welcome to the delicious world of Protein Loaded Sweet Potato Boats! Whether you’re seeking a quick weeknight dinner, prepping for a meal-prep Sunday, or just craving a satisfying dish that provides nourishment, these sweet potato boats are the answer. Let’s embark on a culinary adventure that blends simplicity with mouthwatering flavors, while ensuring that every bite leaves you feeling energetic and fueled.
Why sweet potatoes, you ask? Well, not only are they packed with vitamins, minerals, and fiber, but they also have this wonderful, natural sweetness that brings joy to any meal. Pair that with your choice of protein and a bunch of colorful veggies, and you’ve got yourself a winning combination.
Before we dive into cooking, let me share a little story about why sweet potatoes hold a special place in my heart. Growing up, my mom would prepare stuffed sweet potatoes on chilly evenings, transforming the humble spud into a comforting, hearty meal. The kitchen would fill with the aroma of spices, and I would impatiently wait at the table, the anticipation building as I could almost taste the sweetness mingling with the savory filling. Those meals were filled with laughter, joy, and the kind of warmth that made everything feel right in the world. Even now, each time I prepare them, I’m transported back to those cozy dinners, and I can’t wait for you to create your own memories with this dish!
Ingredients
Here’s what you’ll need to create your own protein-loaded sweet potato boats:
-
4 Medium Sweet Potatoes
Naturally sweet and loaded with vitamins, particularly Vitamin A. Look for firm potatoes with smooth skin. You can substitute with regular potatoes, but the sweet variety brings a unique flavor profile. -
1-2 Tablespoons Olive Oil
Adds richness and helps to roast the potatoes and vegetables without them sticking. Avocado oil works too for a buttery flavor! -
Pinch of Salt
Enhances the natural sweetness of the sweet potatoes and balances the flavors. Use sea salt or Himalayan pink salt for a gourmet twist. -
1 Small Onion, Diced
Onions add a classic depth of flavor. If you’re not a fan, leeks or shallots are great substitutes that provide a milder taste. -
1 Bell Pepper, Diced
Choose any color bell pepper—red, yellow, or green. They’re packed with Vitamin C and add crunch and sweetness. Zucchini can be a fun swap if you prefer more veggies! -
1 to 1.5 Cups Protein of Choice
Pick your adventure! Lean ground turkey, black beans, chickpeas, or shredded chicken all work beautifully. Tofu or tempeh can be great for a veggie twist. -
2 Cloves Garlic, Minced
Garlic introduces a fragrant and savory element. Fresh is always best, but garlic powder can work in a pinch. -
1 Teaspoon Ground Cumin
This spice adds an earthy warmth and depth. If you’re looking for a change, smoked paprika can give it a slightly different flair. -
1 Teaspoon Chili Powder
This brings a bit of heat and complexity. Adjust the amount based on your heat preference. For less spice, paprika or Italian seasoning can be good alternatives. -
Salt and Pepper, to Taste
Essential for seasoning. You can also experiment with fresh herbs! -
1 Cup Fresh Spinach
Adds color and nutrients! Kale or Swiss chard works just as well. -
1/2 Cup Shredded Cheese (Cheddar, Mozzarella, or Vegan Cheese Alternative)
This brings creaminess and flavor. If you’re avoiding dairy, shredded nutritional yeast is a melty, cheesy alternative. -
Fresh Cilantro, Chopped
A burst of freshness at the end! You can switch this for parsley if you’re not a cilantro fan.
Step-by-Step Instructions
Ready to make magic happen in the kitchen? Let’s get cooking!
-
Preheat Your Oven:
Preheat your oven to 400°F (200°C). This step is essential for achieving perfectly roasted sweet potatoes that are caramelized and soft. While you wait, let’s prep our ingredients. -
Prepare the Sweet Potatoes:
Give the sweet potatoes a good wash and poke a few holes in them with a fork. This allows steam to escape while they bake, preventing any messy explosions. Coat them lightly with olive oil and sprinkle a pinch of salt for flavor. Place them on a baking sheet lined with parchment paper for easy cleanup! -
Bake the Sweet Potatoes:
Pop those bad boys in the oven and let them bake for about 45-50 minutes, or until they’re tender and easily pierced with a fork. The sweet smell wafting through your kitchen will be your reward! -
Sauté the Vegetables:
As your potatoes are baking, heat 1 tablespoon of olive oil in a skillet over medium heat. Toss in the diced onion and bell pepper. Sauté them until the onion turns translucent and the peppers become soft—about 5-7 minutes. This step adds a flavor base that’s essential for the dish. -
Add the Protein:
Stir in your protein of choice (ground turkey, beans, etc.) along with the minced garlic, cumin, chili powder, and a splash of salt and pepper. If you’re using ground turkey, cook until browned (about 8-10 minutes). If using beans or chickpeas, just mix them until heated through. -
Add the Spinach:
During the last couple of minutes of cooking, add in the fresh spinach, stirring until it wilts down. It makes for a beautiful presentation as well as a nutritious boost! -
Combine and Stuff:
Once your sweet potatoes are done baking, take them out and let them cool for a couple of minutes. Carefully slice them in half lengthwise and gently scoop out some of the flesh to make room for the stuffing (don’t waste any—add it to your mix!). Fill each sweet potato half with the protein-veggie mixture and top with shredded cheese. -
Final Bake:
Return the stuffed sweet potatoes to the oven for an additional 10-15 minutes, or until the cheese is melted and bubbly. If you love your cheese extra crispy, broil for the last couple of minutes but keep a close watch! -
Garnish and Serve:
Once done, garnish with fresh cilantro and any other toppings you desire, like avocado slices or a dollop of Greek yogurt for creaminess.
Serving Suggestions
Plate your stunning sweet potato boats on a colorful platter. You can serve them alongside a fresh green salad with lemon vinaigrette for a balanced meal, or as part of a family-style feast where everyone can customize their toppings. These sweet potatoes are not just delicious but also serve as a vibrant centerpiece!
Recipe Variations
-
Tex-Mex Twist:
Swap the spices for taco seasoning and top with pico de gallo, jalapeños, and avocado for a zesty kick. -
Mediterranean Delight:
Use chickpeas, add oregano, and finish with a sprinkle of feta cheese and kalamata olives. -
Italian Style:
Replace the bell pepper with diced tomatoes, add Italian herbs, and use shredded mozzarella and basil for a pizza-inspired version. -
Breakfast Brilliance:
Fill the boats with scrambled eggs, spinach, and cheese, and serve topped with salsa for a hearty breakfast option. -
Vegan Option:
Use black beans or lentils, nutritional yeast for the cheese, and load up on veggies for a plant-based delight.
Chef’s Notes
Sweet potatoes have become a pantry staple for me over the years. I experimented with them in various ways, but I always find myself returning to this recipe. There’s something so satisfying about transforming a simple sweet potato into a gourmet meal. I remember one time, I had an unexpected guest, and I whipped this up using whatever leftover proteins I had, and it was an instant hit! Now it’s a go-to whenever I’m pressed for time yet crave something delightful.
FAQs and Troubleshooting
Q: My sweet potatoes are still hard after baking, what did I do wrong?
A: You might have picked larger sweet potatoes that require more cooking time. Smaller potatoes typically take about 30-40 minutes, while larger ones can take up to an hour. Always test for doneness by piercing with a fork.
Q: Can I make these ahead of time?
A: Absolutely! Bake the sweet potatoes and prepare the filling in advance. When you’re ready to eat, you can stuff them and reheat in the oven.
Q: How do I store leftovers?
A: Store any leftovers in an airtight container in the fridge for up to 3 days. Reheat in the oven or microwave for an easy meal!
Q: Can I freeze these?
A: You can freeze the filling separately and prep the sweet potatoes fresh for the best texture. However, fully assembled, after baking, they can also be frozen. Just be sure to thaw them in the fridge before reheating.
Nutritional Info
This dish is packed with nutrients! Here’s a rough breakdown for a serving (1 sweet potato half stuffed):
- Calories: Approximately 350
- Protein: 20g (depending on protein choice)
- Carbohydrates: 50g
- Fiber: 10g
- Fat: 10g
Eating well can be both simple and delicious. With these Protein Loaded Sweet Potato Boats, you’re not only nourishing your body but creating light, comforting meals that celebrate the joy of cooking. Enjoy every bite, knowing that you’re sharing your love for food and health with those around you. Happy cooking!
PrintProtein Loaded Sweet Potato Boats

A wholesome and flavorful dish featuring sweet potatoes stuffed with your choice of protein and colorful veggies.
- Prep Time: 15 minutes
- Cook Time: 50 minutes
- Total Time: 65 minutes
- Yield: 4 servings 1x
- Category: Main Course
- Method: Baking
- Cuisine: American
- Diet: Vegetarian
Ingredients
- 4 Medium Sweet Potatoes
- 1–2 Tablespoons Olive Oil
- Pinch of Salt
- 1 Small Onion, Diced
- 1 Bell Pepper, Diced
- 1 to 1.5 Cups Protein of Choice
- 2 Cloves Garlic, Minced
- 1 Teaspoon Ground Cumin
- 1 Teaspoon Chili Powder
- Salt and Pepper, to Taste
- 1 Cup Fresh Spinach
- 1/2 Cup Shredded Cheese (Cheddar, Mozzarella, or Vegan Cheese Alternative)
- Fresh Cilantro, Chopped
Instructions
- Preheat your oven to 400°F (200°C).
- Prepare the sweet potatoes by washing them and poking holes with a fork.
- Coat the sweet potatoes with olive oil and sprinkle with salt.
- Bake the sweet potatoes for about 45-50 minutes until tender.
- Sauté the diced onion and bell pepper in olive oil until soft.
- Add the protein, garlic, cumin, chili powder, salt, and pepper, and cook for the appropriate time.
- Stir in the fresh spinach until wilted.
- Combine the mixture with the scooped out sweet potato flesh and stuff each sweet potato half.
- Return the stuffed sweet potatoes to the oven for 10-15 minutes until the cheese is melted.
- Garnish with fresh cilantro before serving.
Notes
Feel free to customize the toppings or the protein used in this recipe to fit your dietary needs.
Nutrition
- Serving Size: 1 serving
- Calories: 350
- Sugar: 5g
- Sodium: 400mg
- Fat: 12g
- Saturated Fat: 4g
- Unsaturated Fat: 6g
- Trans Fat: 0g
- Carbohydrates: 45g
- Fiber: 10g
- Protein: 20g
- Cholesterol: 30mg
Keywords: sweet potatoes, protein, healthy, meal prep, vegetarian