Stone Fruit Pie
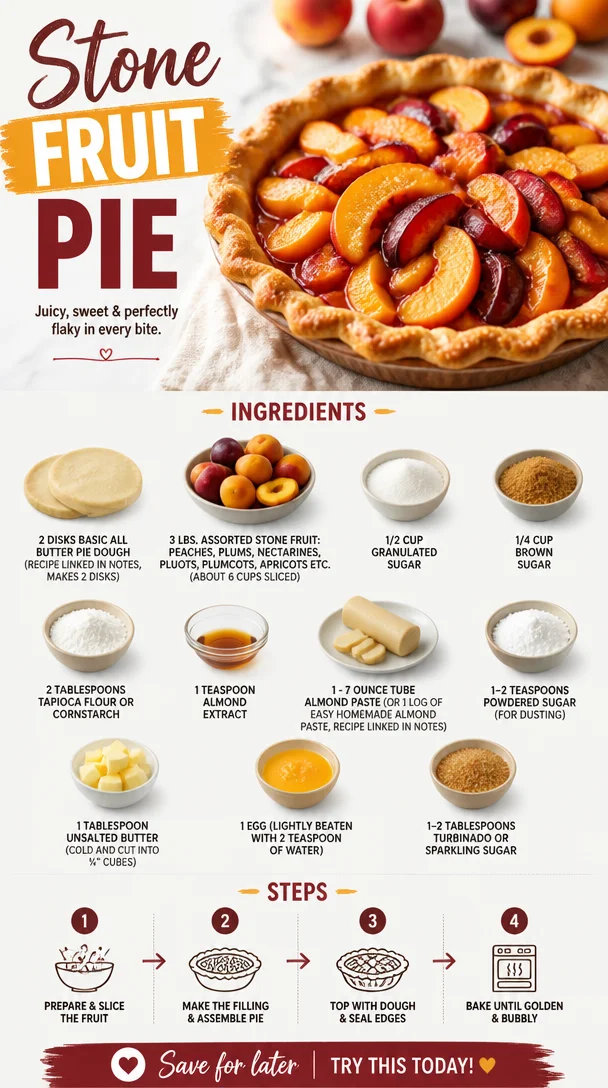
Stone Fruit Pie: A Slice of Summer Bliss
Welcome to another delightful adventure in the kitchen! Today, we’re celebrating one of my all-time favorite desserts: Stone Fruit Pie. Picture this: warm, juicy slices of peaches, plums, and cherries all mingling together under a buttery, flaky crust. It’s like a hug in pie form—but who said comfort has to be reserved for winter? Stone fruit season is a joyous time, and what better way to embrace it than with a show-stopping pie that’s as beautiful as it is delicious?
When I was a kid, my family would embark on summer road trips, and one of our favorite stops was the local fruit stand. As we’d pull up, the rich aroma of ripe fruit wafting through the air felt like a siren’s call, beckoning us closer. My mom would load up the car with an assortment of peaches, plums, and nectarines—our stone fruit bounty. We’d eat them fresh, of course, but when we got home, it was pie-making time! The kitchen was filled with laughter, chatter, and sweet fragrances as we transformed those juicy gems into something even more magical.
There’s something truly special about making pie as a family. Whether you’re assembling the crust, whipping up the filling, or fighting over who gets to sprinkle the sugar on top, it’s a bonding experience, steeped in love and nostalgia. Now, I want to share that joy with you through this easy-to-follow Stone Fruit Pie recipe. Let’s roll up our sleeves and dive in!
Ingredients
Here’s what you’ll need to create this delicious pie:
-
2 disks Basic All Butter Pie Dough
(For the perfect flaky crust. You can use store-bought if you’re short on time! Find the recipe here.) -
3 lbs. assorted stone fruit (peaches, plums, nectarines, pluots, plumcots, apricots, etc. – about 6 cups sliced)
(Choose your favorites! Feel free to mix and match. Just make sure they’re ripe for the best flavor! For a fun twist, you can even try some cherries or figs.) -
1/2 cup granulated sugar
(Brings out the natural sweetness of your fruit. You can substitute with coconut sugar for a healthier option!) -
1/4 cup brown sugar
(Adds a rich, molasses flavor that complements the fruit beautifully.) -
2 tablespoons tapioca flour or cornstarch
(Helps thicken the filling so it’s not runny. If you’re looking for a gluten-free alternative, both options work wonderfully!) -
1 teaspoon almond extract
(Gives a lovely depth of flavor. If you’re not a fan, vanilla extract can be used instead.) -
1 – 7 ounce tube almond paste or 1 log of Easy Homemade Almond Paste
(Adds a delightful nuttiness. Homemade paste is a great way to control the sweetness! Recipe here.) -
1-2 teaspoons powdered sugar
(For a sweet dusting at the end—totally optional but adds a touch of charm!) -
1 tablespoon unsalted butter (cold and cut into ¼” cubes)
(Dotting the filling with butter enhances richness. Trust me, don’t skip this step!) -
1 egg (lightly beaten with 2 teaspoons of water)
(This egg wash gives the crust that perfect golden brown color.) -
1-2 tablespoons Turbinado or sparkling sugar
(Sprinkle it on top for a delightful crunch. Make it shine like the summer sun!)
Step-by-Step Instructions
Here’s how to put this delightful pie together, step by step. Ready, set, bake!
-
Preheat Your Oven: Start by preheating your oven to 425°F (220°C). This high temperature is key for a beautifully flaky crust.
-
Prepare the Pie Dough: Roll out one disk of your pie dough on a floured surface to fit your pie pan. Don’t worry about perfection; rustic is charming! Place it into your pie dish (don’t forget to trim any excess overhang) and pop it in the fridge while you prepare the filling.
-
Slice the Fruit: Grab your stone fruit and slice them up into even pieces. Aim for about 1/2-inch thick slices. Don’t stress about uniformity—each piece tells a summer story!
-
Mix the Filling: In a large mixing bowl, toss the sliced fruit with both sugars, tapioca flour (or cornstarch), and almond extract. Once it’s all mixed together, let it sit for about 10 minutes. This allows the fruit juices to start merging, making for an extra flavorful filling.
-
Add the Almond Paste: Crumble the almond paste into small pieces and mix it into the fruit. This step adds such a delicious nuttiness that complements the bright fruit flavor. It’s like a surprise waiting inside!
-
Fill the Crust: Remove the pie crust from the fridge and pour the luscious fruit mixture into the shell. Dot the top with cold butter cubes. This will keep your filling rich and luscious.
-
Top It Off: Roll out your second pie dough disk and place it over the filling. You can create a lattice top for a gorgeous presentation or simply cover it with a solid layer. Cut slits for steam to escape if you opt for the latter.
-
Egg Wash and Sugar: Brush the top crust with the egg wash mixture, then sprinkle with turbinado sugar for some sparkle and texture.
-
Bake: Pop your pie into the oven and bake for 15 minutes at 425°F to get that crust nice and golden. Then, reduce the temperature to 350°F (175°C) and continue baking for 30-35 minutes until the filling is bubbly and the crust is golden brown.
-
Cool and Serve: Once out of the oven, let your pie cool for at least an hour. This will help the filling set up perfectly. Trust me, it’s worth the wait!
Serving Suggestions
To serve this stunning Stone Fruit Pie, a scoop of vanilla ice cream or whipped cream on top is a classic match made in heaven. I also love sprinkling a bit of fresh mint or basil for an unexpected pop of flavor and color. Slice it into generous pieces and watch your guests’ eyes light up—they’ll be excited for a taste of your summer masterpiece!
Recipe Variations
Feeling adventurous? Here are a few twists you can try on this classic recipe:
- Spiced Stone Fruit Pie: Add a teaspoon of cinnamon or nutmeg to the fruit filling for a warm flavor profile.
- Crumble Topping: Instead of a top crust, sprinkle a crumble made from oats, brown sugar, and butter for a crunchy texture.
- Savory Twist: Mix in some fresh herbs like thyme or rosemary into the fruit filling for an unexpected savory layer.
- Different Fruit Combos: Swap out some of the stone fruit for berries or apples for a unique fusion pie!
- Gluten-Free Version: Use a gluten-free pie dough recipe to make this pie accessible for gluten-sensitive friends.
Chef’s Notes
As with any recipe, this Stone Fruit Pie has evolved over time! I remember experimenting with different fruit mixtures based on what we found at the farmer’s market, leading to some delightful surprises. One time, I added a splash of bourbon to the fruit filling for an extra kick—just be sure to adjust your sugar levels accordingly if you try that! I’ve also had moments where I completely forgot to add sugar, only to discover that the natural sweetness of ripe fruit stood out beautifully. Embrace those kitchen flubs; they often lead to happy accidents!
FAQs and Troubleshooting
1. My pie crust shrunk during baking. What went wrong?
This could be due to overworking the dough or inaccurate chilling time. Make sure to chill the dough properly and handle it gently.
2. Why did my filling turn out runny?
Ensure you measured the fruit accurately and allowed it to sit with the sugars and thickening agent for a bit before baking. If it’s extra juicy, a little extra tapioca flour or cornstarch can help thicken things up.
3. Can I freeze this pie?
Absolutely! You can freeze both baked and unbaked pies. Just make sure to wrap it well in plastic wrap and aluminum foil. Thaw in the fridge overnight before baking or reheating.
4. How can I tell when it’s done?
Look for a golden crust and bubbly filling. You can also check the internal temperature; it should read around 200°F (93°C) when finished.
Nutritional Info
This Stone Fruit Pie is not only comforting but also packed with the goodness of fruits! Depending on your choice of sugars and butters, a slice will typically contain approximately 300 calories, along with fiber and vitamins, especially when using a variety of colorful fruits. Enjoying it in moderation is key!
So there you have it—a delightful journey through the process of making a Stone Fruit Pie that celebrates the essence of summer. I encourage you to gather your loved ones for a baking session, because food is always better when shared. Let’s bring back those nostalgic memories, one slice at a time! Happy baking! 🍑🥧✨
PrintStone Fruit Pie
A delightful pie filled with warm, juicy slices of peaches, plums, and cherries under a buttery, flaky crust.
- Prep Time: 30 minutes
- Cook Time: 45 minutes
- Total Time: 1 hour 15 minutes
- Yield: 8 servings 1x
- Category: Dessert
- Method: Baking
- Cuisine: American
- Diet: Vegetarian
Ingredients
- 2 disks Basic All Butter Pie Dough
- 3 lbs. assorted stone fruit (peaches, plums, nectarines, etc.)
- 1/2 cup granulated sugar
- 1/4 cup brown sugar
- 2 tablespoons tapioca flour or cornstarch
- 1 teaspoon almond extract
- 1 – 7 ounce tube almond paste
- 1–2 teaspoons powdered sugar
- 1 tablespoon unsalted butter (cold and cut into ¼” cubes)
- 1 egg (lightly beaten with 2 teaspoons of water)
- 1–2 tablespoons Turbinado or sparkling sugar
Instructions
- Preheat your oven to 425°F (220°C).
- Prepare one disk of pie dough to fit your pie pan.
- Slice the stone fruit into even pieces, about 1/2-inch thick.
- Mix the sliced fruit with both sugars, tapioca flour, and almond extract.
- Add the crumbled almond paste into the fruit mixture.
- Fill the crust with the fruit mixture and dot with cold butter cubes.
- Top with the second pie dough disk and cut slits for steam to escape.
- Brush the top crust with the egg wash and sprinkle with turbinado sugar.
- Bake for 15 minutes at 425°F, then reduce to 350°F (175°C) and bake for 30-35 minutes.
- Cool for at least an hour before serving.
Notes
Serve with vanilla ice cream or whipped cream for the perfect pairing.
Nutrition
- Serving Size: 1 slice
- Calories: 300
- Sugar: 20g
- Sodium: 150mg
- Fat: 10g
- Saturated Fat: 4g
- Unsaturated Fat: 5g
- Trans Fat: 0g
- Carbohydrates: 45g
- Fiber: 3g
- Protein: 4g
- Cholesterol: 30mg
Keywords: Stone fruit pie, summer dessert, pie recipe, baking
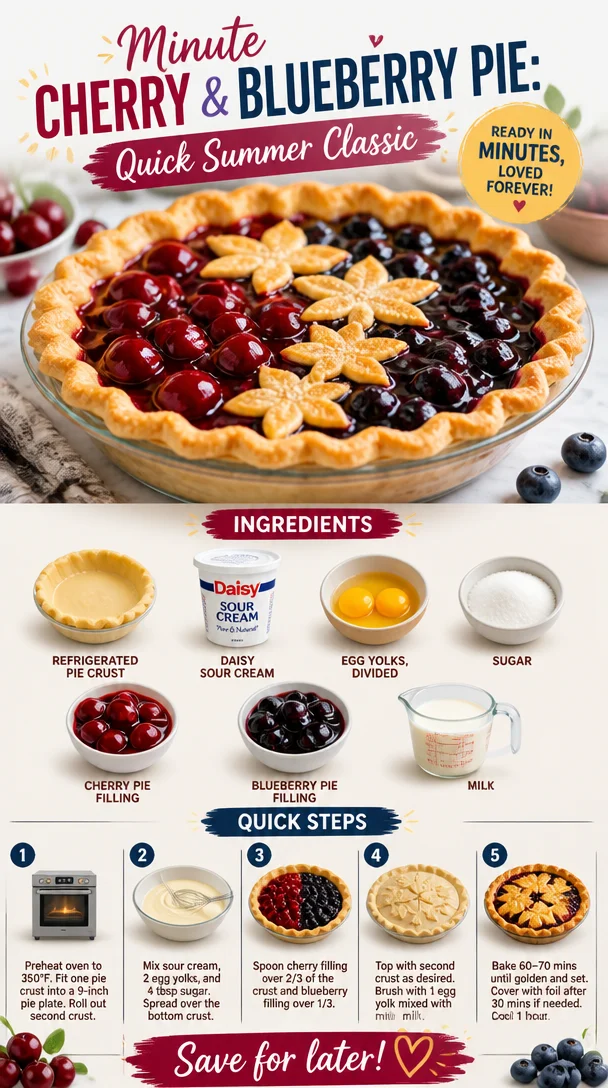
Minute Cherry & Blueberry Pie: Quick Summer Classic
Cherry and Blueberry Pie: A Wholesome Family Classic
Welcome, foodies! Today we’re diving into a beloved staple that tantalizes taste buds and warms hearts: Cherry and Blueberry Pie. This delicious dessert is a beautiful marriage of sweet cherries and luscious blueberries, all encased in a buttery, flaky crust that’s simply irresistible.
To me, pies are the ultimate symbol of comfort food. They bring back memories of family gatherings, sunny picnics, and cozy nights on the porch, watching the stars after dinner. The aroma of pie baking in the oven stirs nostalgia in the air, instantly whisking me back to my childhood and the wonderful kitchen moments shared with my grandma.
Personal Story
I vividly remember the summer my grandma decided to teach me the art of pie-making. I was about eight years old, standing on a stool so I could reach the counter. She had a way of making everything feel like a big adventure. Armed with a basket of fresh cherries and blueberries from the local farmer’s market, we set out to create the perfect pie.
With her flour-dusted apron and that twinkle in her eye, she showed me how to mix the fruits with just the right amount of sugar and lemon juice. The joy was in the journey as much as in the finished product. I learned not just how to make a pie but how love and care transform simple ingredients into something magical.
We spent the afternoon chatting, laughing, and, of course, tasting the filling as we went. The final product was a pie so delicious that I remember wanting to keep it all to myself. Sure enough, it became a family favorite, feeding not just our bellies but our souls. And every time I make this Cherry and Blueberry Pie, I’m reminded of those sunny days spent laughing in the kitchen.
Let’s create some beautiful pie memories together, shall we?
Ingredients
Here’s what you’ll need for this scrumptious Cherry and Blueberry Pie:
-
Refrigerated Pie Crust: A classic shortcut! You can make your own if you’re up for it, but don’t be afraid to grab a store-bought crust for convenience. It’ll save you time and still yield a delicious pie.
-
Daisy Sour Cream: This isn’t just for dipping! Sour cream adds an amazing creaminess and tang to your filling, balancing the sweetness of the fruits perfectly. If you’re feeling adventurous, try Greek yogurt as a substitute for a healthier twist.
-
Egg Yolks (divided): These will help bind your filling for a rich, luscious texture. Save the egg whites for breakfast or a meringue!
-
Sugar: This is your sweetener. Ground sugar (like superfine sugar) dissolves quicker, while brown sugar adds a lovely depth of flavor.
-
Cherry Pie Filling: Store-bought is fine, but if you’re using fresh cherries, you’ll need about 2 cups, pitted and halved. Just add your sugar and lemon juice!
-
Blueberry Pie Filling: Just like the cherry filling, you can grab this from the store or make your own using 2 cups of fresh blueberries. Simply cook with sugar and a little cornstarch for thickening!
-
Milk: You’ll use this to brush the crust before baking, giving you that beautiful golden finish. Almond or oat milk are excellent dairy-free options.
Step-by-Step Instructions
Now let’s get cooking! Here’s how to assemble your Cherry and Blueberry Pie step-by-step:
-
Preheat Your Oven: Set your oven to 425°F (220°C). This is essential for that perfect golden crust. A hot oven makes all the difference!
-
Prepare Your Crust: Roll out your refrigerated pie crust (if using) on a lightly floured surface until it’s about 12 inches in diameter. Don’t worry if it’s not perfect; rustic is charming!
-
Transfer to Pie Dish: Carefully place the crust in your 9-inch pie dish, pressing it gently into the edges. If you have excess dough hanging over the edge, you can trim it, but leave some for a beautiful crimped edge later!
-
Mix the Fruit Filling: In a medium bowl, combine the cherry and blueberry fillings, sugar, and 2 egg yolks. Stir until thoroughly mixed. Remember, tasting is key—adjust the sweetness to your liking!
-
Add the Sour Cream: Gently fold in the Daisy Sour Cream. This is what makes the filling so creamy and delicious. It will help to mellow the sugars and enhance the fruit flavor!
-
Fill the Pie: Spoon the fruit mixture into the prepared crust, spreading it evenly. Make sure it’s heaped nicely—this pie is all about those juicy fruit fillings!
-
Cover the Pie: If you have a second pie crust, roll it out and drape it over the filling. You can create a lattice top for a bit of flair, or simply cut slits for steam vents. Crimp the edges to seal the pie and prevent any juices from escaping.
-
Brush with Egg and Milk: Combine the remaining egg yolk with a splash of milk, and brush this mixture over the crust. This will give you that mouthwatering golden finish!
-
Bake the Pie: Place your pie on a baking sheet (to catch any drips) and bake for 25-30 minutes or until the crust is golden and the filling is bubbling. Make your kitchen smell heavenly!
-
Cool Down: Let it cool for at least an hour. I know it’s tough to wait, but this helps the filling set up beautifully.
Serving Suggestions
When it’s finally time to dig in, serve your Cherry and Blueberry Pie with a scoop of vanilla ice cream or a dollop of freshly whipped cream on top for an indulgent treat. Leftovers (if there are any!) can be enjoyed for breakfast—because why not?
Recipe Variations
Feel like mixing things up? Try one of these variations:
- Mixed Berry Delight: Swap in raspberries or blackberries for a berry medley pie.
- Peach Fusion: Add in diced peaches for a summery twist!
- Nutty Crust: Add crushed nuts to your pie crust for added texture and flavor.
- Vegan Version: Use a vegan pie crust and substitute the egg with flaxseed and the sour cream with cashew cream.
Chef’s Notes
I can’t tell you how many times this pie has been my go-to for potlucks and family gatherings. It’s a crowd-pleaser, and people always ask for the recipe (which of course, I happily share!). One time, I attempted to speed up the cooling process by placing my pie in the fridge—we ended up with a very experimental, chilly pie that didn’t quite make the cut! So learn from my mistake and let it cool at room temperature.
FAQs and Troubleshooting
Q: My pie filling is too runny. What can I do?
A: If your filling ends up too juicy, make sure you’re using enough thickening agent when making your filling. You can also try simmering it a bit on the stove with some cornstarch.
Q: How do I prevent my crust from burning?
A: If the edges of your crust are browning too fast, simply cover them with foil or use a pie shield during baking until the pie is done.
Q: Can I freeze leftover pie?
A: Absolutely! Wrap it tightly and store in the freezer for up to three months. Just remember to let it cool completely before freezing.
Q: How do I keep my crust flaky?
A: Make sure your butter or shortening is cold, and don’t overwork the dough!
Nutritional Info
While the nutritional content will vary depending on the exact ingredients you use, a single slice of Cherry and Blueberry Pie typically contains approximately:
- Calories: 320
- Fat: 16g
- Carbohydrates: 43g
- Protein: 3g
Wrapping It Up
There you have it! A delightful Cherry and Blueberry Pie that’s sure to impress family and friends while embodying the spirit of nostalgia and love. Remember, pie-making is an art, and like any art form, it’s something to enjoy and evolve over time. I can’t wait to hear your stories and see your own pie adventures. Let’s keep it fresh, simple, and seriously delicious! Happy baking!
PrintCherry and Blueberry Pie

A delicious combination of sweet cherries and luscious blueberries in a buttery, flaky crust.
- Prep Time: 15 minutes
- Cook Time: 30 minutes
- Total Time: 45 minutes
- Yield: 8 servings 1x
- Category: Dessert
- Method: Baking
- Cuisine: American
- Diet: Vegetarian
Ingredients
- 1 refrigerated pie crust
- 1 cup Daisy sour cream
- 2 egg yolks (divided)
- 3/4 cup sugar
- 2 cups cherry pie filling
- 2 cups blueberry pie filling
- 2 tablespoons milk
Instructions
- Preheat your oven to 425°F (220°C).
- Prepare your crust by rolling out the refrigerated pie crust on a lightly floured surface until about 12 inches in diameter.
- Transfer the crust into a 9-inch pie dish, pressing gently into the edges.
- Mix the cherry and blueberry fillings, sugar, and 2 egg yolks in a medium bowl until thoroughly combined.
- Add the Daisy sour cream and fold gently.
- Fill the prepared crust with the fruit mixture, spreading it evenly.
- Cover the pie with a second pie crust or create a lattice top.
- Brush the crust with the mixture of the remaining egg yolk and milk.
- Bake for 25-30 minutes or until the crust is golden and filling is bubbling.
- Cool for at least an hour before serving.
Notes
Serve with vanilla ice cream or whipped cream. Leftovers can be enjoyed for breakfast.
Nutrition
- Serving Size: 1 slice
- Calories: 320
- Sugar: 18g
- Sodium: 150mg
- Fat: 16g
- Saturated Fat: 9g
- Unsaturated Fat: 5g
- Trans Fat: 0g
- Carbohydrates: 43g
- Fiber: 2g
- Protein: 3g
- Cholesterol: 85mg
Keywords: cherry pie, blueberry pie, dessert pie, summer dessert, family recipe