
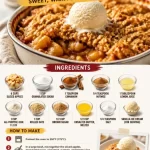
Apple Cobbler
Apple Cobbler: A Comforting Classic with a Flavorful Twist
Welcome, food lovers! Today, we’re diving into one of the ultimate comfort desserts—apple cobbler. There’s just something magical about the aroma of baked apples mixed with spices wafting through the kitchen that instantly makes you feel at home. Whether you’re hosting a cozy dinner party or simply want to treat yourself after a long day, this apple cobbler is sure to delight your taste buds and warm your soul.
A Taste of Nostalgia
Let me take you back to my childhood—hot summer afternoons spent at my grandmother’s house, where the kitchen was always bustling. I remember the sound of her antique wooden spoon clinking against the mixing bowl as she prepared her famous apple cobbler. She had a knack for turning simple ingredients into something extraordinary, and that recipe was her crown jewel. Whenever she pulled the cobbler out of the oven, the sweet, cinnamon-scented air would wrap around us like a warm hug.
On those lazy afternoons, we’d gather around the table, plates piled high with that toasty, bubbling dessert. The first scoop would always be the best—smooth, soft apples paired with a crispy topping, often dished out with a scoop of vanilla ice cream melting into it. There’s something about those memories that fills me with joy, and it inspires me to share this classic dish with all of you today. It reminds us that the kitchen can be a gathering place, a source of comfort, and a canvas for creativity.
Ingredients
Here’s what you’ll need to whip up this delightful apple cobbler. Each ingredient plays a key role in creating the perfect balance of flavor and texture.
-
6 cups sliced apples
- Apple varieties like Granny Smith, Honeycrisp, or Fuji add the perfect balance of sweetness and tartness. Don’t hesitate to mix and match!
-
1 cup granulated sugar
- This is essential for sweetening your apples. If you’re looking to cut back on sugar, you can substitute half with honey or maple syrup for a more natural option!
-
1 teaspoon cinnamon
- Cinnamon is the star spice in this recipe, bringing warmth and comfort. For an extra kick, try adding some cardamom or allspice!
-
1/4 teaspoon nutmeg
- Just a hint of nutmeg enhances the flavors beautifully. If you’re not a fan of nutmeg, feel free to leave it out.
-
1 tablespoon lemon juice
- This balances the sweetness of the apples and keeps them from browning. You can use lime juice in a pinch for a zesty twist!
-
1 cup all-purpose flour
- This forms the base of your topping. If you’re looking for a gluten-free option, almond flour or a gluten-free baking blend works wonders!
-
1 cup rolled oats
- Oats bring a chewy texture—perfect for that comforting topping. For a nutty flavor, try substituting half with chopped nuts like pecans or walnuts.
-
1/2 cup brown sugar
- This adds depth and a slight hint of caramel flavor. You can easily swap it with coconut sugar for a healthier option!
-
1/2 cup unsalted butter, melted
- Butter adds richness to the cobbler. If you’d like to lighten it up, you can use coconut oil instead for a dairy-free version.
-
1/4 teaspoon salt
- A pinch of salt enhances all the flavors in the dish, making it taste richer. Always a must!
-
Vanilla ice cream (for serving)
- A scoop of creamy vanilla ice cream is a classic complement. Try caramel or cinnamon ice cream for an extra treat!
Step-by-Step Instructions
Now that we have our ingredients ready, it’s time to get to the fun part—cooking! Follow these steps to create a mouthwatering apple cobbler that’ll have everyone begging for seconds.
-
Preheat Your Oven:
- Preheat your oven to 350°F (175°C). This is crucial because you want your cobbler to bake evenly and achieve that golden, crispy topping.
-
Prepare the Apples:
- In a large mixing bowl, toss together the sliced apples, granulated sugar, cinnamon, nutmeg, and lemon juice until the apples are well-coated.
- Tip: If you’re using different apple varieties, combine them for a more layered flavor profile. The key here is to let them mingle with the sugar and spices for at least 10 minutes!
-
Make the Topping:
- In another bowl, mix together the flour, oats, brown sugar, salt, and melted butter.
- Chef’s Hack: Use your hands to crumble the mixture. It might feel messy, but that’s where the magic happens! You want a crumbly texture that will bake up crispy.
-
Combine Layers:
- Pour the apple mixture into a greased 9×13-inch baking dish, making sure to spread it evenly. Sprinkle the topping mixture generously over the apples.
- Tip: Don’t worry about covering every inch. Leaving some gaps allows the heat to penetrate and creates those delightful crispy bits!
-
Bake to Perfection:
- Place your baking dish in the oven and bake for about 40-45 minutes or until the apples are bubbling and the topping is golden brown.
- Pro Tip: Keep an eye on it towards the end of the baking time—you want it bubbly and golden, but not burnt!
-
Cool and Serve:
- Allow the cobbler to cool for 10-15 minutes before serving. This sets everything and makes it easier to scoop out.
- Nothing feels better than serving warm cobbler topped with that creamy ice cream as it slowly melts into the sweet filling!
Serving Suggestions
For the ultimate presentation, serve your warm apple cobbler in individual ramekins or a big scoop in cozy bowls. Top each serving with a generous scoop of vanilla ice cream, and perhaps a sprig of mint for a pop of color. Drizzle with caramel sauce if you’re feeling a little extra! It’s all about creating that inviting, shareable moment around the table.
Recipe Variations
-
Berry-Apple Delight:
- Add mixed berries (like blueberries or raspberries) to your apple mixture for a sweet and tangy burst of flavor!
-
Caramel Swirl:
- Drizzle some caramel sauce over the apple layer before adding the topping for an indulgent twist.
-
Nutty Crumble:
- Include chopped pecans or walnuts in the crumble topping for added crunch and nuttiness.
-
Spiced Pear Cobbler:
- Swap out some apples for ripe pears for a different but equally delicious flavor combination.
-
Oatless Option:
- For a lighter topping, substitute the oats with crushed graham crackers mixed with a bit of butter for that classic dessert vibe!
Chef’s Notes
This apple cobbler recipe has been a staple in my kitchen for years, and it’s evolved over time—just like us! I started with my grandmother’s version, which was perfectly lovely but lacked a bit of texture. By incorporating oats and tweaking the spices, I created my own spin. One thing remains the same though: it’s still about those cozy memories and the joy of sharing this dessert with family and friends.
Now, imagine pulling this lively cobbler out of the oven and the hearts it brings together—each slice tells a story and adds a note of warmth to any gathering. It’s truly a simple yet profound expression of love!
FAQs and Troubleshooting
1. What if my apples are too tart?
- If your apples are too tart, consider adding a bit more sugar to balance the flavors. A drizzle of honey or maple syrup can also help enhance the sweetness!
2. My cobbler topping is too dry. What should I do?
- If your topping feels too dry before baking, try adding a tablespoon or two more melted butter until it reaches a crumbly but moist consistency.
3. Can I make this ahead of time?
- Absolutely! You can prepare both the apple filling and the topping a day ahead. Just assemble and bake when you’re ready to serve for that freshly-baked goodness!
4. How do I store leftovers?
- Store any leftovers in an airtight container in the refrigerator for 3-4 days. To reheat, pop it in the oven at 350°F (175°C) until warmed through—or enjoy it cold (though I highly recommend it warm!).
Nutritional Info (Optional)
For those who might be keeping track, a typical serving of apple cobbler (about 1/8 of the pan) contains:
- Calories: Approximately 250-300
- Protein: 3g
- Fat: 12g
- Carbohydrates: 40g
- Fiber: 2g
- Sugar: 20g
Now you know all the ins and outs of making a delightful apple cobbler! The best part? It’s as easy as it is delicious. I can’t wait for you to create your own memories with this dish. So grab your aprons, gather your ingredients, and let the magic begin! Happy baking! 🍏🥧
PrintApple Cobbler
A comforting and classic apple cobbler with a delicious twist.
- Prep Time: 15 minutes
- Cook Time: 45 minutes
- Total Time: 60 minutes
- Yield: 8 servings 1x
- Category: Dessert
- Method: Baking
- Cuisine: American
- Diet: Vegetarian
Ingredients
- 6 cups sliced apples
- 1 cup granulated sugar
- 1 teaspoon cinnamon
- 1/4 teaspoon nutmeg
- 1 tablespoon lemon juice
- 1 cup all-purpose flour
- 1 cup rolled oats
- 1/2 cup brown sugar
- 1/2 cup unsalted butter, melted
- 1/4 teaspoon salt
- Vanilla ice cream (for serving)
Instructions
- Preheat your oven to 350°F (175°C).
- In a large mixing bowl, toss together the sliced apples, granulated sugar, cinnamon, nutmeg, and lemon juice until the apples are well-coated.
- Mix together the flour, oats, brown sugar, salt, and melted butter in another bowl.
- Pour the apple mixture into a greased 9×13-inch baking dish.
- Sprinkle the topping mixture generously over the apples.
- Bake for about 40-45 minutes or until the apples are bubbling and the topping is golden brown.
- Allow the cobbler to cool for 10-15 minutes before serving.
Notes
Serve warm topped with vanilla ice cream for the ultimate treat. You can also drizzle with caramel sauce for extra sweetness!
Nutrition
- Serving Size: 1 serving
- Calories: 275
- Sugar: 20g
- Sodium: 100mg
- Fat: 12g
- Saturated Fat: 7g
- Unsaturated Fat: 4g
- Trans Fat: 0g
- Carbohydrates: 40g
- Fiber: 3g
- Protein: 3g
- Cholesterol: 30mg
Keywords: apple cobbler, dessert, comfort food, baking, thanksgiving dessert
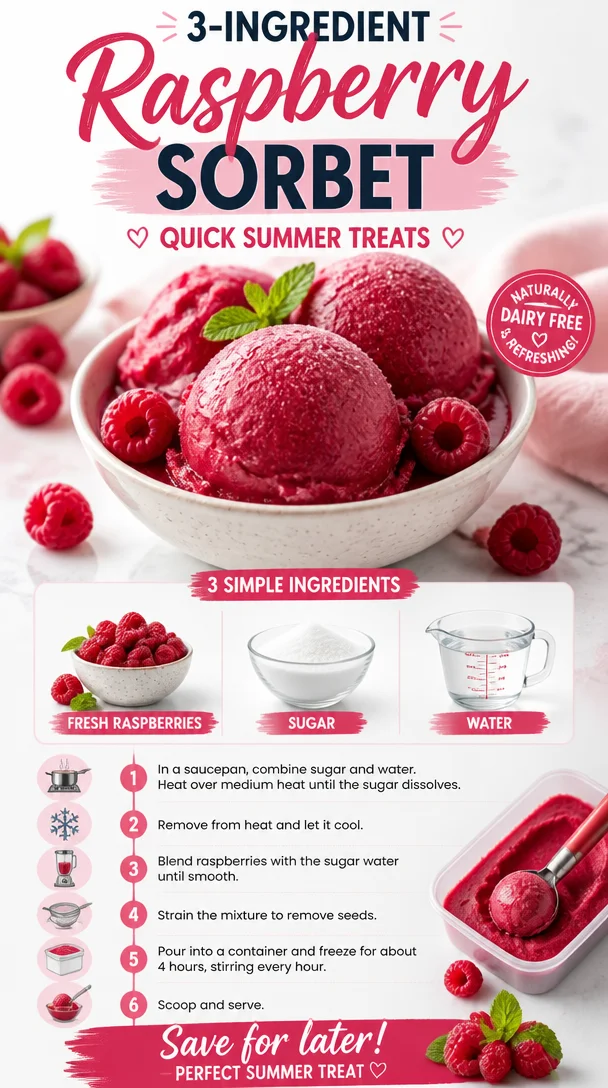
Ingredient Raspberry Sorbet: Quick Summer Treats
Refreshed and Revitalized: How to Make Perfect Raspberry Sorbet
Nothing screams summer like a refreshing scoop of homemade raspberry sorbet. It’s that perfect treat that strikes a balance between indulgent and guilt-free, and the best part? You can whip it up in your own kitchen with just a few simple ingredients. Today, we’re diving into the juicy world of raspberry sorbet—trust me, this recipe will soon become your go-to for cooling off on warm days or impressing guests at summer gatherings.
But first, let’s talk about why raspberry sorbet holds a special place in my heart. Picture this: it’s a sunny afternoon, the kind of day where the air feels light and the sun casts a golden glow over everything. As a child, I spent those days at my grandma’s house, where she always managed to have the best treats stashed away in her freezer. One of my favorites? Her homemade raspberry sorbet. It was vibrant, so bright in color, and equally bursting with flavor. Each spoonful transported me to berry fields, where I could imagine myself picking ripe, juicy raspberries under the warm sun.
When I asked her how she made it, she chuckled and said, “Oh dear, it’s much simpler than you think! Just fresh raspberries, some sugar, and a little bit of water. It’s all about letting the fresh fruit shine.” And shine it did! The moments spent savoring her sorbet with the laughter and joy of family surrounding me made those summers unforgettable. Now, I’m excited to share her simple yet delightful recipe with all of you so that you can create your own sweet memories!
Ingredients
Here’s what you need to make this delightful raspberry sorbet:
-
2 cups fresh raspberries
Raspberries are the star of the show! These little gems are not only delicious, but they’re also packed with antioxidants and vitamins. If fresh raspberries are unavailable, you can substitute with frozen raspberries—just thaw them before blending. -
1 cup sugar
Sugar helps extract the sweetness from the berries and gives the sorbet its signature texture. If you’re looking for a healthier option, consider using honey or agave syrup, though you may need to adjust the quantity based on taste. -
1 cup water
The water helps create a smoother texture in the sorbet. If you’re feeling adventurous, you could use coconut water or a splash of fruit juice to introduce a hint of extra flavor.
Step-by-Step Instructions
Ready to get started? Let’s whip up some raspberry sorbet!
-
Prepare the Raspberries
Start by rinsing the fresh raspberries gently under cool water. Be careful not to squish them! Pat them dry with a paper towel or clean kitchen cloth. Fresh berries are the heart of this recipe, so starting with quality fruit is key. -
Make the Simple Syrup
In a saucepan, combine 1 cup of sugar and 1 cup of water over medium heat. Stir until the sugar is completely dissolved. This will only take a few minutes. Gently simmer if you want to bring out the flavors, but there’s no need to boil. Once the syrup is clear and has thickened slightly, remove it from the heat and let it cool for about 10 minutes.Chef’s Tip: You can infuse your simple syrup with a splash of lemon juice or mint leaves for an added twist!
-
Blend it Up
Once your syrup has cooled, combine the fresh raspberries in a blender or food processor. Pour the cooled syrup over the raspberries and blend until you achieve a smooth mixture. It should look luscious and bright!Chef’s Insight: If you prefer a chunkier texture, you can pulse the blender instead of blending continuously. This will retain some raspberry seeds that give the sorbet a delightful crunch.
-
Strain the Mixture
For a super smooth sorbet, strain the blended mixture through a fine-mesh sieve into a bowl. This will help remove the seeds, resulting in a creamy texture that’s perfect for scooping. Use a spatula to press the mixture, getting every last drop of sorbet goodness. -
Chill Out Time
Pour the strained mixture into an airtight container and place it in the freezer. Allow it to freeze for about 4-6 hours, or until it’s firm yet scoopable. If you plan ahead, you can prep this the night before for a really easy dessert the next day.Pro Tip: Stir the mixture every hour during freezing to help break up any ice crystals and achieve that silky sorbet texture.
-
Scoop and Serve
Once the sorbet is frozen and ready to be enjoyed, take it out and let it sit at room temperature for a few minutes before attempting to scoop. It’ll be more pliable, making it easier to dish out into bowls or cones.
Serving Suggestions
When it comes to serving raspberry sorbet, a little creativity goes a long way! I love serving it in chilled bowls garnished with fresh mint leaves or a sprinkle of lemon zest. If you’re feeling fancy, consider creating a sorbet float by layering it with sparkling water or lemonade—talk about a refreshing treat!
Recipe Variations
- Berry Blast: Swap out some of the raspberries for other berries like strawberries, blueberries, or blackberries for a mixed berry sorbet.
- Citrus Burst: Add a squeeze of fresh lemon or lime juice into the mix for a zesty kick that brightens up those raspberry flavors.
- Tropical Twist: Incorporate some coconut milk for added creaminess, transforming your sorbet into a tropical delight.
- Herbaceous Infusion: A hint of basil or rosemary can elevate the flavors, making for a sophisticated sorbet perfect for dinner parties.
- Chocolate Drizzle: Once served, drizzle some melted dark chocolate on top for an indulgent treat that balances the tartness of the raspberries.
Chef’s Notes
Every time I make raspberry sorbet, I’m reminded of my grandma and her wisdom—keeping recipes simple and letting the natural flavors shine. What I love about this sorbet is that it’s not just a sweet snack; it’s an experience to enjoy with loved ones. Over the years, I’ve played with this basic recipe, infusing fresh herbs or creating flavors that evoke special moments. No matter how you choose to make it, the joy of creating and sharing it is what truly matters.
FAQs and Troubleshooting
Q: My sorbet turned out too icy. What happened?
A: If your sorbet is icy, this often happens because it hasn’t been stirred enough while freezing. Next time, be sure to stir every hour or consider using an ice cream maker for a creamier texture.
Q: Can I use frozen raspberries instead of fresh?
A: Absolutely! Just be sure to thaw them slightly before blending. Frozen fruit can often yield even more intense flavor!
Q: How can I store leftover sorbet?
A: Store any leftover sorbet in an airtight container in the freezer. To prevent ice crystals from forming, ensure it’s tightly sealed.
Q: Can I use a different type of sweetener?
A: Yes! Honey or agave syrup works well, but remember to adjust the quantity to your desired sweetness level since they are sweeter than sugar.
Nutritional Info
(Serving Size: 1/2 cup, Approximate values)
- Calories: 120
- Total Fat: 0g
- Saturated Fat: 0g
- Cholesterol: 0mg
- Sodium: 0mg
- Total Carbohydrates: 31g
- Dietary Fiber: 3g
- Sugars: 27g
- Protein: 1g
Raspberry sorbet is not just a dessert; it’s a celebration of flavors and memories that we create in the kitchen. So roll up those sleeves, grab your ingredients, and let your culinary adventure begin. Here’s to creating fresh, flavorful moments—one scoop at a time!
PrintPerfect Raspberry Sorbet
A refreshing homemade raspberry sorbet that balances indulgence with guilt-free enjoyment, perfect for summer days.
- Prep Time: 10 minutes
- Cook Time: 10 minutes
- Total Time: 360 minutes
- Yield: 4 servings 1x
- Category: Dessert
- Method: Freezing
- Cuisine: American
- Diet: Vegan
Ingredients
- 2 cups fresh raspberries
- 1 cup sugar
- 1 cup water
Instructions
- Prepare the raspberries by rinsing them gently under cool water and patting them dry.
- Make the simple syrup by combining 1 cup of sugar and 1 cup of water in a saucepan over medium heat until dissolved.
- Blend the cooled syrup with the fresh raspberries until smooth.
- Strain the mixture through a fine-mesh sieve into a bowl to remove seeds.
- Chill the strained mixture in an airtight container in the freezer for about 4-6 hours.
- Scoop the sorbet and serve in chilled bowls, garnished as desired.
Notes
Stir the mixture every hour during freezing to prevent ice crystallization.
Nutrition
- Serving Size: 1/2 cup
- Calories: 120
- Sugar: 27g
- Sodium: 0mg
- Fat: 0g
- Saturated Fat: 0g
- Unsaturated Fat: 0g
- Trans Fat: 0g
- Carbohydrates: 31g
- Fiber: 3g
- Protein: 1g
- Cholesterol: 0mg
Keywords: raspberry, sorbet, summer dessert, easy dessert, vegan dessert
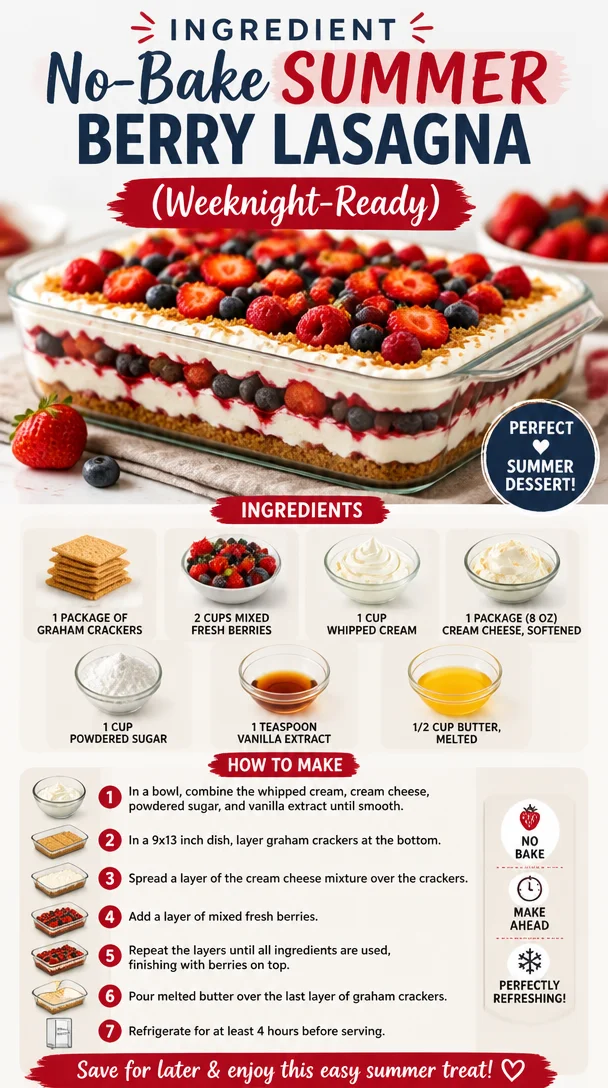
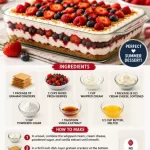
Ingredient No-Bake Summer Berry Lasagna (Weeknight-Ready)
No-Bake Summer Berry Lasagna: A Delightful Twist on a Classic
When the summer sun is shining, there’s nothing quite like the fresh taste of berries to brighten your day. And what better way to celebrate the season than with a dessert that’s not only simple to whip up but also a showstopper at any summer gathering? Welcome to the world of No-Bake Summer Berry Lasagna!
Picture this: layer upon layer of creamy goodness, tart fresh berries, and sweet, crunchy graham crackers weaving together to create a dessert that feels indulgently rich while being refreshingly light. This is the kind of dish that will have your friends oohing and aahing, wondering how you pulled it off without turning on the oven.
What I love about this recipe, aside from its incredible taste, is the way it brings people together. No-Bake Summer Berry Lasagna evokes memories of summer barbecues, potlucks, and family gatherings. You know those warm evenings where laughter fills the air and everyone is sharing stories over delicious food? That’s what this dessert is all about.
So, let’s dive into how you can create your very own No-Bake Summer Berry Lasagna. Trust me, once you make it, you’ll never look at a traditional lasagna the same way again.
A Slice of Nostalgia
Growing up, my family would gather every summer for what we called "Berry Days." My mom, armed with fresh berries from our garden, would invite neighbors over for a day of berry picking, baking, and laughter. We would rush inside, red-stained fingers from too many sweet-tart treats, and transform those freshly picked berries into all sorts of delicious concoctions.
Among all those cherished recipes, my favorite was this No-Bake Summer Berry Lasagna. I remember the first time I helped make it; the messy combinations of cream cheese and whipped cream, the sweet scent of berries wafting through the kitchen, and the fun of layering it all up like a sweet puzzle! It was an event, a celebration of summer, and an excuse to eat dessert first.
Every bite evokes those nostalgic summer afternoons filled with chatter, laughter, and a whole lot of love. And now, it’s your turn to create those same memories.
Ingredients
Here’s what you’ll need to make this scrumptious No-Bake Summer Berry Lasagna:
-
1 package of graham crackers
The base of your lasagna. These create that perfect crispy layer! Use cinnamon or honey variety for a twist. -
2 cups mixed fresh berries
A delightful combination of strawberries, blueberries, and raspberries for freshness. You can substitute with any berries you love! -
1 cup whipped cream
Adds a light and fluffy texture. If you’re short on time, store-bought whipped cream works; just make sure it’s light and airy! -
1 package (8 oz) cream cheese, softened
This creamy base is the heart of the lasagna. Make sure it’s soft for an easy mix. You can swap with a vegan cream cheese for a dairy-free option! -
1 cup powdered sugar
Sweetens up the cream cheese mixture. For a healthier alternative, you can use coconut sugar, which will add a hint of caramel flavor. -
1 teaspoon vanilla extract
Adds a lovely depth of flavor. Always use pure vanilla extract for the best taste! -
1/2 cup butter, melted
Helps hold the graham cracker crust together. If you’re looking for a lighter option, melted coconut oil works well here too!
Step-by-Step Instructions
-
Prepare the Cream Cheese Mixture:
In a large mixing bowl, beat the softened cream cheese until smooth. Add in the powdered sugar and vanilla extract, and continue mixing until it’s completely blended. You want a creamy, luscious texture, so don’t rush this step! Pro tip: Use an electric mixer to get that light airiness. -
Whip the Cream:
In a separate bowl, whip the cream until soft peaks form. You want it fluffy but still spreadable. For a hint of sweetness, consider adding a tablespoon of powdered sugar to the cream while whipping. -
Combine Cream Mixtures:
Gently fold the whipped cream into the cream cheese mixture. Here’s where the magic happens! Mix until just combined—no need to overdo it. You want to keep that puffiness from the cream. -
Prepare the Dish:
Grab a 9×13-inch glass dish (or whatever you have on hand). Start by laying down a single layer of graham crackers at the bottom. Break them if necessary to fit! -
Add the Cream Layer:
Spread about half of the cream cheese mixture evenly over the graham crackers. This is your first layer of creamy goodness. -
Berry Time:
Scatter one cup of your mixed berries over the cream cheese layer. Feel free to mix and match! Hint: crushing some of the berries slightly under your fingers releases even more flavor. -
Repeat Layers:
Repeat the process! Another layer of graham crackers, followed by the rest of the cream cheese mixture, and another cup of berries. You’re building a delicious masterpiece here! -
Top It Off:
Finish with a final layer of graham crackers and a sprinkle of fresh berries on top for a stunning presentation. -
Chill:
Cover the dish with plastic wrap and let it chill in the refrigerator for at least four hours, or overnight if you can wait! This allows all those flavors to meld beautifully. -
Serve and Enjoy:
When you’re ready to serve, slice into squares and watch as everyone digs into this delightful summer treat!
Serving Suggestions
To serve, I like to plate individual squares on a cute dessert plate. A sprinkle of mint on top provides a lovely color contrast and a fresh pop of flavor. You can also drizzle some berry sauce or a sprinkle of crushed graham crackers for added texture. Don’t forget a scoop of vanilla ice cream on the side for a truly decadent experience!
Recipe Variations
Feeling adventurous? Here are some creative twists to try with your No-Bake Summer Berry Lasagna:
- Citrus Burst: Add a bit of lemon or orange zest to the cream cheese mixture for a zesty kick.
- Chocolate Lovers: Sprinkle mini chocolate chips between layers or add cocoa powder to the whipped cream for a chocolatey twist.
- Nutty Crunch: Layer in chopped nuts like almonds or walnuts for a delightful crunch.
- Peachy Keen: Replace some of the berries with fresh peach slices for a juicy summer variation!
- Gluten-Free: Swap graham crackers with gluten-free cookies or your favorite gluten-free cracker for a suitable alternative.
Chef’s Notes
I’ve made this No-Bake Summer Berry Lasagna countless times, and it’s always a crowd-pleaser! One year, I decided to be adventurous and dyed the cream cheese mixture with a hint of pink food coloring for extra fun—it looked fabulous, though my kids still debate whether they liked it better in its natural state!
Cooking is about experimentation and finding what works for you. I encourage you to make this dessert your own; each variation has its own charm.
FAQs and Troubleshooting
1. Why did my cream cheese mixture turn out lumpy?
Make sure your cream cheese is truly softened. If it’s still cold from the fridge, it won’t mix well. Try placing it in the microwave for a few seconds or leaving it out for a bit longer.
2. Can I make this dessert ahead of time?
Absolutely! In fact, it’s best when made a day ahead. Just store it tightly wrapped in the fridge, and it will taste delicious after the flavors meld.
3. What if I don’t have fresh berries?
You can absolutely use frozen berries, but make sure to thaw and drain them first to avoid excess moisture. Canned berries work in a pinch too!
4. How should I store leftovers?
Keep any leftovers in an airtight container in the fridge. It will last for 2-3 days, though I doubt there will be much left with how good it is!
Nutritional Info
(Optional):
Per serving (based on 12 servings): Approximately 220 calories, 9g fat, 32g carbohydrates, 2g protein.
Whether you’re reminiscing about summer gatherings or getting together with friends for a fun evening, this No-Bake Summer Berry Lasagna is a vibrant, flavorful dessert that’s sure to bring joy to your table. So gather up those fresh berries, roll up your sleeves, and let’s get cooking! Here’s to delicious memories and flavor-filled adventures! 🍓💖
PrintNo-Bake Summer Berry Lasagna
A delightful twist on a classic dessert featuring layers of creamy goodness, fresh berries, and crunchy graham crackers, perfect for summer gatherings.
- Prep Time: 20 minutes
- Cook Time: 0 minutes
- Total Time: 240 minutes
- Yield: 12 servings 1x
- Category: Dessert
- Method: No-Bake
- Cuisine: American
- Diet: Vegetarian
Ingredients
- 1 package of graham crackers
- 2 cups mixed fresh berries (strawberries, blueberries, raspberries)
- 1 cup whipped cream
- 1 package (8 oz) cream cheese, softened
- 1 cup powdered sugar
- 1 teaspoon vanilla extract
- 1/2 cup butter, melted
Instructions
- Prepare the Cream Cheese Mixture: In a large mixing bowl, beat the softened cream cheese until smooth. Add in the powdered sugar and vanilla extract, and continue mixing until completely blended.
- Whip the Cream: In a separate bowl, whip the cream until soft peaks form.
- Combine Cream Mixtures: Gently fold the whipped cream into the cream cheese mixture until just combined.
- Prepare the Dish: Grab a 9×13-inch glass dish and lay down a single layer of graham crackers at the bottom.
- Add the Cream Layer: Spread half of the cream cheese mixture evenly over the graham crackers.
- Berry Time: Scatter one cup of mixed berries over the cream cheese layer.
- Repeat Layers: Add another layer of graham crackers followed by the rest of the cream cheese mixture and another cup of berries.
- Top It Off: Finish with a final layer of graham crackers and a sprinkle of fresh berries on top.
- Chill: Cover the dish with plastic wrap and let it chill in the refrigerator for at least 240 minutes (4 hours) or overnight.
- Serve and Enjoy: Slice into squares and serve.
Notes
For extra flavor, consider adding citrus zest or chocolate chips. This dessert can be made a day ahead for the best taste.
Nutrition
- Serving Size: 1 serving
- Calories: 220
- Sugar: 12g
- Sodium: 200mg
- Fat: 9g
- Saturated Fat: 5g
- Unsaturated Fat: 3g
- Trans Fat: 0g
- Carbohydrates: 32g
- Fiber: 2g
- Protein: 2g
- Cholesterol: 30mg
Keywords: no-bake dessert, summer dessert, berry lasagna, refreshing dessert, easy dessert
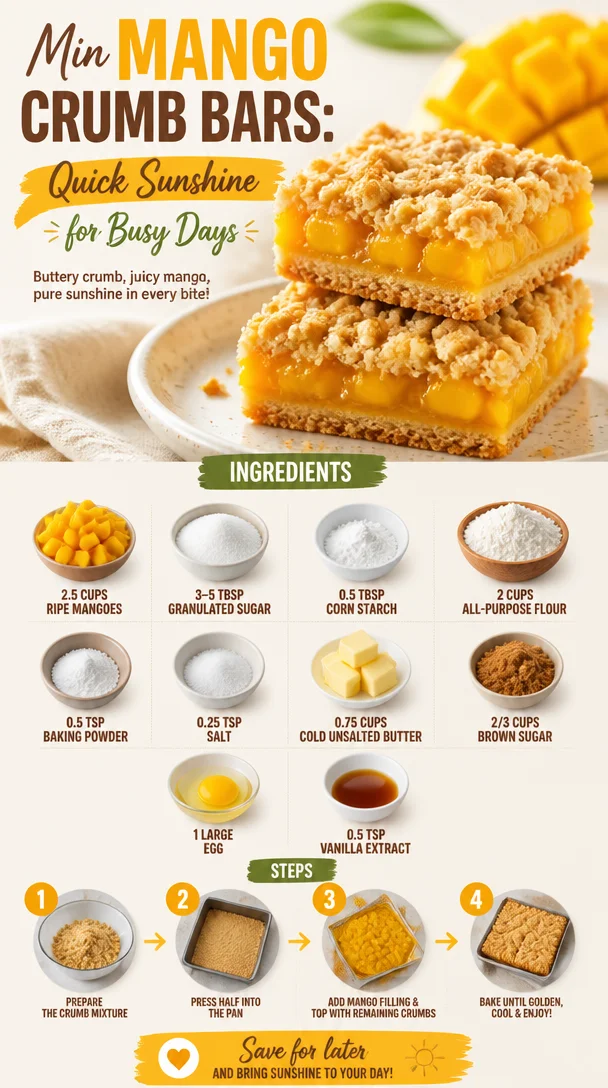
Min Mango Crumb Bars: Quick Sunshine for Busy Days
Irresistible Mango Crumb Bars That Brighten Your Day
Welcome to a slice of sunshine right in your kitchen! Today, we’re diving into a delightful treat that’s as vibrant as a day at the beach: Mango Crumb Bars. Picture this: a buttery, crumbly crust holding a luscious mango filling that dances on your taste buds with a burst of tropical goodness. It’s such a joy to bake with ripe, sweet mangoes, and when you combine them with a crumbly topping, you get a dessert that’s perfect for any occasion—be it a picnic, a potluck, or just a cozy afternoon at home.
These bars capture the essence of summer in every bite. They’re easy to make, and I promise you’ll want to whip them up over and over again! There’s nothing quite like that first bite—the sweetness of the mango combined with the buttery crust is simply heavenly. Whether you’re savoring them with your morning coffee or serving them at a gathering, these bars will brighten up your day.
So grab your apron, put on your favorite playlist, and let’s create something that will not only tantalize your taste buds but also warm your heart. Ready to make some mango magic? Let’s get started!
Personal Story
Let me take you back to my childhood. Every summer, my family would head to the local farmer’s market, and I would eagerly await the moment I could dive into a delicious mango. My mom would always buy a basketful of these golden gems, and she had this incredible knack for selecting the ripest ones. We’d sit in the backyard with the sun shining down, juices dripping from our fingers as we devoured those sweet, juicy mangoes.
One day, my mom and I decided to get creative and turned our favorite fruits into a dessert. We mixed the mango with some sugar and a touch of flour, and poured it over a crumbly base. Let me tell you, it was magic! That random kitchen adventure became a cherished memory and the spark for my love of baking. Every time I make these Mango Crumb Bars, I’m reminded of those lazy summer afternoons filled with laughter, family, and the irresistible aroma of fresh mangoes. It’s funny how one simple recipe can carry so much nostalgia and joy!
Ingredients
Here’s what you’ll need to make your own irresistible Mango Crumb Bars:
-
2.5 cups ripe mangoes
(The sweeter the mangoes, the more delightful the filling! Look for those soft, fragrant fruits for the best flavor.) -
3-5 tbsp granulated sugar
(Adjust based on the ripeness of your mangoes for a perfect sweet balance. Riper mangoes will need less sugar, while firmer ones may require a touch more.) -
0.5 tbsp corn starch
(This helps thicken the filling, ensuring it doesn’t run when baked. It’s like magic in your baking!) -
2 cups all-purpose flour
(The base for a sturdy yet soft crumb that holds everything together. For a gluten-free option, try using almond flour but adjust the liquid slightly.) -
0.5 tsp baking powder
(This ingredient gives your crust a light and airy texture—because who wants a dense crust?) -
0.25 tsp salt
(Salt enhances the overall flavor profile of the Mango Crumb Bars. Don’t skip it!) -
0.75 cups cold unsalted butter
(Cold butter creates that irresistibly flaky texture we all love. Try to keep it chilled until it’s time to mix!) -
2/3 cups brown sugar
(Adds a rich, caramel flavor that perfectly complements the mango filling. It’s the secret sauce of scrumptiousness!) -
1 large egg
(Binds the ingredients together while contributing to that tender crumb—no dry bars here!) -
0.5 tsp vanilla extract
(A touch of vanilla elevates the flavor to new heights. Because really, who can resist vanilla?)
Step-by-Step Instructions
-
Preheat your oven: Start by preheating your oven to 350°F (175°C). This way, when you’re done mixing, your oven is ready to bake those bars to golden perfection!
-
Prepare your pan: Line an 8×8 square baking pan with parchment paper, allowing some overhang on the sides. This makes for easy removal later—trust me, you’ll thank yourself!
-
Mix the filling: In a mixing bowl, combine your chopped ripe mangoes, 3 tablespoons of granulated sugar, and corn starch. Stir gently until the mangoes are well coated. Let this sit while you prepare the crust. This step ensures the fruit releases just a bit of juice, setting the stage for a delicious filling.
-
Make the crust: In a large bowl, whisk together the all-purpose flour, baking powder, and salt. In another bowl, cream the cold unsalted butter and brown sugar until light and fluffy—about 2 minutes. Adding the egg and vanilla extract, mix until combined.
-
Combine wet and dry: Add your flour mixture to the wet ingredients, stirring until crumbly and just combined. You want to retain some texture—overmixing can lead to tough bars!
-
Assemble the bars: Press about two-thirds of the crumb mixture into the prepared baking pan to form a crust. Use your hands and make sure it’s evenly distributed.
-
Pour in the filling: Carefully pour your mango mixture over the crust. Then sprinkle the remaining crumb mixture on top—it should be clumpy and not completely uniform for that lovely rustic look!
-
Bake: Bake in the preheated oven for about 30-35 minutes, or until the top is golden brown and the filling is bubbly. You’ll know they’re ready when your kitchen smells heavenly!
-
Cool and slice: Allow the bars to cool in the pan for at least 10 minutes before using the parchment overhang to lift them out. Transfer to a wire rack and let cool completely before slicing. Trust me, this will prevent the filling from oozing out.
Serving Suggestions
To serve these delightful Mango Crumb Bars, cut them into squares and dust a bit of powdered sugar on top for an elegant finish. Pair them with a scoop of vanilla ice cream or a dollop of whipped cream for an indulgent treat! A sprig of fresh mint as a garnish will add a pop of color and a fresh aroma. Enjoy them with a cup of tea or coffee, and let the flavors transport you to a tropical paradise!
Recipe Variations
-
Coconut Mango Crumb Bars: Incorporate shredded coconut into the crumb topping for a beachy twist.
-
Spicy Mango Crumb Bars: Add a pinch of cayenne pepper to the mango filling for a surprising kick that balances the sweetness.
-
Mixed Fruit Crumb Bars: Swap half of the mango for other fruit like peaches or berries for a delightful fruit medley.
-
Gluten-Free Option: Use an all-purpose gluten-free flour blend in place of regular flour for a gluten-free delight.
Chef’s Notes
As I’ve honed this recipe over time, I’ve played around with different fruits and toppings. You wouldn’t believe the fun I’ve had experimenting! One time, while brainstorming, I accidentally mixed in some cinnamon, and it became a family favorite! If you ever have an “oops” moment in the kitchen, embrace it! Some of my best recipes have come from happy accidents, so don’t be afraid to make this your own.
FAQs and Troubleshooting
1. Why are my crumb bars too crumbly?
If your crumb mixture is too dry, it could be that the butter wasn’t cold enough or you accidentally added too much flour. Always measure flour accurately—spoon it into your cup and level it off!
2. My mango filling is too runny. What’s wrong?
Make sure to use corn starch and allow the filling to sit for a few minutes before baking. If your mangoes are very juicy, you might need to adjust the amount of corn starch or try a thicker fruit next time.
3. Can I use frozen mangoes?
Yes, you can! Just ensure you thaw them, drain excess liquid, and chop them before use. Frozen mangoes can be a great backup when you don’t have fresh ones!
4. How do I store the leftover bars?
Keep them in an airtight container in the refrigerator for up to a week. They can also be frozen for up to three months, but let them cool completely before freezing.
Now that you have everything you need, it’s your turn to create these Mango Crumb Bars that are sure to brighten any day. Happy baking, and may your kitchen be filled with love and laughter!
PrintIrresistible Mango Crumb Bars
Delightful Mango Crumb Bars featuring a buttery crust and luscious mango filling, perfect for any occasion.
- Prep Time: 15 minutes
- Cook Time: 35 minutes
- Total Time: 50 minutes
- Yield: 16 servings 1x
- Category: Dessert
- Method: Baking
- Cuisine: American
- Diet: Vegetarian
Ingredients
- 2.5 cups ripe mangoes
- 3–5 tbsp granulated sugar
- 0.5 tbsp corn starch
- 2 cups all-purpose flour
- 0.5 tsp baking powder
- 0.25 tsp salt
- 0.75 cups cold unsalted butter
- 2/3 cups brown sugar
- 1 large egg
- 0.5 tsp vanilla extract
Instructions
- Preheat your oven to 350°F (175°C).
- Line an 8×8 square baking pan with parchment paper.
- Combine chopped ripe mangoes, 3 tablespoons of granulated sugar, and corn starch in a mixing bowl.
- Whisk together all-purpose flour, baking powder, and salt in a large bowl.
- Cream cold unsalted butter and brown sugar until light and fluffy.
- Add the egg and vanilla extract, mixing until combined.
- Stir the flour mixture into the wet ingredients until crumbly and just combined.
- Press two-thirds of the crumb mixture into the prepared baking pan to form a crust.
- Pour your mango mixture over the crust, then sprinkle the remaining crumb mixture on top.
- Bake for 30-35 minutes or until the top is golden brown and the filling is bubbly.
- Cool in the pan for at least 10 minutes before using the parchment overhang to lift them out.
- Let cool completely before slicing.
Notes
For a sweet twist, dust with powdered sugar before serving. Pair with vanilla ice cream for an extra treat!
Nutrition
- Serving Size: 1 square
- Calories: 250
- Sugar: 12g
- Sodium: 150mg
- Fat: 10g
- Saturated Fat: 6g
- Unsaturated Fat: 4g
- Trans Fat: 0g
- Carbohydrates: 33g
- Fiber: 2g
- Protein: 3g
- Cholesterol: 30mg
Keywords: Mango Crumb Bars, dessert recipe, summer treat, baking recipe
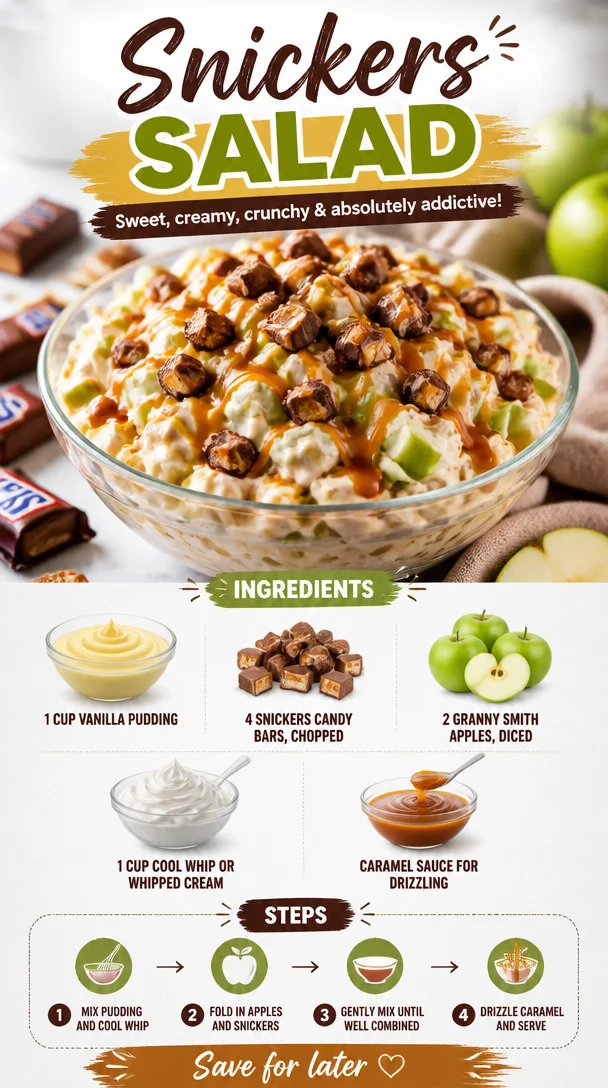
Snickers Salad
Snickers Salad: A Sweet, Crunchy Treat You’ll Love!
Are you ready to take your taste buds on a delightful adventure? Welcome to the world of Snickers Salad—a scrumptiously sweet dish that will have everyone asking for seconds! When I first stumbled upon this recipe as a kid during a family gathering, I thought it was too good to be true. This isn’t your ordinary salad; it’s sweet, crunchy, and absurdly easy to make. I remember watching my aunt whip this up, tossing Snickers, apples, and whipped cream together like it was the most natural thing in the world. I mean, who wouldn’t want a salad where candy is a star player?
You might be wondering—salad? Candy? Apples? This delightful concoction is often served as a dessert, and it’s incredibly versatile, making it perfect for every occasion. Whether you’re potlucking, celebrating a birthday, or just treating yourself on a Wednesday, Snickers Salad fits the bill. It’s like a scoop of happiness in a bowl, combining creamy textures with a crunch from the apples and a delightful surprise from the chocolatey Snickers bars.
What I love most about this Snickers Salad is how approachable it is. You don’t have to be a master chef to impress your friends with this recipe—trust me! The combination of flavors, simplicity of preparation, and nostalgia wrapped up in one dish make it a crowd-pleaser every time. Plus, it’s a great way to sneak in some fruit into your dessert (let’s pretend those apples are the healthy part, shall we?). So grab your apron (or your favorite comfy shirt) and let’s jump into making this sensational dish together!
A Sweet Memory with Snickers Salad
Before we dive into the recipe, I want to share a sweet memory about my first encounter with Snickers Salad. It was a summer barbecue hosted by my parents in our backyard. The sun was shining, burgers were sizzling, and the tantalizing aroma of grilled veggies wafted through the air. My cousins were running around with the energy only kids could muster, while the adults were busy discussing—the weather? I don’t know!
And then, my aunt Michelle arrived with a giant bowl of Snickers Salad. She had this beaming smile on her face, and I could tell she knew she was about to steal the show. As soon as she set it down on the table, it was like a magnet for everyone. I remember peeking into the bowl and thinking, “Is that…Snickers? In a salad?” The mix of crunchy apples, velvety pudding, and sweet caramel sauce created a beautiful clash of flavors I had never experienced.
After that day, Snickers Salad became a staple at our family get-togethers. Every time I take a bite of that creamy, sweet goodness, I’m transported back to those sunny afternoons, surrounded by laughter and love. It’s amazing how food can connect us to memories, isn’t it? Now, let’s create our own memories and dive into making this fantastic dish.
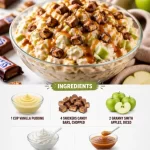
Ingredients
Here’s everything you’ll need to whip up your own delicious Snickers Salad:
-
1 cup vanilla pudding
This is the creamy base of your salad. The vanilla flavor complements the chocolate in the Snickers beautifully. If you want a lighter option, you can use vanilla Greek yogurt instead! -
4 Snickers candy bars, chopped
The hero of the dish! Feel free to get creative with other chocolate bars like Milky Ways or Twix if you’re feeling adventurous, but trust me, the classic Snickers here is hard to beat. -
2 Granny Smith apples, diced
The tartness of these apples balances the rich sweetness of the Snickers. If you’re looking for a sweeter alternative, Fuji or Honeycrisp apples work perfectly. -
1 cup Cool Whip or whipped cream
The light and fluffy texture of whipped cream is what brings everything together, giving it that dreamy effect. For a lower-calorie option, you could use whipped coconut cream. -
Caramel sauce for drizzling
Because let’s be honest, everything is better with caramel. You can buy this pre-made or, if you’re up for it, make your own! A sprinkle of sea salt over the warm caramel takes it to another level.
Step-by-Step Instructions
Ready to bring your Snickers Salad to life? Here we go—follow these simple steps for a fantastic treat:
-
Prepare the Pudding
In a mixing bowl, prepare the vanilla pudding as per the package instructions. If you’re using instant pudding, mix it with milk until it thickens, usually about 2 minutes of whisking. Looking to save time? You can make this ahead of time—just cover it and refrigerate until you’re ready to mix everything together. -
Chop the Snickers
Take your Snickers bars and chop them into bite-sized pieces. It’s best if you chill the bars in the freezer for a bit—they’re much easier to chop when cold! The extra crunch when biting into them is absolute heaven. -
Dice the Apples
Wash and dice the Granny Smith apples. You’re aiming for around half-inch pieces. No need to be too particular; a rustic look adds charm! If you want to keep them from browning, toss them in a tiny bit of lemon juice—it doesn’t alter the flavor, just keeps them looking fresh. -
Combine Ingredients
In a large mixing bowl, combine the prepared pudding, chopped Snickers, and diced apples. Gently fold everything together until the apples and Snickers are evenly coated with the pudding. Get in there with your spatula; it’s okay to be a little rough—just be gentle with those apples! -
Add the Whipped Cream
Now it’s time to fold in the Cool Whip or whipped cream. This step adds a lovely lightness to the salad. Keep it gentle! You want to combine everything without losing that airiness. -
Chill Time
Once all the ingredients are mixed together, cover the bowl with plastic wrap and let it chill in the refrigerator for at least 30 minutes. This allows the flavors to meld together perfectly. Trust me; it’s worth the wait! -
Drizzle and Serve
When you’re ready to serve, spoon the salad into bowls, and drizzle with caramel sauce. If you’re feeling extra fancy, you can even sprinkle some crushed peanuts on top for an added crunch. Voilà! A masterpiece made with love and the perfect balance of flavors.
Serving Suggestions
Serve your Snickers Salad in individual bowls or in a large glass dish for that retro dessert vibe! Garnish with extra chopped Snickers and a light drizzle of caramel sauce on top. A sprinkle of crushed nuts can add an appetizing crunch and elegant touch. Voila! You’ve got yourself a presentation that not only tastes amazing but looks fantastic, too!
Recipe Variations
Why not get a little creative and switch things up? Here are some variations you can try:
-
Nutty Addition: Add in some chopped walnuts or pecans for a nutty crunch that complements the sweetness beautifully.
-
Chocolate Lovers Delight: Mix in mini chocolate chips along with the Snickers for an extra chocolaty treat!
-
Healthier Option: Replace the Snickers with dark chocolate-covered almonds for a healthier twist, while still delivering that chocolatey satisfaction.
-
Fruity Fusion: Trade in some of the apples for diced bananas or pears—both are fabulous and will add a yummier sweetness!
-
Dairy-Free Version: Swap out the Cool Whip for coconut whipped cream and use almond milk for the pudding. Delicious and dairy-free!
Chef’s Notes
I still remember the first time I made this for my friends. I was nervous they’d think it was weird—an unconventional salad, right? But to my surprise, they devoured it like it was the best thing ever. We all laughed as we tried to determine if we were having dessert or snack time! This recipe has stuck with me over the years, reminding me that food is all about joy and connection. Plus, my friends now expect it at every get-together, so it’s become a beloved tradition!
FAQs and Troubleshooting
Q: Can I make this ahead of time?
Absolutely! You can prepare it a day in advance. Just splash some lemon juice on the apples before mixing them in to keep them fresh.
Q: What if I can’t find Snickers?
No problem! Swap them for any chocolate candy bars you love—Milky Way, Twix, or even Reese’s peanut butter cups. Get creative!
Q: My pudding isn’t thickening; what did I do wrong?
Sometimes, it’s all about the milk. Make sure to use cold milk as indicated. If it continues to stay runny, check the expiration date—old pudding mix can be temperamental.
Q: Can I make this vegan?
Great question! You can use plant-based pudding, coconut cream, and dairy-free chocolate bars to create a delicious vegan version that everyone can enjoy!
Nutritional Info (Optional)
- Serving Size: 1 cup
- Calories: 350
- Total Fat: 18g
- Saturated Fat: 8g
- Carbohydrates: 42g
- Sugars: 27g
- Protein: 3g
Snickers Salad is a fabulous mix of flavors that is sure to ignite joy in your kitchen—and in your tummy. So, whether you’re whipping it up for a special occasion or cozying up on the couch to indulge, remember to savor not just the taste, but the memories it brings along. Happy cooking, friends!
PrintSnickers Salad
A scrumptiously sweet dish combining Snickers, apples, and whipped cream for a delightful dessert experience.
- Prep Time: 15 minutes
- Cook Time: 0 minutes
- Total Time: 45 minutes
- Yield: 4 servings 1x
- Category: Dessert
- Method: No-Cook
- Cuisine: American
- Diet: Vegetarian
Ingredients
- 1 cup vanilla pudding
- 4 Snickers candy bars, chopped
- 2 Granny Smith apples, diced
- 1 cup Cool Whip or whipped cream
- Caramel sauce for drizzling
Instructions
- Prepare the pudding by mixing it with milk as per package instructions, then refrigerate.
- Chop the Snickers bars into bite-sized pieces.
- Dice the Granny Smith apples into half-inch pieces.
- Combine the prepared pudding, chopped Snickers, and diced apples in a large mixing bowl.
- Add the Cool Whip or whipped cream and gently fold to combine.
- Chill the salad in the refrigerator for at least 30 minutes.
- Drizzle with caramel sauce before serving.
Notes
You can prepare this a day in advance by keeping the apples coated in lemon juice to prevent browning.
Nutrition
- Serving Size: 1 cup
- Calories: 350
- Sugar: 27g
- Sodium: 100mg
- Fat: 18g
- Saturated Fat: 8g
- Unsaturated Fat: 8g
- Trans Fat: 0g
- Carbohydrates: 42g
- Fiber: 1g
- Protein: 3g
- Cholesterol: 0mg
Keywords: Snickers Salad, dessert, easy salad, sweet treat
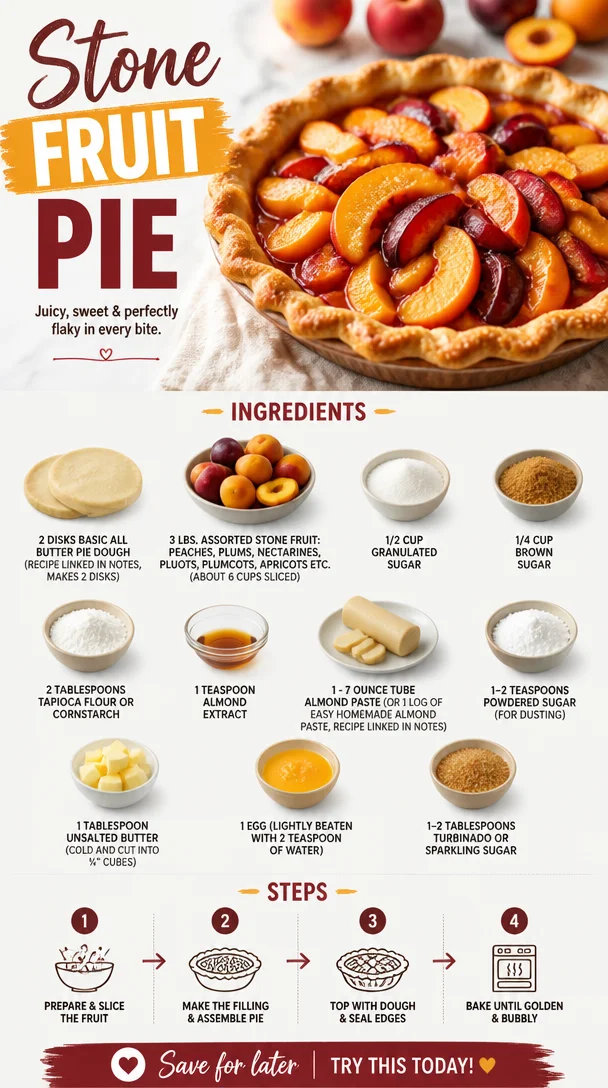
Stone Fruit Pie
Stone Fruit Pie: A Slice of Summer Bliss
Welcome to another delightful adventure in the kitchen! Today, we’re celebrating one of my all-time favorite desserts: Stone Fruit Pie. Picture this: warm, juicy slices of peaches, plums, and cherries all mingling together under a buttery, flaky crust. It’s like a hug in pie form—but who said comfort has to be reserved for winter? Stone fruit season is a joyous time, and what better way to embrace it than with a show-stopping pie that’s as beautiful as it is delicious?
When I was a kid, my family would embark on summer road trips, and one of our favorite stops was the local fruit stand. As we’d pull up, the rich aroma of ripe fruit wafting through the air felt like a siren’s call, beckoning us closer. My mom would load up the car with an assortment of peaches, plums, and nectarines—our stone fruit bounty. We’d eat them fresh, of course, but when we got home, it was pie-making time! The kitchen was filled with laughter, chatter, and sweet fragrances as we transformed those juicy gems into something even more magical.
There’s something truly special about making pie as a family. Whether you’re assembling the crust, whipping up the filling, or fighting over who gets to sprinkle the sugar on top, it’s a bonding experience, steeped in love and nostalgia. Now, I want to share that joy with you through this easy-to-follow Stone Fruit Pie recipe. Let’s roll up our sleeves and dive in!
Ingredients
Here’s what you’ll need to create this delicious pie:
-
2 disks Basic All Butter Pie Dough
(For the perfect flaky crust. You can use store-bought if you’re short on time! Find the recipe here.) -
3 lbs. assorted stone fruit (peaches, plums, nectarines, pluots, plumcots, apricots, etc. – about 6 cups sliced)
(Choose your favorites! Feel free to mix and match. Just make sure they’re ripe for the best flavor! For a fun twist, you can even try some cherries or figs.) -
1/2 cup granulated sugar
(Brings out the natural sweetness of your fruit. You can substitute with coconut sugar for a healthier option!) -
1/4 cup brown sugar
(Adds a rich, molasses flavor that complements the fruit beautifully.) -
2 tablespoons tapioca flour or cornstarch
(Helps thicken the filling so it’s not runny. If you’re looking for a gluten-free alternative, both options work wonderfully!) -
1 teaspoon almond extract
(Gives a lovely depth of flavor. If you’re not a fan, vanilla extract can be used instead.) -
1 – 7 ounce tube almond paste or 1 log of Easy Homemade Almond Paste
(Adds a delightful nuttiness. Homemade paste is a great way to control the sweetness! Recipe here.) -
1-2 teaspoons powdered sugar
(For a sweet dusting at the end—totally optional but adds a touch of charm!) -
1 tablespoon unsalted butter (cold and cut into ¼” cubes)
(Dotting the filling with butter enhances richness. Trust me, don’t skip this step!) -
1 egg (lightly beaten with 2 teaspoons of water)
(This egg wash gives the crust that perfect golden brown color.) -
1-2 tablespoons Turbinado or sparkling sugar
(Sprinkle it on top for a delightful crunch. Make it shine like the summer sun!)
Step-by-Step Instructions
Here’s how to put this delightful pie together, step by step. Ready, set, bake!
-
Preheat Your Oven: Start by preheating your oven to 425°F (220°C). This high temperature is key for a beautifully flaky crust.
-
Prepare the Pie Dough: Roll out one disk of your pie dough on a floured surface to fit your pie pan. Don’t worry about perfection; rustic is charming! Place it into your pie dish (don’t forget to trim any excess overhang) and pop it in the fridge while you prepare the filling.
-
Slice the Fruit: Grab your stone fruit and slice them up into even pieces. Aim for about 1/2-inch thick slices. Don’t stress about uniformity—each piece tells a summer story!
-
Mix the Filling: In a large mixing bowl, toss the sliced fruit with both sugars, tapioca flour (or cornstarch), and almond extract. Once it’s all mixed together, let it sit for about 10 minutes. This allows the fruit juices to start merging, making for an extra flavorful filling.
-
Add the Almond Paste: Crumble the almond paste into small pieces and mix it into the fruit. This step adds such a delicious nuttiness that complements the bright fruit flavor. It’s like a surprise waiting inside!
-
Fill the Crust: Remove the pie crust from the fridge and pour the luscious fruit mixture into the shell. Dot the top with cold butter cubes. This will keep your filling rich and luscious.
-
Top It Off: Roll out your second pie dough disk and place it over the filling. You can create a lattice top for a gorgeous presentation or simply cover it with a solid layer. Cut slits for steam to escape if you opt for the latter.
-
Egg Wash and Sugar: Brush the top crust with the egg wash mixture, then sprinkle with turbinado sugar for some sparkle and texture.
-
Bake: Pop your pie into the oven and bake for 15 minutes at 425°F to get that crust nice and golden. Then, reduce the temperature to 350°F (175°C) and continue baking for 30-35 minutes until the filling is bubbly and the crust is golden brown.
-
Cool and Serve: Once out of the oven, let your pie cool for at least an hour. This will help the filling set up perfectly. Trust me, it’s worth the wait!
Serving Suggestions
To serve this stunning Stone Fruit Pie, a scoop of vanilla ice cream or whipped cream on top is a classic match made in heaven. I also love sprinkling a bit of fresh mint or basil for an unexpected pop of flavor and color. Slice it into generous pieces and watch your guests’ eyes light up—they’ll be excited for a taste of your summer masterpiece!
Recipe Variations
Feeling adventurous? Here are a few twists you can try on this classic recipe:
- Spiced Stone Fruit Pie: Add a teaspoon of cinnamon or nutmeg to the fruit filling for a warm flavor profile.
- Crumble Topping: Instead of a top crust, sprinkle a crumble made from oats, brown sugar, and butter for a crunchy texture.
- Savory Twist: Mix in some fresh herbs like thyme or rosemary into the fruit filling for an unexpected savory layer.
- Different Fruit Combos: Swap out some of the stone fruit for berries or apples for a unique fusion pie!
- Gluten-Free Version: Use a gluten-free pie dough recipe to make this pie accessible for gluten-sensitive friends.
Chef’s Notes
As with any recipe, this Stone Fruit Pie has evolved over time! I remember experimenting with different fruit mixtures based on what we found at the farmer’s market, leading to some delightful surprises. One time, I added a splash of bourbon to the fruit filling for an extra kick—just be sure to adjust your sugar levels accordingly if you try that! I’ve also had moments where I completely forgot to add sugar, only to discover that the natural sweetness of ripe fruit stood out beautifully. Embrace those kitchen flubs; they often lead to happy accidents!
FAQs and Troubleshooting
1. My pie crust shrunk during baking. What went wrong?
This could be due to overworking the dough or inaccurate chilling time. Make sure to chill the dough properly and handle it gently.
2. Why did my filling turn out runny?
Ensure you measured the fruit accurately and allowed it to sit with the sugars and thickening agent for a bit before baking. If it’s extra juicy, a little extra tapioca flour or cornstarch can help thicken things up.
3. Can I freeze this pie?
Absolutely! You can freeze both baked and unbaked pies. Just make sure to wrap it well in plastic wrap and aluminum foil. Thaw in the fridge overnight before baking or reheating.
4. How can I tell when it’s done?
Look for a golden crust and bubbly filling. You can also check the internal temperature; it should read around 200°F (93°C) when finished.
Nutritional Info
This Stone Fruit Pie is not only comforting but also packed with the goodness of fruits! Depending on your choice of sugars and butters, a slice will typically contain approximately 300 calories, along with fiber and vitamins, especially when using a variety of colorful fruits. Enjoying it in moderation is key!
So there you have it—a delightful journey through the process of making a Stone Fruit Pie that celebrates the essence of summer. I encourage you to gather your loved ones for a baking session, because food is always better when shared. Let’s bring back those nostalgic memories, one slice at a time! Happy baking! 🍑🥧✨
PrintStone Fruit Pie
A delightful pie filled with warm, juicy slices of peaches, plums, and cherries under a buttery, flaky crust.
- Prep Time: 30 minutes
- Cook Time: 45 minutes
- Total Time: 1 hour 15 minutes
- Yield: 8 servings 1x
- Category: Dessert
- Method: Baking
- Cuisine: American
- Diet: Vegetarian
Ingredients
- 2 disks Basic All Butter Pie Dough
- 3 lbs. assorted stone fruit (peaches, plums, nectarines, etc.)
- 1/2 cup granulated sugar
- 1/4 cup brown sugar
- 2 tablespoons tapioca flour or cornstarch
- 1 teaspoon almond extract
- 1 – 7 ounce tube almond paste
- 1–2 teaspoons powdered sugar
- 1 tablespoon unsalted butter (cold and cut into ¼” cubes)
- 1 egg (lightly beaten with 2 teaspoons of water)
- 1–2 tablespoons Turbinado or sparkling sugar
Instructions
- Preheat your oven to 425°F (220°C).
- Prepare one disk of pie dough to fit your pie pan.
- Slice the stone fruit into even pieces, about 1/2-inch thick.
- Mix the sliced fruit with both sugars, tapioca flour, and almond extract.
- Add the crumbled almond paste into the fruit mixture.
- Fill the crust with the fruit mixture and dot with cold butter cubes.
- Top with the second pie dough disk and cut slits for steam to escape.
- Brush the top crust with the egg wash and sprinkle with turbinado sugar.
- Bake for 15 minutes at 425°F, then reduce to 350°F (175°C) and bake for 30-35 minutes.
- Cool for at least an hour before serving.
Notes
Serve with vanilla ice cream or whipped cream for the perfect pairing.
Nutrition
- Serving Size: 1 slice
- Calories: 300
- Sugar: 20g
- Sodium: 150mg
- Fat: 10g
- Saturated Fat: 4g
- Unsaturated Fat: 5g
- Trans Fat: 0g
- Carbohydrates: 45g
- Fiber: 3g
- Protein: 4g
- Cholesterol: 30mg
Keywords: Stone fruit pie, summer dessert, pie recipe, baking
Mango Mousse
The Creamy Dream: Your Ultimate Guide to Mango Mousse
Welcome to Clean Plate Cravings, where today we’re diving into the world of sweet indulgence with a twist of tropical flair! We’re whipping up a Mango Mousse that’s not only light and refreshing but also feels like a little bite of heaven in every spoonful. If you’ve ever felt like dessert needs to be a heavy affair, I’m here to change that perception! This Mango Mousse is the answer to your sweet tooth without the guilt.
So, let’s talk about why mango mousse is the perfect dessert for any occasion. Imagine a warm summer evening, the air sweet with the scent of blooming flowers, and you gather around a table with friends and family. You want to serve something that not only looks stunning but also transports everyone to a sunny beach with every delicious bite! This mousse does just that! It’s not just food; it’s an experience wrapped in simple, fresh ingredients.
Picture this: fluffy, creamy, and oh-so-fruity mousse that melts in your mouth. It’s like a mini vacation with each spoonful—who wouldn’t want that? Plus, it’s a wonderful way to impress guests or just to treat yourself after a long day. You’ll find that making mousse can be uncomplicated and rewarding, making it ideal for both novice and seasoned chefs alike.
Ready to get your kitchen adventure started? Allow me to guide you through this delightful dish, and you’ll soon understand why I just can’t get enough of mango mousse!
A Sweet Memory of Mango Mousse
Growing up, I spent most of my summers at my grandma’s house. Among all her scrumptious treats—think fresh peach cobbler and blueberry pies—one dessert always stood out: her velvety mango mousse. The first time she served it, I remember being captivated! The bright orange color practically danced on the plate, promising bursts of flavor that were sure to excite my taste buds.
In her warm kitchen, filled with the sound of laughter and clinking glasses, I asked her how she made it. With a twinkle in her eye, she explained gently (as grandmas do), "It’s easy, my dear! You just let the mango shine through." And shine it did! That day she showed me that desserts don’t have to be complicated; they can be just as delightful when they highlight fresh ingredients.
To this day, whenever I whip up a batch of mango mousse, those summer days at Grandma’s house flood back into my memory. The mousse is not only a treat for the taste buds but also a fond reminder of the love and warmth shared in the kitchen. Now, it’s your turn to create your own beautiful memories with this delightful recipe.
Mango Mousse Ingredients
Let’s gather our ingredients before diving into the preparation! For our light and luscious mango mousse, you’ll need:
-
3 Ripe Mangos: The star of the show! Choose firm but slightly soft mangos with a sweet aroma. For substitutes, you can use frozen mango puree (just thaw it first) or other fruits like peaches or passionfruit for an interesting twist.
-
1 Cup Heavy Cream: This creates that luxuriously creamy texture. Need a lighter option? Substitute with coconut cream for a tropical flare, or use whipped coconut yogurt for a dairy-free version.
-
1/4 Cup Sugar: Just enough to elevate the natural sweetness of the mango. If you’re looking for alternatives, honey, agave syrup, or a sugar substitute can work, but remember they may alter the final flavor slightly!
Each ingredient, albeit simple, plays a significant role in creating a memorable and delicious dessert. By choosing fresh, quality ingredients, you’re not just making mousse; you’re creating a swoon-worthy experience ready to impress!
Step-by-Step Instructions
Now that we have our ingredients, let’s get started with the preparation! Ready? Let’s roll up those sleeves and create something magical!
-
Prepare the Mangos:
- First off, grab those luscious mangos! Carefully peel the skin with a sharp knife (watch those fingers!), then slice the flesh away from the pit.
- Chef Hack: Try cutting the mango into cubes and then gently scoring the flesh before scooping it out with a spoon—it’s a real game-changer!
-
Blend the Mangos:
- Toss the mango chunks into your blender or food processor. Blitz them until you have a smooth puree—this should take around 30 seconds if your mangos are ripe.
- For a unique touch, add a squeeze of lime juice! It brightens the flavor and gives it a refreshing zing.
-
Whip the Heavy Cream:
- In a separate mixing bowl, pour in the heavy cream. Using an electric mixer, whip on medium-high speed until soft peaks form.
- Tip: Make sure your bowl and beaters are cold for quicker whipping—any little tricks can go a long way!
-
Combine the Cream and Mango Puree:
- Gently fold the mango puree into the whipped cream using a spatula. Be careful not to deflate the cream; you want to maintain that light and airy texture.
- Chef Insight: Don’t rush this step! Folding slowly creates a lighter mousse!
-
Sweeten it Up:
- Sprinkle in the sugar and continue to fold until fully incorporated. Taste to check that sweetness is just right.
- Still too tart? A tad more sugar won’t hurt, but remember, the ripe mangos should provide most of the sweetness!
-
Chill the Mousse:
- Spoon your delightful mousse into serving glasses or bowls, then pop them into the refrigerator for at least an hour to set. This step helps flavor deepen and texture firm up.
- Chef Tip: If you want to be a little extra fancy, use a piping bag to fill your glasses for a beautiful presentation!
-
Garnish and Serve:
- Once set, garnish your mango mousse with fresh mint sprigs or a sprinkle of toasted coconut. Get creative here! Your beautiful work deserves to shine.
Serving Suggestions
Serving mango mousse is as simple and enjoyable as making it! You can present it in individual clear glasses or bowls to show off that gorgeous color. Layering with some crushed graham crackers will add a delightful crunch. A fresh slice of lime on the side adds a pop of color and an extra hint of freshness. Remember, presentation matters; take a moment to make it as visually appealing as it is delicious—your guests will appreciate it.
Recipe Variations
Want to shake things up? Here are some fun variations to twist your mango mousse:
-
Add Some Spice: Incorporate a pinch of cayenne pepper or cinnamon for a surprising kick!
-
Chocolate Lover’s Delight: Drizzle some melted dark chocolate on top or mix in cocoa powder for a tropical-chocolate fusion.
-
Coconut Cream: Replace heavy cream with coconut cream for a richer, coconut-infused version.
-
Berry Bliss: Mix in some pureed strawberries or blueberries for a fruity fusion that contrasts beautifully with mango.
-
Healthier Option: Swap sugar with honey or maple syrup and use Greek yogurt instead of heavy cream for a protein-packed pre-or post-workout treat.
Chef’s Notes
Over the years, my mango mousse has become a beloved staple, featuring at birthdays, summer barbecues, and spontaneous dessert dates with friends. It’s adapted and evolved with my culinary journey, often inspired by new ingredients or creative ideas from my kitchen crew.
And let me tell you, one memorable kitchen disaster occurred when I mistakenly grabbed salt instead of sugar. Let’s just say a salty mousse was definitely one to forget! But hey, that’s what makes cooking fun right? Take risks, learn, and above all, enjoy every moment—whether it turns out perfectly or not!
FAQs and Troubleshooting
Q: Can I use frozen mangos for this recipe?
A: Absolutely! Just make sure to thaw them beforehand and blend until smooth. Frozen mangos can sometimes be even sweeter!
Q: What can I do if my mousse doesn’t set?
A: If it doesn’t set properly, it might need more time in the fridge. You could also try adding gelatin (1 teaspoon dissolved in warm water) during the mixing stage for an extra firm mousse.
Q: How do I know when to stop whipping the cream?
A: Stop when you see soft peaks form! If you over-whip, you risk turning it into butter, which isn’t the goal here.
Q: Can I make this mousse dairy-free?
A: For sure! Just swap heavy cream with coconut cream and use a dairy-free sweetener if needed!
Nutritional Info
While I encourage enjoying this delightful treat, keep in mind that moderation is key for indulgence. A serving contains approximately 250 calories, depending on your specific ingredients and portions.
And there you have it! A vibrant, delicious, and soul-soothing Mango Mousse recipe crafted with love and memories. As you embark on this kitchen adventure, I hope you find it just as joyous as I always do! Remember, the kitchen is your playground. So, have fun, experiment, and, most importantly, enjoy every bite—whether savoring it solo or sharing it with loved ones! Happy cooking!
PrintMango Mousse

A light and refreshing mango mousse that’s a perfect dessert for any occasion, offering a taste of tropical delight.
- Prep Time: 15 minutes
- Cook Time: 0 minutes
- Total Time: 60 minutes
- Yield: 4 servings 1x
- Category: Dessert
- Method: Chilling
- Cuisine: Tropical
- Diet: Gluten Free
Ingredients
- 3 Ripe Mangos
- 1 Cup Heavy Cream
- 1/4 Cup Sugar
Instructions
- Prepare the Mangos: Carefully peel the skin and slice the flesh away from the pit.
- Blend the Mangos: Toss the mango chunks into your blender and blitz until smooth.
- Whip the Heavy Cream: In a bowl, whip the heavy cream until soft peaks form.
- Combine the Cream and Mango Puree: Gently fold the mango puree into the whipped cream.
- Sweeten it Up: Sprinkle in the sugar and fold until fully incorporated.
- Chill the Mousse: Spoon into serving glasses and refrigerate for at least an hour.
- Garnish and Serve: Garnish with fresh mint or toasted coconut before serving.
Notes
Serve in individual glasses and layer with crushed graham crackers for added crunch!
Nutrition
- Serving Size: 1 serving
- Calories: 250
- Sugar: 18g
- Sodium: 50mg
- Fat: 15g
- Saturated Fat: 10g
- Unsaturated Fat: 5g
- Trans Fat: 0g
- Carbohydrates: 28g
- Fiber: 2g
- Protein: 2g
- Cholesterol: 70mg
Keywords: mango mousse, dessert, tropical dessert, light mousse, refreshing dessert
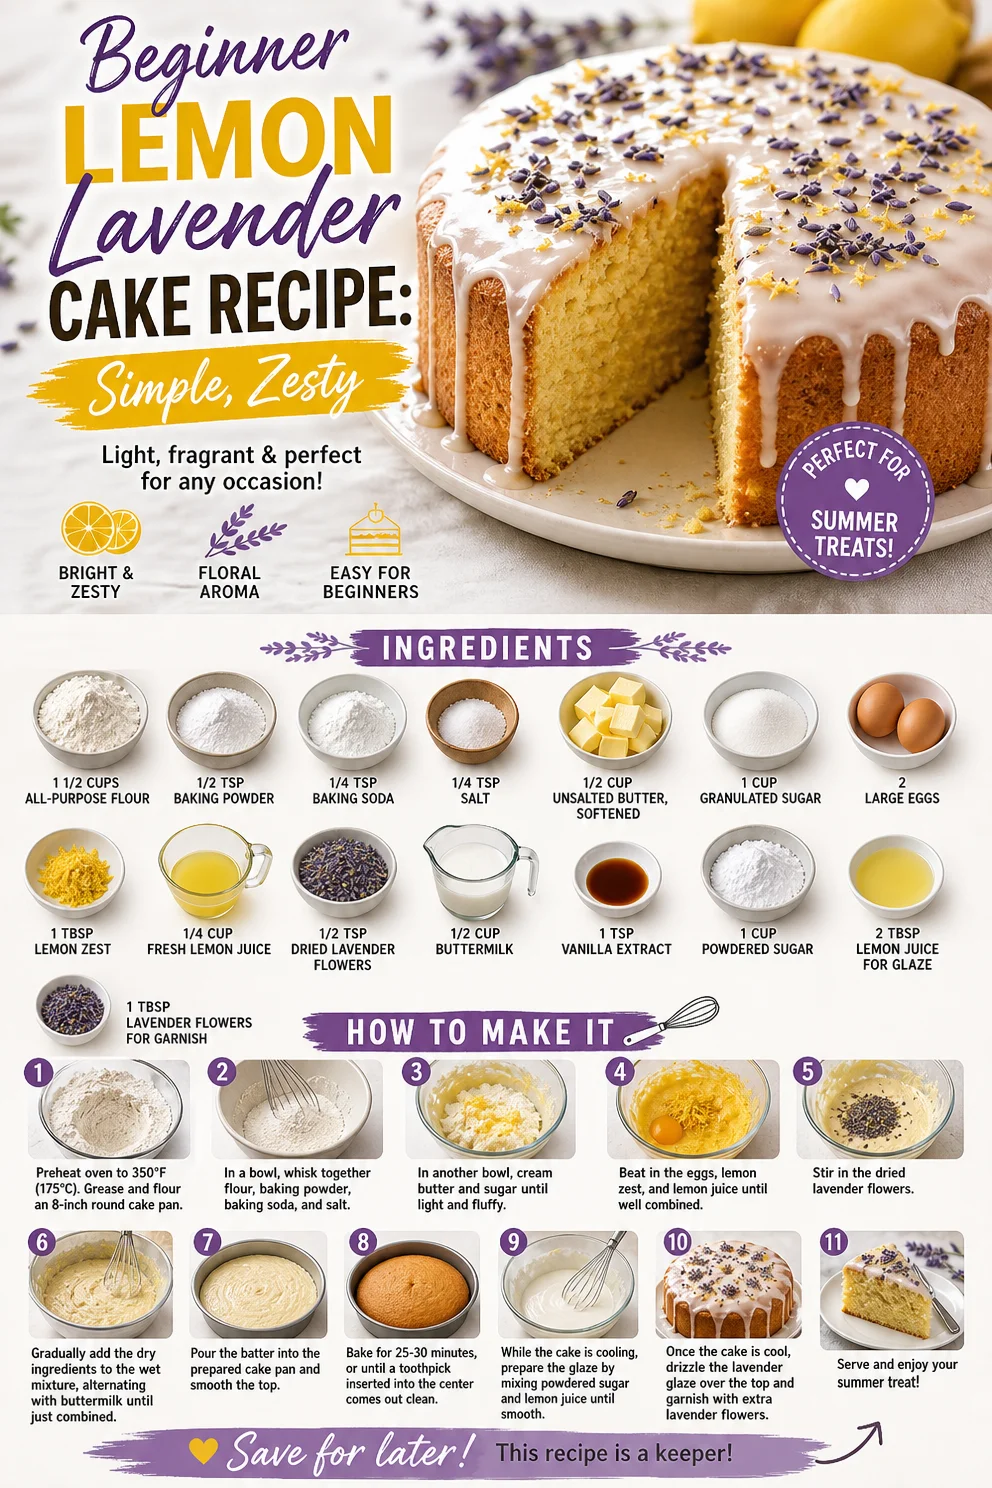
Beginner Lemon Lavender Cake Recipe: Simple, Zesty
Indulging in Nostalgia: The Delight of Lemon Lavender Cake
Welcome, food lovers! Today, I’m thrilled to share with you one of my favorite recipes that beautifully combines the invigorating zest of lemons with the delicate floral notes of lavender. That’s right, we’re diving into the world of Lemon Lavender Cake—a dessert that not only tantalizes your taste buds but also transports you to sunlit gardens with every bite. Picture this: a slice of moist cake topped with a silky glaze, bursting with citrusy brightness and floral undertones. It doesn’t just taste delicious; it feels like a hug in cake form!
Now, some of you might be thinking, “Lavender in a cake? Really?” And I’m here to say, “Absolutely!” Don’t let the idea intimidate you. When used correctly, lavender can elevate your baking game. It adds an unexpected twist that’s surprisingly comforting. Even if you think you’re not a lavender person, I urge you to give it a shot. You might just discover a new flavor obsession!
Let’s transport ourselves to my kitchen for a moment. The air is fragrant with citrus, and I can hear the gentle clinks of my baking tools against the counter, mixing in rhythm with some soft music. Baking has always been a joyful ritual for me—a way to express love and creativity. And when I pull this cake out of the oven, the first thing I do is give it a little sniff. The combination of lemon and lavender is nothing short of intoxicating. If baking is an art, then this recipe makes you a brilliant artist. So, let’s get those aprons on and start creating something delicious!
A Sweet Memory
The inspiration behind this Lemon Lavender Cake comes from many summer afternoons spent at my grandmother’s cottage. She had a small garden filled with vibrant flowers, but what stood out most were her lavender plants. I still remember walking through her garden, the sun gently warming my back, inhaling the floral aroma that seemed to dance through the air. One afternoon, she invited me into her cozy kitchen, where we whipped up a cake that would forever hold a special place in my heart.
As we mixed the batter, I giggled at the way she cautioned me to be careful with the lavender. “A little goes a long way,” she said with a wink. I’ve carried that advice with me through the years, and it’s one of those beautifully simple lessons that stuck. The cake we baked together was simple yet elegant, and the zesty lemon contrasted perfectly with the aromatic lavender. Each slice reminded me of those sunny afternoons, laughter floating around us like the sweet scent intertwined with the breeze. That nostalgia is what drives me to recreate this cake, with each bite as comforting as a cherished memory.
Ingredients
Here’s what you’ll need to create this delightful Lemon Lavender Cake:
-
1 1/2 cups all-purpose flour
- The backbone of any cake! For a lighter version, you could substitute half with almond flour for a nutty flavor.
-
1/2 teaspoon baking powder
- This helps the cake rise. Be sure it’s fresh for the best results!
-
1/4 teaspoon baking soda
- Balances the acidity of the lemon. Another crucial leavening agent to make your cake fluffy.
-
1/4 teaspoon salt
- Balances flavors and enhances sweetness. It’s a baker’s secret weapon!
-
1/2 cup unsalted butter, softened
- Butter creates the cake’s rich, moist texture. Don’t skip the softening step; it should be room temperature!
-
1 cup granulated sugar
- Adds sweetness and helps the cake brown properly. You can swap this for coconut sugar for a healthier twist.
-
2 large eggs
- Eggs bind the ingredients and add moisture. Ensure they’re at room temperature for an even mix.
-
1 tablespoon lemon zest
- This is where the magic begins—fresh zest gives an intense lemon flavor. Always use organic lemons when you can!
-
1/4 cup fresh lemon juice
- The star of the show! Freshly squeezed is best, as bottled lemon juice just doesn’t compare in flavor.
-
1/2 teaspoon dried lavender flowers
- Use culinary-grade lavender. You can find this in specialty stores or online—it’s worth it!
-
1/2 cup buttermilk
- Adds moisture and gives the cake a tender crumb. You can make your own with milk and a splash of vinegar!
-
1 teaspoon vanilla extract
- A must for depth of flavor. Try using homemade vanilla extract for an extra touch!
-
1 cup powdered sugar
- Perfect for that sweet, glossy glaze that brings the whole cake together.
-
2 tablespoons lemon juice for glaze
- Intensifies the lemony flavor and adds a lovely tang to the glaze.
-
1 tablespoon lavender flowers for garnish
- For a final touch of elegance, sprinkle these on top!
Step-by-Step Instructions
Let’s put on our chef hats and get baking! Here’s how to masterfully whip up your Lemon Lavender Cake in no time:
-
Preheat your oven to 350°F (175°C).
- Prepping your oven ensures an even bake. You want to be ready to go as soon as the batter is mixed!
-
Grease and flour a 9-inch round cake pan.
- This is so your cake doesn’t stick. You can also line the bottom with parchment paper for easier removal.
-
In a mixing bowl, whisk together the all-purpose flour, baking powder, baking soda, and salt.
- This is creating your dry mix. Whisking aerates the flour, ensuring your cake rises nicely.
-
In another bowl, beat the softened butter and granulated sugar together until light and fluffy.
- This step can take about 3-5 minutes. The air you incorporate is key for a light texture!
-
Add the eggs, lemon zest, and lemon juice to the butter mixture. Mix until well combined.
- This fruity combo is where you start to see the magic happen!
-
Gradually add the dry ingredients to the wet mixture, alternating with buttermilk. Begin and end with the flour mixture.
- Mix until just combined—overmixing can lead to a dense cake. We want light and fluffy!
-
Gently fold in the dried lavender flowers.
- Use a spatula to fold—it preserves the tenderness of the batter!
-
Pour the batter into the prepared cake pan and level off the top.
- Give the pan a little shake to smooth the batter.
-
Bake in the preheated oven for 25-30 minutes, or until a toothpick inserted into the center comes out clean.
- Every oven is a little different, so keep an eye on it, especially the first time you make this!
-
Allow the cake to cool in the pan for 10 minutes, then transfer to a wire rack to cool completely.
- Patience is key! Letting it cool all the way will allow for a better texture when you glaze.
-
While the cake cools, prepare the glaze by whisking together powdered sugar and lemon juice until smooth.
- If it’s too thick, add more lemon juice. Too runny? Just add a bit more powdered sugar!
- Once the cake is cool, pour the glaze over the top and let it drip down the sides. Garnish with lavender flowers.
- The presentation matters! Use a spoon to help guide the glaze if you want a bit more control.
Voilà! You’ve just mastered a beautiful Lemon Lavender Cake!
Serving Suggestions
When it comes to serving this beauty, keep it simple yet elegant. A slice on a beautifully patterned plate with a sprig of fresh lavender on the side gives a lovely presentation. Pair it with a dollop of whipped cream or a scoop of vanilla ice cream for an extra treat. This cake is fantastic for brunch gatherings, afternoon tea, or just a sweet way to treat yourself!
Recipe Variations
Here are a few creative twists you can consider to make this recipe your own:
-
Lemon Elderflower Cake: Replace the lavender with elderflower cordial for a flowery flavor that beautifully complements the lemon.
-
Lavender Vanilla Bean Cake: Add vanilla bean paste to the batter for a rich, aromatic depth that pairs wonderfully with the floral notes.
-
Gluten-Free Lavender Cake: Substitute the all-purpose flour with a gluten-free baking mix to make this cake suitable for gluten-sensitive guests.
-
Vegan Lemon Lavender Cake: Replace eggs with flax eggs (1 tablespoon of ground flaxseed mixed with 2.5 tablespoons of water) and use a plant-based butter alternative or coconut oil.
Chef’s Notes
I can’t tell you how many times I’ve made this cake, each time adding a little twist or realizing I forgot an ingredient! One time, I made it with coconut sugar, giving it a subtle caramel note beneath the lemon. And oh, darling, on another occasion, my neighbor brought me fresh mint from her garden. A little mint syrup drizzled on top was a game changer!
Every bake is an adventure, and I encourage you to make this recipe your own. Don’t be afraid to tinker around! Trust me, the result is always worth it, whether it’s beautifully imperfect or perfectly flawed.
FAQs and Troubleshooting
Q1: Why did my cake sink in the middle?
- This typically happens due to overmixing or not baking it long enough. Make sure to mix until just combined and test for doneness with a toothpick!
Q2: Can I use dried lavender if I can’t find fresh?
- Absolutely! Just ensure it’s labeled as culinary-grade. Fresh flowers can be too potent!
Q3: How should I store leftover cake?
- Keep it in an airtight container at room temperature for up to three days, or in the fridge if you prefer a chilled treat.
Q4: Can I make this as cupcakes?
- Yes! Pour the batter into a lined muffin tin and bake for about 18-20 minutes.
By keeping these tips in mind, you’ll be well on your way to baking a delightful Lemon Lavender Cake that’ll leave everyone asking for your secret recipe!
Nutritional Info
While baking is all about joy and flavor, being mindful of nutritional aspects can be beneficial. Please note the following estimates per slice (assuming 12 servings):
- Calories: ~210
- Protein: 2g
- Fat: 9g
- Carbohydrates: 31g
- Sugar: 15g
And there you have it, beautiful bakers! A delightful journey through the delightful realm of Lemon Lavender Cake. Remember, the best ingredient in your kitchen is love—so bake with joy, share with friends, and savor every slice! Happy baking! 🍰🌼
PrintLemon Lavender Cake
A delightful dessert that combines the invigorating zest of lemons with delicate floral notes of lavender, topped with a silky glaze.
- Prep Time: 15 minutes
- Cook Time: 30 minutes
- Total Time: 45 minutes
- Yield: 12 servings 1x
- Category: Dessert
- Method: Baking
- Cuisine: American
- Diet: Vegetarian
Ingredients
- 1 1/2 cups all-purpose flour
- 1/2 teaspoon baking powder
- 1/4 teaspoon baking soda
- 1/4 teaspoon salt
- 1/2 cup unsalted butter, softened
- 1 cup granulated sugar
- 2 large eggs
- 1 tablespoon lemon zest
- 1/4 cup fresh lemon juice
- 1/2 teaspoon dried lavender flowers
- 1/2 cup buttermilk
- 1 teaspoon vanilla extract
- 1 cup powdered sugar
- 2 tablespoons lemon juice for glaze
- 1 tablespoon lavender flowers for garnish
Instructions
- Preheat your oven to 350°F (175°C).
- Grease and flour a 9-inch round cake pan.
- In a mixing bowl, whisk together the all-purpose flour, baking powder, baking soda, and salt.
- In another bowl, beat the softened butter and granulated sugar together until light and fluffy.
- Add the eggs, lemon zest, and lemon juice to the butter mixture. Mix until well combined.
- Gradually add the dry ingredients to the wet mixture, alternating with buttermilk. Begin and end with the flour mixture.
- Gently fold in the dried lavender flowers.
- Pour the batter into the prepared cake pan and level off the top.
- Bake in the preheated oven for 25-30 minutes, or until a toothpick inserted into the center comes out clean.
- Allow the cake to cool in the pan for 10 minutes, then transfer to a wire rack to cool completely.
- While the cake cools, prepare the glaze by whisking together powdered sugar and lemon juice until smooth.
- Once the cake is cool, pour the glaze over the top and let it drip down the sides. Garnish with lavender flowers.
Notes
Serve with a sprig of fresh lavender or a dollop of whipped cream for an elegant touch.
Nutrition
- Serving Size: 1 slice
- Calories: 210
- Sugar: 15g
- Sodium: 200mg
- Fat: 9g
- Saturated Fat: 5g
- Unsaturated Fat: 3g
- Trans Fat: 0g
- Carbohydrates: 31g
- Fiber: 1g
- Protein: 2g
- Cholesterol: 30mg
Keywords: cake, lemon, lavender, dessert, baking
The Best Southern Banana Cobbler Dessert
The Best Southern Banana Cobbler Dessert: A Sweet Treat That’ll Make You Smile!
Hey there, fellow food lovers! Today, we’re diving into a classic Southern dessert that’s sure to warm your heart and tickle your taste buds: Southern Banana Cobbler. Now, I can already hear some of you saying, “Banana cobbler? Is that even a thing?” Yes, indeed! This cozy dessert is a delightful twist on the traditional cobbler, combining the lusciousness of ripe bananas with a comforting, buttery crust.
As we navigate through the recipe, you’ll find that it’s not just about the ingredients; it’s about the stories behind them, the memories they create, and the joy they bring when shared. Whether it’s a family gathering, a barbecue with friends, or a cozy evening at home, this dessert brings everyone together. So grab your aprons, put on your favorite tunes, and let’s whisk up some memories and deliciousness together!
A Personal Touch: A Nostalgic Favorite
There’s something about Southern desserts that feels like a warm hug. Growing up in the South, every family gathering was marked by the sweet aroma of freshly baked goods wafting through the air. One of my earliest memories is my grandmother’s kitchen—it was a magical place filled with laughter, love, and, of course, food.
I can vividly recall watching her prepare this banana cobbler as she recounted stories from her own childhood. The sizzle of melted butter in a pan was music to my ears, and the sight of those ripe bananas transformed into something whimsical was a sight to behold. She would always let me help—mashing the bananas, sprinkling sugar, and, of course, sneaking a taste here and there.
Now, as an adult, I’ve carried on this tradition, making this dessert for family and friends. It brings back warm memories every time I take a bite, and I hope that when you make it, it brings you that same feeling of nostalgia.
Ingredients: What You’ll Need
Before we really get into the cooking, let’s talk about the star players in this delightful dish. Here’s what you’ll need:
-
5 ripe bananas, sliced: The riper, the better! Look for bananas with plenty of brown spots—that means they’re extra sweet and perfect for baking! If you’re in a pinch, you can use frozen bananas; just make sure to thaw and drain excess liquid.
-
1 cup granulated sugar: This sweetener is essential for balancing the flavors. You can substitute it with coconut sugar or brown sugar for a deeper, caramel-like flavor.
-
½ cup unsalted butter, melted: Butter adds richness and depth to the cobbler. If you need a dairy-free option, coconut oil works beautifully in its place.
-
1 teaspoon vanilla extract: For a hint of warm, sweet flavor that elevates the dessert. Homemade vanilla extract is an easy DIY project if you’re feeling adventuresome!
-
1 teaspoon ground cinnamon: This warm spice adds a lovely aroma and enhances the flavor of the bananas. Feel free to experiment with cardamom for a unique twist!
-
¼ teaspoon salt: Just a pinch enhances all the other flavors in the dish. You can use sea salt or Himalayan salt—both work wonderfully.
-
1 cup self-rising flour: This is what gives the cobbler its structure. If you don’t have self-rising flour, you can easily make your own by mixing 1 cup of all-purpose flour with 1.5 teaspoons of baking powder and ½ teaspoon of salt.
-
1 cup whole milk: Adds moisture and richness. For a lighter version, you can substitute with almond milk or oat milk, but a little fat really helps with the creamy texture.
-
½ cup sugar for the topping: This creates a delightful crust on top. You can halve the amount if you prefer a less sweet dessert.
-
½ teaspoon ground nutmeg (optional): This spice adds depth and warmth; however, if you’re not a fan, it can be skipped entirely.
-
Vanilla ice cream (optional): A scoop on top is heavenly! Homemade or store-bought will work perfectly.
-
Whipped cream (optional): Light and fluffy, it’s a delightful complement to the warm cobbler.
-
Chopped pecans or walnuts (optional): A sprinkle adds crunch and a nutty flavor that pairs beautifully with bananas.
-
Caramel drizzle (optional): For that extra touch of sweetness—because why not?
Step-by-Step Instructions: Let’s Get Cooking!
Now that we have all our ingredients ready, let’s get into the nitty-gritty of crafting this fabulous Southern Banana Cobbler!
-
Preheat Your Oven: Set your oven to 350°F (175°C). This step is crucial! You want your oven hot and ready to create that golden, crispy top.
-
Prepare Your Baking Dish: Grab a 9×13 inch baking dish and grease it lightly with butter or cooking spray. This will ensure your cobbler doesn’t stick and it releases easily when it’s time to serve.
-
Mash Those Bananas: In a medium mixing bowl, mash the ripe bananas until mostly smooth with some small chunks remaining. You want to feel the texture when you dive in! A fork works like magic for this.
-
Mix Wet Ingredients: Add the melted butter, sugar, vanilla extract, and cinnamon to your mashed bananas. Stir until everything is well combined. The melted butter should help break down the sugar, making it nice and creamy.
-
Blend in Dry Ingredients: Gradually mix in the self-rising flour and milk until fully combined. It’s okay if it’s a bit lumpy; that’s part of the charm! Remember, mix gently to avoid overmixing—this can make your cobbler tough instead of tender.
-
Transfer to Baking Dish: Pour the cobbler mixture into your prepared baking dish, spreading it evenly. At this stage, you might notice how fragrant it is. The aromas are heavenly!
-
Bake That Sweetness: Pop the dish into the oven and let it bake for about 30-35 minutes, or until the top is golden brown and a toothpick inserted in the center comes out clean.
-
Cool and Serve: Once it’s baked, let it cool for roughly 10 minutes. This waiting period allows the flavors to meld perfectly. Serve warm with vanilla ice cream, whipped cream, or any toppings you fancy!
Serving Suggestions: The Art of Plating
When it comes to serving this delicious banana cobbler, a warm scoop of it in a bowl is all you really need—but why not elevate it a bit? Here are some friendly serving tips:
-
For a Rustic Look: Spoon servings into individual ramekins or small bowls. These little portions not only look adorable but make serving easy and inviting!
-
Garnish: Top each serving with a dollop of whipped cream and a sprinkle of chopped nuts. If you’re feeling fancy, a drizzle of caramel sauce adds a gourmet touch.
-
Ice Cream Love: Place a warm piece of cobbler in a bowl and top it off with a generous scoop of vanilla ice cream. The combination of hot and cold is absolutely irresistible!
Recipe Variations: Get Creative!
Looking to shake things up a bit? Here are some fun variations and twists you can try:
-
Nutty Banana Cobbler: Add a half cup of chopped walnuts or pecans to the batter for added crunch and flavor.
-
Chocolate Banana Cobbler: Sprinkle some chocolate chips over the top before baking for a rich dessert that will satisfy any sweet tooth.
-
Caribbean Twist: Use coconut milk instead of whole milk and add shredded coconut in with the bananas for a tropical vibe.
-
Berry Banana Cobbler: Toss in a cup of blueberries or raspberries for a fruity burst that pairs beautifully with bananas.
-
Vegan-Friendly Version: Substitute eggs with flax eggs and use almond milk instead of whole milk, plus coconut oil in place of butter for a delicious vegan cobbler!
Chef’s Notes: A Touch of Love
This Southern Banana Cobbler recipe has come a long way! Over the years, I’ve tried many variations, adding different spices, fruits, and toppings. One funny memory I have is the time I tried to impress my friends by adding a splash of bourbon into the mix for an adult twist. Let’s just say it turned out a bit too “spirited”—but we laughed, and it became a night to remember!
The beauty of this dessert is its flexibility. It’s a canvas for your creativity, and you can tweak it to suit your mood and taste preferences. So don’t hesitate to experiment; after all, the kitchen is meant for fun!
FAQs and Troubleshooting: Common Questions
Q1: My cobbler didn’t rise as much as I expected. What went wrong?
A: Make sure your self-rising flour is fresh! Old baking ingredients can lead to flat baked goods. Also, ensure you’ve mixed just until combined—overmixing can cause it to be dense.
Q2: Can I use plain flour instead of self-rising flour?
A: Absolutely! Just remember to add the appropriate baking powder and salt as mentioned in the ingredients section to achieve that delightful rise.
Q3: How do I store leftovers?
A: Once cooled, store any leftovers in an airtight container in the refrigerator for up to three days. To reheat, pop it in the microwave for a few seconds or in the oven at 350°F until warmed through.
Q4: What if I don’t have ripe bananas?
A: If your bananas aren’t ripe enough, you can speed up the ripening process by placing them in a brown paper bag for a day or two. Or, you can try baking them at 300°F for about 15-20 minutes until they’re soft.
Nutritional Info (Optional)
While this banana cobbler is a delightful treat, moderation is key. A serving (1/8 of the pan) typically contains approximately:
- Calories: 280
- Total Fat: 12g
- Carbohydrates: 42g
- Protein: 4g
- Sugars: 22g
Just remember, it’s all about balance, and a little indulgence now and then never hurt anyone!
So there you have it! A warm, delightful Southern Banana Cobbler recipe that’s sure to bring joy to your kitchen and your loved ones’ hearts. I can’t wait for you to try it and create your own stories around this charming dessert. Happy cooking, and don’t forget to share your cobbler adventures with me—I’d love to hear them! 🍌✨
PrintSouthern Banana Cobbler

A delightful Southern dessert that combines ripe bananas with a buttery crust, perfect for family gatherings and cozy evenings.
- Prep Time: 15 minutes
- Cook Time: 35 minutes
- Total Time: 50 minutes
- Yield: 8 servings 1x
- Category: Dessert
- Method: Baking
- Cuisine: Southern
- Diet: Vegetarian
Ingredients
- 5 ripe bananas, sliced
- 1 cup granulated sugar
- ½ cup unsalted butter, melted
- 1 teaspoon vanilla extract
- 1 teaspoon ground cinnamon
- ¼ teaspoon salt
- 1 cup self-rising flour
- 1 cup whole milk
- ½ cup sugar for the topping
- ½ teaspoon ground nutmeg (optional)
- Vanilla ice cream (optional)
- Whipped cream (optional)
- Chopped pecans or walnuts (optional)
- Caramel drizzle (optional)
Instructions
- Preheat your oven to 350°F (175°C).
- Prepare your baking dish by greasing it lightly with butter or cooking spray.
- Mash the ripe bananas until mostly smooth in a medium mixing bowl.
- Mix the melted butter, sugar, vanilla extract, and cinnamon into the mashed bananas until well combined.
- Blend in the self-rising flour and milk until fully combined, making sure not to overmix.
- Transfer the cobbler mixture into the prepared baking dish and spread it evenly.
- Bake for 30-35 minutes, or until the top is golden brown and a toothpick inserted in the center comes out clean.
- Cool for roughly 10 minutes before serving warm with optional toppings.
Notes
Feel free to add walnuts or pecans for crunch or top with ice cream and caramel drizzle for an extra treat.
Nutrition
- Serving Size: 1 serving
- Calories: 350
- Sugar: 20g
- Sodium: 200mg
- Fat: 12g
- Saturated Fat: 6g
- Unsaturated Fat: 4g
- Trans Fat: 0g
- Carbohydrates: 50g
- Fiber: 3g
- Protein: 5g
- Cholesterol: 30mg
Keywords: banana cobbler, Southern dessert, comfort food, easy banana recipe, baked dessert