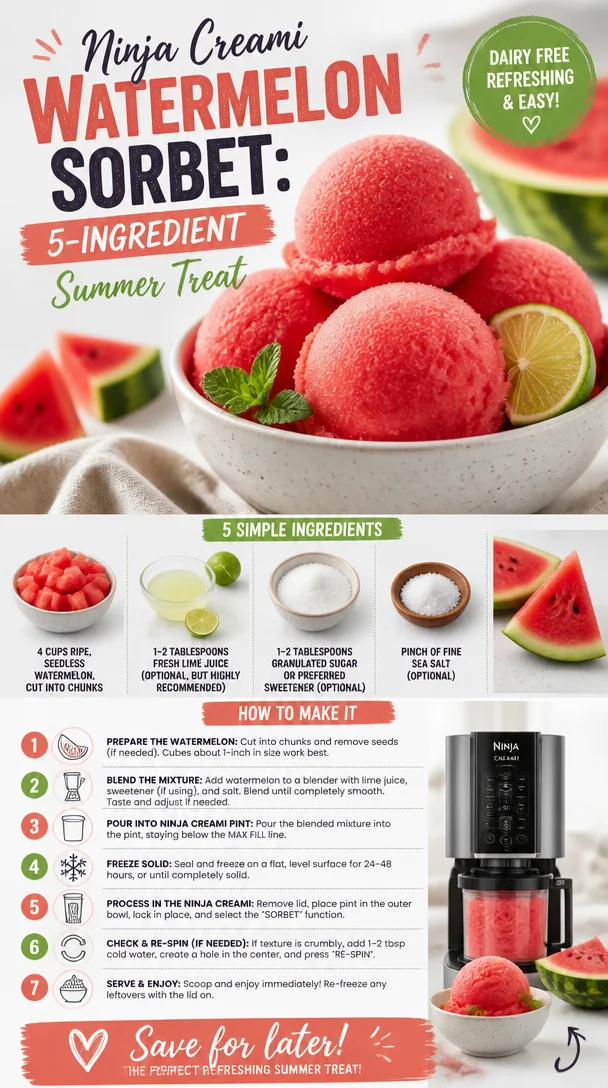
Ninja Creami Watermelon Sorbet: 5-Ingredient Summer Treat
Easy Ninja Creami Watermelon Sorbet Recipe: Summer Delight!
As the sun shines brightly and the temperatures rise, there’s nothing quite like a refreshing treat to cool you down. Enter the Easy Ninja Creami Watermelon Sorbet! This vibrant, fruity sorbet is not only an explosion of flavor, but it’s also an easy recipe you can whip up in no time. The light, summery taste of watermelon combined with a hint of lime is the perfect way to celebrate the warm weather. Whether you’re lounging by the pool, hosting a backyard barbecue, or just trying to beat the heat, this sorbet is your sweetest solution.
I’m Ava Carter, and I’m thrilled to share a recipe that’s not only incredibly delicious but also brings back some of my fondest summer memories. Picture this: a lazy afternoon, family lounging under a big oak tree, laughter echoing as we indulge in ice-cold treats. Watermelon was always on our picnic blanket—it was juicy, sweet, and so refreshing after a hot day. Fast forward to now, and that nostalgia inspires my love for this sorbet. It captures those sunny days perfectly, and every spoonful feels like a little bite of summertime joy.
So grab your Ninja Creami, and let’s create something that will not only tantalize your taste buds but also take you back to those wonderful warm days. With minimal ingredients and a dash of creativity, you’ll be enjoying a frozen dessert that’s all-natural and oh-so-satisfying.
Personal Story
Growing up, summers meant visiting my grandparents’ farm, where we’d spend long days picking fresh fruit from their sprawling garden. Watermelon was always a highlight—huge, sweet, and dripping with juice, it was a staple of our family gatherings. We’d sit on the porch, spitting out seeds and giggling as we raced to see who could finish their slice first. Those simple moments created lasting memories, always filled with laughter and love. Fast forward to today, and I channel that nostalgic joy into creating recipes that evoke those summer feelings. My Ninja Creami Watermelon Sorbet embodies those blissful days, allowing me to relive them with each scoop!
Ingredients
Here’s what you’ll need to create this delectable sorbet:
-
4 cups ripe, seedless watermelon, cut into chunks
- Choose the ripest watermelon you can find—it ensures maximum sweetness and flavor. If you happen to have seeds, just make sure to remove them for a smoother texture.
-
1-2 tablespoons fresh lime juice (optional, but highly recommended)
- This adds a zesty flavor that beautifully complements the sweetness of the watermelon. If you don’t have lime, fresh lemon juice works just as well!
-
1-2 tablespoons granulated sugar or preferred sweetener (optional)
- Depending on the natural sweetness of your watermelon, you might prefer to add a hint of sweetener. Alternatives like honey, agave syrup, or any sugar substitute can work—just adjust to your preference!
-
Pinch of fine sea salt (optional)
- Salt enhances the flavor, bringing out the natural sweetness of the fruit. A tiny pinch is all you need to elevate the taste without making it salty!
Step-by-Step Instructions
Ready to get started? Let’s break it down step by step!
-
Prepare the Watermelon:
- Start by cutting your watermelon into small chunks. Aim for even-sized pieces, as this will help them freeze uniformly. The more prolific the watermelon, the better the sorbet. Feel free to sample a chunk for sweetness—nothing beats freshly cut watermelon!
-
Freeze the Watermelon:
- Spread the watermelon chunks on a baking sheet lined with parchment paper in a single layer. This helps prevent them from sticking together. Pop the tray in the freezer for about 2-3 hours until the watermelon is completely frozen solid. I usually do this the night before so I’m ready to blend in the morning—it really helps for meal prep!
-
Blend the Watermelon:
- Once frozen, toss the watermelon chunks into your Ninja Creami. If you’re adding lime juice and sweetener, this is the moment to include them too. Blend on the sorbet setting until smooth and creamy. Don’t forget to scrape down the sides if needed. Trust me, the aroma will take you back to those summers!
-
Taste and Adjust:
- Give your sorbet a quick taste. This is where those chef instincts come in! If it’s sweet enough, fantastic! If you prefer a bit more zing, add more lime juice or sweetener as needed and blend again.
-
Pack It Up:
- Transfer your creamy mixture into a freezer-safe container, ensuring it’s packed well to avoid ice crystals forming. Smooth out the top, cover it, and let it chill for another hour for the perfect scoop-able texture.
-
Scoop and Enjoy:
- When you’re ready to treat yourself, take your sorbet out of the freezer and let it sit for a few minutes to soften up. Scoop it into your favorite bowls or cones, and enjoy that refreshing summer bliss!
Serving Suggestions
To serve, I love to add a sprig of mint on top for a pop of color and fresh aroma. You can also dress it up with a sprinkle of toasted coconut or a drizzle of chocolate sauce for an indulgent twist. For an Instagram-ready moment, serve it in a chilled bowl or glass, topped with a thin slice of lime. It’s as delightful to look at as it is to eat!
Recipe Variations
Feeling adventurous? Here are a few ideas to make this sorbet your own:
-
Berry Blast: Add a cup of frozen strawberries or blueberries for a mixed berry delight. This adds flavor and a fun color!
-
Tropical Twist: Incorporate chunks of pineapple or a splash of coconut milk for an instant tropical vibe.
-
Herbal Infusion: Add a few basil leaves or mint to the blending process for a refreshing herbaceous touch.
-
Creamy Sorbet: For a creamier texture, mix in a splash of coconut cream or Greek yogurt before blending. It’s a game-changer!
-
Spicy Kick: For adventurous palates, add a dash of cayenne pepper or jalapeño for a sweet-and-spicy experience.
Chef’s Notes
This Easy Ninja Creami Watermelon Sorbet has undergone quite a culinary journey! Originally, I simply blended frozen watermelon and called it good, but as I experimented with flavors and textures, it transformed into this delightful recipe. I chuckle thinking about some of my earlier attempts at nutty sorbets that turned out more like frozen mush! However, every endeavor has led to this refreshing treat that I can share with all of you. It’s moments like these that remind me why I love cooking: it’s all about learning, experimenting, and sharing joy through food.
FAQs and Troubleshooting
1. Can I use other melons for this recipe?
Absolutely! Cantaloupe or honeydew melon can also be used for delicious sorbet variations. Just follow the same instructions!
2. Why isn’t my sorbet coming out creamy?
If your sorbet is grainy or icy, it may need more blending. Use the "sorbet" function on your Ninja Creami or blend it a little longer until smooth. You could also try adding a little bit of water to help the texture.
3. How long can I store the sorbet?
This sorbet can be stored for up to two weeks in the freezer. Just ensure it’s sealed tightly in an airtight container to prevent freezer burn.
4. What if my watermelon isn’t sweet enough?
No worries! Just add a bit more sweetener to taste after blending. Remember, sometimes the ripeness of fruit can really vary, so it’s always good to taste first!
Nutritional Info
While I’m all about enjoying delicious flavors, if you’re curious, here’s a rough breakdown per serving (about ½ cup):
- Calories: 60
- Protein: 1g
- Fat: 0g
- Carbohydrates: 16g
- Fiber: 1g
- Sugar: 12g
Now that you’re equipped with this easy, vibrant recipe packed full of summery goodness, I can’t wait for you to try it! Whip out that Ninja Creami and dive into a bowl of watermelon delight. Here’s to making fresh, feel-good memories in your kitchen—one sorbet scoop at a time! Enjoy, and as always, happy cooking!
PrintEasy Ninja Creami Watermelon Sorbet
A refreshing watermelon sorbet perfect for summer, combining the sweetness of ripe watermelon with a hint of lime.
- Prep Time: 10 minutes
- Cook Time: 0 minutes
- Total Time: 135 minutes
- Yield: 4 servings 1x
- Category: Dessert
- Method: Blending and Freezing
- Cuisine: American
- Diet: Vegan
Ingredients
- 4 cups ripe, seedless watermelon, cut into chunks
- 1–2 tablespoons fresh lime juice (optional)
- 1–2 tablespoons granulated sugar or preferred sweetener (optional)
- A pinch of fine sea salt (optional)
Instructions
- Prepare the watermelon: Cut your watermelon into small chunks.
- Freeze the watermelon: Spread the chunks on a baking sheet lined with parchment paper and freeze for 2-3 hours.
- Blend the watermelon: Toss the frozen chunks into your Ninja Creami, adding lime juice and sweetener if desired. Blend on the sorbet setting.
- Taste and adjust: Sample the sorbet and add more lime or sweetener if needed, then blend again.
- Pack it up: Transfer the mixture into a freezer-safe container and let it chill for another hour.
- Scoop and enjoy: Serve the sorbet in bowls, optionally garnished with mint or other toppings.
Notes
This sorbet can be made using other melons like cantaloupe or honeydew. It can be stored for up to two weeks in an airtight container.
Nutrition
- Serving Size: 1/2 cup
- Calories: 60
- Sugar: 12g
- Sodium: 5mg
- Fat: 0g
- Saturated Fat: 0g
- Unsaturated Fat: 0g
- Trans Fat: 0g
- Carbohydrates: 16g
- Fiber: 1g
- Protein: 1g
- Cholesterol: 0mg
Keywords: sorbet, watermelon, summer dessert, refreshing, vegan
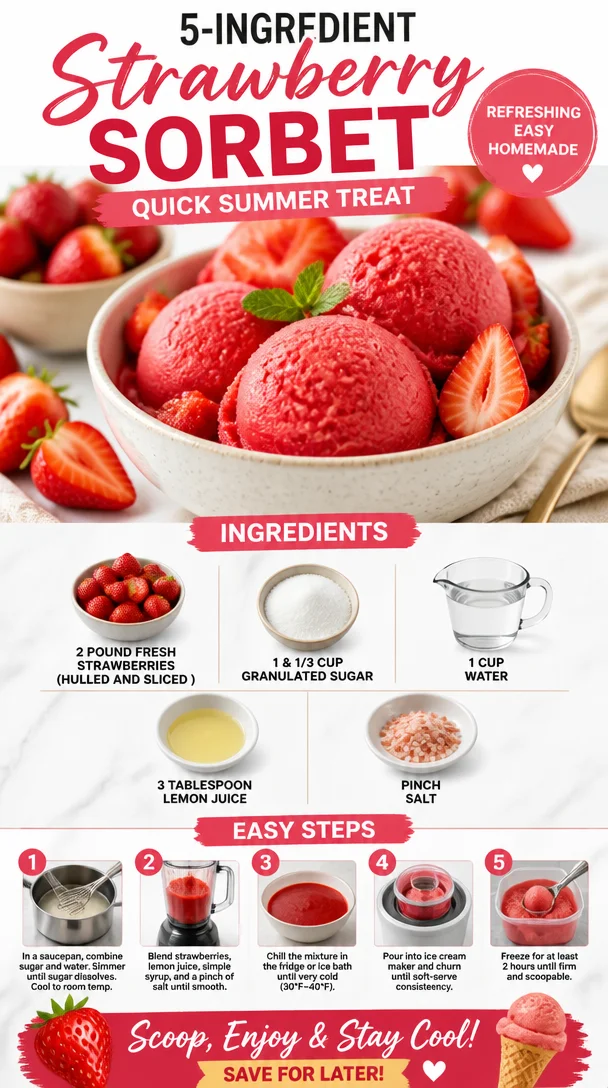
Ingredient Strawberry Sorbet: Quick Summer Treat
Hey there, fellow food lovers! If you’re looking for a refreshing treat that screams summer and brings back those nostalgic childhood memories, I’ve got just the recipe for you: delicious Strawberry Sorbet! Imagine juicy, ripe strawberries pureed into a smooth, icy delight, kissed with a touch of lemon to balance the sweetness. It’s that perfect, feel-good dessert that brings a smile to your face and a cool boost on a hot day.
Let me take you on a little journey back to a sun-soaked afternoon when I first learned to whip up this gem. I was just a kid, running around the backyard with my siblings and cousins, our hands sticky with melted popsicle drippings and our laughter filling the air. My grandmother, a culinary wizard who knew how to make magic with fresh fruits, decided to surprise us with a special treat—her homemade strawberry sorbet. With the intoxicating aroma of fresh strawberries wafting through the kitchen, I couldn’t resist sneaking spoonfuls straight from the blender!
Silly me, I thought making sorbet was a complex affair reserved for fancy ice cream parlors. But my grandma let me in on the secret: it’s as easy as blending, freezing, and enjoying! From that day on, strawberry sorbet became our go-to summer delight, and I knew I had to recreate that memory. Lucky for you, I’m here to share that very recipe, perfect for any occasion, whether you’re hosting a summer soiree, enjoying a cozy night in, or looking for a sweet indulgence that fits your clean eating goals.
So grab your favorite apron, and let’s dive into the colorful world of strawberries, sugar, and pure joy. I promise you, with just a few simple ingredients, you’ll be enjoying this delightful sorbet in no time!
Personal Story
Let me take you back to a sunny Saturday afternoon spent at my grandparents’ home in the countryside. Picture this: the sun starting to dip behind the trees, casting a warm golden glow on everything it touches. My grandma had just returned from a trip to the local farmer’s market with a basket brimming with the freshest strawberries you could ever imagine. Their sweet, vibrant aroma wafted through the kitchen as she began to prepare her famed strawberry sorbet.
As I sneaked into the kitchen, entranced by the sight of those luscious red berries, she caught my eye and grinned, “Want to help, Ava?” Of course, I jumped at the chance! We hulled and sliced those juicily ripe berries together while she shared stories of her childhood and how her mother used to make the same sorbet on hot summer days. I remember giggling as I pretended to be a professional chef, creating my own berry masterpieces, all the while stealing bites of the sweet fruit.
When the mixture was finally ready, my grandma poured it into a container, and we eagerly awaited—impatiently, I might add—the moment it would transform into frosty perfection. I can still hear the sound of that sorbet machine whirring; the anticipation was almost as delicious as the treat itself. Finally, when the time came, she spooned out the first serving, topping it off with a sprig of mint from her garden. That first bite was pure bliss, refreshing and bursting with flavor, and it instantly transported me to lazy summer days filled with laughter and joy.
Those moments in the kitchen with my grandma are memories I cherish deeply, and every time I make strawberry sorbet, I feel like I’m revisiting that special time. It’s a sweet reminder that cooking is so much more than just making food—it’s about creating connections, sharing stories, and enjoying life’s simple pleasures.
Ingredients
Here’s what you’ll need to create your own batch of heavenly Strawberry Sorbet:
-
2 pounds fresh strawberries (hulled and sliced)
The star of the show! Use ripe, juicy strawberries for the best flavor. If strawberries aren’t available, you can substitute with other berries, like raspberries or peaches. -
1 & 1/3 cups granulated sugar
This will sweeten the sorbet and help achieve the perfect texture. If you’re looking for a healthier alternative, consider using honey or agave syrup—just adjust the quantity to your taste as they are sweeter. -
1 cup water
This will help dissolve the sugar and create a smooth blend. If you want to infuse a different flavor, you can use fruit juice instead, like orange or lemonade! -
3 tablespoons lemon juice
A splash of freshness! This brightens the flavor of the strawberries. Freshly squeezed lemon juice is best, but bottled will do in a pinch. -
Pinch of salt
Adding a tiny bit of salt enhances the flavors and balances the sweetness. Don’t skip it!
And there you have it—simple and accessible ingredients that come together to create a delightful dessert. Now let’s get to the fun part!
Step-by-Step Instructions
Follow these easy steps, and you’ll have your sorbet chillin’ in no time. Are you ready? Let’s do this!
Step 1: Prepare Your Strawberries
Start by hulling and slicing your fresh strawberries. This is the fun part! Get your kids involved or turn on some music to enjoy while you work. When you’re done, place the sliced strawberries in a mixing bowl.
Chef Tip: Look for strawberries that are bright red and fragrant. If they are slightly overripe, that’s okay! They’ll still work beautifully in this recipe.
Step 2: Sweeten the Strawberries
Sprinkle the sugar over the strawberries, mixing gently to ensure they’re well coated. Let them sit for about 15-20 minutes to allow the sugar to draw out the natural juices.
Chef Insight: This process is known as maceration, and it enhances the flavor while creating a lovely syrup! You can use this trick on other fruits, too; it works magic for peaches or even mangoes!
Step 3: Blend It Up
After letting the strawberries macerate, transfer them into a blender or food processor. Add in the water, lemon juice, and a pinch of salt. Blend until you achieve a smooth, vibrant mixture.
Chef Hack: If you love a chunkier texture, leave a few berries whole or pulse the blender a few times rather than completely pureeing them.
Step 4: Taste Test
Now’s the moment of truth! Give your strawberry mixture a little taste. If it needs more sweetness, feel free to add a bit more sugar or a splash of honey. Remember, you want a refreshing flavor that burst in your mouth!
Chef Tip: Trust your taste buds! Feel free to adjust the sweetness and acidity to your liking.
Step 5: Chill It Down
Pour the mixture into a shallow, airtight container. Cover it and pop it into the freezer for about 4-6 hours, or until completely frozen. If you’re in a hurry, you can also use an ice cream maker to churn your sorbet!
Chef Secret: If using an ice cream maker, follow the manufacturer’s instructions. The process usually takes around 20-30 minutes for creamy results!
Step 6: Serve and Enjoy
Once your sorbet is nice and frozen, take it out and let it sit for a few minutes at room temperature to soften before scooping. It’ll make serving so much easier! Scoop it into bowls, garnish with fresh mint, and enjoy your delightful creation!
Serving Suggestion: For a touch of elegance, serve the sorbet in stylish dessert cups, and drizzle a little extra lemon juice or a berry compote on top for added flair.
Serving Suggestions
Strawberry Sorbet is effortlessly versatile. Serve it in bowls topped with a sprig of fresh mint for that perfect touch of color and freshness. You can also scoop it into a cone for a fun, ice cream-inspired treat. Feeling fancy? Pair it with slices of pound cake or alongside some dark chocolate for a decadent dessert experience. The vibrant red hue of the sorbet is not only a feast for the palate but also a visual delight!
Recipe Variations
- Berry Medley Sorbet: Combine strawberries with other berries like blueberries or raspberries for a mixed berry sorbet that’s bursting with flavor!
- Peachy Strawberry: Add ripe peaches to the mix for a delightful variation that brings a bit of Southern sweetness.
- Mango Tango: Swap half the strawberries for ripe mango for a tropical twist that takes you straight to paradise.
- Herbal Twist: Infuse a hint of mint or basil by blending a few leaves in with the strawberries before freezing, adding a refreshing herbal note.
- Coconut Cream Sorbet: For a creamy, tropical delight, add a cup of coconut cream to the mixture for a coconut-strawberry fusion.
Chef’s Notes
Over the years, this Strawberry Sorbet recipe has turned into a cherished family tradition. It’s been handed down through generations, and each summer, you’ll find my siblings and I gathering in the kitchen to rekindle those memories while creating new ones with our kids. The best part? Everyone makes it their own! Some add a splash of orange zest, while others like to experiment with different sweeteners. The variations are endless, but the laughter and joy remain constant.
And while you may think the recipe is perfection as it is, I’ve had my fair share of kitchen mishaps—like the time I accidentally grabbed cayenne pepper instead of salt (who knew sorbet could have a kick?). It’s all part of the culinary adventure, and believe me, every mistake teaches us something new. If you make the wrong turn, just laugh it off and try again. Cooking is just as much about joy as it is about satisfying your cravings!
FAQs and Troubleshooting
Q: Can I use frozen strawberries instead of fresh?
Absolutely! Frozen strawberries are a fantastic alternative. Just let them thaw slightly before blending, and you’re good to go.
Q: Why is my sorbet too hard to scoop?
If your sorbet becomes rock-solid, try letting it sit at room temperature for a bit before scooping. You can also mix in a bit more water or lemon juice to soften it up for next time!
Q: How long can I store the sorbet?
In an airtight container, your sorbet will last in the freezer for about a month. Just remember to cover it well to avoid freezer burn—nobody wants that!
Q: Can I make this sorbet without sugar?
You can attempt a sugar-free version using sugar substitutes like stevia or monk fruit. Adjust quantities to suit your taste buds, and enjoy guilt-free!
Nutritional Info (Optional)
For those of you interested in the numbers, this Strawberry Sorbet generally contains about 120 calories per half-cup serving, with a healthy dose of vitamin C and antioxidants from the strawberries!
And there you have it! A delightful, indulgent, and vibrant Strawberry Sorbet recipe that’s as fun to make as it is to eat. Each scoop transports you back to those sunny summer afternoons filled with laughter and love. So get in the kitchen, whip up a batch, and don’t forget to share your creations! Happy sorbet-making!
PrintStrawberry Sorbet
A refreshing and delightful strawberry sorbet that captures the essence of summer with ripe strawberries and a touch of lemon.
- Prep Time: 20 minutes
- Cook Time: 360 minutes
- Total Time: 380 minutes
- Yield: 6 servings 1x
- Category: Dessert
- Method: Blending & Freezing
- Cuisine: American
- Diet: Vegan
Ingredients
- 2 pounds fresh strawberries (hulled and sliced)
- 1 & 1/3 cups granulated sugar
- 1 cup water
- 3 tablespoons lemon juice
- Pinch of salt
Instructions
- Prepare your strawberries by hulling and slicing them, then place in a mixing bowl.
- Sprinkle the sugar over the strawberries and mix gently; let sit for 15-20 minutes.
- Transfer the strawberries into a blender, add water, lemon juice, and salt; blend until smooth.
- Taste the mixture and adjust sweetness as needed.
- Pour the mixture into a shallow container and freeze for 4-6 hours.
- Serve the sorbet in bowls garnished with fresh mint.
Notes
For variations, try adding other fruits like peaches or blending in mint for a refreshing twist.
Nutrition
- Serving Size: 1/2 cup
- Calories: 120
- Sugar: 25g
- Sodium: 5mg
- Fat: 0g
- Saturated Fat: 0g
- Unsaturated Fat: 0g
- Trans Fat: 0g
- Carbohydrates: 30g
- Fiber: 2g
- Protein: 1g
- Cholesterol: 0mg
Keywords: strawberry, sorbet, dessert, summer treat, vegan dessert
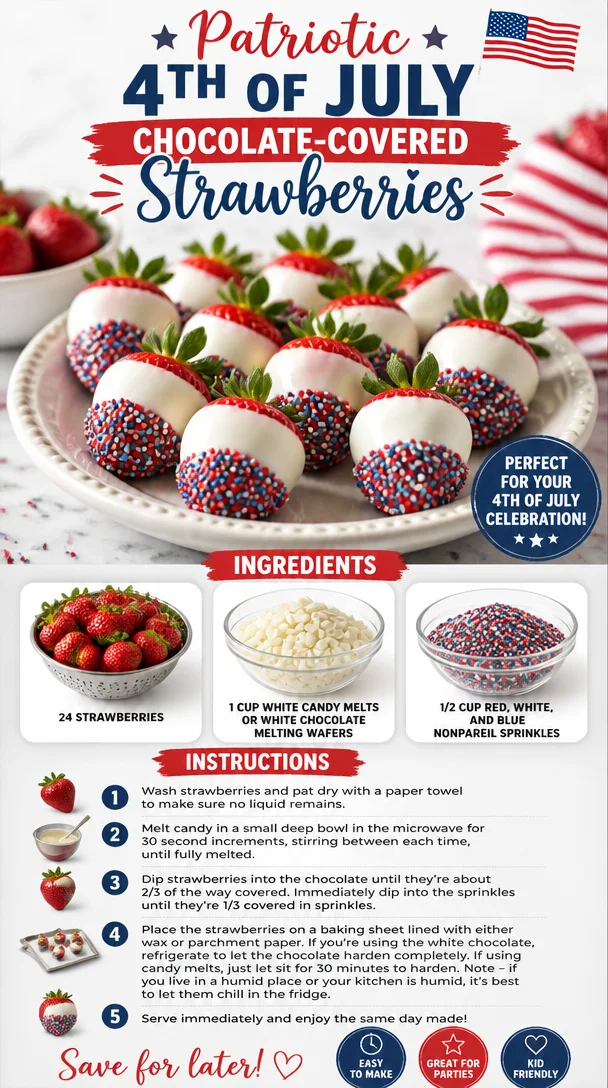
Patriotic 4th of July Chocolate-Covered Strawberries
Celebrate Independence Day with Festive Chocolate Covered Strawberries
When it comes to 4th of July festivities, nothing screams summer quite like a table laden with vibrant fruits and colorful treats. This year, I’m taking the celebration to the next level with a simple, yet stunning dessert: chocolate-covered strawberries! These berries are not only a delightful treat but they also embody the spirit of independence with their red, white, and blue decor—perfect for your summer gatherings or backyard barbecues.
What makes these chocolate-covered strawberries truly special isn’t just their picture-perfect presentation; it’s the fun that comes with making them. I have fond memories of preparing festive desserts with my family as a kid. I remember my mom melting chocolate in a double boiler while we’d eagerly await our turn to dip the strawberries in that luscious goodness. The kitchen would be filled with laughter and sweet scents, while our creativity flowed as we decorated them—tossing sprinkles like confetti. Those joyous moments are what inspired this recipe. They perfectly encapsulate the flavors of summer, as well as the spirit of togetherness. So let’s dive into this simple, healthy treat that will elevate your holiday gathering.
Here’s the beauty of chocolate-covered strawberries: they’re incredibly versatile and can be tailored to fit any celebration, but when they sport the colors of our flag? Pure magic! Your guests will love them, and you’ll love how easy they are to whip up. So, roll up your sleeves, and let’s savor the spirit of summer with these gorgeous, sweet bites!
Ingredients
To create the most delectable 4th of July chocolate-covered strawberries, you’ll need the following ingredients:
-
24 strawberries
Fresh strawberries are a must! Look for ones that are bright red, plump, and free of blemishes. If strawberries aren’t in season, you can substitute with other berries like blueberries or raspberries for their vibrant colors. Just remember that the dipping process may vary slightly based on the berry you use. -
1 cup white candy melts or white chocolate melting wafers
These sweet, creamy melts make for an easy and tasty coating. White chocolate can be a little finicky, so the melting wafers tend to provide a smoother finish that’s easier to work with. If you’re feeling extra adventurous, you can substitute with milk chocolate or dark chocolate for a twist on flavor. -
1/2 cup red, white, and blue nonpareil sprinkles
Sprinkles add that festive touch we all adore! Feel free to switch things up with any colored sprinkles, or even coconut flakes for a tropical vibe. Just keep in mind that coconut flakes won’t have the same colorful effect but will definitely bring some texture.
Step-by-Step Instructions
Ready to create some mouthwatering treats? Let’s get started! Here’s a step-by-step guide to making your chocolate-covered strawberries:
-
Prep Your Strawberries
Start by rinsing your strawberries gently under cold water. Pat them dry with a paper towel, making sure they’re completely dry before dipping. One little chef hack—avoid dipping wet strawberries in chocolate as it can lead to clumping and uneven coating. A dry berry means smooth chocolate bliss! -
Melt the Candy Melts
In a microwave-safe bowl, pour in your white candy melts or chocolate wafers. Heat in the microwave for 30 seconds at a time, stirring after each interval until smooth and completely melted. It’s crucial to keep an eye on your mixture—burnt chocolate is a no-go! If you’re using a double boiler, place the chocolate over simmering water and stir until melted. If it starts to seize, add a teaspoon of coconut oil or shortening to regain that silky texture. -
Dip the Strawberries
Hold a strawberry by its leafy green top and dip it into the melted chocolate, swirling gently to coat it evenly. Let the excess chocolate drip back into the bowl. It’s all about that perfect coating! If you find the chocolate thickening while you dip, just reheat it for a few seconds. -
Add the Sprinkles
Now comes the fun part! Before the chocolate sets, sprinkle your red, white, and blue nonpareils over the chocolate-covered strawberries. This is where you can really let your creativity shine. Don’t be shy! The more sprinkles, the better. You could even set up an assembly line and have your friends or kids help out. -
Let Them Set
Place your decorated strawberries on a baking sheet lined with parchment paper. Once all the strawberries are dipped and sprinkled, pop them into the fridge for about 30 minutes. This will help the chocolate firm up nicely, resulting in that satisfying crunch when you bite in.
Serving Suggestions
These chocolate-covered strawberries are not just delicious; they’re a visual delight too! When it’s time to serve, arrange them artfully on a platter or cake stand. You can even line them up in a flag pattern for that extra festive touch. For added elegance, you could drape a few mint leaves around the strawberries for a pop of green. Trust me, your guests will be snapping pictures before digging in!
Recipe Variations
Looking to add your unique twist? Here are a few variations to consider:
-
Chocolate Drizzle: After setting, melt some dark or milk chocolate and drizzle it over the white chocolate-covered strawberries for an elegant touch.
-
Nutty Delight: After dipping in chocolate, roll the strawberries in crushed nuts or shredded coconut for extra texture and flavor.
-
Flavor Explosion: Mix a few drops of mint or almond extract into your melted chocolate for a different flavor profile that will wow your guests.
-
Caramel Surprise: Before dipping in chocolate, drizzle melted caramel over the strawberries to offer a sweet surprise.
-
Fruit Medley: Experiment with other fruits like pretzel rods or bananas! Dip them in chocolate and decorate them in the same festive way.
Chef’s Notes
Over the years, my journey with chocolate-covered strawberries has evolved—from the clumsy, chocolate-smeared hands of childhood to being a weekend favorite at summer parties. I once had a mishap where I completely overlooked a berry’s wetness and ended up with a chocolate blob instead of that glossy finish I wanted. Instead of feeling defeated, we turned it into a game—how messy could we get while making desserts? That’s the joy of cooking: it’s full of surprises and laughter.
These strawberries represent more than just a treat. They symbolize good times, sharing, and delicious adventures in the kitchen with family and friends. So even if they don’t turn out picture-perfect, remember: it’s all about the fun you have along the way!
FAQs and Troubleshooting
-
What if my chocolate thickens or seizes?
This often happens when it overheats. If it thickens, try stirring in a little coconut oil or shortening to smooth it out. For seized chocolate, you can sometimes salvage it with a bit of cream, adding it slowly until you restore that melt-in-your-mouth texture. -
Can I use frozen strawberries?
It’s best to use fresh strawberries for this particular recipe, as frozen strawberries can release water and lead to a messy dipping situation. If you only have frozen on hand, thaw them thoroughly and dry them before dipping. -
How can I store leftover chocolate-covered strawberries?
Store them in an airtight container in the refrigerator for up to 2 days. Keep them in a single layer if possible; layering can lead to squished chocolate on the bottoms. If you notice any condensation, it might be best to let them sit at room temperature for a little while before serving. -
What if I can’t find the right sprinkles?
No worries! You can create your colorful mix using any sprinkles you have—just think outside the box. Crushed candies, colored sugar, or even edible glitter can work wonders!
Nutritional Info
While dessert isn’t usually a focus on nutrition, it’s good to know something like chocolate-covered strawberries has its advantages. Strawberries are rich in vitamins, especially Vitamin C, and antioxidants, and they’re low in calories. Keep in mind that the chocolate and sprinkles will add some sweetness and calories, so enjoy them in moderation!
So there you have it—a delicious recipe for chocolate-covered strawberries that will make your 4th of July celebration even more memorable! With minimal effort, you can impress your friends and family with this stunning dessert that captures the spirit of summer. Happy eating, and may your holiday be filled with laughter and joy!
PrintFestive Chocolate Covered Strawberries

Celebrate Independence Day with these vibrant and delicious chocolate-covered strawberries, perfect for summer gatherings.
- Prep Time: 15 minutes
- Cook Time: 10 minutes
- Total Time: 25 minutes
- Yield: 4 servings 1x
- Category: Dessert
- Method: No-Cook
- Cuisine: American
- Diet: Vegetarian
Ingredients
- 24 strawberries
- 1 cup white candy melts or white chocolate melting wafers
- 1/2 cup red, white, and blue nonpareil sprinkles
Instructions
- Prep your strawberries by rinsing gently under cold water and patting dry.
- Melt the candy melts in a microwave-safe bowl, heating in 30-second intervals, stirring until smooth.
- Dip the strawberries into the melted chocolate, holding by the leafy green tops.
- Add the sprinkles over the chocolate-covered strawberries before the chocolate sets.
- Let them set on a lined baking sheet in the fridge for about 30 minutes.
Notes
Experiment with different types of chocolate and toppings, such as crushed nuts or flavored extracts.
Nutrition
- Serving Size: 1 serving
- Calories: 150
- Sugar: 20g
- Sodium: 30mg
- Fat: 7g
- Saturated Fat: 4g
- Unsaturated Fat: 2g
- Trans Fat: 0g
- Carbohydrates: 20g
- Fiber: 2g
- Protein: 1g
- Cholesterol: 0mg
Keywords: chocolate-covered strawberries, festive dessert, 4th of July, summer treats, easy dessert
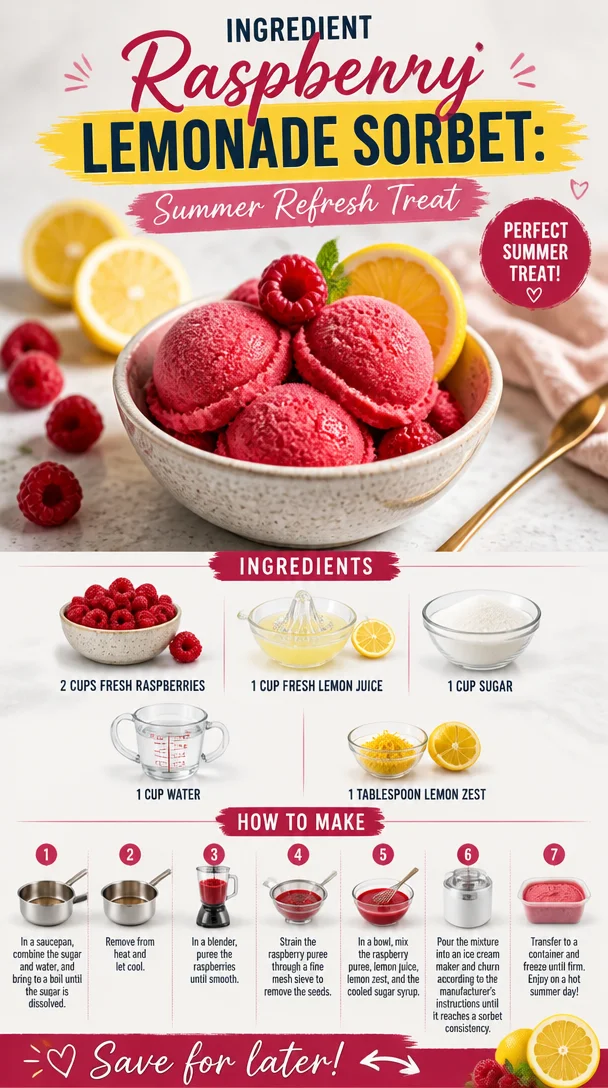
Ingredient Raspberry Lemonade Sorbet: Summer Refresh Treat
Raspberry Lemonade Sorbet: A Refreshing Delight
Welcome, sorbet lovers! Today, we’re diving into a dish that feels like summer in a bowl—Raspberry Lemonade Sorbet. This delightful frozen treat combines the vibrant flavors of fresh raspberries and zesty lemons, making it a perfect way to cool off on a warm day. Plus, it’s simple enough for anyone to make, even if you’re new to the kitchen.
Imagine this: You’ve spent the day soaking in the sunshine, lounging around with friends, and you’re in desperate need of a refreshing pick-me-up. This sorbet is a delightful solution! With the bright notes of lemon mingling with the sweetness of ripe raspberries, each spoonful will transport you to berry fields and lemon orchards, no matter where you are.
The best part? You only need a handful of ingredients to whip up this fantastic sorbet. You might have most of them in your kitchen already! And let me tell you, once you try this recipe, you’ll wonder how you ever lived without it. So grab your blender, and let’s get started on this fruity masterpiece!
A Sweet Childhood Memory
Let me take you back to my childhood for a minute. Growing up, summer meant heading to my grandmother’s house in the countryside, where the gardens were bursting with ripe fruit. One of my favorite traditions was picking fresh raspberries in her garden. I can still feel the warm sun on my back as I searched through the bushes, aiming to find the biggest, juiciest berries.
Once we gathered enough, my grandmother would mix up a refreshing raspberry lemonade that was always served at our family barbecues. It was tart, sweet, and oh-so-refreshing on those hot afternoons. In my teenage years, I remember experimenting with different flavor combos, but the classic raspberry and lemon combination always had a special place in my heart.
As I grew older, those sunny afternoons inspired me to create this Raspberry Lemonade Sorbet. Every scoop is a celebration of those sweet, simple memories made under the sun with family and friends. So let’s bring a little nostalgia and joy back into your kitchen!
Ingredients
Here’s what you’ll need to create this refreshing Raspberry Lemonade Sorbet:
-
2 cups fresh raspberries
Juicy and vibrant, fresh raspberries are the star of this dish. You can substitute with frozen raspberries if fresh aren’t available, but fresh provides the best texture and flavor. -
1 cup fresh lemon juice
Freshly squeezed is best! Bottled lemon juice can be used in a pinch, but the flavor won’t be as bright. If you want a sweeter sorbet, consider adding a bit more sugar to balance the tartness. -
1 cup sugar
This is what brings all the flavors together and helps create that amazing texture. You can swap it with honey or agave if you’re looking for a more natural sweetener, though it might alter the taste slightly. -
1 cup water
Just plain ol’ water to dilute the mixture. Sparkling water can add a nice fizzy twist if you want to get creative! -
1 tablespoon lemon zest
Zest brings depth to the flavor and enhances the lemony punch. If you’re out of lemons, orange zest can be a lovely alternative for a slightly different flavor profile.
Step-by-Step Instructions
Now let’s get down to the nitty-gritty of making this sorbet!
-
Blend the Raspberries
Start by placing the raspberries in a blender or food processor. Pulse until smooth, and if you want a super silky texture, you can strain the mixture through a fine mesh sieve to remove the seeds. This is a bit of extra effort, but trust me, it creates a luxurious sorbet! -
Make a Simple Syrup
In a small saucepan, combine the sugar and water. Heat over medium heat, stirring until the sugar has fully dissolved. This should only take a few minutes. Let it cool slightly while you squeeze the lemons. -
Juice the Lemons
Roll the lemons on the countertop to soften them before slicing them in half and juicing them. Try to remove any seeds that sneak in during this process. Straining the juice also helps prevent pesky seeds from ruining your sorbet. -
Combine Ingredients
In a large bowl, mix the blended raspberries, fresh lemon juice, and lemon zest. Slowly pour in your cooled simple syrup, tasting as you go to find your perfect sweetness balance. If you like it tarter, keep the sugar level low; if you prefer it sweeter, add a bit more sugar syrup! -
Chill the Mixture
Cover your sorbet mixture and pop it in the refrigerator for about 1-2 hours. This step allows the flavors to meld beautifully. It also helps the mixture to be chilled when you hit the ice cream maker. -
Churn the Sorbet
Once your mixture has chilled, pour it into your ice cream maker and churn according to the manufacturer’s instructions. It should take about 20-25 minutes to reach that soft-serve consistency we all love. -
Freeze Until Firm
Transfer the churned sorbet into an airtight container and let it freeze for an additional 3-4 hours, or until firm. Be sure to store it in the coldest part of your freezer to maintain that perfect texture. -
Enjoy!
Scoop out the sorbet and enjoy this refreshing treat! If it becomes too hard in the freezer, let it sit at room temperature for a few minutes before scooping.
Serving Suggestions
This Raspberry Lemonade Sorbet can brighten up any dessert table. Serve it in chilled bowls or cones for a fun summer treat. You can also add mint leaves or a sprinkle of lemon zest on top for an extra pop of color and flavor! Pair it with fresh berries or a drizzle of raspberry sauce for an elegant presentation, or simply enjoy it on its own—because it’s just that good!
Recipe Variations
Here are a few fun twists you might consider:
- Minty Fresh: Add some chopped fresh mint leaves to the mixture for a refreshing herbal note.
- Coconut Cream Twist: Swirl in some coconut cream before freezing for a tropical touch.
- Berry Blend: Mix in other berries like strawberries or blueberries for a mixed berry sorbet.
- Lime Boost: Substitute some of the lemon juice with lime juice for a zesty lime-berry flavor.
- Spicy Kick: Add a pinch of cayenne pepper for a surprising heat that pairs beautifully with the sweetness.
Chef’s Notes
When I first made this sorbet, I was simply trying to recreate that childhood joy—what I didn’t expect was how much it would become a hit at summer gatherings. I still remember the first time I served it to friends; they couldn’t get enough! Now, it’s a staple whenever I need a refreshing dessert.
I lovingly make this sorbet every summer, experimenting with new variations each time. It has morphed from being just a simple treat into a family favorite with everyone asking for seconds. It’s amazing how a dish can create those lasting memories.
FAQs and Troubleshooting
-
Can I make this sorbet without an ice cream maker?
Yes! After blending your ingredients, pour the mixture into a shallow dish and place it in the freezer. Every 30 minutes, scrape it with a fork until it’s frozen and fluffy. It won’t be as smooth as churned sorbet but still delicious! -
What if my sorbet is too hard?
If it’s super hard, just let it sit out for 5-10 minutes before trying to scoop. You can also blend it again for a softer texture. -
How long does the sorbet last in the freezer?
It should last about 2-3 weeks if stored properly in an airtight container. After this time, the flavor can start to fade. -
Can I adjust the sweetness?
Absolutely! This recipe is adjustable based on your taste. Just remember that the sweetness may change once frozen, so taste as you go!
Nutritional Info
While I typically focus on enjoyment over specifics, here’s a ballpark estimate for a serving of Raspberry Lemonade Sorbet (1/2 cup):
- Calories: ~130
- Total Fat: 0g
- Sodium: 1mg
- Total Carbohydrates: 33g
- Sugars: 29g
- Protein: 1g
Enjoy this delightful Raspberry Lemonade Sorbet as a refreshing companion to your summertime adventures. Trust me, it’s like a scoop of sunshine on your tongue! Happy sorbet-making, friends!
PrintRaspberry Lemonade Sorbet

A refreshing and vibrant frozen treat that combines fresh raspberries and zesty lemons, perfect for cooling off on a warm day.
- Prep Time: 10 minutes
- Cook Time: 10 minutes
- Total Time: 120 minutes
- Yield: 4 servings 1x
- Category: Dessert
- Method: Freezing
- Cuisine: American
- Diet: Vegan
Ingredients
- 2 cups fresh raspberries
- 1 cup fresh lemon juice
- 1 cup sugar
- 1 cup water
- 1 tablespoon lemon zest
Instructions
- Blend the raspberries in a blender until smooth. Strain if desired for a silky texture.
- Make a simple syrup by heating sugar and water in a saucepan until dissolved. Let cool.
- Juice the lemons, removing seeds, and strain the juice if necessary.
- Combine blended raspberries, lemon juice, and lemon zest in a bowl. Add cooled simple syrup, adjusting sweetness to taste.
- Chill the mixture in the refrigerator for 1-2 hours.
- Churn the sorbet mixture in an ice cream maker according to manufacturer instructions for 20-25 minutes.
- Freeze the churned sorbet in an airtight container for 3-4 hours until firm.
- Enjoy! Scoop and serve, letting sit at room temperature for easier scooping if too hard.
Notes
Consider adding mint leaves or lemon zest on top when serving for an extra pop of flavor.
Nutrition
- Serving Size: 1/2 cup
- Calories: 130
- Sugar: 29g
- Sodium: 1mg
- Fat: 0g
- Saturated Fat: 0g
- Unsaturated Fat: 0g
- Trans Fat: 0g
- Carbohydrates: 33g
- Fiber: 2g
- Protein: 1g
- Cholesterol: 0mg
Keywords: sorbet, raspberry, lemonade, dessert, summer treat, refreshing, vegan
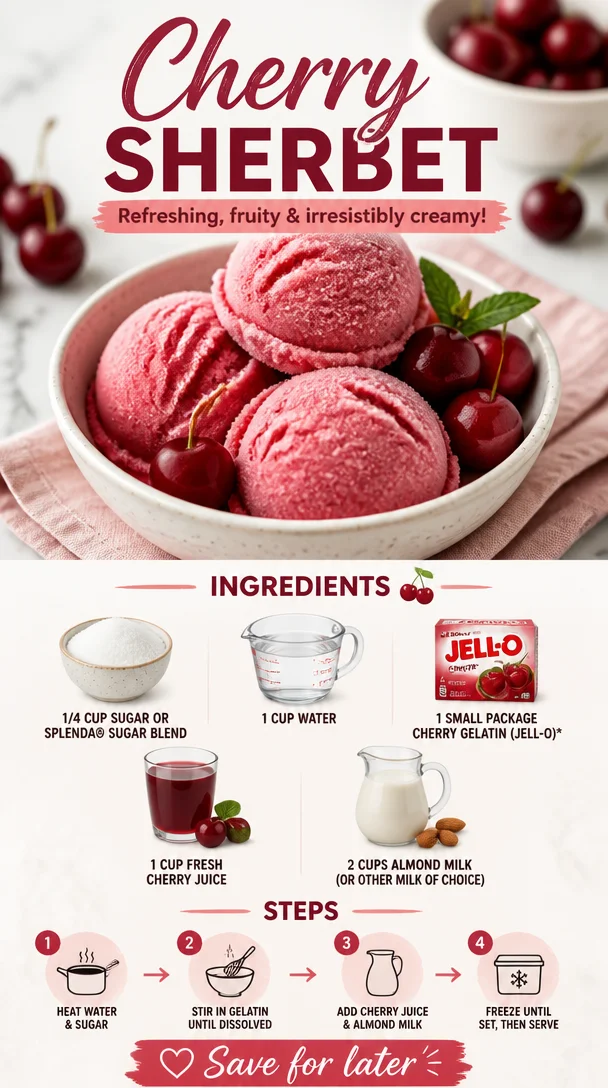
Cherry Sherbet
Cool Down with Homemade Cherry Sherbet
Welcome to another delightful adventure in the kitchen! Today, we’re diving into the refreshing world of cherry sherbet, a treat that will whisk you back to childhood memories and outdoor summer fun. There’s something oh-so-special about enjoying a bowl of homemade sherbet on a hot day, isn’t there? The creamy texture, the vibrant color, and the sweet-tart flavor all come together to create a delicious experience that makes your taste buds dance.
Growing up, my summers were filled with trips to the local ice cream shop with my family, where I would always opt for a scoop (or two) of cherry sherbet. I loved the way the cool, sweet flavor hit my tongue, a burst of cherries combined with that lovely creaminess. It was a simple pleasure in a world that often felt chaotic. As I got older, I realized I could recreate that joy in my own kitchen, and guess what? It’s easier than you might think!
Whether you’re making this to cool off after a long day or to impress your friends at a summer gathering, cherry sherbet is sure to bring smiles all around. So grab your apron, and let’s get started on this delicious journey!
A Cherry Memory
One of my fondest memories tied to cherry sherbet takes me back to summer barbecues at my grandparents’ house. The sun would be shining, the grill sizzling, and the aroma of burgers wafting through the air. After the main course, my grandma would always bring out her homemade cherry sherbet, which she’d churn in her old-fashioned ice cream maker. It was this beautiful pink color that made everyone’s hearts sing.
I can still hear the laughter of my cousins as we raced to the porch, bowls in hand, eager to dig in. My grandma would always say, “It’s made with love and the freshest cherries!” Those words stuck with me, and they inspire the way I create recipes today. That joy, that connection with family, and the simplicity of enjoying good food are what we’re all about here.
Ingredients
Gather up these simple ingredients to create your very own cherry sherbet:
-
1/4 cup sugar or SPLENDA® Sugar Blend
This sweetener helps balance the tartness of the cherries. If you’re looking to cut calories, SPLENDA is a great low-calorie option. Feel free to adjust the sweetness according to your taste! -
1 cup water
Water is the base for your syrup, helping dissolve the sugar and infuse flavor into the cherries. You can use sparkling water for an extra fizzy version—fun for gatherings! -
1 small package cherry gelatin (Jell-O)
This adds sweetness and helps create that wonderful sherbet texture. If you can’t find cherry, raspberry gelatin works beautifully as a substitute. -
1 cup fresh cherry juice
Fresh cherry juice packs a powerful punch of flavor! If cherry season isn’t in full swing, you can opt for bottled juice, but make sure it’s 100% juice with no added sugars. -
2 cups almond milk (or other milk of choice)
Almond milk adds creaminess while keeping it light. If you’re a fan of dairy, whole milk or half-and-half will work for a richer sherbet experience.
Step-by-Step Instructions
Ready to whip up this sweet treat? Let’s dive into the cooking steps, where I’ll sprinkle in some tips and tricks along the way!
-
Prepare the Cherry Syrup:
In a saucepan, combine the sugar and water over medium heat. Stir until the sugar is fully dissolved. Bring it to a gentle simmer, letting it bubble away for about 5 minutes. Chef’s Tip: Keeping your syrup warm will help the cherry gelatin dissolve more easily later on. -
Add the Jell-O:
Remove the saucepan from heat, and stir in the cherry gelatin. Keep stirring until it’s completely dissolved. This is the moment where that rich cherry aroma will fill your kitchen—you’ll be tempted to taste! -
Stir in Cherry Juice:
Once the gelatin is dissolved, add the fresh cherry juice. Give it a good stir to combine everything. The color should start turning a beautiful shade of pink, reminiscent of summer sunsets! Pro Tip: If you’re unsure about the cherry juice flavor, taste it and adjust the sweetness by adding more sugar if needed. -
Mix in the Almond Milk:
Now, let your mixture cool to room temperature. Once cooled, stir in the almond milk (or your milk of choice). This will give the sherbet its creamy, dreamy texture. Chef Hack: If you’re in a hurry, you can chill your syrup in the fridge for quicker cooling! -
Ice Cream Maker Time:
Pour the mixture into your ice cream maker and churn according to the manufacturer’s instructions. Typically, this should take around 20-30 minutes. If you don’t have an ice cream maker, don’t fret! Pour it into a shallow dish and freeze, stirring every 30 minutes until it reaches your desired consistency. -
Final Freeze:
Once it’s churned to a soft-serve consistency, transfer your cherry sherbet to a lidded container. Freeze for an additional 2-4 hours to firm it up. Side Note: If it’s too hard to scoop after freezing, let it sit at room temperature for a few minutes before serving. -
Serve and Enjoy:
Scoop your homemade cherry sherbet into bowls or cones and enjoy! Consider topping it off with fresh cherries, a sprinkle of coconut flakes, or a drizzle of chocolate sauce. You’ve earned it!
Serving Suggestions
When it comes to serving your cherry sherbet, presentation is key! Serve it in beautiful sundae glasses or waffle cones for that nostalgic ice cream shop feel. Don’t forget to add a few fresh cherries or a sprig of mint for a pop of color! If you’re feeling adventurous, layer it in a glass with some chocolate or vanilla ice cream for a marbled effect—sometimes the best recipes bring a little pizzazz!
Recipe Variations
Here are some fun alternatives to mix things up:
-
Berry Blast: Add a cup of other mixed berry juices (like blueberry or raspberry) for a sherbet mix that’s bursting with flavor.
-
Coconut Cherry: Substitute almond milk with coconut milk for a tropical flair.
-
Cherry Limeade: Mix in some fresh lime juice to brighten up the flavor and give it a zesty kick.
-
Frozen Yogurt Twist: Use yogurt instead of milk for a healthier, tangy version!
-
Alcohol-Infused: For an adult twist, blend in a splash of vodka or rum (just a touch!) when mixing the milk for a refreshing summertime cocktail.
Chef’s Notes
This cherry sherbet recipe has been a beloved staple in my family for years, evolving with each season. I often look back at my grandma’s old ice cream maker sitting in the corner of the kitchen, a beautiful reminder of simpler times. Sometimes, I add a dash of almond extract or vanilla for a more complex flavor profile. The best part? You can customize this recipe endlessly! Whether it’s a summer day with friends or a cozy winter evening, you can always find a reason to whip up a batch of this creamy goodness.
FAQs and Troubleshooting
1. Can I use frozen cherries instead of fresh ones?
Absolutely! Just thaw and juice them before using. You may need to adjust the sugar based on how sweet the cherries are.
2. What if my sherbet is too hard to scoop?
Let it sit out for 5-10 minutes before scooping. You can also blend it with a little milk for a softer texture.
3. How long will the sherbet last in the freezer?
It will keep for about 2-3 weeks in an airtight container, although it’s hard to resist for that long!
4. Is it necessary to use gelatin?
While gelatin helps achieve that scoopable texture, you can omit it if you prefer, though the texture may be a bit icier.
Enjoy this homemade cherry sherbet, and remember that cooking is all about joy, experimentation, and sharing this delicious journey with others. Life is too short not to indulge in vibrant, flavorful food—so let’s keep things fresh, simple, and above all, delicious!
PrintHomemade Cherry Sherbet
A refreshing cherry sherbet that combines sweet-tart cherries with a creamy texture, perfect for hot summer days.
- Prep Time: 15 minutes
- Cook Time: 35 minutes
- Total Time: 50 minutes
- Yield: 4 servings 1x
- Category: Dessert
- Method: Churning
- Cuisine: American
- Diet: Vegetarian
Ingredients
- 1/4 cup sugar or SPLENDA® Sugar Blend
- 1 cup water
- 1 small package cherry gelatin (Jell-O)
- 1 cup fresh cherry juice
- 2 cups almond milk (or other milk of choice)
Instructions
- Prepare the Cherry Syrup: In a saucepan, combine the sugar and water over medium heat. Stir until the sugar is fully dissolved. Bring to a gentle simmer for about 5 minutes.
- Add the Jell-O: Remove the saucepan from heat, and stir in the cherry gelatin until completely dissolved.
- Stir in Cherry Juice: Once the gelatin is dissolved, add the fresh cherry juice and stir to combine.
- Mix in the Almond Milk: Let the mixture cool to room temperature, then stir in the almond milk.
- Pour the mixture into your ice cream maker and churn according to the manufacturer’s instructions, typically around 20-30 minutes.
- Transfer the cherry sherbet to a lidded container and freeze for an additional 2-4 hours to firm it up.
- Serve and Enjoy: Scoop the homemade cherry sherbet into bowls or cones and enjoy!
Notes
Serve in sundae glasses or waffle cones. Consider topping with fresh cherries or a drizzle of chocolate sauce.
Nutrition
- Serving Size: 1 serving
- Calories: 220
- Sugar: 28g
- Sodium: 80mg
- Fat: 4g
- Saturated Fat: 0g
- Unsaturated Fat: 4g
- Trans Fat: 0g
- Carbohydrates: 42g
- Fiber: 1g
- Protein: 3g
- Cholesterol: 0mg
Keywords: cherry sherbet, homemade dessert, summer treat
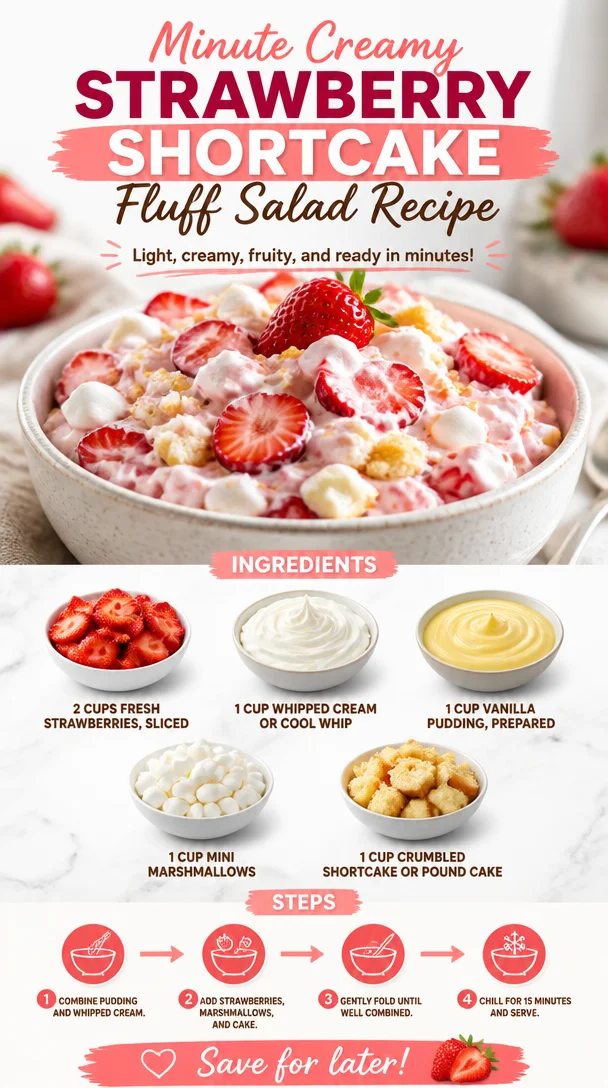
Minute Creamy Strawberry Shortcake Fluff Salad Recipe
Strawberry Shortcake Fluff Salad: A Sweet Symphony of Flavor
Welcome, friends, to a delightful culinary journey where fun flavors and wholesome ingredients come together in perfect harmony! Today, I’m excited to share a recipe that embodies everything I believe about cooking and eating—it’s simple, absolutely delicious, and brings a smile to your face. Say hello to my Strawberry Shortcake Fluff Salad! Perfect for summer gatherings, cozy family dinners, or even a treat for yourself, this dish is all about celebrating fresh, feel-good food.
Picture this: it’s a sun-kissed afternoon, and the tantalizing smell of strawberries wafts through the air. Family and friends are gathered, laughter lingers, and the table is bursting with colors and joyful energy. That’s the essence of summer, isn’t it? When I think back to my childhood summers, one of my fondest memories is the big family picnics in my grandparents’ backyard. My grandmother, a culinary wizard in her own right, would whip up this fluffy, sweet Strawberry Shortcake Fluff Salad that had us all clamoring for seconds. It was a refreshing treat on hot days—a glorious blend of flavors that paired beautifully with sunshine and smiles.
You’ll find this dish captures that nostalgia while adding a modern twist. The sweetness of ripe strawberries, combined with fluffy whipped cream, luscious vanilla pudding, soft mini marshmallows, and buttery shortcake crumbles, creates a delightful dessert that’s not just a feast for the palate but also a visual delight. Trust me, this Strawberry Shortcake Fluff Salad will become a staple in your home, bringing joy and vibrant flavors to your table. Let’s dive into the kitchen and create this masterpiece!
A Sweet Memory to Savor
As I reminisce about those cherished summer picnics, I can almost hear the laughter and see the smiles of my loved ones as they dug into my grandma’s creation. It wasn’t just food; it was a moment—a celebration of unity, love, and summer. She always had a knack for making the simplest ingredients shine. I still remember her saying, “A good dish is all about love and good quality ingredients.” This philosophy inspired me to keep my recipes approachable but flavorful.
One summer, I decided to help her in the kitchen while she prepared the salad. I was responsible for slicing strawberries and sneaking a few into my mouth when I thought she wasn’t looking! The vibrant red of the berries, the fluffy clouds of cream, and the golden shortcake crumbles stuck with me. Every spoonful was a harmony of textures, flavors, and memories, and we both knew that sharing food makes every experience richer and more meaningful. Today, I cherish those moments and hope to pass on that joy and love through my cooking.
Let’s bring a bit of that nostalgia into your home with my rendition of this delightful Strawberry Shortcake Fluff Salad!
Ingredients
Before we roll up our sleeves and get cooking, let’s gather our ingredients. This recipe is as simple as it is delicious. Here’s what you’ll need:
-
2 cups fresh strawberries, sliced
- Fresh strawberries are the star of this dish! When choosing berries, look for vibrant, plump ones without any bruises. If you can’t find fresh strawberries, feel free to use frozen strawberries. Just thaw them first and drain excess moisture to avoid a soggy fluff.
-
1 cup whipped cream or Cool Whip
- Whipped cream adds a light and airy texture. You can use store-bought Cool Whip for convenience, or make your own by whipping heavy cream until it forms soft peaks. The home-made version will taste fresher!
-
1 cup vanilla pudding, prepared
- This ingredient brings creaminess and sweetness. You can use instant pudding, but for a richer flavor, consider preparing it from scratch with milk, sugar, and vanilla.
-
1 cup mini marshmallows
- Mini marshmallows add a fun, chewy texture to the fluff salad. If you’re feeling adventurous, swap these out for flavored marshmallows, like strawberry or coconut, for a unique twist.
-
1 cup crumbled shortcake or pound cake
- Shortcake or pound cake provides a comforting, buttery base. If you’re looking for a gluten-free version, there are plenty of gluten-free cakes available that will work beautifully!
These ingredients come together to create a dish that not only tastes incredible but also brings back joyful memories of family gatherings and sunny days.
Step-by-Step Instructions
Now that we have our lovely ingredients lined up, let’s get into the fun part—creating our Strawberry Shortcake Fluff Salad! Here’s a step-by-step guide:
-
Prep the Strawberries:
- Take your fresh strawberries, remove the green tops, and slice them into thin pieces. Don’t be shy about tasting a few as you go—quality control is a must! Set them aside in a bowl.
- Tip: For added flavor, sprinkle the sliced strawberries with a little sugar and let them sit for about 15 minutes. This will create a syrupy sweetness that enhances the overall flavor!
-
Whip the Cream:
- If you’re making your own whipped cream, use a mixing bowl and an electric mixer to whip the heavy cream until it forms soft peaks. Add a tablespoon of powdered sugar for sweetness and a splash of vanilla extract for flavor.
- Chef Hack: Make sure your mixing bowl and beaters are cold to ensure the cream whips up perfectly!
-
Prepare the Pudding:
- If using instant pudding, follow the package instructions by mixing it with milk. If you’re making your own, combine milk, sugar, and a touch of vanilla in a saucepan, heat until warm, then stir in your cornstarch until thickened.
- Let the pudding cool slightly before folding it into the whipped cream.
-
Combine Whipped Cream and Pudding:
- In a large mixing bowl, gently fold the prepared whipped cream into the vanilla pudding using a spatula. Be gentle; we want to keep that lovely light texture!
- Pro Tip: Folding involves gently mixing without deflating the whipped cream, rotating the bowl while you scrape along the sides and bottom with the spatula.
-
Mix in the Marshmallows:
- Add the mini marshmallows to the cream and pudding mixture, incorporating them subtly. These will be little delightful bites in your salad!
-
Assemble the Fluff Salad:
- In a large serving bowl, layer the prepared strawberry slices, followed by a generous layer of the whipped cream and pudding mixture. Then add a layer of crumbled shortcake or pound cake. Repeat until you’ve used all ingredients, finishing with a layer of the whipped cream mixture on top.
- Presentation Tip: You can also serve this is individual cups for a beautiful display—perfect for parties!
-
Chill and Serve:
- Cover the bowl with plastic wrap and let it chill in the refrigerator for at least 1 hour. This step is crucial! Chilling allows the flavors to meld and gives the marshmallows time to soften for that perfect fluffiness.
- When you’re ready to serve, give it a gentle stir, and enjoy the beautiful blend of flavors and textures!
Serving Suggestions
When it comes to serving Strawberry Shortcake Fluff Salad, the sky’s the limit! The vibrant colors make for a stunning presentation. You can serve it right from the bowl or in individual dessert cups layered elegantly—what a treat!
Consider garnishing each serving with additional sliced strawberries or a sprinkle of crushed shortcake crumbs on top for that extra touch. If you’re feeling a bit indulgent, a drizzle of chocolate or caramel sauce wouldn’t hurt either!
Recipe Variations
Now, if you’re feeling adventurous and want to tweak this recipe, I’ve got some fun suggestions for you:
-
Berry Medley: Swap out the strawberries for a mix of your favorite berries—blueberries, raspberries, or blackberries can add an exciting twist to the flavor profile.
-
Chocolate Lovers: Add some mini chocolate chips or a drizzle of chocolate syrup when layering for a rich chocolate-strawberry flavor explosion!
-
Nutty Delight: Sprinkle a handful of chopped nuts (like pecans or almonds) between the layers for added crunch and flavor.
-
Cream Cheese Variation: For a richer texture, consider folding in a bit of softened cream cheese into the whipped cream and pudding mixture. It adds a delicious creaminess to the fluff!
-
Dairy-Free Version: Use coconut cream in place of whipped cream, cashew milk pudding, and gluten-free cake to convert this into a delightful dairy-free treat!
Chef’s Notes
As I reflect on this recipe, I can’t help but think about how it has evolved over time. My grandmother had a knack for making seasonal fruits shine in her desserts, and she effortlessly balanced richness with lightness. I’ve kept her spirit alive by ensuring my recipe is just as simple, yet bursting with flavor.
Funny story: One year, I decided to throw a summer BBQ and whipped this salad up as an impromptu dessert, only to find out that I was also serving it as an appetizer while everyone mingled! Who could resist such a delicious, fluffy treat right from the start?
I love seeing how different families interpret this recipe—each version reflecting personal tastes and memories. It’s what makes cooking so special.
FAQs and Troubleshooting
1. Can I make this salad ahead of time?
Absolutely! This salad actually tastes better after sitting in the fridge for a few hours as the flavors meld. Just be sure to cover it well to keep it fresh.
2. How do I prevent the strawberries from getting mushy?
As mentioned earlier, tossing the sliced strawberries with a little sugar helps them maintain their structure before adding them to the fluff. Also, avoid mixing them in too early.
3. Can I use a different type of cake?
Definitely! Any soft cake will work. Angel food cake is an excellent alternative if you want something lighter, or even a sponge cake!
4. The marshmallows are sticking together; what can I do?
If the mini marshmallows tend to clump up, toss them lightly in a bit of cornstarch before adding them to the mix. This will help keep them fluffy!
Nutritional Info
While this dish falls squarely in the dessert category, it brings with it a medley of fresh fruit. Generally, a serving can provide:
- Calories: Approximately 250
- Protein: 2g
- Fat: 10g
- Carbohydrates: 36g
- Dietary Fiber: 1g
Of course, nutritional values will vary based on ingredients and portions, but who’s counting when you’re having this much fun?
And there you have it! The Strawberry Shortcake Fluff Salad, a beautiful dish that brings joy, laughter, and a bit of nostalgia to your table. Whether you serve it at a celebration, family picnic, or simply enjoy it at home, it’s a dessert that’s sure to please everyone. Remember, food is about creating memories—so gather your loved ones and let the magic happen! Enjoy, friends!
PrintStrawberry Shortcake Fluff Salad
A delightful and fluffy dessert that brings together fresh strawberries, whipped cream, vanilla pudding, mini marshmallows, and shortcake crumbles for a refreshing treat perfect for summer.
- Prep Time: 15 minutes
- Cook Time: 0 minutes
- Total Time: 75 minutes
- Yield: 4 servings 1x
- Category: Dessert
- Method: No Cooking
- Cuisine: American
- Diet: Vegetarian
Ingredients
- 2 cups fresh strawberries, sliced
- 1 cup whipped cream or Cool Whip
- 1 cup vanilla pudding, prepared
- 1 cup mini marshmallows
- 1 cup crumbled shortcake or pound cake
Instructions
- Prep the strawberries: Remove the green tops and slice them thinly. Set aside.
- Whip the cream: Whip the heavy cream until soft peaks form, adding powdered sugar and vanilla to taste.
- Prepare the pudding: Mix instant pudding with milk or prepare it from scratch and let it cool.
- Combine the whipped cream and pudding gently to maintain the texture.
- Mix in the mini marshmallows to the cream mixture.
- Assemble the salad by layering strawberries, whipped cream mixture, and shortcake in a serving bowl.
- Chill in the refrigerator for at least 1 hour before serving.
Notes
Can be made ahead of time and tastes better after chilling. Serve in bowls or individual cups for a beautiful presentation.
Nutrition
- Serving Size: 1 serving
- Calories: 250
- Sugar: 20g
- Sodium: 200mg
- Fat: 10g
- Saturated Fat: 6g
- Unsaturated Fat: 4g
- Trans Fat: 0g
- Carbohydrates: 36g
- Fiber: 1g
- Protein: 2g
- Cholesterol: 30mg
Keywords: dessert, strawberry salad, fluff salad, summer dessert
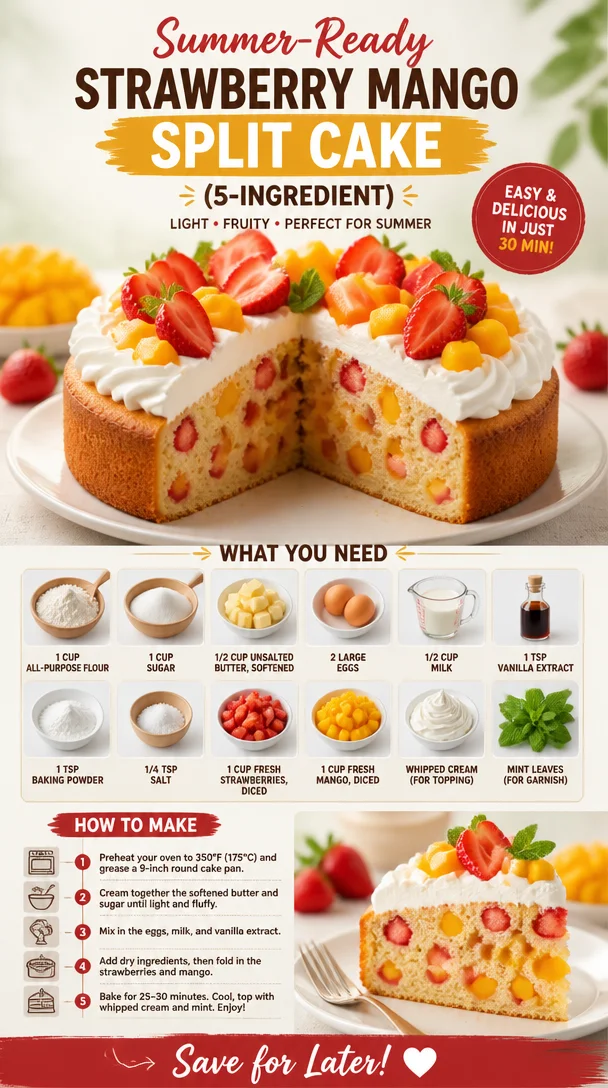
Summer-Ready Strawberry Mango Split Cake (5-Ingredient)
Strawberry Mango Split Cake: A Sweet Slice of Summer
Hello, my fellow food lovers! Grab your apron and let’s get cooking because today, we’re diving into an unforgettable treat that will brighten up your day—the Strawberry Mango Split Cake! With the perfect combo of sweet strawberries and juicy mangoes, this dessert is everything you need to celebrate summer. It’s light, fluffy, and bursting with flavor, promising to whisk you away to sun-soaked days.
This cake is not only a delightful culinary endeavor but also a wonderful way to create memories—either with friends gathered around the kitchen or family sitting together at the dining table, indulging in something truly special. The vibrant colors and fresh fruits will have everyone smiling before the first bite even reaches their lips! Plus, this recipe is incredibly approachable, making it perfect for bakers of any skill level.
Now, let me let you in on a little secret—baking doesn’t have to be a daunting task filled with meticulous measurements and complicated techniques. It should be a joyous, creative expression of love, and that’s exactly what we’re celebrating here. So, whether you’re looking to impress guests at a summer barbecue or simply treat yourself after a long week, this cake is your ticket to flavor town!
Get ready for a delicious journey as we blend together simple ingredients into a cake that’s as easy to make as it is delightful to eat. So, roll up your sleeves, and let’s whip up this Strawberry Mango Split Cake!
Personal Story
Growing up, our family was all about the gatherings—especially during the summertime. My mom would whip up her famous fruit desserts, and nothing took center stage quite like her fruit cakes. The air was always filled with laughter, the clinking of glasses, and, of course, my mom’s cheerful voice guiding us in the kitchen. One summer day, she decided we’d try something new: a cake inspired by the classic banana split, but with a fruity twist. That’s when the Strawberry Mango Split Cake was born!
I remember that day vividly. My little sister and I were tasked with chopping the strawberries and mangoes. While we giggled and argued over who got to use the knife first—safely supervised, of course!—the kitchen filled with the sweet fragrance of the ripe fruits. When the cake emerged from the oven, golden and fluffy, there was no waiting for it to cool.
We slathered on whipped cream and garnished it with mint leaves before taking that first bite. I still taste that moment, the combination of the moist cake melting with the freshness of the fruit—a culinary harmony that felt like summer in every bite. Now, as I’m sharing this recipe with all of you, I hope to spark your own memories in the kitchen, creating delicious moments that stick with you just as this cake has for me!
Ingredients
-
1 cup all-purpose flour
- The backbone of your cake! For a gluten-free option, you can substitute with almond flour or a gluten-free blend.
-
1 cup sugar
- Sweet goodness! If you’re looking to cut back on sugar, use coconut sugar or a sweetener of your choice, but remember to adjust the quantity as needed.
-
1/2 cup unsalted butter, softened
- This adds richness and moisture to our cake. If you prefer, you can swap it for coconut oil, though that might give a slightly different texture.
-
2 large eggs
- Eggs help bind the cake. For a vegan option, you can use flaxseed meal mixed with water (1 tablespoon flaxseed meal + 2.5 tablespoons water = 1 egg).
-
1/2 cup milk
- Whole milk is fantastic for moisture, but feel free to use almond or oat milk for a dairy-free alternative.
-
1 tsp vanilla extract
- Vanilla takes the flavor to another level. Use pure vanilla extract for the best taste, or try almond extract for a unique twist!
-
1 tsp baking powder
- This is your leavening agent, ensuring a lovely rise. Don’t confuse it with baking soda; they’re not interchangeable.
-
1/4 tsp salt
- Balances the sweetness and enhances flavor. A pinch can make all the difference!
-
1 cup fresh strawberries, diced
- The star of our cake! You can swap these with cherries or blueberries if you’re feeling adventurous.
-
1 cup fresh mango, diced
- Adds a tropical zing! If fresh is not available, use frozen mango, but thaw it well first.
-
Whipped cream (for topping)
- Light and fluffy creaminess to crown the cake! You can use store-bought or make your own with heavy cream.
-
Mint leaves (for garnish)
- A refreshing touch! This will elevate the presentation. You can skip this if you don’t have any on hand.
Step-by-Step Instructions
-
Preheat Your Oven: Start by preheating your oven to 350°F (175°C). A good chef always prepares the workspace, and this ensures your cake bakes evenly.
-
Grease the Cake Pan: Grab a round cake pan (9-inch works great) and grease it with butter or non-stick spray. This will prevent sticking and make sure your cake slides right out.
-
Mix the Dry Ingredients: In a mixing bowl, whisk together the flour, baking powder, and salt. This helps ensure that the baking powder is evenly distributed throughout the flour, giving you an even rise.
-
Cream the Butter and Sugar: In another bowl, beat the softened butter and sugar together until it’s light and fluffy. I like using a hand mixer for speed, but a good ol’ wooden spoon works too—it just might take a little longer. The air whipped in here will make your cake nice and fluffy!
-
Add the Eggs: One at a time, add the eggs to the butter mixture, making sure to mix well after each addition. This helps emulsify the mixture; don’t skip this step!
-
Incorporate Vanilla and Milk: Stir in the vanilla extract and milk until well combined. You’ll want this batter to be smooth and creamy, so take your time here.
-
Mix Dry and Wet Ingredients: Gradually add the flour mixture into the wet mixture, folding gently until just combined. Be careful not to overmix; a few lumps are okay!
-
Add the Fruits: Now, fold in the diced strawberries and mangoes, distributing them evenly throughout the batter. You want bites of fruit in every slice!
-
Pour into the Pan: Pour the batter into the greased cake pan, smoothing the top with a spatula.
-
Bake: Pop your cake into the oven for 25-30 minutes, or until the top is golden and a toothpick inserted in the center comes out clean.
-
Cool: Once baked, remove the cake from the oven and let it cool in the pan for about 10 minutes before transferring it to a wire rack to cool completely.
-
Serve: Slice your beautiful cake, and top each slice generously with whipped cream and a sprig of mint for that final touch. Enjoy every bite!
Serving Suggestions
When it comes to serving the Strawberry Mango Split Cake, presentation is key. I love to slice this lovely cake into wedges and arrange them on a vibrant platter for a pop of color. A dollop of whipped cream on top adds an enticing flair, and don’t forget those mint leaves! They not only look gorgeous but also bring a refreshing aroma to every slice. Perfect for picnics, parties, or a simple family dessert night!
Recipe Variations
Here are some fun twists to keep your cake fresh and exciting every time you bake it:
-
Berry Blast: Swap out the strawberries and mango for your favorite berries like blueberries or raspberries. Mix and match for a berry medley!
-
Coconut Dream: Add shredded coconut into the batter for a tropical touch.
-
Chocolate Drizzle: After the cake cools, drizzle melted dark chocolate over the top for an indulgent touch.
-
Spiced Up: Add a teaspoon of cinnamon or cardamom to the batter for a warm, inviting flavor profile.
-
Gluten-Free: Substitute the all-purpose flour for a gluten-free flour blend to accommodate dietary needs.
Chef’s Notes
This recipe has been with me for years, evolving alongside my baking journey. I remember the first time I made it—it was a disaster! I accidentally overmixed the batter, and it came out as a dense brick rather than a fluffy cake. But, like all cooking adventures, lessons were learned. Now, I can whip this up in my sleep, and it always brings joyful reactions from my friends and family. It’s the kind of recipe that invites laughter, stories, and delicious memories—just like those summer days spent in my childhood kitchen!
FAQs and Troubleshooting
1. My cake didn’t rise—what happened?
- This can happen for several reasons! Be sure your baking powder is fresh and that you didn’t overmix the batter. A good tip is to test your baking powder by adding a teaspoon to warm water; it should fizz!
2. Can I make this cake ahead of time?
- Absolutely! You can bake it a day in advance. Just keep it covered with plastic wrap at room temperature. I find that the flavors deepen overnight!
3. My cake is too dense—what can I do?
- A dense cake usually means it was overmixed or there wasn’t enough air incorporated. Remember to mix until just combined, and fold gently when adding in your fruits.
4. How do I store leftovers?
- Store any leftover cake in an airtight container in the refrigerator for up to 3 days. Serve chilled or at room temperature—they’re both delicious!
Nutritional Info
While the nutritional information may vary based on specific ingredient brands and measurements, a serving of this Strawberry Mango Split Cake contains approximately 250 calories, with a good balance of carbohydrates and some fats from the butter. Feel free to adjust ingredients like sugar and cream to fit your dietary goals!
So there you have it, folks! Your guide to crafting a fabulous Strawberry Mango Split Cake that will surely leave you with smiles and satisfied bellies. Enjoy the sweet journey, and remember—cooking is all about exploration, so feel free to experiment and make this cake your own! Happy baking! 🍰
PrintStrawberry Mango Split Cake

A delightful, light, and fluffy cake bursting with the flavors of fresh strawberries and juicy mangoes, perfect for summer celebrations.
- Prep Time: 15 minutes
- Cook Time: 30 minutes
- Total Time: 45 minutes
- Yield: 8 servings 1x
- Category: Dessert
- Method: Baking
- Cuisine: American
- Diet: Vegetarian
Ingredients
- 1 cup all-purpose flour
- 1 cup sugar
- 1/2 cup unsalted butter, softened
- 2 large eggs
- 1/2 cup milk
- 1 tsp vanilla extract
- 1 tsp baking powder
- 1/4 tsp salt
- 1 cup fresh strawberries, diced
- 1 cup fresh mango, diced
- Whipped cream (for topping)
- Mint leaves (for garnish)
Instructions
- Preheat your oven to 350°F (175°C).
- Grease a round cake pan with butter or non-stick spray.
- Mix the flour, baking powder, and salt together in a mixing bowl.
- Cream the softened butter and sugar together until light and fluffy.
- Add the eggs to the butter mixture one at a time, mixing well after each addition.
- Incorporate the vanilla extract and milk until well combined.
- Mix the dry ingredients into the wet ingredients until just combined.
- Add the diced strawberries and mangoes, folding gently into the batter.
- Pour the batter into the greased cake pan.
- Bake for 25-30 minutes or until a toothpick comes out clean.
- Cool the cake for about 10 minutes before transferring it to a wire rack.
- Serve each slice topped with whipped cream and a sprig of mint.
Notes
This recipe can be modified with different fruits or flavors. Try adding shredded coconut or a chocolate drizzle for variations!
Nutrition
- Serving Size: 1 slice
- Calories: 250
- Sugar: 17g
- Sodium: 180mg
- Fat: 10g
- Saturated Fat: 6g
- Unsaturated Fat: 3g
- Trans Fat: 0g
- Carbohydrates: 34g
- Fiber: 1g
- Protein: 3g
- Cholesterol: 55mg
Keywords: Strawberry, Mango, Cake, Summer Dessert, Fruit Cake, Baking
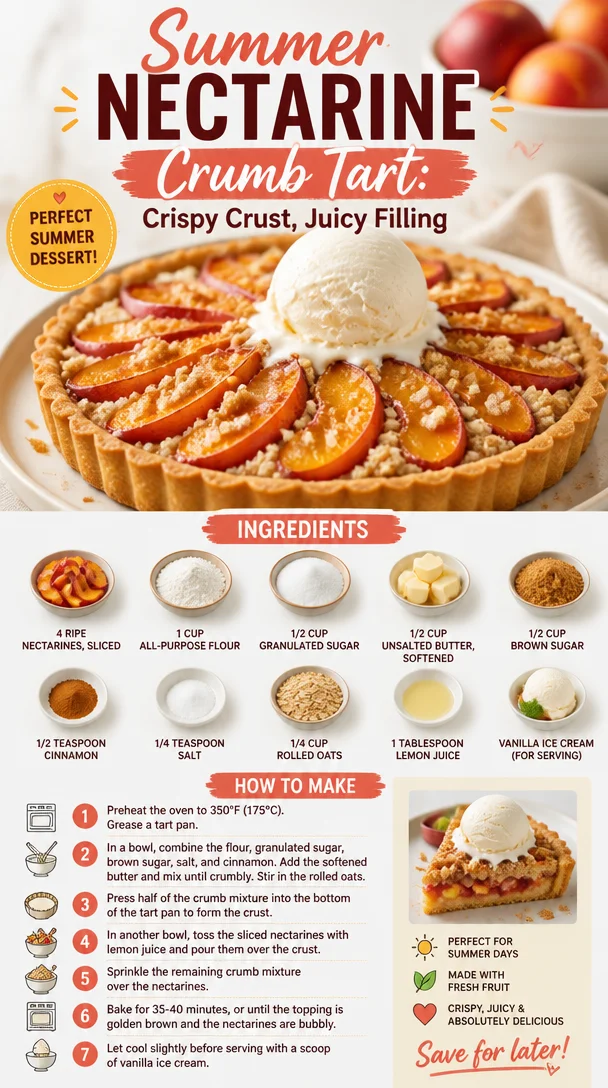
Summer Nectarine Crumb Tart: Crispy Crust, Juicy Filling
A Sweet Summertime Treat: Nectarine Crumb Tart
Welcome back, fellow foodies! Today, we’re diving into a delightful kitchen adventure with a recipe that’s perfect for summer gatherings or simply to savor on a lazy afternoon: Nectarine Crumb Tart. Picture this: a buttery, crumbly crust hugging ripe, juicy nectarines, all topped with a crunchy, golden topping. This tart not only looks beautiful on your table but is also bursting with flavor that will make your taste buds sing. Can you feel that summertime vibe already?
"Why nectarines?" you ask. Well, let me tell you, nectarines are the unsung heroes of summer fruits. Their silky skin and sweet, succulent flesh just scream sunshine and happiness. Plus, they’re so versatile! Whether you’re baking, grilling, or just slicing them up for a snack, they fit right into any culinary scenario. So, let’s roll up our sleeves and get baking!
A Fun Kitchen Memory
Before we dive into the details of our Nectarine Crumb Tart, let me share a little story. One of my warmest memories in the kitchen is from a summer spent at my grandmother’s house. Every August, when the nectarines were ripe and overflowing at the local farm stand, she would invite me over for our special baking sessions. We spent countless afternoons laughing and chatting while we made sweet treats—nectarine cobblers, jams, and of course, crumb tarts.
I still remember the moment we pulled a golden-brown tart out of the oven. The buttery aroma wafting through her kitchen was almost magical. We waited for it to cool, but not without sneaking a few bites of the crumb topping. While it was cooling, we’d sit on the porch, sipping iced tea, letting the warm breeze carry our laughter away. That’s the beauty of cooking; it’s not just about the food—it’s about the memories we create along the way. So, let’s recreate a bit of that magic together with this Nectarine Crumb Tart!
Ingredients
Here’s everything you’ll need to whip up this delightful tart, along with some quick chef tips for each ingredient:
- 4 ripe nectarines, sliced: Choose nectarines that yield slightly to gentle pressure. If you’re in a pinch, peaches work well too!
- 1 cup all-purpose flour: This will form the base of our crust. For a gluten-free option, substitute with almond flour or a 1:1 gluten-free blend.
- 1/2 cup granulated sugar: This will sweeten the tart nicely, but feel free to swap out for coconut sugar for a deeper flavor.
- 1/2 cup unsalted butter, softened: Butter brings rich flavor to our crust. If you’re looking for a dairy-free version, try using coconut oil.
- 1/2 cup brown sugar: This adds a lovely molasses flavor to the crumb topping. You can substitute it with more granulated sugar if you prefer.
- 1/2 teaspoon cinnamon: A warm spice that enhances the sweetness of our nectarines. Nutmeg can also be a lovely alternative if that’s what you have on hand.
- 1/4 teaspoon salt: Balances out the sweetness. Don’t skip this!
- 1/4 cup rolled oats: These will give our crumb topping a hearty texture. Quick oats can be a convenient substitute if that’s what you have.
- 1 tablespoon lemon juice: This brightens up the flavor of the nectarines. Lime juice could also work in a pinch!
- Vanilla ice cream (for serving): Because what’s a tart without a little scoop of ice cream? For a dairy-free option, try coconut or almond milk ice cream!
Step-by-Step Instructions
Now that you’ve gathered your ingredients, let’s get down to the nitty-gritty of making this Nectarine Crumb Tart. Follow these steps, and remember, a little laughter and patience go a long way in the kitchen!
-
Preheat your oven: First things first, preheat your oven to 350°F (175°C). This is crucial because we want our tart to bake evenly and perfectly golden brown.
-
Prepare the crust: In a mixing bowl, cream together the softened butter and granulated sugar until it’s light and fluffy. This will take about 2-3 minutes. It’s essential for creating a tender crust! Chef tip: Use a hand mixer for ease, but if you’re feeling nostalgic, a wooden spoon will do just fine!
-
Add the dry ingredients: Gradually mix in the flour, brown sugar, cinnamon, and salt. It’ll start to resemble a crumbly dough. Don’t stress if it looks a bit dry; we’ll make it work!
-
Form the crust: Press about two-thirds of this mixture into the bottom of a greased tart pan (9 or 10 inches works great). Use your fingers to create an even layer. Note: Don’t panic if it doesn’t look perfect; it’ll come together beautifully in the oven!
-
Arrange the nectarines: Evenly distribute the sliced nectarines over the crust. Drizzle with lemon juice for that extra zing.
-
Make the crumb topping: With the remaining dough mixture, add the rolled oats and give it a quick mix. Then, sprinkle this over the nectarines, creating a rustic crumb layer. Chef hack: To achieve a more even golden color, make sure to break up any large clumps of the topping.
-
Bake: Place your tart in the preheated oven and bake for about 30-35 minutes, or until the top is golden and the nectarines are bubbly. Ah, that aroma is going to make your kitchen feel like a bakery! Pro tip: If you notice the edges are browning too much, cover them gently with aluminum foil.
-
Cool down: Once baked, let your tart cool for at least 15-20 minutes before serving. This helps the juices settle and makes slicing a breeze.
Serving Suggestions
Serving this Nectarine Crumb Tart is an art form in itself. Slice it into generous wedges and serve on a beautiful platter. A scoop of vanilla ice cream on the side is a must; the creaminess pairs wonderfully with the tart’s sweetness. You could even garnish with fresh mint leaves for a pop of color and freshness!
Recipe Variations
One of the best things about this recipe is its flexibility! Here are a few ideas to switch things up:
- Berry Delight: Swap out half the nectarines for fresh blueberries or raspberries for a mixed berry tart.
- Spiced Up: Add a pinch of nutmeg or ginger to the crumb topping for a warm twist.
- Nutty Crunch: Incorporate chopped walnuts or pecans into the crumb topping for an added crunch and nutty flavor.
- Syrup Drizzle: Drizzle some caramel or honey over the tart before serving for an extra indulgent touch.
- Sweet Swaps: Use agave syrup or maple syrup in place of granulated sugar for a different sweetness profile.
Chef’s Notes
Ah, the evolution of recipes! This Nectarine Crumb Tart has gone through many adaptations since that summer with my grandma. I’ve experimented with different fruits, from plums to apples, and each time has been a delightful surprise. The most memorable twist? I once made a savory version with bacon bits and goat cheese—let’s just say that one didn’t last long at my potluck!
FAQs and Troubleshooting
-
What if my dough is too crumbly?
If your crumb mixture doesn’t hold together, try adding a teaspoon of water or milk, one at a time, until it’s workable. -
Can I prep this in advance?
Absolutely! You can prepare the tart the night before and store it covered in the refrigerator. Just bake it fresh the next day for a warm treat. -
How do I store leftovers?
Store any leftover tart in an airtight container at room temperature for 2-3 days. You can also refrigerate it if you prefer. -
What if my nectarines are hard?
If you have underripe nectarines, place them in a brown paper bag with an apple or banana for a couple of days. They’ll ripen beautifully!
Nutritional Info (Optional)
While I always recommend enjoying dessert in moderation, it’s good to know what you’re eating! A slice of Nectarine Crumb Tart (without ice cream) contains approximately:
- Calories: 250
- Protein: 3g
- Carbohydrates: 35g
- Fat: 12g
- Fiber: 2g
Remember to adjust based on your specific ingredient substitutions!
Alright, my friends! There you have it—a delightful recipe for Nectarine Crumb Tart that promises to bring back joyful memories and create new ones in your kitchen. Share it with family and friends, and don’t forget to leave a comment about your own kitchen adventures with this recipe. Let’s keep the love for food fresh and flowing! Happy baking!
PrintNectarine Crumb Tart
A delightful summer tart with a buttery crumb crust and juicy nectarines, perfect for gatherings or a lazy afternoon.
- Prep Time: 15 minutes
- Cook Time: 35 minutes
- Total Time: 50 minutes
- Yield: 8 servings 1x
- Category: Dessert
- Method: Baking
- Cuisine: American
- Diet: Vegetarian
Ingredients
- 4 ripe nectarines, sliced
- 1 cup all-purpose flour
- 1/2 cup granulated sugar
- 1/2 cup unsalted butter, softened
- 1/2 cup brown sugar
- 1/2 teaspoon cinnamon
- 1/4 teaspoon salt
- 1/4 cup rolled oats
- 1 tablespoon lemon juice
- Vanilla ice cream (for serving)
Instructions
- Preheat your oven to 350°F (175°C).
- Prepare the crust by creaming butter and granulated sugar until light and fluffy.
- Add the flour, brown sugar, cinnamon, and salt gradually.
- Form the crust by pressing two-thirds of the mixture into a greased tart pan.
- Arrange the sliced nectarines over the crust and drizzle with lemon juice.
- Make the crumb topping by adding rolled oats to the remaining dough mixture.
- Bake for about 30-35 minutes or until golden and bubbly.
- Cool for 15-20 minutes before serving.
Notes
Slice and serve with vanilla ice cream for a delightful treat. Garnish with fresh mint leaves for added freshness.
Nutrition
- Serving Size: 1 slice
- Calories: 250
- Sugar: 15g
- Sodium: 100mg
- Fat: 12g
- Saturated Fat: 7g
- Unsaturated Fat: 3g
- Trans Fat: 0g
- Carbohydrates: 35g
- Fiber: 2g
- Protein: 3g
- Cholesterol: 30mg
Keywords: nectarine tart, summer dessert, crumb tart, easy baking, fruity dessert
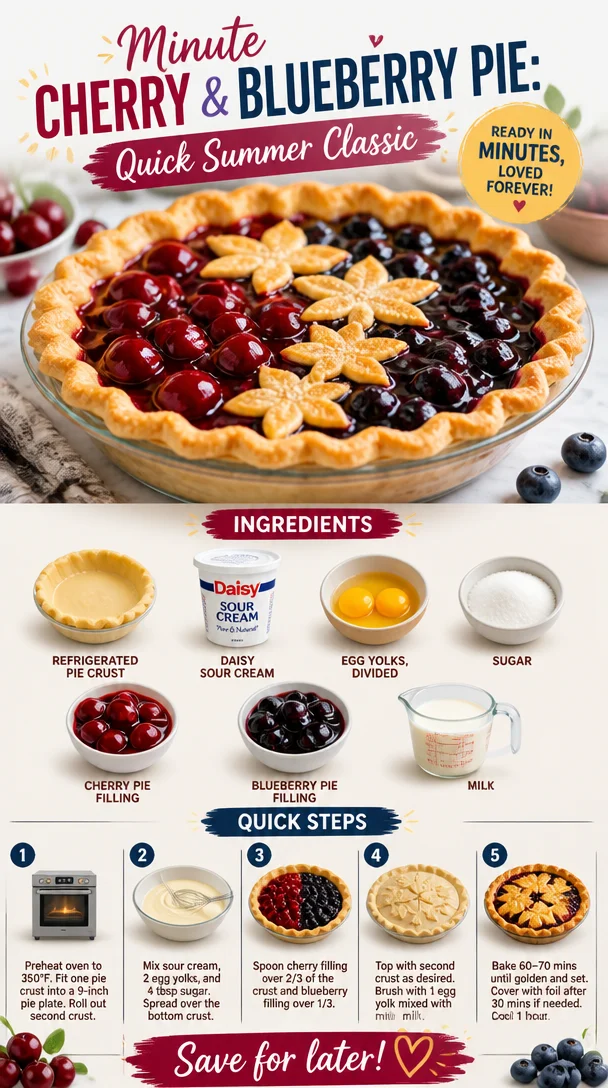
Minute Cherry & Blueberry Pie: Quick Summer Classic
Cherry and Blueberry Pie: A Wholesome Family Classic
Welcome, foodies! Today we’re diving into a beloved staple that tantalizes taste buds and warms hearts: Cherry and Blueberry Pie. This delicious dessert is a beautiful marriage of sweet cherries and luscious blueberries, all encased in a buttery, flaky crust that’s simply irresistible.
To me, pies are the ultimate symbol of comfort food. They bring back memories of family gatherings, sunny picnics, and cozy nights on the porch, watching the stars after dinner. The aroma of pie baking in the oven stirs nostalgia in the air, instantly whisking me back to my childhood and the wonderful kitchen moments shared with my grandma.
Personal Story
I vividly remember the summer my grandma decided to teach me the art of pie-making. I was about eight years old, standing on a stool so I could reach the counter. She had a way of making everything feel like a big adventure. Armed with a basket of fresh cherries and blueberries from the local farmer’s market, we set out to create the perfect pie.
With her flour-dusted apron and that twinkle in her eye, she showed me how to mix the fruits with just the right amount of sugar and lemon juice. The joy was in the journey as much as in the finished product. I learned not just how to make a pie but how love and care transform simple ingredients into something magical.
We spent the afternoon chatting, laughing, and, of course, tasting the filling as we went. The final product was a pie so delicious that I remember wanting to keep it all to myself. Sure enough, it became a family favorite, feeding not just our bellies but our souls. And every time I make this Cherry and Blueberry Pie, I’m reminded of those sunny days spent laughing in the kitchen.
Let’s create some beautiful pie memories together, shall we?
Ingredients
Here’s what you’ll need for this scrumptious Cherry and Blueberry Pie:
-
Refrigerated Pie Crust: A classic shortcut! You can make your own if you’re up for it, but don’t be afraid to grab a store-bought crust for convenience. It’ll save you time and still yield a delicious pie.
-
Daisy Sour Cream: This isn’t just for dipping! Sour cream adds an amazing creaminess and tang to your filling, balancing the sweetness of the fruits perfectly. If you’re feeling adventurous, try Greek yogurt as a substitute for a healthier twist.
-
Egg Yolks (divided): These will help bind your filling for a rich, luscious texture. Save the egg whites for breakfast or a meringue!
-
Sugar: This is your sweetener. Ground sugar (like superfine sugar) dissolves quicker, while brown sugar adds a lovely depth of flavor.
-
Cherry Pie Filling: Store-bought is fine, but if you’re using fresh cherries, you’ll need about 2 cups, pitted and halved. Just add your sugar and lemon juice!
-
Blueberry Pie Filling: Just like the cherry filling, you can grab this from the store or make your own using 2 cups of fresh blueberries. Simply cook with sugar and a little cornstarch for thickening!
-
Milk: You’ll use this to brush the crust before baking, giving you that beautiful golden finish. Almond or oat milk are excellent dairy-free options.
Step-by-Step Instructions
Now let’s get cooking! Here’s how to assemble your Cherry and Blueberry Pie step-by-step:
-
Preheat Your Oven: Set your oven to 425°F (220°C). This is essential for that perfect golden crust. A hot oven makes all the difference!
-
Prepare Your Crust: Roll out your refrigerated pie crust (if using) on a lightly floured surface until it’s about 12 inches in diameter. Don’t worry if it’s not perfect; rustic is charming!
-
Transfer to Pie Dish: Carefully place the crust in your 9-inch pie dish, pressing it gently into the edges. If you have excess dough hanging over the edge, you can trim it, but leave some for a beautiful crimped edge later!
-
Mix the Fruit Filling: In a medium bowl, combine the cherry and blueberry fillings, sugar, and 2 egg yolks. Stir until thoroughly mixed. Remember, tasting is key—adjust the sweetness to your liking!
-
Add the Sour Cream: Gently fold in the Daisy Sour Cream. This is what makes the filling so creamy and delicious. It will help to mellow the sugars and enhance the fruit flavor!
-
Fill the Pie: Spoon the fruit mixture into the prepared crust, spreading it evenly. Make sure it’s heaped nicely—this pie is all about those juicy fruit fillings!
-
Cover the Pie: If you have a second pie crust, roll it out and drape it over the filling. You can create a lattice top for a bit of flair, or simply cut slits for steam vents. Crimp the edges to seal the pie and prevent any juices from escaping.
-
Brush with Egg and Milk: Combine the remaining egg yolk with a splash of milk, and brush this mixture over the crust. This will give you that mouthwatering golden finish!
-
Bake the Pie: Place your pie on a baking sheet (to catch any drips) and bake for 25-30 minutes or until the crust is golden and the filling is bubbling. Make your kitchen smell heavenly!
-
Cool Down: Let it cool for at least an hour. I know it’s tough to wait, but this helps the filling set up beautifully.
Serving Suggestions
When it’s finally time to dig in, serve your Cherry and Blueberry Pie with a scoop of vanilla ice cream or a dollop of freshly whipped cream on top for an indulgent treat. Leftovers (if there are any!) can be enjoyed for breakfast—because why not?
Recipe Variations
Feel like mixing things up? Try one of these variations:
- Mixed Berry Delight: Swap in raspberries or blackberries for a berry medley pie.
- Peach Fusion: Add in diced peaches for a summery twist!
- Nutty Crust: Add crushed nuts to your pie crust for added texture and flavor.
- Vegan Version: Use a vegan pie crust and substitute the egg with flaxseed and the sour cream with cashew cream.
Chef’s Notes
I can’t tell you how many times this pie has been my go-to for potlucks and family gatherings. It’s a crowd-pleaser, and people always ask for the recipe (which of course, I happily share!). One time, I attempted to speed up the cooling process by placing my pie in the fridge—we ended up with a very experimental, chilly pie that didn’t quite make the cut! So learn from my mistake and let it cool at room temperature.
FAQs and Troubleshooting
Q: My pie filling is too runny. What can I do?
A: If your filling ends up too juicy, make sure you’re using enough thickening agent when making your filling. You can also try simmering it a bit on the stove with some cornstarch.
Q: How do I prevent my crust from burning?
A: If the edges of your crust are browning too fast, simply cover them with foil or use a pie shield during baking until the pie is done.
Q: Can I freeze leftover pie?
A: Absolutely! Wrap it tightly and store in the freezer for up to three months. Just remember to let it cool completely before freezing.
Q: How do I keep my crust flaky?
A: Make sure your butter or shortening is cold, and don’t overwork the dough!
Nutritional Info
While the nutritional content will vary depending on the exact ingredients you use, a single slice of Cherry and Blueberry Pie typically contains approximately:
- Calories: 320
- Fat: 16g
- Carbohydrates: 43g
- Protein: 3g
Wrapping It Up
There you have it! A delightful Cherry and Blueberry Pie that’s sure to impress family and friends while embodying the spirit of nostalgia and love. Remember, pie-making is an art, and like any art form, it’s something to enjoy and evolve over time. I can’t wait to hear your stories and see your own pie adventures. Let’s keep it fresh, simple, and seriously delicious! Happy baking!
PrintCherry and Blueberry Pie

A delicious combination of sweet cherries and luscious blueberries in a buttery, flaky crust.
- Prep Time: 15 minutes
- Cook Time: 30 minutes
- Total Time: 45 minutes
- Yield: 8 servings 1x
- Category: Dessert
- Method: Baking
- Cuisine: American
- Diet: Vegetarian
Ingredients
- 1 refrigerated pie crust
- 1 cup Daisy sour cream
- 2 egg yolks (divided)
- 3/4 cup sugar
- 2 cups cherry pie filling
- 2 cups blueberry pie filling
- 2 tablespoons milk
Instructions
- Preheat your oven to 425°F (220°C).
- Prepare your crust by rolling out the refrigerated pie crust on a lightly floured surface until about 12 inches in diameter.
- Transfer the crust into a 9-inch pie dish, pressing gently into the edges.
- Mix the cherry and blueberry fillings, sugar, and 2 egg yolks in a medium bowl until thoroughly combined.
- Add the Daisy sour cream and fold gently.
- Fill the prepared crust with the fruit mixture, spreading it evenly.
- Cover the pie with a second pie crust or create a lattice top.
- Brush the crust with the mixture of the remaining egg yolk and milk.
- Bake for 25-30 minutes or until the crust is golden and filling is bubbling.
- Cool for at least an hour before serving.
Notes
Serve with vanilla ice cream or whipped cream. Leftovers can be enjoyed for breakfast.
Nutrition
- Serving Size: 1 slice
- Calories: 320
- Sugar: 18g
- Sodium: 150mg
- Fat: 16g
- Saturated Fat: 9g
- Unsaturated Fat: 5g
- Trans Fat: 0g
- Carbohydrates: 43g
- Fiber: 2g
- Protein: 3g
- Cholesterol: 85mg
Keywords: cherry pie, blueberry pie, dessert pie, summer dessert, family recipe
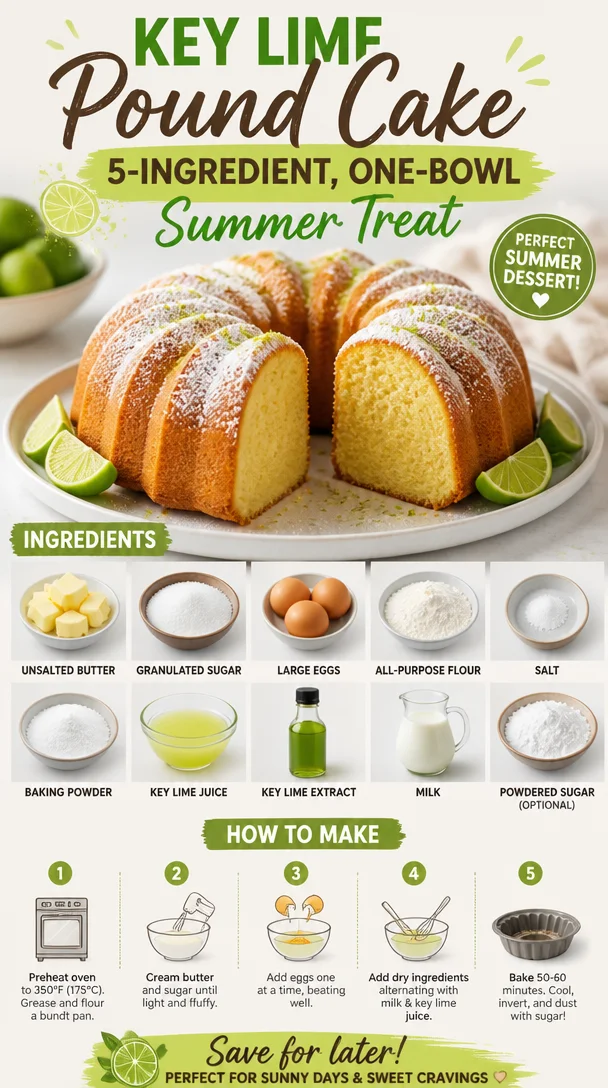
Key Lime Pound Cake: 5-Ingredient, One-Bowl Summer Treat
Key Lime Pound Cake: A Slice of Sunshine
Hello, fellow food lovers! Today, we’re diving into a vibrant and tangy treat that will awaken your taste buds and bring a ray of sunshine into your kitchen: Key Lime Pound Cake. Oh, how I love this cake! It’s like a little slice of the tropics, transporting you straight to a serene beach setting with every bite. Not only is this cake incredibly delightful and bursting with flavor, but it also boasts a texture that’s perfectly dense and moist—ideal for any occasion, be it a family gathering, a cozy afternoon tea, or simply a treat for yourself.
As the name suggests, this cake carries the bright, zesty sweetness of key limes—a unique fruit celebrated in Florida and known for its distinct tartness that makes it all the more refreshing. Trust me, once you bake this cake, your house will be filled with an aroma that could warm the coldest of hearts! So, let’s roll up our sleeves and get to baking this cheerful confection that’s sure to impress.
A Taste of Nostalgia
Let me take you back to my childhood when my grandma would whip up her famous Key Lime Pie on special occasions. Those family gatherings were filled with laughter, love, and, of course, the intoxicating scent of citrus wafting through the air. I remember rushing to the kitchen, excited to help mix the ingredients—my little hands covered in flour and my face smudged with whatever I could ‘taste test.’
One summer, she decided to switch things up and introduced us to her Key Lime Pound Cake. I was hesitant at first because, for me, pie was queen. But the moment I took my first bite, I was hooked! The cake was airy yet rich, sweet yet tangy. It was bursting with flavor and the perfect way to end a warm summer evening. Even now, every time I bake this cake, I can hear her cheerful laugh and see her twinkling eyes, and it brings such warmth and joy to my heart. So, let’s create a piece of that memory together with this delicious Key Lime Pound Cake recipe!
Ingredients
Before we get into the cooking, let’s gather our ingredients to ensure we create the best Key Lime Pound Cake ever:
-
1 cup unsalted butter, softened
The base of our cake! It gives the cake that wonderful richness. If you’re looking for a lighter option, you can substitute it with equal parts of Greek yogurt or applesauce for a healthier twist. -
2 cups granulated sugar
This sweetener is essential for balancing the tartness of the key lime. If you’re in the mood for natural sugars, coconut sugar or honey can make decent alternatives, but they might alter the texture slightly. -
4 large eggs
Eggs add moisture and richness. If you prefer an egg-free version, try using flax eggs (1 tablespoon of ground flaxseed mixed with 3 tablespoons of water), which work surprisingly well in baked goods. -
3 cups all-purpose flour
This will give structure to the cake. You can easily substitute with a gluten-free flour blend if you’re gluten-sensitive. -
1/2 teaspoon salt
Just a pinch! Salt enhances all the flavors and balances out the sweetness. -
1 teaspoon baking powder
This is our leavening agent, which helps the cake rise. Don’t confuse it with baking soda, as they serve different purposes. -
1/2 cup key lime juice
Fresh key lime juice is the star of our show! If you can’t find key limes, regular lime juice will do—just remember, it’s a bit less tart! -
2 teaspoons key lime extract
This boosts the key lime flavor! You could leave it out if you’re using fresh key limes, but it adds an extra punch. -
1/2 cup milk
Whole milk works best, but almond milk or oat milk are great dairy-free alternatives that won’t change the cake’s texture much. -
Powdered sugar for dusting (optional)
A lovely finishing touch! It adds a delicate sweetness and visual appeal—perfect for a sprinkle on top right before serving.
Step-by-Step Instructions
Alright, let’s get this cake baking! Follow along with these steps:
-
Preheat Your Oven
Start by preheating your oven to 350°F (175°C). This is an essential leap because we want our cake to bake evenly. While it’s warming up, you can prep the pan! -
Prep the Pan
Grab a 9×5-inch loaf pan and grease it well with butter or cooking spray. You can also line it with parchment paper for extra protection against sticking. I always find that a parchment lining helps make the cake come out without a hitch. -
Cream the Butter and Sugar
In a large mixing bowl, beat the softened butter and granulated sugar together until the mixture is pale and fluffy—this should take about 3-5 minutes. It’s all about incorporating air for a light texture. Pro tip: Use room temperature butter for the best results! -
Add the Eggs
One at a time, add the eggs to the butter and sugar mixture, beating well after each addition. This allows the eggs to incorporate fully and prevents a curdled batter. Don’t forget to scrape down the sides of the bowl! -
Mix Dry Ingredients
In a separate bowl, whisk together the flour, salt, and baking powder. This ensures that the leavening agent is evenly distributed throughout the flour, which is crucial for a good rise. -
Incorporate the Dry Mixture
Gradually add the dry ingredients to the wet mixture, alternating with the milk, and mix on low speed. Be careful not to overmix; you want a smooth batter without lumps but not a gluten-glutened mess. -
Bring in the Zest and Juice
Now it’s time for the star players—add the key lime juice and key lime extract! This is where your batter transforms into a delightful citrus party. Fold it in gently with a spatula to keep that airy texture. -
Pour the Batter
Transfer the batter into your prepared loaf pan, smoothing the top with a spatula. Give it a little wiggle to settle the batter in all corners. -
Bake the Cake
Pop that cake into your preheated oven and bake for around 60-70 minutes, or until a toothpick inserted into the center comes out clean. The aroma at this point will have you dancing in the kitchen, I promise! -
Cool Down
Once baked, let the cake cool in the pan for about 10 minutes before transferring it to a wire rack to cool completely. This cooling step is vital; letting it rest too long in the pan could trap moisture and make it soggy.
Serving Suggestions
When your Key Lime Pound Cake is cooled and ready to go, it’s time to serve! I love to slice it thick and dust the top with some powdered sugar for that charming touch. Pair each slice with a dollop of whipped cream or a scoop of vanilla ice cream for a decadent treat. You could also garnish it with thin slices of fresh key lime or zest for that mouthwatering presentation. Serve it at a summer picnic or with a cup of coffee—trust me, it’s the perfect match!
Recipe Variations
Feeling adventurous? Here are a few fun twists you could try with your Key Lime Pound Cake:
-
Coconut Infusion: Toss in some shredded coconut to the batter for a tropical flair that pairs beautifully with the lime.
-
Berry Bliss: Fold in some fresh raspberries or blueberries for a delightful burst of flavor and color.
-
Cream Cheese Swirl: Before baking, swirl some cream cheese mixture (just beat together cream cheese, sugar, and a bit of lime juice) into the batter for a rich, tangy surprise in each slice.
-
Lime Glaze: Create a simple glaze with powdered sugar and key lime juice to drizzle over the cake once it’s cooled for extra sweetness and a citrusy kick.
-
Gluten-Free Version: Swap all-purpose flour with a gluten-free blend for a delicious dessert anyone can enjoy!
Chef’s Notes
Every time I bake this cake, I think of my grandma’s warm hugs and her delightful laughter. This recipe has evolved a lot over the years, from those summer baking days in her cozy kitchen to me whipping it up in my modern space. Each ingredient carries a bit of nostalgia and joy, and I love the memories that come alive while baking. Feel free to experiment—I’ve honestly had friends ask for a cake this simple off my blog just because they wanted to recreate the cheerful vibes of family gatherings. Food is love, right?
FAQs and Troubleshooting
Q: My cake is sinking in the middle! What happened?
A: A sinking cake can be due to several reasons: overmixing the batter, too much leavening agent, or underbaking. Make sure to follow the step-by-step mixing and check for doneness with a toothpick!
Q: How can I store leftovers?
A: To maintain freshness, wrap the cooled cake tightly in plastic wrap or foil and store it at room temperature for up to 3 days or in the refrigerator for up to a week.
Q: Can I freeze this cake?
A: Absolutely! Wrap each slice individually and place them in an airtight container. You can freeze them for up to three months. Just let them thaw in the fridge, and they’ll taste as good as fresh!
Q: Why is my cake dry?
A: Dry cake can result from overbaking or using old ingredients (like flour). Always double-check your oven temperature and the date on your baking powder!
Nutritional Info (Optional)
While indulging in desserts is a special treat, knowing the nutritional aspect is always helpful. A slice of this delicious Key Lime Pound Cake has approximately:
- Calories: 320
- Fat: 15g
- Carbohydrates: 45g
- Sugar: 25g
- Protein: 4g
Now grab those ingredients, tie that apron tight, and let’s bake up some sunshine in cake form! Your kitchen (and heart) will thank you. Happy baking! 🍰✨
PrintKey Lime Pound Cake
A vibrant and tangy Key Lime Pound Cake that transports you to the tropics with every bite. Moist, dense, and bursting with flavor, it’s perfect for any occasion.
- Prep Time: 15 minutes
- Cook Time: 70 minutes
- Total Time: 85 minutes
- Yield: 8 servings 1x
- Category: Dessert
- Method: Baking
- Cuisine: American
- Diet: Vegetarian
Ingredients
- 1 cup unsalted butter, softened
- 2 cups granulated sugar
- 4 large eggs
- 3 cups all-purpose flour
- 1/2 teaspoon salt
- 1 teaspoon baking powder
- 1/2 cup key lime juice
- 2 teaspoons key lime extract
- 1/2 cup milk
- Powdered sugar for dusting (optional)
Instructions
- Preheat your oven to 350°F (175°C).
- Grab a 9×5-inch loaf pan and grease it with butter or cooking spray.
- Cream the softened butter and granulated sugar together until pale and fluffy.
- Add the eggs one at a time, beating well after each addition.
- Whisk together the flour, salt, and baking powder in a separate bowl.
- Gradually add the dry ingredients to the wet mixture, alternating with the milk.
- Add the key lime juice and extract, folding gently to combine.
- Transfer the batter into the prepared loaf pan and smooth the top.
- Bake for 60-70 minutes, or until a toothpick inserted comes out clean.
- Cool in the pan for about 10 minutes before transferring to a wire rack.
Notes
Serve with whipped cream or vanilla ice cream and garnish with key lime slices for an even more delightful presentation.
Nutrition
- Serving Size: 1 slice
- Calories: 320
- Sugar: 25g
- Sodium: 200mg
- Fat: 15g
- Saturated Fat: 9g
- Unsaturated Fat: 5g
- Trans Fat: 0g
- Carbohydrates: 45g
- Fiber: 1g
- Protein: 4g
- Cholesterol: 100mg
Keywords: cake, dessert, key lime, pound cake, tropical, summer, baked goods