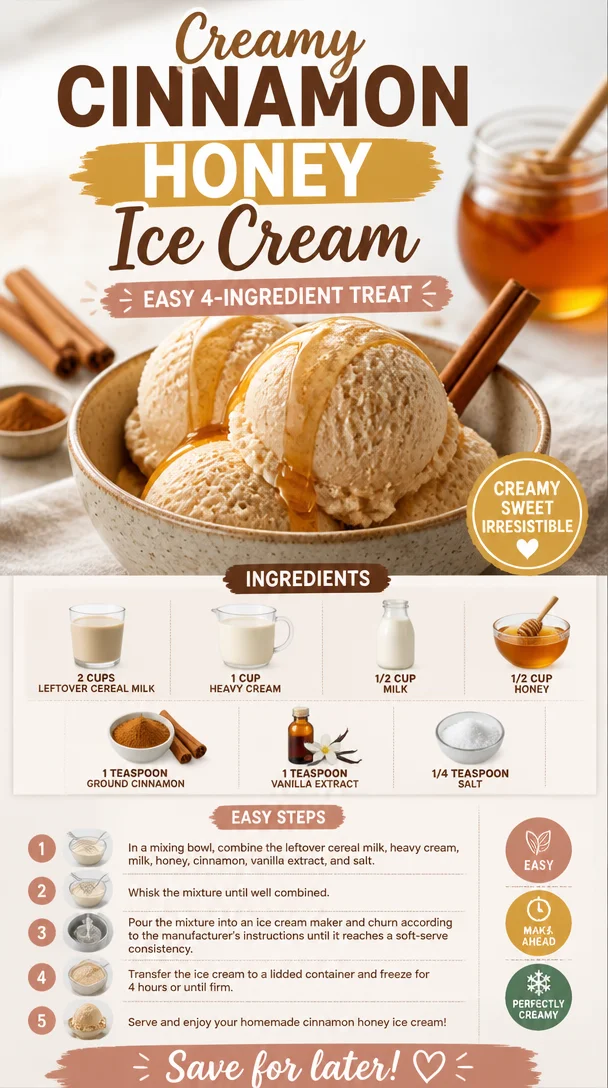
Creamy Cinnamon Honey Ice Cream: Easy 4-Ingredient Treat
The Sweet Symphony of Cinnamon Honey Ice Cream
Hey there, fellow food lovers! Today, we’re diving into the cool, creamy world of homemade ice cream with a twist that’s bound to awaken your taste buds—Cinnamon Honey Ice Cream. As the temperatures rise and the days stretch longer, there’s nothing quite like a scoop (or two) of refreshing homemade ice cream to cool you down and satisfy your sweet tooth. This recipe is not only delicious but also a delightful nod to simpler times, perfectly combining the warmth of cinnamon with the soothing sweetness of honey.
A Scoop of Nostalgia
Let me take you back to my childhood—one memory stands out like bright sprinkles on vanilla ice cream. It was a hot summer day, the kind where the sun feels like it’s glaring down just a bit too much. My family had this amazing tradition of making homemade ice cream every Saturday. We would gather in the kitchen, each sibling claiming their role: one would measure and pour, another would crank the ice cream maker, and the youngest (yours truly) would expertly sprinkle in the mix-in flavors with wild abandon.
But my favorite was always the “surprise flavor” that my mom would conjure up, and one particular Saturday, she decided to embrace the warmth of cinnamon and the sweetness of honey. That combination was whimsical and comforting, like a hug in a bowl. Fast forward to today, and I’ve taken that old family favorite and played with it a bit, introducing leftover cereal milk into the mix. Yes, you read that right! We’re transforming what would typically go unused into something glorious.
Are you ready to create your own scoop of nostalgia? Let’s get into it!
Ingredients You’ll Need
Here’s what you need to make this deliciously creamy Cinnamon Honey Ice Cream. Each ingredient plays an essential role in crafting that sinfully sweet and spicy flavor!
-
2 cups leftover cereal milk: Don’t toss that delicious milk after the cereal is gone! It’s packed with flavor and a sugary kiss from your favorite breakfast. If you don’t have any on hand, you can substitute with any milk (bonus points for adding a couple of tablespoons of sugar!) or even a mix of milk and a splash of vanilla extract for extra creaminess.
-
1 cup heavy cream: This is the star of the show! Heavy cream gives the ice cream that rich, velvety texture we all love. If you’re looking for a lighter option, you can try half-and-half, but it won’t be as creamy.
-
1/2 cup milk: This helps balance out the richness of the cream. You can use any milk you have—almond milk, oat milk, or whole milk all work beautifully.
-
1/2 cup honey: Sweetness from honey adds a touch of floral notes and warmth that complements the cinnamon perfectly. If you’re out of honey or prefer a different sweetener, agave syrup or maple syrup can work too!
-
1 teaspoon ground cinnamon: This is where the flavor magic happens! Ground cinnamon brings that warm, comforting spice. If you have it, feel free to use freshly grated cinnamon for a more intense flavor.
-
1 teaspoon vanilla extract: A splash of vanilla is like adding a warm hug to the mixture. Skip it at your own peril!
-
1/4 teaspoon salt: A pinch of salt enhances all those flavors and balances the sweetness. You can use sea salt or table salt—as long as you don’t skip it!
Step-by-Step Instructions
Are you ready to whip up the most delightful ice cream of your summer? Let’s get started!
-
Mix the Base: In a large mixing bowl, combine the leftover cereal milk, heavy cream, milk, honey, ground cinnamon, vanilla extract, and salt. Use a whisk to blend everything together until well incorporated. I like to whisk for a minute or so—this not only mixes the ingredients but also helps to dissolve the honey, creating a smoother texture!
-
Taste Test: This part is the best part—grab a spoon and taste your cream mixture! You can add a smidge more cinnamon, honey, or salt if you want to tweak the flavors to your liking. Just keep in mind that the flavors will mellow a bit once frozen.
-
Chill Time: Cover your bowl with plastic wrap or a lid, and refrigerate the mixture for at least 2 hours, or ideally overnight. This step allows the flavors to meld together beautifully and will also give you a creamier texture!
-
Churn It: After your mixture is chilled, it’s time to churn! Pour the mixture into your ice cream maker and churn according to the manufacturer’s instructions. Typically, it takes about 20-25 minutes. You’re looking for a thick, soft-serve-like consistency.
-
Freeze for Firmness: Once churned, transfer the ice cream to an airtight container. Smooth the top with a spatula, then cover it with a layer of plastic wrap before sealing the container. This is important for minimizing ice crystals! Freeze for at least 4 hours—or overnight for the best results—until it’s firm enough to scoop.
-
Serve It Up: After the hard wait, your ice cream is ready to serve! Give it a few minutes to soften at room temperature for easier scooping. Use an ice cream scoop (or a warm spoon) to serve it into bowls.
Serving Suggestions
Cinnamon Honey Ice Cream is fantastic on its own, but why not take it to the next level? Serve it between two warm slices of cinnamon bread for a dreamy sandwich, or top it with a sprinkle of crushed nuts, a drizzle of chocolate sauce, or fresh fruit. The options are endless, and your guests will be begging for seconds!
Recipe Variations
Feeling adventurous? Here are a few creative twists you could add to your Cinnamon Honey Ice Cream:
-
Chocolate Chip Delight: Fold in mini chocolate chips or chunks before freezing for an indulgent treat.
-
Nutty Marvel: Add a quarter cup of chopped pecans or walnuts for added crunch and rich flavor.
-
Spiced Up: For those who like a bit of heat, add a pinch of cayenne pepper or a dash of nutmeg to the base mixture.
-
Fruit Fusion: Swirl in some fresh fruits like figs or slices of banana before freezing for a fruity explosion!
Chef’s Notes
This recipe is near and dear to my heart because it reminds me of those carefree summer days spent in the kitchen with my family. I’ve found that the best recipes often come from experimenting with what you have on hand, and this ice cream is a prime example. Over the years, I’ve played around with different flavors—adding a pinch of cardamom or swapping honey for caramel. So go ahead; make this recipe your own! The beautiful thing about cooking is that it’s always evolving, just like us.
FAQs and Troubleshooting
Q: Can I use a different sweetener?
Absolutely! Feel free to swap honey for agave or maple syrup. Just keep in mind that the flavor will change slightly, so adjust your taste accordingly.
Q: What if I don’t have an ice cream maker?
No worries! You can make this without one. Pour your mixture into a shallow dish, and place it in the freezer. Every 30 minutes, stir vigorously with a fork to break up the ice crystals until it reaches your desired consistency.
Q: My ice cream is too hard! What can I do?
If your ice cream is rock solid, let it sit on the counter for about 10-15 minutes before scooping to soften it. You’ll get perfect, creamy scoops in no time.
Q: How long will this ice cream last?
In an airtight container, your cinnamon honey ice cream will last about 2-3 weeks in the freezer—if it lasts that long! I suggest labeling it with a date to keep track.
Nutritional Info
While we love a good treat, it’s good to know what you’re indulging in! Each serving of this Cinnamon Honey Ice Cream roughly contains:
- Calories: 250
- Fat: 15g
- Carbohydrates: 28g
- Protein: 3g
- Sugars: 20g
(Since variations in ingredients and serving sizes can affect nutritional value, be sure to check your labels!)
So, there you have it! Your guide to creating delightful Cinnamon Honey Ice Cream that captures the essence of sweet, nostalgic summers. I hope this recipe fills your kitchen with warmth, laughter, and, most importantly, deliciousness. Enjoy every scoop, and be sure to share your creations with friends and family. Happy cooking!
PrintCinnamon Honey Ice Cream

A delightful homemade ice cream combining the warmth of cinnamon and the sweetness of honey, perfect for cooling down on hot summer days.
- Prep Time: 15 minutes
- Cook Time: 20 minutes
- Total Time: 295 minutes
- Yield: 4 servings 1x
- Category: Dessert
- Method: Churning
- Cuisine: American
- Diet: Vegetarian
Ingredients
- 2 cups leftover cereal milk
- 1 cup heavy cream
- 1/2 cup milk
- 1/2 cup honey
- 1 teaspoon ground cinnamon
- 1 teaspoon vanilla extract
- 1/4 teaspoon salt
Instructions
- Mix the Base: In a large mixing bowl, combine the leftover cereal milk, heavy cream, milk, honey, ground cinnamon, vanilla extract, and salt. Use a whisk to blend everything together until well incorporated.
- Taste Test: Grab a spoon and taste your cream mixture.
- Chill Time: Cover your bowl and refrigerate the mixture for at least 120 minutes.
- Churn It: Pour the mixture into your ice cream maker and churn according to the manufacturer’s instructions.
- Freeze for Firmness: Transfer the ice cream to an airtight container and freeze for at least 240 minutes.
- Serve It Up: Let it soften at room temperature before serving.
Notes
Experiment with mix-ins like chocolate chips or fresh fruits for a fun twist on this classic recipe.
Nutrition
- Serving Size: 1 serving
- Calories: 250
- Sugar: 20g
- Sodium: 100mg
- Fat: 15g
- Saturated Fat: 9g
- Unsaturated Fat: 6g
- Trans Fat: 0g
- Carbohydrates: 28g
- Fiber: 0g
- Protein: 3g
- Cholesterol: 40mg
Keywords: ice cream, dessert, cinnamon, honey, homemade, summer treat
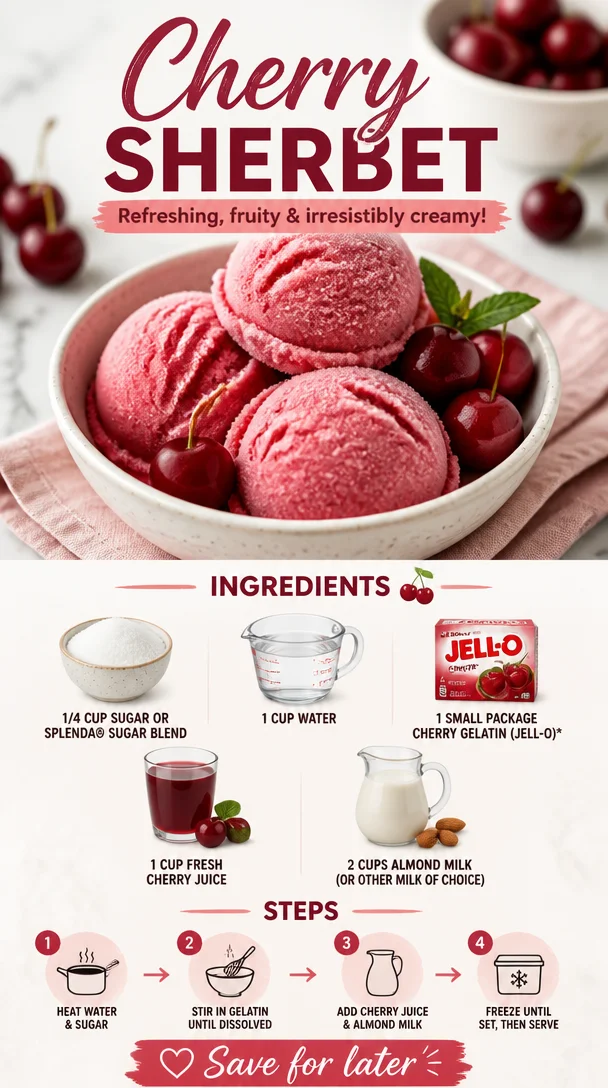
Cherry Sherbet
Cool Down with Homemade Cherry Sherbet
Welcome to another delightful adventure in the kitchen! Today, we’re diving into the refreshing world of cherry sherbet, a treat that will whisk you back to childhood memories and outdoor summer fun. There’s something oh-so-special about enjoying a bowl of homemade sherbet on a hot day, isn’t there? The creamy texture, the vibrant color, and the sweet-tart flavor all come together to create a delicious experience that makes your taste buds dance.
Growing up, my summers were filled with trips to the local ice cream shop with my family, where I would always opt for a scoop (or two) of cherry sherbet. I loved the way the cool, sweet flavor hit my tongue, a burst of cherries combined with that lovely creaminess. It was a simple pleasure in a world that often felt chaotic. As I got older, I realized I could recreate that joy in my own kitchen, and guess what? It’s easier than you might think!
Whether you’re making this to cool off after a long day or to impress your friends at a summer gathering, cherry sherbet is sure to bring smiles all around. So grab your apron, and let’s get started on this delicious journey!
A Cherry Memory
One of my fondest memories tied to cherry sherbet takes me back to summer barbecues at my grandparents’ house. The sun would be shining, the grill sizzling, and the aroma of burgers wafting through the air. After the main course, my grandma would always bring out her homemade cherry sherbet, which she’d churn in her old-fashioned ice cream maker. It was this beautiful pink color that made everyone’s hearts sing.
I can still hear the laughter of my cousins as we raced to the porch, bowls in hand, eager to dig in. My grandma would always say, “It’s made with love and the freshest cherries!” Those words stuck with me, and they inspire the way I create recipes today. That joy, that connection with family, and the simplicity of enjoying good food are what we’re all about here.
Ingredients
Gather up these simple ingredients to create your very own cherry sherbet:
-
1/4 cup sugar or SPLENDA® Sugar Blend
This sweetener helps balance the tartness of the cherries. If you’re looking to cut calories, SPLENDA is a great low-calorie option. Feel free to adjust the sweetness according to your taste! -
1 cup water
Water is the base for your syrup, helping dissolve the sugar and infuse flavor into the cherries. You can use sparkling water for an extra fizzy version—fun for gatherings! -
1 small package cherry gelatin (Jell-O)
This adds sweetness and helps create that wonderful sherbet texture. If you can’t find cherry, raspberry gelatin works beautifully as a substitute. -
1 cup fresh cherry juice
Fresh cherry juice packs a powerful punch of flavor! If cherry season isn’t in full swing, you can opt for bottled juice, but make sure it’s 100% juice with no added sugars. -
2 cups almond milk (or other milk of choice)
Almond milk adds creaminess while keeping it light. If you’re a fan of dairy, whole milk or half-and-half will work for a richer sherbet experience.
Step-by-Step Instructions
Ready to whip up this sweet treat? Let’s dive into the cooking steps, where I’ll sprinkle in some tips and tricks along the way!
-
Prepare the Cherry Syrup:
In a saucepan, combine the sugar and water over medium heat. Stir until the sugar is fully dissolved. Bring it to a gentle simmer, letting it bubble away for about 5 minutes. Chef’s Tip: Keeping your syrup warm will help the cherry gelatin dissolve more easily later on. -
Add the Jell-O:
Remove the saucepan from heat, and stir in the cherry gelatin. Keep stirring until it’s completely dissolved. This is the moment where that rich cherry aroma will fill your kitchen—you’ll be tempted to taste! -
Stir in Cherry Juice:
Once the gelatin is dissolved, add the fresh cherry juice. Give it a good stir to combine everything. The color should start turning a beautiful shade of pink, reminiscent of summer sunsets! Pro Tip: If you’re unsure about the cherry juice flavor, taste it and adjust the sweetness by adding more sugar if needed. -
Mix in the Almond Milk:
Now, let your mixture cool to room temperature. Once cooled, stir in the almond milk (or your milk of choice). This will give the sherbet its creamy, dreamy texture. Chef Hack: If you’re in a hurry, you can chill your syrup in the fridge for quicker cooling! -
Ice Cream Maker Time:
Pour the mixture into your ice cream maker and churn according to the manufacturer’s instructions. Typically, this should take around 20-30 minutes. If you don’t have an ice cream maker, don’t fret! Pour it into a shallow dish and freeze, stirring every 30 minutes until it reaches your desired consistency. -
Final Freeze:
Once it’s churned to a soft-serve consistency, transfer your cherry sherbet to a lidded container. Freeze for an additional 2-4 hours to firm it up. Side Note: If it’s too hard to scoop after freezing, let it sit at room temperature for a few minutes before serving. -
Serve and Enjoy:
Scoop your homemade cherry sherbet into bowls or cones and enjoy! Consider topping it off with fresh cherries, a sprinkle of coconut flakes, or a drizzle of chocolate sauce. You’ve earned it!
Serving Suggestions
When it comes to serving your cherry sherbet, presentation is key! Serve it in beautiful sundae glasses or waffle cones for that nostalgic ice cream shop feel. Don’t forget to add a few fresh cherries or a sprig of mint for a pop of color! If you’re feeling adventurous, layer it in a glass with some chocolate or vanilla ice cream for a marbled effect—sometimes the best recipes bring a little pizzazz!
Recipe Variations
Here are some fun alternatives to mix things up:
-
Berry Blast: Add a cup of other mixed berry juices (like blueberry or raspberry) for a sherbet mix that’s bursting with flavor.
-
Coconut Cherry: Substitute almond milk with coconut milk for a tropical flair.
-
Cherry Limeade: Mix in some fresh lime juice to brighten up the flavor and give it a zesty kick.
-
Frozen Yogurt Twist: Use yogurt instead of milk for a healthier, tangy version!
-
Alcohol-Infused: For an adult twist, blend in a splash of vodka or rum (just a touch!) when mixing the milk for a refreshing summertime cocktail.
Chef’s Notes
This cherry sherbet recipe has been a beloved staple in my family for years, evolving with each season. I often look back at my grandma’s old ice cream maker sitting in the corner of the kitchen, a beautiful reminder of simpler times. Sometimes, I add a dash of almond extract or vanilla for a more complex flavor profile. The best part? You can customize this recipe endlessly! Whether it’s a summer day with friends or a cozy winter evening, you can always find a reason to whip up a batch of this creamy goodness.
FAQs and Troubleshooting
1. Can I use frozen cherries instead of fresh ones?
Absolutely! Just thaw and juice them before using. You may need to adjust the sugar based on how sweet the cherries are.
2. What if my sherbet is too hard to scoop?
Let it sit out for 5-10 minutes before scooping. You can also blend it with a little milk for a softer texture.
3. How long will the sherbet last in the freezer?
It will keep for about 2-3 weeks in an airtight container, although it’s hard to resist for that long!
4. Is it necessary to use gelatin?
While gelatin helps achieve that scoopable texture, you can omit it if you prefer, though the texture may be a bit icier.
Enjoy this homemade cherry sherbet, and remember that cooking is all about joy, experimentation, and sharing this delicious journey with others. Life is too short not to indulge in vibrant, flavorful food—so let’s keep things fresh, simple, and above all, delicious!
PrintHomemade Cherry Sherbet
A refreshing cherry sherbet that combines sweet-tart cherries with a creamy texture, perfect for hot summer days.
- Prep Time: 15 minutes
- Cook Time: 35 minutes
- Total Time: 50 minutes
- Yield: 4 servings 1x
- Category: Dessert
- Method: Churning
- Cuisine: American
- Diet: Vegetarian
Ingredients
- 1/4 cup sugar or SPLENDA® Sugar Blend
- 1 cup water
- 1 small package cherry gelatin (Jell-O)
- 1 cup fresh cherry juice
- 2 cups almond milk (or other milk of choice)
Instructions
- Prepare the Cherry Syrup: In a saucepan, combine the sugar and water over medium heat. Stir until the sugar is fully dissolved. Bring to a gentle simmer for about 5 minutes.
- Add the Jell-O: Remove the saucepan from heat, and stir in the cherry gelatin until completely dissolved.
- Stir in Cherry Juice: Once the gelatin is dissolved, add the fresh cherry juice and stir to combine.
- Mix in the Almond Milk: Let the mixture cool to room temperature, then stir in the almond milk.
- Pour the mixture into your ice cream maker and churn according to the manufacturer’s instructions, typically around 20-30 minutes.
- Transfer the cherry sherbet to a lidded container and freeze for an additional 2-4 hours to firm it up.
- Serve and Enjoy: Scoop the homemade cherry sherbet into bowls or cones and enjoy!
Notes
Serve in sundae glasses or waffle cones. Consider topping with fresh cherries or a drizzle of chocolate sauce.
Nutrition
- Serving Size: 1 serving
- Calories: 220
- Sugar: 28g
- Sodium: 80mg
- Fat: 4g
- Saturated Fat: 0g
- Unsaturated Fat: 4g
- Trans Fat: 0g
- Carbohydrates: 42g
- Fiber: 1g
- Protein: 3g
- Cholesterol: 0mg
Keywords: cherry sherbet, homemade dessert, summer treat