Ingredient Peach Sorbet: Homemade, Quick & Refreshing
Homemade Peach Sorbet: A Sweet Summer Delight
Ah, summer—the season that brings longer days, sunshine, and delectable fruits ripe for the picking! Among the treasure trove of summer produce, juicy peaches reign supreme for me. Whether you bite into one fresh off the tree, toss them on the grill, or let them shine in a stunning dessert, peaches have a way of stealing the spotlight and warming your heart. Today, I’m thrilled to share a recipe that’s not only refreshing but also incredibly easy to make: homemade peach sorbet.
Picture this: it’s a warm afternoon, your friends are gathered, laughter fills the air, and the sun casts a golden glow all around. You casually stroll into the kitchen, emerge with a bowl of lusciously smooth peach sorbet, and serve it up with a flourish. That’s how you become the star of your own summer soirée! This sorbet is creamy, vibrant, and makes for a perfect way to cool down, but it’s also a celebration of summer flavors that anyone can whip up. So let’s dive into how to create this simple and delightful treat together!
Personal Story
Growing up, summer vacations at my grandparents’ farm were the highlight of my childhood. Their backyard was filled with fruit trees, but none captured my heart quite like the peach tree. I remember the thrill of waking up to fresh peach cobbler baking in the oven. My grandmother would often take me to the orchard, and we would pick the ripest, sun-kissed peaches until our arms were loaded. Later, we’d sit on the porch, peach juice running down our arms, savoring every juicy bite as we shared stories.
One sunny afternoon, my grandma decided we’d make her famous peach sorbet—this delightful recipe was a cherished tradition passed down through generations. I can still taste its creamy sweetness and hear her soft laughter as we struggled to keep it from melting before we could scoop it into our bowls. Fast forward to today, and every time I make this peach sorbet, I’m transported back to that porch and those precious summer moments. It’s not just a dessert; it’s a slice of nostalgia wrapped in peachy goodness.
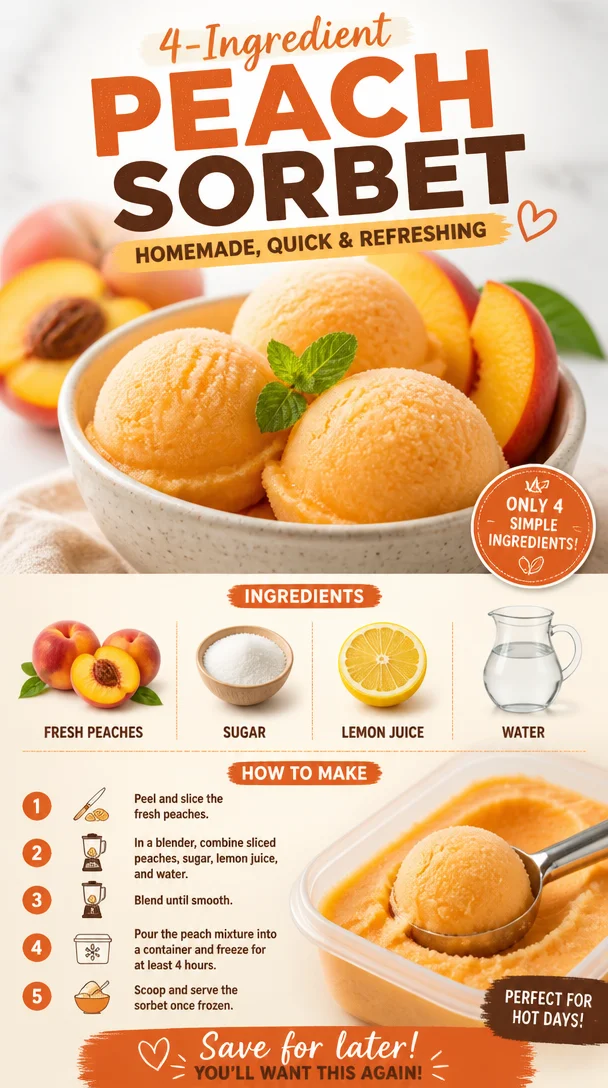
Ingredients
Here’s what you’ll need to make this delightful peach sorbet:
-
Fresh Peaches: The star of the show! Choose ripe, fragrant peaches that yield slightly when pressed. If you can’t find peaches, nectarines work beautifully as a substitute!
-
Sugar: This brings out the natural sweetness of the peaches. You can adjust the quantity—use more if your peaches are tart or less if they are super sweet. For a healthier option, try using honey or agave syrup.
-
Lemon Juice: A splash of acidity brightens up the flavors and balances the sweetness. Fresh lemon juice is ideal, but bottled juice will work well too. You can swap this for lime juice if you’re feeling adventurous!
-
Water: This helps to blend everything smoothly and creates the right texture. If you want a more intense peach flavor, consider replacing some water with peach juice.
Step-by-Step Instructions
-
Prep Your Peaches: Start by washing your fresh peaches thoroughly. Slice them in half, remove the pits, and chop them into smaller chunks. Pro tip: If you find peeling peaches tricky, blanch them in boiling water for 30 seconds and then plunge them into ice water; the skins will slide off easily!
-
Blend the Ingredients: Toss the chopped peaches into a blender or food processor along with 1 cup of sugar, 2 tablespoons of fresh lemon juice, and ½ cup of water. Blend until you achieve a smooth, silky consistency. Taste it—add more sugar or lemon juice according to your preference!
-
Chill the Mixture: Pour the peach mixture into a shallow dish and cover it tightly with plastic wrap or a lid. Place it in the freezer for about 2-3 hours, or until it’s firm but still slightly soft. This prevents ice crystals from forming and helps achieve a creamy texture.
-
Churn It: Once the mixture is nicely chilled, it’s time to churn! For this, I recommend using an ice cream maker (if you have one!). Pour the mixture into the machine and churn for about 20-25 minutes until it’s creamy and fluffy. In case you don’t have an ice cream maker, no worries! Just keep stirring the mixture every 30 minutes to break up the ice crystals as it freezes.
-
Final Freeze: Transfer the churned sorbet into an airtight container and let it freeze for another 1-2 hours. This final step is key for achieving that perfect scoopable texture!
-
Serve: Once your sorbet is ready, scoop it into bowls and garnish with fresh mint sprigs, slices of peaches, or a drizzle of honey. Take a moment to admire the vibrant color before diving in!
Serving Suggestions
For a sun-kissed summer treat, serve this peach sorbet in a chilled bowl or elegant dessert glass. You can also pair it with a dollop of whipped cream for extra indulgence or serve it alongside a slice of almond cake for a delightful contrast of flavors and textures.
Recipe Variations
-
Berry Bliss: Add a handful of strawberries or raspberries to the peach mixture for a berry-infused sorbet with a tangy twist.
-
Tropical Vibes: Mix in some diced mango or pineapple for a tropical flair that brings the beach to your backyard.
-
Herbal Infusion: Try adding a sprig of basil or mint while blending for a refreshing herbal note that elevates the flavor.
-
Coconut Love: Substitute coconut water for part of the regular water to create a tropical, creamy sorbet.
Chef’s Notes
Creating this peach sorbet has been a culinary journey for me! I began with my grandmother’s classic recipe, but over the years, I’ve played around with different fruits and flavors, discovering a world of endless possibilities. I’ll never forget the time I accidentally added jalapeños while trying a spicy version for a summer barbecue—it was an unexpected hit! Remember, cooking is about experimenting and having fun. Don’t be afraid to adjust the ingredients to fit your taste or dietary needs.
FAQs and Troubleshooting
Q: What if my sorbet turns out icy?
A: This is often due to having too much water or not churning it enough. If it’s icy, let it sit at room temperature for about 10-15 minutes before serving to soften it up!
Q: Can I use frozen peaches instead of fresh?
A: Absolutely! Just make sure they’re thawed and drained of excess liquid before blending. Frozen peaches can be a convenient option if fresh ones aren’t available.
Q: How long will the peach sorbet last in the freezer?
A: It can last about 2-3 weeks in an airtight container. To maintain the best texture, be sure to seal it tightly.
Q: Can I skip the sugar?
A: While this will reduce the sweetness, you can definitely adjust or replace it with a natural sweetener. Just taste as you go to find the right balance!
Nutritional Info
While I won’t bore you with numbers, know that this peach sorbet is a fantastic way to indulge in a guilt-free treat. Each scoop is packed with vitamins, antioxidants, and the wonderful natural flavors of peaches, making it the perfect summer dessert.
So there you have it—your guide to creating a refreshing homemade peach sorbet that’s bursting with flavor and memories! Gather those sun-kissed peaches, invite some friends over, and let this sorbet be the star of your summer parties. Happy cooking, and even happier eating! 🍑✨
PrintHomemade Peach Sorbet

A refreshing homemade peach sorbet that’s creamy, vibrant, and perfect for summer gatherings.
- Prep Time: 15 minutes
- Cook Time: 0 minutes
- Total Time: 180 minutes
- Yield: 4 servings 1x
- Category: Dessert
- Method: Freezing
- Cuisine: American
- Diet: Vegetarian
Ingredients
- 4 cups ripe peaches, chopped
- 1 cup sugar (adjust to taste)
- 2 tablespoons fresh lemon juice
- ½ cup water
Instructions
- Prep your peaches: Wash, slice, and chop peaches; blanch if needed.
- Blend the ingredients: Combine peaches, sugar, lemon juice, and water in a blender.
- Chill the mixture: Freeze the blended mixture for 2-3 hours.
- Churn it: Use an ice cream maker or stir every 30 minutes if not available.
- Final freeze: Store in an airtight container for 1-2 hours.
- Serve: Scoop and garnish with mint or peach slices.
Notes
Adjust sugar based on peach ripeness. Serve in chilled bowls for best presentation.
Nutrition
- Serving Size: 1 serving
- Calories: 150
- Sugar: 25g
- Sodium: 1mg
- Fat: 0g
- Saturated Fat: 0g
- Unsaturated Fat: 0g
- Trans Fat: 0g
- Carbohydrates: 38g
- Fiber: 2g
- Protein: 1g
- Cholesterol: 0mg
Keywords: peach sorbet, summer dessert, frozen treat, vegetarian dessert
Lime Sherbet
Refreshing Lime Sherbet: A Splash of Citrus Goodness!
Ah, lime sherbet—a dessert that dances on your taste buds, evoking sunny afternoons and carefree days. If you’re like me, you have sweet memories tied to every delightful scoop. Think about it: there’s something magical about a frozen treat that is both creamy and zesty, especially during the warmer months. But who says we have to limit ourselves to just those hot summer days? This lime sherbet can add a refreshing twist to any season, ensuring you savor every bite, no matter the time of year!
When I first tackled the idea of making lime sherbet from scratch, it was because I wanted a vibrant and light dessert that brought joy to the table without weighing you down. Just like you, I appreciate food that not only tastes good but also feels good. Plus, making this dessert at home means we can control every last ingredient. It’s all about keeping our indulgences fresh, flavorful, and oh-so satisfying.
Join me on this cool culinary journey as we whip up a batch of lime sherbet that’s bound to be the star of your dessert lineup! Prepare to indulge in an extraordinary balance of tart lime zest and creamy richness that will leave your taste buds wanting more.
A Sweet Slice of Memory Lane
Let me take you back to that memory from my childhood. I remember spending long summer days at my grandmother’s house, where the air was filled with the fragrance of her garden and the laughter of kids playing on the lawn. She had this signature lime sherbet that she made every year when the limes from her tree burst with ripeness.
The way she scooped out the lime sherbet into cheerful bowls was like watching a performance; her hands moved gracefully, and the bright green color seemed to sparkle in the sunlight. Each bite was a burst of tangy sweetness, creating a joyful harmony that would dance on my tongue as vibrant as her storytelling. I could spend hours sitting on the porch, trying to convince my siblings to share their scoops while my grandmother quietly made her way back to her garden.
Now, as I create this lime sherbet in my own kitchen, I can feel her spirit guiding me. That’s the beauty of food—it brings back the best memories and connects us to those we love. And the recipe? Oh, it has just a few tweaks, making it even more approachable for today’s tastes.
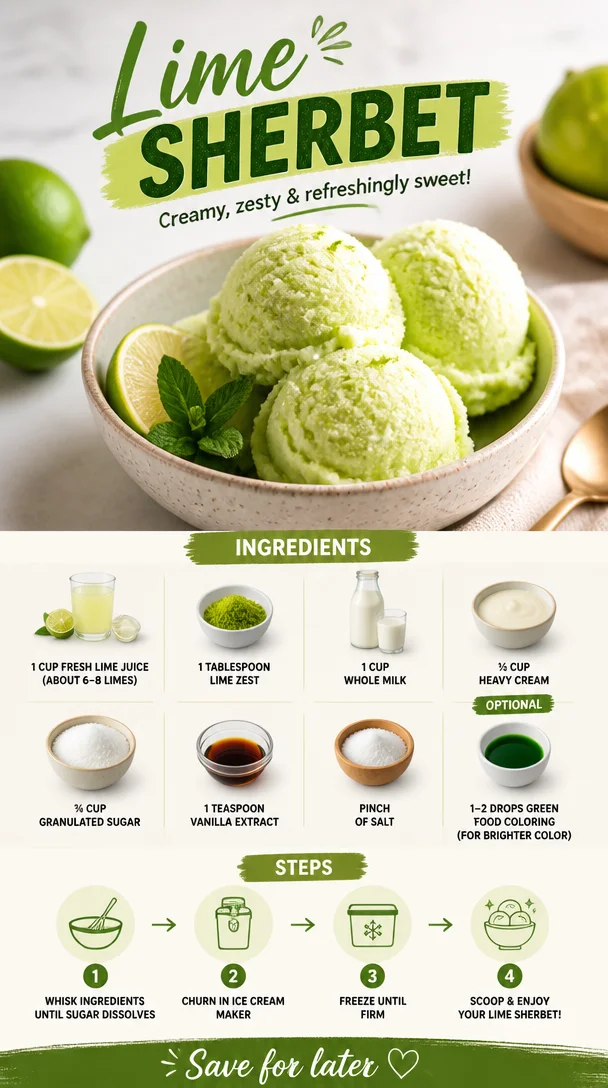
Ingredients
Let’s gather our ingredients and dive into this delicious recipe!
-
1 cup fresh lime juice (about 6–8 limes)
Tip: Freshly squeezed is the way to go! Bottled lime juice just doesn’t have that vibrant zing. If you need a substitute, you could use lemon juice, but trust me, you’ll miss the tangy sweetness of the limes! -
1 tablespoon lime zest
Pro Insight: Zesting adds a powerful citrus aroma and amplifies the lime flavor. Remember to zest before you juice! And don’t toss those peels—use them in your smoothies or teas! -
1 cup whole milk
Substitution: For a lighter version, you can use almond milk or oat milk, though the creaminess will differ slightly. Whole milk gives that beautiful creamy texture you crave! -
½ cup heavy cream
Chef’s Note: Heavy cream is your best friend when it comes to making desserts creamy. Don’t skip it! If you prefer a lighter option, full-fat coconut cream works like a charm for a dairy-free version. -
¾ cup granulated sugar
Alternative: If you’re looking for a healthier replacement, try pure maple syrup or a non-caloric sweetener. Adjust the amount based on sweetness preference! -
1 teaspoon vanilla extract
Expert Tip: Vanilla adds a warm note that balances the tanginess of the lime beautifully! Choose pure vanilla extract for the best flavor. -
Pinch of salt
Never underestimate salt—it enhances sweetness, bringing out the lime’s natural flavors! -
Optional: 1–2 drops green food coloring
Chef’s Choice: While this is totally optional, a drop or two can amp up the visual appeal. But I promise, this sherbet will be just as yummy without it!
Now that we have our vibrant line-up ready, let’s get to the fun part—making the lime sherbet!
Step-by-Step Instructions
-
Juice those limes! Start by cutting the limes in half and juicing them until you have one cup of fresh lime juice. I highly recommend using a citrus juicer to make this task easier. Trust me, your hands will thank you later!
Tip: If you roll the limes on the countertop with your palm before cutting, it’ll help release more juice!
-
Zest it up! Grab a microplane or zester and zest one tablespoon from the lime peels. Remember, you’re just getting the green part—try to avoid the bitter white pith underneath!
-
Mix the wet ingredients. In a mixing bowl, combine the fresh lime juice, lime zest, whole milk, heavy cream, vanilla extract, and a pinch of salt. Whisk until everything is blended nicely. You want a creamy mixture that smells like a bright summer day!
Chef’s Insight: Taste your mixture! If it needs more sweetness, now’s the time to add a bit more sugar.
-
Sweeten to taste. Gradually add in the granulated sugar, whisking until it dissolves completely. This part is crucial. If sugaring it is your main concern, feel free to adjust based on your preference or the tartness of your limes!
-
Add optional food coloring. If you want a pop of green, add in the optional food coloring, one drop at a time, until you achieve the desired hue. Just remember: A little goes a long way!
-
Chill the mixture. Once your mixture is well combined, cover the bowl with plastic wrap or a lid and refrigerate it for about an hour. Chilling it helps the flavors meld beautifully!
-
Churn away! After it’s chilled, transfer your lime mixture to an ice cream maker and churn according to the manufacturer’s instructions. Typically, this takes about 20–30 minutes. But if you don’t have an ice cream maker, no worries!
(If you’re going the no-churn route: Pour the mixture into a freezer-safe container and freeze for about 1–2 hours, stirring every 30 minutes to break up ice crystals until it reaches a smooth consistency.)
-
Freeze until firm. Transfer the churned sherbet into a clean container, smoothing it out on top. Cover with a lid or plastic wrap and pop it into the freezer for about 4 hours, or until it’s firm enough to scoop.
Serving Suggestions
Scooping out your homemade lime sherbet is a real treat! Serve it in fun dessert bowls, or go all out and use waffle cones for that extra crunch. You can also elevate your dish with a mint leaf garnish or a sprinkle of zest on top. If you want to get fancy, drizzle some coconut syrup or your favorite fruit compote to add another layer of flavor. No matter how you serve it, this sherbet is bound to brighten up any dessert table!
Recipe Variations
Now, if you’re feeling adventurous and want to mix things up a bit, here are a few creative twists you can try:
-
Berry Lime Sherbet: Toss in a cup of blended fresh berries (like strawberries or raspberries) to the mixture before churning. The berry and lime combo is out of this world!
-
Coconut Lime Sherbet: Replace half the milk with coconut milk for a tropical coconut lime sherbet that transports you to an island paradise.
-
Minty Lime Twist: Add a teaspoon of finely chopped fresh mint to your lime mixture for a refreshing mint lime sherbet that adds a cooling flavor.
-
Creamy Avocado Lime: For an unexpected twist, blend ripe avocado into your mixture for an ultra-creamy texture and a unique flavor.
Chef’s Notes
When I first started making lime sherbet, I can’t tell you how many batches I went through trying to find that perfect balance of tart and sweet. One time, I decided to experiment with different sugars—I even made a “lime sherbet challenge” with friends to see which version tasted better! (We agreed that the classic granulated sugar still reigns supreme.) Every time I whip up this recipe, it feels like a delightful throwback to those hot summer days and cool treats.
Over the years, this recipe has evolved with my cooking style, becoming more versatile as I embraced natural ingredients and less refined sugar. The best part? Every variation I’ve made feels like an heirloom passed down from my grandmother’s kitchen. Each scoop is filled with love, joy, and nostalgia.
FAQs and Troubleshooting
Q1: My sherbet turned out icy instead of creamy. What happened?
- This could happen if your mixture freezes too quickly or if the mixture wasn’t well combined. Remember to churn until it’s smooth and creamy, and make sure it’s frozen long enough for that perfect texture!
Q2: How long does homemade lime sherbet last in the freezer?
- It’s best enjoyed within 1–2 weeks, as it may become icy after that. If you freeze it longer, be sure to let it sit out for a few minutes before scooping!
Q3: Can I make this sherbet without an ice cream maker?
- Absolutely! Follow the no-churn method mentioned above, stirring every 30 minutes while it freezes to incorporate air and prevent ice crystals from forming.
Q4: What can I do if I don’t have enough lime juice?
- If you’re short on lime juice, you can substitute with lemon juice or a mixture of lemon and lime! Just remember that the flavor may change slightly.
Nutritional Info (Optional)
While I believe in enjoying life’s sweet moments, I wanted to give you a snapshot of the goodness packed into this lime sherbet:
- Serving Size: 1/2 cup
- Calories: Approximately 150 calories
- Total Fat: 7g
- Saturated Fat: 4g
- Cholesterol: 30mg
- Sodium: 25mg
- Total Carbohydrates: 20g
- Sugars: 17g
- Protein: 2g
And there you have it! Your kitchen is about to be filled with the irresistible aroma of lime sherbet. I can’t wait for you to scoop up a bowl and take that first, refreshing bite. This treat is sure to become a staple in your dessert lineup, just like it is in mine! Happy cooking and even happier indulging! 🍋✨
PrintRefreshing Lime Sherbet
A vibrant and light lime sherbet that’s both creamy and zesty, perfect for any season.
- Prep Time: 20 minutes
- Cook Time: 15 minutes
- Total Time: 60 minutes
- Yield: 4 servings 1x
- Category: Dessert
- Method: Churning
- Cuisine: American
- Diet: Vegetarian
Ingredients
- 1 cup fresh lime juice (about 6–8 limes)
- 1 tablespoon lime zest
- 1 cup whole milk
- ½ cup heavy cream
- ¾ cup granulated sugar
- 1 teaspoon vanilla extract
- Pinch of salt
- Optional: 1–2 drops green food coloring
Instructions
- Juice those limes! Start by cutting the limes in half and juicing them until you have one cup of fresh lime juice.
- Zest it up! Grab a microplane or zester and zest one tablespoon from the lime peels.
- Mix the wet ingredients. In a mixing bowl, combine the fresh lime juice, lime zest, whole milk, heavy cream, vanilla extract, and a pinch of salt. Whisk until blended.
- Sweeten to taste. Gradually add in the granulated sugar, whisking until it dissolves completely.
- Add optional food coloring if desired, one drop at a time, until you achieve the desired hue.
- Chill the mixture. Cover the bowl with plastic wrap and refrigerate for about an hour.
- Churn away! After it’s chilled, transfer your lime mixture to an ice cream maker and churn according to manufacturer’s instructions.
- Freeze until firm. Transfer the churned sherbet into a clean container and freeze for about 4 hours, or until firm enough to scoop.
Notes
This sherbet can be served in dessert bowls or waffle cones. Garnish with mint or a sprinkle of zest for an extra touch.
Nutrition
- Serving Size: 1/2 cup
- Calories: 150
- Sugar: 17g
- Sodium: 25mg
- Fat: 7g
- Saturated Fat: 4g
- Unsaturated Fat: 3g
- Trans Fat: 0g
- Carbohydrates: 20g
- Fiber: 0g
- Protein: 2g
- Cholesterol: 30mg
Keywords: lime sherbet, frozen dessert, citrus treat