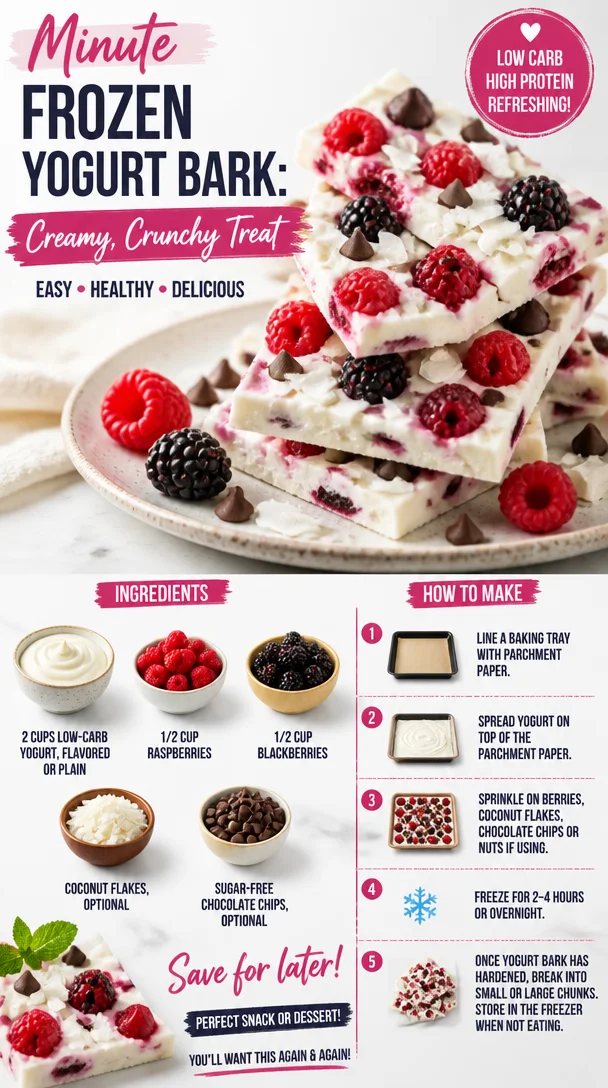
Minute Frozen Yogurt Bark: Creamy, Crunchy Treat
Frozen Yogurt Bark: The Ultimate Refreshing Treat
Hey there, fellow food lovers! Have you ever come home from a long day, craving something sweet but also guilt-free? If you’re nodding your head, then let’s talk about a delightful little treat that will make your taste buds sing without weighing you down: Frozen Yogurt Bark.
This isn’t just any ordinary snack—it’s a celebration of vibrant colors, refreshing flavors, and creamy goodness that you can whip up in no time. Imagine a canvas of creamy yogurt blanketed with pops of juicy berries, a sprinkle of coconut, and maybe even a cheeky handful of sugar-free chocolate chips. It’s the ideal combination of health and indulgence, and trust me, it’s as easy as pie (or should I say bark?) to make!
A Little Backstory
Growing up, my mom had this incredible way of turning simple snacks into magical treats. One hot summer afternoon, she introduced my siblings and me to a version of this yogurt delight. I still vividly remember the thrill of spreading yogurt on a baking sheet, rolling the fruits into it like they were little gems, and then eagerly watching as it froze into a delectable masterpiece.
The excitement of breaking that bark into pieces was like unwrapping a gift on Christmas morning! It was a ritual that brought us all together—playing taste testers, arguing over who got the biggest slice, and inevitably turning it into a messy but oh-so-fun experience. Today, I recreate that magic and share it with you, dear friends, because life is too short not to enjoy delicious, wholesome treats that bring back good memories.
Ingredients
Ready to gather those fresh ingredients? Here’s what you’ll need to make your own Frozen Yogurt Bark:
-
2 cups low-carb yogurt: Choose your favorite flavor like vanilla or go for plain and add your twist with fresh fruits and toppings. If you’re looking for a dairy-free version, coconut or almond yogurt works wonders too!
-
1/2 cup raspberries: These little ruby-red beauties are packed with antioxidants and bring a delightful tartness to the mix. Feel free to swap in strawberries or blueberries if you prefer!
-
1/2 cup blackberries: Full of flavor and fiber, blackberries add a fun burst of goodness. If you can’t find them, other berries or even chopped bananas will do the trick!
-
Coconut flakes (optional): Toasted or plain, coconut flakes add a wonderful texture and a tropical twist. If you’re not a coconut fan, just skip it or substitute with chopped nuts for added crunch.
-
Sugar-free chocolate chips (optional): For the chocolate lovers out there, these make a heavenly addition! If you’re avoiding chocolate altogether, consider adding a drizzle of honey or agave syrup instead.
Step-by-Step Instructions
Okay, let’s roll up our sleeves and get to the fun part! Here’s how to create your very own Frozen Yogurt Bark:
-
Prepare Your Baking Sheet: Line a baking sheet with parchment paper—this makes for easy removal and cleanup later. Pro tip: if you crinkle the parchment a bit before placing it down, it’ll lay flat and hold its shape better.
-
Mix Up the Yogurt: In a mixing bowl, take your low-carb yogurt and stir it up! You can add a splash of vanilla extract or a drizzle of maple syrup for extra flavor if you like. Not too much though; we want to keep it light and healthy!
-
Spread the Yogurt: Pour the yogurt mixture onto your prepared baking sheet and spread it out evenly. Aim for about 1/2 inch thickness so it freezes perfectly. It should look like a creamy canvas ready for embellishment.
-
Add the Berries: Now, sprinkle your raspberries and blackberries across the yogurt. Gently press them in a bit so they adhere well when frozen. This is where the magic happens! Don’t be afraid to get creative with your fruit placement—let those colors shine!
-
Sprinkle the Toppings: If you’re using coconut flakes or sugar-free chocolate chips, sprinkle them over the top. Remember, you can never have too much of a good thing, but make sure it’s evenly distributed for maximum yumminess.
-
Freeze It Out: Pop the baking sheet into the freezer for at least 4 hours, or until the yogurt is completely frozen. This is the hardest part—waiting! You might want to set a timer as a reminder; the anticipation is real!
-
Break It Up: Once frozen, remove the bark from the freezer. Using your hands or a sharp knife, break it into pieces (like breaking brittle) and watch it shatter delightfully. Presentation tip: you can break them into jagged pieces for a rustic look, or cut them into neat squares if you wanna impress someone special.
Serving Suggestions
When serving Frozen Yogurt Bark, get a little fancy! Arrange the pieces on a colorful platter, maybe even drizzle a touch of melted dark chocolate or honey over the top for an extra treat. This bark doubles as a frozen dessert and a fun snack that’s perfect for summer gatherings or a cozy movie night. Trust me; your friends won’t stop raving about your amazing culinary skills!
Recipe Variations
Let’s spice things up! Here are a few fun twists you can try to make your Frozen Yogurt Bark even more exciting:
-
Nutty Delight: Add chopped walnuts, almonds, or pecans instead of coconut for a crunchy twist.
-
Tropical Fruit Burst: Swap out the berries for tropical fruits like pineapple, mango, or kiwi for a summery vibe.
-
Chocolate Lovers’ Dream: Mix in cocoa powder to the yogurt for a chocolate base and sprinkle with chocolate chips.
-
Nut Butter Swirl: Drizzle almond or peanut butter on top before freezing to make it extra creamy and indulgent.
-
Spicy Cinnamon: Add a pinch of cinnamon or chili powder to the yogurt for a warm and spicy surprise!
Chef’s Notes
Ah, the beauty of frozen treats! One of the coolest things about Frozen Yogurt Bark is that it can be modified based on whatever ingredients you have on hand or what’s in season. Over the years, I’ve genuinely enjoyed experimenting with various toppings and flavors. Sometimes I throw in granola for crunch, or yogurt with unexpected spices like cardamom for a fun twist. It’s like a blank canvas that never gets old!
And yes, I’ve had my share of culinary mishaps—like the time I didn’t line the baking sheet properly and ended up with a stuck yogurt slab that became a science experiment. Pro tip: Always check the parchment paper; it’s your best friend in the kitchen!
FAQs and Troubleshooting
1. Can I use regular yogurt instead of low-carb yogurt?
Absolutely! Just be mindful of the sugar content. Greek yogurt works beautifully, giving it a thicker texture!
2. My bark is too soft and not breaking nicely. What did I do wrong?
It’s likely that your yogurt wasn’t frozen long enough. Make sure to freeze it for at least 4 hours for the best results. If it’s still soft, pop it back in!
3. How do I store any leftovers?
Store your bark in an airtight container in the freezer between layers of parchment paper. It should stay fresh for about two weeks, but trust me, it will probably disappear long before then!
4. Can I mix different fruits?
Definitely! Feel free to mix fruits and even add in some nuts or seeds for extra texture. Just keep an eye on the weight of the fruits so it doesn’t get too soggy.
Nutritional Info
This Frozen Yogurt Bark recipe is not only delicious but also packed with nutrition! Here’s a rough breakdown for one piece (assuming 8 pieces in total):
- Calories: Approximately 80 kcal
- Protein: 5g
- Carbohydrates: 7g
- Fat: 3g
- Fiber: 2g
- Sugar: 2g (natural from fruits)
So there you have it, my dear friends—an easy, fun, and nutritious treat perfect for any occasion. Try making this Frozen Yogurt Bark for yourself and let your creativity shine! That first bite will take you back to my childhood, and I know it’ll spark a smile on your face too. Happy freezing, and remember to keep it fresh and delicious!
PrintFrozen Yogurt Bark
A delightful guilt-free treat made with creamy yogurt, vibrant berries, and optional toppings that you can whip up in no time.
- Prep Time: 10 minutes
- Cook Time: 0 minutes
- Total Time: 250 minutes
- Yield: 8 servings 1x
- Category: Dessert
- Method: Freezing
- Cuisine: American
- Diet: Vegetarian
Ingredients
- 2 cups low-carb yogurt
- 1/2 cup raspberries
- 1/2 cup blackberries
- Coconut flakes (optional)
- Sugar-free chocolate chips (optional)
Instructions
- Prepare your baking sheet: Line a baking sheet with parchment paper.
- Mix up the yogurt: Stir the low-carb yogurt in a mixing bowl.
- Spread the yogurt: Pour the yogurt mixture onto the prepared baking sheet and spread it out evenly.
- Add the berries: Sprinkle raspberries and blackberries across the yogurt.
- Sprinkle the toppings: Add coconut flakes or sugar-free chocolate chips if using.
- Freeze it out: Place in the freezer for at least 240 minutes, or until frozen solid.
- Break it up: Remove from the freezer and break it into pieces.
Notes
Feel free to modify with different fruits and toppings based on what’s in season or your personal preference.
Nutrition
- Serving Size: 1 piece
- Calories: 80
- Sugar: 2g
- Sodium: 50mg
- Fat: 3g
- Saturated Fat: 1g
- Unsaturated Fat: 2g
- Trans Fat: 0g
- Carbohydrates: 7g
- Fiber: 2g
- Protein: 5g
- Cholesterol: 5mg
Keywords: Frozen Yogurt Bark, Healthy Snack, Guilt-free Dessert, Quick Treat
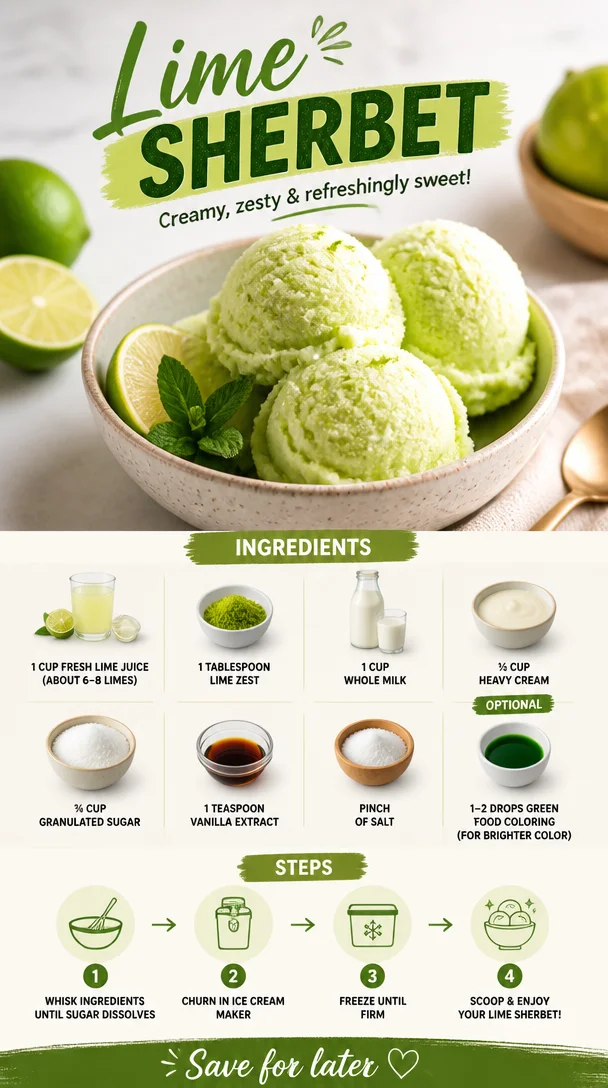
Lime Sherbet
Refreshing Lime Sherbet: A Splash of Citrus Goodness!
Ah, lime sherbet—a dessert that dances on your taste buds, evoking sunny afternoons and carefree days. If you’re like me, you have sweet memories tied to every delightful scoop. Think about it: there’s something magical about a frozen treat that is both creamy and zesty, especially during the warmer months. But who says we have to limit ourselves to just those hot summer days? This lime sherbet can add a refreshing twist to any season, ensuring you savor every bite, no matter the time of year!
When I first tackled the idea of making lime sherbet from scratch, it was because I wanted a vibrant and light dessert that brought joy to the table without weighing you down. Just like you, I appreciate food that not only tastes good but also feels good. Plus, making this dessert at home means we can control every last ingredient. It’s all about keeping our indulgences fresh, flavorful, and oh-so satisfying.
Join me on this cool culinary journey as we whip up a batch of lime sherbet that’s bound to be the star of your dessert lineup! Prepare to indulge in an extraordinary balance of tart lime zest and creamy richness that will leave your taste buds wanting more.
A Sweet Slice of Memory Lane
Let me take you back to that memory from my childhood. I remember spending long summer days at my grandmother’s house, where the air was filled with the fragrance of her garden and the laughter of kids playing on the lawn. She had this signature lime sherbet that she made every year when the limes from her tree burst with ripeness.
The way she scooped out the lime sherbet into cheerful bowls was like watching a performance; her hands moved gracefully, and the bright green color seemed to sparkle in the sunlight. Each bite was a burst of tangy sweetness, creating a joyful harmony that would dance on my tongue as vibrant as her storytelling. I could spend hours sitting on the porch, trying to convince my siblings to share their scoops while my grandmother quietly made her way back to her garden.
Now, as I create this lime sherbet in my own kitchen, I can feel her spirit guiding me. That’s the beauty of food—it brings back the best memories and connects us to those we love. And the recipe? Oh, it has just a few tweaks, making it even more approachable for today’s tastes.
Ingredients
Let’s gather our ingredients and dive into this delicious recipe!
-
1 cup fresh lime juice (about 6–8 limes)
Tip: Freshly squeezed is the way to go! Bottled lime juice just doesn’t have that vibrant zing. If you need a substitute, you could use lemon juice, but trust me, you’ll miss the tangy sweetness of the limes! -
1 tablespoon lime zest
Pro Insight: Zesting adds a powerful citrus aroma and amplifies the lime flavor. Remember to zest before you juice! And don’t toss those peels—use them in your smoothies or teas! -
1 cup whole milk
Substitution: For a lighter version, you can use almond milk or oat milk, though the creaminess will differ slightly. Whole milk gives that beautiful creamy texture you crave! -
½ cup heavy cream
Chef’s Note: Heavy cream is your best friend when it comes to making desserts creamy. Don’t skip it! If you prefer a lighter option, full-fat coconut cream works like a charm for a dairy-free version. -
¾ cup granulated sugar
Alternative: If you’re looking for a healthier replacement, try pure maple syrup or a non-caloric sweetener. Adjust the amount based on sweetness preference! -
1 teaspoon vanilla extract
Expert Tip: Vanilla adds a warm note that balances the tanginess of the lime beautifully! Choose pure vanilla extract for the best flavor. -
Pinch of salt
Never underestimate salt—it enhances sweetness, bringing out the lime’s natural flavors! -
Optional: 1–2 drops green food coloring
Chef’s Choice: While this is totally optional, a drop or two can amp up the visual appeal. But I promise, this sherbet will be just as yummy without it!
Now that we have our vibrant line-up ready, let’s get to the fun part—making the lime sherbet!
Step-by-Step Instructions
-
Juice those limes! Start by cutting the limes in half and juicing them until you have one cup of fresh lime juice. I highly recommend using a citrus juicer to make this task easier. Trust me, your hands will thank you later!
Tip: If you roll the limes on the countertop with your palm before cutting, it’ll help release more juice!
-
Zest it up! Grab a microplane or zester and zest one tablespoon from the lime peels. Remember, you’re just getting the green part—try to avoid the bitter white pith underneath!
-
Mix the wet ingredients. In a mixing bowl, combine the fresh lime juice, lime zest, whole milk, heavy cream, vanilla extract, and a pinch of salt. Whisk until everything is blended nicely. You want a creamy mixture that smells like a bright summer day!
Chef’s Insight: Taste your mixture! If it needs more sweetness, now’s the time to add a bit more sugar.
-
Sweeten to taste. Gradually add in the granulated sugar, whisking until it dissolves completely. This part is crucial. If sugaring it is your main concern, feel free to adjust based on your preference or the tartness of your limes!
-
Add optional food coloring. If you want a pop of green, add in the optional food coloring, one drop at a time, until you achieve the desired hue. Just remember: A little goes a long way!
-
Chill the mixture. Once your mixture is well combined, cover the bowl with plastic wrap or a lid and refrigerate it for about an hour. Chilling it helps the flavors meld beautifully!
-
Churn away! After it’s chilled, transfer your lime mixture to an ice cream maker and churn according to the manufacturer’s instructions. Typically, this takes about 20–30 minutes. But if you don’t have an ice cream maker, no worries!
(If you’re going the no-churn route: Pour the mixture into a freezer-safe container and freeze for about 1–2 hours, stirring every 30 minutes to break up ice crystals until it reaches a smooth consistency.)
-
Freeze until firm. Transfer the churned sherbet into a clean container, smoothing it out on top. Cover with a lid or plastic wrap and pop it into the freezer for about 4 hours, or until it’s firm enough to scoop.
Serving Suggestions
Scooping out your homemade lime sherbet is a real treat! Serve it in fun dessert bowls, or go all out and use waffle cones for that extra crunch. You can also elevate your dish with a mint leaf garnish or a sprinkle of zest on top. If you want to get fancy, drizzle some coconut syrup or your favorite fruit compote to add another layer of flavor. No matter how you serve it, this sherbet is bound to brighten up any dessert table!
Recipe Variations
Now, if you’re feeling adventurous and want to mix things up a bit, here are a few creative twists you can try:
-
Berry Lime Sherbet: Toss in a cup of blended fresh berries (like strawberries or raspberries) to the mixture before churning. The berry and lime combo is out of this world!
-
Coconut Lime Sherbet: Replace half the milk with coconut milk for a tropical coconut lime sherbet that transports you to an island paradise.
-
Minty Lime Twist: Add a teaspoon of finely chopped fresh mint to your lime mixture for a refreshing mint lime sherbet that adds a cooling flavor.
-
Creamy Avocado Lime: For an unexpected twist, blend ripe avocado into your mixture for an ultra-creamy texture and a unique flavor.
Chef’s Notes
When I first started making lime sherbet, I can’t tell you how many batches I went through trying to find that perfect balance of tart and sweet. One time, I decided to experiment with different sugars—I even made a “lime sherbet challenge” with friends to see which version tasted better! (We agreed that the classic granulated sugar still reigns supreme.) Every time I whip up this recipe, it feels like a delightful throwback to those hot summer days and cool treats.
Over the years, this recipe has evolved with my cooking style, becoming more versatile as I embraced natural ingredients and less refined sugar. The best part? Every variation I’ve made feels like an heirloom passed down from my grandmother’s kitchen. Each scoop is filled with love, joy, and nostalgia.
FAQs and Troubleshooting
Q1: My sherbet turned out icy instead of creamy. What happened?
- This could happen if your mixture freezes too quickly or if the mixture wasn’t well combined. Remember to churn until it’s smooth and creamy, and make sure it’s frozen long enough for that perfect texture!
Q2: How long does homemade lime sherbet last in the freezer?
- It’s best enjoyed within 1–2 weeks, as it may become icy after that. If you freeze it longer, be sure to let it sit out for a few minutes before scooping!
Q3: Can I make this sherbet without an ice cream maker?
- Absolutely! Follow the no-churn method mentioned above, stirring every 30 minutes while it freezes to incorporate air and prevent ice crystals from forming.
Q4: What can I do if I don’t have enough lime juice?
- If you’re short on lime juice, you can substitute with lemon juice or a mixture of lemon and lime! Just remember that the flavor may change slightly.
Nutritional Info (Optional)
While I believe in enjoying life’s sweet moments, I wanted to give you a snapshot of the goodness packed into this lime sherbet:
- Serving Size: 1/2 cup
- Calories: Approximately 150 calories
- Total Fat: 7g
- Saturated Fat: 4g
- Cholesterol: 30mg
- Sodium: 25mg
- Total Carbohydrates: 20g
- Sugars: 17g
- Protein: 2g
And there you have it! Your kitchen is about to be filled with the irresistible aroma of lime sherbet. I can’t wait for you to scoop up a bowl and take that first, refreshing bite. This treat is sure to become a staple in your dessert lineup, just like it is in mine! Happy cooking and even happier indulging! 🍋✨
PrintRefreshing Lime Sherbet
A vibrant and light lime sherbet that’s both creamy and zesty, perfect for any season.
- Prep Time: 20 minutes
- Cook Time: 15 minutes
- Total Time: 60 minutes
- Yield: 4 servings 1x
- Category: Dessert
- Method: Churning
- Cuisine: American
- Diet: Vegetarian
Ingredients
- 1 cup fresh lime juice (about 6–8 limes)
- 1 tablespoon lime zest
- 1 cup whole milk
- ½ cup heavy cream
- ¾ cup granulated sugar
- 1 teaspoon vanilla extract
- Pinch of salt
- Optional: 1–2 drops green food coloring
Instructions
- Juice those limes! Start by cutting the limes in half and juicing them until you have one cup of fresh lime juice.
- Zest it up! Grab a microplane or zester and zest one tablespoon from the lime peels.
- Mix the wet ingredients. In a mixing bowl, combine the fresh lime juice, lime zest, whole milk, heavy cream, vanilla extract, and a pinch of salt. Whisk until blended.
- Sweeten to taste. Gradually add in the granulated sugar, whisking until it dissolves completely.
- Add optional food coloring if desired, one drop at a time, until you achieve the desired hue.
- Chill the mixture. Cover the bowl with plastic wrap and refrigerate for about an hour.
- Churn away! After it’s chilled, transfer your lime mixture to an ice cream maker and churn according to manufacturer’s instructions.
- Freeze until firm. Transfer the churned sherbet into a clean container and freeze for about 4 hours, or until firm enough to scoop.
Notes
This sherbet can be served in dessert bowls or waffle cones. Garnish with mint or a sprinkle of zest for an extra touch.
Nutrition
- Serving Size: 1/2 cup
- Calories: 150
- Sugar: 17g
- Sodium: 25mg
- Fat: 7g
- Saturated Fat: 4g
- Unsaturated Fat: 3g
- Trans Fat: 0g
- Carbohydrates: 20g
- Fiber: 0g
- Protein: 2g
- Cholesterol: 30mg
Keywords: lime sherbet, frozen dessert, citrus treat
Ingredient Coconut Mango Freezer Pops for Summer
Cool Down with Tropical Bliss: Coconut Mango Popsicles
Welcome to the sweet escape of summer! If you’re anything like me, there’s nothing quite as refreshing as a delicious homemade popsicle on a hot day. As the sun blazes down and the days stretch long, it’s time to embrace the magic of fruity treats that are both satisfying and healthy. Today, I’m excited to share my beloved Coconut Mango Popsicles—a recipe that’s more than just a dessert; it’s a little piece of sunshine!
Picture this: You’re lounging in a hammock, the gentle breeze tousling your hair, and you reach into your cooler to pull out a blissful popsicle. You take your first bite, and suddenly, you’re whisked away to a tropical paradise, the flavors of sweet mango and creamy coconut dancing on your taste buds. Trust me, these popsicles are like a mini-vacation on a stick!
One of the reasons I adore this recipe is its simplicity and vibrant flavor. We’re not talking complicated techniques or obscure ingredients here—just real, wholesome goodness! This is all about enjoying feel-good ingredients that make you smile. Plus, they’re perfect for a family-friendly treat or a healthy snack when those sweet cravings hit.
So, grab your blender, some popsicle molds, and let’s dive into the world of coconut and mango bliss!
A Taste of Home: My Popsicle Memory
Let me take you back to a balmy summer evening from my childhood. I was visiting my grandparents in Florida, where the air was thick with warmth and the laughter of my cousins filled the backyard. Those lazy afternoons were always spent chasing each other around the pool, splashing and squealing like kids do.
My grandma, the magical kitchen sorceress, would come out every once in a while with a tray of colorful popsicles, each bright hue sparking joy more than the last. Every bite was a joyous explosion of fruitiness, but the ones laced with coconut were my absolute favorite. They were like the summer sun made edible.
I came to realize my love for those nostalgic popsicles wasn’t just about the flavors—they were a symbol of summer, of family togetherness, and of all things delightful. Decades later, I can still see my grandma’s smile as we raced for the final popsicle, and I can feel the sunshine on my skin.
Now, every time I whip up these Coconut Mango Popsicles, I picture those carefree summer days and all the love that went into each fruity bite. And best of all, I get to share this wholesome, feel-good treat with you!
Ingredients You’ll Need
Let’s gather our ingredients! Here’s what you’ll need to bring the tropical vibes into your kitchen:
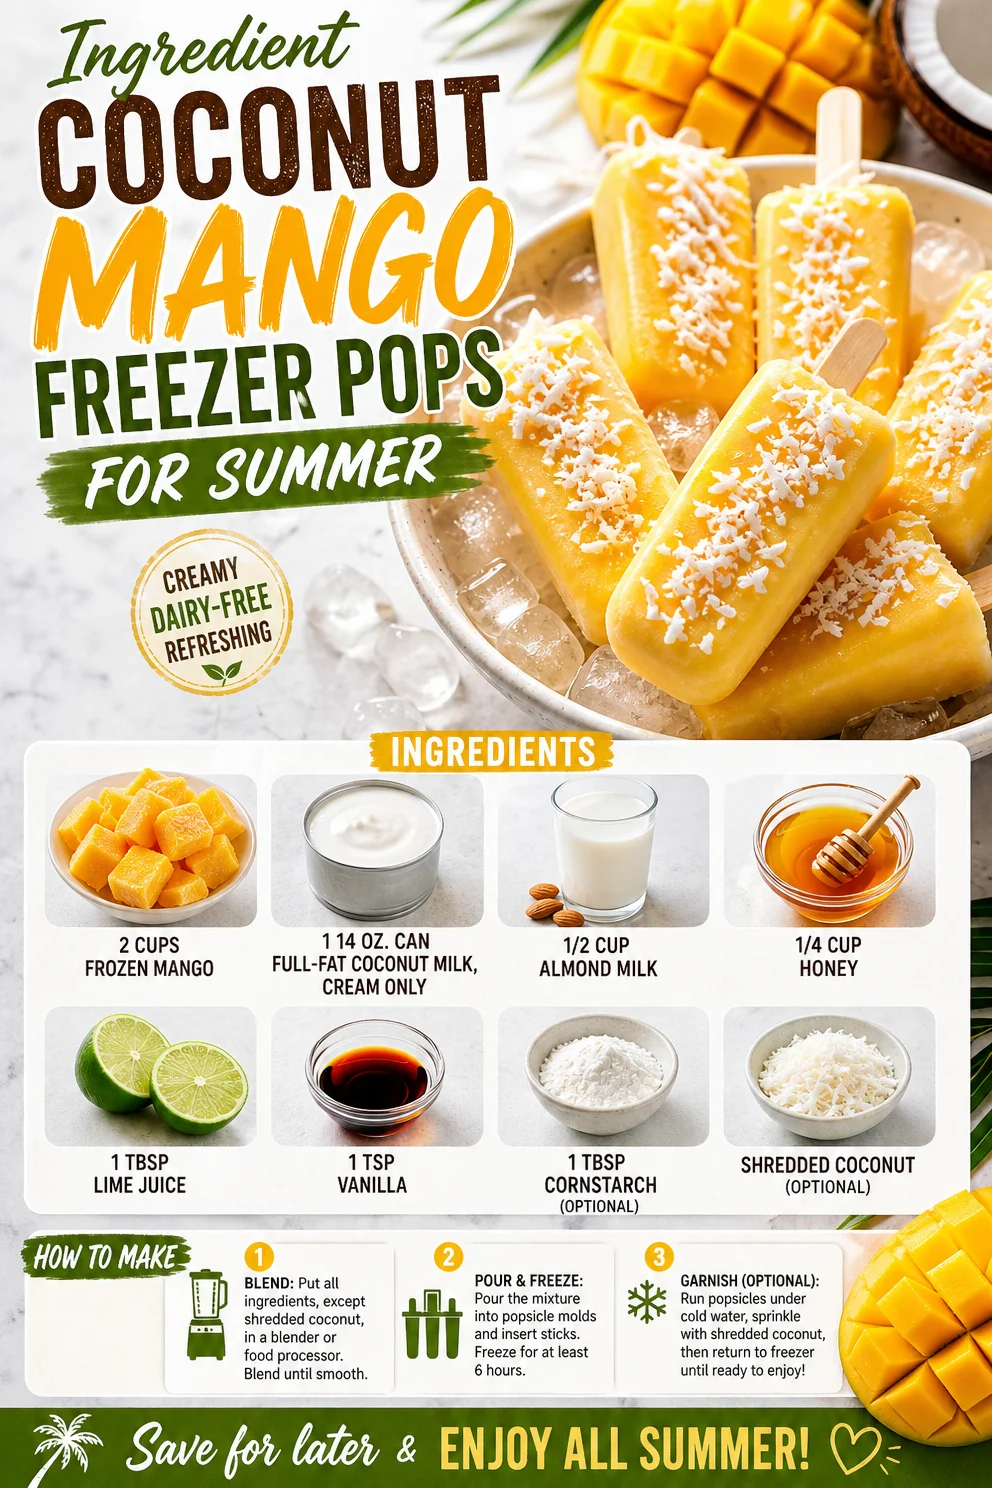
- 2 cups frozen mango: Frozen mango is not only convenient, but it also offers that sweet, tangy flavor year-round. If you can’t find frozen mango, feel free to use fresh mango—just peel, chop, and freeze until firm.
- 1 (14 oz) can full-fat coconut milk, cream only: The creamy richness of this milk will give us that dreamy texture. Always shake the can before opening, and if you prefer a lighter version, try using light coconut milk for fewer calories!
- 1/2 cup almond milk: This helps to balance out the consistency and gives a nutty undertone. Unsweetened almond milk is best, or you can swap it for any nut or dairy milk you prefer.
- 1/4 cup honey: For sweetness! Honey pairs beautifully with mango and coconut. If you want a vegan option, agave syrup or maple syrup works wonderfully as substitutes.
- 1 Tbsp lime juice: A splash of acid enhances the flavors and provides a refreshing zing. You can also use lemon juice if you prefer.
- 1 tsp vanilla: Adds a depth of flavor—I always recommend using pure vanilla extract for the best taste.
- 1 Tbsp cornstarch (optional): If you desire a popsicle that’s extra creamy and less icy, whisk a bit of cornstarch into your mixture (mixed with almond milk) before blending.
- Shredded coconut (optional): For garnishing, this adds a slight crunch and an extra coconut flavor. Go for unsweetened shredded coconut if you’d like it less sugary!
Step-by-Step Instructions
Ready to get your popsicle game on? Let’s blend this tropical delight step-by-step!
-
Prep Your Ingredients: Start by gathering all your ingredients on your kitchen counter. This helps the cooking process flow smoothly (and it keeps your stress levels down!). I like to have everything pre-measured in little bowls, so it’s just a matter of blending, pouring, and freezing.
-
Blend the Base: In a blender, combine the frozen mango, coconut milk (just the creamy part!), almond milk, honey, lime juice, and vanilla extract. If you decided to use cornstarch for that creamy texture, whisk it with the almond milk first before adding it to the blender. Blend on high until everything is smooth and silky—about 30 seconds should do it. If the mixture is too thick, you can add a bit more almond milk, a tablespoon at a time.
-
Taste the Mix: Here’s my favorite step! Give your mixture a taste. This is where you can customize it a bit more—want it sweeter? Add a tad more honey. Looking for more zing? Throw in a bit more lime juice.
-
Pour into Molds: Carefully pour your blended mixture into popsicle molds, filling each mold about 3/4 full to leave room for expansion as they freeze. If you want to add that shredded coconut, sprinkle a layer into each mold before pouring in the mixture. Just a little, so you don’t overwhelm the flavor!
-
Insert Sticks: If your popsicle molds come with sticks, insert them now. If not, don’t worry! Just cover the molds with aluminum foil and poke wooden sticks through the foil in the center of each mold.
-
Freeze: Place your molds in the freezer for at least 4-6 hours, or until completely frozen. If you’re like me and can’t handle the wait, try to resist peeking too often!
-
Unmolding Time: Once frozen, to enjoy, run warm water over the outside of the mold for a few seconds to help loosen the popsicles. Gently pull on the sticks to release them, and voilà! You have a stunning tropical treat ready to be devoured!
Serving Suggestions
Serving these Coconut Mango Popsicles is as easy as 1-2-3! Present them on a colorful platter, perhaps with a few sprigs of fresh mint for a pop of color. You can even drizzle a bit of honey over the top for added sweetness and a touch of elegance. Kids will love these as playful snacks, and so will the adults! Pair them with a fresh fruit salad or a tropical smoothie for a full-on fruity feast.
Recipe Variations
Feeling adventurous? Here are a few fun ways to shake things up:
- Berry Bliss: Add in a cup of frozen strawberries or blueberries for a swirled effect and a lovely color contrast.
- Spicy Twist: Add a pinch of cayenne pepper or some finely chopped jalapeño to the mixture to give your popsicles a fun kick!
- Creamy Delight: Mix in some Greek yogurt before blending for a protein boost and creamier texture.
- Tropical Sensation: Substitute the lime with fresh orange juice and add a few chopped pineapple pieces for a more tropical punch.
- Nutty Fun: Incorporate a tablespoon of almond butter into the mixture for an extra nutty flavor that pairs beautifully with coconut.
Chef’s Notes
Every recipe I create has its own little story, and these popsicles are no exception! I remember whipping these up for my friend’s summer BBQ, and I found myself standing by the freezer, pulling them out with each guest’s arrival. I felt like a mixologist, only instead of cocktails, I was serving sweet, frozen magic! The joy on everyone’s faces was priceless as they devoured them, nostalgic and happy.
Over the years, I’ve adjusted and adapted this recipe based on feedback, but my favorite part is always the first taste. The fresh mango flavor is simply unparalleled. It’s like a crunchy, fruity party in your mouth!
FAQs and Troubleshooting
Q: Why are my popsicles icy instead of creamy?
A: If your popsicles are icy, it’s likely due to not enough fat! Make sure to use full-fat coconut milk, and consider adding a bit of Greek yogurt or using cornstarch to enhance creaminess.
Q: How do I store leftovers?
A: If you have extra popsicles, wrap them in parchment paper and store them in a zip-top bag in the freezer. This prevents freezer burn and keeps them fresh!
Q: Can I use other fruits instead of mango?
A: Absolutely! This recipe is versatile. You can use ripe peaches, pineapple, or even mixed berries—just blend until smooth.
Q: How long do they take to freeze completely?
A: Popsicles typically need at least 4-6 hours to freeze. If you can, leave them overnight to ensure they’re solid!
Nutritional Info
While I encourage enjoying treats in moderation, here’s a quick rundown of what you’ll be sipping on in each popsicle (the values may vary based on ingredient choices):
- Calories: Approximately 120 calories per popsicle
- Fat: 8g (mostly from coconut milk)
- Carbohydrates: 16g
- Sugar: 9g (natural sugars from mango and honey)
- Protein: 1.5g
And there you have it, my friends! Coconut Mango Popsicles are waiting for you to enjoy. This recipe is not just a way to cool down; it’s a way to bring sunny smiles to your kitchen! So, go ahead and join me in this tropical adventure. Happy blending!
PrintCoconut Mango Popsicles
Delicious homemade popsicles made with creamy coconut milk and sweet mango, perfect for cooling down on a hot day.
- Prep Time: 10 minutes
- Cook Time: 0 minutes
- Total Time: 360 minutes
- Yield: 6 servings 1x
- Category: Dessert
- Method: Freezing
- Cuisine: Tropical
- Diet: Vegan
Ingredients
- 2 cups frozen mango
- 1 (14 oz) can full-fat coconut milk, cream only
- 1/2 cup almond milk
- 1/4 cup honey
- 1 Tbsp lime juice
- 1 tsp vanilla
- 1 Tbsp cornstarch (optional)
- Shredded coconut (optional)
Instructions
- Prep Your Ingredients: Gather all your ingredients on your kitchen counter.
- Blend the Base: Combine the frozen mango, coconut milk, almond milk, honey, lime juice, and vanilla extract in a blender. Blend until smooth.
- Taste the Mix: Taste your mixture and adjust sweetness or acidity if desired.
- Pour into Molds: Pour the mixture into popsicle molds, filling them about 3/4 full.
- Insert Sticks: Insert sticks into the molds or cover with foil and poke sticks through the foil.
- Freeze: Freeze for at least 4-6 hours until solid.
- Unmolding Time: Run warm water over the outside of the mold to loosen the popsicles, then gently pull on the sticks.
Notes
Add optional garnishes like shredded coconut for extra flavor and texture.
Nutrition
- Serving Size: 1 popsicle
- Calories: 120
- Sugar: 9g
- Sodium: 5mg
- Fat: 8g
- Saturated Fat: 7g
- Unsaturated Fat: 1g
- Trans Fat: 0g
- Carbohydrates: 16g
- Fiber: 1g
- Protein: 1.5g
- Cholesterol: 0mg
Keywords: popsicles, coconut, mango, summer, dessert