Minute One-Pan Oven Roasted Salmon for Weeknights
Oven Roasted Salmon: A Delicious Way to Enjoy a Healthy Meal
Welcome back to Clean Plate Cravings! Today, I’m excited to share a recipe that perfectly marries health and flavor—Oven Roasted Salmon. This dish is not only quick to whip up but also gives you that restaurant-quality taste right in your own kitchen. If you’re looking to impress guests, meal prep for the week, or simply enjoy a fantastic dinner with minimal fuss, this is the recipe for you!
Eating well doesn’t mean sacrificing flavor, and with salmon, we can harness both nutrition and deliciousness. I remember the first time I roasted salmon in the oven; it was a game-changer! I was visiting my friend in Seattle, a city famous for its seafood. One evening, we decided to cook together, and she pulled out a beautiful piece of salmon. As it roasted, the kitchen filled with a mouthwatering aroma that was irresistible. That night wasn’t just about the delicious meal; it was also about the laughter, chatting, and memories created. We paired that salmon with roasted vegetables and sat on the patio, enjoying the cool Seattle breeze. Since then, I’ve prized salmon in my kitchen, and I can’t wait to share my simple yet flavorful take on it with you.
Now, let’s dive into this scrumptious Oven Roasted Salmon recipe that promises to bring a burst of flavor to your table!
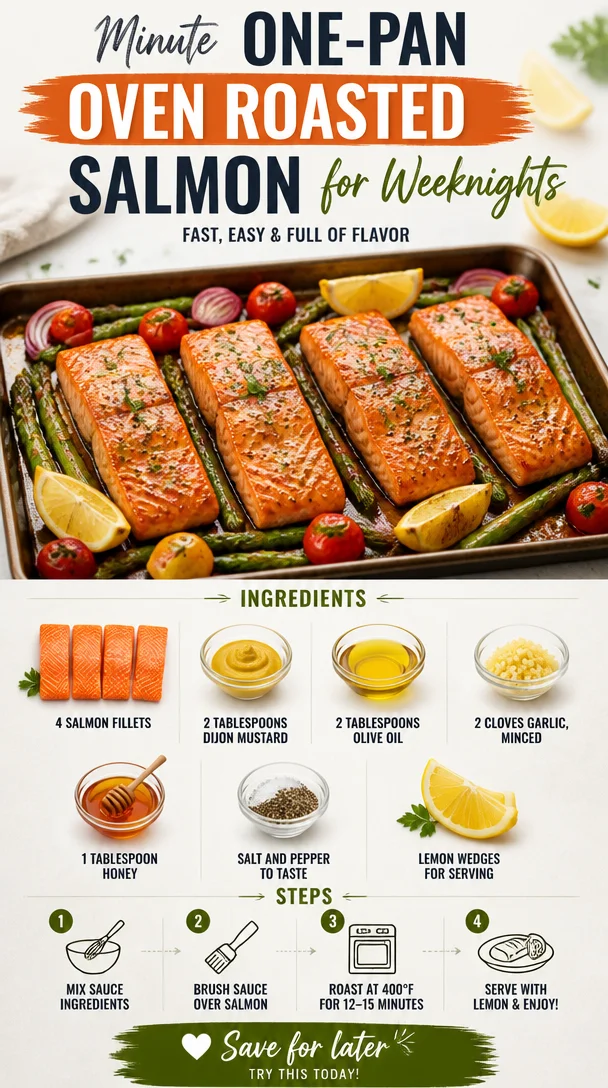
Ingredients
-
4 salmon fillets: Fresh salmon is key for this dish. Look for skin-on fillets for extra flavor and moisture. If you’re not a fan of salmon, feel free to swap it out with trout or even chicken breast.
-
2 tablespoons Dijon mustard: This tangy mustard adds a delightful zing that enhances the flavor of the salmon. If you want a milder flavor, try using whole grain mustard or even honey mustard for a sweeter twist.
-
2 tablespoons olive oil: A good quality virgin olive oil brings richness and depth to the dish. Can’t find olive oil? Avocado oil works brilliantly here too, with its light flavor profile.
-
2 cloves garlic, minced: Garlic is a flavor powerhouse; it complements the salmon perfectly. For a softer flavor, try roasting whole cloves instead and mashing them into a paste.
-
1 tablespoon honey: A touch of sweetness from honey balances the savory notes of the salmon and mustard. Maple syrup is a great alternative if you’re avoiding honey.
-
Salt and pepper to taste: Essential for seasoning, but feel free to get creative! Add a sprinkle of smoked paprika or dill for additional flavor notes.
-
Lemon wedges for serving: A squeeze of fresh lemon juice enhances the flavors and adds brightness to the dish. If you love citrus, try using fresh lime or oranges as well!
Step-by-Step Instructions
1. Preheat Your Oven
Start by preheating your oven to 400°F (200°C). This temperature is perfect for roasting, allowing the salmon to cook evenly while developing that lovely crispy exterior.
Chef Tip: Use a convection setting if available—this circulating air will help achieve an extra-crisp skin!
2. Prepare the Marinade
In a small bowl, whisk together the Dijon mustard, olive oil, minced garlic, and honey until well combined. This marinade will not only flavor the fish but also create a beautiful glaze as it bakes.
Chef Note: If you loved soy sauce, you could sub a tablespoon for a savory kick!
3. Season the Salmon
Place the salmon fillets skin-side down on a greased baking sheet or lined with parchment paper. Brush the marinade generously over the top of each fillet, ensuring every inch is coated. Sprinkle salt and pepper to taste.
Chef Hack: For extra crispy skin, pat the fillets dry with paper towels before applying the marinade!
4. Bake the Salmon
Slide your baking sheet into the preheated oven and roast for 12-15 minutes, depending on the thickness of your fillets. You want the salmon to be just cooked through and flake easily with a fork. A good rule of thumb is to cook it for about 4-6 minutes per half-inch of thickness.
Watch out: Salmon is best served slightly undercooked, as it will continue to cook from residual heat once out of the oven!
5. Serve with a Splash of Citrus
Remove the salmon from the oven and let it rest for a couple of minutes. Plate the fillets, squeezing fresh lemon on top for that delectable citrus finish. Enjoy it alongside your favorite side dishes like steamed veggies, rice, or a colorful salad!
Bonus Tip: Garnish with fresh herbs like parsley or dill for a beautiful presentation.
Serving Suggestions
To plate your oven roasted salmon, lay a salmon fillet slightly off-center on the plate. Serve with a generous scoop of your favorite grain on the other side—think quinoa, farro, or a light couscous salad. Add a vibrant side of roasted vegetables, like asparagus or broccoli, for that perfect pop of color. A lemon wedge on the side not only brightens the dish but invites guests to enjoy that final burst of flavor!
Recipe Variations
-
Mediterranean Style: Add chopped olives, sun-dried tomatoes, and a sprinkle of feta cheese before roasting for a delightful Mediterranean twist.
-
Herb-Crusted: Coat the fillets in fresh herbs like dill, parsley, or thyme before roasting—a fresh burst of flavor!
-
Spicy Kick: Mix in a pinch of red pepper flakes with the marinade for those who love a little heat.
-
Ginger Citrus: Add freshly grated ginger to the marinade for a refreshing zing that complements the salmon beautifully.
Chef’s Notes
Cooking salmon has become a staple in my home! I’ve gone from throwing it in the oven as-is to experimenting with all kinds of marinades and flavors over the years. One memorable attempt, I threw in a splash of orange juice and a handful of cilantro, creating a flavor combination that I never would have thought to pair! From that moment on, the kitchen became my laboratory, leading to an array of delicious discoveries. Salmon is forgiving and versatile—a true kitchen superstar!
FAQs and Troubleshooting
-
How do I know when my salmon is done cooking?
When salmon is perfectly cooked, it should appear opaque and flake easily with a fork. If you have a thermometer handy, aim for an internal temperature of about 145°F (63°C). -
Why did my salmon turn out dry?
Overcooking is the usual culprit. Keep an eye on the cooking time and check for doneness a few minutes early, especially if your fillets are thinner. -
Can I use frozen salmon?
Absolutely! Just make sure you thaw it completely before cooking for the most even results. -
What sides pair well with oven roasted salmon?
Roasted vegetables, garlic mashed potatoes, quinoa salad, or a simple green salad dress up this salmon beautifully!
Nutritional Info (Optional)
Eating salmon is one of the best dietary choices you can make! Salmon is packed with omega-3 fatty acids, which are fantastic for heart health. A typical 6 oz. serving of salmon provides approximately:
- Calories: 367
- Protein: 39g
- Fat: 23g (mostly healthy fats!)
- Carbohydrates: 0g
This menu is not only nutritious but also fills your kitchen with delightful aromas and flavors.
Now that you’ve got my Oven Roasted Salmon recipe in your back pocket, I’m excited for you to give it a try! Enjoy it with friends, loved ones, or just treat yourself to a well-deserved meal. Happy cooking, and as always, keep those plates clean but full of joy and flavor!
PrintOven Roasted Salmon

A quick and flavorful recipe for oven roasted salmon that’s perfect for impressing guests or enjoying a healthy meal at home.
- Prep Time: 10 minutes
- Cook Time: 15 minutes
- Total Time: 25 minutes
- Yield: 4 servings 1x
- Category: Main Course
- Method: Baking
- Cuisine: American
- Diet: Gluten-Free
Ingredients
- 4 salmon fillets
- 2 tablespoons Dijon mustard
- 2 tablespoons olive oil
- 2 cloves garlic, minced
- 1 tablespoon honey
- Salt and pepper to taste
- Lemon wedges for serving
Instructions
- Preheat your oven to 400°F (200°C).
- Whisk together the Dijon mustard, olive oil, minced garlic, and honey in a small bowl.
- Place the salmon fillets skin-side down on a greased baking sheet and brush with the marinade.
- Sprinkle salt and pepper to taste.
- Bake for 12-15 minutes, until just cooked through.
- Remove from the oven and let it rest for a couple of minutes. Squeeze fresh lemon on top before serving.
Notes
For extra crispy skin, pat the fillets dry before applying the marinade. Experiment with different marinades for varied flavors.
Nutrition
- Serving Size: 1 fillet
- Calories: 367
- Sugar: 5g
- Sodium: 300mg
- Fat: 23g
- Saturated Fat: 3g
- Unsaturated Fat: 15g
- Trans Fat: 0g
- Carbohydrates: 0g
- Fiber: 0g
- Protein: 39g
- Cholesterol: 70mg
Keywords: salmon, oven roasted, healthy dinner, seafood recipe, easy meal
Minute One-Pan Chicken Burrito Casserole for Weeknights
Chicken Burrito Casserole: A Comforting Classic That Delivers Flavor and Warmth
Hello, fellow foodies! Today, we’re diving into one of my absolute favorite recipes that feels like a warm hug: Chicken Burrito Casserole. This dish effortlessly combines the hearty, comforting elements of a casserole with all the spicy, zesty flavors we love in burritos. If you’re looking for a meal that’s easy to prepare, family-friendly, and utterly delicious, you’ve found your winner!
Picture this: a busy weeknight when you want to whip up something that not only fills your belly but also ignites your taste buds with excitement. This Chicken Burrito Casserole checks all the boxes. Imagine layers of tender chicken, colorful veggies, zesty spices, and ooey-gooey cheese—all baked to perfection and served hot from the oven. Sounds dreamy, right?
This dish is perfect for meal prep, easy enough for beginners, and versatile enough for any palate. It embraces everything we love about burritos, minus the fuss of rolling them up. Plus, it’s a hit with friends and family—everyone will be asking for seconds!
So grab your apron, turn up the music, and let’s get ready to create a wholesome dish that brings people together. This Chicken Burrito Casserole isn’t just about the food; it’s about sharing delicious moments around the table.
A Nostalgic Kitchen Memory
Let me take you back to a particularly vivid memory from my childhood. I remember coming home from school, the rich aroma of spices wafting through the air as my mom prepped one of our family favorites—burritos. Those after-school moments were sacred. We would gather around the kitchen island, my siblings and I hunched over a plate, eagerly awaiting our turn to fill our soft tortillas with all the delicious fixings.
But there was one day that stands out vividly in my mind. My mom decided to mix things up and made a burrito casserole instead. We were skeptical at first—where was the fun of rolling our own burritos? But as soon as we took our first bite, oh boy! The gooey melted cheese, the perfectly seasoned chicken, and the burst of flavors conquered our taste buds in an instant. From that moment on, burrito casseroles became our family’s go-to for a fun, flavorful meal.
Fast forward to today, when I find myself sharing this timeless recipe with everyone who needs a little comfort in their life. It’s a beautiful reminder of how food can be a bridge connecting generations, cultures, and memories.
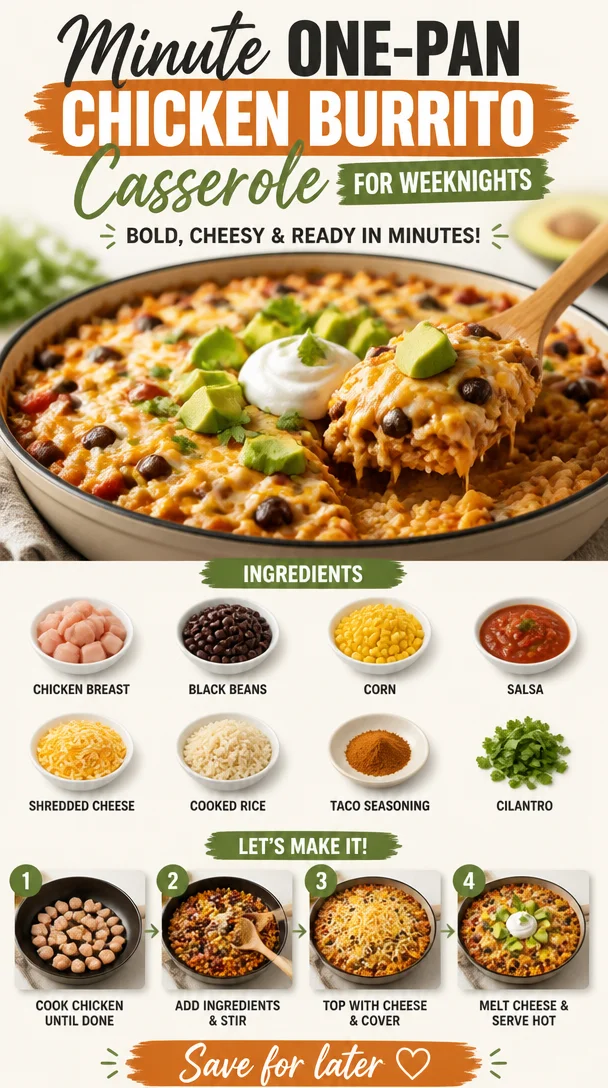
Ingredients
Here’s what you’ll need to create this mouthwatering Chicken Burrito Casserole:
-
Cooked Chicken Breast: (about 3 cups, shredded)
You can use rotisserie chicken for convenience or poach some chicken breast at home. If you’re vegetarian, feel free to substitute with black beans or chickpeas for a protein-packed alternative! -
Tortillas: (10-12 corn or flour tortillas)
I prefer corn for the traditional taste, but flour tortillas work well too! For gluten-free options, you can use corn tortillas or even a grain-free tortilla. -
Black Beans: (1 can, drained and rinsed, or 1.5 cups cooked black beans)
These add protein and fiber! If you’re not a fan of black beans, try pinto beans or kidney beans for a different flavor. -
Corn: (1 cup, frozen or canned)
Sweet, crisp corn enhances the texture! If you can get your hands on fresh corn, it elevates the dish even further. -
Diced Tomatoes: (1 can, with juice)
Tomatoes provide acidity and moisture. Substitute with fresh chopped tomatoes or salsa for an extra kick. -
Onion: (1 medium onion, diced)
Sautéed onions add depth. You can swap out with leeks or shallots if you want to switch things up. -
Red Bell Pepper: (1, diced)
Sweet and colorful, red bell peppers brighten up the dish. Any bell pepper variety can work here! -
Chili Powder: (1 tablespoon)
This is where the flavors really start to pop! Feel free to use other spices like cumin or paprika if you prefer a different spice profile. -
Garlic Powder: (1 teaspoon)
It’s a must for savory dishes! Fresh garlic is a great substitute if you prefer a bold flavor. -
Cumin: (1 teaspoon)
Cumin brings warmth and authenticity. You could replace it with a pinch of taco seasoning if you have it on hand. -
Shredded Cheese: (2 cups, such as cheddar or Monterey Jack)
Creamy and melty, cheese is the finishing touch! For a dairy-free version, try cashew cheese or nutritional yeast. -
Fresh Cilantro: (for garnish)
This adds a refreshing touch. If you’re not a cilantro fan, green onions or parsley can be used instead.
Step-by-Step Instructions
Ready to get cooking? Let’s dive into the steps to create your Chicken Burrito Casserole!
Step 1: Preheat Your Oven
Preheat your oven to 375°F (190°C). Prepping ahead of time will ensure your casserole is perfectly baked without any fuss later on!
Step 2: Dice the Veggies
While the oven heats up, let’s get chopping! Dice the onion and red bell pepper. This is where you can let your creativity shine. Want to throw in some zucchini or mushrooms? Go for it! The more veggies you add, the healthier your casserole becomes.
Step 3: Sauté on the Stovetop
In a large skillet over medium heat, drizzle a little olive oil. Add your diced onion and red bell pepper. Sauté for about 5-7 minutes until they are soft and fragrant. This step is crucial because it brings out the natural sweetness of the veggies and adds a ton of flavor.
Step 4: Add the Chicken and Spices
Now, stir in your shredded chicken, black beans, corn, diced tomatoes, chili powder, garlic powder, and cumin. Give everything a good stir to combine all the ingredients evenly. Let it cook for about 5 minutes, allowing the flavors to meld together. This is also your moment to taste test—don’t be shy!
Step 5: Layer the Dish
Grab a 9×13 inch baking dish and start layering. Begin by spreading a couple of spoonfuls of the chicken mixture evenly at the bottom of the dish. Then, line the tortillas over the mixture, covering the entire surface. Don’t worry too much about gaps; they’ll fill in as the casserole bakes.
Step 6: Add More Goodness
Spread another layer of the chicken mixture over the tortillas, and then sprinkle half of your shredded cheese on top. Repeat this layering process with more tortillas, the remaining chicken mixture, and top it off with the remaining cheese. It’s all about those delicious layers that create that moment of bliss when you dive in!
Step 7: Bake It Up
Cover the dish with aluminum foil (to avoid sticking) and bake in the preheated oven for 20 minutes. After that, remove the foil and bake for an additional 10-15 minutes, or until the edges are bubbly and the cheese is melted and golden. Your kitchen will smell like heaven right about now!
Step 8: Garnish and Serve
Once baked, take the casserole out of the oven and let it sit for about 10 minutes before serving. This will allow everything to settle and make for easier slicing. Garnish with fresh cilantro for that vibrant pop of color and flavor!
Serving Suggestions
Serve your Chicken Burrito Casserole with a side of tangy guacamole or fresh salsa. You could even serve it alongside a light leafy green salad dressed with lime vinaigrette to contrast the rich flavors of the casserole. The beauty of this dish is that it’s a complete meal on its own, but adding a refreshing side balances the richness beautifully.
Recipe Variations
Feel like switching things up? Here are a few creative variations you can try:
- Spicy Kick: Add diced jalapeños to the chicken mixture for an extra kick of heat!
- Vegetarian Delight: Replace the chicken with a mix of your favorite vegetables like zucchini, mushrooms, and more beans.
- Taco Fiesta: Swap out the cilantro for fresh corn salsa for a zesty surprise.
- Cheesy Goodness: Experiment with different cheese blends, like pepper jack for a spicier rendition.
- BBQ Twist: Incorporate BBQ sauce into the chicken mixture for a smoky flavor profile.
Chef’s Notes
This recipe has evolved over the years as I’ve experimented with different ingredients and flavor combinations. I’ve swapped in various beans, added seasonal veggies, and even used leftover barbecue chicken to make it feel fresh and new every time. There’s simply no wrong way to make a burrito casserole, and that’s part of the joy!
Sometimes, I’ll throw on some diced avocados right before serving for a creamy contrast that everyone loves. Also, keep in mind that this recipe freezes beautifully! Prepare a double batch, then freeze one for a rainy day—it’s like an instant meal waiting for you!
FAQs and Troubleshooting
Can I make this dish ahead of time?
Absolutely! You can prepare the casserole up to the baking step, cover it, and store it in the fridge for up to 24 hours. Just pop it in the oven when you’re ready!
Why did my casserole turn out soggy?
If the casserole has too much moisture, it can turn soggy. Make sure to drain the canned ingredients and not to overload with liquid.
Can I substitute the chicken for another protein?
Yes! Feel free to try turkey, beef, or even tofu for a plant-based option. Just make sure to adjust cooking times based on the protein used.
How do I store leftover casserole?
Keep any leftovers in an airtight container and store them in the fridge for up to four days. Reheat in the oven or microwave until warmed through!
Nutritional Info
If you’re tracking nutrition, here’s a quick overview (per serving, assuming 8 servings):
- Calories: 380
- Protein: 25g
- Carbohydrates: 40g
- Fats: 15g
- Fiber: 6g
(Note: Nutritional info may vary based on ingredient brands and portion sizes.)
And there you have it! Your Chicken Burrito Casserole is officially ready to be devoured. Thank you for joining me today, and I can’t wait to hear how your version turns out. Remember: good food is all about connection, exploration, and joy. So keep it fresh, keep it simple, and keep enjoying every delicious bite!
PrintChicken Burrito Casserole

A comforting Chicken Burrito Casserole that delivers flavorful layers of chicken, black beans, corn, and cheese, all baked to perfection.
- Prep Time: 15 minutes
- Cook Time: 30 minutes
- Total Time: 45 minutes
- Yield: 8 servings 1x
- Category: Main Course
- Method: Baking
- Cuisine: Mexican
- Diet: None
Ingredients
- 3 cups cooked chicken breast, shredded
- 10–12 corn or flour tortillas
- 1 can black beans, drained and rinsed
- 1 cup corn, frozen or canned
- 1 can diced tomatoes, with juice
- 1 medium onion, diced
- 1 red bell pepper, diced
- 1 tablespoon chili powder
- 1 teaspoon garlic powder
- 1 teaspoon cumin
- 2 cups shredded cheese (cheddar or Monterey Jack)
- Fresh cilantro, for garnish
Instructions
- Preheat your oven to 375°F (190°C).
- Dice the onion and red bell pepper.
- Sauté in a large skillet over medium heat with olive oil for about 5-7 minutes.
- Add the shredded chicken, black beans, corn, diced tomatoes, chili powder, garlic powder, and cumin.
- Layer the ingredients in a 9×13 inch baking dish starting with the chicken mixture, followed by the tortillas, then more chicken, and finally the cheese.
- Cover with aluminum foil and bake for 20 minutes, then remove the foil and bake for another 10-15 minutes.
- Garnish with fresh cilantro before serving.
Notes
This recipe freezes beautifully, so consider making a double batch!
Nutrition
- Serving Size: 1 serving
- Calories: 380
- Sugar: 4g
- Sodium: 600mg
- Fat: 15g
- Saturated Fat: 7g
- Unsaturated Fat: 5g
- Trans Fat: 0g
- Carbohydrates: 40g
- Fiber: 6g
- Protein: 25g
- Cholesterol: 70mg
Keywords: chicken casserole, burrito casserole, comfort food, Mexican dish, easy recipe