Easy Reese’s Peanut Butter Ice Cream (No-Churn, 4-Ingredient)
Indulge in the Decadence of Homemade Reese’s Peanut Butter Ice Cream
Hey there, fellow food lovers! Ava here, and today I’m incredibly excited to share a recipe that combines two of America’s favorite indulgences: ice cream and peanut butter cups! If you’ve ever found yourself daydreaming about a creamy, dreamy dessert that echoes your childhood, look no further. Today, we’re making Reese’s Peanut Butter Ice Cream, a treat that’s as delightful as it sounds and totally worth the brain freeze!
A Moment of Nostalgia
Before we dive into the creamy goodness of this recipe, let me take you back to one of those hot summer days from my childhood. Picture this: the sun is blazing, and the air is thick with the chatter of kids playing outside. It was the perfect day for ice cream, and my friends and I would race down to the local ice cream shop, the one with the huge colorful sign that read “Scoops of Joy.” My favorite? The peanut butter cup flavor!
I remember the thrill of anticipation as I watched the ice cream being scooped, my mouth watering with excitement. Each scoop was a swirl of creamy, peanut buttery heaven, dotted with chunks of chocolatey, crunchy Reese’s cups. I’d savor every spoonful, completely oblivious to the drippy chaos that was happening all around me. That first bite would always take me back to how simple things could be when you followed your cravings and shared good food with great friends.
Creating my own version of that nostalgic ice cream treat was inevitable. Fast forward to today, and I’m sharing my ultimate Reese’s Peanut Butter Ice Cream recipe that captures all those childhood flavors. Get ready to scoop up some happiness!
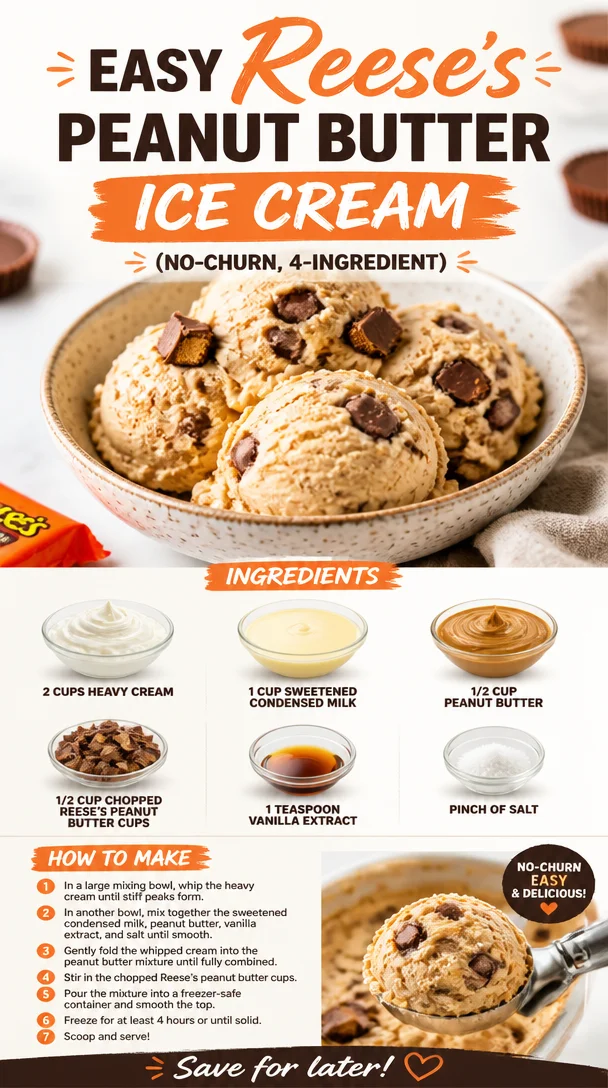
Ingredients You’ll Need
Let’s gather the stars of our show! Here’s what you’ll need for this luscious homemade ice cream:
-
2 cups heavy cream: The magic ingredient! This will provide a rich, creamy base. If you’re looking for a lighter option, you can substitute with coconut cream for a dairy-free version.
-
1 cup sweetened condensed milk: This adds sweetness and creaminess. If you want a less sugary alternative, you could try evaporated milk, though the texture will be slightly different.
-
1/2 cup peanut butter: The creamy dream that binds the flavor! Use any brand you love—or even homemade peanut butter if you’re feeling adventurous. For a twist, try crunchy peanut butter for added texture.
-
1/2 cup chopped Reese’s peanut butter cups: The true stars! You can use mini or regular-sized cups. If you’re in the mood to mix it up, try swapping these for any other chocolate candy you adore.
-
1 teaspoon vanilla extract: This enhances the flavor profile. Pure vanilla is recommended for the best taste, but imitation will work too in a pinch.
-
Pinch of salt: A little salt elevates the flavors—don’t skip it! If you’re feeling cheeky, add a touch of sea salt just before serving for a delightful salty-sweet contrast.
Step-by-Step Instructions
Ready to whip up this creamy goodness? Let’s make some ice cream magic!
-
Whip the Cream: In a large bowl, use an electric mixer to whip the heavy cream until stiff peaks form. This usually takes about 3-5 minutes. Remember to start at a lower speed to avoid a whipped cream explosion!
-
Mix the Base: In a separate bowl, combine the sweetened condensed milk, peanut butter, vanilla extract, and a pinch of salt. Use a whisk to blend everything until smooth. Make sure the peanut butter is well incorporated—no lumps allowed!
-
Fold It Together: With a spatula, gently fold the whipped cream mixture into the peanut butter blend. You want the mixture to stay airy and light, so use a gentle folding motion. Be patient and take your time—it’ll be worth it!
-
Add the Chunks: Once the base is mixed, fold in the chopped Reese’s peanut butter cups. This is where the magic really happens! Incorporate them evenly throughout the mixture for those delightful bursts of chocolate and peanut butter bliss.
-
Chill and Freeze: Transfer the mixture into an airtight container. Smooth the top with your spatula, cover with a lid, and put it in the freezer. You’ll want to let it freeze for at least 6 hours—overnight is even better if you can wait that long!
Serving Suggestions
When you’re ready to serve, scoop out generous portions of your Reese’s Peanut Butter Ice Cream into bowls or cones. Drizzle a little extra peanut butter on top for that gourmet touch, and don’t forget to sprinkle more chopped Reese’s cups or even some crushed nuts if you like! Serve with a big smile and enjoy every moment of indulgence.
Recipe Variations
Want to switch things up? Here are a few fun variations to try:
-
Chocolate Peanut Butter Swirl: Add a swirl of chocolate fudge sauce into the ice cream before freezing for extra chocolatey goodness.
-
Banana Base: Replace half of the peanut butter with mashed bananas for a creamy, fruity twist.
-
Dairy-Free Delight: Use coconut cream and coconut milk instead of dairy for a vegan-friendly treat—just make sure to use dairy-free candies!
-
Crunchy Topping: Add some crushed pretzels or nuts to the mix for an unexpected crunch that will take your ice cream to the next level.
-
Chocolate Chips: Swap out some Reese’s cups with chocolate chips or even mini marshmallows for a unique flavor combo.
Chef’s Notes
I’ve been at this ice cream game for a while now, and let me tell you, each batch is a little labor of love. One funny thing that happened during my early attempts was when I accidentally switched the sweetened condensed milk with canned pumpkin. Let’s just say, “Pumpkin Spice Peanut Butter Ice Cream” was a hard sell! But hey, every mishap in the kitchen is an opportunity for creativity, right? Over the years, this recipe has evolved to capture the essence of that local ice cream shop, and every time I scoop a bowl, it brings me back to simpler times and sweeter memories.
FAQs and Troubleshooting
1. Why is my ice cream not freezing properly?
This could be due to not mixing the ingredients thoroughly. Make sure the heavy cream is whipped to stiff peaks before folding into the mixture. Also, ensure your freezer is set to a proper freezing temperature.
2. Can I use natural peanut butter?
Yes! Just keep in mind that natural peanut butter tends to be more runny. You may want to blend in a bit of powdered sugar to achieve a thicker consistency.
3. How do I store leftovers?
Keep any leftover ice cream in an airtight container with a layer of parchment paper on top to prevent ice crystals from forming.
4. Can I churn this in an ice cream maker?
Absolutely! If you have an ice cream maker, follow the manufacturer’s instructions. Just pour your mixture into the churner instead of freezing it directly in the container.
Nutritional Info
While this recipe is meant for indulgence rather than calorie counting, a typical serving contains approximately:
- Calories: 300 per scoop
- Total Fat: 24g
- Saturated Fat: 12g
- Sugar: 20g
- Protein: 5g
Feel free to adjust portion sizes based on your treat levels because life is too short not to enjoy ice cream!
So there you have it, my amazing friends! A recipe bursting with nostalgia, flavor, and oh-so-creamy goodness! Whether you’re enjoying it after dinner, on a hot summer’s day, or just because—it’s all about pleasure in every scoop. Happy making, and may your kitchen adventures be as tasty as your dreams! Let’s scoop it up!
PrintReese’s Peanut Butter Ice Cream
A creamy, dreamy homemade ice cream that combines the rich flavors of peanut butter and Reese’s cups, capturing childhood memories.
- Prep Time: 15 minutes
- Cook Time: 0 minutes
- Total Time: 360 minutes
- Yield: 6 servings 1x
- Category: Dessert
- Method: No-churn
- Cuisine: American
- Diet: Vegetarian
Ingredients
- 2 cups heavy cream
- 1 cup sweetened condensed milk
- 1/2 cup peanut butter
- 1/2 cup chopped Reese’s peanut butter cups
- 1 teaspoon vanilla extract
- Pinch of salt
Instructions
- Whip the cream: In a large bowl, use an electric mixer to whip the heavy cream until stiff peaks form, about 3-5 minutes.
- Mix the base: In a separate bowl, combine the sweetened condensed milk, peanut butter, vanilla extract, and pinch of salt. Whisk until smooth.
- Fold it together: Gently fold the whipped cream into the peanut butter mixture until airy.
- Add the chunks: Fold in the chopped Reese’s peanut butter cups evenly throughout the mixture.
- Chill and freeze: Transfer to an airtight container, smooth the top, cover, and let freeze for at least 6 hours or overnight.
Notes
For serving, drizzle extra peanut butter on top and sprinkle with additional chopped Reese’s cups or crushed nuts. Feel free to experiment with different variations!
Nutrition
- Serving Size: 1 serving
- Calories: 350
- Sugar: 20g
- Sodium: 150mg
- Fat: 24g
- Saturated Fat: 12g
- Unsaturated Fat: 8g
- Trans Fat: 0g
- Carbohydrates: 36g
- Fiber: 1g
- Protein: 5g
- Cholesterol: 70mg
Keywords: ice cream, peanut butter, dessert, homemade, Reese's, childhood memories