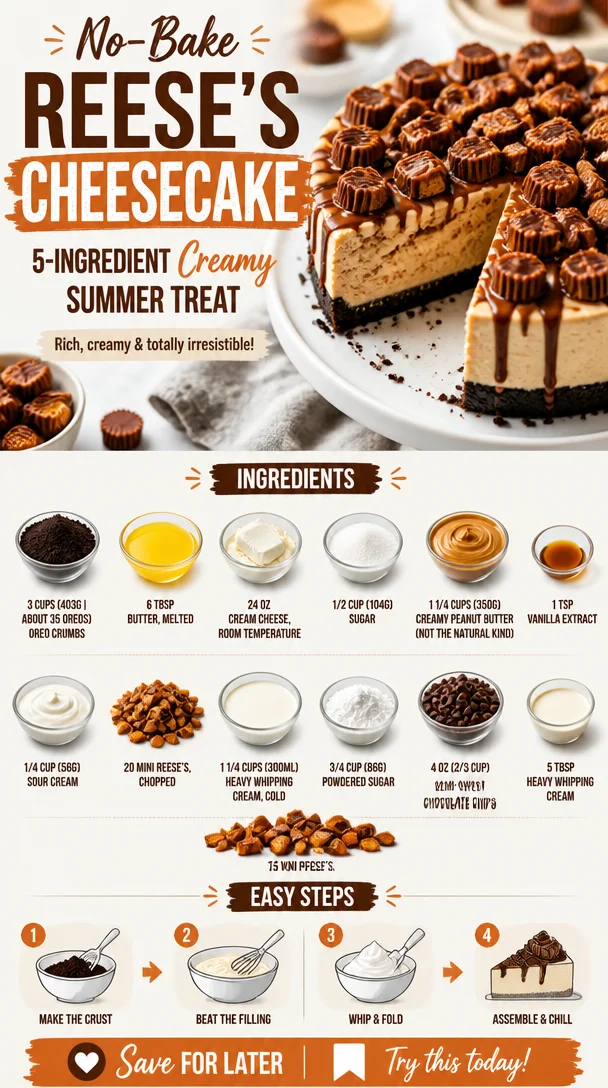
No-Bake Reese’s Cheesecake: 5-Ingredient Creamy Summer Treat
No-Bake Reese’s Peanut Butter Cheesecake: An Irresistible Treat
Welcome to the sweet side of cooking, friends! Today, we’re diving headfirst into a scrumptious creation that combines two of the best things known to humankind: cheesecake and Reese’s Peanut Butter Cups. Yes, you heard it right—this is a No-Bake Reese’s Peanut Butter Cheesecake, and it’s so simple, creamy, and utterly delicious that you’ll find it hard to resist. Whether you’re planning a birthday bash or just need a sweet pick-me-up after a long week, this cheesecake is the answer to all your dessert dreams.
Picture this: creamy cheesecake goodness resting atop a crumbly Oreo crust, all drizzled with luscious chocolate and studded with mini Reese’s. It’s like a party on your plate, and the best part? You can whip it up without ever turning on your oven! So, grab your mixing bowls and let’s get started on making this delightful dessert that’s perfect for all peanut butter and chocolate lovers out there.
A Sweet Memory
Before we jump into the recipe, I want to share a little story about my love for cheesecake. Growing up, my mom would always make a chocolate cheesecake for special occasions—birthdays, anniversaries, you name it. I remember the rich aroma wafting through our kitchen, and how each slice was a reason to celebrate. But let’s be real; it was the creamy, dreamy texture of that cheesecake that always had me begging for seconds.
Years later, I discovered the delightful combination of peanut butter and chocolate, thanks to my obsession with those mini Reese’s cups. So, I thought, "Why not create a cheesecake recipe that pays homage to both my childhood favorite and my peanut buttery obsession?" That’s how the No-Bake Reese’s Peanut Butter Cheesecake was born! It’s easy, it fulfills my sweet tooth, and every bite transports me back to those family gatherings. Let’s make some sweet memories together, shall we?
Ingredients
To create this dessert masterpiece, you’ll need the following ingredients. Each ingredient plays a crucial role in delivering that perfect flavor and texture, so let’s break them down:
-
Oreo crumbs (3 cups | about 35 Oreos): These will be the base of our cheesecake. If you’re feeling adventurous, you can substitute with graham cracker crumbs for a different flavor profile, but let’s be honest—Oreo crust is where it’s at!
-
Butter (6 tbsp, melted): This binds the Oreo crumbs together. For a dairy-free version, coconut oil works well as a substitute.
-
Cream cheese (24 oz, room temperature): The star ingredient that gives the cheesecake its creamy texture. You can opt for reduced-fat cream cheese if you want to lighten it up a bit.
-
Sugar (1/2 cup | 104g): A balance of sweetness in your cheesecake. Feel free to use coconut sugar or a sugar substitute to suit your dietary preferences.
-
Creamy peanut butter (1 1/4 cups | 350g): This is where the magic happens! Make sure to use creamy, not natural, peanut butter for the best consistency.
-
Vanilla extract (1 tsp): A must-have for flavor enhancement. Homemade vanilla extract brings an extra touch of warmth!
-
Sour cream (1/4 cup | 58g): This adds a hint of tanginess and creaminess, elevating the overall taste of the cheesecake. Greek yogurt is a decent substitute if you’re out of sour cream.
-
Mini Reese’s (20, chopped): Because who doesn’t want chunks of chocolatey goodness in their cheesecake? You can use regular Reese’s or even other varieties if you wish!
-
Heavy whipping cream (1 1/4 cups | 300ml, cold): Essential for whipping into fluffy clouds of deliciousness. For a lighter option, opt for whipped coconut cream.
-
Powdered sugar (3/4 cup | 86g): This sweetens the whipped cream and stabilizes it, ensuring we get that perfect dollop on top. You can reduce the quantity if you prefer less sweetness.
-
Semi-sweet chocolate chips (4 oz | 2/3 cup): These will be melted to create that dreamy chocolate drizzle. Any chocolate you love will work—dark chocolate is a great option too!
-
Heavy whipping cream (5 tbsp): Used to melt down the chocolate for that rich drizzle!
-
Mini Reese’s (15, chopped): Trust me; you’ll want even more of this goodness on top!
Step-by-Step Instructions
Making this No-Bake Reese’s Peanut Butter Cheesecake is a breeze. Follow these steps, and you’ll have a dessert fit for a celebration in no time!
-
Prepare the Oreo crust:
- In a mixing bowl, combine the Oreo crumbs and melted butter. Mix until the crumbs are evenly coated—think wet sand.
- Press the mixture firmly into the bottom of a 9-inch springform pan. Use the back of a measuring cup for even pressure; this will help it hold its shape once set. Put it in the freezer while you prepare the filling.
-
Make the cheesecake filling:
- In a large mixing bowl, beat the room temperature cream cheese with an electric mixer until it’s smooth and creamy—about 2 minutes. This is where you’ll want to make sure there are no lumps!
- Add the sugar, creamy peanut butter, vanilla extract, and sour cream. Beat again until everything is well combined. The mixture should be fluffy and full of that inviting peanut buttery goodness.
-
Fold in the chopped Reese’s:
- Gently fold in the chopped mini Reese’s using a spatula. This step is all about preserving the chunks in your cheesecake. Trust me; each bite will be worth it!
-
Whip the cream:
- In a separate bowl, pour in the cold heavy whipping cream. Beat on high speed until soft peaks form—this should take around 3-4 minutes.
- Gradually add the powdered sugar, continuing to whip until stiff peaks form. Aim for a cloud-like, fluffy consistency.
-
Combine the whipped cream with the cream cheese mixture:
- Gently fold the whipped cream into the cheesecake mixture until it’s well combined but still light and airy. Remember, you want that airy texture—the fluffier, the better!
-
Pour the filling into the crust:
- Carefully spoon the cheesecake filling over the prepared crust, smoothing out the top as you go. Use a spatula to create a gentle swirl if you’re feeling fancy!
-
Chill the cheesecake:
- Cover the springform pan with plastic wrap and place it in the refrigerator. Allow it to chill for at least 4 hours, or overnight if you can resist the temptation!
-
Make the chocolate drizzle:
- In a microwave-safe bowl, combine the semi-sweet chocolate chips and 5 tablespoons of heavy whipping cream. Microwave in 30-second intervals, stirring in between, until melted and smooth. Set aside to cool slightly.
-
Serve it up:
- Once the cheesecake is set, remove it from the springform pan. Drizzle the melted chocolate over the top and finish with the remaining chopped mini Reese’s scattered across the surface. It’s like a fancy dessert just waiting to wow your friends and family!
Serving Suggestions
Slice your No-Bake Reese’s Peanut Butter Cheesecake into generous portions and place them on dessert plates. I love adding a dollop of whipped cream on the side for that extra touch of joy! Consider serving it with a forkful of chocolate sauce for added indulgence. Pair it with a scoop of vanilla ice cream or a sprinkle of crushed nuts for a fabulous crunch. This dessert is about making it your own, so feel free to get creative!
Recipe Variations
Looking to mix things up? Here are some fun variations to try:
-
Cookie Base Swap: Try using graham crackers, digestive biscuits, or even crushed pretzels for a salty-sweet crust!
-
Flavor Infusion: Add a tablespoon of your favorite liqueur, like Kahlúa or Bailey’s, to the cheesecake filling for an adult twist.
-
Healthier Version: Substitute half of the cream cheese with Greek yogurt for a lighter option, and use a natural peanut butter without added sugar.
-
Peanut Butter Swirl: For a pretty presentation, drizzle some extra peanut butter into the filling before pouring it into the crust and use a knife to create swirls.
-
Nutty Surprise: Add crushed nuts, like peanuts or almonds, into the cheesecake mixture for extra crunch and flavor—yum!
Chef’s Notes
This No-Bake Reese’s Peanut Butter Cheesecake is one of those recipes that’s evolved over time. I remember my first attempts, where I may have overwhipped the cream (leading to a bit of a grainy texture—oops!) or slightly underfilled my crust. It took a few tries to get the balance just right, but that was all part of the fun! Now, I love sharing it with friends and family, and it never fails to impress.
So, don’t stress if things get a little messy in the kitchen. After all, the joy of cooking comes not just from the end result but from the laughter and love shared along the way!
FAQs and Troubleshooting
-
Can I use natural peanut butter instead of creamy?
- While you can technically use natural peanut butter, it can affect the texture of your cheesecake. Avoid the oily, drippy kind as it may make your cheesecake too runny.
-
What if my cheesecake doesn’t set?
- It could be due to not chilling it long enough or not using sufficient stabilizing ingredients like cream cheese. Ensure both are well mixed and cold to help it firm up properly.
-
How do I store leftovers?
- Store any leftover cheesecake in an airtight container in the fridge for up to 5 days. Just remember to cover the top with plastic wrap to keep it fresh!
-
Can I freeze this cheesecake?
- Absolutely! Once set, wrap it tightly in plastic wrap and aluminum foil, and it will last in the freezer for about 2 months. Let it defrost in the refrigerator overnight before serving.
I hope this No-Bake Reese’s Peanut Butter Cheesecake brings as much joy to your home as it has to mine. It’s simple, delicious, and an absolute crowd-pleaser—a dessert worth celebrating! So go on, grab the ingredients, and let’s make some sweet memories together. Happy baking (or should I say making?)!
PrintNo-Bake Reese’s Peanut Butter Cheesecake
A creamy and delicious no-bake cheesecake that combines the rich flavors of peanut butter and chocolate, perfect for dessert lovers.
- Prep Time: 15 minutes
- Cook Time: 240 minutes
- Total Time: 255 minutes
- Yield: 12 servings 1x
- Category: Dessert
- Method: No-Bake
- Cuisine: American
- Diet: Vegetarian
Ingredients
- 3 cups Oreo crumbs (about 35 Oreos)
- 6 tbsp butter, melted
- 24 oz cream cheese, room temperature
- 1/2 cup sugar (104g)
- 1 1/4 cups creamy peanut butter (350g)
- 1 tsp vanilla extract
- 1/4 cup sour cream (58g)
- 20 mini Reese’s, chopped
- 1 1/4 cups heavy whipping cream (300ml, cold)
- 3/4 cup powdered sugar (86g)
- 4 oz semi-sweet chocolate chips (2/3 cup)
- 5 tbsp heavy whipping cream
- 15 mini Reese’s, chopped
Instructions
- Prepare the Oreo crust: In a mixing bowl, combine the Oreo crumbs and melted butter. Mix until the crumbs are evenly coated. Press the mixture firmly into the bottom of a 9-inch springform pan. Freeze while preparing the filling.
- Make the cheesecake filling: Beat the cream cheese until smooth and creamy. Add the sugar, peanut butter, vanilla extract, and sour cream. Beat until well combined.
- Fold in the chopped Reese’s, preserving the chunks.
- Whip the cream: In a separate bowl, beat the cold heavy whipping cream until soft peaks form. Gradually add powdered sugar until stiff peaks form.
- Combine the whipped cream with the cheesecake mixture, folding gently until well combined.
- Pour the filling into the crust and smooth out the top.
- Chill the cheesecake for at least 4 hours or overnight.
- Make the chocolate drizzle by melting chocolate chips and cream in the microwave in intervals. Set aside to cool.
- Serve the chilled cheesecake topped with chocolate drizzle and remaining chopped Reese’s.
Notes
For a healthier version, substitute half the cream cheese with Greek yogurt and use natural peanut butter. Store leftovers in an airtight container in the fridge for up to 5 days.
Nutrition
- Serving Size: 1 serving
- Calories: 400
- Sugar: 27g
- Sodium: 250mg
- Fat: 25g
- Saturated Fat: 10g
- Unsaturated Fat: 10g
- Trans Fat: 0g
- Carbohydrates: 35g
- Fiber: 2g
- Protein: 6g
- Cholesterol: 40mg
Keywords: cheesecake, no-bake, peanut butter, dessert, chocolate
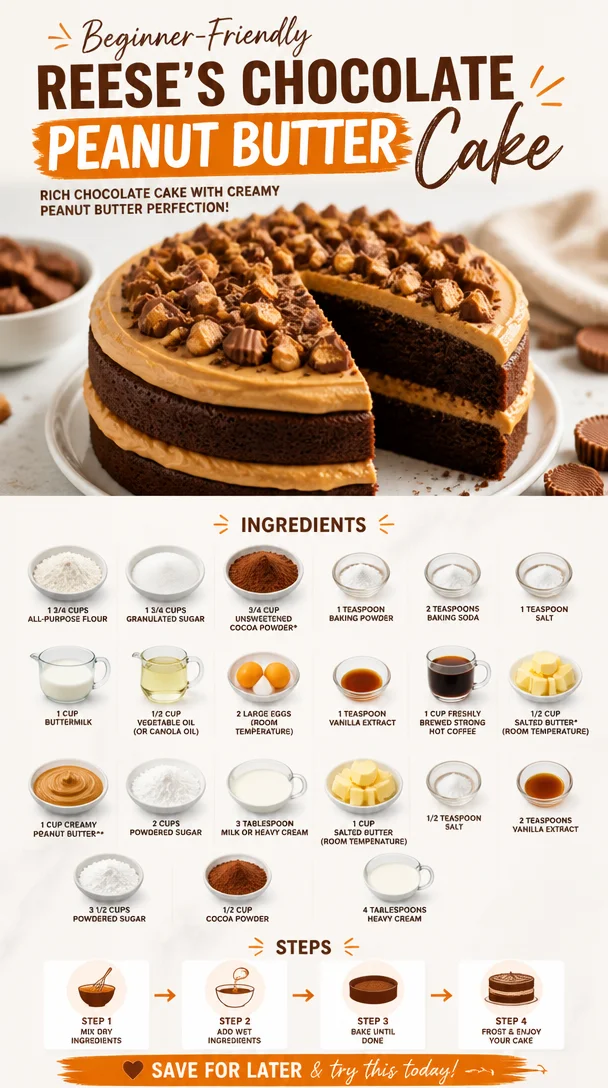
Beginner-Friendly Reese’s Chocolate Peanut Butter Cake
Indulge in Decadence: The Ultimate Reese’s Chocolate Peanut Butter Cake
Welcome, fellow food lovers! Today, I’m excited to share one of my absolute favorite desserts—the Reese’s Chocolate Peanut Butter Cake. If you’re anything like me, you understand the magnificent union of chocolate and peanut butter that makes the world seem a little brighter with every bite. This cake is the ultimate indulgence, a chocolatey paradise enhanced by the rich, nutty goodness of creamy peanut butter. Whether you’re celebrating a special occasion or simply craving something sweet, this cake is bound to satisfy.
Now, let’s talk about comfort food. It doesn’t take a culinary genius to appreciate the magic of a slice of cake, but when it’s a moist chocolate cake slathered with peanut butter frosting, that’s where euphoria happens, my friends! There’s something so grounding about baking—(maybe it’s the intoxicating aroma of chocolate wafting through the air)—that brings back fond memories. For me, it was always about the simple joys: coming home from school to my mom whipping up her famous chocolate cake, the sound of her mixing bowl clinking against the counter as she blended those decadent ingredients. That childhood nostalgia is alive in every layer of this cake.
Today, I want to help you recreate that joyful experience in your own kitchen. Buckle up as we dive into this rich, chocolatey world full of sweet surprises that will have your taste buds dancing!
A Sweet Memory
Thinking back, I remember one rainy afternoon in my childhood when the skies were gray and dreary. My mom and I decided to whip up our favorite chocolate cake, a recipe that had become ours over the years. While mixing the ingredients, she turned to me with a playful glimmer in her eye and said, "Ava, how about we take this to the next level and add peanut butter?” Little did I know, this innocent suggestion would spark my lifelong love affair with this classic flavor duo!
So there we went, adding peanut butter to the cake mix and frosting, and that day forever changed my baking game. As we devoured our creation, laughter filled the kitchen, and those moments became treasured memories. Every bite was decadently delightful, a perfect blend of rich chocolate and nutty peanut butter that felt like a warm hug. Fast-forward to today, and I still find myself recreating that magic in my own kitchen, with a few touches and tips that I’m excited to share with you.
Ingredients
Here’s what you’ll need to whip up this delicious cake:
-
1 3/4 cups all-purpose flour
The backbone of our cake. Can’t go wrong here! If you’re gluten-sensitive, feel free to swap it with a 1:1 gluten-free flour blend. -
1 3/4 cups granulated sugar
For a touch of sweetness and that sweet caramelization during baking. -
3/4 cup unsweetened cocoa powder
Use high-quality cocoa for a richer flavor—I promise it makes a difference! -
1 teaspoon baking powder
Helps the cake rise slightly. You can use this instead of baking soda if you have it on hand. -
2 teaspoons baking soda
This will give the cake that perfect fluffiness alongside the buttermilk reaction. -
1 teaspoon salt
Enhances all the flavors, making the chocolate pop! -
1 cup buttermilk
Adds moisture and a subtle tang. If you don’t have buttermilk, a mixture of regular milk with a splash of vinegar works wonders! -
1/2 cup vegetable oil (or canola oil)
Helps keep the cake moist. You could even use melted coconut oil for a twist! -
2 large eggs (room temperature)
Provide richness and structure. Room temperature eggs mix better, so remember to take them out ahead of time! -
1 teaspoon vanilla extract
A splash of vanilla is always a good idea to enhance sweetness. -
1 cup freshly brewed strong hot coffee
Don’t worry; it won’t taste like coffee! It just deepens the chocolate flavor. Use decaf or espresso for a milder flavor. -
1/2 cup salted butter (room temperature)
This will be key in creating a creamy, flavorful frosting. -
1 cup creamy peanut butter
The star of the show! Feel free to use crunchy if you like a texture surprise. -
2 cups powdered sugar
Sweetens the frosting like a dream. -
3 tablespoons milk or heavy cream
This will smooth out the frosting to your desired consistency. Choose heavy cream for a silkier texture! -
1 cup salted butter (room temperature)
Yes, we’re using this again! It’s vital for that irresistible frosting. -
1/2 teaspoon salt
Balances the sweetness in the frosting for a delightful finish. -
2 teaspoons vanilla extract (again!)
Go big or go home! -
3 1/2 cups powdered sugar
More sweetness because we love it! -
1/2 cup cocoa powder
A touch of chocolate for our frosting—yes, please! -
4 tablespoons heavy cream
This will give your frosting that velvety finish.
Step-by-Step Instructions
Alright, let’s get baking! Follow these detailed steps:
-
Preheat Your Oven: Begin by preheating your oven to 350°F (175°C). While the oven warms up, it’s a great time to prepare your cake pans. Grease and flour two 9-inch round cake pans or line them with parchment paper for easy removal.
-
Mix the Dry Ingredients: In a large mixing bowl, whisk together the flour, granulated sugar, cocoa powder, baking powder, baking soda, and salt until well combined. This is crucial—mixing these together first ensures even distribution of all those dry ingredients.
-
Combine the Wet Ingredients: In another bowl, whisk together the buttermilk, vegetable oil, eggs, and vanilla extract until it’s smooth and well blended.
-
Combine the Mixtures: Gradually pour the wet mixture into the dry ingredients, mixing with a spatula or electric mixer on low speed. The batter will be thick at this point.
-
Brew That Coffee: Start your coffee brewing. You want it hot and fresh for the next step!
-
Mix in Hot Coffee: Once your coffee is brewed, add it to your batter and mix until combined. You might be worried about the runny mixture, but that hot coffee is what gives the cake is moistness!
-
Transfer to Cake Pans: Divide the batter evenly between the prepared cake pans. Give them a light tap on the counter to release any air bubbles and ensure an even bake.
-
Bake: Place the pans in the preheated oven and bake for 30-35 minutes. Check doneness by inserting a toothpick into the center—if it comes out clean or with a few moist crumbs, you’re golden.
-
Cool: Once baked, remove them from the oven and let them cool in the pans for about 10-15 minutes before transferring to a wire rack to cool completely.
-
Prepare the Frosting: In a large mixing bowl, beat together the room temperature salted butter and creamy peanut butter until it’s light and fluffy. Gradually mix in the powdered sugar, followed by milk (or heavy cream) until you reach your desired texture. Add salt and vanilla, and beat until smooth and creamy.
-
Frost the Cakes: Once your cakes are completely cool, place one layer on a serving plate. Spread a generous layer of peanut butter frosting on top. Place the second layer on top and frost the sides and top of the cake. Crave even more decadence? Top with crushed Reese’s cups or chocolate shavings!
-
Final Touches: For a fun twist, whip up a chocolate ganache or extra chocolate frosting to drizzle over the top before serving—can you handle the temptation?!
Serving Suggestions
Serving this cake is all about presentation! Slice generous pieces and showcase the delightful layers of chocolate and peanut butter. Pair it with a scoop of vanilla ice cream or a dollop of whipped cream on the side. For a little extra flair, garnish with chopped peanuts, chocolate chips, or miniature Reese’s cups. It’ll wow your friends and family every time!
Recipe Variations
Feel adventurous? Here are a few variations to shake things up:
-
Chocolate Chip Surprise: Fold in some chocolate chips into the batter for extra gooeyness.
-
Nutty Crunch: Swap half the peanut butter for chunky peanut butter, adding delightful texture.
-
Healthier Choice: Try substituting half of the granulated sugar with honey or maple syrup for a lighter sweetness.
-
Frosting Flavors: Experiment with different frosting flavors by adding a splash of almond extract or a swirl of melted chocolate.
-
Gluten-Free Option: Use a gluten-free flour blend to make the cake gluten-free without sacrificing flavor.
Chef’s Notes
I have to admit that this recipe has evolved over the years. Initially, I was hesitant to combine peanut butter and chocolate in one cake, fearing it might be too rich. But as I experimented, I realized that life is all about taking delicious risks. The way these flavors harmonize is pure bliss, and every time I bake this cake, it feels like a warm hug from my childhood. And let’s be real—who wouldn’t want a slice of that?
FAQs and Troubleshooting
1. Why did my cake sink in the middle?
This can happen if your oven temperature is too low or the batter was overmixed after adding the dry ingredients. Make sure to preheat the oven and mix until just combined.
2. Can I use natural peanut butter in the frosting?
You can, but the texture may differ. Natural peanut butter can be thinner and less sweet; be prepared to adjust powdered sugar accordingly.
3. How do I prevent my cake from sticking to the pan?
Greasing and flouring the pans properly or using parchment paper will help ensure easy removal. You could even use non-stick spray for extra insurance!
4. Can I make this cake ahead of time?
Absolutely! The cake layers can be baked a day ahead and stored tightly wrapped at room temperature. Frost just before serving to keep it fresh.
Dive into this indulgent recipe full of flavor and childhood memories! I can’t wait for you all to experience the delight of this Reese’s Chocolate Peanut Butter Cake. Whether it’s for a birthday, anniversary, or simply because you deserve it—this cake is a must-try and always a winner in my book. Happy baking, friends!
PrintReese’s Chocolate Peanut Butter Cake
A decadent chocolate cake slathered with creamy peanut butter frosting, perfect for any occasion.
- Prep Time: 15 minutes
- Cook Time: 30 minutes
- Total Time: 45 minutes
- Yield: 12 servings 1x
- Category: Dessert
- Method: Baking
- Cuisine: American
- Diet: Vegetarian
Ingredients
- 1 3/4 cups all-purpose flour
- 1 3/4 cups granulated sugar
- 3/4 cup unsweetened cocoa powder
- 1 teaspoon baking powder
- 2 teaspoons baking soda
- 1 teaspoon salt
- 1 cup buttermilk
- 1/2 cup vegetable oil
- 2 large eggs (room temperature)
- 1 teaspoon vanilla extract
- 1 cup freshly brewed strong hot coffee
- 1/2 cup salted butter (room temperature)
- 1 cup creamy peanut butter
- 2 cups powdered sugar
- 3 tablespoons milk or heavy cream
- 1 cup salted butter (room temperature)
- 1/2 teaspoon salt (for frosting)
- 2 teaspoons vanilla extract (for frosting)
- 3 1/2 cups powdered sugar (for frosting)
- 1/2 cup cocoa powder (for frosting)
- 4 tablespoons heavy cream (for frosting)
Instructions
- Preheat your oven to 350°F (175°C). Prepare two 9-inch round cake pans by greasing and flouring them or lining with parchment paper.
- Mix the dry ingredients: In a large mixing bowl, whisk together the flour, granulated sugar, cocoa powder, baking powder, baking soda, and salt until well combined.
- Combine the wet ingredients: In another bowl, whisk together the buttermilk, vegetable oil, eggs, and vanilla extract until smooth.
- Combine the mixtures: Gradually pour the wet mixture into the dry ingredients, mixing until just combined.
- Brew your coffee. It should be hot and fresh.
- Mix in the hot coffee until combined.
- Transfer the batter evenly between the prepared cake pans.
- Bake for 30-35 minutes or until a toothpick comes out clean.
- Cool the cakes in the pans for 10-15 minutes before transferring to a wire rack to cool completely.
- Prepare the frosting by beating together the room temperature salted butter and creamy peanut butter until light and fluffy. Gradually mix in powdered sugar and milk until smooth.
- Frost the cooled cakes, first layering with frosting between the two layers, then covering the top and sides.
- Serve with optional decorations like crushed Reese’s cups or chocolate shavings.
Notes
For a rich flavor, use high-quality cocoa powder. You can also add chocolate chips to the batter for extra texture.
Nutrition
- Serving Size: 1 slice
- Calories: 550
- Sugar: 30g
- Sodium: 450mg
- Fat: 28g
- Saturated Fat: 10g
- Unsaturated Fat: 10g
- Trans Fat: 0g
- Carbohydrates: 65g
- Fiber: 3g
- Protein: 10g
- Cholesterol: 50mg
Keywords: chocolate cake, peanut butter, dessert, baking, indulgent, celebration
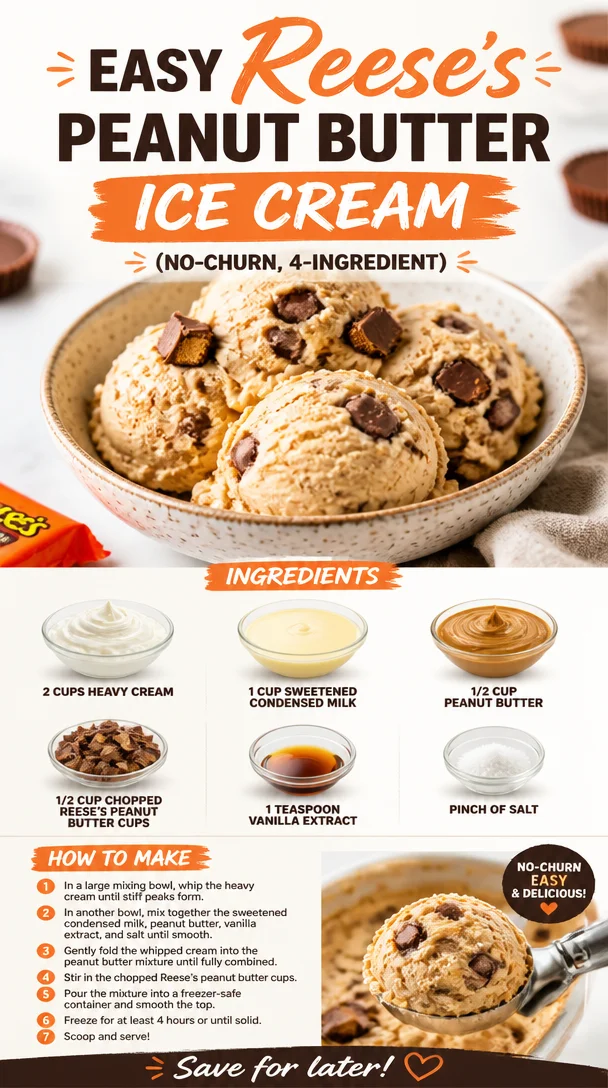
Easy Reese’s Peanut Butter Ice Cream (No-Churn, 4-Ingredient)
Indulge in the Decadence of Homemade Reese’s Peanut Butter Ice Cream
Hey there, fellow food lovers! Ava here, and today I’m incredibly excited to share a recipe that combines two of America’s favorite indulgences: ice cream and peanut butter cups! If you’ve ever found yourself daydreaming about a creamy, dreamy dessert that echoes your childhood, look no further. Today, we’re making Reese’s Peanut Butter Ice Cream, a treat that’s as delightful as it sounds and totally worth the brain freeze!
A Moment of Nostalgia
Before we dive into the creamy goodness of this recipe, let me take you back to one of those hot summer days from my childhood. Picture this: the sun is blazing, and the air is thick with the chatter of kids playing outside. It was the perfect day for ice cream, and my friends and I would race down to the local ice cream shop, the one with the huge colorful sign that read “Scoops of Joy.” My favorite? The peanut butter cup flavor!
I remember the thrill of anticipation as I watched the ice cream being scooped, my mouth watering with excitement. Each scoop was a swirl of creamy, peanut buttery heaven, dotted with chunks of chocolatey, crunchy Reese’s cups. I’d savor every spoonful, completely oblivious to the drippy chaos that was happening all around me. That first bite would always take me back to how simple things could be when you followed your cravings and shared good food with great friends.
Creating my own version of that nostalgic ice cream treat was inevitable. Fast forward to today, and I’m sharing my ultimate Reese’s Peanut Butter Ice Cream recipe that captures all those childhood flavors. Get ready to scoop up some happiness!
Ingredients You’ll Need
Let’s gather the stars of our show! Here’s what you’ll need for this luscious homemade ice cream:
-
2 cups heavy cream: The magic ingredient! This will provide a rich, creamy base. If you’re looking for a lighter option, you can substitute with coconut cream for a dairy-free version.
-
1 cup sweetened condensed milk: This adds sweetness and creaminess. If you want a less sugary alternative, you could try evaporated milk, though the texture will be slightly different.
-
1/2 cup peanut butter: The creamy dream that binds the flavor! Use any brand you love—or even homemade peanut butter if you’re feeling adventurous. For a twist, try crunchy peanut butter for added texture.
-
1/2 cup chopped Reese’s peanut butter cups: The true stars! You can use mini or regular-sized cups. If you’re in the mood to mix it up, try swapping these for any other chocolate candy you adore.
-
1 teaspoon vanilla extract: This enhances the flavor profile. Pure vanilla is recommended for the best taste, but imitation will work too in a pinch.
-
Pinch of salt: A little salt elevates the flavors—don’t skip it! If you’re feeling cheeky, add a touch of sea salt just before serving for a delightful salty-sweet contrast.
Step-by-Step Instructions
Ready to whip up this creamy goodness? Let’s make some ice cream magic!
-
Whip the Cream: In a large bowl, use an electric mixer to whip the heavy cream until stiff peaks form. This usually takes about 3-5 minutes. Remember to start at a lower speed to avoid a whipped cream explosion!
-
Mix the Base: In a separate bowl, combine the sweetened condensed milk, peanut butter, vanilla extract, and a pinch of salt. Use a whisk to blend everything until smooth. Make sure the peanut butter is well incorporated—no lumps allowed!
-
Fold It Together: With a spatula, gently fold the whipped cream mixture into the peanut butter blend. You want the mixture to stay airy and light, so use a gentle folding motion. Be patient and take your time—it’ll be worth it!
-
Add the Chunks: Once the base is mixed, fold in the chopped Reese’s peanut butter cups. This is where the magic really happens! Incorporate them evenly throughout the mixture for those delightful bursts of chocolate and peanut butter bliss.
-
Chill and Freeze: Transfer the mixture into an airtight container. Smooth the top with your spatula, cover with a lid, and put it in the freezer. You’ll want to let it freeze for at least 6 hours—overnight is even better if you can wait that long!
Serving Suggestions
When you’re ready to serve, scoop out generous portions of your Reese’s Peanut Butter Ice Cream into bowls or cones. Drizzle a little extra peanut butter on top for that gourmet touch, and don’t forget to sprinkle more chopped Reese’s cups or even some crushed nuts if you like! Serve with a big smile and enjoy every moment of indulgence.
Recipe Variations
Want to switch things up? Here are a few fun variations to try:
-
Chocolate Peanut Butter Swirl: Add a swirl of chocolate fudge sauce into the ice cream before freezing for extra chocolatey goodness.
-
Banana Base: Replace half of the peanut butter with mashed bananas for a creamy, fruity twist.
-
Dairy-Free Delight: Use coconut cream and coconut milk instead of dairy for a vegan-friendly treat—just make sure to use dairy-free candies!
-
Crunchy Topping: Add some crushed pretzels or nuts to the mix for an unexpected crunch that will take your ice cream to the next level.
-
Chocolate Chips: Swap out some Reese’s cups with chocolate chips or even mini marshmallows for a unique flavor combo.
Chef’s Notes
I’ve been at this ice cream game for a while now, and let me tell you, each batch is a little labor of love. One funny thing that happened during my early attempts was when I accidentally switched the sweetened condensed milk with canned pumpkin. Let’s just say, “Pumpkin Spice Peanut Butter Ice Cream” was a hard sell! But hey, every mishap in the kitchen is an opportunity for creativity, right? Over the years, this recipe has evolved to capture the essence of that local ice cream shop, and every time I scoop a bowl, it brings me back to simpler times and sweeter memories.
FAQs and Troubleshooting
1. Why is my ice cream not freezing properly?
This could be due to not mixing the ingredients thoroughly. Make sure the heavy cream is whipped to stiff peaks before folding into the mixture. Also, ensure your freezer is set to a proper freezing temperature.
2. Can I use natural peanut butter?
Yes! Just keep in mind that natural peanut butter tends to be more runny. You may want to blend in a bit of powdered sugar to achieve a thicker consistency.
3. How do I store leftovers?
Keep any leftover ice cream in an airtight container with a layer of parchment paper on top to prevent ice crystals from forming.
4. Can I churn this in an ice cream maker?
Absolutely! If you have an ice cream maker, follow the manufacturer’s instructions. Just pour your mixture into the churner instead of freezing it directly in the container.
Nutritional Info
While this recipe is meant for indulgence rather than calorie counting, a typical serving contains approximately:
- Calories: 300 per scoop
- Total Fat: 24g
- Saturated Fat: 12g
- Sugar: 20g
- Protein: 5g
Feel free to adjust portion sizes based on your treat levels because life is too short not to enjoy ice cream!
So there you have it, my amazing friends! A recipe bursting with nostalgia, flavor, and oh-so-creamy goodness! Whether you’re enjoying it after dinner, on a hot summer’s day, or just because—it’s all about pleasure in every scoop. Happy making, and may your kitchen adventures be as tasty as your dreams! Let’s scoop it up!
PrintReese’s Peanut Butter Ice Cream
A creamy, dreamy homemade ice cream that combines the rich flavors of peanut butter and Reese’s cups, capturing childhood memories.
- Prep Time: 15 minutes
- Cook Time: 0 minutes
- Total Time: 360 minutes
- Yield: 6 servings 1x
- Category: Dessert
- Method: No-churn
- Cuisine: American
- Diet: Vegetarian
Ingredients
- 2 cups heavy cream
- 1 cup sweetened condensed milk
- 1/2 cup peanut butter
- 1/2 cup chopped Reese’s peanut butter cups
- 1 teaspoon vanilla extract
- Pinch of salt
Instructions
- Whip the cream: In a large bowl, use an electric mixer to whip the heavy cream until stiff peaks form, about 3-5 minutes.
- Mix the base: In a separate bowl, combine the sweetened condensed milk, peanut butter, vanilla extract, and pinch of salt. Whisk until smooth.
- Fold it together: Gently fold the whipped cream into the peanut butter mixture until airy.
- Add the chunks: Fold in the chopped Reese’s peanut butter cups evenly throughout the mixture.
- Chill and freeze: Transfer to an airtight container, smooth the top, cover, and let freeze for at least 6 hours or overnight.
Notes
For serving, drizzle extra peanut butter on top and sprinkle with additional chopped Reese’s cups or crushed nuts. Feel free to experiment with different variations!
Nutrition
- Serving Size: 1 serving
- Calories: 350
- Sugar: 20g
- Sodium: 150mg
- Fat: 24g
- Saturated Fat: 12g
- Unsaturated Fat: 8g
- Trans Fat: 0g
- Carbohydrates: 36g
- Fiber: 1g
- Protein: 5g
- Cholesterol: 70mg
Keywords: ice cream, peanut butter, dessert, homemade, Reese's, childhood memories