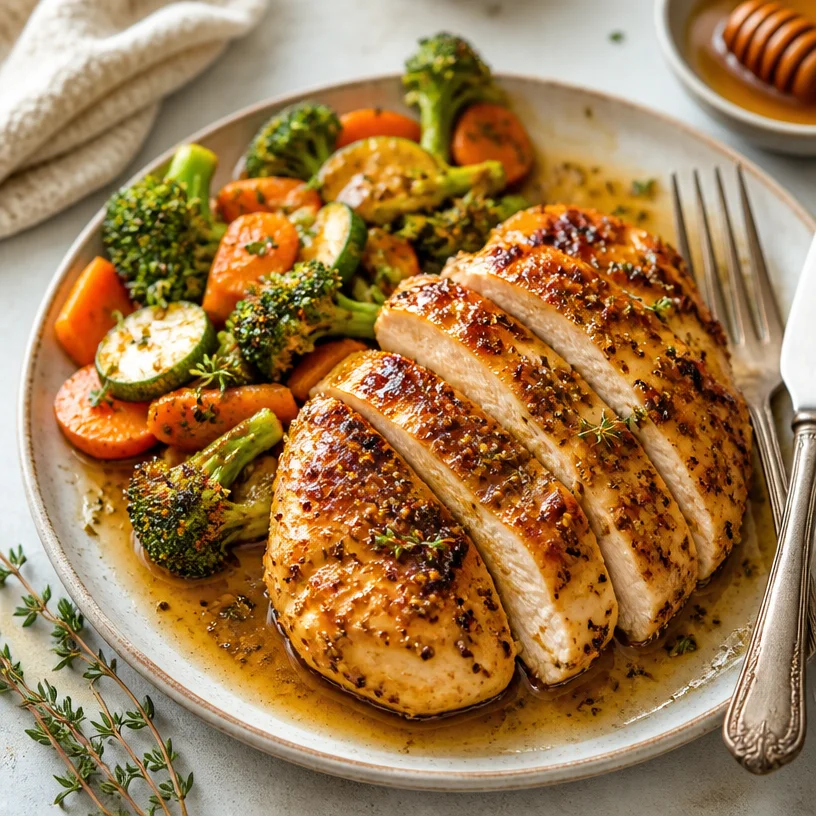
One-Pan Maple Mustard Chicken Dinner in 30 Minutes
Maple Mustard Chicken: A Simple Yet Satisfying Delight
Hey there, fellow food lovers! Today, we’re diving into the tasty world of Maple Mustard Chicken—trust me, this dish is going to blow your mind! It’s sweet, tangy, and everything you didn’t know you needed on your dinner table. If you’re looking for a recipe that’s not just simple but also satisfies those cravings for flavor and warmth, you’re in for a treat.
Let’s set the stage. Picture this: a cozy evening, the unmistakable aroma wafting from the kitchen, and your favorite playlist filling the air. You take that first bite of Maple Mustard Chicken, and it’s pure magic—the sweetness of maple syrup balancing beautifully with the zesty mustard. Oh yeah, you know what I’m talking about!
A Personal Taste of Nostalgia
This recipe brings back so many memories for me, and I can’t help but smile when I think of the first time I made it. It was one of those spontaneous weeknight dinners after a long day of work. I had just moved into my first apartment, and my kitchen was mostly bare with a few essential spices and sauces. On a whim, I decided to experiment. I grabbed some chicken breasts, a bottle of maple syrup sitting at the back of my fridge, and my trusty mustard.
With a little creativity and a dash of bravery, I whipped up this dish, not expecting much. But to my surprise, the blend of flavors was fantastic! My roommate, who is a notoriously picky eater, took one taste and declared it a hit! From that moment on, Maple Mustard Chicken became a staple in our household, a crowd-pleaser that brought smiles to busy weeknights. And let me tell you, it soon became the go-to recipe whenever friends came over for dinner.
So, if you’re ready to create delicious memories of your own, let’s jump right into it!
Ingredients
Here’s what you’ll need for this scrumptious Maple Mustard Chicken, along with some tips and tricks to make your dish shine:
-
Chicken Breasts: The star of the dish! I recommend using boneless skinless chicken breasts for tenderness and quicker cooking. Feel free to substitute with chicken thighs for a richer flavor, or even tofu for a vegetarian twist.
-
Maple Syrup: This liquid gold adds natural sweetness and depth to the dish. If you’re in a pinch, honey works great, though it does give a slightly different flavor profile. For a fun twist, try using agave syrup!
-
Mustard: I prefer Dijon for its tangy kick, but you can experiment with whole grain mustard for a more rustic texture or yellow mustard for a milder taste. Just remember, the mustard is what brings that zing!
-
Olive Oil: A little fat helps to carry flavor and adds a lovely golden color to the chicken. You can substitute it with avocado oil or even melted butter, depending on your preferences.
-
Garlic: Fresh garlic cloves add a lovely aromatic quality that elevates the dish. If you’re in a hurry, you can use garlic powder instead, but freshly minced brings the best flavor.
-
Salt and Pepper: These pantry staples enhance all the flavors in your dish. Always adjust to your taste!
Step-by-Step Instructions
Ready to cook? Here’s how to make your Maple Mustard Chicken:
-
Preheat Your Oven: First things first, preheat your oven to 375°F (190°C). This will ensure your chicken cooks evenly and gets that lovely roast.
-
Prepare the Chicken: Rinse the chicken breasts under cold water and pat them dry with paper towels. This step helps the marinade stick better. Season both sides with salt and pepper before moving on.
-
Make the Maple Mustard Marinade: In a medium bowl, combine ½ cup of maple syrup, ¼ cup of Dijon mustard, 2 minced garlic cloves, and 2 tablespoons of olive oil. Whisk until it’s well blended. Take a moment to enjoy the enticing aroma!
-
Marinate the Chicken: Place the chicken breasts in a shallow dish and pour the marinade over the top. Make sure each piece is coated evenly. This is key to getting that delicious flavor throughout! Cover it and let it marinate for at least 30 minutes—quick tip: the longer, the better! If you can, marinate overnight in the fridge.
-
Transfer to Baking Dish: Once marinated, transfer the chicken to a baking dish, reserving the marinade. Arrange the breasts evenly spaced so they cook nicely.
-
Bake: Pop the dish in the preheated oven. Bake for 25-30 minutes, or until the chicken is cooked through and reaches an internal temperature of 165°F (75°C). As it bakes, the sweet glaze will caramelize, creating a glorious crust.
-
Baste with Marinade: Halfway through baking, drizzle some reserved marinade over the chicken for extra glaziness. Just make sure to avoid cross-contamination.
-
Broil to Finish: For an extra touch, turn on the broiler for the last 2-3 minutes of cooking. Watch it carefully—the chicken will bubble and caramelize beautifully!
-
Rest and Serve: Once done, remove the chicken from the oven, tent it with foil, and let it rest for about 5 minutes. This allows the juices to redistribute, making your chicken ultra moist!
Serving Suggestions
When it’s time to serve, there are so many delightful options! Plate your Maple Mustard Chicken alongside a vibrant garden salad for a refreshing contrast. You can also serve it with roasted vegetables or over a fluffy bed of quinoa or rice to soak up that delicious sauce. Don’t forget to drizzle a bit of the leftover glaze on top for added flair!
Recipe Variations
Want to get a little creative? Here are some fun variations you can try:
-
Herb Infusion: Add fresh chopped herbs like rosemary or thyme to the marinade for an earthy touch.
-
Spicy Kick: Mix in a teaspoon of red pepper flakes or a splash of hot sauce to the marinade for a spicy version.
-
Fruitiness: Toss in some sliced apples or pears into the baking dish for a sweet touch that caramelizes beautifully alongside the chicken.
-
Gluten-Free Option: If you’re avoiding gluten, double-check your mustard and enjoy this dish with gluten-free sides like quinoa or a fresh veggie medley.
-
Stovetop Method: For a quick version, you can pan-sear the chicken in a skillet until golden brown, then pour in the marinade and let it simmer until cooked through.
Chef’s Notes
I can barely keep track of how many times I’ve made this dish over the years. From weeknight dinners to fancy gatherings, Maple Mustard Chicken never disappoints. One of my favorite memories was cooking this on a chilly fall night for my family as we gathered around the table, sharing laughter and stories. That’s the beauty of food—it brings us together!
In fact, it doesn’t just satisfy the taste buds; it nurtures relationships and creates lasting memories. So don’t be afraid to share your own kitchen stories when making this delicious recipe!
FAQs and Troubleshooting
-
How do I know when my chicken is done? Use a meat thermometer to check the internal temperature; it should read 165°F (75°C). No thermometer? Cut into the thickest part of the chicken, and it should be opaque with no pink juices.
-
Can I make this ahead of time? Absolutely! You can marinate the chicken the night before and store it in the fridge. For leftovers, just store the chicken in an airtight container in the refrigerator for up to 3 days.
-
Why is my glaze not sticking? Make sure you’re marinating long enough and basting during cooking. It helps create that sticky goodness you crave!
-
Can I use frozen chicken? Yes, but thaw it completely before marinating and cooking. This ensures even cooking and proper flavor absorption.
Nutritional Info
Although I like to stress the joy of food over strict nutrition, here’s a quick snapshot of the nutrition for a standard serving of Maple Mustard Chicken:
- Calories: Approximately 350 kcal
- Protein: 30g
- Carbohydrates: 30g
- Fat: 10g
Now that you have everything you need, it’s time to get cooking! Bring the aroma of Maple Mustard Chicken into your kitchen and savor every bite. Here’s to happy cooking and delicious memories, friends! Enjoy!
PrintMaple Mustard Chicken
A sweet and tangy chicken dish marinated in a delicious maple mustard glaze, perfect for any weeknight dinner.
- Prep Time: 10 minutes
- Cook Time: 30 minutes
- Total Time: 40 minutes
- Yield: 2 servings 1x
- Category: Main Course
- Method: Baking
- Cuisine: American
- Diet: Gluten-Free
Ingredients
- 2 boneless skinless chicken breasts
- ½ cup maple syrup
- ¼ cup Dijon mustard
- 2 minced garlic cloves
- 2 tablespoons olive oil
- Salt and pepper to taste
Instructions
- Preheat your oven to 375°F (190°C).
- Prepare the chicken by rinsing under cold water and patting dry.
- Make the maple mustard marinade by combining maple syrup, Dijon mustard, minced garlic, and olive oil in a medium bowl.
- Marinate the chicken in a shallow dish with the marinade for at least 30 minutes.
- Transfer the chicken to a baking dish and arrange evenly.
- Bake for 25-30 minutes, until the chicken reaches an internal temperature of 165°F (75°C).
- Baste the chicken with reserved marinade halfway through baking.
- Broil for the last 2-3 minutes for a crispy finish.
- Rest the chicken for 5 minutes before serving.
Notes
For more flavor, marinate overnight. Serve with a fresh salad or over quinoa.
Nutrition
- Serving Size: 1 serving
- Calories: 350
- Sugar: 25g
- Sodium: 400mg
- Fat: 10g
- Saturated Fat: 1g
- Unsaturated Fat: 8g
- Trans Fat: 0g
- Carbohydrates: 30g
- Fiber: 0g
- Protein: 30g
- Cholesterol: 70mg
Keywords: maple mustard chicken, easy chicken recipe, weeknight dinner, savory chicken
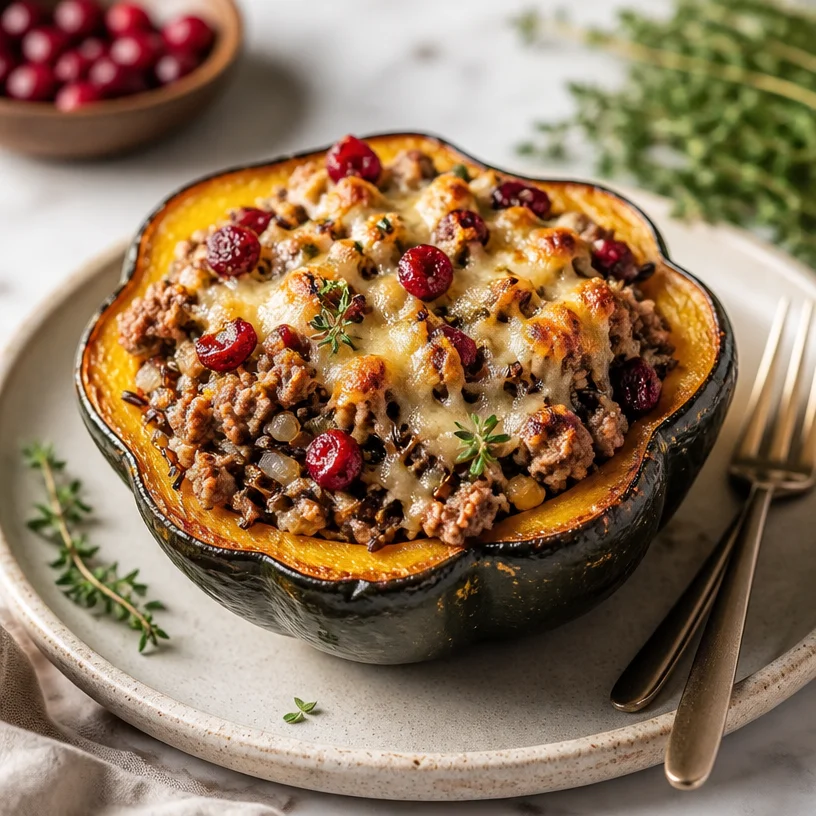
One-Pan Stuffed Acorn Squash: 30-Minute Weeknight Dinner
Stuffed Acorn Squash: A Cozy Fall Delight
Fall is in the air, and there’s nothing quite like the sight of vibrant acorn squash gracing your kitchen counter, beckoning you to transform it into a beautiful and wholesome meal. Today, we’re diving into a dish that not only fills your belly but feeds your soul: Stuffed Acorn Squash with Ground Turkey, Cranberries, and Wild Rice.
As the weather gets cooler, it’s the perfect time to take comfort in hearty, feel-good recipes. This dish is elegant enough for dinner parties yet simple enough for a cozy weeknight in. I promise that with each bite, you’ll experience a lovely blend of flavors that warms both the heart and the palate.
Personal Story
When I was a child, autumn meant two things: the thrill of jumping into piles of crunchy leaves and my mom’s famous stuffed acorn squash. I remember the aroma wafting through our home as she prepared the meal, a blend of sweet and savory notes that wrapped around me like a warm hug. Each year, she’d encourage my siblings and me to help her with the stuffing. With every scoop of wild rice mixed with cranberries, we’d squeal with delight; it felt like we were creating little treasures that held all our favorite flavors. Now, every time I make stuffed acorn squash, I’m transported back to those cherished moments. It’s more than just a dish; it’s a reminder that food has the power to bring people together.
Ingredients
Let’s roll up our sleeves and gather the ingredients for this luxurious dish:
-
Acorn Squash: The star of our show! Its slightly sweet, nutty flavor perfectly complements the savory stuffing. If acorn squash isn’t available, butternut or spaghetti squash can also work beautifully.
-
Ground Turkey: Lean and packed with protein, ground turkey is a lovely substitute for traditional beef or pork. If you prefer a vegetarian option, consider using lentils or chickpeas instead.
-
Cranberries: Dried cranberries add a burst of sweetness that balances the dish. If you’re watching your sugar, dried cherries or blueberries can be great alternatives.
-
Wild Rice: This adds a delightful chewy texture and earthy flavor. You could swap in quinoa or brown rice if you prefer, but the wild rice offers a unique twist that’s flavorful and nutritious.
-
Onion: Onion brings depth to the stuffing. Shallots or leeks can also lend a lovely flavor profile.
-
Celery: Adds crunch and freshness. You can replace it with bell peppers for a sweeter note, or simply omit it if you’re not a fan.
-
Garlic: A classic flavor booster! If fresh isn’t on hand, garlic powder works in a pinch.
-
Olive Oil: A drizzle of olive oil helps sauté the veggies and adds a silky finish. Avocado oil or grapeseed oil are solid substitutes.
-
Herbs (Thyme and Sage): Fresh herbs elevate the dish with fragrant notes of autumn. Feel free to use dried herbs if that’s what you have on hand – just adjust the quantities.
-
Salt and Pepper: Essential for flavor! Always season to taste as you go.
Step-by-Step Instructions
-
Preheat the Oven: Start by preheating your oven to 400°F (200°C). This gets the cooking process going before you even start assembling your dish.
-
Prepare the Acorn Squash: Cut the acorn squashes in half lengthwise (cooking tip: use a sharp knife for clean cuts). Scoop out the seeds—don’t worry about being perfect! Drizzle a little olive oil inside each half and sprinkle with salt and pepper. This will help them roast to perfection!
-
Roast the Squash: Place the squash halves, cut side down, on a baking sheet. Roast them in the oven for about 25-30 minutes. You want them fork-tender, so keep an eye on them!
-
Cook the Wild Rice: While the squash is roasting, prepare the wild rice according to package instructions. Usually, it takes about 45 minutes to cook, so it’s good to have this going while everything else is in the oven. The fluffiness of the rice is key, so don’t rush it!
-
Sauté the Aromatics: In a large skillet, heat a tablespoon of olive oil over medium heat. Add diced onion and celery to the pan. Sauté these for about 5 minutes, until the onion becomes translucent and the celery softens.
-
Brown the Ground Turkey: Push the veggies to one side of the pan and add the ground turkey, breaking it up with a spatula. Cook until it’s browned and cooked through (about 7-10 minutes). The turkey will soak up all that delicious flavor from the aromatics.
-
Add the Flavor: Toss in minced garlic and herbs at this stage. Cook for an additional minute until fragrant. Your kitchen will smell heavenly!
-
Mix It Up: Now, add the cooked wild rice and dried cranberries into the skillet with the turkey and veggies. Stir everything together and season with salt and pepper to taste. Feel free to get creative—this is your moment to shine!
-
Stuff the Squash: Carefully turn the roasted squash halves right side up. Generously fill each half with the turkey and rice mixture. Don’t be shy—heap it high!
-
Final Bake: Pop the stuffed squash back in the oven for an additional 10-15 minutes, just to heat everything through and allow the flavors to meld.
-
Serve and Enjoy: Once done, pull them out of the oven and let them cool for a few minutes. Then, drizzle a little extra olive oil on top, if desired, for a finishing touch.
Serving Suggestions
Plating these stuffed acorn squashes is a visual delight! Serve them warm on a rustic wooden platter to create a cozy vibe. Garnish with a sprinkle of fresh chopped herbs for that beautiful pop of green, and don’t forget a wedge of lemon on the side for a zesty twist!
Recipe Variations
-
Vegetarian Delight: Skip the turkey and load up on beans, mushrooms, and extra veggies like zucchini or spinach for a wholesome vegetarian version.
-
Cheesy Goodness: Mix in some feta or goat cheese into the stuffing before baking for a creamy and tangy flavor kick.
-
Spice it Up: Add some heat with diced jalapeños or a dash of cayenne pepper to the turkey mixture. A little kick never hurt anyone!
-
Nuts About It: Toss in some chopped walnuts or pecans for added crunch and nuttiness.
-
Herb Forward: Swap out thyme and sage for fresh rosemary and parsley for a refreshing take on flavor!
Chef’s Notes
If there’s one thing I’ve learned in my cooking journey, it’s that recipes are never set in stone. I often find myself getting a little adventurous—like the time I added leftover cranberry sauce (yes, that’s right!) into the stuffing. It gave a surprising burst of tart sweetness that I can’t believe I hadn’t tried sooner! Each time I make this dish, I embrace the idea that cooking should be flexible and fun. So, my advice is always to trust your instincts and have fun with it!
FAQs and Troubleshooting
1. My acorn squash is tough to cut! What should I do?
If your squash is particularly firm, microwave it for 2-3 minutes first to soften it slightly, making it easier to cut.
2. How do I know when my wild rice is done?
Wild rice should be chewy and split open when cooked, with a tender bite. Just be sure to taste it before draining!
3. Can I make this dish ahead of time?
Absolutely! You can prepare the stuffing a day in advance and just assemble and bake the acorn squash before serving.
4. My stuffing seems dry. How can I fix it?
If your stuffing ends up a bit dry, drizzle in some chicken or vegetable broth, or even a splash of olive oil, to add moisture!
Nutritional Info (Optional)
While I believe good food doesn’t need to dwell on numbers, here’s a rough estimate for one stuffed acorn squash half:
- Calories: 350
- Protein: 20g
- Carbs: 40g
- Fat: 12g
- Fiber: 7g
Conclusion
There you have it, my lovely foodies! Stuffed acorn squash is a delightful celebration of fall flavors that is tough to beat. With each bite, you’ll savor the warmth of home-cooked goodness and perhaps a sprinkle of nostalgia, just like I do. Remember, cooking is all about enjoying the moment, so embrace the spices, share the laughter, and have fun in your kitchen. Now, roll up those sleeves and get stuffing—your cozy meal awaits!
PrintStuffed Acorn Squash
A cozy fall dish featuring acorn squash stuffed with ground turkey, cranberries, and wild rice, perfect for chilly evenings.
- Prep Time: 15 minutes
- Cook Time: 45 minutes
- Total Time: 60 minutes
- Yield: 4 servings 1x
- Category: Main Course
- Method: Baking
- Cuisine: American
- Diet: None
Ingredients
- 2 Acorn Squash
- 1 lb Ground Turkey
- 1/2 cup Dried Cranberries
- 1 cup Wild Rice
- 1 Onion, diced
- 1 Celery stalk, diced
- 2 cloves Garlic, minced
- 2 tbsp Olive Oil
- 1 tsp Dried Thyme
- 1 tsp Dried Sage
- Salt and Pepper to taste
Instructions
- Preheat the oven to 400°F (200°C).
- Prepare the acorn squash by cutting in half and scooping out the seeds. Drizzle with olive oil and season with salt and pepper.
- Roast the squash halves cut side down on a baking sheet for 25-30 minutes until fork-tender.
- Cook the wild rice according to package instructions (approximately 45 minutes).
- Sauté diced onion and celery in a skillet with olive oil for 5 minutes.
- Brown the ground turkey in the skillet for 7-10 minutes, breaking it up as it cooks.
- Add minced garlic and herbs, cooking for an additional minute.
- Mix in the cooked wild rice and cranberries, seasoning with salt and pepper.
- Stuff the roasted squash with the turkey and rice mixture.
- Final bake for 10-15 minutes to heat through.
- Serve warm with a drizzle of olive oil on top.
Notes
Feel free to customize with additional vegetables or spices to create your perfect stuffed squash.
Nutrition
- Serving Size: 1 half of acorn squash
- Calories: 350
- Sugar: 5g
- Sodium: 400mg
- Fat: 12g
- Saturated Fat: 2g
- Unsaturated Fat: 8g
- Trans Fat: 0g
- Carbohydrates: 40g
- Fiber: 7g
- Protein: 20g
- Cholesterol: 75mg
Keywords: stuffed acorn squash, fall recipe, savory squash, healthy dinner, comfort food
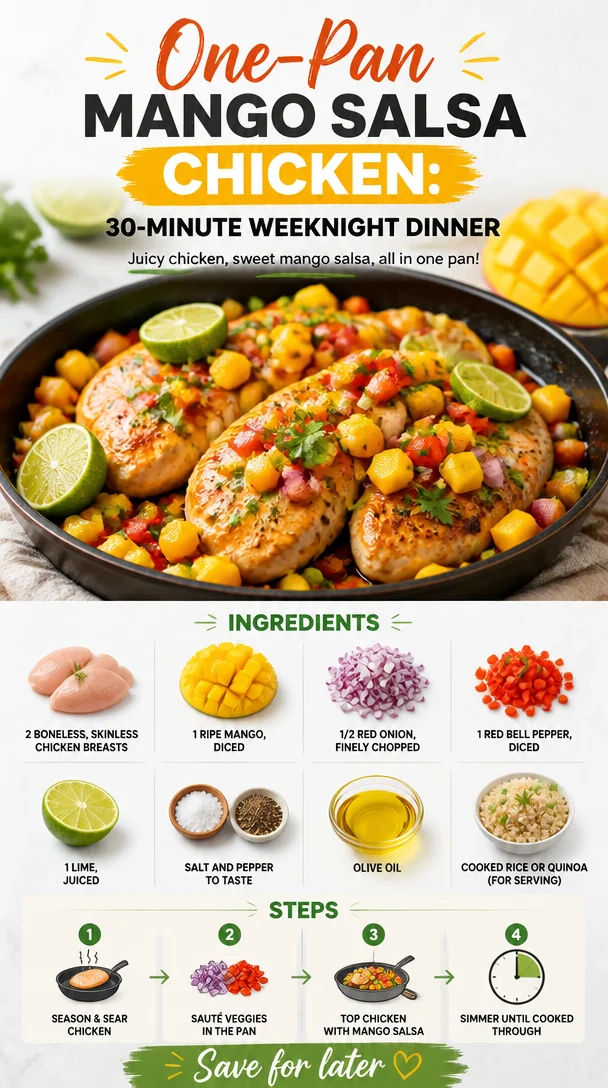
One-Pan Mango Salsa Chicken: 30-Minute Weeknight Dinner
Delightful Chicken with Mango Salsa: A Flavorful and Vibrant Meal
Welcome to Clean Plate Cravings! I’m absolutely thrilled to share a recipe that’s not just a crowd-pleaser but also perfect for those busy weeknights when you want something fresh, wholesome, and utterly delicious. Today, we’ll dive into the colorful world of Chicken with Mango Salsa—a dish that’s as vibrant as summer itself!
Eating well shouldn’t feel like a chore; it should feel exhilarating and nourishing. That’s exactly what this dish embodies. The tender chicken breast pairs beautifully with the juicy, sweet mango salsa that bursts with flavor in every bite. Whether you’re preparing a casual family dinner or impressing friends at a gathering, this recipe meets all of your culinary needs while keeping it light and fun.
Picture this: you’re cooking away in your kitchen, the tantalizing aroma of grilled chicken filling the air. You finish off the dish with a zesty mango salsa that adds that extra zing—how can anyone resist? This is what we’re crafting today! It’s fresh, simple, and seriously delicious—just how I like it. Let’s get started!
A Taste of Nostalgia
One of my fondest memories in the kitchen revolves around summer barbecues at my grandparents’ house. The anticipation of gathering around the grill with family rang in the air, and the vibrant aromas were a feast for the senses. My grandmother would whip up her famous grilled chicken, and the highlight was always her fresh mango salsa. I can still hear her laughter and the sound of sizzling chicken on the grill.
The combination of the tender chicken coated in spices and the sweet, tangy mango salsa would elevate any meal. It wasn’t just the flavor that made it special; it was the moments we shared together around the table, swapping stories and enjoying delicious food. I remember sneaking back to the grill, hoping for another bite.
This recipe channels that warmth and joy, infusing your kitchen with comforting memories of laughter and love. So, grab your knife, put on your apron, and let’s create some delicious magic together!
Ingredients
Here’s what you’ll need to whip up this delightful dish:
-
2 boneless, skinless chicken breasts
- These provide the perfect canvas for our spices. You can substitute with thighs if you like dark meat, which tends to be juicier!
-
1 ripe mango, diced
- Sweet and juicy, mangoes are the star of the show here! If mango is out of season, feel free to swap with diced pineapple or peach for a similar sweetness.
-
1/2 red onion, finely chopped
- It adds a crunchy texture and a mild flavor. If red onion feels too sharp for your palate, yellow or green onions work just as nicely.
-
1 red bell pepper, diced
- Sweet and refreshing, this bell pepper brings a pop of color and extra crunch. Try swapping it with yellow or orange bell peppers for a different flavor profile.
-
1 lime, juiced
- Lime juice brightens everything up; it balances the sweetness of the mango. If lime isn’t available, lemon juice makes a fine substitution.
-
Salt and pepper to taste
- Simple but essential! Seasoning is vital to elevate all the flavors in the dish.
-
Olive oil
- Perfect for sautéing or grilling the chicken. Feel free to use canola or avocado oil if that’s what you have on hand.
-
Cooked rice or quinoa (for serving)
- These grains soak up the delicious juices and make for a hearty side! You could use cauliflower rice for a low-carb option.
Step-by-Step Instructions
Now that we have our ingredients ready, let’s jump into the kitchen and get cooking!
Step 1: Preparing the Chicken
First up, let’s gear the chicken. Pat those chicken breasts dry with a paper towel and season them generously with salt and pepper. If you’re feeling adventurous, sprinkle on a bit of garlic powder or smoked paprika for an extra kick!
Step 2: Cooking the Chicken
Heat a skillet or grill pan over medium-high heat and drizzle it with olive oil. Once hot, place the chicken in the pan. You should hear that satisfying sizzle! Cook for about 6-7 minutes per side, or until the chicken is golden brown and cooked through (the internal temperature should reach 165°F).
Chef’s Tip: Let the chicken rest for a few minutes after cooking. This helps retain all those juicy flavors inside!
Step 3: Whipping Up the Mango Salsa
While the chicken is resting, let’s get to that marvelous salsa. In a mixing bowl, combine the diced mango, finely chopped red onion, and diced red bell pepper. Squeeze the fresh lime juice over the top, adding a pinch of salt and pepper. Toss gently to combine.
Chef’s Tip: For an added kick, throw in some diced jalapeño or a dash of chili powder—spicy salsa anyone?
Step 4: Plating It Up!
Now, to serve! Fluff up some cooked rice or quinoa on the plate as your base. Slice the rested chicken and place it on top. Finish with a generous scoop of that vibrant mango salsa right over the chicken. Voilà! You’re ready to dig in!
Serving Suggestions
For a restaurant-style presentation, consider garnishing with some freshly chopped cilantro or edible flowers. The bright green herbs pop beautifully against the chicken and salsa, making your dish visually stunning!
This Chicken with Mango Salsa is perfect for packing into lunch boxes or serving at a summer picnic—trust me, everyone will be asking for the recipe!
Recipe Variations
- Tropical Twist: Add diced avocado to the salsa for a creamier texture.
- Grilled Version: Grill the chicken outside for a smoky flavor and an enhanced char.
- Herbaceous Delight: Swap out lime juice for orange juice in the salsa for a sweeter flavor profile.
- Spicy Option: Incorporate some chopped cilantro and a touch of jalapeño in your salsa if you love a bit of heat.
- Meal Prep: Double the recipe and meal prep for the week—this dish tastes great cold on salads too!
Chef’s Notes
I’ve been whipping up variations of this dish for years, and I always love how it brings friends and family together. One time, I even made a version with grilled shrimp instead of chicken—talk about a crowd-pleaser! The salsa is super versatile, and I’ve even tossed it onto fish tacos; the freshness simply cannot be beat.
Cooking is about experimentation, and I encourage you to try out different fruits in the salsa or different methods of cooking the chicken. Who knows what delightful combination you might discover!
FAQs and Troubleshooting
Q: How can I make sure my chicken stays juicy?
A: Be sure not to overcook the chicken. Using a meat thermometer is a great way to check for doneness without guessing!
Q: Can I make the mango salsa ahead of time?
A: Yes! Just keep in mind that the mango may soften a bit over time. If you’re making it a few hours in advance, consider leaving out the red onion until you’re ready to serve for that crisp bite!
Q: What if my mango isn’t ripe?
A: A slightly underripe mango can still work; just add a pinch of sugar to balance out the tartness.
Q: Can I freeze leftovers?
A: I’d recommend freezing the chicken separately from the salsa, as the salsa doesn’t freeze well. The chicken will keep well in an airtight container for up to 3 months.
Nutritional Info
While this recipe is packed with wholesome ingredients, here’s a quick breakdown:
- Calories: Approximately 390 per serving
- Protein: 30g
- Carbohydrates: 30g
- Fat: 15g
- Fiber: 4g
This dish is not only a feast for your taste buds but also a nourishing option that fits perfectly into a balanced diet.
I hope you all love making this Chicken with Mango Salsa as much as I do! It’s a reminder of the joyous moments in the kitchen and the shared love for delicious food. So gather your loved ones, share a meal, and let laughter fill the air! Happy cooking, friends!
PrintChicken with Mango Salsa
A vibrant and flavorful dish featuring tender chicken breast paired with a refreshing mango salsa that bursts with sweetness.
- Prep Time: 15 minutes
- Cook Time: 20 minutes
- Total Time: 35 minutes
- Yield: 4 servings 1x
- Category: Main Course
- Method: Grilling
- Cuisine: American
- Diet: Gluten-Free
Ingredients
- 2 boneless, skinless chicken breasts
- 1 ripe mango, diced
- 1/2 red onion, finely chopped
- 1 red bell pepper, diced
- 1 lime, juiced
- Salt and pepper to taste
- Olive oil
- Cooked rice or quinoa (for serving)
Instructions
- Pat the chicken breasts dry with a paper towel and season generously with salt and pepper.
- Heat a skillet or grill pan over medium-high heat and drizzle with olive oil. Once hot, place the chicken in the pan and cook for about 6-7 minutes per side, until golden brown and cooked through.
- Combine the diced mango, finely chopped red onion, and diced red bell pepper in a mixing bowl. Squeeze lime juice over the top, adding a pinch of salt and pepper.
- Fluff up some cooked rice or quinoa on the plate, slice the rested chicken, and top with the vibrant mango salsa.
Notes
Add diced avocado to the salsa for creaminess or grill the chicken for a smoky flavor. Don’t overcook the chicken to maintain juiciness.
Nutrition
- Serving Size: 1 serving
- Calories: 390
- Sugar: 15g
- Sodium: 300mg
- Fat: 15g
- Saturated Fat: 2g
- Unsaturated Fat: 10g
- Trans Fat: 0g
- Carbohydrates: 30g
- Fiber: 4g
- Protein: 30g
- Cholesterol: 70mg
Keywords: chicken, mango salsa, summer recipe, healthy meal, grilling