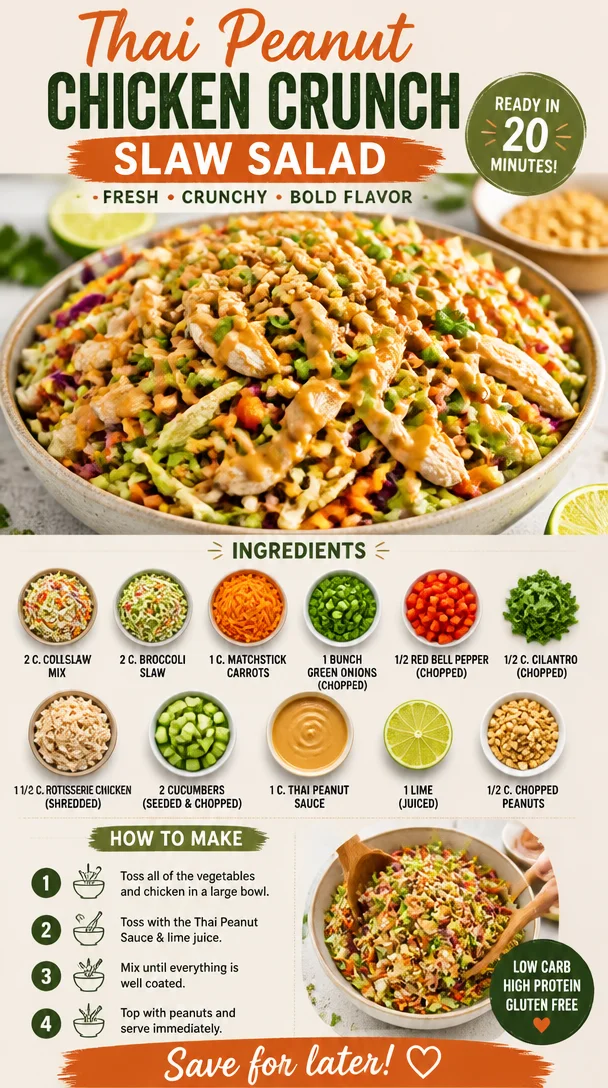
Thai Peanut Chicken Crunch Slaw Salad
Thai Peanut Chicken Crunch Slaw Salad: A Fresh and Flavorful Feast
Introduction
Hey there, food lovers! Today, we’re diving into a dish that’s as colorful as it is delicious: Thai Peanut Chicken Crunch Slaw Salad. If you’re like me and believe that salads should be exciting and satisfying, then you’re in for a treat. This salad is a vibrant festival of flavors and textures, guaranteed to tickle your taste buds while leaving you feeling fresh and energized.
Now, let’s be real: how many times have you been stuck at a boring old salad bar, feeling uninspired by limp greens and a drizzle of bland dressing? Blech! That’s not how we do things around here. Cooking should be fun, and salads should be more than just rabbit food. That’s where my Thai Peanut Chicken Crunch Slaw Salad comes in: it’s crunchy, creamy, tangy, and oh-so-delicious!
Imagine this: fresh, crisp veggies mingled with tender, juicy chicken all coated in a luscious peanut sauce that’s bursting with flavor. Plus, it’s super easy to whip up, so you can enjoy it on busy nights or impress that special someone at your next dinner party. Let’s unpack the magic of this salad and create something extraordinary together!
Personal Story
Let me take you down memory lane for a moment. Growing up, my family and I would visit a little Thai restaurant that was tucked away in our neighborhood. It was one of those hidden gems where the flavors were as vibrant as the decor. I still remember the aroma that greeted us as we stepped inside, a delightful blend of spices that felt like a warm hug.
One summer evening, I decided to test my culinary skills by trying to recreate one of their most popular dishes: a spicy peanut chicken salad. I had no idea what I was doing, but the whole process felt like an adventure! I chopped away at those veggies like a pro (or at least I thought so) and mixed my ingredients with abandon, all the while imagining the smiles on my family’s faces when they tasted it.
The end result was deliciously satisfying—a chaotic, colorful bowl of goodness that elicited happy sighs all around. It quickly became a family favorite, and soon enough, I was experimenting with even more vibrant ingredients and flavors. It was that evening that sparked my passion for bringing fresh, fun recipes to the world. Fast forward to today, and now I’m excited to share one of my all-time favorites with you: the Thai Peanut Chicken Crunch Slaw Salad!
Ingredients
Here’s what you’ll need to create this mouthwatering dish:
-
2 cups coleslaw mix: A crunchy base that adds great texture. You can substitute with shredded cabbage if you’re in a pinch!
-
2 cups broccoli slaw: Packed with nutrients and a bit more crunch. If you can’t find this, a julienned carrot or bell pepper works well too.
-
1 cup matchstick carrots: For added color and sweetness. Shredded carrots can be used as a quick substitute.
-
1 bunch green onions (chopped): Adds a fresh, mild onion flavor. Feel free to swap for shallots if you like a bolder bite.
-
1/2 red bell pepper (chopped): Sweet and crunchy. Any color bell pepper can work here—get creative!
-
1/2 cup cilantro (chopped): Freshness overload! If cilantro isn’t your thing, fresh parsley or mint could also be delightful.
-
1 1/2 cups rotisserie chicken (shredded): Perfect for saving time and adding flavor. You can also use grilled chicken for a smoky touch.
-
2 cucumbers (seeded & chopped): Refreshing and hydrating! You can replace them with zucchini for a fun twist.
-
1 cup Thai peanut sauce: The star of the show! If you’re up for it, making your own sauce is a cinch, and I can share a quick recipe if you’d like!
-
1 lime (juiced): Brightens everything up! Lemon adds a similar zing if you don’t have lime on hand.
-
1/2 cup chopped peanuts: For that satisfying crunch. Feel free to substitute with sunflower seeds or almonds if you want to mix it up.
Step-by-Step Instructions
Let’s get cooking! Follow these easy steps to make your Thai Peanut Chicken Crunch Slaw Salad.
-
Prepare the Veggies: Start by rinsing and chopping all your veggies. Get them looking as vibrant as possible—your salad should be a feast for the eyes! Take a moment to admire that rainbow of colors in your bowl. Pro tip: a sharp knife will make chopping a breeze and keep all those beautiful colors intact.
-
Shred the Chicken: If you’re using a rotisserie chicken, shred it into bite-sized pieces. It should be tender and juicy, ready to mingle with those veggies. If you want to add an extra layer of flavor, toss the chicken in a bit of the peanut sauce before adding it to the salad. Trust me, this little hack elevates the dish!
-
Mixing it Up: In a large mixing bowl, combine the coleslaw mix, broccoli slaw, matchstick carrots, green onions, red bell pepper, cilantro, cucumbers, and chicken. Gently toss everything together, ensuring a lovely blend of colors and textures. Don’t worry if it looks a little chaotic; that’s the beauty of a good slaw!
-
Drizzle the Dressing: Time to add the star—a generous drizzle of that creamy Thai peanut sauce! Now, this is where you can really customize it to your taste; start with about 3/4 of a cup and add more if you like it extra saucy. Toss again until everything is nicely coated.
-
The Citrus Kick: Squeeze the lime juice over the salad and toss once more. The lime adds a zing that cuts through the richness of the peanut sauce, taking your salad to the next level.
-
Nuts About It: Finish off with the chopped peanuts. You can either sprinkle them on top for a beautiful presentation or mix them right in for an all-around crunch.
Serving Suggestions
Time to dig in! Serve your Thai Peanut Chicken Crunch Slaw Salad in a large bowl for a family-style meal or plate it individually for a more elegant touch. Dress it up with additional peanuts or cilantro on top for that extra pop. This salad thrives as a light lunch or a delightful side dish at dinner—and it pairs beautifully with grilled shrimp or fish!
Recipe Variations
Feeling adventurous? Here are some fun twists on this recipe to keep things interesting:
-
Spicy Kick: Add sliced jalapeños or a dash of sriracha to the peanut sauce for a spicy kick that will wake up your taste buds!
-
Protein Packed: Swap out the chicken for cooked tofu or chickpeas if you want to make a vegetarian or vegan version.
-
Sweet Surprise: Toss in some diced mango or pineapple for a touch of sweetness that pairs wonderfully with the savory peanut sauce.
-
Herb Swap: Experiment with different herbs. Mint, basil, or even dill can add a completely different flavor profile to your salad.
-
Grain Add-In: For extra heartiness, serve your salad on a bed of quinoa or add cooked rice noodles for a filling, complete meal.
Chef’s Notes
Over the years, this salad has become a staple in my kitchen! I love how versatile it is—you can honestly throw in whatever you have in the fridge! There was one time I decided to clean out my pantry and found some neglected bell peppers and a bit of cabbage. I tossed it all together, and that version ended up being a huge hit among my friends at a potluck!
And let’s be honest, the fun of cooking is trying new things, right? So don’t shy away from experimenting. Who knows what delicious combinations you’ll come up with?
FAQs and Troubleshooting
Q: Can I prepare this salad in advance?
A: Absolutely! You can pre-cut the veggies and store them in the fridge. However, I’d recommend waiting to dress the salad until just before serving to keep everything crunchy.
Q: How do I store leftovers?
A: Store any leftovers in an airtight container in the fridge for up to 2-3 days. The peanuts may lose some crunch, but the flavors will still be fantastic!
Q: What if I can’t find rotisserie chicken?
A: No worries! You can easily cook and shred your own chicken at home, or use any leftover protein you have on hand.
Q: Can I use bottled peanut sauce?
A: Sure thing! Just choose a good-quality peanut sauce that you love. You’ll enjoy a shortcut without sacrificing flavor.
Nutritional Info
This Thai Peanut Chicken Crunch Slaw Salad is not only delicious but also packed with nutrients:
- Calories: Approximately 400 per serving (depending on portion sizes and dressing usage)
- Protein: A good source of protein from the chicken and peanuts
- Fiber: The veggies provide a nice boost of fiber, keeping you full and satisfied
- Vitamins: Rich in vitamins A, C, and K from all the fresh produce
So, there you have it! A fresh, flavorful Thai Peanut Chicken Crunch Slaw Salad that’s bursting with color and nutrition. No matter the occasion, I hope you give this recipe a try and make it your own! Remember, good food should be fun—so grab your whisk, put on your favorite tunes, and let’s cook up some love! Happy eating!
PrintThai Peanut Chicken Crunch Slaw Salad
A vibrant and flavorful salad featuring crunchy veggies and juicy chicken, all coated in a luscious peanut sauce.
- Prep Time: 15 minutes
- Cook Time: 15 minutes
- Total Time: 30 minutes
- Yield: 4 servings 1x
- Category: Salad
- Method: Mixing
- Cuisine: Thai
- Diet: Gluten-Free
Ingredients
- 2 cups coleslaw mix
- 2 cups broccoli slaw
- 1 cup matchstick carrots
- 1 bunch green onions (chopped)
- 1/2 red bell pepper (chopped)
- 1/2 cup cilantro (chopped)
- 1 1/2 cups rotisserie chicken (shredded)
- 2 cucumbers (seeded & chopped)
- 1 cup Thai peanut sauce
- 1 lime (juiced)
- 1/2 cup chopped peanuts
Instructions
- Prepare the Veggies: Start by rinsing and chopping all your veggies.
- Shred the Chicken: If you’re using a rotisserie chicken, shred it into bite-sized pieces.
- Mixing it Up: In a large mixing bowl, combine the coleslaw mix, broccoli slaw, matchstick carrots, green onions, red bell pepper, cilantro, cucumbers, and chicken.
- Drizzle the Dressing: Add the creamy Thai peanut sauce and toss to coat.
- The Citrus Kick: Squeeze lime juice over the salad and toss.
- Nuts About It: Finish off with chopped peanuts sprinkled on top.
Notes
This salad is versatile; feel free to add other vegetables or proteins based on your preference.
Nutrition
- Serving Size: 1 serving
- Calories: 400
- Sugar: 6g
- Sodium: 500mg
- Fat: 20g
- Saturated Fat: 3g
- Unsaturated Fat: 15g
- Trans Fat: 0g
- Carbohydrates: 30g
- Fiber: 5g
- Protein: 25g
- Cholesterol: 60mg
Keywords: salad, Thai, chicken salad, healthy, quick recipe, peanut sauce
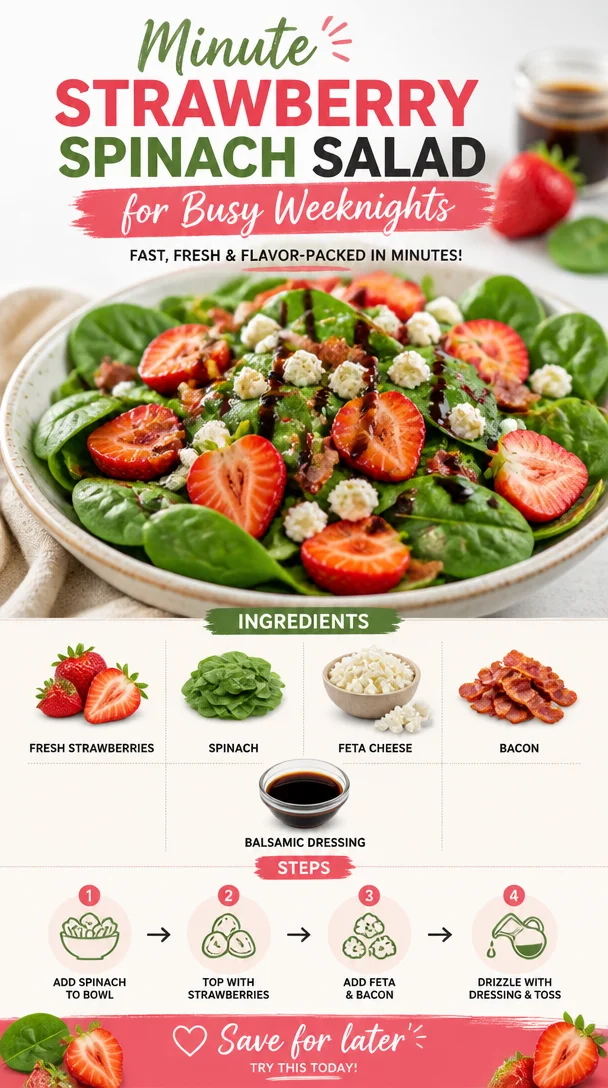
Minute Strawberry Spinach Salad for Busy Weeknights
Fresh, Irresistible Strawberry Spinach Salad: A Love Letter to Summer Flavors
Welcome to another culinary adventure with Clean Plate Cravings! Today, I’m excited to share a dish that epitomizes freshness and vibrance: the Strawberry Spinach Salad. This isn’t just any salad; it’s a symphony of flavors bursting with the goodness of ripe strawberries, crisp spinach, tangy feta cheese, crunchy bacon, and a luscious balsamic dressing. If you’re looking for a feel-good meal that sparks joy and nourishes your body, you’ve clicked on the right recipe!
But first, let’s talk about salads. They often get a bad rap for being boring or lacking personality, don’t you think? I mean, salads shouldn’t have to be mundane; they can be exciting, soon-to-be favorites that dance on your taste buds. When I think of summer, I think of long, lazy days, sunshine, and fresh produce that practically calls my name at the market. That’s how this beautiful Strawberry Spinach Salad came to life—a celebration of seasonal flavors that’ll keep you coming back for more.
Picture this: it’s a sunny afternoon, and the world outside is a cheerful tapestry of blooming flowers and buzzing bees. As I stroll through the farmers’ market, there’s something magical about being surrounded by vibrant colors and intoxicating aromas. The strawberries? They’re plump, juicy, and gleaming red, begging to be picked. The spinach? Dark green and crisp, ready to provide the perfect backdrop for this delightful salad. It was one of those moments that reminded me of childhood summers spent in my grandma’s garden, where the best meals came straight from the earth.
This salad combines the sweetness of strawberries, the earthiness of spinach, the creaminess of feta, and the savory crunch of bacon. Toss in a drizzle of balsamic dressing, and you’ve got a winning dish that’s as lovely to look at as it is delicious to eat. Whether you’re serving it alongside grilled chicken for dinner or enjoying it as a light lunch, this Strawberry Spinach Salad is sure to become a new staple in your culinary repertoire.
So, grab your apron and let’s dive into this refreshing recipe that’s perfect for brunch, picnics, or simply treating yourself to something delightful!
A Culinary Memory: Summer Orchard Pickings
Growing up, summers meant plenty of time spent outdoors, but nothing was more exhilarating than picking strawberries with my family. Imagine a warm day, the sun shining vibrant rays, and rows of strawberry plants stretching as far as the eye can see. With every ripe berry I plucked, there was a perfect fracture of sweetness, accompanied by a satisfying crunch. After our baskets were full, my mom would whip up her famous strawberry salad—her signature dish served at every family gathering.
The flavors of the salad remind me of those sunny afternoons spent with my family—the laughter, the sibling rivalries over who could pick the biggest berries, and the inevitable food fight that ensued when we got back home. We’d sit around the table, enjoying our colorful salad while sharing stories and building memories. Those moments of connection and joy are what I cherish most, and I hope that this Strawberry Spinach Salad brings a little bit of that magic into your kitchen too!
Ingredients
Here’s what you’ll need to create this vibrant Strawberry Spinach Salad:
-
Fresh Strawberries
- The star of the show! Look for strawberries that are bright red and fragrant. If fresh strawberries are unavailable, feel free to use frozen ones, but let them thaw first for the best flavor.
-
Spinach
- Baby spinach is my go-to, as it’s tender and mild. If spinach isn’t your thing, you can swap it for arugula or mixed greens for a peppery twist.
-
Feta Cheese
- Feta brings a wonderful creaminess and tang. You can substitute feta with goat cheese for a different flavor profile, or use a dairy-free feta if you’re keeping dairy out of your diet.
-
Bacon
- The crispy element that adds depth! For a healthier take, feel free to use turkey bacon or even leave it out entirely for a vegetarian version. Crunchy chickpeas make a great alternative if you’re looking for plant-based protein!
-
Balsamic Dressing
- A homemade balsamic dressing (combine balsamic vinegar, olive oil, honey, and a pinch of salt) elevates the salad. Store-bought dressings work in a pinch too; just make sure they’re high-quality for the best flavor.
Step-by-Step Instructions
-
Prepare the Ingredients
Start by washing the spinach thoroughly under cold water to remove any dirt or grit. Pat it dry with a paper towel or salad spinner. Fresh and clean spinach is key to a refreshing salad. While you’re at it, rinse the strawberries, hull them, and slice them into quarters or halves depending on their size. -
Cook the Bacon
In a skillet over medium heat, cook the bacon until it’s crispy. This usually takes about 6-8 minutes. Keep an eye on it to prevent burning! Once cooked, transfer the bacon to a plate lined with paper towels to absorb excess grease. Once cooled, crumble it into bite-sized pieces. Not only does bacon amp up the flavor, but the crunch is essential too! -
Make the Dressing
While the bacon is cooking, let’s whip up that balsamic dressing! In a small bowl, whisk together 3 tablespoons of balsamic vinegar, 1 tablespoon of honey (or maple syrup for a vegan option), and 3 tablespoons of extra virgin olive oil. Season with salt and pepper. Adjust the sweetness or acidity to your taste—remember, you’re the chef! -
Mix the Salad
In a large bowl, combine the fresh spinach and sliced strawberries. Sprinkle in the crumbled feta cheese and bacon. Drizzle the homemade dressing over the salad and toss gently using tongs or your hands (my favorite method for ensuring an even distribution). Pro tip: don’t dress the salad too far in advance—a fresh salad is always best! -
Serve the Salad
Transfer the tossed salad to a serving platter or individual bowls. For extra flair, consider garnishing with a few whole strawberries or additional feta crumbles. If you’re feeling fancy, sprinkle some nuts on top for a delightful crunch!
Serving Suggestions
This Strawberry Spinach Salad shines when plated beautifully. You can serve it as a side dish alongside grilled chicken or fish, or enjoy it as a vibrant main course. To elevate your presentation, consider using a mix of textured serving plates or bowls—the contrast will make your dish pop visually! Don’t forget to add some fresh mint leaves on top for a refreshing aroma.
Recipe Variations
Here are a few variations you can try to keep things exciting:
- Berry Medley: Incorporate other berries like blueberries or raspberries for a mixed berry salad.
- Avocado Boost: Add sliced avocados for a creamy texture and healthy fats.
- Citrus Twist: Toss in some orange segments for a sweet acidity that pairs perfectly with the strawberries.
- Nuts or Seeds: Include a handful of walnuts, pecans, or sunflower seeds for extra crunch and nutrition.
- Herbed Dressing: Try adding fresh herbs, such as basil or mint, to the dressing for an aromatic lift.
Chef’s Notes
This Strawberry Spinach Salad has been a staple in my home and evolves with the seasons. When strawberries are out of season, I switch things up. In the fall, I replace strawberries with apples or pears, and in the winter, I’ll toss in some roasted butternut squash. Each variation has its own charm, but the essence of enjoying fresh produce remains the same. Creating this salad has become an annual tradition in my household, and I love how it sparks conversations and memories just like in my childhood.
FAQs and Troubleshooting
Q: Can I make this salad ahead of time?
A: While the salad can be prepped ahead, I recommend waiting to dress it until just before serving. This will keep the spinach fresh and crispy.
Q: What should I do if my bacon is too greasy?
A: If your bacon has rendered too much grease, simply drain it on a paper towel. This will help soak up any excess fat, leaving you with crispy bites.
Q: How do I store leftover salad?
A: Store any leftovers in an airtight container in the refrigerator for up to a day. However, be aware that the spinach might wilt. For best results, keep the dressing separate and add it right before eating.
Q: Can this salad be made vegan?
A: Absolutely! Omit the bacon and feta, and substitute with avocado and chickpeas for protein. Use a plant-based dressing or a simple olive oil and vinegar blend instead.
Nutritional Info (Optional)
While I believe in enjoying food without any guilt, it’s good to know how nutritious this Strawberry Spinach Salad can be. One serving (without added bacon) provides about 150 calories, 9g of fat, 10g of carbs, and 4g of protein, depending on the portion sizes and specific ingredients used. It’s packed with vitamins A and C, fiber, and antioxidants—perfect for keeping you energized and healthy!
So there you have it—a fresh, delightful Strawberry Spinach Salad that not only satisfies your taste buds but also brings a sprinkle of nostalgia to the table. I hope this recipe inspires you to explore the vibrant flavors of summer and create some fabulous kitchen memories of your own. Happy cooking, my friends!
PrintStrawberry Spinach Salad

A vibrant salad combining fresh strawberries, crisp spinach, tangy feta, crunchy bacon, and a luscious balsamic dressing.
- Prep Time: 15 minutes
- Cook Time: 8 minutes
- Total Time: 23 minutes
- Yield: 4 servings 1x
- Category: Salad
- Method: Mixing
- Cuisine: American
- Diet: Vegetarian
Ingredients
- 2 cups fresh strawberries, hulled and sliced
- 4 cups baby spinach, cleaned
- 1/2 cup feta cheese, crumbled
- 4 slices bacon, cooked and crumbled
- 3 tablespoons balsamic vinegar
- 3 tablespoons extra virgin olive oil
- 1 tablespoon honey (or maple syrup)
- Salt and pepper to taste
Instructions
- Prepare the ingredients: Wash the spinach and strawberries, and slice the strawberries.
- Cook the bacon in a skillet over medium heat until crispy, about 6-8 minutes.
- Make the dressing by whisking together balsamic vinegar, honey, olive oil, salt, and pepper.
- Mix the salad: Combine spinach, strawberries, feta, and bacon in a large bowl. Drizzle dressing and toss gently.
- Serve the salad on a platter or in bowls, garnishing with whole strawberries or nuts if desired.
Notes
For a vegan option, omit bacon and feta, and use chickpeas for protein. Dress the salad just before serving to keep it fresh.
Nutrition
- Serving Size: 1 serving
- Calories: 150
- Sugar: 5g
- Sodium: 400mg
- Fat: 9g
- Saturated Fat: 2g
- Unsaturated Fat: 4g
- Trans Fat: 0g
- Carbohydrates: 10g
- Fiber: 4g
- Protein: 4g
- Cholesterol: 15mg
Keywords: salad, strawberry salad, spinach salad, summer salad, healthy recipes
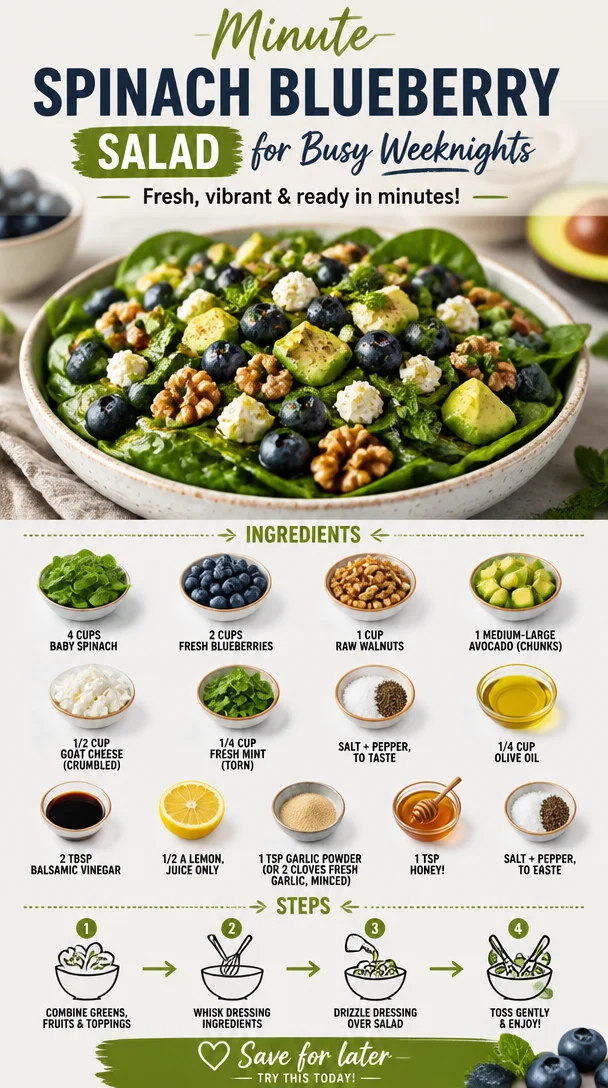
Minute Spinach Blueberry Salad for Busy Weeknights
20-Minute Spinach Blueberry Salad: A Fresh Take on a Classic Delight
Hey there, food lovers! Welcome to my kitchen, where the aromas are mouthwatering, the colors are vibrant, and the stories are just as delicious as the dishes we whip up. Today, we’re diving into the wonderful world of salads, specifically my quick and fabulous Spinach Blueberry Salad. It’s that delightful blend of sweet and savory, and trust me when I say it’s bursting with flavor!
Picture this: You’ve had a long day, and you’re craving something fresh and vibrant that won’t take ages to prepare. Enter this salad! With just 20 minutes of your time, you’ll create a dish that not only tastes like sunshine but also nourishes your body. The combination of baby spinach, juicy blueberries, creamy avocado, and crunchy walnuts makes this salad a feast for your taste buds—and don’t even get me started on the dressing! It’s a heavenly concoction of olive oil, balsamic vinegar, and a hint of garlic that pulls everything together beautifully.
Salads often get a bad rap, right? People think they’re bland or boring, but I’m here to change that perception. This Spinach Blueberry Salad will have you doing a happy dance in the kitchen! Plus, it’s easily customizable, meaning you can tweak it based on what you have on hand. Whether you’re having it as a light lunch, a side dish at dinner, or prepping for meal prep for the week, this salad is super versatile. So grab your apron and let’s get cooking!
Personal Story
I’ll never forget the first time I whipped up a blueberry salad. It was a sunny afternoon at my grandmother’s house—she had a garden brimming with fresh produce, and blueberries were in peak season. I remember her handing me a basket and sending me into the garden to gather the ripest fruit. The excitement of plucking those plump, sweet berries off the bush had me feeling like a treasure hunter.
Later, we tossed them with some spinach from her garden and a simple dressing she taught me. The first bite was like the sun bursting through the clouds. The sweetness of the blueberries perfectly contrasted the earthiness of the spinach. It became our little tradition to make that salad together every summer, sharing stories about our days while enjoying the simple yet unforgettable flavors. This recipe takes me back to that joyful time, reminding me of the importance of fresh ingredients and good company.
Ingredients
Here’s what you’ll need for this vibrant spinach blueberry salad:
-
4 cups baby spinach: Fresh, tender, and just the right base for our salad. Baby spinach is packed with nutrients and has a mild flavor. If you can’t find baby spinach, regular spinach works, too—just be sure to chop it into smaller pieces.
-
2 cups fresh blueberries: Sweet and juicy, these little gems bring a burst of flavor. Blueberries are also packed with antioxidants! Don’t have fresh? Frozen blueberries can work in a pinch; just be sure to thaw and drain them first.
-
1 cup raw walnuts: They add a delightful crunch and a dose of healthy fats. If walnuts aren’t your favorite, try pecans or almonds instead. Toast them lightly in a pan for extra flavor!
-
1 medium-large avocado: Creamy and nourishing, avocado brings richness to this salad. You can substitute with diced cucumber if you want a lighter crunch.
-
1/2 cup goat cheese: Adding a tangy note to the salad, goat cheese takes it to the next level! If you’re not a fan, feta can work beautifully, or you can skip the cheese for a dairy-free option.
-
1/4 cup fresh mint: Slightly sweet and refreshing, mint adds a delightful twist. Feel free to switch it up with basil or even parsley if you prefer.
-
Salt + pepper, to taste: Always a must for seasoning!
For the Dressing:
-
1/4 cup olive oil: A staple in any kitchen. It provides a rich base. If you need a lighter option, avocado oil is a great substitute.
-
2 Tbsp balsamic vinegar: Adds depth and sweetness to the dressing. Apple cider vinegar can be a delicious alternative if that’s what you have on hand.
-
1/2 a lemon, juice only: A splash of acidity brightens everything up. Lime juice works, too, if you’re feeling adventurous.
-
1 tsp garlic powder: A hint of garlic elevates the flavor. If you prefer fresh, minced garlic is fabulous—just use about 2 cloves.
-
1 tsp honey: A touch of sweetness to balance out the acidity and bitterness. Agave syrup can be used for a vegan alternative.
-
Salt + pepper, to taste: Always essential for bringing flavors together!
Step-by-Step Instructions
Now, let’s get our hands a little dirty and bring this beautiful salad to life! The steps are simple and quick, so follow along:
-
Prep Your Ingredients: First things first, wash and dry your baby spinach and blueberries. Dry spinach helps the dressing stick, and we want all that tasty goodness in every bite.
-
Chop and Slice: Next, it’s time to dice your avocado and crumble your goat cheese. To easily cut an avocado, slice it in half, remove the pit, and use a spoon to scoop out chunks—or you can slice it while it’s still in the skin and then scoop it out!
-
Toast the Walnuts (Optional): If you like extra flavor, this is the perfect time to toast your walnuts! Place them in a dry skillet over medium heat, tossing frequently for about 3–5 minutes until they’re golden and fragrant. Watch closely; they can burn quickly!
-
Make the Dressing: In a small bowl or a jar with a lid, whisk together the olive oil, balsamic vinegar, lemon juice, garlic powder, honey, salt, and pepper. If you’re using jar, just shake it until everything is combined. Easy peasy!
-
Assemble the Salad: In a large bowl, add the baby spinach, followed by the blueberries, walnuts, avocado, and goat cheese. Drizzle about half of the dressing over the salad so it’s not swimming, and give it a gentle toss to combine—be careful not to mash the avocado!
-
Adjust and Serve: Taste your salad. If it needs more salt, pepper, or dressing, now’s the time to adjust. Once you’re happy, it’s ready to serve!
-
Garnish with Fresh Mint: Sprinkle the torn mint leaves right before serving for a fresh burst of flavor.
And voilà, you’ve got yourself a gorgeous Spinach Blueberry Salad that’s ready to impress!
Serving Suggestions
To serve this dish beautifully, plate it in a large bowl to showcase the colorful ingredients or portion it into smaller bowls for individual servings. Drizzle a little extra dressing over the top and garnish with a few additional blueberries and mint leaves. This salad is fantastic on its own, but you can pair it with grilled chicken or shrimp for a heartier meal, or enjoy it as a side dish alongside your favorite protein.
Recipe Variations
Feeling adventurous? Here are some fun variations to shake things up!
-
Add Protein: Toss in grilled chicken, shrimp, or chickpeas for a protein boost. This makes it a more filling option!
-
Swap the Cheese: If you’re looking for different flavors, try crumbled feta or even sliced strawberries for a sweet twist.
-
Change the Nuts: Use pumpkin seeds instead if you have a nut allergy or want a different crunch.
-
Go Tropical: Add in diced mango or papaya for a vibrant fruit salad twist!
-
Vegan Version: Skip the cheese and swap honey with maple syrup for a completely plant-based dish.
Chef’s Notes
This salad is close to my heart, but it’s also a blank canvas! I love that I can swap in whatever ingredients I have on hand, often leading to delicious surprises. One time, I ended up tossing in leftover grilled chicken from dinner, and it transformed the salad into a satisfying meal.
An embarrassing kitchen moment? Let’s just say I mistook garlic powder for cinnamon once—yikes! But that mistake taught me always to double-check my spices, and the learning continues every day in the kitchen!
FAQs and Troubleshooting
-
Can I make this salad ahead of time?
While the salad is best fresh, you can prep the ingredients in advance. Keep the dressing separate until you’re ready to serve to prevent the spinach from wilting. -
What if I don’t like blueberries?
No worries! You can substitute with any seasonal fruit such as strawberries, raspberries, or even sliced apples. -
What should I do if the salad feels too bland?
Always taste as you go! You can add more dressing, a sprinkle of lemon juice, or more seasoning. A pinch of sea salt can elevate everything! -
How do I store leftovers?
Store any leftover salad in an airtight container for up to 2 days, but be aware that the spinach will wilt. If possible, keep the dressing separate until serving.
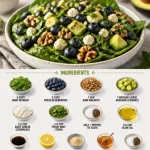
Nutritional Info
This Spinach Blueberry Salad not only packs a punch of flavor but is also nutrient-dense. A rough estimate for one serving includes:
- Calories: ~280
- Protein: ~6g
- Fat: ~20g (mostly from healthy sources)
- Carbohydrates: ~24g
It’s a delightful dish that provides a well-rounded meal or side full of vitamins and minerals!
Let’s wrap it up here, friends—this Spinach Blueberry Salad is all about fresh ingredients coming together to create a beautiful dish that can brighten any meal. So gather your ingredients, roll up your sleeves, and let’s get cooking! Enjoy the flavors, and remember to share your creations! Happy eating!
Print20-Minute Spinach Blueberry Salad
A fresh and vibrant salad combining baby spinach, juicy blueberries, creamy avocado, and crunchy walnuts, drizzled with a delicious homemade dressing.
- Prep Time: 10 minutes
- Cook Time: 10 minutes
- Total Time: 20 minutes
- Yield: 4 servings 1x
- Category: Salad
- Method: No cooking required
- Cuisine: American
- Diet: Vegetarian
Ingredients
- 4 cups baby spinach
- 2 cups fresh blueberries
- 1 cup raw walnuts
- 1 medium-large avocado
- 1/2 cup goat cheese
- 1/4 cup fresh mint
- Salt and pepper, to taste
- 1/4 cup olive oil
- 2 Tbsp balsamic vinegar
- 1/2 a lemon, juice only
- 1 tsp garlic powder
- 1 tsp honey
- Salt and pepper, to taste
Instructions
- Prep your ingredients: Wash and dry spinach and blueberries.
- Chop and slice the avocado and crumble the goat cheese.
- Toast the walnuts in a dry skillet over medium heat for 3–5 minutes (optional).
- Make the dressing by whisking together olive oil, balsamic vinegar, lemon juice, garlic powder, honey, salt, and pepper.
- Assemble the salad in a large bowl and drizzle with half the dressing.
- Adjust the seasoning with more salt, pepper, or dressing to taste.
- Garnish with torn mint leaves before serving.
Notes
This salad is quick to prepare and can be customized with various proteins or fruits.
Nutrition
- Serving Size: 1 serving
- Calories: 280
- Sugar: 10g
- Sodium: 200mg
- Fat: 20g
- Saturated Fat: 3g
- Unsaturated Fat: 17g
- Trans Fat: 0g
- Carbohydrates: 24g
- Fiber: 4g
- Protein: 6g
- Cholesterol: 10mg
Keywords: salad, spinach, blueberry, healthy, quick, fresh, vegetarian
Min High-Protein Cheeseburger Bowls for Low-Carb Meal Prep
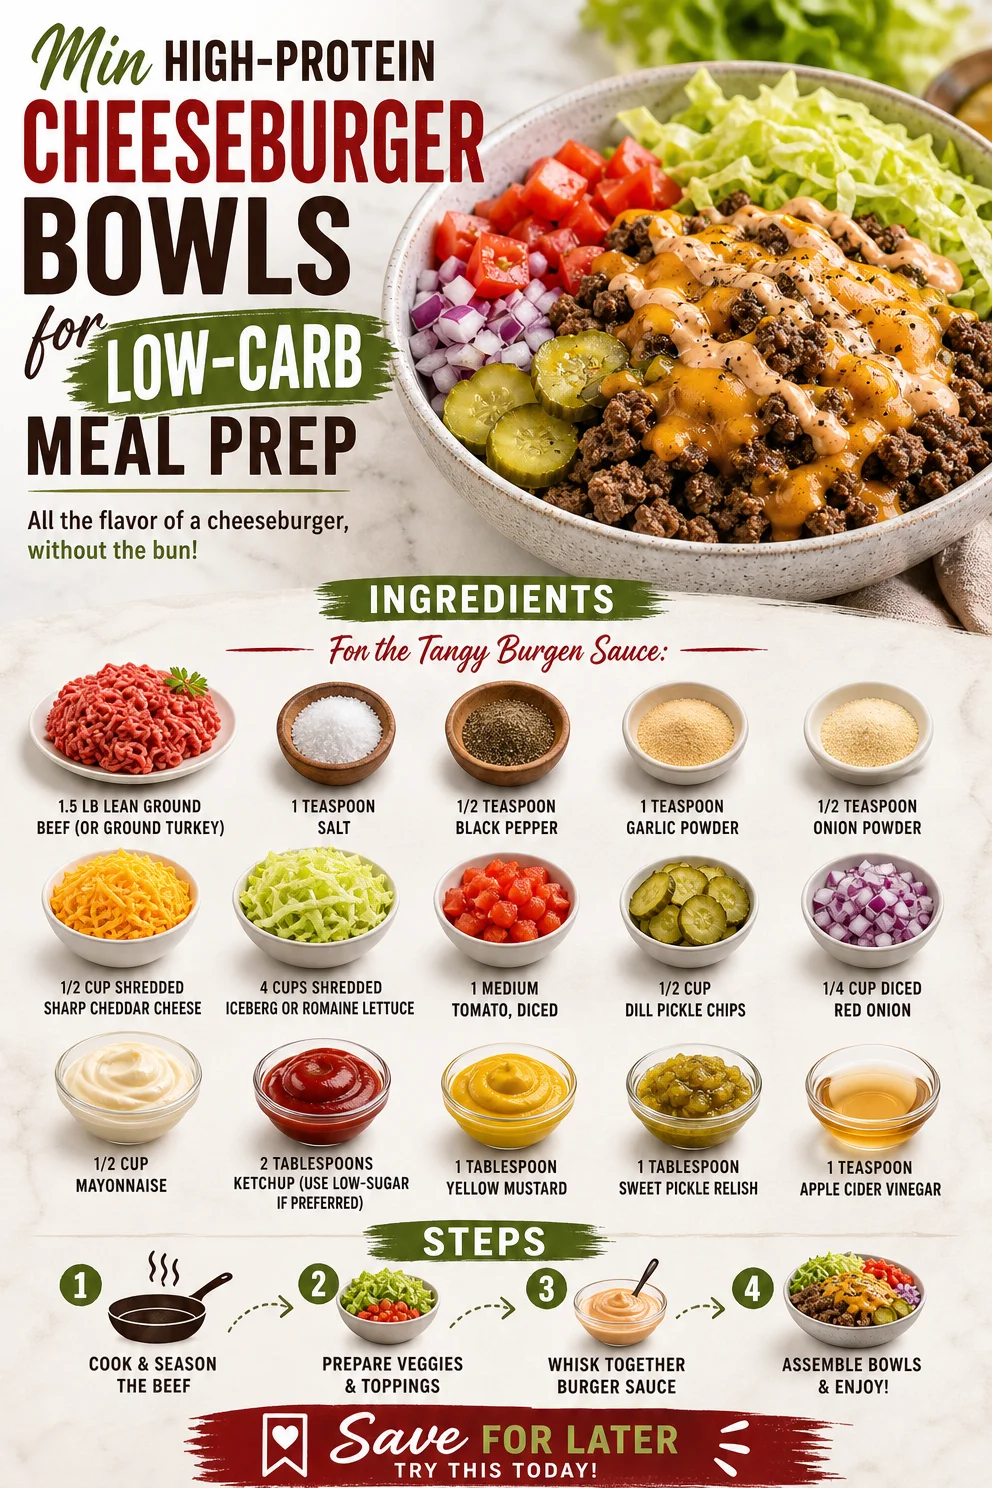
High-Protein Cheeseburger Bowls: Easy Low-Carb Meal Prep
Welcome to another delicious adventure here at Clean Plate Cravings! Today, we’re diving into the world of comfort food with a healthful twist – High-Protein Cheeseburger Bowls. This recipe is all about enjoying the classic flavors of a cheeseburger while keeping it low-carb and nutritious. Picture this: a vibrant bowl brimming with lean protein, crisp veggies, and draped in a tangy sauce that’ll make your taste buds dance. Whether you’re meal prepping for the week or whipping up a quick dinner, these cheeseburger bowls are going to become a staple in your kitchen.
Now, before we jump into the cooking, let me share a little story that captures my passion for this dish.
Personal Story
Ah, cheeseburgers! They hold a special place in my heart (and stomach). I remember my dad firing up the grill on Saturday afternoons while the tantalizing aroma of sizzling beef wafted through our backyard. We’d gather around, laughter echoing, while dad flipped patties to perfection. He had this secret blend of seasonings that made every bite nothing short of magical. Each burger was a masterpiece topped with melty cheese and all the fixings.
As I grew older, I realized my love for burgers wasn’t just about the taste; it was about those shared moments, the joy of good food bringing people together. Fast forward to today, I’ve concocted a healthier twist on that family favorite. These High-Protein Cheeseburger Bowls capture the essence of those delightful afternoons, minus the heavy carbs. So grab your apron, and let’s recreate this nostalgic dish together!
Ingredients
For the Bowls:
-
1.5 lb lean ground beef (or ground turkey)
This is the star of your bowl! Lean meat helps keep the protein high and the fat lower. If you’re looking for an even leaner option, ground turkey is a fantastic substitute. You can also use plant-based ground meat for a vegetarian version. -
1 teaspoon salt
Essential for enhancing the flavors of your meat. Feel free to tweak the amount based on your taste preference, or try a seasoned salt for an extra kick! -
1/2 teaspoon black pepper
A key seasoning that brings depth to the meat. You can use white pepper for a milder flavor, or add red pepper flakes if you like a little heat. -
1 teaspoon garlic powder
Adds a warm, aromatic flavor. You can substitute with fresh minced garlic if you prefer a bolder garlic hit—just adjust the quantity since fresh garlic is more potent. -
1/2 teaspoon onion powder
This enhances the savory flavor profile. Fresh onions can be used here too; just sauté them with the meat until they soften for a sweeter, richer taste. -
1/2 cup shredded sharp cheddar cheese
Because what’s a cheeseburger without cheese? Opt for a low-fat version if you want to cut down on calories, or experiment with other types like pepper jack for a spicy twist. -
4 cups shredded iceberg or romaine lettuce
The perfect crunchy base for your bowl! If you’re feeling adventurous, swap it for spinach or kale for added nutrients. -
1 medium tomato, diced
Fresh tomatoes add a juicy burst. Cherry tomatoes work well too; just halve them for a sweet pop of flavor. -
1/2 cup dill pickle chips
These provide a zesty crunch that really elevates the dish. If you prefer a bit of sweetness, you can use bread-and-butter pickles instead. -
1/4 cup diced red onion
A little kick of sharpness. You can use green onions for a milder taste or leave them out entirely if you’re not a fan.
For the Tangy Burger Sauce:
-
1/2 cup mayonnaise
A creamy base for our sauce. Try using Greek yogurt for a lighter version rich in protein. -
2 tablespoons ketchup
Adds a hint of sweetness. Choose low-sugar ketchup if you’re watching your sugar intake. -
1 tablespoon yellow mustard
Brings tang and depth to the sauce. You can swap for Dijon for a more sophisticated flavor. -
1 tablespoon sweet pickle relish
This is what adds that classic burger flavor. If you want to skip it, a teaspoon of honey can add a sweet touch instead. -
1 teaspoon apple cider vinegar
For a touch of acidity that balances the flavors. If you don’t have it on hand, white vinegar can work, but adjust to taste as it’s a bit sharper.
Step-by-Step Instructions
Step 1: Cook the Meat
Start by heating a large skillet over medium heat. Add your lean ground beef (or turkey) to the pan. Season it with salt, black pepper, garlic powder, and onion powder. Use a spatula to break the meat into crumbles as it cooks. You’re looking for a nice brown color, which typically takes about 8-10 minutes. Stir occasionally to prevent sticking. This step is crucial; browning the meat adds amazing flavor!
Step 2: Prepare the Sauce
While the meat is cooking, let’s whip up our tangy burger sauce. In a medium bowl, combine the mayonnaise, ketchup, mustard, sweet pickle relish, and apple cider vinegar. Stir well until everything is smooth and combined. Give it a taste—feel free to adjust ingredients based on your preferences. You might like it a little sweeter or tangier!
Step 3: Assemble the Bowls
Once the meat is fully cooked, it’s assembly time! Start with a generous handful of shredded lettuce at the bottom of each bowl. This is your base, and it’s going to add crunch and freshness. Top the lettuce with a scoop of the seasoned meat, then sprinkle the shredded cheddar cheese over the hot beef. The cheese will melt slightly, creating that delicious cheeseburger effect.
Step 4: Add Fresh Toppings
Next, it’s time for the fun part—adding your toppings! Dice the tomato and scatter it over the bowl along with the dill pickle chips and diced red onion. Each bite will be a delightful mix of flavors and textures.
Step 5: Drizzle with Sauce
Finally, drizzle the tangy burger sauce generously over the top. You can also serve some on the side for dipping, which is always a hit!
Step 6: Dig In!
There you have it—your High-Protein Cheeseburger Bowls are ready to be enjoyed! Serve them warm, and don’t forget to take the first bite to savor the symphony of flavors. You’ll be transported straight back to those backyard barbecues with every mouthful!
Serving Suggestions
These cheeseburger bowls are versatile! For a colorful presentation, you can serve them in vibrant bowls or even on a bed of seasoned quinoa for added nutrition and texture. For guests, consider adding some crusty bread or whole-grain buns on the side for the ultimate burger experience.
Recipe Variations
- BBQ Cheeseburger Bowls: Add barbecue sauce to the beef while it cooks for a smoky twist!
- Southwest Style: Mix in black beans and corn, and add avocado slices for a Tex-Mex flair.
- Mediterranean Variation: Swap the cheddar for feta and add olives and cucumber—yum!
- Vegan Option: Use a plant-based ground meat substitute and cashew mayo for the sauce.
- Spicy Kick: Toss in jalapeños or chili powder for an extra kick of heat.
Chef’s Notes
Creating these cheeseburger bowls has been a labor of love for me. Initially, I started with a traditional burger recipe, but as I embraced healthier eating habits, I knew I had to find a way to keep the comfort without the carbs. Over time, I discovered that by using fresh ingredients and crafting a flavorful sauce, I could satisfy that cheeseburger craving without the guilt! Plus, these bowls make for quick meal prep—an added win in my busy kitchen life.
FAQs and Troubleshooting
1. Can I make this ahead of time?
Absolutely! These bowls are perfect for meal prep. Just store everything separately in airtight containers and assemble when you’re ready to eat. The toppings keep well for a few days, and the flavors meld beautifully.
2. What if I don’t have all the spices?
Don’t worry! You can always customize the spices based on what you have on hand. Italian seasoning or a dash of paprika can also work wonders.
3. How can I make it spicy?
Want to add some heat? Incorporate diced jalapeños into the bowls or mix spicy mustard into your sauce. You could also blend in some Sriracha!
4. My ground meat is dry—what did I do wrong?
Overcooking can dry out meat, especially lean varieties! Make sure to cook it just until it’s no longer pink. If it happens, try mixing in a bit of your tangy sauce to bring some moisture back.
Nutritional Info
(Approximate per serving – based on 4 servings with ground beef, excluding optional toppings)
- Calories: 400
- Protein: 35g
- Carbohydrates: 8g (Net carbs: 5g)
- Fat: 25g
So there you have it—High-Protein Cheeseburger Bowls! With every flavorful bite, you’ll not only be nourishing your body but also reminiscing about those cherished grilled moments. Happy cooking, my food-loving friends!
PrintHigh-Protein Cheeseburger Bowls

Enjoy the classic flavors of a cheeseburger while keeping it low-carb and nutritious with these High-Protein Cheeseburger Bowls.
- Prep Time: 15 minutes
- Cook Time: 10 minutes
- Total Time: 25 minutes
- Yield: 4 servings 1x
- Category: Main Course
- Method: Cooking
- Cuisine: American
- Diet: Low Carb
Ingredients
- 1.5 lb lean ground beef (or ground turkey)
- 1 teaspoon salt
- 1/2 teaspoon black pepper
- 1 teaspoon garlic powder
- 1/2 teaspoon onion powder
- 1/2 cup shredded sharp cheddar cheese
- 4 cups shredded iceberg or romaine lettuce
- 1 medium tomato, diced
- 1/2 cup dill pickle chips
- 1/4 cup diced red onion
- 1/2 cup mayonnaise
- 2 tablespoons ketchup
- 1 tablespoon yellow mustard
- 1 tablespoon sweet pickle relish
- 1 teaspoon apple cider vinegar
Instructions
- Cook the meat: Heat a large skillet over medium heat. Add your lean ground beef (or turkey) to the pan. Season it with salt, black pepper, garlic powder, and onion powder. Cook until browned, about 8-10 minutes.
- Prepare the sauce: In a medium bowl, combine the mayonnaise, ketchup, mustard, sweet pickle relish, and apple cider vinegar. Stir well until smooth and combined.
- Assemble the bowls: Start with a handful of shredded lettuce at the bottom of each bowl. Top with a scoop of the seasoned meat, then sprinkle the shredded cheddar cheese over the hot beef.
- Add fresh toppings: Dice the tomato and scatter it over the bowl along with the dill pickle chips and diced red onion.
- Drizzle with sauce: Generously drizzle the tangy burger sauce over the top.
- Dig in and enjoy: Serve warm and savor the delicious flavors!
Notes
These bowls are perfect for meal prep. Store ingredients separately and assemble when ready to eat.
Nutrition
- Serving Size: 1 serving
- Calories: 400
- Sugar: 4g
- Sodium: 700mg
- Fat: 25g
- Saturated Fat: 9g
- Unsaturated Fat: 9g
- Trans Fat: 0g
- Carbohydrates: 8g
- Fiber: 3g
- Protein: 35g
- Cholesterol: 90mg
Keywords: cheeseburger bowls, low-carb, meal prep, high-protein

Minute High-Protein Honey Garlic Shrimp for Meal Prep
High-Protein Honey Garlic Shrimp: A Delicious Adventure
Introduction
Hello, fellow food lovers! Buckle up your aprons because today we’re embarking on a culinary journey that’s about to transform your weeknight dinners—High-Protein Honey Garlic Shrimp! This dish is not just tantalizingly tasty; it’s also packed with protein, making it a guilt-free pleasure you’ll want to savor again and again.
Imagine a busy weekday evening. You’ve shuffled through the chaos of meetings, errands, and the inevitable “What’s for dinner?” disaster. You walk into your kitchen, and the thought of whipping up something delicious feels miles away. But wait! With just a handful of ingredients, you can bring the vibrant flavors of a great seafood restaurant right to your table.
This dish features juicy shrimp coated in a sweet and savory honey garlic sauce that’s simply irresistible! Not only is it quick to prepare—taking about 20-30 minutes—but it’s also extraordinarily versatile, allowing you to serve it with rice, quinoa, or fresh vegetables. Plus, it’s wonderful on its own or dressed up with your favorite sides.
And let’s not forget about the nutritional side of things! Shrimp is an excellent source of protein and packed with vitamins and minerals, making this dish not only scrumptious but also wholesome. Join me as we dive headfirst into this adventure in flavor!
Personal Story
Growing up in my family, seafood wasn’t just food; it was a celebration. I fondly remember the evenings spent by the ocean, the salty breeze wrapping around us as my parents cooked up shrimp on the grill while sharing stories and laughter. One evening, my dad decided to try his hand at making garlic shrimp with a touch of honey sauce—an experiment that turned into a family favorite.
We all waited eagerly as the sweet aroma drifted from the kitchen to the dining table—a combination of smoky garlic and a hint of sweetness dancing through the air. As the first bite melted in my mouth, I realized he’d created magic! That simple dish, full of flavor and nostalgia, became a staple in our household.
Fast forward to today, and I can’t tell you how happy it makes me to recreate that same happiness in my own kitchen, pasta parties instead replaced with meal prepping shrimp for the week ahead. Trust me, once you try this High-Protein Honey Garlic Shrimp, you’ll have your own memories to cherish for years to come!
Ingredients
To make this delectable dish, gather the following ingredients:
-
1 pound shrimp, peeled and deveined
Fresh shrimp provides the best flavor and texture. If you can’t find fresh, frozen shrimp works too! Just ensure to thaw it thoroughly before cooking. -
1/4 cup honey
Honey adds a lovely sweetness to balance the garlic. Adjust the quantity if you prefer a sweeter or less sweet flavor! -
3 cloves garlic, minced
Garlic is essential for that delightful aromatic quality. Feel free to use garlic powder in a pinch—just aim for about 1 teaspoon. -
2 tablespoons soy sauce
This adds the umami kick! You can swap in low-sodium soy sauce for a lighter option, or use tamari for a gluten-free alternative. -
1 tablespoon olive oil
Olive oil adds healthy fats and helps prevent shrimp from sticking to the pan. If you’re looking for a flavor twist, try sesame oil for an extra punch! -
Salt and pepper to taste
Seasoning is vital! Remember, you can always add more, but you can’t take it out once it’s in. -
Cooked rice or vegetables for serving
Serve this dish over your choice of rice, quinoa, or steamed veggies. It’s super versatile—play around to find your favorite combination!
Step-by-Step Instructions
Step 1: Preparing the Shrimp
Start by ensuring your shrimp is thawed, cleaned, and patted dry. The drier they are, the better they’ll sear. There’s nothing worse than steaming when you want a lovely golden crust! Chef tip: If your shrimp come with tails, consider leaving them on for presentation—makes it feel a bit fancier!
Step 2: Mixing the Sauce
In a small bowl, whisk together the honey, minced garlic, and soy sauce. This sauce is where the magic happens! Pro tip: If you like a bit of kick, add a pinch of red pepper flakes to the mix for a sweet and spicy finish.
Step 3: Heating the Pan
In a large skillet, heat the olive oil over medium-high heat. You want the oil hot but not smoking; too much heat can burn the garlic and give it a bitter flavor. Keep an eye on it! If your pan starts to smoke, turn it down a notch.
Step 4: Cooking the Shrimp
Add the shrimp to the skillet in a single layer. Let them cook for about 2-3 minutes without stirring to achieve that golden sear. You’ll know they’re ready to flip when they turn pink around the edges. Chef secret: Don’t overcrowd the pan! If you’re making a double batch, do it in two rounds.
Step 5: Adding the Sauce
Once the shrimp are beautifully seared, pour the honey garlic sauce over and toss to coat. Cook for another 1-2 minutes until the shrimp are fully cooked and the sauce has thickened slightly. Tip: The shrimp will continue cooking from residual heat, so take them off the stove as soon as they’re opaque.
Step 6: Seasoning
Taste your shrimp and season with salt and pepper if needed. You may not even need it with the soy sauce already in there! A little spritz of lemon juice at the end can elevate the flavors to another level—try it out!
Serving Suggestions
To serve, pile a generous portion of cooked rice or your favorite veggies on a plate and gently lay the honey garlic shrimp on top. Drizzle any extra sauce over the shrimp and garnish with sesame seeds or finely chopped green onions for a little extra flair! This presentation not only packs a flavor punch but also makes for an eye-catching meal!
Recipe Variations
-
Spicy Honey Garlic Shrimp: Add a splash of sriracha or a diced fresh chili to the sauce for an exciting kick!
-
Citrusy Twist: Squeeze some fresh lime juice into the sauce for a refreshing zing that compliments the sweetness of the honey.
-
Zucchini Noodles Option: Serve the honey garlic shrimp over spiralized zucchini noodles for a low-carb alternative!
-
Herb Infusion: Mix in some fresh basil or cilantro when serving to elevate the dish with vibrant herb flavors.
-
Sweet and Savory: Toss in some pineapple chunks when cooking the shrimp for a tropical, sweet addition!
Chef’s Notes
This High-Protein Honey Garlic Shrimp recipe has evolved over the years. Initially, I used to cook my shrimp in plain olive oil, but after my dad introduced me to the beauty of sauce-making, I couldn’t resist adding flavor layers. The sweetness of honey and the pungent garlic opened a whole new world of possibilities!
And let me tell you, there have been funny moments, too! One time, during a dinner party, I accidentally spilled half a bottle of honey into the pan, thinking I was using a different recipe! It turned into a sticky disaster but somehow turned out to be the favorite dish of the night—so, I guess accidents in the kitchen can be a blessing, right?
FAQs and Troubleshooting
1. How do I know when the shrimp are cooked?
Look for shrimp that have turned pink and opaque all the way through. They should curl up into a "C" shape. If they curl into an "O," they may be overcooked.
2. Can I use frozen shrimp?
Absolutely! Just make sure to thaw them completely and pat them dry before cooking. This ensures they sear nicely.
3. What sides pair well with honey garlic shrimp?
This dish is super versatile! Try it over fluffy rice, sautéed greens, or even a fresh salad for a balanced meal.
4. Why is my sauce too runny?
If your sauce isn’t thickening, try increasing the heat slightly and cooking for a bit longer. Alternatively, you can add a cornstarch-water slurry (1 tsp cornstarch mixed with 1 tsp water) to thicken it up quickly.
Nutritional Info (Optional)
While I haven’t included the specifics in our conversation, you can roughly estimate this serving to contain about 200 calories, with 22 grams of protein, 8 grams of carbs, and minimal fats if you stick to olive oil.
So there you have it—your go-to High-Protein Honey Garlic Shrimp recipe! Don’t forget to share your culinary experiences with me, and let’s keep the delicious vibes flowing. Happy cooking!
PrintHigh-Protein Honey Garlic Shrimp

A quick and delicious high-protein meal featuring shrimp coated in a sweet and savory honey garlic sauce.
- Prep Time: 10 minutes
- Cook Time: 10 minutes
- Total Time: 20 minutes
- Yield: 4 servings 1x
- Category: Main Course
- Method: Sautéing
- Cuisine: Seafood
- Diet: Gluten-Free
Ingredients
- 1 pound shrimp, peeled and deveined
- 1/4 cup honey
- 3 cloves garlic, minced
- 2 tablespoons soy sauce
- 1 tablespoon olive oil
- Salt and pepper to taste
- Cooked rice or vegetables for serving
Instructions
- Start by ensuring your shrimp is thawed, cleaned, and patted dry.
- In a small bowl, whisk together the honey, minced garlic, and soy sauce.
- In a large skillet, heat the olive oil over medium-high heat.
- Add the shrimp to the skillet in a single layer; let them cook for about 2-3 minutes without stirring.
- Once the shrimp are beautifully seared, pour the honey garlic sauce over and toss to coat.
- Taste your shrimp and season with salt and pepper if needed.
Notes
For an exciting kick, consider adding sriracha or diced chili to the sauce. A squeeze of fresh lemon juice at the end can elevate the flavors.
Nutrition
- Serving Size: 1 serving
- Calories: 200
- Sugar: 21g
- Sodium: 400mg
- Fat: 7g
- Saturated Fat: 1g
- Unsaturated Fat: 5g
- Trans Fat: 0g
- Carbohydrates: 9g
- Fiber: 0g
- Protein: 22g
- Cholesterol: 200mg
Keywords: shrimp, honey garlic, seafood, quick dinner, high-protein

Low Carb Green Beans
Low Carb Green Beans: Fresh, Flavorful, and Full of Life
Welcome back, food enthusiasts! Today, we’re diving into a simple yet vibrant dish that will make your taste buds dance: Low Carb Green Beans! Whether you’re on a health kick, trying to keep your carb intake in check, or simply looking to add some green goodness to your plate, these green beans are here to save the day.
Let’s talk about those humble green beans. They’re not just a side dish; they’re a canvas for flavor, a burst of color on your plate, and a nod to the best of nature’s bounty. Tossed with garlic, shimmering olive oil, and a zesty squeeze of lemon juice, these green beans are anything but boring.
One of my favorite things about cooking with fresh produce is that it connects us to the seasons and to memories of family gatherings, picnics in the park, or just cozy weeknight dinners. So grab your apron, and let’s get cooking!
A Trip Down Memory Lane
Let me take you back to my grandma’s kitchen—a bustling hub of activity. Every summer, we’d visit her in the countryside, and her garden was a treasure trove of fresh veggies. Among them, the green beans stood out, their bright green hue promising a mouthful of crisp, refreshing goodness.
I remember the day she taught me to sauté those green beans perfectly. It was less of a formal lesson and more of just a fun, flour-dusted afternoon spent laughing about life while we cooked. She’d throw in some garlic and a splash of lemon juice, and every time, I’d be surprised at how such simple ingredients could create something so delightful. It’s these kinds of memories that fill my soul and inspire me to keep sharing recipes that bring people together. Think of this dish as a little homage to my grandma’s garden and all the love that went into those meals.
Ingredients
Let’s gather our ingredients! Here’s what you’ll need for these fabulous Low Carb Green Beans:
-
Fresh Green Beans: The star of our show! Look for bright, firm beans with a vibrant green color. You can substitute them with other veggies like asparagus or broccoli if you’re feeling experimental.
-
Olive Oil: A must-have for that luscious flavor. Extra virgin olive oil is highly recommended for its rich taste, but feel free to swap it with avocado oil for a kick of healthy fats!
-
Garlic: Because what’s a good dish without garlic? Fresh garlic cloves bring a punch of flavor. If you’re in a hurry, garlic powder can be a handy substitute, though fresh is always best!
-
Salt: Essential for bringing out the flavors of our ingredients. Sea salt or kosher salt works beautifully.
-
Pepper: A dash of fresh black pepper adds depth. You can play with different types, like lemon pepper or smoked paprika, for an extra twist.
-
Lemon Juice: The zesty finish. Freshly squeezed is ideal, but bottled lemon juice will do in a pinch.
Step-by-Step Instructions
Ready to cook? Let’s get started with these delightful green beans!
-
Prep your beans: Begin by rinsing your fresh green beans under cool running water. Snap off the stem ends, discarding them as you go. If you’re feeling fancy, you can also cut them into bite-sized pieces.
-
Heat the pan: Grab a large skillet and place it over medium heat. Add about 2 tablespoons of olive oil, allowing it to warm up until it’s glistening but not smoking. This will help our beans sauté beautifully.
-
Add garlic: Toss in 2-3 minced garlic cloves. Here’s a chef hack: make sure to stir the garlic frequently to prevent it from burning. We want fragrant and golden—not charred!
-
Introduce the beans: Once your garlic is aromatic, it’s time to add the green beans to the pan. Stir them well to coat them in that garlicky bliss.
-
Season it up: Sprinkle in a good pinch of salt and a few cracks of black pepper. This is where you can make it your own; if you like heat, consider some red pepper flakes here too!
-
Sauté to perfection: Continue cooking for about 5-7 minutes, stirring occasionally. You want your green beans tender but still with a bit of crunch—just perfectly al dente.
-
Finish with lemon: Add a splash of fresh lemon juice near the end of cooking. This boosts the flavor and adds a bright, fresh note that’s simply addicting.
-
Taste test: Give your green beans a taste. Need more seasoning? Don’t hesitate to tweak it to your liking. This is your masterpiece!
-
Serve and enjoy: Transfer your vibrant green beans to a serving dish, and watch everyone’s eyes light up at the sight of that fresh, colorful dish!
Serving Suggestions
For an elegant touch, try garnishing your Low Carb Green Beans with some slivered almonds or crispy shallots. They add a delightful crunch and aesthetic appeal to the dish. Serve them hot next to grilled chicken or fish for a wholesome meal, or toss the beans with some cherry tomatoes for an even more colorful presentation. And if you’re up for it, a sprinkle of feta cheese takes it to a whole new level!
Recipe Variations
Feel free to shake things up with these twists on the classic low carb green beans:
-
Asian-Inspired: Swap the olive oil for sesame oil and add a splash of soy sauce and sesame seeds for an Asian flair.
-
Italian Style: Mix in a few chopped sun-dried tomatoes and sprinkle with Parmesan cheese before serving.
-
Mediterranean Wonders: Toss in olives and artichoke hearts for a burst of flavor.
-
Herby Spin: Add fresh herbs like thyme or basil right before serving, for an extra splash of freshness that’s just delightful.
Chef’s Notes
These green beans are one of my go-to sides because they’re not only easy to whip up but also leave room for creativity. The recipe has evolved over the years, starting simply with just salt and pepper, but it’s all the little extras—a dash of lemon here, a swirl of oil there—that make it endlessly interesting. Plus, they pair beautifully with nearly any main dish, which is a huge win in my book!
Fun fact: I once attempted to impress a date by creating a full five-course meal, and the moment the green beans hit the table? That was it. They stole the show with their brightness and flavor—and yes, the date went splendidly too!
FAQs and Troubleshooting
-
What if my green beans are tough?
- If your green beans are tough, they may be overcooked. To ensure a tender yet crunchy texture, stand by during cooking and taste-test along the way!
-
How can I make this dish more filling?
- You can add cooked quinoa, chickpeas, or even toss in some protein like grilled shrimp or chicken, making it a one-pan wonder!
-
Can I prepare these ahead of time?
- Absolutely! You can blanch the beans and sauté them when ready to serve. Just keep in the fridge until you’re set to finish cooking.
-
What’s the best way to store leftovers?
- Place any leftovers in an airtight container in the fridge for up to 3 days. You can reheat them in the skillet with a splash of olive oil to refresh their flavor.
Nutritional Info
These Low Carb Green Beans are not only a fantastic side but also a healthy choice! One serving (about 1 cup) has approximately:
- Calories: 70
- Fat: 6g
- Carbs: 6g
- Fiber: 2g
- Protein: 2g
Now, feel free to celebrate those fresh flavors packed into every bite. I hope this recipe brings you joyful kitchen moments and delicious meals shared with loved ones. Remember, cooking should always be fun, approachable, and fueling—not just for your body, but for your soul! Happy cooking!
PrintLow Carb Green Beans

A vibrant and healthy dish featuring fresh green beans tossed with garlic and lemon for a burst of flavor.
- Prep Time: 10 minutes
- Cook Time: 10 minutes
- Total Time: 20 minutes
- Yield: 4 servings 1x
- Category: Side Dish
- Method: Sautéing
- Cuisine: American
- Diet: Low Carb, Vegetarian
Ingredients
- 1 pound Fresh Green Beans, trimmed
- 2 tablespoons Olive Oil
- 2–3 cloves Garlic, minced
- Salt, to taste
- Pepper, to taste
- Juice of 1 Lemon
Instructions
- Prep your beans: Rinse the green beans under cool water and snap off the stem ends.
- Heat the pan: Place a large skillet over medium heat and add olive oil until warm.
- Add garlic: Toss in minced garlic and stir frequently to prevent burning.
- Introduce the beans: Add the green beans to the pan and stir to coat.
- Season it up: Sprinkle with salt and pepper, adding red pepper flakes if desired.
- Sauté to perfection: Cook for 5-7 minutes until beans are tender but crunchy.
- Finish with lemon: Add lemon juice near the end of cooking.
- Taste test: Adjust seasoning as needed.
- Serve and enjoy: Transfer to a serving dish and serve hot.
Notes
For added crunch, garnish with slivered almonds or crispy shallots. These beans pair well with grilled chicken or fish.
Nutrition
- Serving Size: 1 serving
- Calories: 70
- Sugar: 2g
- Sodium: 250mg
- Fat: 6g
- Saturated Fat: 1g
- Unsaturated Fat: 5g
- Trans Fat: 0g
- Carbohydrates: 6g
- Fiber: 2g
- Protein: 2g
- Cholesterol: 0mg
Keywords: green beans, low carb, healthy side dish, vegetarian, easy recipe

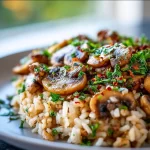
Mushroom Rice
Mushroom Rice: A Flavor-Packed Feast for All Occasions
Welcome back to Clean Plate Cravings, my foodie friends! Today, we’re diving into a dish that warms the heart and satisfies the soul: Mushroom Rice. This delightful recipe is a celebration of simple ingredients, with earthy mushrooms taking center stage. So grab your apron, put on your favorite playlist, and let’s embark on a culinary adventure together!
Imagine walking into your kitchen, the comforting aromas of sautéed onions and garlic wafting through the air. The golden light filters through the window, and you feel that sense of satisfaction that comes only from creating something delicious at home. That’s the magic we’re all about at Clean Plate Cravings.
This Mushroom Rice recipe is not just a side dish; it’s a canvas for creativity and a delightful addition to any meal. Whether you’re enjoying it alongside grilled chicken, a fresh salad, or even on its own, this rice dish is comforting, filling, and utterly delicious. Plus, it’s super easy to whip up, making it the perfect option for busy weeknights or last-minute dinners when you want to impress without the stress.
Let me take you back to my childhood for a moment. Growing up, my mom made a version of this Mushroom Rice that I can still picture vividly. On rainy Sundays, she would gather us around the kitchen, the warmth of the stove mixing with the love in the air. The mushrooms would sizzle in the pan, releasing their rich aroma, while we all fought over who got to help stir the pot. Some of my fondest memories revolve around that dish—filled with laughter, good conversation, and of course, delicious food. It’s funny how a simple bowl of rice can hold so much nostalgia and love!
Now, let’s roll up our sleeves and get cooking!
Ingredients
-
1 cup rice: I usually prefer long-grain rice for this dish, but short-grain works nicely too! If you’re looking for a healthier option, try brown rice or quinoa.
-
2 cups vegetable or chicken broth: This is where the flavor magic happens! Homemade broth takes it up a notch, but store-bought works just fine. You can also use water if you’re in a pinch, though I recommend sticking with broth for that deep flavor.
-
1 cup mushrooms, sliced: Button mushrooms are a great starter, but feel free to experiment with shiitake, cremini, or even wild mushrooms for a different flair!
-
1 onion, chopped: Sweet onions like Vidalia or red onions can add a lovely touch. If you need to make it low-FODMAP, try using green onions instead!
-
2 cloves garlic, minced: Fresh garlic is a must! If you’re short on time, jarred minced garlic will do, but the flavor won’t be quite as vibrant.
-
2 tablespoons olive oil: This will create a beautiful base for your rice. Canola oil works too, or for a slight twist, why not use sesame oil?
-
Salt and pepper to taste: Always taste as you go! Don’t forget to adjust seasoning for your palate.
-
Parsley for garnish (optional): A sprinkle of fresh parsley adds a pop of color and freshness. Feel free to swap it out for thyme or basil depending on your flavor preference.
Step-by-Step Instructions
Step 1: Sauté the Aromatics
Heat the 2 tablespoons of olive oil in a medium-sized skillet over medium heat. Once the oil is shimmering, add the onion. Sauté for about 3-4 minutes until they become translucent. This step is crucial; you’ll want that sweet onion flavor to develop, so don’t rush it!
Step 2: Add Garlic and Mushrooms
Now, toss in the minced garlic and give it a good stir for about 30 seconds until fragrant. Be careful not to burn it! Next, add in the sliced mushrooms. They will soak up all those delightful flavors. Cook for another 5-7 minutes, stirring occasionally, until the mushrooms are golden and their moisture has evaporated.
Step 3: Stir in the Rice
Once the mushrooms are cooked down and slightly browned, it’s time to add the rice. Stir it into the mushroom mix for about a minute. This toasting step is a chef’s secret! It adds a nutty flavor and helps keep the rice fluffy.
Step 4: Add the Broth and Simmer
Pour in the broth—this is where all the flavor comes together. Season with salt and pepper to taste. Bring it to a gentle boil. Once boiling, reduce the heat to low, cover, and simmer for 15-20 minutes. Keep it covered during cooking to allow the rice to steam perfectly!
Step 5: Fluff and Garnish
After 20 minutes, remove the skillet from heat and let it sit for 5 minutes—this step helps the rice firm up. Using a fork, fluff the rice gently to separate the grains. Garnish with fresh parsley for a colorful finish, and voila! Your Mushroom Rice masterpiece is ready to serve.
Serving Suggestions
Plate this Mushroom Rice in beautiful bowls, perhaps alongside your favorite protein or some roasted vegetables. For an elegant touch, consider drizzling a bit of balsamic reduction on the plate. You can’t go wrong here; the simple elegance of this dish is its charm!
Recipe Variations
Feel free to let your culinary creativity flourish with these fun twists:
-
Add Protein: Stir in cooked chicken or tofu for a heartier meal.
-
Cheesy Delight: Mix in some grated parmesan or nutritional yeast for a cheesy flavor.
-
Zesty Twist: Add a splash of lemon juice right before serving for a refreshing zing.
-
Wild Mushroom Medley: Use a mix of mushrooms for different textures and flavors.
-
Spicy Kick: Toss in some red pepper flakes for a hint of heat!
Chef’s Notes
This Mushroom Rice recipe is one of those versatile gems that has evolved in my kitchen over the years. Each time I prepare it, I find myself thinking of my childhood memories and how little tweaks can completely change a dish. Sometimes I swap in saffron for a luxurious touch, while other times I keep it super simple. The variations are endless, and that’s what keeps me excited about cooking!
One funny kitchen mishap comes to mind: I accidentally used cinnamon instead of cumin once while trying to create a savory version! Surprisingly, it was a hit at the dinner table!
FAQs and Troubleshooting
1. My rice turned out mushy. What went wrong?
Mushy rice is often a sign of using too much liquid or cooking too long. Make sure to measure your broth accurately and stick to the simmering time for best results.
2. Can I make this ahead of time?
Absolutely! Mushroom Rice can be made ahead and reheats wonderfully. Just store it in an airtight container in the fridge for up to 3 days.
3. How can I amp up the flavor without adding calories?
Use homemade or high-quality broth, introducing fresh herbs, or topping with a squeeze of citrus for that flavorful boost without the added numbers!
4. Can I freeze Mushroom Rice?
Yes! Let it cool completely, then store in freezer-safe containers. It will last for up to 2 months. Reheat it in the microwave, adding a splash of broth for moisture if needed.
Nutritional Info
While the nutritional content may vary based on specific ingredients and brands used, a typical serving of Mushroom Rice will be approximately:
- Calories: 220
- Protein: 5g
- Fat: 7g
- Carbohydrates: 36g
- Fiber: 2g
And there you have it, folks! A delightful dish that carries the warmth of home-cooked memories while keeping your meals fresh, wholesome, and vibrant. Remember, Mushroom Rice is not just a recipe; it’s an experience—you can tweak it, love it, and make it your own. Happy cooking, and may your plates always be clean and cravings fully satisfied!
PrintMushroom Rice
A comforting and flavorful Mushroom Rice dish that’s perfect for any occasion.
- Prep Time: 10 minutes
- Cook Time: 30 minutes
- Total Time: 40 minutes
- Yield: 4 servings 1x
- Category: Side Dish
- Method: Sautéing
- Cuisine: Comfort Food
- Diet: Vegetarian
Ingredients
- 1 cup long-grain rice
- 2 cups vegetable or chicken broth
- 1 cup mushrooms, sliced
- 1 onion, chopped
- 2 cloves garlic, minced
- 2 tablespoons olive oil
- Salt and pepper to taste
- Parsley for garnish (optional)
Instructions
- Heat the 2 tablespoons of olive oil in a medium-sized skillet over medium heat. Once the oil is shimmering, add the onion. Sauté for about 3-4 minutes until they become translucent.
- Add the minced garlic and stir for about 30 seconds until fragrant. Next, add in the sliced mushrooms. Cook for another 5-7 minutes, stirring occasionally, until the mushrooms are golden.
- Stir in the rice and toast it in the mushroom mixture for about a minute.
- Pour in the broth, season with salt and pepper, bring to a gentle boil. Reduce the heat to low, cover, and simmer for 15-20 minutes.
- Remove from heat and let it sit for 5 minutes. Fluff the rice gently with a fork and garnish with fresh parsley.
Notes
Feel free to experiment with different types of mushrooms and additional spices for variation.
Nutrition
- Serving Size: 1 serving
- Calories: 220
- Sugar: 1g
- Sodium: 350mg
- Fat: 7g
- Saturated Fat: 1g
- Unsaturated Fat: 6g
- Trans Fat: 0g
- Carbohydrates: 36g
- Fiber: 2g
- Protein: 5g
- Cholesterol: 0mg
Keywords: Mushroom Rice, Vegetarian Recipe, Comfort Food
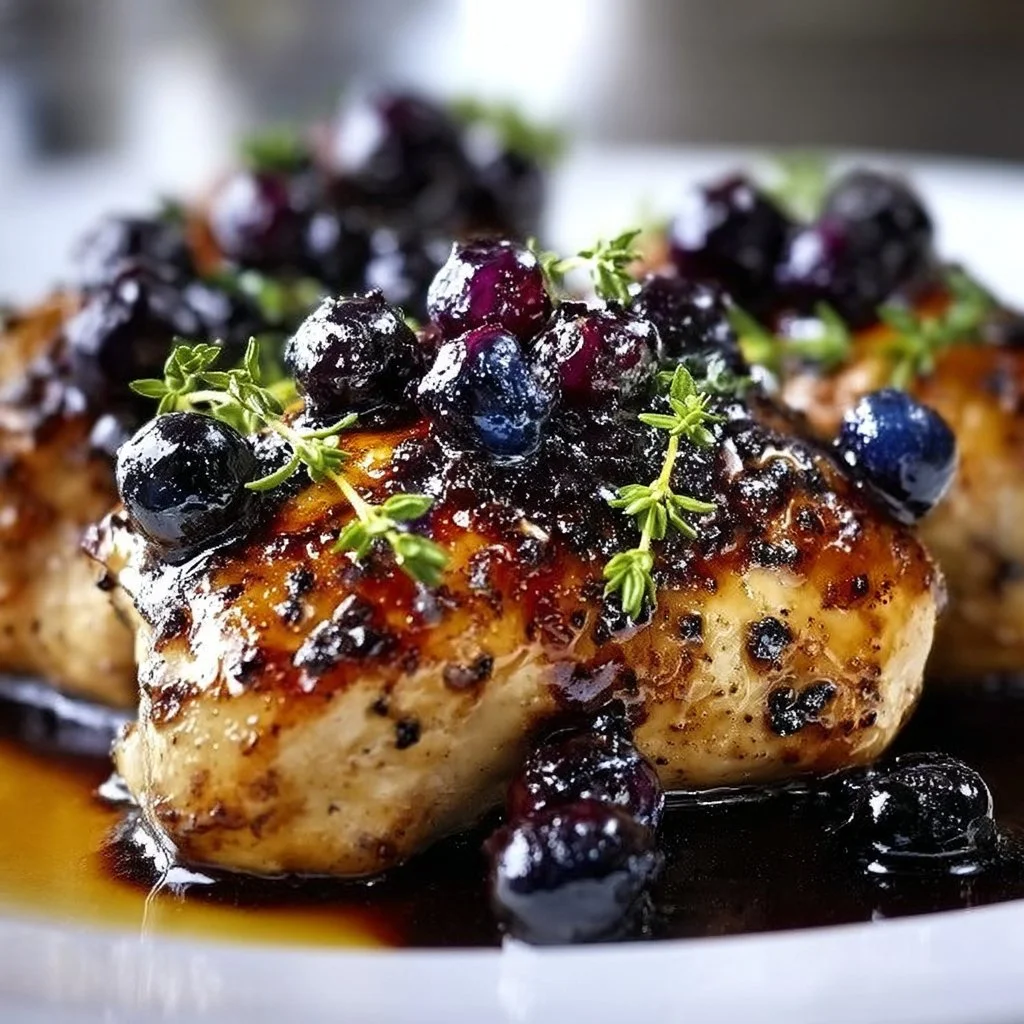
Best-Ever Blueberry Thyme Chicken
Best-Ever Blueberry Thyme Chicken
Welcome, food lovers! Today, we’re diving into a dish that’s not only bursting with flavor but also wrapped in a delightful story that brings a smile to my face every time I make it. You guessed it—it’s my Best-Ever Blueberry Thyme Chicken! This dish is a celebration of chicken’s versatility, the freshness of blueberries, and the aromatic whispers of thyme. So grab your aprons, and let’s get to cooking!
What makes this dish so special, you ask? Well, it’s like a cozy summer evening captured in a dish. Picture this: the sun setting, a gentle breeze rustling through the trees, and the sweet scent of blueberries wafting through the air. I discovered this recipe on one of those blissful weekends in the countryside, where the farmer’s market was just a stone’s throw away, and the produce was as fresh as could be. My friends and I were on a quest to create a meal that would embody those cherished summer memories, and boy, did we nail it with this one!
As the chicken sizzled in the pan and the blueberries popped, releasing their juices, I remember how we all gathered around the kitchen island, chatting, laughing, and sharing little bite-sized pieces of perfectly cooked chicken drizzled in a tangy blueberry sauce. It was one of those moments that made me realize how food can be a powerful connector and a source of joy.
This dish is easy to prepare and happens to be an absolute showstopper—perfect for a weeknight dinner or a weekend gathering. Even better, it combines the sweetness of fresh blueberries with the savory herbaceousness of thyme, creating a flavor profile that’s simply irresistible. Trust me, this is a meal that you will look forward to making time and again!
Ingredients
Here’s what you’ll need to whip up this delightful dish:
-
4 chicken breasts
A great source of lean protein! If you’re not a fan of chicken, feel free to substitute with turkey breasts or even tofu for a plant-based option. -
1 cup fresh blueberries
These juicy little gems add a burst of sweetness and vibrant color! If blueberries aren’t in season, feel free to swap in frozen blueberries—just ensure they are thawed before using. -
2 tablespoons fresh thyme leaves
Thyme’s earthy, slightly minty flavor pairs wonderfully with savory foods. If fresh is hard to find, dried thyme works too; however, you’ll want to use half the amount since dried herbs are more concentrated. -
2 tablespoons olive oil
A heart-healthy fat that will keep your chicken juicy and tender. Avocado oil or melted coconut oil can be great substitutes if you’re looking for something different. -
2 tablespoons balsamic vinegar
This adds a delicious tanginess that balances the sweetness of the blueberries beautifully. Red wine vinegar can be a fantastic alternative if you don’t have balsamic vinegar on hand. -
Salt and pepper to taste
Always essential in any dish to bring out the flavors and make everything pop! Feel free to get creative with different spices; a pinch of smoked paprika or garlic powder would work wonders.
Step-by-Step Instructions
Now that we have all the ingredients ready, let’s dive into the cooking process:
-
Prep the Chicken: Start by giving the chicken breasts a good rinse and patting them dry with a paper towel. This helps them sear better and get that lovely golden color. Season both sides generously with salt and pepper. Don’t be shy—this is where the flavor begins!
-
Heat the Pan: In a large skillet, heat the olive oil over medium-high heat. Wait until it shimmers like a disco ball before adding the chicken. This will help achieve a nice sear!
-
Sear the Chicken: Carefully place the chicken breasts in the hot skillet, making sure not to overcrowd the pan. Searing should take about 5-7 minutes on each side until the chicken is golden brown and cooked through (internal temperature should reach 165°F/75°C). Use this opportunity to dance a little while you wait!
-
Add Blueberries and Thyme: Once the chicken is perfectly seared, reduce the heat to medium. Gently add the fresh blueberries and thyme to the pan, stirring it all together. This will create a beautiful sauce as the blueberries start to burst!
-
Drizzle Balsamic Vinegar: Pour in the balsamic vinegar, stirring it up to coat the chicken and blueberries. Let this simmer for about 2-3 minutes. The sauce will thicken slightly, becoming a luscious glaze that’s both sweet and tangy.
-
Finishing Touches: Taste the sauce and adjust seasoning if necessary. Once you’re satisfied with the flavor, remove the pan from heat. Cover it lightly and let it rest for a few minutes. Resting allows the juices to redistribute throughout the chicken, making it juicy and flavorful!
-
Serve It Up: Plate your chicken breasts, generously spooning the blueberry-thyme sauce over the top.
Serving Suggestions
To make this dish truly shine, serve the Best-Ever Blueberry Thyme Chicken over a bed of wild rice or quinoa. It’s also lovely with a side of steamed green beans or a fresh mixed salad. Don’t forget to drizzle a little extra sauce over everything—it’s too delicious to miss!
Recipe Variations
Love to mix things up in the kitchen? Here are a few tasty variations for you to try:
-
Spicy Kick: Add a pinch of red pepper flakes or cayenne pepper to the sauce for a spicy twist that contrasts wonderfully with the sweetness of the blueberries.
-
Citrus Zing: Mix in some orange or lemon juice with the balsamic vinegar for a refreshing citrus flavor that brightens up the dish.
-
Herby Delight: Switch up the thyme with rosemary or oregano for a different flavor profile while still keeping it fresh and aromatic.
-
Nuts for Crunch: Top the finished dish with toasted almond slivers or walnuts for extra texture and a nutty taste.
Chef’s Notes
This Best-Ever Blueberry Thyme Chicken recipe has come a long way since my first attempt. Back then, I was terrified of cooking chicken! I remember my first few experiences ended in rubbery disaster. But practice makes perfect, and now I can whip this up in my sleep. It’s amazing how a few simple ingredients and a little bit of love can turn a basic meal into something extraordinary!
Every time I prepare this dish, I’m transported back to that sunny day at the farmers’ market. It rekindles the connection to nature, fresh food, and the joy of sharing a meal with friends. Cooking should always evoke happiness—never stress!
FAQs and Troubleshooting
1. Why is my chicken still pink inside?
Make sure your chicken is cooked to an internal temperature of 165°F (75°C). If you’re unsure, use a meat thermometer for precision!
2. What if my sauce is too thick?
If the sauce thickens too much while simmering, feel free to add a splash of water or chicken broth to loosen it up. Stir well while on heat.
3. Can I make this ahead of time?
Absolutely! This dish is great for meal prep. Just store the cooked chicken and sauce in an airtight container in the fridge for up to 3 days.
4. How can I reheat leftovers?
Reheat your chicken gently in a skillet over low heat or in the microwave. Add a splash of water or broth if it’s looking dry to maintain moisture.
Nutritional Info (optional)
This dish is not only delicious but also packed with nutrients! Each serving of Best-Ever Blueberry Thyme Chicken provides a balance of protein, healthy fats, and antioxidants from the blueberries. For a detailed nutritional breakdown, you can use a nutrition calculator or app.
So there you have it, my food-loving friends! With the Best-Ever Blueberry Thyme Chicken, you can create a meal that’s not just delicious but also brimming with fond memories and joy. There’s nothing quite like sharing a meal—when that meal is as vibrant and pleasing as this one, it’s bound to ignite some wonderful conversations around the table. Happy cooking, and remember to keep your plates clean and your cravings satisfied!
PrintBest-Ever Blueberry Thyme Chicken

A delightful dish combining sweet blueberries and savory thyme with juicy chicken, perfect for any occasion.
- Prep Time: 10 minutes
- Cook Time: 20 minutes
- Total Time: 30 minutes
- Yield: 4 servings 1x
- Category: Main Course
- Method: Pan-searing
- Cuisine: American
- Diet: Gluten Free
Ingredients
- 4 chicken breasts
- 1 cup fresh blueberries
- 2 tablespoons fresh thyme leaves
- 2 tablespoons olive oil
- 2 tablespoons balsamic vinegar
- Salt and pepper to taste
Instructions
- Prep the Chicken: Start by giving the chicken breasts a good rinse and patting them dry with a paper towel. Season both sides generously with salt and pepper.
- Heat the Pan: In a large skillet, heat the olive oil over medium-high heat until shimmering.
- Sear the Chicken: Place the chicken breasts in the hot skillet for about 5-7 minutes on each side until golden brown.
- Add Blueberries and Thyme: Once seared, reduce heat to medium, and add the fresh blueberries and thyme, stirring gently.
- Drizzle Balsamic Vinegar: Pour in balsamic vinegar and let simmer for about 2-3 minutes until sauce thickens slightly.
- Finishing Touches: Remove from heat, adjust seasoning if necessary, and let rest for a few minutes.
- Serve It Up: Plate the chicken breast and spoon the blueberry-thyme sauce over the top.
Notes
Serve the chicken over wild rice or quinoa with a side of green beans or mixed salad.
Nutrition
- Serving Size: 1 serving
- Calories: 400
- Sugar: 8g
- Sodium: 300mg
- Fat: 15g
- Saturated Fat: 2g
- Unsaturated Fat: 10g
- Trans Fat: 0g
- Carbohydrates: 30g
- Fiber: 3g
- Protein: 35g
- Cholesterol: 80mg
Keywords: chicken, blueberries, thyme, summer recipe, main course, easy dinner
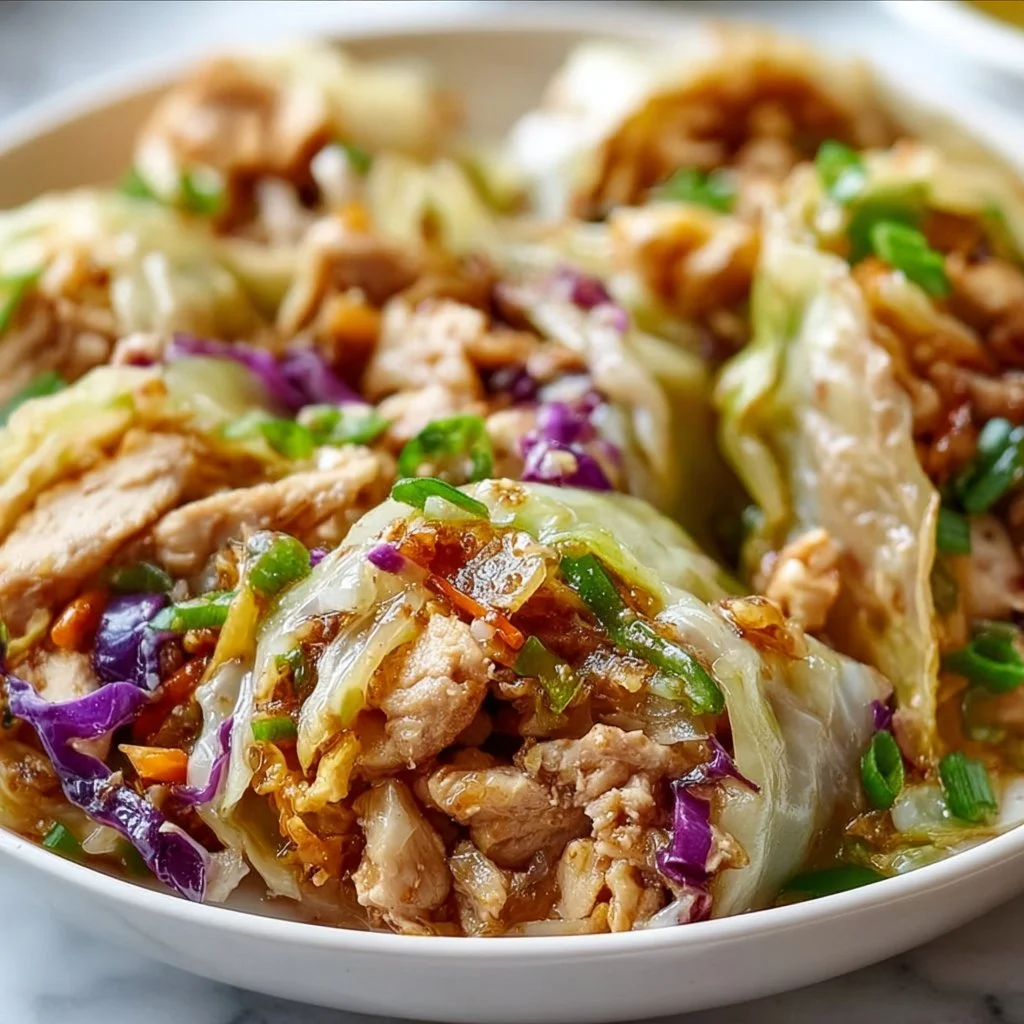
Egg Roll Bowls with Chicken and Cabbage
Egg Roll Bowls with Chicken and Cabbage: A Flavorful Twist on a Classic Favorite
Welcome to another exciting culinary adventure here at Clean Plate Cravings! Today, we’re whipping up something that’s not just delicious but also takes you on a little trip down memory lane. Whether you’re a meal-prepping pro or a novice in the kitchen, this dish is perfect for anyone looking to satisfy their cravings without sacrificing flavor or freshness. Let’s dive into these Egg Roll Bowls with Chicken and Cabbage!
Personal Story
Growing up, my mom had a few signature dishes that made our home feel extra cozy and delicious. One of the standout meals was definitely her homemade egg rolls. Every Sunday, the kitchen would transform into a bustling hub of flavors—crispy wrappers, sizzling filling, and that magical aroma that enveloped the whole house. I loved stealing a crunchy piece straight from the fryer before they even hit the table! Those crispy, savory bites always reminded me of family gatherings and cozy evenings in, where laughter filled the air and the food was a highlight.
As life got busier and our family dynamics shifted, finding time to make those egg rolls became a challenge. That’s when the idea of an egg roll bowl struck me! It maintains all those amazing flavors we love about traditional egg rolls but in a super simple, nourishing bowl that anyone can whip up in no time. Plus, it’s a great way to enjoy that classic taste without any frying, making it a perfect meal for any day of the week!
Ingredients
Let’s gather our colorful cast of ingredients before we get cooking. Each one plays an essential role in crafting these delightful egg roll bowls!
-
1 pound ground chicken
A lean protein that cooks quickly and absorbs flavors beautifully. If you want to switch it up, try ground turkey or even a plant-based ground meat. -
2 cups shredded cabbage
The star of this dish! Crunchy, nutrient-dense, and full of antioxidants. For a twist, use bok choy or stir-fried kale. -
1 cup carrots, shredded
Sweet and crunchy, they add great color and a hint of natural sweetness. You can substitute with sliced bell peppers for a bolder flavor. -
3 green onions, chopped
These add a fresh bite and aromatic flavor. You can replace them with chives or shallots if you prefer something milder. -
2 cloves garlic, minced
A key ingredient that elevates the overall taste. Fresh garlic is best, but garlic powder works in a pinch! -
1 tablespoon ginger, minced
This will add a zesty warmth to the dish; ginger paste is a suitable substitute if you’re short on fresh ginger. -
3 tablespoons soy sauce
The umami punch! For a gluten-free version, try tamari or coconut aminos. -
1 tablespoon sesame oil
Adds a deliciously nutty flavor. For an alternative, try avocado oil, but it won’t have that toasty taste. -
Salt and pepper, to taste
Essential for seasoning and bringing all the flavors together. -
Cooked rice or quinoa, for serving
These form the hearty base of your bowl—feel free to use cauliflower rice for a lighter option! -
Sesame seeds, for garnish
Crunchy and nutty, they add the perfect finishing touch! You can swap this for chopped peanuts for a fun twist.
Step-by-Step Instructions
Are you ready to create something delicious? Let’s get cooking!
-
Heat it Up
Start by heating a large skillet over medium heat. Add in 1 tablespoon of sesame oil. When the oil is hot and shimmering, it’s time to add the ground chicken.
Pro Tip: Use a spatula to break the chicken into smaller pieces as it cooks for even browning. -
Cook the Chicken
Cook the ground chicken for about 5–7 minutes, or until it’s fully cooked and no longer pink. Season with a pinch of salt and pepper.
Chef Hack: If you want a bit more flavor, add a splash of soy sauce during cooking! -
Add Aromatics
Once the chicken is cooked, toss in the minced garlic and ginger. Sauté for about 1–2 minutes until fragrant.
Tip: Make sure to keep stirring so the garlic doesn’t burn! A burnt taste can ruin the flavor. -
Incorporate Veggies
Next, add the shredded cabbage and carrots to the skillet. Stir everything together and let it cook for about 5 minutes, stirring occasionally, until the cabbage is tender but still crunchy.
Fun Fact: You’ll know it’s ready when the kitchen smells amazing! -
Seasoning Magic
Pour in the soy sauce and stir well. Cook for another 2–3 minutes, allowing the flavors to meld together and the cabbage to soak up that deliciousness.
Tip: Taste it! Add more soy sauce or pepper based on your preference! -
Finish Strong
Remove the skillet from heat and toss in the chopped green onions. Give it one last stir to incorporate everything.
Chef’s Insight: The residual heat will perfectly wilt the green onions while keeping their vibrant color!
Serving Suggestions
To serve your Egg Roll Bowls, start by layering a generous scoop of rice or quinoa in a bowl. Spoon over the fragrant chicken and cabbage mixture, ensuring everyone gets a hearty portion. Finish with a sprinkle of sesame seeds for that extra crunch!
And voilà—you’ve got a dinner that’s quick, easy, and oh-so-satisfying!
Recipe Variations
Want to switch things up a bit? Here are a few variations you can try:
-
Spicy Kick: Add some red pepper flakes or sriracha when you’re sautéing the garlic for a spicy twist!
-
Different Protein: Switch out the chicken for ground pork, beef, or tofu to suit your palate.
-
Extra Veggies: Add in some bell peppers, zucchini, or mushrooms for added nutrition and flavor.
-
Rice Alternatives: Try quinoa, cauliflower rice, or even brown rice for a different base.
-
Herb It Up: Experiment with fresh herbs like cilantro or basil for a vibrant freshness!
Chef’s Notes
This recipe has become a kitchen staple for me! I love how adaptable it is, turning into whatever I have on hand. One winter evening, I had a random assortment of veggies in the fridge, so I threw them into the mix, and it turned out spectacularly! It’s moments like these that inspire creativity in cooking—seriously, don’t be afraid to play with your food!
Plus, it’s a hit with friends and family, making it great for casual gatherings. Everyone loves a cozy bowl of goodness, and this dish can easily feed a crowd!
FAQs and Troubleshooting
1. Can I prepare this dish ahead of time?
Absolutely! You can prep the chicken and vegetable mixture ahead and store it in an airtight container in the fridge. Just reheat when you’re ready to serve.
2. What if my egg roll bowl is too salty?
If you’ve added too much soy sauce, try adding another cup of shredded cabbage or carrots to balance the flavor.
3. Can I freeze leftovers?
Definitely! Portion out the leftovers in containers and freeze for a quick meal later. Just make sure to separate the rice from the filling if you want to keep the textures nice.
4. What if I can’t find fresh ginger?
You can use ground ginger in a pinch! Just use ¼ teaspoon for every tablespoon of fresh ginger required.
Nutritional Info
Estimated per serving (based on 4 servings):
- Calories: 350
- Protein: 30g
- Carbs: 30g
- Fat: 15g
- Fiber: 4g
Now you’ve got a go-to recipe for Egg Roll Bowls with Chicken and Cabbage! It’s a simple, fun, and satisfying meal that brings the essence of those nostalgic egg rolls straight to your bowl. So grab your apron, gather your ingredients, and let’s create a meal that’s fresh, vibrant, and absolutely delicious! Happy cooking!
PrintEgg Roll Bowls with Chicken and Cabbage

A flavorful twist on classic egg rolls, this dish combines ground chicken, cabbage, and a savory mix of spices for a quick and satisfying meal.
- Prep Time: 10 minutes
- Cook Time: 15 minutes
- Total Time: 25 minutes
- Yield: 4 servings 1x
- Category: Main Course
- Method: Stovetop
- Cuisine: Asian
- Diet: Paleo
Ingredients
- 1 pound ground chicken
- 2 cups shredded cabbage
- 1 cup carrots, shredded
- 3 green onions, chopped
- 2 cloves garlic, minced
- 1 tablespoon ginger, minced
- 3 tablespoons soy sauce
- 1 tablespoon sesame oil
- Salt and pepper, to taste
- Cooked rice or quinoa, for serving
- Sesame seeds, for garnish
Instructions
- Heat a large skillet over medium heat. Add 1 tablespoon of sesame oil. When hot, add the ground chicken.
- Cook the ground chicken for 5–7 minutes, or until fully cooked. Season with salt and pepper.
- Add minced garlic and ginger. Sauté for 1–2 minutes until fragrant.
- Incorporate shredded cabbage and carrots, cooking for 5 minutes, until cabbage is tender but crunchy.
- Pour in the soy sauce and cook for another 2–3 minutes.
- Finish by tossing in chopped green onions and stir to combine.
Notes
You can meal prep this dish ahead of time and store in the fridge for easy reheating. Feel free to customize the recipe by adding more veggies or changing the protein.
Nutrition
- Serving Size: 1 serving
- Calories: 350
- Sugar: 5g
- Sodium: 600mg
- Fat: 15g
- Saturated Fat: 3g
- Unsaturated Fat: 10g
- Trans Fat: 0g
- Carbohydrates: 30g
- Fiber: 4g
- Protein: 30g
- Cholesterol: 100mg
Keywords: egg roll, chicken, cabbage, healthy, meal prep
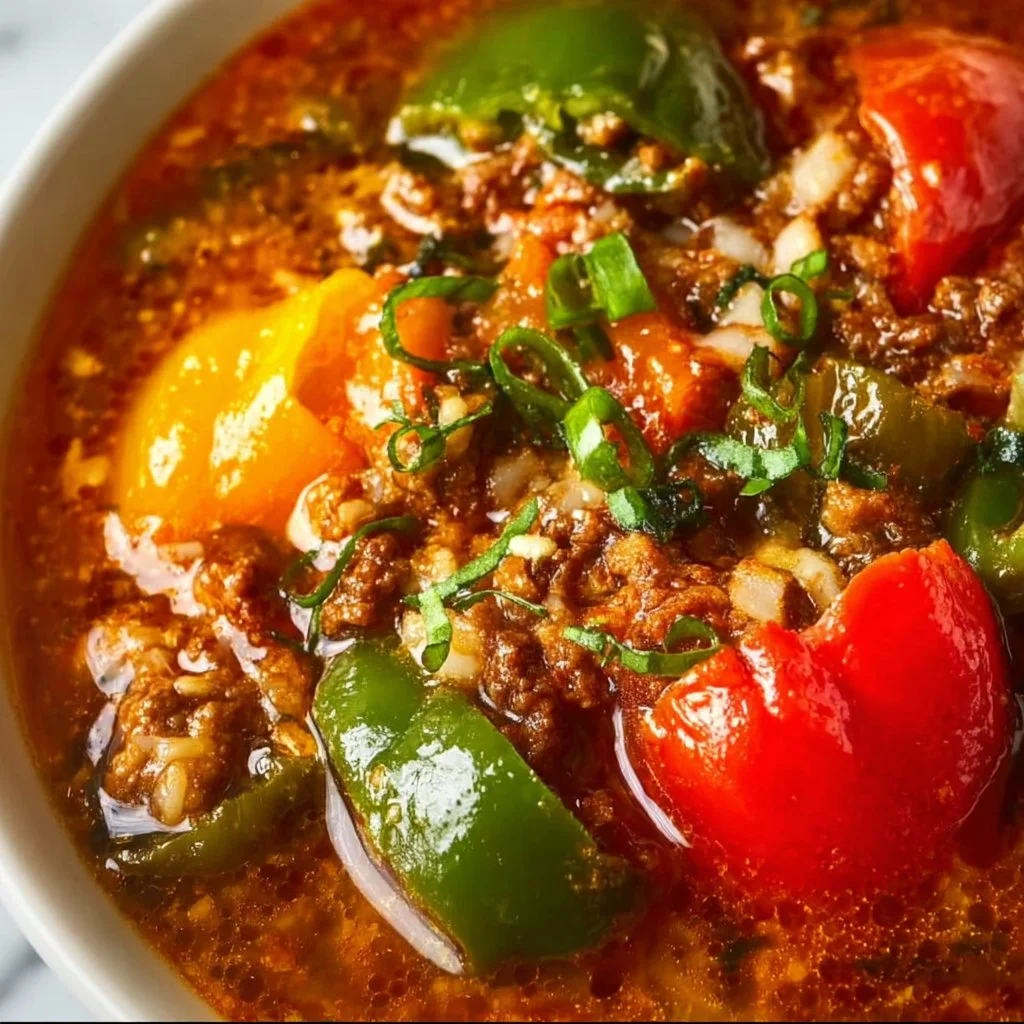
Keto stuffed pepper soup
Dive into Decadence: Keto Stuffed Pepper Soup
Welcome, my fellow food enthusiasts! Today, we’re diving into a dish that is not only packed with flavor but also fits seamlessly into the keto lifestyle—Keto Stuffed Pepper Soup. You know those days when the weather is a bit drizzly, and all you want is something warm and comforting? That’s where this delicious soup comes into play. It’s hearty, it’s nutritious, and it’s downright satisfying!
Imagine curling up on the couch with a steaming bowl of vibrant red and green goodness, just waiting to fill your belly with warmth. This Keto Stuffed Pepper Soup is like getting all the goodness of stuffed peppers without the hassle—no need to hollow out any peppers here! Just chop, sauté, and simmer for a delightful one-pot meal that’ll have everyone asking for seconds.
But beyond its comforting qualities, this soup is all about fresh ingredients and bold flavors. We’re talking richly seasoned ground beef, fresh bell peppers, and aromatic herbs bringing vitality to your bowl. Plus, it’s a great way to meet those veggie goals while enjoying every spoonful. So grab your apron, and let’s get started on this delicious journey!
A Fond Memory to Spice Up Your Kitchen
Ah, the memories that come flooding back when I think of stuffed peppers! One of my favorite childhood memories is being in the kitchen with my grandma, watching her work her magic. The kitchen was always filled with such excitement and warmth when she’d throw together her famous stuffed peppers. The moment the smell of sautéed onions and garlic wafted through the air, I knew dinner would be something special.
Grandma’s technique was a bit more traditional; she would carefully stuff each pepper and bake them to perfection. I loved the anticipation as they bubbled away in the oven. But as time went on and life got busier, I realized I needed a quicker version without sacrificing all that nostalgic flavor. That’s how this Keto Stuffed Pepper Soup came to life! With all the comforting elements of grandma’s classic but served in a way that fits our fast-paced lives today.
Ingredients Breakdown
Let’s gather all the fresh, wholesome ingredients for our Keto Stuffed Pepper Soup. Remember, the beauty of cooking lies in flexibility—don’t hesitate to mix things up based on what you have on hand!
-
Olive Oil (1 tablespoon)
A heart-healthy fat that adds richness. Feel free to substitute with avocado oil for a different flavor profile. -
Chopped Onion (70 g / 2.5 oz)
Provides a sweet base for your soup. If you’re looking for a milder taste, shallots would work well too. -
Ground Beef (450 g / 1 lb / 16 oz)
This is the protein powerhouse of your soup. For a leaner option, ground turkey or chicken can be fantastic alternatives. -
Chopped Green or Yellow Pepper (80 g / 2.8 oz)
Adds that classic stuffed pepper flavor! You can mix and match with other colors like orange for more sweetness. -
Chopped Red Pepper (145 g / 5.12 oz)
Not only does it brighten the soup, but it also brings a wee bit of sweetness. If you’re looking to reduce carbs, you can skip this altogether. -
Minced Garlic (3 cloves)
The aromatic punch we all love! If fresh isn’t available, 1 teaspoon of garlic powder can work as a substitute. -
Canned Crushed Tomatoes (1 cup / 200 ml)
Introduces acidity and depth. If you prefer fresh, go for about 4-5 ripe tomatoes, chopped. -
Beef Broth (1.5 cups / 300 ml)
Adds a robust flavor base. Vegetable broth can be used for a vegetarian twist! -
Water (2 cups / 400 ml)
Helps to reach the desired consistency; you can adjust based on how chunky or brothy you like it. -
Salt (1/2 teaspoon or more to taste)
Don’t skip seasoning! Use sea salt or kosher salt for better flavor. -
Pepper (to taste)
Freshly cracked black pepper enhances all the flavors. -
Ground Paprika (1 teaspoon)
Adds warmth and subtle smokiness. Smoked paprika is a great substitution for added depth. -
Turmeric (1 teaspoon)
Not only does it boost color, but it’s also full of anti-inflammatory properties. -
Dried Basil (1 teaspoon)
A classic herb that complements the peppers beautifully. You can easily swap it out for dried thyme or oregano. -
Dried Oregano (1 teaspoon)
A necessity for that Italian flair. Fresh could be used if you have it on hand. -
Freshly Chopped Parsley (1 tablespoon)
Brightens the finished dish. Substitute with cilantro if you’re a fan of its unique flavor!
For Serving:
-
Sour Cream
Adds a creamy, tangy touch—Greek yogurt is a great substitute! -
Freshly Chopped Parsley
For that color pop on top! -
Chopped Spring Onion
A milder onion flavor that’s perfect for garnish. -
Shredded Cheddar Cheese
Because who doesn’t love cheese? Feel free to use your favorite cheese blend!
Step-by-Step Cooking Instructions
Alright, let’s get to the fun part—cooking this delectable Keto Stuffed Pepper Soup! Here’s a step-by-step breakdown to guide you through.
-
Sauté the Aromatics
In a large pot, heat the olive oil over medium heat. Add the chopped onions and let them sweat for about 3-4 minutes until they’re translucent and aromatic. This step builds the foundation of flavor for your soup! -
Add the Garlic
Next, toss in the minced garlic and sauté for an additional 1-2 minutes until fragrant. Be careful not to burn it! Burnt garlic brings bitterness, and trust me, we don’t want that in our delicious soup. -
Brown the Ground Beef
Crank up the heat a smidge and add the ground beef. Using a wooden spoon, break it apart and cook until browned, about 6-8 minutes. Drain excess grease if desired. This step enriches the soup with meaty goodness. -
Incorporate the Peppers
Add the chopped green and red peppers to the pot. Stir everything together and let it cook for about 5 minutes, allowing the peppers to soften slightly. The vibrant colors are truly a feast for the eyes! -
Mix in the Tomatoes and Broth
Now it’s time to pour in the crushed tomatoes and beef broth. Stir to combine, and then add the water. Bring everything to a gentle simmer. -
Season Your Soup
Sprinkle in the salt, pepper, paprika, turmeric, basil, and oregano. This is your chance to infuse the flavors! Let the soup simmer for about 20-25 minutes, uncovered. The longer it simmers, the more those flavors meld together. -
Final Touches
After simmering, taste your soup and adjust the seasoning as necessary. If you like, feel free to add more spices or herbs! The magic happens when we taste and tweak until it’s just right. -
Prepare for Serving
Once satisfied, ladle your Keto Stuffed Pepper Soup into bowls. Top with a dollop of sour cream, a sprinkle of chopped parsley, chopped spring onions, and a generous handful of shredded cheddar cheese.
Serving Suggestions
Plating is an art! To serve your flavorful Keto Stuffed Pepper Soup, simply ladle it into a rustic bowl or a deep plate. The vibrant colors of the peppers and herbs will look stunning against the white bowl. Garnish generously to create a beautiful contrast, and don’t forget a side of crusty bread for those who aren’t counting carbs—just for dipping, of course!
Recipe Variations
Now, for the creative souls out there, here are some fun twists you might want to try with this recipe:
-
Spicy Kick: Add in some diced jalapeños or a sprinkle of red pepper flakes for an extra layer of heat.
-
Vegetarian Delight: Substitute ground beef with lentils or robust mushrooms for a hearty vegetarian option.
-
Cheesy Goodness: Stir in cream cheese towards the end of cooking for an extra creamy texture and rich flavor.
-
Herb Infusion: Try fresh herbs like thyme and rosemary instead of dried for a bright, aromatic addition.
-
Curry Twist: Incorporate curry powder in place of the paprika and turmeric for a fun, exotic take on the flavors.
Chef’s Notes
This Keto Stuffed Pepper Soup has been a hit in my kitchen, evolving with each batch. It started as a quick weeknight meal and turned into something I love to serve at gatherings—everyone loves it! One memory that stands out is the time I accidentally added double the garlic… you know what? It turned out pretty fantastic! The beauty of cooking is that while there’s a recipe, there’s always room for creativity and accidental breakthroughs. Embrace the kitchen chaos; some of the best flavors come from unexpected discoveries!
FAQs and Troubleshooting
1. My soup is too thick—what can I do?
If your soup has thickened more than you’d like, simply add a bit more broth or water until you reach your desired consistency.
2. Can I make this soup in advance?
Absolutely! This soup actually gets better over time as the flavors meld. Store it in the fridge for up to 4 days, and reheat on the stove when you’re ready to enjoy.
3. What’s the best way to freeze leftovers?
Let the soup cool completely, then transfer it to an airtight container. It can be frozen for up to 3 months. Just thaw in the fridge overnight before reheating.
4. Why does my soup taste a bit bland?
Every ingredient brings its own level of flavor! If yours falls flat, it could be due to insufficient seasoning. Taste as you go and don’t be afraid to add more salt, spices, or herbs.
Nutritional Info (Optional)
For those keeping track, here’s a rough breakdown per serving:
- Calories: 340
- Protein: 24g
- Fat: 22g
- Carbohydrates: 9g (Net carbs after fiber)
- Fiber: 3g
And there you have it—the delightful journey that is Keto Stuffed Pepper Soup! I hope it brings as much joy to your kitchen as it does to mine. Remember, cooking is about exploring flavors, enjoying the moment, and making delicious memories. So, let’s eat well, feel good, and keep those cravings in check. Happy cooking, friends!
PrintKeto Stuffed Pepper Soup

A delicious, comforting soup packed with the flavors of stuffed peppers, perfect for a keto lifestyle.
- Prep Time: 10 minutes
- Cook Time: 30 minutes
- Total Time: 40 minutes
- Yield: 6 servings 1x
- Category: Soup
- Method: Stovetop
- Cuisine: American
- Diet: Keto
Ingredients
- 1 tablespoon Olive Oil
- 70 g Chopped Onion
- 450 g Ground Beef
- 80 g Chopped Green or Yellow Pepper
- 145 g Chopped Red Pepper
- 3 cloves Minced Garlic
- 1 cup (200 ml) Canned Crushed Tomatoes
- 1.5 cups (300 ml) Beef Broth
- 2 cups (400 ml) Water
- 1/2 teaspoon Salt (or more to taste)
- Pepper (to taste)
- 1 teaspoon Ground Paprika
- 1 teaspoon Turmeric
- 1 teaspoon Dried Basil
- 1 teaspoon Dried Oregano
- 1 tablespoon Freshly Chopped Parsley
- Sour Cream (for serving)
- Freshly Chopped Parsley (for garnish)
- Chopped Spring Onion (for garnish)
- Shredded Cheddar Cheese (for topping)
Instructions
- Sauté the olive oil in a large pot over medium heat. Add the chopped onions and let them sweat for about 3-4 minutes until translucent.
- Add the minced garlic and sauté for an additional 1-2 minutes until fragrant.
- Brown the ground beef, breaking it apart as it cooks, for about 6-8 minutes until browned.
- Incorporate the chopped green and red peppers and cook for about 5 minutes, allowing them to soften.
- Mix in the crushed tomatoes and beef broth, then add the water. Bring to a gentle simmer.
- Season the soup with salt, pepper, paprika, turmeric, basil, and oregano. Let it simmer uncovered for 20-25 minutes.
- Taste and adjust seasoning as necessary before serving.
- Prepare the soup in bowls and top with sour cream, parsley, chopped spring onions, and shredded cheddar cheese.
Notes
This soup can be made in advance and tastes even better the next day. Feel free to customize with additional spices or herbs.
Nutrition
- Serving Size: 1 serving
- Calories: 340
- Sugar: 4g
- Sodium: 800mg
- Fat: 22g
- Saturated Fat: 10g
- Unsaturated Fat: 8g
- Trans Fat: 0g
- Carbohydrates: 9g
- Fiber: 3g
- Protein: 24g
- Cholesterol: 80mg
Keywords: keto, soup, stuffed peppers, healthy recipe, low carb