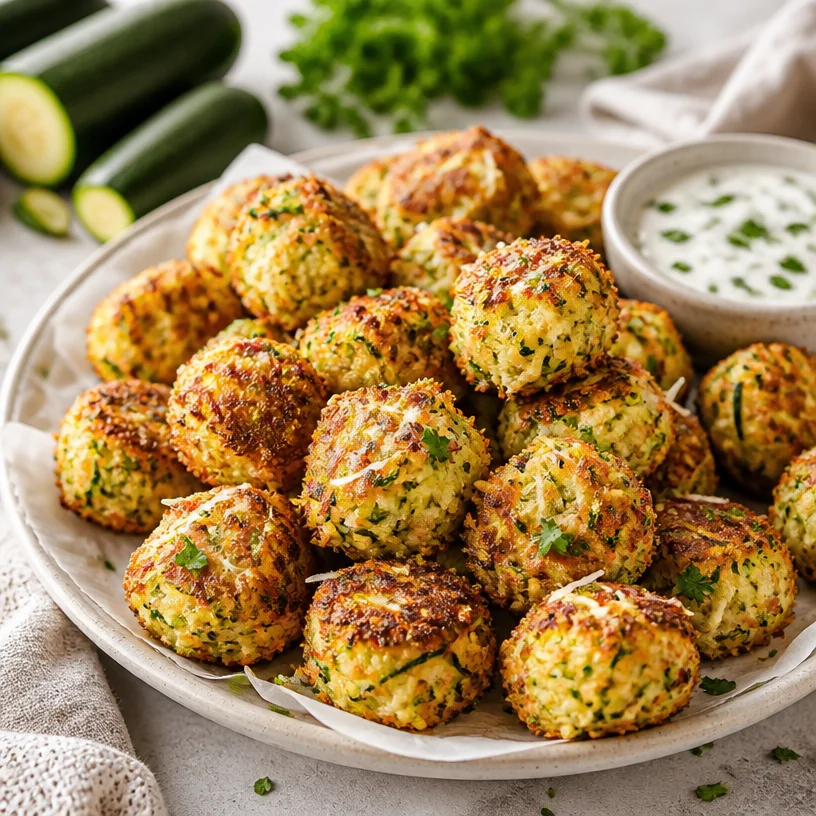
Crispy Cheesy Zucchini Tots: 25-Minute Weeknight Snack
Cheesy Zucchini Tots: The Perfect Bite of Nostalgia and Flavor
Hey there, food lovers! Welcome back to Clean Plate Cravings, where we believe eating well means tasting amazing. Today, we’re talking about one of my absolute favorite comfort foods: Cheesy Zucchini Tots. These little wonders are crispy on the outside, cheesy on the inside, and a delightful way to sneak some veggies into your day. So, grab your apron, and let’s get cooking!
A Dash of Nostalgia
When I think back to my childhood, I can almost hear the sizzling sound of fresh vegetables meeting hot olive oil in my mom’s kitchen. She had a magic touch when it came to making veggie dishes that tasted like a treat instead of a chore. One of my earliest culinary memories is racing home from school, smelling something irresistible wafting through the air, only to find out that it was her famous zucchini fries—golden brown, crispy, and oh-so-cheesy!
Those were the days when vegetables were our best allies, and I didn’t even realize I was being fed healthy food. I still remember the joy of dipping those crunchy bites into homemade ranch dressing, scraping the plate clean. Inspired by those memories, I decided to whip up a fun twist on my mom’s creation: Cheesy Zucchini Tots! My version is perfect for satisfying cravings while keeping things light and fulfilling.
Ingredients
Let’s talk ingredients! Here’s what you’ll need for these scrumptious tots:
-
2 medium zucchinis: The star of the show! Look for firm zucchinis without any blemishes. If zucchini isn’t in season, you could substitute with yellow squash.
-
1 cup shredded cheese (cheddar or mozzarella): Cheese adds that melty goodness! Cheddar provides a sharp flavor, while mozzarella will give you that classic gooiness. Feel free to mix and match!
-
1/2 cup breadcrumbs: These help bind everything together and give the tots their crunchy texture. Use gluten-free breadcrumbs to keep it free from gluten or even crushed crackers if you’re out.
-
1/4 cup grated Parmesan cheese: This adds a fantastic depth of flavor. Nutritional yeast can be a great vegan substitute if you’re looking for a cheesy flavor without dairy.
-
1 egg: This acts as a binder to hold everything together. If you’re vegan or egg-free, try a flax egg (1 tablespoon ground flaxseeds + 2.5 tablespoons water, let it sit for 5 minutes).
-
1 teaspoon garlic powder: For that savory kick! Fresh minced garlic is an excellent substitute; just use a little less since it’s more potent.
-
1 teaspoon onion powder: Adds another layer of flavor. If you have fresh onions, sauté a small amount until soft before mixing them in.
-
Salt and pepper to taste: Essential seasonings to enhance all the flavors! Remember, you can get creative with herbs or spices based on your preference.
-
Olive oil for cooking: A light drizzle will keep those tots from sticking and who doesn’t love a hint of oiliness for extra flavor?
Step-by-Step Instructions
Alright, it’s showtime! Let’s guide you through the process of making these delicious Cheesy Zucchini Tots.
-
Preheat Your Oven: Start by preheating your oven to 400°F (200°C). This ensures that your tots will be perfectly crisp when they come out.
-
Grate the Zucchini: Wash the zucchinis well and grate them using a box grater or a food processor. Aim for medium shreds. The more moisture you can extract, the better your tots will crisp up, so don’t skip this step!
-
Drain the Zucchini: Place the grated zucchini in a cheesecloth or a clean kitchen towel. Squeeze out as much liquid as you can! This will prevent the mixture from becoming too soggy. Sometimes, after taxing those zucchinis, you might feel like a little workout was just involved!
-
Mix the Ingredients: In a mixing bowl, combine the drained zucchini, shredded cheese, breadcrumbs, Parmesan, egg, garlic powder, onion powder, salt, and pepper. Fold everything together until it’s well combined—this is where the magic happens!
-
Form the Tots: With clean hands (or a cookie scoop!), shape the mixture into small, oval-shaped tots, about 1 inch long. Make sure they are tightly packed so they hold their shape during baking—think of it like playing with edible clay!
-
Arrange on a Baking Sheet: Line a baking sheet with parchment paper or lightly grease it with olive oil. Place the tots on the sheet, leaving space between them to allow for even cooking.
-
Drizzle with Olive Oil: Give the tots a quick drizzle of olive oil or spritz with cooking spray before popping them in the oven. This little step adds that golden crispy finish we all crave!
-
Bake: Bake for about 20-25 minutes, flipping halfway through, until they are golden brown and crispy. I know it’s tough, but try to resist eating them straight out of the oven; let them cool for a few minutes!
Serving Suggestions
These Cheesy Zucchini Tots are best served hot, right from the oven. They make the perfect appetizer or snack, paired with a dollop of sour cream, ranch dressing, or even some spicy salsa for those who like it a little kicked up! I love to plate them up in a fun bowl, garnished with fresh herbs for that extra flair. They’re sure to impress friends and family alike—just don’t forget the napkins!
Recipe Variations
Mixing things up in the kitchen is key! Here are a few fun twists to try with your Cheesy Zucchini Tots:
-
Herbed Tots: Add fresh herbs like basil or parsley to the mix for a burst of freshness.
-
Spicy Tots: Toss in a pinch of crushed red pepper flakes for a spicy kick or some diced jalapeños for heat.
-
Mediterranean Style: Replace the Parmesan with feta cheese and add some chopped black olives for a delicious Mediterranean twist.
-
Sweet Potato Add-in: Toss in half a cup of grated sweet potato for sweetness and an extra nutrient boost.
-
Bacon or Ham: Mix in some crumbled bacon or diced ham for that smoky, savory flavor that’ll be hard to resist.
Chef’s Notes
These Cheesy Zucchini Tots have definitely evolved through the years! Originally inspired by my love for all things fried, I tried a few variations before landing on this lighter baked version. I also genuinely believe that every chef must have a recipe that saves dinner for those evenings filled with chaos—these tots are that recipe for me. Making your family love veggies while keeping the good vibes flowing? That’s my kind of cooking!
FAQs and Troubleshooting
1. My tots fell apart while baking! What did I do wrong?
This usually means there wasn’t enough binding in your mixture. Make sure to drain your zucchini well, and consider adding an extra egg or more breadcrumbs to help hold the mixture together.
2. Can I make these ahead of time?
Absolutely! Shape the tots and refrigerate them for up to 24 hours before baking. Just ensure they’re in a sealed container so they don’t dry out.
3. What do I do if they aren’t crispy enough?
If you find the tots aren’t as crispy as you’d like, let them bake a little longer, flipping them halfway through for even cooking. A sprinkle of extra breadcrumbs before baking can also help.
4. Can I freeze them?
Yes! Freeze the uncooked, shaped tots on a baking sheet, and once they’re frozen solid, transfer them to a bag. Bake from frozen, adding a few more minutes to the cooking time.
Nutritional Info
The beauty of these Cheesy Zucchini Tots lies not just in their taste but also in their health benefits. They’re low in calories and high in fiber, helping you feel fuller longer without the guilt.
Each serving (around 4-5 tots) contains approximately:
- Calories: 150
- Protein: 8g
- Carbohydrates: 10g
- Dietary Fiber: 2g
- Fat: 8g
So there you have it, foodies! Your guide to whipping up the most delightful Cheesy Zucchini Tots that are sure to become a staple in your kitchen. Remember to have fun while cooking—after all, that’s what it’s all about! Let me know how your creation turns out, and happy cooking! 🥳
PrintCheesy Zucchini Tots

Crispy on the outside and cheesy on the inside, these Cheesy Zucchini Tots are a delightful way to sneak some veggies into your day.
- Prep Time: 15 minutes
- Cook Time: 25 minutes
- Total Time: 40 minutes
- Yield: 4 servings 1x
- Category: Appetizer
- Method: Baking
- Cuisine: American
- Diet: Vegetarian
Ingredients
- 2 medium zucchinis
- 1 cup shredded cheese (cheddar or mozzarella)
- 1/2 cup breadcrumbs
- 1/4 cup grated Parmesan cheese
- 1 egg
- 1 teaspoon garlic powder
- 1 teaspoon onion powder
- Salt and pepper to taste
- Olive oil for cooking
Instructions
- Preheat your oven to 400°F (200°C).
- Grate the zucchinis using a box grater or food processor.
- Drain the grated zucchini using a cheesecloth or kitchen towel to remove excess moisture.
- Mix the drained zucchini, shredded cheese, breadcrumbs, Parmesan, egg, garlic powder, onion powder, salt, and pepper in a bowl.
- Form the mixture into small oval-shaped tots, about 1 inch long.
- Arrange the tots on a lined baking sheet with space between them.
- Drizzle with olive oil or spritz with cooking spray.
- Bake for 20-25 minutes, flipping halfway through, until golden brown and crispy.
Notes
These tots are best served hot and pair well with ranch dressing or spicy salsa. Feel free to customize with herbs or spices to taste.
Nutrition
- Serving Size: 4-5 tots
- Calories: 150
- Sugar: 2g
- Sodium: 300mg
- Fat: 8g
- Saturated Fat: 3g
- Unsaturated Fat: 5g
- Trans Fat: 0g
- Carbohydrates: 10g
- Fiber: 2g
- Protein: 8g
- Cholesterol: 30mg
Keywords: zucchini tots, cheesy snacks, healthy appetizers, comfort food
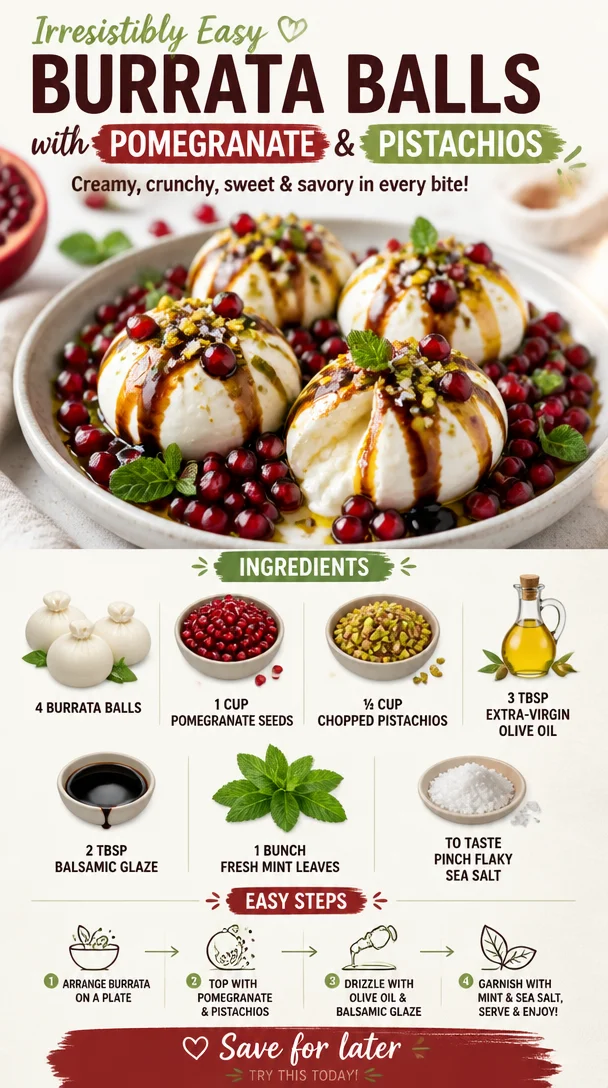
Irresistibly Easy Burrata Balls with Pomegranate & Pistachios
Irresistibly Easy Burrata Balls with Pomegranate & Pistachios
Welcome to a delightful journey of flavor! Today, I’m thrilled to share a recipe that has captured my heart (and my taste buds) like no other: Irresistibly Easy Burrata Balls with Pomegranate & Pistachios. If you’re looking for a dish that’s fresh, full of contrast, and oh-so-indulgent without the guilt, you’re in for a treat!
Picture this: You’ve just come home from a long day, and your thoughts drift to what’s for dinner. You want something quick but special, something to impress without a mountain of effort on your plate. That’s where these burrata balls come into play! Creamy, dreamy burrata cradling a sweet explosion of pomegranate seeds, paired with the rich crunch of pistachios and drizzled with fragrant olive oil—it’s the kind of dish that not only looks stunning but feels like a dream when you dive in.
This dish embodies simplicity and elegance—it’s perfect for setting the mood for a cozy dinner at home or dazzling guests at your next gathering. Plus, this combination of flavors is a crowd-pleaser, and you can whip it up in no time. Gather your ingredients, and let’s dive into this culinary adventure together!
A Personal Story
This recipe holds a special place in my heart, and it all began with a family celebration. I remember the summer of my childhood, bustling with laughter and family gatherings in the backyard. We’d gather around the grill, the scent of fresh herbs and grilled vegetables wafting through the air as we set up the picnic table. It became a tradition to have a casual yet remarkable cheese platter, and that’s where I first met burrata.
One summer evening, my cousin brought over some fresh burrata from an artisanal cheese shop. It was love at first bite! The creamy interior spilled out like liquid gold, and we paired it with whatever we could find—the sweetness of summertime fruits, fresh herbs from the garden, and crunchy nuts. Fast forward to the present day, and I’ve adapted that simple joy into this elegant dish. Each bite of these burrata balls conjures memories of laughter, warmth, and love shared over food. Trust me; once you try it, you’ll want to make it your go-to dish!
Ingredients
Let’s get ready to create some magic in the kitchen! Here’s what you’ll need for these Irresistibly Easy Burrata Balls:
-
4 pieces burrata balls
- The star of the dish! These creamy treasures melt in your mouth and do an incredible job of savoring all the surrounding flavors.
-
1 cup pomegranate seeds
- These juicy gems are like little bursts of sweetness! They not only add elegance but are packed with antioxidants. If you can’t find fresh pomegranates, you can swap with dried cranberries for a similar effect.
-
0.5 cup chopped pistachios
- The delightful crunch in this dish comes from these lovely green nuts. Not only do they impart a nutty flavor, but they also bring vibrant color. For a nut-free alternative, try sunflower seeds.
-
3 tablespoons extra-virgin olive oil
- A drizzle of high-quality olive oil enhances the richness and adds a lovely fruity note. Using a flavored olive oil, such as lemon or garlic, could be a great twist!
-
2 tablespoons balsamic glaze
- This sweet and tangy syrup elevates the entire dish. If you can’t find glaze, a drizzle of traditional balsamic vinegar adds a lovely touch—just let it reduce slightly on the stove for a richer flavor.
-
1 bunch fresh mint leaves
- They provide a refreshing contrast to the richness of the burrata. If mint isn’t your style, fresh basil or arugula makes a fantastic substitute!
-
To taste pinch flaky sea salt
- A sprinkle at the end elevates every single flavor—don’t skip this step!
Step-by-Step Instructions
Ready to whip up this masterpiece? Let’s do it together! Here’s how to bring these Irresistibly Easy Burrata Balls to life:
-
Gather Your Ingredients: First, set your kitchen up for success. Gather all your ingredients and get those pomegranate seeds ready. You can either buy them pre-packaged or cut open a fresh pomegranate; just be warned—things might get a bit messy!
-
Prep the Burrata: Gently place the burrata balls on a serving platter. Using a sharp knife (or even your hands!), make a few slits on the top of each ball. This will allow them to ooze out that luscious, creamy goodness when served.
-
Sprinkle on the Pomegranate Seeds: Next, generously scatter the pomegranate seeds over the burrata. The sweet, jewel-like seeds create a stunning contrast against the white cheese.
-
Add the Chopped Pistachios: Now, take those gorgeous green pistachios and sprinkle them on top. This adds a lovely crunch and pops of color that make the dish irresistible!
-
Drizzle with Olive Oil: Time for a lavish drizzle! Pour the extra-virgin olive oil over the top, allowing it to cascade over all those delightful ingredients. This step is crucial as it creates a silky sauce that ties everything together.
-
Top it with Balsamic Glaze: Next, take that balsamic glaze and drizzle it over the entire platter. You’ll want to be generous but not overwhelming. The glaze’s tangy sweetness perfectly balances the dish’s creaminess.
-
Finish with Mint and Salt: Finally, tear the fresh mint leaves and scatter them atop the burrata, adding a bright pop of color and freshness. Don’t forget that pinch of flaky sea salt to bring forth all the flavors!
-
Serve Immediately: This dish is best served fresh. Grab some crispy crostini, chips, or sliced baguette to pair alongside—it’s the perfect vehicle for carrying that creamy burrata and those delightful toppings!
Serving Suggestions
When it comes to serving these burrata balls, presentation is key! Plate the dish on a large, beautiful platter to showcase the vibrant colors. Surround the burrata with your favorite toasted bread or crostini, so it’s easy for guests to dig in. You can even tuck a few sprigs of mint around the platter for an extra touch of elegance. This dish is all about inviting everyone to share, so let it be the centerpiece of your table, sparking smiles and conversations over each delightful bite.
Recipe Variations
Now, let’s spice things up with a few variations to keep this dish fresh and exciting:
-
Mediterranean Twist: Add slices of ripe tomatoes and Kalamata olives for a classic Mediterranean flair!
-
Spicy Kick: Sprinkle a dash of red pepper flakes over the top for some zing that balances the creaminess of burrata.
-
Fruit Fusion: Switch things up by incorporating seasonal fruits like figs or peaches, which complement the burrata beautifully.
-
Herbed Delight: Mix up the herbs! Instead of mint, try fresh basil or even some zesty thyme for a different flavor profile.
-
Nut-Free Version: Swap out the pistachios for crunchy seeds like pumpkin or sunflower seeds to cater to nut allergies!
Chef’s Notes
This recipe has evolved with my seasonal inspirations and the ingredients I have on hand. A funny kitchen story that comes to mind—one time, I decided to host a last-minute gathering, and I completely forgot to buy pomegranate seeds! I dashed to the store only to discover they had run out of fresh ones but had frozen ones available. I thought, “Why not?” They added a different texture but tasted great! The moral of the story? Don’t be afraid to improvise, and remember that cooking is about exploration and fun.
FAQs and Troubleshooting
1. What if I can’t find burrata?
- Don’t worry! You can substitute it with fresh mozzarella for a similar taste experience, though it won’t be quite as creamy.
2. Can I prepare this dish in advance?
- While I recommend serving burrata fresh for the best flavor, you can prep the ingredients in advance. Just leave the assembly until right before serving.
3. How can I make this dish vegan?
- For a creamy vegan alternative, try using cashew cheese or a thick, herbed vegan cheese spread.
4. My balsamic glaze is too thick; how can I fix it?
- If the glaze has thickened too much, you can gently heat it with a splash of water to loosen it up, bringing it back to a drizzling consistency.
Nutritional Info
While this dish is undeniably delicious, it’s also packed with nutrients! The pomegranate seeds provide antioxidants, and pistachios offer healthy fats. This dish is a balanced blend of good-for-you ingredients and is perfect for a light snack or as part of a larger meal.
Now you’re ready to dive into the magic of these Irresistibly Easy Burrata Balls with Pomegranate & Pistachios. Enjoy, share with friends, and relish the joy that great food can bring. Happy cooking, foodies!
PrintIrresistibly Easy Burrata Balls with Pomegranate & Pistachios
A fresh and indulgent dish featuring creamy burrata balls with sweet pomegranate seeds, crunchy pistachios, and a drizzle of olive oil.
- Prep Time: 10 minutes
- Cook Time: 0 minutes
- Total Time: 10 minutes
- Yield: 4 servings 1x
- Category: Appetizer
- Method: No-cook
- Cuisine: Mediterranean
- Diet: Vegetarian
Ingredients
- 4 pieces burrata balls
- 1 cup pomegranate seeds
- 0.5 cup chopped pistachios
- 3 tablespoons extra-virgin olive oil
- 2 tablespoons balsamic glaze
- 1 bunch fresh mint leaves
- To taste pinch flaky sea salt
Instructions
- Gather your ingredients: First, set your kitchen up for success. Gather all your ingredients and get those pomegranate seeds ready.
- Prep the burrata: Gently place the burrata balls on a serving platter. Make a few slits on the top of each ball.
- Sprinkle on the pomegranate seeds: Generously scatter the pomegranate seeds over the burrata.
- Add the chopped pistachios: Sprinkle them on top for a lovely crunch and color.
- Drizzle with olive oil: Pour the extra-virgin olive oil over the top.
- Top it with balsamic glaze: Drizzle the balsamic glaze over the entire platter.
- Finish with mint and salt: Tear the fresh mint leaves and scatter them atop the burrata, then add a pinch of flaky sea salt.
- Serve immediately: Plate the dish with crispy crostini or sliced baguette.
Notes
This dish is best served fresh, and it pairs well with crispy bread for dipping.
Nutrition
- Serving Size: 1 serving
- Calories: 300
- Sugar: 10g
- Sodium: 150mg
- Fat: 20g
- Saturated Fat: 5g
- Unsaturated Fat: 15g
- Trans Fat: 0g
- Carbohydrates: 25g
- Fiber: 4g
- Protein: 9g
- Cholesterol: 20mg
Keywords: burrata, appetizer, Mediterranean, pomegranate, pistachios, easy recipe
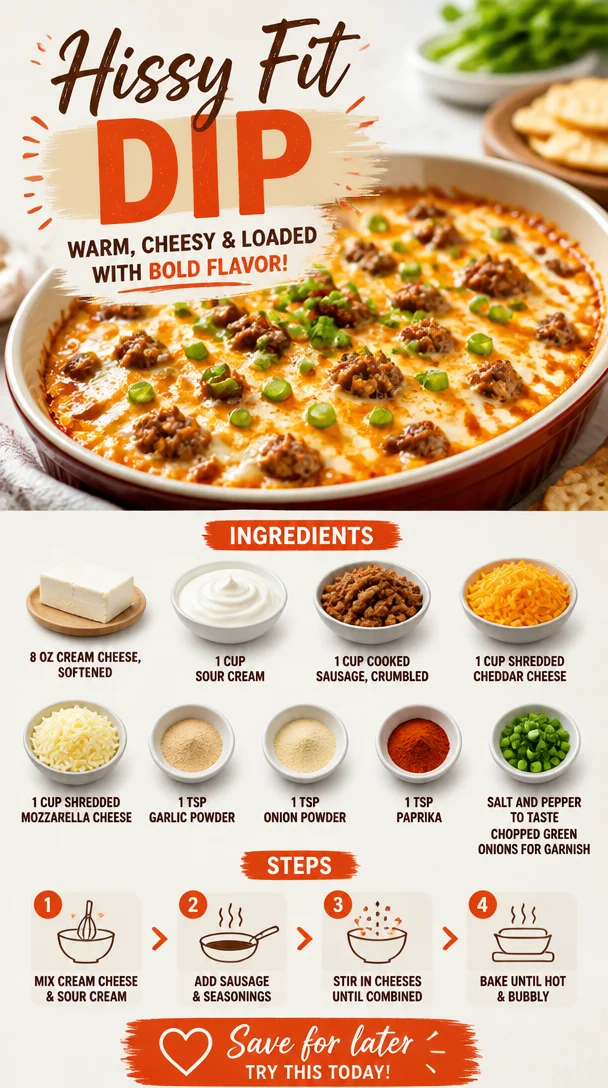
Hissy Fit Dip
Hissy Fit Dip: The Creamy Comfort Food You’ll Crave
Welcome back to Clean Plate Cravings, my food-loving friends! Today, I have a treat for you that’s as easy to whip up as it is to devour. Let’s dive into the world of Hissy Fit Dip—a creamy, savory delight that hits all the right notes for your next gathering or cozy night in. Trust me, this dip is about to make your taste buds do a happy dance!
When I think of Hissy Fit Dip, I’m flooded with memories of laughter, friends, and indulgence. This dip has a way of bringing people together, whether it’s game day, a potluck, or just a chill Friday night at home. It’s that comforting dish you can rely on to satisfy your cravings and impress your guests all at once. Plus, it’s so simple to make that even the most kitchen-challenged among us can pull it off. So roll up your sleeves, grab your apron, and let’s get cooking!
A Nostalgic Story
Growing up, our family had a unique tradition that revolved around Friday night game nights. We’d gather around the TV with piles of snacks, cheering for our favorite teams while munching on all sorts of comfort food. One Friday evening, my mom decided to make a new dip she’d heard about—Hissy Fit Dip. Intrigued by the name, my friends and I couldn’t wait to dig in!
The moment that warm, cheesy goodness hit our taste buds, we were transported to a world of flavor. It was creamy, with just the right amount of spice from the sausage and a lovely melty consistency that made it irresistible. Every scoop was a bit of heaven, and soon enough, we were stealing bites directly from the baking dish! There might have been some friendly arguments about who got the last bite, leading to giggles and a few good-natured “hissy fits.”
Fast forward to today, and Hissy Fit Dip has become a staple in my own kitchen, providing me with the same joy and nostalgia as it did back then. Each time I make it, I’m reminded of those carefree evenings filled with laughter, good food, and cherished friendships. Now, I can’t wait for you to create your own memories with this scrumptious dip!
Ingredients
Here’s what you’ll need to bring this delightful dip to life:
-
8 oz cream cheese, softened
This is the base of our dip! Cream cheese adds that rich, creamy texture. If you’re looking for a lighter option, you can substitute with Greek yogurt. -
1 cup sour cream
A must for the creaminess! It adds a tangy flavor that balances the richness. You can use non-fat or low-fat sour cream if you want to cut calories, or even a dairy-free version if you prefer. -
1 cup cooked sausage, crumbled
Sausage brings a savory punch to the dip. I recommend using Italian sausage for some spice, but feel free to go with turkey or a plant-based sausage if you’re looking for a healthier or vegetarian option. -
1 cup shredded cheddar cheese
Cheddar contributes that iconic cheesy flavor and gooey stretch. A sharp cheddar will up the flavor profile. You could swap in pepper jack if you want a kick! -
1 cup shredded mozzarella cheese
Mozzarella is all about the melt! It keeps the dip luscious and creamy. Try using a low-moisture mozzarella for the best melting quality. -
1 tsp garlic powder
A little garlic powder boosts flavor without the chopping! You can substitute fresh minced garlic if you prefer a stronger garlic kick. -
1 tsp onion powder
This adds a sweet and savory depth. If you have fresh onions, sautéing them first can brighten the flavor even more. -
1 tsp paprika
Paprika lends color and a subtle smokiness to the dip. If you’re feeling adventurous, try smoked paprika for a deeper flavor. -
Salt and pepper to taste
Essential for bringing all the flavors together. Always taste your dip before serving to make necessary adjustments. -
Chopped green onions for garnish
A fresh finish! Green onions add a pop of color and a burst of freshness to balance the richness of the dip.
Step-by-Step Instructions
Now that you have your ingredients ready, let’s put this delicious Hissy Fit Dip together!
-
Preheat your oven to 350°F (175°C).
Be sure to do this first so your oven is ready when you’re done prepping. -
In a large mixing bowl, combine the softened cream cheese and sour cream.
Use a hand mixer or a spatula to blend them together until smooth. This step is essential for avoiding lumps! -
Add in the cooked sausage, cheddar cheese, and mozzarella cheese.
Mix until everything is well combined—a good stir will help disperse the sausage and cheese evenly throughout the dip. -
Sprinkle in the garlic powder, onion powder, and paprika.
It’s time for seasoning! Stir well to incorporate these spices, ensuring each luscious bite is packed with flavor. -
Season with salt and pepper to taste.
Remember, you can always add more salt later, so start with a little and build up if needed. -
Transfer the dip mixture to a baking dish.
I recommend using an 8×8 inch dish, but any oven-safe dish will do. Spread the mixture evenly across the bottom. -
Bake in the preheated oven for 25-30 minutes or until bubbling and golden on top.
Keep an eye on it during the last few minutes; you want that perfect golden crust without burning! -
Once it’s out of the oven, let it cool for a few minutes.
This is the hardest part—don’t dive in just yet! A slight cool will make it easier to scoop. -
Garnish with chopped green onions just before serving.
This adds a colorful touch and a refreshing crunch that cuts through the richness of the cheese.
Voilà! You’ve created a dip that will become a household favorite (if it isn’t already!).
Serving Suggestions
Hissy Fit Dip is best served warm, right out of the oven. Pair it with an array of sides to accompany your dip:
- Tortilla chips: Go classic with crunchy chips!
- Vegetable sticks: Carrots, celery, and bell peppers provide a satisfying crunch.
- Bread: Serve with slices of crusty bread or toasted baguette for a more substantial dipper.
- Crackers: Opt for a colorful variety to create an appealing platter.
No matter how you choose to serve it, this dip is bound to be a hit!
Recipe Variations
Feel like mixing things up? Here are a few creative twists to try with your Hissy Fit Dip:
-
Buffalo Chicken Hissy Fit Dip: Swap out the sausage for shredded cooked chicken and add a dash of hot sauce for some spicy flair.
-
Spinach and Artichoke Version: Stir in a cup of cooked spinach and a half-cup of chopped artichokes for a classic twist!
-
Southwestern Style: Add black beans, corn, and diced green chilies for a zesty Southwestern flavor profile.
-
Cheesy Jalapeño Dip: For heat lovers, include diced jalapeños and use pepper jack cheese instead of cheddar.
-
Vegetarian Hissy Fit Dip: Skip the sausage, and add finely diced bell peppers and zucchini for a veggie version that’s just as delicious!
Chef’s Notes
Ah, the evolution of Hissy Fit Dip! Over the years, this recipe has traveled through many iterations in my kitchen. Originally, I thought it was just a standard cheesy dip, but the moment I started experimenting with spices and different cheeses, it exploded in flavor. I’ll never forget the first time I tried adding a touch of smoked paprika—it was a game-changer!
Another funny memory? Once, I forgot to add the sausage, and my friends accidentally dubbed it a “healthy version.” Little did they know, I just had a major “oops!” moment! But that dip was just as delicious, proving that Hissy Fit Dip truly is versatile.
FAQs and Troubleshooting
1. Can I make this dip ahead of time?
Absolutely! You can prepare the dip, store it in the fridge for up to 24 hours, and then bake it right before serving. Perfect for planning ahead!
2. My dip is too thick; what can I do?
If it seems too thick, you can mix in a splash of milk or additional sour cream before baking to loosen it up a bit.
3. How do I store leftovers?
Store any leftover dip in an airtight container in the fridge for up to 3 days. Just reheat in the oven or microwave before enjoying!
4. How can I make it spicier?
Add more garlic powder, a pinch of cayenne pepper, or even a splash of hot sauce to kick up the spice levels.
Nutritional Info
This Hissy Fit Dip is definitely a treat, so enjoy it in moderation as part of a balanced diet! (Note: Nutritional values will vary based on specific brands and preparation.)
- Calories per serving: Approximately 200-250 (based on serving size and ingredients used)
- Protein: 10g
- Fat: 18g
- Carbohydrates: 4g
Remember, good food is all about balance and sharing great moments with friends and family!
Now that you’ve discovered the secrets of Hissy Fit Dip, it’s time to gather those ingredients and get cooking. Enjoy the process, have fun, and create your own wonderful memories around this creamy delight. Happy dipping!
PrintHissy Fit Dip

A creamy and savory dip that is perfect for gatherings and cozy nights in, guaranteed to satisfy your cravings.
- Prep Time: 15 minutes
- Cook Time: 30 minutes
- Total Time: 45 minutes
- Yield: 8 servings 1x
- Category: Appetizer
- Method: Baking
- Cuisine: American
- Diet: Vegetarian
Ingredients
- 8 oz cream cheese, softened
- 1 cup sour cream
- 1 cup cooked sausage, crumbled
- 1 cup shredded cheddar cheese
- 1 cup shredded mozzarella cheese
- 1 tsp garlic powder
- 1 tsp onion powder
- 1 tsp paprika
- Salt and pepper to taste
- Chopped green onions for garnish
Instructions
- Preheat your oven to 350°F (175°C).
- Combine the softened cream cheese and sour cream in a large mixing bowl.
- Add in the cooked sausage, cheddar cheese, and mozzarella cheese.
- Sprinkle in the garlic powder, onion powder, and paprika.
- Season with salt and pepper to taste.
- Transfer the dip mixture to a baking dish.
- Bake in the preheated oven for 25-30 minutes or until bubbling and golden on top.
- Let it cool for a few minutes.
- Garnish with chopped green onions just before serving.
Notes
Feel free to prepare the dip ahead of time and store it in the fridge for up to 24 hours before baking.
Nutrition
- Serving Size: 1 serving
- Calories: 250
- Sugar: 2g
- Sodium: 500mg
- Fat: 18g
- Saturated Fat: 9g
- Unsaturated Fat: 7g
- Trans Fat: 0g
- Carbohydrates: 4g
- Fiber: 0g
- Protein: 10g
- Cholesterol: 50mg
Keywords: dip, creamy dip, Hissy Fit Dip, easy appetizer, cheese dip