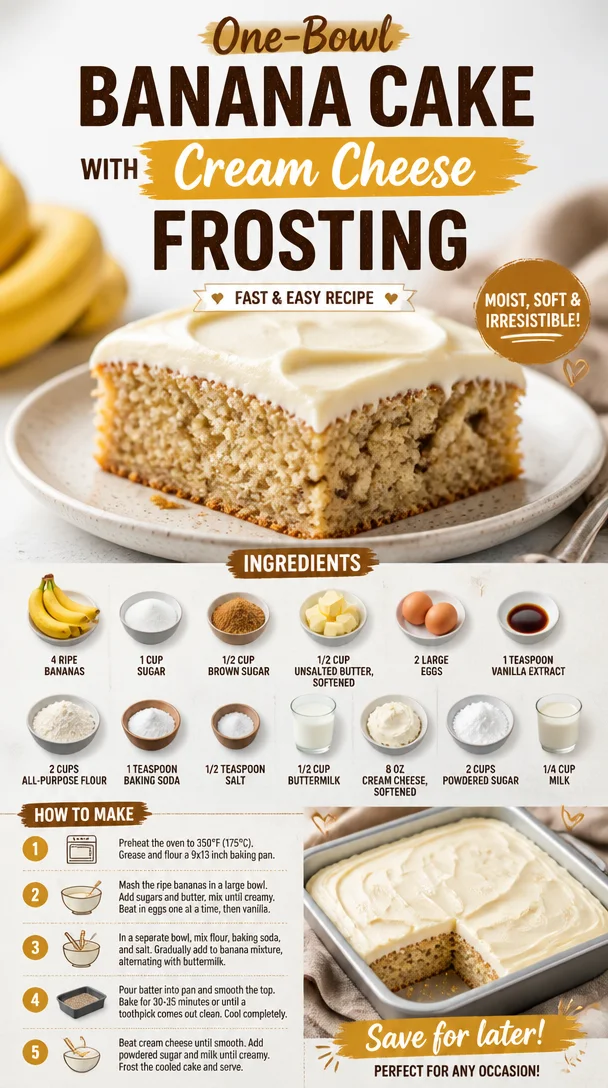
One-Bowl Banana Cake with Cream Cheese Frosting (Fast & Easy Recipe)
The Ultimate Comfort: Pioneer Woman Banana Cake with Cream Cheese Frosting
Introduction
Hey, food lovers! It’s Ava Carter here, and today we’re diving into a whimsical dessert that radiates warmth and nostalgia—Pioneer Woman Banana Cake with Cream Cheese Frosting. If you’re anything like me, you’ve got a special spot in your heart for bananas, whether they’re in a smoothie, on toast, or in this unforgettable cake.
Banana cake reminds me of lazy afternoons spent in my grandma’s kitchen, where the sun streamed through the window, and the sweet smell of ripe bananas filled the air. There was something magical about how her kitchen transformed ordinary ingredients into something extraordinary. This cake is one of those wonders that embodies both comfort and joy, making it perfect for any gathering—a birthday party, family dinner, or simply a treat for yourself!
This cake is fluffy, moist, and packed with the delightful sweetness of bananas, all topped with a silky cream cheese frosting that will make your taste buds dance. So grab your apron, roll up your sleeves, and let’s create something delicious together that will surely become a family favorite!
Personal Story
When I think of banana cake, I can’t help but be transported back to my childhood. I vividly remember stacking up overripe bananas on the kitchen counter, waiting for their day to shine in my grandma’s banana bread. But one day, she decided to whip up a cake instead—and oh, what a day that was! As the rich aroma wafted through the house, my siblings and I couldn’t contain our excitement.
After what felt like hours (in reality, it was only thirty minutes), the cake was finally ready, bringing us all together around the kitchen table. Each slice was a perfect blend of banana sweetness and a velvety cream cheese frosting that was out of this world. We licked our forks clean, of course, and nobody cared about the mess we made around the table. That day, I learned not just about baking, but the warmth of sharing a homemade treat with loved ones. It’s the kind of memory that sticks with you, don’t you think? It taught me to cherish each moment, especially when it’s accompanied by dessert!
Ingredients
Here’s what you’ll need to make this delightful cake, along with some helpful notes:
-
4 ripe bananas: The riper, the better! Brown spots mean more sweetness. If you’re out of bananas, you can try substituting with unsweetened applesauce—about 1 cup will do.
-
1 cup sugar: A standard granulated sugar provides the perfect sweetness. If you prefer, you can use coconut sugar as a healthier alternative, keeping in mind it will give a slightly caramel-like flavor.
-
1/2 cup brown sugar: This adds depth and moisture. Light brown is better, but dark brown works beautifully too if that’s what you have on hand.
-
1/2 cup unsalted butter, softened: This is essential for that to-die-for texture. You can swap it with coconut oil for a dairy-free option, or use vegan butter.
-
2 large eggs: They add structure and moisture. If you’re looking for an egg-free option, a flax egg (1 tablespoon flaxseed meal + 2.5 tablespoons water) works wonders!
-
1 teaspoon vanilla extract: A must-have for that aromatic flavor. Feel free to experiment with almond extract for a unique twist.
-
2 cups all-purpose flour: All-purpose gives us that light and fluffy texture. For a gluten-free version, use a 1:1 gluten-free baking flour.
-
1 teaspoon baking soda: This is the leavening agent that gives our cake rise. Make sure it’s fresh for the best results!
-
1/2 teaspoon salt: A pinch of salt enhances all the flavors. Feel free to use Kosher or sea salt.
-
1/2 cup buttermilk: Buttermilk makes the cake tender and moist. If you don’t have any, a simple substitute can be made by adding a tablespoon of vinegar to regular milk and letting it sit for a few minutes.
-
8 oz cream cheese, softened: The creamy base for our frosting. If you want a lighter version, you can use Neufchâtel cheese.
-
2 cups powdered sugar: This gives the frosting its sweetness and silky texture. You can reduce the sugar for a less sweet frosting if desired.
-
1/4 cup milk: To help with the consistency of the frosting. You can opt for almond or oat milk if you’re dairy-free.
Step-by-Step Instructions
Now that we have everything ready, let’s roll up our sleeves and get baking!
-
Preheat Your Oven
Start by preheating your oven to 350°F (175°C). This will ensure your cake bakes evenly and perfectly. Trust me; preheating is one of those steps you don’t want to skip! -
Prepare Your Pans
Grease and flour two 9-inch round cake pans—or if you’re feeling fancy, you could line them with parchment paper for easier removal! This step is crucial—nobody wants their cake to stick to the bottom. -
Mash the Bananas
In a mixing bowl, mash those ripe bananas until smooth. I love to use a fork for this—it’s easy and nostalgic, reminding me of my childhood baking sessions. -
Mix the Sugars and Butter
In a separate bowl (or your stand mixer), combine the granulated sugar, brown sugar, and softened butter. Beat until creamy and fluffy—that’s about 2-3 minutes. This is where the magic begins! -
Incorporate the Eggs and Vanilla
Add in the eggs one at a time, mixing well after each addition. Pour in that lovely vanilla extract, too; your kitchen is about to smell incredible! -
Combine Dry Ingredients
In another bowl, mix the all-purpose flour, baking soda, and salt. This step helps distribute the leavening agent evenly throughout the cake. -
Add Dry Ingredients and Buttermilk
Gradually add the dry mixture to the wet ingredients, alternating with the buttermilk, mixing just until combined. Avoid over-mixing to keep that cake light and fluffy! -
Fold in the Mashed Bananas
Carefully fold in those mashed bananas, ensuring they’re evenly distributed. You want every bite to be filled with banana goodness! -
Pour and Bake
Divide the batter evenly between the prepared pans. Pop them into your preheated oven and bake for about 25-30 minutes or until a toothpick inserted in the center comes out clean. -
Cool the Cakes
Once done, remove them from the oven and let them cool in the pans for about 10 minutes. Then, carefully remove them from the pans and transfer them to a wire rack to cool completely. This is where patience pays off! -
Prepare the Frosting
In a mixing bowl, beat the softened cream cheese and gradually add in the powdered sugar until smooth and creamy. Stir in the milk to reach your desired consistency. You want it spreadable, not too runny. -
Frost the Cake
Once the cakes are completely cooled, place one layer on your serving plate, spread a generous amount of frosting, then gently place the second layer on top and frost the top and sides. Get creative here; no need for perfection—rustic is so in!
Serving Suggestions
Slice the cake into generous portions and serve on a colorful plate, perhaps with a fresh banana slice on top for that extra flourish. A dollop of whipped cream or a scoop of ice cream on the side wouldn’t hurt either, am I right? This cake is suitable for any occasion, but it also makes a delightful afternoon treat with a cup of coffee or tea.
Recipe Variations
Now let’s get your creativity flowing! Here are a few twists you could try:
-
Chocolate Chip Banana Cake: Fold in 1 cup of semi-sweet chocolate chips into the batter for a delightful chocolatey flavor.
-
Nutty Banana Cake: Add 1 cup of chopped walnuts or pecans for a crunchy texture throughout the cake.
-
Spiced Banana Cake: Mix in a teaspoon of cinnamon or a pinch of nutmeg to add a warm, cozy flavor profile.
-
Banana Coconut Cake: Stir in 1/2 cup of shredded coconut to the batter for a tropical vibe.
-
Vegan Version: Replace eggs with flax eggs, use coconut oil instead of butter, and substitute with almond milk for buttermilk and vegan cream cheese for frosting.
Chef’s Notes
This banana cake has traveled with me through many kitchens and has adapted to various tastes and preferences. The beauty of this recipe is its incredible versatility. I once made it for a friend’s birthday party and added a layer of chocolate ganache on top of the cream cheese frosting—let me tell you, it was a hit! If you ever have overripe bananas staring at you from the counter, you know exactly what to do—it’s like a warm hug in dessert form.
FAQs and Troubleshooting
1. My cake is dense! What happened?
This often happens when the batter is over-mixed or if too much flour was added. Remember to mix just until combined, and spoon flour into your measuring cup rather than scooping it directly with the cup, which can pack it in.
2. How can I tell when my cake is done?
A toothpick inserted into the center should come out clean or with just a few moist crumbs. If it’s covered in batter, give it a few more minutes!
3. Can I make this cake ahead of time?
Absolutely! This cake stores well in the fridge for up to 5 days. You can also freeze the layers (wrapped in plastic wrap) for up to 3 months. Just thaw and frost when you’re ready!
4. My frosting is too runny. What do I do?
No worries! You can add a little more powdered sugar to thicken up the frosting. Conversely, if it’s too thick, a splash of milk will do the trick!
Nutritional Info
While indulgent, this cake is best enjoyed in moderation. Each slice is a lovely treat to brighten your day, and when you bake it with love, it’s an ingredient you can definitely feel good about!
So there you have it, friends—a delightful recipe for Pioneer Woman Banana Cake with Cream Cheese Frosting that’s sure to create not just a delicious treat but fantastic memories in your kitchen. Now go forth, bake up a storm, and savor every delightful bite! Happy baking! 🍌🍰
PrintPioneer Woman Banana Cake with Cream Cheese Frosting
A fluffy, moist banana cake topped with silky cream cheese frosting, perfect for any gathering.
- Prep Time: 15 minutes
- Cook Time: 30 minutes
- Total Time: 45 minutes
- Yield: 12 servings 1x
- Category: Dessert
- Method: Baking
- Cuisine: American
- Diet: Vegetarian
Ingredients
- 4 ripe bananas
- 1 cup granulated sugar
- 1/2 cup brown sugar
- 1/2 cup unsalted butter, softened
- 2 large eggs
- 1 teaspoon vanilla extract
- 2 cups all-purpose flour
- 1 teaspoon baking soda
- 1/2 teaspoon salt
- 1/2 cup buttermilk
- 8 oz cream cheese, softened
- 2 cups powdered sugar
- 1/4 cup milk
Instructions
- Preheat your oven to 350°F (175°C).
- Grease and flour two 9-inch round cake pans.
- Mash the bananas until smooth.
- Mix the granulated sugar, brown sugar, and softened butter until creamy.
- Incorporate the eggs one at a time and add the vanilla extract.
- Combine the flour, baking soda, and salt in another bowl.
- Add the dry mixture to the wet ingredients, alternating with buttermilk.
- Fold in the mashed bananas.
- Pour the batter into prepared pans and bake for 25-30 minutes.
- Cool the cakes in the pans for 10 minutes, then transfer to a wire rack.
- Prepare the frosting by beating cream cheese and powdered sugar until smooth and creamy; stir in milk.
- Frost the cooled cakes and serve.
Notes
This cake is versatile—try adding chocolate chips, nuts, or spices for variations.
Nutrition
- Serving Size: 1 slice
- Calories: 400
- Sugar: 30g
- Sodium: 300mg
- Fat: 15g
- Saturated Fat: 8g
- Unsaturated Fat: 5g
- Trans Fat: 0g
- Carbohydrates: 55g
- Fiber: 2g
- Protein: 5g
- Cholesterol: 60mg
Keywords: banana cake, cream cheese frosting, dessert, baking, comfort food
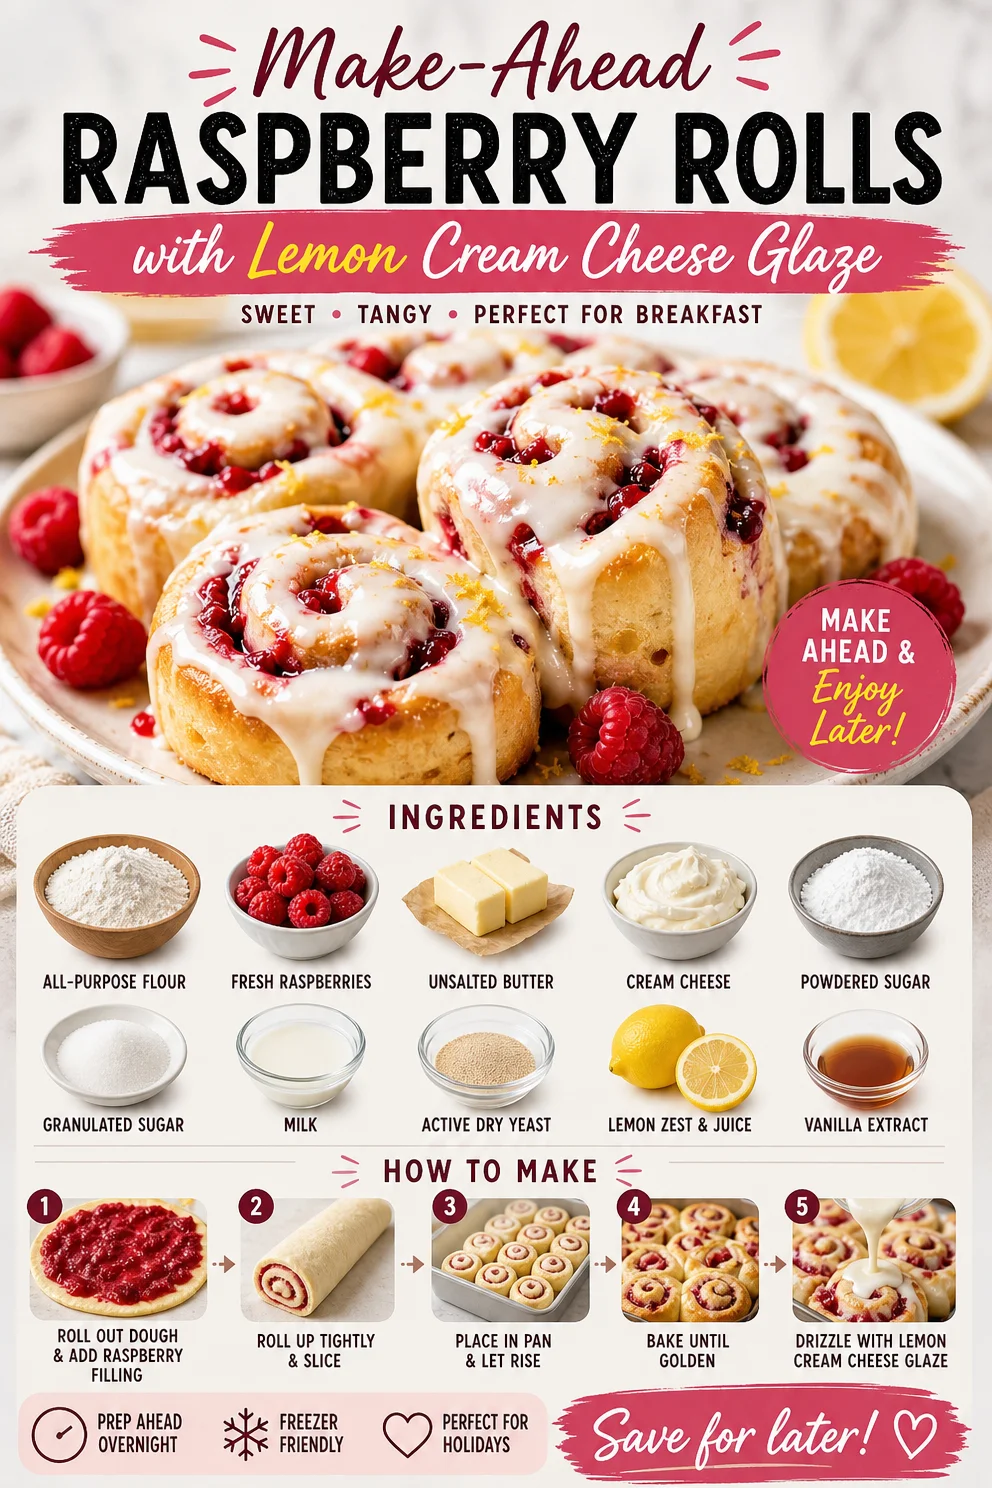
Make-Ahead Raspberry Rolls with Lemon Cream Cheese Glaze
Overnight Raspberry Sweet Rolls with Lemon Cream Cheese Glaze
Welcome to Clean Plate Cravings, my dear food enthusiasts! Today, we’re diving into a delightful recipe that’s bound to become a cherished favorite in your kitchen: Overnight Raspberry Sweet Rolls with a zesty Lemon Cream Cheese Glaze. Just imagine waking up to the sweet aroma of freshly baked rolls infused with tangy raspberries, drizzled in a luscious lemon glaze! It’s not just breakfast; it’s an experience.
A Sweet Morning Memory
Let me take you back to a sunny Sunday morning, years ago when I was just a young home cook trying to impress my family. It was one of those rare mornings when everyone was home, and I wanted to create something special. I decided to try my hand at baking sweet rolls, inspired by my grandmother’s old recipe box that was filled with hand-written notes.
As I bustled around the kitchen, flour danced in the air, and my little brother, with his chocolate-stained face, kept sneaking bites of the dough. I managed to create a bit of chaos, but the joy on my family’s faces when they sunk their teeth into those sweet rolls made it all worthwhile. The rolls weren’t perfect, but the laughter, the mess, and the taste blended into one beautiful memory that I’ll cherish forever. That love for baking, combined with fresh ingredients and a bit of creativity, turned those rolls into something magical.
Now, I’m excited to share my updated version with you! These Overnight Raspberry Sweet Rolls are not only simple but also infused with wholesome flavor. You’ll love how effortless and incredibly delicious they are!
Ingredients
Here’s what you’ll need to create these drool-worthy rolls:
-
1 cup whole milk: Essential for a soft dough, warm the milk to about 110°F to activate the yeast. You can substitute with almond or oat milk for a dairy-free version.
-
1/4 cup granulated sugar: Sweetens the dough and helps activate the yeast. You can use coconut sugar for a healthier alternative, but the sweetness and color might slightly differ.
-
1 package (2 1/4 tsp) active dry yeast: This is the key to fluffy rolls! If you have instant yeast, feel free to use that as well; just skip the proofing step.
-
1/4 cup unsalted butter, melted: Adds richness and flavor. You could also use coconut oil for a dairy-free option!
-
1 large egg: Helps bind the dough and adds moisture. If you’re vegan, replace it with a flax egg (1 tablespoon ground flaxseed + 2.5 tablespoons water).
-
3 cups all-purpose flour: Provides the structure. For a healthier twist, you can swap in whole wheat flour or use a gluten-free blend.
-
1 cup fresh raspberries: These juicy gems give a tart contrast to the sweet rolls. Frozen raspberries work too, but be mindful of the extra moisture.
-
1/2 teaspoon salt: Balances the flavors – don’t skip it!
-
For the lemon cream cheese glaze:
- 4 oz cream cheese, softened: Creamy base for the glaze. Vegan cream cheese can replace this for a plant-based option.
- 1 cup powdered sugar: Sweetness is key here; feel free to adjust according to your taste.
- Zest of 1 lemon: Adds a fragrant and bright flavor.
- 2-3 tablespoons lemon juice: Adjust the acidity to your preference here.
Step-by-Step Instructions
Let’s roll up our sleeves and get started!
-
Activate the yeast: In a small bowl, combine the warm milk and granulated sugar, then sprinkle in the yeast. Stir gently and let it sit for about 5-10 minutes until it’s frothy. This means your yeast is happy and alive!
-
Mix the dough: In a large mixing bowl, combine the melted butter, egg, and salt. Once the yeast mixture is bubbly, pour it into the bowl with the other ingredients. Gradually add in the flour, one cup at a time, mixing with a wooden spoon until a soft dough forms.
-
Knead the dough: Lightly flour a clean surface and turn out the dough. Knead for about 8-10 minutes until it’s smooth and elastic. If the dough is sticky, sprinkle in a bit more flour as needed. Here’s a chef hack: you can also use a stand mixer with a dough hook attachment for this step—it’ll save you time and energy!
-
Let it rise: Place the dough in a lightly greased bowl, cover with a kitchen towel, and let it rise in a warm spot for 1-2 hours, or until doubled in size. I like to preheat my oven for a minute, turn it off, and place my dough inside for the perfect cozy environment!
-
Prepare the filling: Once the dough has risen, roll it out on a floured surface into a rectangle (about 15×10 inches). Gently spread butter over the dough, then sprinkle the fresh raspberries evenly.
-
Roll it up: Starting from one long edge, tightly roll the dough into a log. Pinch the seam to seal and cut it into 12 even pieces. Place these rolls in a greased 9×13-inch baking dish, cut side up, and cover again with a towel.
-
Second rise: Let the rolls rise for another 30-60 minutes in a warm spot, or until they look fluffy. Don’t rush this step; the longer they rise, the lighter your rolls will be!
-
Preheat and bake: Preheat your oven to 375°F (190°C). Once the rolls have puffed up, bake them in the oven for 25-30 minutes, or until golden brown. Your kitchen will start to smell heavenly!
-
Make the glaze: While the rolls are baking, prepare the lemon cream cheese glaze. In a bowl, beat the softened cream cheese until smooth, then add the powdered sugar, lemon zest, and lemon juice. Mix until you achieve a silky consistency!
-
Glaze and enjoy: Once the rolls are out of the oven, drizzle that zesty glaze generously over the warm rolls and serve them while they’re still warm!
Serving Suggestions
To serve these Overnight Raspberry Sweet Rolls, arrange them on a rustic wooden platter or a simple white dish. Drizzle extra glaze on top for that elegant touch, and garnish with a few lemon slices or fresh mint leaves for a pop of color. Pair them with a steaming cup of coffee or tea for a cozy breakfast spread!
Recipe Variations
- Berry medley: Swap out raspberries for a mix of blueberries and blackberries for a delightful stunning blend.
- Chocolate twist: Drizzle some melted dark chocolate on top for an indulgent variation!
- Nutty addition: Add chopped nuts like pecans or walnuts to the filling for added crunch and nutrition.
- Cinnamon sugar: Sprinkle a mixture of cinnamon and sugar on the dough before rolling for a warm and comforting flavor!
- Lemon poppy seed: Mix poppy seeds into the glaze for a lovely twist that complements the lemon perfectly.
Chef’s Notes
These Overnight Raspberry Sweet Rolls have come a long way since that first attempt in my family kitchen. Over time, I learned the magic of fresh ingredients, a hint of creativity, and the importance of patience. There’s something so fulfilling about waking up to fresh baked goodies, and I can’t wait for you to create your own morning memories with this recipe!
Don’t be afraid to play around with flavors and fillings. It’s all about finding what makes your taste buds dance with joy, and trust me, these sweet rolls are so versatile.
FAQs and Troubleshooting
-
Why did my sweet rolls not rise?
If your rolls didn’t rise well, your yeast might have been expired. Always check the expiration date before use. Additionally, make sure you’re working with warm—not hot—milk during activation! -
How can I store leftovers?
Once cooled, these rolls can be stored in an airtight container at room temperature for up to two days. For longer storage, wrap them tightly and freeze for up to a month! -
What can I do if my filling leaked out during baking?
Sometimes, the juicy raspberries may release some liquid. To avoid this, consider blotting them gently with a paper towel before adding to the dough. If some filling spills out, no worries—it’ll still taste amazing! -
Can I make this recipe dairy-free?
Absolutely! Use plant-based milk, vegan cream cheese for the glaze, and coconut oil in place of butter to keep it dairy-free without sacrificing flavor.
Nutritional Info
While I typically focus on enjoyment over strict nutritional info, if you’re curious, a single roll (without glaze) comes in at around 180 calories, 5g protein, and 8g fat. However, remember that these numbers can vary based on substitutions and portion sizes!
I hope you’ve enjoyed this delightful journey of making Overnight Raspberry Sweet Rolls with Lemon Cream Cheese Glaze! May your mornings be as joyful and vibrant as these sweet rolls. Happy baking, and don’t forget to share your kitchen adventures with me!
PrintOvernight Raspberry Sweet Rolls with Lemon Cream Cheese Glaze

Delightful overnight raspberry sweet rolls topped with a tangy lemon cream cheese glaze, perfect for a cozy breakfast experience.
- Prep Time: 60 minutes
- Cook Time: 30 minutes
- Total Time: 90 minutes
- Yield: 12 servings 1x
- Category: Breakfast
- Method: Baking
- Cuisine: American
- Diet: Vegetarian
Ingredients
- 1 cup whole milk
- 1/4 cup granulated sugar
- 1 package (2 1/4 tsp) active dry yeast
- 1/4 cup unsalted butter, melted
- 1 large egg
- 3 cups all-purpose flour
- 1 cup fresh raspberries
- 1/2 teaspoon salt
- For the lemon cream cheese glaze:
- 4 oz cream cheese, softened
- 1 cup powdered sugar
- Zest of 1 lemon
- 2–3 tablespoons lemon juice
Instructions
- Activate the yeast: In a small bowl, combine the warm milk and granulated sugar, then sprinkle in the yeast. Stir gently and let it sit for about 5-10 minutes until it’s frothy.
- Mix the dough: In a large mixing bowl, combine the melted butter, egg, and salt. Once the yeast mixture is bubbly, pour it into the bowl with the other ingredients. Gradually add in the flour, one cup at a time, mixing with a wooden spoon until a soft dough forms.
- Knead the dough: Lightly flour a clean surface and turn out the dough. Knead for about 8-10 minutes until it’s smooth and elastic.
- Let it rise: Place the dough in a lightly greased bowl, cover with a kitchen towel, and let it rise in a warm spot for 1-2 hours, or until doubled in size.
- Prepare the filling: Once the dough has risen, roll it out on a floured surface into a rectangle (about 15×10 inches). Gently spread butter over the dough, then sprinkle the fresh raspberries evenly.
- Roll it up: Starting from one long edge, tightly roll the dough into a log. Pinch the seam to seal and cut it into 12 even pieces.
- Second rise: Let the rolls rise for another 30-60 minutes in a warm spot, or until they look fluffy.
- Preheat and bake: Preheat your oven to 375°F (190°C). Once the rolls have puffed up, bake them in the oven for 25-30 minutes, or until golden brown.
- Make the glaze: While the rolls are baking, prepare the lemon cream cheese glaze by mixing the softened cream cheese, powdered sugar, lemon zest, and lemon juice until smooth.
- Glaze and enjoy: Once the rolls are out of the oven, drizzle the glaze generously over the warm rolls and serve them immediately.
Notes
For an alternative, you can use coconut oil instead of butter and adjust the glaze for sweetness to your liking.
Nutrition
- Serving Size: 1 sweet roll
- Calories: 180
- Sugar: 8g
- Sodium: 150mg
- Fat: 8g
- Saturated Fat: 4g
- Unsaturated Fat: 3g
- Trans Fat: 0g
- Carbohydrates: 23g
- Fiber: 1g
- Protein: 5g
- Cholesterol: 25mg
Keywords: breakfast, sweet rolls, raspberry, lemon glaze, brunch recipe