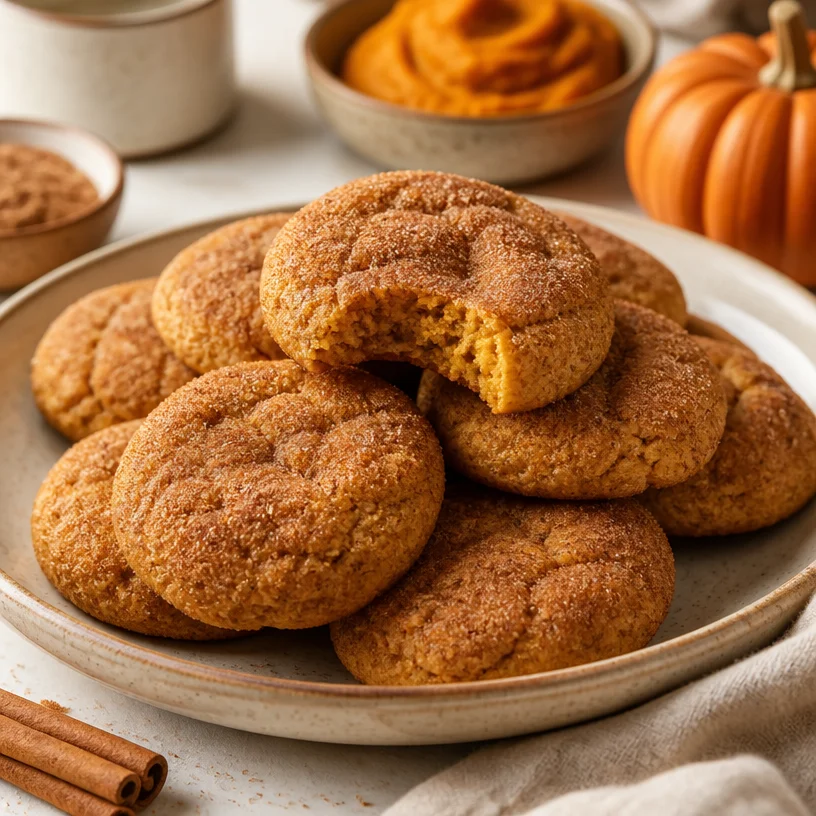
One-Bowl Pumpkin Snickerdoodle Cookies: Simple Autumn Bake
The Cozy Delight of Pumpkin Snickerdoodle Cookies
Welcome to my cozy corner of the culinary world, where not only do we whip up dishes that make our taste buds dance with joy, but we also celebrate the moments that food creates in our lives. Today, we’re diving into a seasonal favorite: Pumpkin Snickerdoodle Cookies! These delightful treats bring together the warm, spicy notes of fall with the classic charm of a soft and chewy snickerdoodle. If the thought of sinking your teeth into a fluffy, cinnamon-sugar-dusted cookie filled with pumpkin goodness makes your heart flutter, you’re in for a real treat!
Picture this: the leaves are turning golden, the air feels crisp, and the scent of cinnamon is wafting through your kitchen. With these cookies, you’re not just baking; you’re capturing the essence of autumn in every bite. These cookies are perfect for family gatherings, cozy evenings at home, or even just for a little self-love on a rainy day. So grab your apron, and let’s get started—because these Pumpkin Snickerdoodle Cookies deserve a spot in your baking rotation!
A Nostalgic Memory
It’s funny how certain scents can transport you back in time. I remember the first time I made snickerdoodle cookies with my grandmother. It was late October, and the golden sunlight streamed through the kitchen window, casting a warm glow on everything it touched. She had this delightful recipe, a secret passed down through generations, and we decided to add a twist to it that day—pumpkin!
As the rich aroma of baking cookies filled the air, I felt a sense of joy and comfort that only comes from spending time in the kitchen with someone special. Each time we rolled the dough in cinnamon sugar, we shared stories and laughter, creating a bond that extended beyond the mixing bowl. Those moments taught me how food could connect us to each other and the memories we cherish.
Now, every time I bake these Pumpking Snickerdoodle Cookies, I think of those beautiful afternoons spent with my grandma, surrounded by love, laughter, and the magic of the kitchen. Let’s recreate that moment together!
Ingredients
-
1 cup brown butter
Brown butter brings a nutty, toasty flavor that can elevate any baked good. To make it, simply melt the butter until it turns a lovely amber color and has tiny brown bits at the bottom. If you’re short on time, feel free to use regular melted butter, but you’ll miss out on that extra depth of flavor. -
1 cup sugar
Regular granulated sugar adds sweetness and helps achieve that perfect chewy cookie texture. You can swap this for coconut sugar for a more caramel-like flavor, but the texture might change slightly. -
1/2 cup brown sugar
Brown sugar is essential here for added moisture and that delightful soft texture. You could use light or dark brown sugar depending on your preference—dark brown will provide a more intense flavor. -
1 cup pumpkin puree
The star of the show! It not only adds moisture and flavor but also makes these cookies perfect for fall. Be sure to use pure pumpkin puree, not pumpkin pie filling, to keep your cookies from being too sweet. -
2 large eggs
Eggs bind everything together and help create that fluffy texture. For a vegan option, you can substitute with flax eggs (1 tablespoon of ground flaxseed with 3 tablespoons of water for each egg). -
1 teaspoon vanilla extract
Vanilla extract adds warmth and depth to any baking. You can also use almond extract for a different flavor twist. -
3 cups all-purpose flour
Flour provides structure to the cookies. If you’re looking for gluten-free options, try a gluten-free 1:1 flour blend, but results may vary. -
1 teaspoon baking soda
This is the leavening agent that helps the cookies rise. Be sure it’s fresh for the best results! -
1 teaspoon cream of tartar
This is another key ingredient in traditional snickerdoodles, helping to create that signature chewy texture and tang. If you don’t have it, you can substitute with additional baking soda, but the texture might be a bit different. -
1 teaspoon pumpkin spice
A warm blend of cinnamon, nutmeg, ginger, and cloves that perfectly complements the pumpkin. If you don’t have pumpkin spice, use an equivalent amount of cinnamon and nutmeg. -
1/2 teaspoon salt
Salt is crucial to enhance the flavors of the cookie. Don’t skip it! -
1/4 cup granulated sugar (for rolling)
This is your “cinnamon sugar” for rolling the cookies before baking. -
1 tablespoon cinnamon (for rolling)
This adds that classic snickerdoodle flavor and is absolutely essential for a delightful sugary finish.
Step-by-Step Instructions
-
Brown the Butter: Start by browning your butter in a small saucepan over medium heat. Keep stirring while it melts; it will begin to foam, then turn golden brown and smell nutty. This process can take about 5-7 minutes. Trust me, the smell alone is worth it! After it’s browned, set it aside to cool slightly.
-
Mix the Sugars: In a large mixing bowl, combine the cooled brown butter with the granulated sugar and brown sugar. Beat them together until well combined. The texture should be smooth and slightly creamy. I often use a hand mixer, but a whisk works just fine too—just get those muscles working!
-
Add Pumpkin and Eggs: Next, stir in the pumpkin puree and mix well until fully incorporated. Add the eggs one at a time, mixing until you achieve a uniform batter. Then include the vanilla extract for that homey flavor boost!
-
Combine Dry Ingredients: In another bowl, whisk together the flour, baking soda, cream of tartar, pumpkin spice, and salt. This step ensures that everything mixes evenly. Slowly add the dry ingredients to the wet mixture, folding until just combined; overmixing can make your cookies tough, so be careful!
-
Chill the Dough: Cover the bowl with plastic wrap and refrigerate the dough for at least 30 minutes. Chilling helps the cookies hold their shape while baking and ensures they stay soft and chewy.
-
Preheat the Oven: While the dough chills, preheat your oven to 350°F (180°C). Line a baking sheet with parchment paper for easy cleanup!
-
Make Cinnamon-Sugar Coating: In a small bowl, mix together the granulated sugar with the cinnamon. This will be the delicious rolling mixture for our cookies.
-
Shape the Cookies: Once the dough is ready, use a cookie scoop (or your hands) to portion out about 1.5 tablespoons of dough. Roll each piece into a ball, then roll in the cinnamon-sugar mixture until perfectly coated.
-
Bake: Place the dough balls spaced apart on your baking sheet (about 2 inches apart), and bake for 10-12 minutes, or until the edges start to turn golden. Don’t worry if they seem a little underbaked—the cookies will continue to firm up as they cool.
-
Cool and Enjoy: Let them cool on the baking sheet for a few minutes before transferring to a wire rack to cool completely. Try not to eat them all at once—I dare you!
Serving Suggestions
To serve these Pumpkin Snickerdoodle Cookies, arrange them nicely on a decorative plate with a sprinkle of powdered sugar on top for an elegant touch. They pair beautifully with a warm cup of cider or even a classic chai latte. For a fun twist, stack a couple of cookies with a scoop of vanilla ice cream in between—hello, pumpkin ice cream sandwich!
Recipe Variations
-
Nutty Addition: Add chopped pecans or walnuts to the dough for a crunchy texture.
-
Choco-Pumpkin Delight: Toss in some chocolate chips or white chocolate chunks for a delicious sweet twist!
-
Dairy-Free Version: Substitute the butter with vegan butter or coconut oil to make these cookies dairy-free.
-
Gluten-Free Option: Use a gluten-free flour blend in place of all-purpose flour to accommodate gluten sensitivities.
-
Extra Spice: If you’re a spice lover, throw in a pinch of cayenne pepper for a surprising kick in your cookies.
Chef’s Notes
Every time I bake these Pumpkin Snickerdoodle Cookies, I can’t help but think about how they evolve from a simple recipe into something so heartfelt. This recipe has been tweaked over the years, based on feedback and my own experimenting—like trying different spices or sweeteners. It’s amazing how a little twist can make a big difference. And if you ever find yourself having a baking fail, remember: even the best chefs have had cookies end up as pancake disasters. It’s all part of the fun!
FAQs and Troubleshooting
-
Why are my cookies flat?
If your cookies spread too much, it might be because the dough is too warm. Ensure you chill the dough well before baking. -
How should I store leftover cookies?
Keep them in an airtight container at room temperature for up to a week. They won’t last long, though—trust me! -
Can I freeze these cookies?
Absolutely! You can freeze the dough in balls and bake them fresh as needed. Just add an extra minute or two to the baking time if baking from frozen. -
Why didn’t my cookies rise?
Ensure your baking soda is fresh and that you didn’t accidentally skip adding the cream of tartar, as both are essential for getting that classic snickerdoodle rise.
With the enchantment of pumpkin and cinnamon dancing together in these amazing cookies, I hope you find joy and warmth as you create and share these delightful treats in your kitchen. Remember, it’s not just about the cookies; it’s the connections you make and the delicious memories you create along the way. Happy baking, friends!
PrintPumpkin Snickerdoodle Cookies
Delightful pumpkin snickerdoodle cookies that combine warm spices and pumpkin for a seasonal treat.
- Prep Time: 15 minutes
- Cook Time: 12 minutes
- Total Time: 45 minutes
- Yield: 24 cookies 1x
- Category: Dessert
- Method: Baking
- Cuisine: American
- Diet: Vegetarian
Ingredients
- 1 cup brown butter
- 1 cup sugar
- 1/2 cup brown sugar
- 1 cup pumpkin puree
- 2 large eggs
- 1 teaspoon vanilla extract
- 3 cups all-purpose flour
- 1 teaspoon baking soda
- 1 teaspoon cream of tartar
- 1 teaspoon pumpkin spice
- 1/2 teaspoon salt
- 1/4 cup granulated sugar (for rolling)
- 1 tablespoon cinnamon (for rolling)
Instructions
- Brown the butter in a saucepan over medium heat, stirring until it turns golden brown and smells nutty, about 5-7 minutes.
- Mix the cooled brown butter with granulated sugar and brown sugar until smooth.
- Add the pumpkin puree and eggs one at a time, mixing until incorporated.
- Combine dry ingredients in another bowl and gradually add to the wet mixture, folding gently.
- Chill the dough in the refrigerator for at least 30 minutes.
- Preheat the oven to 350°F (180°C) and line a baking sheet with parchment paper.
- Make a cinnamon-sugar coating by mixing granulated sugar and cinnamon.
- Shape the dough into balls and roll in the cinnamon-sugar mixture.
- Bake for 10-12 minutes, until the edges are golden.
- Cool on a wire rack before serving.
Notes
Serve with warm cider or vanilla ice cream for a delightful twist.
Nutrition
- Serving Size: 1 cookie
- Calories: 150
- Sugar: 10g
- Sodium: 80mg
- Fat: 7g
- Saturated Fat: 4g
- Unsaturated Fat: 3g
- Trans Fat: 0g
- Carbohydrates: 20g
- Fiber: 1g
- Protein: 2g
- Cholesterol: 35mg
Keywords: cookies, pumpkin, snickerdoodle, fall, dessert
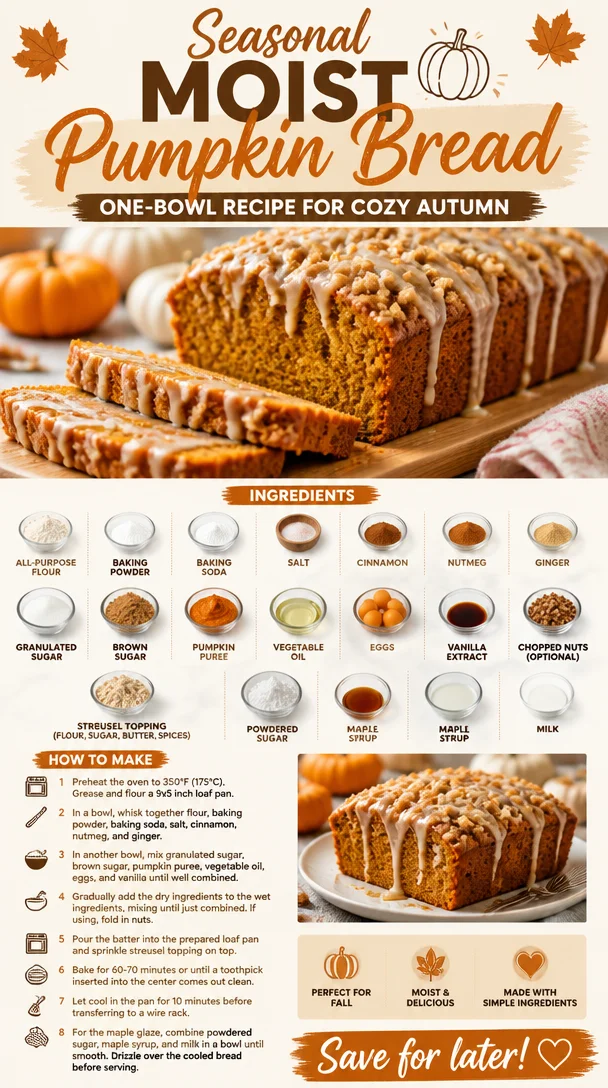
Seasonal Moist Pumpkin Bread: One-Bowl Recipe for Cozy Autumn
The Ultimate Moist Pumpkin Bread Recipe: Fall’s Favorite Treat
Ah, pumpkin bread! It’s that cozy slice of nostalgia that makes you feel all warm and fuzzy inside, as if you’re wrapped in a blanket next to a crackling fire. With the aromatic blend of spices and that oh-so-satisfying moist texture, it’s no wonder this delicious treat has become a beloved staple, especially in the fall. Whether you spread a bit of butter on a fresh slice, savor it with your morning coffee, or whip it up for a last-minute gathering, pumpkin bread is a versatile and delightful addition to any menu.
When I think of pumpkin bread, I’m transported back to my childhood kitchen, where the sweet, earthy scent of spices wafted through the air, inviting us to come and taste what my mom was baking. There was something magical about the sound of the mixer whirring, the sight of vibrant orange pumpkin puree spilling into the mixing bowl, and the excitement of sprinkling in the fragrant cinnamon and nutmeg. Those weekday afternoons, with my siblings and I hovering around the oven, eagerly awaiting the golden-brown loaf to emerge, were some of my favorite moments.
And now, I’m thrilled to share my version of this classic recipe with you! It’s moist, flavorful, and oh-so-satisfying—perfect for sharing, gifting, or simply indulging in all by yourself. So, let’s roll up our sleeves and dive into the wonderful world of baking moist pumpkin bread!
Ingredients You’ll Need
Here’s a complete list of ingredients you’ll need for this scrumptious pumpkin bread. Each one plays a vital role in creating that perfect loaf you’ll crave all fall long.
-
2 cups all-purpose flour: The foundation of our bread. For a gluten-free option, you can substitute with a gluten-free all-purpose blend or almond flour.
-
1 teaspoon baking powder: This helps our bread rise and gives it that light, airy texture. Make sure it’s fresh for the best effect!
-
1 teaspoon baking soda: Another essential leavening agent that works alongside the baking powder for optimal rise.
-
1 teaspoon salt: Balances the sweetness and enhances the flavors—don’t skimp on this!
-
1 teaspoon ground cinnamon: The quintessential spice in pumpkin bread, adding warmth and depth to each bite.
-
1/2 teaspoon ground nutmeg: A warm and slightly sweet spice that complements the pumpkin perfectly.
-
1/2 teaspoon ground ginger: For a little extra zing! If you want to tone it down, you can replace it with an equal amount of allspice.
-
1 cup granulated sugar: The primary sweetener for this recipe. You can reduce the amount for a less sweet result or use coconut sugar for a healthier alternative.
-
1/2 cup brown sugar: Adds moisture and a rich flavor. You can use all granulated sugar if you’re out of brown sugar.
-
1 cup pumpkin puree: The star ingredient! You can use canned puree or make your own by roasting and pureeing a sugar pumpkin.
-
1/2 cup vegetable oil: Keeps the bread moist. If you prefer a healthier swap, try using applesauce.
-
4 large eggs: Helps bind the ingredients together and adds richness.
-
1 teaspoon vanilla extract: A touch of vanilla brings everything together, enhancing the flavor profile.
-
1 cup chopped nuts (optional): A delightful crunch! You can use walnuts or pecans; if you want it nut-free, just omit them.
-
1/2 cup streusel topping: This adds a delightful crunch on top, made from flour, sugar, butter, and spices—totally worth it!
-
Maple glaze: Optional, but highly recommended! Made with powdered sugar, maple syrup, and a splash of milk, it adds a sweet finish.
Step-by-Step Instructions
Ready to bring this fragrant pumpkin bread to life? Let’s get baking!
-
Preheat your oven: Preheat your oven to 350°F (175°C). This step is crucial, so don’t skip it! A hot oven will help our bread achieve that perfect rise and golden color.
-
Prepare your loaf pans: Grease two 9×5-inch loaf pans with butter or cooking spray to ensure your bread slides out smoothly when cooked. For an extra layer of protection, you can line the bottoms with parchment paper.
-
Mix dry ingredients: In a large mixing bowl, whisk together the flour, baking powder, baking soda, salt, cinnamon, nutmeg, and ginger. This ensures that everything is evenly distributed. A little chef hack: Use a sifter if you have one—this will aerate your dry ingredients and give your bread a lighter texture!
-
Combine wet ingredients: In another bowl, whisk the granulated sugar, brown sugar, pumpkin puree, oil, eggs, and vanilla extract until well combined. The mixture will be thick and creamy, so whip it good!
-
Combine dry and wet ingredients: Gradually add the dry mixture into the wet mixture. Stir gently with a spatula until just combined. Be careful not to overmix—this could make your bread dense instead of light and fluffy.
-
Add nuts (if using): Fold in the chopped nuts gently. If you’re not a nut person, feel free to skip this step, and the bread will still be delicious!
-
Prepare the streusel topping (optional): In a small bowl, mix together flour, sugar, butter, and spices until crumbly. Sprinkle this mixture generously on top of your unbaked batter in the pans.
-
Bake: Pour the batter evenly into the prepared loaf pans, filling each about 2/3 full. Bake in the preheated oven for 50-60 minutes, or until a toothpick inserted into the center comes out clean. Every oven is different, so keep an eye on it in the last few minutes!
-
Cool: Once baked, remove from the oven and let the loaves cool in the pans for about 10 minutes. Then, transfer them to a wire rack to cool completely.
-
Prepare the glaze (optional): While the bread cools, whisk together the powdered sugar, maple syrup, and milk until smooth. Drizzle it over the cooled bread for an added sweet touch!
Serving Suggestions
Now that you’ve baked a gorgeous loaf of pumpkin bread, it’s time to serve! Slice it up as thick or as thin as you like—there’s no wrong way to enjoy this treat. You can serve it warm with a pat of butter for an irresistible melt-in-your-mouth experience. Or, go ahead and top it with a dollop of cream cheese for a delightful combo. It’s also lovely alongside a steaming cup of coffee or chai tea for the perfect midday pick-me-up.
Recipe Variations
Want to shake things up? Here are a few creative twists you might consider:
-
Chocolate Chip Pumpkin Bread: Add 1 cup of semi-sweet or dark chocolate chips to the batter for a decadent treat.
-
Pumpkin Spice Swirl: Add a swirl of cream cheese filling by mixing 8 oz. cream cheese with 1/4 cup sugar and a little vanilla before swirling it into the batter.
-
Dried Fruit Addition: Toss in 1 cup of raisins or dried cranberries for a pop of color and natural sweetness.
-
Vegan Version: Substitute eggs with flaxseed meal (1 tablespoon ground flaxseed + 3 tablespoons water for each egg) and use an oil like coconut or melt-in-your-mouth vegan butter.
-
Savory Pumpkin Bread: Reduce sugars and add herbs like rosemary or thyme for a savory bread that’s fantastic with meals.
Chef’s Notes
This pumpkin bread recipe has evolved beautifully over time. I started off with a basic version, and over the years, I’ve played with different spices and added toppings. I’ve learned that the key to a consistently moist loaf is the balance of wet to dry ingredients, and I’m always experimenting with flavor combinations. And let me tell you, I’ve had my fair share of kitchen disasters—like the time I forgot to add sugar. Let’s just say, it was a very…interesting loaf. But that’s all part of the fun and learning that happens in the kitchen!
FAQs and Troubleshooting
1. Why is my pumpkin bread too dense?
Overmixing the batter is usually the culprit. Mix just until combined to keep it light and airy.
2. How do I know when my pumpkin bread is done?
Insert a toothpick into the center; if it comes out clean or with a few moist crumbs (not wet batter), it’s done!
3. Can I freeze pumpkin bread?
Absolutely! Wrap the cooled loaves tightly in plastic wrap and then in aluminum foil. They can last for up to 3 months in the freezer. Just thaw at room temperature when you’re ready to enjoy.
4. What should I do if my bread sinks in the middle?
This can happen if there’s too much leavening agent or if the batter is under-mixed. Make sure to measure accurately and mix until just combined.
Nutritional Info (Optional)
While I always encourage everyone to enjoy their food mindfully, here’s a rough breakdown for a standard slice of moist pumpkin bread (without glaze):
- Calories: ~180
- Fat: 7g
- Carbohydrates: 29g
- Fiber: 1g
- Sugar: 14g
- Protein: 3g
If you’re looking to make it lighter, you can easily reduce the sugar and oil without compromising taste!
So there you have it—the ultimate moist pumpkin bread recipe! I hope you enjoy making (and devouring) it as much as I do. Remember, the kitchen is all about joy and creativity, so have fun experimenting and making it your own. Happy baking!
PrintThe Ultimate Moist Pumpkin Bread
A cozy and flavorful pumpkin bread perfect for fall, moist with an aromatic blend of spices.
- Prep Time: 15 minutes
- Cook Time: 60 minutes
- Total Time: 75 minutes
- Yield: 2 loaves 1x
- Category: Dessert
- Method: Baking
- Cuisine: American
- Diet: Vegetarian
Ingredients
- 2 cups all-purpose flour
- 1 teaspoon baking powder
- 1 teaspoon baking soda
- 1 teaspoon salt
- 1 teaspoon ground cinnamon
- 1/2 teaspoon ground nutmeg
- 1/2 teaspoon ground ginger
- 1 cup granulated sugar
- 1/2 cup brown sugar
- 1 cup pumpkin puree
- 1/2 cup vegetable oil
- 4 large eggs
- 1 teaspoon vanilla extract
- 1 cup chopped nuts (optional)
- 1/2 cup streusel topping
- Maple glaze (optional)
Instructions
- Preheat your oven to 350°F (175°C).
- Prepare two 9×5-inch loaf pans by greasing them.
- Mix the dry ingredients in a bowl.
- Combine the wet ingredients in another bowl.
- Combine the wet and dry mixtures, stirring gently.
- Add chopped nuts if using.
- Prepare the streusel topping if desired.
- Bake the batter in the prepared pans for 50-60 minutes.
- Cool the loaves in the pans for 10 minutes before transferring to a wire rack.
- Prepare the glaze if desired and drizzle over the cooled bread.
Notes
Serve warm with butter or cream cheese, or enjoy with coffee or chai tea.
Nutrition
- Serving Size: 1 slice
- Calories: 180
- Sugar: 14g
- Sodium: 400mg
- Fat: 7g
- Saturated Fat: 1g
- Unsaturated Fat: 6g
- Trans Fat: 0g
- Carbohydrates: 29g
- Fiber: 1g
- Protein: 3g
- Cholesterol: 30mg
Keywords: pumpkin bread, fall recipes, moist pumpkin bread, baking, dessert
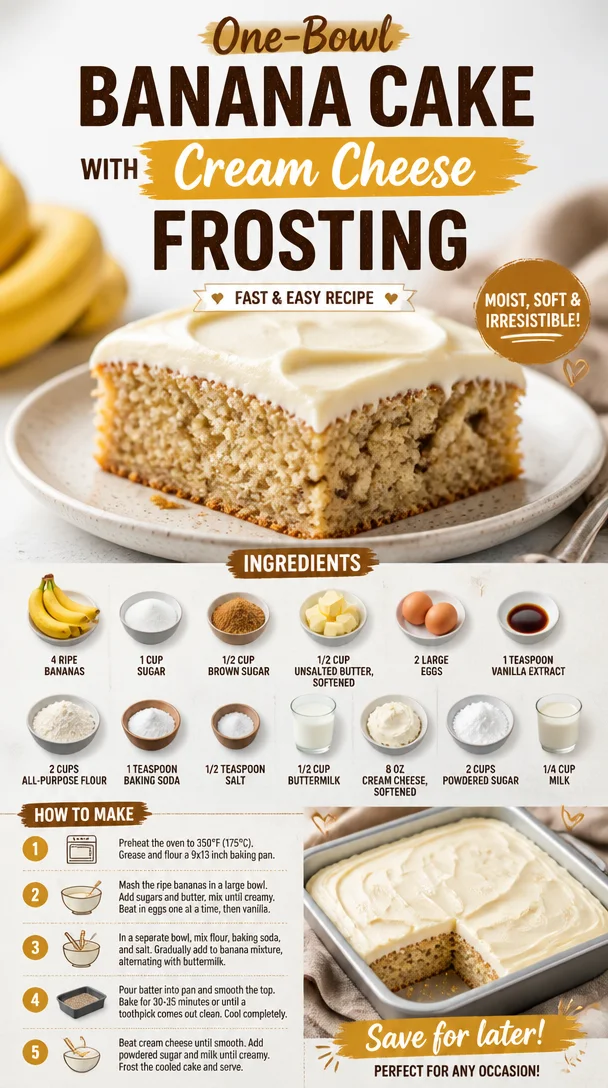
One-Bowl Banana Cake with Cream Cheese Frosting (Fast & Easy Recipe)
The Ultimate Comfort: Pioneer Woman Banana Cake with Cream Cheese Frosting
Introduction
Hey, food lovers! It’s Ava Carter here, and today we’re diving into a whimsical dessert that radiates warmth and nostalgia—Pioneer Woman Banana Cake with Cream Cheese Frosting. If you’re anything like me, you’ve got a special spot in your heart for bananas, whether they’re in a smoothie, on toast, or in this unforgettable cake.
Banana cake reminds me of lazy afternoons spent in my grandma’s kitchen, where the sun streamed through the window, and the sweet smell of ripe bananas filled the air. There was something magical about how her kitchen transformed ordinary ingredients into something extraordinary. This cake is one of those wonders that embodies both comfort and joy, making it perfect for any gathering—a birthday party, family dinner, or simply a treat for yourself!
This cake is fluffy, moist, and packed with the delightful sweetness of bananas, all topped with a silky cream cheese frosting that will make your taste buds dance. So grab your apron, roll up your sleeves, and let’s create something delicious together that will surely become a family favorite!
Personal Story
When I think of banana cake, I can’t help but be transported back to my childhood. I vividly remember stacking up overripe bananas on the kitchen counter, waiting for their day to shine in my grandma’s banana bread. But one day, she decided to whip up a cake instead—and oh, what a day that was! As the rich aroma wafted through the house, my siblings and I couldn’t contain our excitement.
After what felt like hours (in reality, it was only thirty minutes), the cake was finally ready, bringing us all together around the kitchen table. Each slice was a perfect blend of banana sweetness and a velvety cream cheese frosting that was out of this world. We licked our forks clean, of course, and nobody cared about the mess we made around the table. That day, I learned not just about baking, but the warmth of sharing a homemade treat with loved ones. It’s the kind of memory that sticks with you, don’t you think? It taught me to cherish each moment, especially when it’s accompanied by dessert!
Ingredients
Here’s what you’ll need to make this delightful cake, along with some helpful notes:
-
4 ripe bananas: The riper, the better! Brown spots mean more sweetness. If you’re out of bananas, you can try substituting with unsweetened applesauce—about 1 cup will do.
-
1 cup sugar: A standard granulated sugar provides the perfect sweetness. If you prefer, you can use coconut sugar as a healthier alternative, keeping in mind it will give a slightly caramel-like flavor.
-
1/2 cup brown sugar: This adds depth and moisture. Light brown is better, but dark brown works beautifully too if that’s what you have on hand.
-
1/2 cup unsalted butter, softened: This is essential for that to-die-for texture. You can swap it with coconut oil for a dairy-free option, or use vegan butter.
-
2 large eggs: They add structure and moisture. If you’re looking for an egg-free option, a flax egg (1 tablespoon flaxseed meal + 2.5 tablespoons water) works wonders!
-
1 teaspoon vanilla extract: A must-have for that aromatic flavor. Feel free to experiment with almond extract for a unique twist.
-
2 cups all-purpose flour: All-purpose gives us that light and fluffy texture. For a gluten-free version, use a 1:1 gluten-free baking flour.
-
1 teaspoon baking soda: This is the leavening agent that gives our cake rise. Make sure it’s fresh for the best results!
-
1/2 teaspoon salt: A pinch of salt enhances all the flavors. Feel free to use Kosher or sea salt.
-
1/2 cup buttermilk: Buttermilk makes the cake tender and moist. If you don’t have any, a simple substitute can be made by adding a tablespoon of vinegar to regular milk and letting it sit for a few minutes.
-
8 oz cream cheese, softened: The creamy base for our frosting. If you want a lighter version, you can use Neufchâtel cheese.
-
2 cups powdered sugar: This gives the frosting its sweetness and silky texture. You can reduce the sugar for a less sweet frosting if desired.
-
1/4 cup milk: To help with the consistency of the frosting. You can opt for almond or oat milk if you’re dairy-free.
Step-by-Step Instructions
Now that we have everything ready, let’s roll up our sleeves and get baking!
-
Preheat Your Oven
Start by preheating your oven to 350°F (175°C). This will ensure your cake bakes evenly and perfectly. Trust me; preheating is one of those steps you don’t want to skip! -
Prepare Your Pans
Grease and flour two 9-inch round cake pans—or if you’re feeling fancy, you could line them with parchment paper for easier removal! This step is crucial—nobody wants their cake to stick to the bottom. -
Mash the Bananas
In a mixing bowl, mash those ripe bananas until smooth. I love to use a fork for this—it’s easy and nostalgic, reminding me of my childhood baking sessions. -
Mix the Sugars and Butter
In a separate bowl (or your stand mixer), combine the granulated sugar, brown sugar, and softened butter. Beat until creamy and fluffy—that’s about 2-3 minutes. This is where the magic begins! -
Incorporate the Eggs and Vanilla
Add in the eggs one at a time, mixing well after each addition. Pour in that lovely vanilla extract, too; your kitchen is about to smell incredible! -
Combine Dry Ingredients
In another bowl, mix the all-purpose flour, baking soda, and salt. This step helps distribute the leavening agent evenly throughout the cake. -
Add Dry Ingredients and Buttermilk
Gradually add the dry mixture to the wet ingredients, alternating with the buttermilk, mixing just until combined. Avoid over-mixing to keep that cake light and fluffy! -
Fold in the Mashed Bananas
Carefully fold in those mashed bananas, ensuring they’re evenly distributed. You want every bite to be filled with banana goodness! -
Pour and Bake
Divide the batter evenly between the prepared pans. Pop them into your preheated oven and bake for about 25-30 minutes or until a toothpick inserted in the center comes out clean. -
Cool the Cakes
Once done, remove them from the oven and let them cool in the pans for about 10 minutes. Then, carefully remove them from the pans and transfer them to a wire rack to cool completely. This is where patience pays off! -
Prepare the Frosting
In a mixing bowl, beat the softened cream cheese and gradually add in the powdered sugar until smooth and creamy. Stir in the milk to reach your desired consistency. You want it spreadable, not too runny. -
Frost the Cake
Once the cakes are completely cooled, place one layer on your serving plate, spread a generous amount of frosting, then gently place the second layer on top and frost the top and sides. Get creative here; no need for perfection—rustic is so in!
Serving Suggestions
Slice the cake into generous portions and serve on a colorful plate, perhaps with a fresh banana slice on top for that extra flourish. A dollop of whipped cream or a scoop of ice cream on the side wouldn’t hurt either, am I right? This cake is suitable for any occasion, but it also makes a delightful afternoon treat with a cup of coffee or tea.
Recipe Variations
Now let’s get your creativity flowing! Here are a few twists you could try:
-
Chocolate Chip Banana Cake: Fold in 1 cup of semi-sweet chocolate chips into the batter for a delightful chocolatey flavor.
-
Nutty Banana Cake: Add 1 cup of chopped walnuts or pecans for a crunchy texture throughout the cake.
-
Spiced Banana Cake: Mix in a teaspoon of cinnamon or a pinch of nutmeg to add a warm, cozy flavor profile.
-
Banana Coconut Cake: Stir in 1/2 cup of shredded coconut to the batter for a tropical vibe.
-
Vegan Version: Replace eggs with flax eggs, use coconut oil instead of butter, and substitute with almond milk for buttermilk and vegan cream cheese for frosting.
Chef’s Notes
This banana cake has traveled with me through many kitchens and has adapted to various tastes and preferences. The beauty of this recipe is its incredible versatility. I once made it for a friend’s birthday party and added a layer of chocolate ganache on top of the cream cheese frosting—let me tell you, it was a hit! If you ever have overripe bananas staring at you from the counter, you know exactly what to do—it’s like a warm hug in dessert form.
FAQs and Troubleshooting
1. My cake is dense! What happened?
This often happens when the batter is over-mixed or if too much flour was added. Remember to mix just until combined, and spoon flour into your measuring cup rather than scooping it directly with the cup, which can pack it in.
2. How can I tell when my cake is done?
A toothpick inserted into the center should come out clean or with just a few moist crumbs. If it’s covered in batter, give it a few more minutes!
3. Can I make this cake ahead of time?
Absolutely! This cake stores well in the fridge for up to 5 days. You can also freeze the layers (wrapped in plastic wrap) for up to 3 months. Just thaw and frost when you’re ready!
4. My frosting is too runny. What do I do?
No worries! You can add a little more powdered sugar to thicken up the frosting. Conversely, if it’s too thick, a splash of milk will do the trick!
Nutritional Info
While indulgent, this cake is best enjoyed in moderation. Each slice is a lovely treat to brighten your day, and when you bake it with love, it’s an ingredient you can definitely feel good about!
So there you have it, friends—a delightful recipe for Pioneer Woman Banana Cake with Cream Cheese Frosting that’s sure to create not just a delicious treat but fantastic memories in your kitchen. Now go forth, bake up a storm, and savor every delightful bite! Happy baking! 🍌🍰
PrintPioneer Woman Banana Cake with Cream Cheese Frosting
A fluffy, moist banana cake topped with silky cream cheese frosting, perfect for any gathering.
- Prep Time: 15 minutes
- Cook Time: 30 minutes
- Total Time: 45 minutes
- Yield: 12 servings 1x
- Category: Dessert
- Method: Baking
- Cuisine: American
- Diet: Vegetarian
Ingredients
- 4 ripe bananas
- 1 cup granulated sugar
- 1/2 cup brown sugar
- 1/2 cup unsalted butter, softened
- 2 large eggs
- 1 teaspoon vanilla extract
- 2 cups all-purpose flour
- 1 teaspoon baking soda
- 1/2 teaspoon salt
- 1/2 cup buttermilk
- 8 oz cream cheese, softened
- 2 cups powdered sugar
- 1/4 cup milk
Instructions
- Preheat your oven to 350°F (175°C).
- Grease and flour two 9-inch round cake pans.
- Mash the bananas until smooth.
- Mix the granulated sugar, brown sugar, and softened butter until creamy.
- Incorporate the eggs one at a time and add the vanilla extract.
- Combine the flour, baking soda, and salt in another bowl.
- Add the dry mixture to the wet ingredients, alternating with buttermilk.
- Fold in the mashed bananas.
- Pour the batter into prepared pans and bake for 25-30 minutes.
- Cool the cakes in the pans for 10 minutes, then transfer to a wire rack.
- Prepare the frosting by beating cream cheese and powdered sugar until smooth and creamy; stir in milk.
- Frost the cooled cakes and serve.
Notes
This cake is versatile—try adding chocolate chips, nuts, or spices for variations.
Nutrition
- Serving Size: 1 slice
- Calories: 400
- Sugar: 30g
- Sodium: 300mg
- Fat: 15g
- Saturated Fat: 8g
- Unsaturated Fat: 5g
- Trans Fat: 0g
- Carbohydrates: 55g
- Fiber: 2g
- Protein: 5g
- Cholesterol: 60mg
Keywords: banana cake, cream cheese frosting, dessert, baking, comfort food