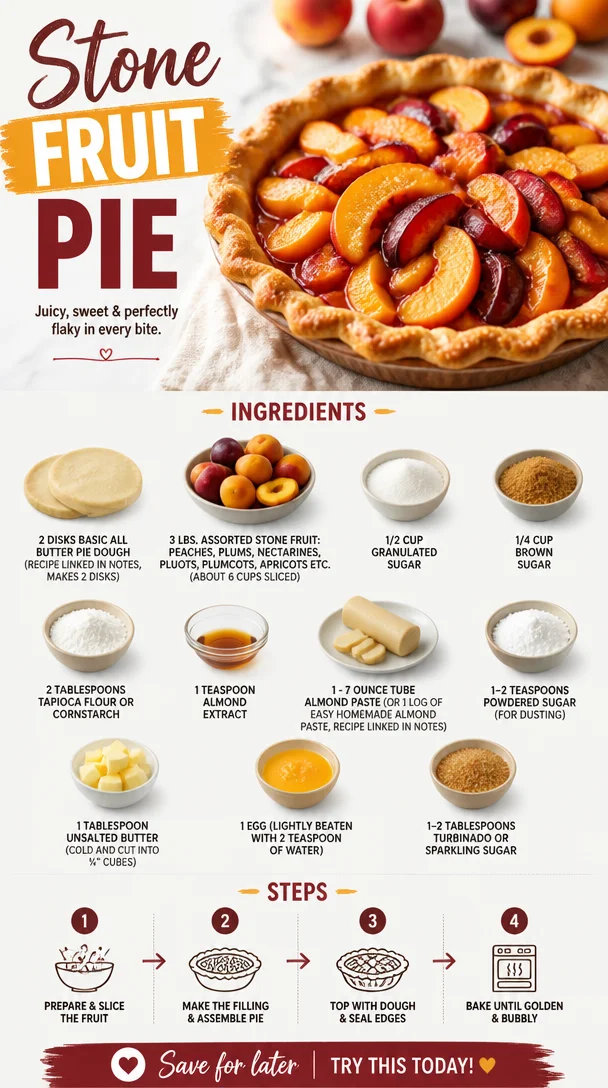
Stone Fruit Pie
Stone Fruit Pie: A Slice of Summer Bliss
Welcome to another delightful adventure in the kitchen! Today, we’re celebrating one of my all-time favorite desserts: Stone Fruit Pie. Picture this: warm, juicy slices of peaches, plums, and cherries all mingling together under a buttery, flaky crust. It’s like a hug in pie form—but who said comfort has to be reserved for winter? Stone fruit season is a joyous time, and what better way to embrace it than with a show-stopping pie that’s as beautiful as it is delicious?
When I was a kid, my family would embark on summer road trips, and one of our favorite stops was the local fruit stand. As we’d pull up, the rich aroma of ripe fruit wafting through the air felt like a siren’s call, beckoning us closer. My mom would load up the car with an assortment of peaches, plums, and nectarines—our stone fruit bounty. We’d eat them fresh, of course, but when we got home, it was pie-making time! The kitchen was filled with laughter, chatter, and sweet fragrances as we transformed those juicy gems into something even more magical.
There’s something truly special about making pie as a family. Whether you’re assembling the crust, whipping up the filling, or fighting over who gets to sprinkle the sugar on top, it’s a bonding experience, steeped in love and nostalgia. Now, I want to share that joy with you through this easy-to-follow Stone Fruit Pie recipe. Let’s roll up our sleeves and dive in!
Ingredients
Here’s what you’ll need to create this delicious pie:
-
2 disks Basic All Butter Pie Dough
(For the perfect flaky crust. You can use store-bought if you’re short on time! Find the recipe here.) -
3 lbs. assorted stone fruit (peaches, plums, nectarines, pluots, plumcots, apricots, etc. – about 6 cups sliced)
(Choose your favorites! Feel free to mix and match. Just make sure they’re ripe for the best flavor! For a fun twist, you can even try some cherries or figs.) -
1/2 cup granulated sugar
(Brings out the natural sweetness of your fruit. You can substitute with coconut sugar for a healthier option!) -
1/4 cup brown sugar
(Adds a rich, molasses flavor that complements the fruit beautifully.) -
2 tablespoons tapioca flour or cornstarch
(Helps thicken the filling so it’s not runny. If you’re looking for a gluten-free alternative, both options work wonderfully!) -
1 teaspoon almond extract
(Gives a lovely depth of flavor. If you’re not a fan, vanilla extract can be used instead.) -
1 – 7 ounce tube almond paste or 1 log of Easy Homemade Almond Paste
(Adds a delightful nuttiness. Homemade paste is a great way to control the sweetness! Recipe here.) -
1-2 teaspoons powdered sugar
(For a sweet dusting at the end—totally optional but adds a touch of charm!) -
1 tablespoon unsalted butter (cold and cut into ¼” cubes)
(Dotting the filling with butter enhances richness. Trust me, don’t skip this step!) -
1 egg (lightly beaten with 2 teaspoons of water)
(This egg wash gives the crust that perfect golden brown color.) -
1-2 tablespoons Turbinado or sparkling sugar
(Sprinkle it on top for a delightful crunch. Make it shine like the summer sun!)
Step-by-Step Instructions
Here’s how to put this delightful pie together, step by step. Ready, set, bake!
-
Preheat Your Oven: Start by preheating your oven to 425°F (220°C). This high temperature is key for a beautifully flaky crust.
-
Prepare the Pie Dough: Roll out one disk of your pie dough on a floured surface to fit your pie pan. Don’t worry about perfection; rustic is charming! Place it into your pie dish (don’t forget to trim any excess overhang) and pop it in the fridge while you prepare the filling.
-
Slice the Fruit: Grab your stone fruit and slice them up into even pieces. Aim for about 1/2-inch thick slices. Don’t stress about uniformity—each piece tells a summer story!
-
Mix the Filling: In a large mixing bowl, toss the sliced fruit with both sugars, tapioca flour (or cornstarch), and almond extract. Once it’s all mixed together, let it sit for about 10 minutes. This allows the fruit juices to start merging, making for an extra flavorful filling.
-
Add the Almond Paste: Crumble the almond paste into small pieces and mix it into the fruit. This step adds such a delicious nuttiness that complements the bright fruit flavor. It’s like a surprise waiting inside!
-
Fill the Crust: Remove the pie crust from the fridge and pour the luscious fruit mixture into the shell. Dot the top with cold butter cubes. This will keep your filling rich and luscious.
-
Top It Off: Roll out your second pie dough disk and place it over the filling. You can create a lattice top for a gorgeous presentation or simply cover it with a solid layer. Cut slits for steam to escape if you opt for the latter.
-
Egg Wash and Sugar: Brush the top crust with the egg wash mixture, then sprinkle with turbinado sugar for some sparkle and texture.
-
Bake: Pop your pie into the oven and bake for 15 minutes at 425°F to get that crust nice and golden. Then, reduce the temperature to 350°F (175°C) and continue baking for 30-35 minutes until the filling is bubbly and the crust is golden brown.
-
Cool and Serve: Once out of the oven, let your pie cool for at least an hour. This will help the filling set up perfectly. Trust me, it’s worth the wait!
Serving Suggestions
To serve this stunning Stone Fruit Pie, a scoop of vanilla ice cream or whipped cream on top is a classic match made in heaven. I also love sprinkling a bit of fresh mint or basil for an unexpected pop of flavor and color. Slice it into generous pieces and watch your guests’ eyes light up—they’ll be excited for a taste of your summer masterpiece!
Recipe Variations
Feeling adventurous? Here are a few twists you can try on this classic recipe:
- Spiced Stone Fruit Pie: Add a teaspoon of cinnamon or nutmeg to the fruit filling for a warm flavor profile.
- Crumble Topping: Instead of a top crust, sprinkle a crumble made from oats, brown sugar, and butter for a crunchy texture.
- Savory Twist: Mix in some fresh herbs like thyme or rosemary into the fruit filling for an unexpected savory layer.
- Different Fruit Combos: Swap out some of the stone fruit for berries or apples for a unique fusion pie!
- Gluten-Free Version: Use a gluten-free pie dough recipe to make this pie accessible for gluten-sensitive friends.
Chef’s Notes
As with any recipe, this Stone Fruit Pie has evolved over time! I remember experimenting with different fruit mixtures based on what we found at the farmer’s market, leading to some delightful surprises. One time, I added a splash of bourbon to the fruit filling for an extra kick—just be sure to adjust your sugar levels accordingly if you try that! I’ve also had moments where I completely forgot to add sugar, only to discover that the natural sweetness of ripe fruit stood out beautifully. Embrace those kitchen flubs; they often lead to happy accidents!
FAQs and Troubleshooting
1. My pie crust shrunk during baking. What went wrong?
This could be due to overworking the dough or inaccurate chilling time. Make sure to chill the dough properly and handle it gently.
2. Why did my filling turn out runny?
Ensure you measured the fruit accurately and allowed it to sit with the sugars and thickening agent for a bit before baking. If it’s extra juicy, a little extra tapioca flour or cornstarch can help thicken things up.
3. Can I freeze this pie?
Absolutely! You can freeze both baked and unbaked pies. Just make sure to wrap it well in plastic wrap and aluminum foil. Thaw in the fridge overnight before baking or reheating.
4. How can I tell when it’s done?
Look for a golden crust and bubbly filling. You can also check the internal temperature; it should read around 200°F (93°C) when finished.
Nutritional Info
This Stone Fruit Pie is not only comforting but also packed with the goodness of fruits! Depending on your choice of sugars and butters, a slice will typically contain approximately 300 calories, along with fiber and vitamins, especially when using a variety of colorful fruits. Enjoying it in moderation is key!
So there you have it—a delightful journey through the process of making a Stone Fruit Pie that celebrates the essence of summer. I encourage you to gather your loved ones for a baking session, because food is always better when shared. Let’s bring back those nostalgic memories, one slice at a time! Happy baking! 🍑🥧✨
PrintStone Fruit Pie
A delightful pie filled with warm, juicy slices of peaches, plums, and cherries under a buttery, flaky crust.
- Prep Time: 30 minutes
- Cook Time: 45 minutes
- Total Time: 1 hour 15 minutes
- Yield: 8 servings 1x
- Category: Dessert
- Method: Baking
- Cuisine: American
- Diet: Vegetarian
Ingredients
- 2 disks Basic All Butter Pie Dough
- 3 lbs. assorted stone fruit (peaches, plums, nectarines, etc.)
- 1/2 cup granulated sugar
- 1/4 cup brown sugar
- 2 tablespoons tapioca flour or cornstarch
- 1 teaspoon almond extract
- 1 – 7 ounce tube almond paste
- 1–2 teaspoons powdered sugar
- 1 tablespoon unsalted butter (cold and cut into ¼” cubes)
- 1 egg (lightly beaten with 2 teaspoons of water)
- 1–2 tablespoons Turbinado or sparkling sugar
Instructions
- Preheat your oven to 425°F (220°C).
- Prepare one disk of pie dough to fit your pie pan.
- Slice the stone fruit into even pieces, about 1/2-inch thick.
- Mix the sliced fruit with both sugars, tapioca flour, and almond extract.
- Add the crumbled almond paste into the fruit mixture.
- Fill the crust with the fruit mixture and dot with cold butter cubes.
- Top with the second pie dough disk and cut slits for steam to escape.
- Brush the top crust with the egg wash and sprinkle with turbinado sugar.
- Bake for 15 minutes at 425°F, then reduce to 350°F (175°C) and bake for 30-35 minutes.
- Cool for at least an hour before serving.
Notes
Serve with vanilla ice cream or whipped cream for the perfect pairing.
Nutrition
- Serving Size: 1 slice
- Calories: 300
- Sugar: 20g
- Sodium: 150mg
- Fat: 10g
- Saturated Fat: 4g
- Unsaturated Fat: 5g
- Trans Fat: 0g
- Carbohydrates: 45g
- Fiber: 3g
- Protein: 4g
- Cholesterol: 30mg
Keywords: Stone fruit pie, summer dessert, pie recipe, baking
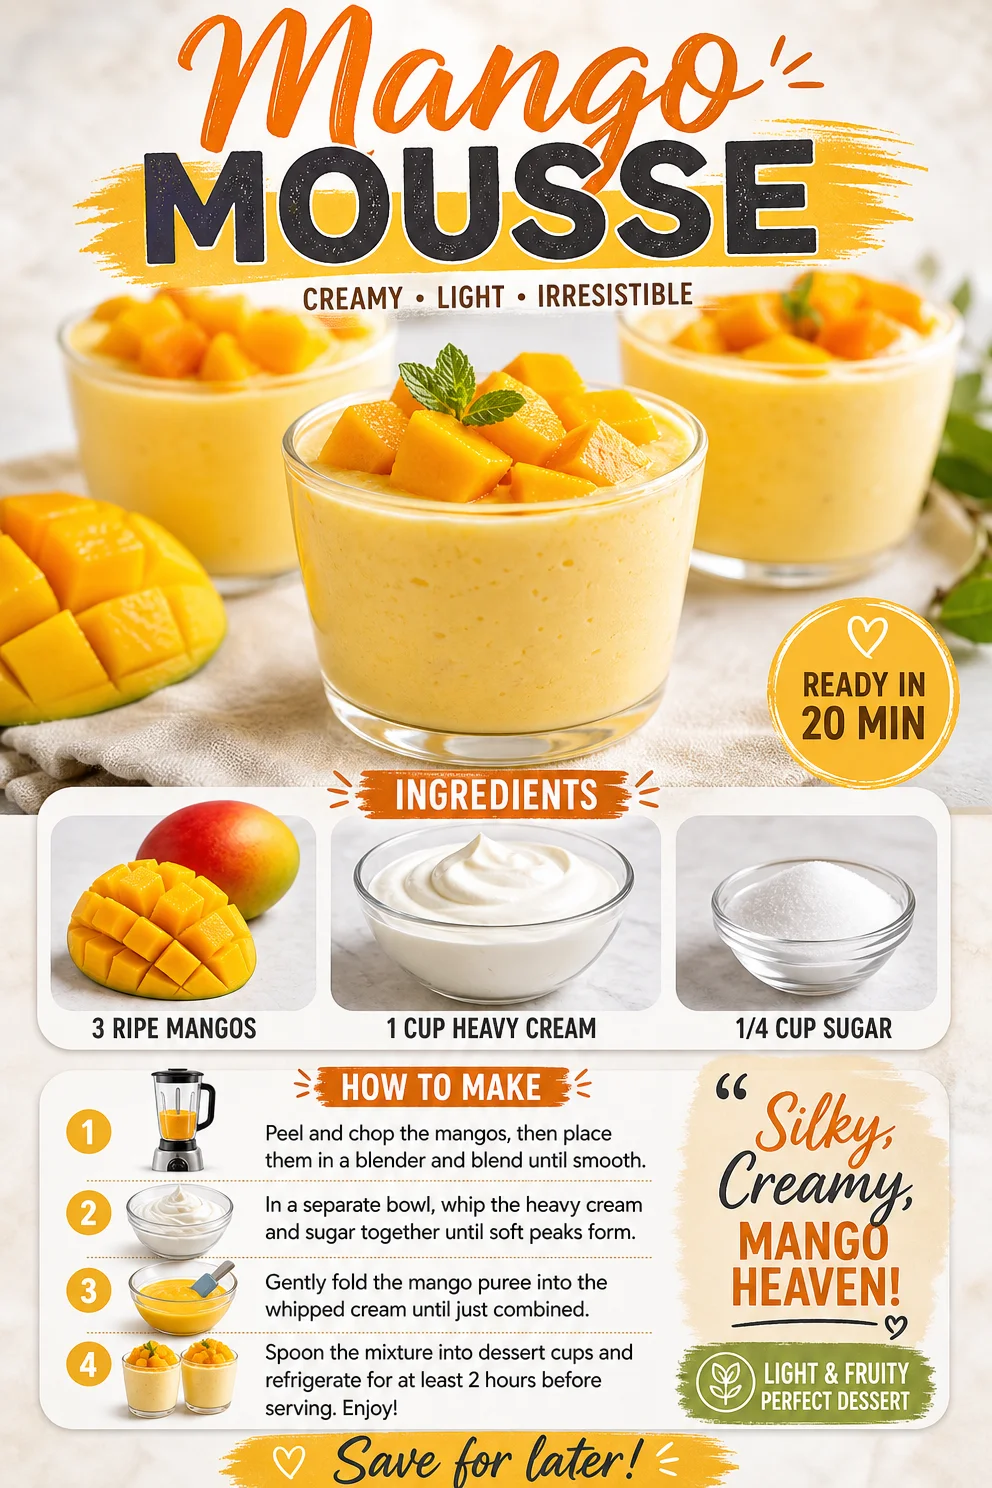
Mango Mousse
The Creamy Dream: Your Ultimate Guide to Mango Mousse
Welcome to Clean Plate Cravings, where today we’re diving into the world of sweet indulgence with a twist of tropical flair! We’re whipping up a Mango Mousse that’s not only light and refreshing but also feels like a little bite of heaven in every spoonful. If you’ve ever felt like dessert needs to be a heavy affair, I’m here to change that perception! This Mango Mousse is the answer to your sweet tooth without the guilt.
So, let’s talk about why mango mousse is the perfect dessert for any occasion. Imagine a warm summer evening, the air sweet with the scent of blooming flowers, and you gather around a table with friends and family. You want to serve something that not only looks stunning but also transports everyone to a sunny beach with every delicious bite! This mousse does just that! It’s not just food; it’s an experience wrapped in simple, fresh ingredients.
Picture this: fluffy, creamy, and oh-so-fruity mousse that melts in your mouth. It’s like a mini vacation with each spoonful—who wouldn’t want that? Plus, it’s a wonderful way to impress guests or just to treat yourself after a long day. You’ll find that making mousse can be uncomplicated and rewarding, making it ideal for both novice and seasoned chefs alike.
Ready to get your kitchen adventure started? Allow me to guide you through this delightful dish, and you’ll soon understand why I just can’t get enough of mango mousse!
A Sweet Memory of Mango Mousse
Growing up, I spent most of my summers at my grandma’s house. Among all her scrumptious treats—think fresh peach cobbler and blueberry pies—one dessert always stood out: her velvety mango mousse. The first time she served it, I remember being captivated! The bright orange color practically danced on the plate, promising bursts of flavor that were sure to excite my taste buds.
In her warm kitchen, filled with the sound of laughter and clinking glasses, I asked her how she made it. With a twinkle in her eye, she explained gently (as grandmas do), "It’s easy, my dear! You just let the mango shine through." And shine it did! That day she showed me that desserts don’t have to be complicated; they can be just as delightful when they highlight fresh ingredients.
To this day, whenever I whip up a batch of mango mousse, those summer days at Grandma’s house flood back into my memory. The mousse is not only a treat for the taste buds but also a fond reminder of the love and warmth shared in the kitchen. Now, it’s your turn to create your own beautiful memories with this delightful recipe.
Mango Mousse Ingredients
Let’s gather our ingredients before diving into the preparation! For our light and luscious mango mousse, you’ll need:
-
3 Ripe Mangos: The star of the show! Choose firm but slightly soft mangos with a sweet aroma. For substitutes, you can use frozen mango puree (just thaw it first) or other fruits like peaches or passionfruit for an interesting twist.
-
1 Cup Heavy Cream: This creates that luxuriously creamy texture. Need a lighter option? Substitute with coconut cream for a tropical flare, or use whipped coconut yogurt for a dairy-free version.
-
1/4 Cup Sugar: Just enough to elevate the natural sweetness of the mango. If you’re looking for alternatives, honey, agave syrup, or a sugar substitute can work, but remember they may alter the final flavor slightly!
Each ingredient, albeit simple, plays a significant role in creating a memorable and delicious dessert. By choosing fresh, quality ingredients, you’re not just making mousse; you’re creating a swoon-worthy experience ready to impress!
Step-by-Step Instructions
Now that we have our ingredients, let’s get started with the preparation! Ready? Let’s roll up those sleeves and create something magical!
-
Prepare the Mangos:
- First off, grab those luscious mangos! Carefully peel the skin with a sharp knife (watch those fingers!), then slice the flesh away from the pit.
- Chef Hack: Try cutting the mango into cubes and then gently scoring the flesh before scooping it out with a spoon—it’s a real game-changer!
-
Blend the Mangos:
- Toss the mango chunks into your blender or food processor. Blitz them until you have a smooth puree—this should take around 30 seconds if your mangos are ripe.
- For a unique touch, add a squeeze of lime juice! It brightens the flavor and gives it a refreshing zing.
-
Whip the Heavy Cream:
- In a separate mixing bowl, pour in the heavy cream. Using an electric mixer, whip on medium-high speed until soft peaks form.
- Tip: Make sure your bowl and beaters are cold for quicker whipping—any little tricks can go a long way!
-
Combine the Cream and Mango Puree:
- Gently fold the mango puree into the whipped cream using a spatula. Be careful not to deflate the cream; you want to maintain that light and airy texture.
- Chef Insight: Don’t rush this step! Folding slowly creates a lighter mousse!
-
Sweeten it Up:
- Sprinkle in the sugar and continue to fold until fully incorporated. Taste to check that sweetness is just right.
- Still too tart? A tad more sugar won’t hurt, but remember, the ripe mangos should provide most of the sweetness!
-
Chill the Mousse:
- Spoon your delightful mousse into serving glasses or bowls, then pop them into the refrigerator for at least an hour to set. This step helps flavor deepen and texture firm up.
- Chef Tip: If you want to be a little extra fancy, use a piping bag to fill your glasses for a beautiful presentation!
-
Garnish and Serve:
- Once set, garnish your mango mousse with fresh mint sprigs or a sprinkle of toasted coconut. Get creative here! Your beautiful work deserves to shine.
Serving Suggestions
Serving mango mousse is as simple and enjoyable as making it! You can present it in individual clear glasses or bowls to show off that gorgeous color. Layering with some crushed graham crackers will add a delightful crunch. A fresh slice of lime on the side adds a pop of color and an extra hint of freshness. Remember, presentation matters; take a moment to make it as visually appealing as it is delicious—your guests will appreciate it.
Recipe Variations
Want to shake things up? Here are some fun variations to twist your mango mousse:
-
Add Some Spice: Incorporate a pinch of cayenne pepper or cinnamon for a surprising kick!
-
Chocolate Lover’s Delight: Drizzle some melted dark chocolate on top or mix in cocoa powder for a tropical-chocolate fusion.
-
Coconut Cream: Replace heavy cream with coconut cream for a richer, coconut-infused version.
-
Berry Bliss: Mix in some pureed strawberries or blueberries for a fruity fusion that contrasts beautifully with mango.
-
Healthier Option: Swap sugar with honey or maple syrup and use Greek yogurt instead of heavy cream for a protein-packed pre-or post-workout treat.
Chef’s Notes
Over the years, my mango mousse has become a beloved staple, featuring at birthdays, summer barbecues, and spontaneous dessert dates with friends. It’s adapted and evolved with my culinary journey, often inspired by new ingredients or creative ideas from my kitchen crew.
And let me tell you, one memorable kitchen disaster occurred when I mistakenly grabbed salt instead of sugar. Let’s just say a salty mousse was definitely one to forget! But hey, that’s what makes cooking fun right? Take risks, learn, and above all, enjoy every moment—whether it turns out perfectly or not!
FAQs and Troubleshooting
Q: Can I use frozen mangos for this recipe?
A: Absolutely! Just make sure to thaw them beforehand and blend until smooth. Frozen mangos can sometimes be even sweeter!
Q: What can I do if my mousse doesn’t set?
A: If it doesn’t set properly, it might need more time in the fridge. You could also try adding gelatin (1 teaspoon dissolved in warm water) during the mixing stage for an extra firm mousse.
Q: How do I know when to stop whipping the cream?
A: Stop when you see soft peaks form! If you over-whip, you risk turning it into butter, which isn’t the goal here.
Q: Can I make this mousse dairy-free?
A: For sure! Just swap heavy cream with coconut cream and use a dairy-free sweetener if needed!
Nutritional Info
While I encourage enjoying this delightful treat, keep in mind that moderation is key for indulgence. A serving contains approximately 250 calories, depending on your specific ingredients and portions.
And there you have it! A vibrant, delicious, and soul-soothing Mango Mousse recipe crafted with love and memories. As you embark on this kitchen adventure, I hope you find it just as joyous as I always do! Remember, the kitchen is your playground. So, have fun, experiment, and, most importantly, enjoy every bite—whether savoring it solo or sharing it with loved ones! Happy cooking!
PrintMango Mousse
A light and refreshing mango mousse that’s a perfect dessert for any occasion, offering a taste of tropical delight.
- Prep Time: 15 minutes
- Cook Time: 0 minutes
- Total Time: 60 minutes
- Yield: 4 servings 1x
- Category: Dessert
- Method: Chilling
- Cuisine: Tropical
- Diet: Gluten Free
Ingredients
- 3 Ripe Mangos
- 1 Cup Heavy Cream
- 1/4 Cup Sugar
Instructions
- Prepare the Mangos: Carefully peel the skin and slice the flesh away from the pit.
- Blend the Mangos: Toss the mango chunks into your blender and blitz until smooth.
- Whip the Heavy Cream: In a bowl, whip the heavy cream until soft peaks form.
- Combine the Cream and Mango Puree: Gently fold the mango puree into the whipped cream.
- Sweeten it Up: Sprinkle in the sugar and fold until fully incorporated.
- Chill the Mousse: Spoon into serving glasses and refrigerate for at least an hour.
- Garnish and Serve: Garnish with fresh mint or toasted coconut before serving.
Notes
Serve in individual glasses and layer with crushed graham crackers for added crunch!
Nutrition
- Serving Size: 1 serving
- Calories: 250
- Sugar: 18g
- Sodium: 50mg
- Fat: 15g
- Saturated Fat: 10g
- Unsaturated Fat: 5g
- Trans Fat: 0g
- Carbohydrates: 28g
- Fiber: 2g
- Protein: 2g
- Cholesterol: 70mg
Keywords: mango mousse, dessert, tropical dessert, light mousse, refreshing dessert
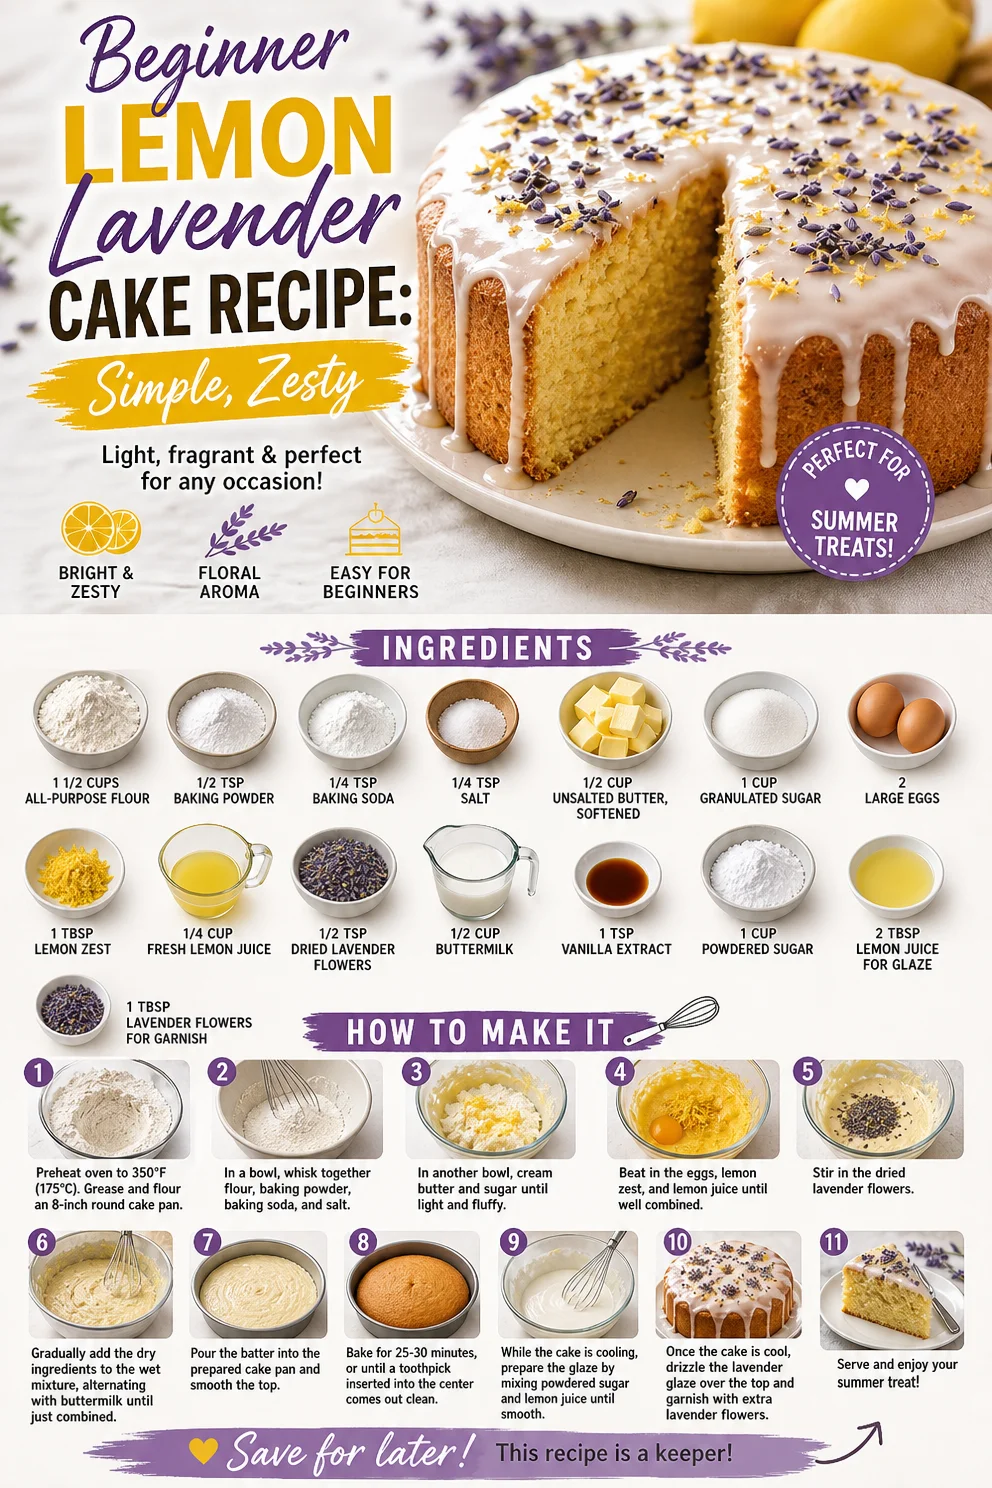
Beginner Lemon Lavender Cake Recipe: Simple, Zesty
Indulging in Nostalgia: The Delight of Lemon Lavender Cake
Welcome, food lovers! Today, I’m thrilled to share with you one of my favorite recipes that beautifully combines the invigorating zest of lemons with the delicate floral notes of lavender. That’s right, we’re diving into the world of Lemon Lavender Cake—a dessert that not only tantalizes your taste buds but also transports you to sunlit gardens with every bite. Picture this: a slice of moist cake topped with a silky glaze, bursting with citrusy brightness and floral undertones. It doesn’t just taste delicious; it feels like a hug in cake form!
Now, some of you might be thinking, “Lavender in a cake? Really?” And I’m here to say, “Absolutely!” Don’t let the idea intimidate you. When used correctly, lavender can elevate your baking game. It adds an unexpected twist that’s surprisingly comforting. Even if you think you’re not a lavender person, I urge you to give it a shot. You might just discover a new flavor obsession!
Let’s transport ourselves to my kitchen for a moment. The air is fragrant with citrus, and I can hear the gentle clinks of my baking tools against the counter, mixing in rhythm with some soft music. Baking has always been a joyful ritual for me—a way to express love and creativity. And when I pull this cake out of the oven, the first thing I do is give it a little sniff. The combination of lemon and lavender is nothing short of intoxicating. If baking is an art, then this recipe makes you a brilliant artist. So, let’s get those aprons on and start creating something delicious!
A Sweet Memory
The inspiration behind this Lemon Lavender Cake comes from many summer afternoons spent at my grandmother’s cottage. She had a small garden filled with vibrant flowers, but what stood out most were her lavender plants. I still remember walking through her garden, the sun gently warming my back, inhaling the floral aroma that seemed to dance through the air. One afternoon, she invited me into her cozy kitchen, where we whipped up a cake that would forever hold a special place in my heart.
As we mixed the batter, I giggled at the way she cautioned me to be careful with the lavender. “A little goes a long way,” she said with a wink. I’ve carried that advice with me through the years, and it’s one of those beautifully simple lessons that stuck. The cake we baked together was simple yet elegant, and the zesty lemon contrasted perfectly with the aromatic lavender. Each slice reminded me of those sunny afternoons, laughter floating around us like the sweet scent intertwined with the breeze. That nostalgia is what drives me to recreate this cake, with each bite as comforting as a cherished memory.
Ingredients
Here’s what you’ll need to create this delightful Lemon Lavender Cake:
-
1 1/2 cups all-purpose flour
- The backbone of any cake! For a lighter version, you could substitute half with almond flour for a nutty flavor.
-
1/2 teaspoon baking powder
- This helps the cake rise. Be sure it’s fresh for the best results!
-
1/4 teaspoon baking soda
- Balances the acidity of the lemon. Another crucial leavening agent to make your cake fluffy.
-
1/4 teaspoon salt
- Balances flavors and enhances sweetness. It’s a baker’s secret weapon!
-
1/2 cup unsalted butter, softened
- Butter creates the cake’s rich, moist texture. Don’t skip the softening step; it should be room temperature!
-
1 cup granulated sugar
- Adds sweetness and helps the cake brown properly. You can swap this for coconut sugar for a healthier twist.
-
2 large eggs
- Eggs bind the ingredients and add moisture. Ensure they’re at room temperature for an even mix.
-
1 tablespoon lemon zest
- This is where the magic begins—fresh zest gives an intense lemon flavor. Always use organic lemons when you can!
-
1/4 cup fresh lemon juice
- The star of the show! Freshly squeezed is best, as bottled lemon juice just doesn’t compare in flavor.
-
1/2 teaspoon dried lavender flowers
- Use culinary-grade lavender. You can find this in specialty stores or online—it’s worth it!
-
1/2 cup buttermilk
- Adds moisture and gives the cake a tender crumb. You can make your own with milk and a splash of vinegar!
-
1 teaspoon vanilla extract
- A must for depth of flavor. Try using homemade vanilla extract for an extra touch!
-
1 cup powdered sugar
- Perfect for that sweet, glossy glaze that brings the whole cake together.
-
2 tablespoons lemon juice for glaze
- Intensifies the lemony flavor and adds a lovely tang to the glaze.
-
1 tablespoon lavender flowers for garnish
- For a final touch of elegance, sprinkle these on top!
Step-by-Step Instructions
Let’s put on our chef hats and get baking! Here’s how to masterfully whip up your Lemon Lavender Cake in no time:
-
Preheat your oven to 350°F (175°C).
- Prepping your oven ensures an even bake. You want to be ready to go as soon as the batter is mixed!
-
Grease and flour a 9-inch round cake pan.
- This is so your cake doesn’t stick. You can also line the bottom with parchment paper for easier removal.
-
In a mixing bowl, whisk together the all-purpose flour, baking powder, baking soda, and salt.
- This is creating your dry mix. Whisking aerates the flour, ensuring your cake rises nicely.
-
In another bowl, beat the softened butter and granulated sugar together until light and fluffy.
- This step can take about 3-5 minutes. The air you incorporate is key for a light texture!
-
Add the eggs, lemon zest, and lemon juice to the butter mixture. Mix until well combined.
- This fruity combo is where you start to see the magic happen!
-
Gradually add the dry ingredients to the wet mixture, alternating with buttermilk. Begin and end with the flour mixture.
- Mix until just combined—overmixing can lead to a dense cake. We want light and fluffy!
-
Gently fold in the dried lavender flowers.
- Use a spatula to fold—it preserves the tenderness of the batter!
-
Pour the batter into the prepared cake pan and level off the top.
- Give the pan a little shake to smooth the batter.
-
Bake in the preheated oven for 25-30 minutes, or until a toothpick inserted into the center comes out clean.
- Every oven is a little different, so keep an eye on it, especially the first time you make this!
-
Allow the cake to cool in the pan for 10 minutes, then transfer to a wire rack to cool completely.
- Patience is key! Letting it cool all the way will allow for a better texture when you glaze.
-
While the cake cools, prepare the glaze by whisking together powdered sugar and lemon juice until smooth.
- If it’s too thick, add more lemon juice. Too runny? Just add a bit more powdered sugar!
- Once the cake is cool, pour the glaze over the top and let it drip down the sides. Garnish with lavender flowers.
- The presentation matters! Use a spoon to help guide the glaze if you want a bit more control.
Voilà! You’ve just mastered a beautiful Lemon Lavender Cake!
Serving Suggestions
When it comes to serving this beauty, keep it simple yet elegant. A slice on a beautifully patterned plate with a sprig of fresh lavender on the side gives a lovely presentation. Pair it with a dollop of whipped cream or a scoop of vanilla ice cream for an extra treat. This cake is fantastic for brunch gatherings, afternoon tea, or just a sweet way to treat yourself!
Recipe Variations
Here are a few creative twists you can consider to make this recipe your own:
-
Lemon Elderflower Cake: Replace the lavender with elderflower cordial for a flowery flavor that beautifully complements the lemon.
-
Lavender Vanilla Bean Cake: Add vanilla bean paste to the batter for a rich, aromatic depth that pairs wonderfully with the floral notes.
-
Gluten-Free Lavender Cake: Substitute the all-purpose flour with a gluten-free baking mix to make this cake suitable for gluten-sensitive guests.
-
Vegan Lemon Lavender Cake: Replace eggs with flax eggs (1 tablespoon of ground flaxseed mixed with 2.5 tablespoons of water) and use a plant-based butter alternative or coconut oil.
Chef’s Notes
I can’t tell you how many times I’ve made this cake, each time adding a little twist or realizing I forgot an ingredient! One time, I made it with coconut sugar, giving it a subtle caramel note beneath the lemon. And oh, darling, on another occasion, my neighbor brought me fresh mint from her garden. A little mint syrup drizzled on top was a game changer!
Every bake is an adventure, and I encourage you to make this recipe your own. Don’t be afraid to tinker around! Trust me, the result is always worth it, whether it’s beautifully imperfect or perfectly flawed.
FAQs and Troubleshooting
Q1: Why did my cake sink in the middle?
- This typically happens due to overmixing or not baking it long enough. Make sure to mix until just combined and test for doneness with a toothpick!
Q2: Can I use dried lavender if I can’t find fresh?
- Absolutely! Just ensure it’s labeled as culinary-grade. Fresh flowers can be too potent!
Q3: How should I store leftover cake?
- Keep it in an airtight container at room temperature for up to three days, or in the fridge if you prefer a chilled treat.
Q4: Can I make this as cupcakes?
- Yes! Pour the batter into a lined muffin tin and bake for about 18-20 minutes.
By keeping these tips in mind, you’ll be well on your way to baking a delightful Lemon Lavender Cake that’ll leave everyone asking for your secret recipe!
Nutritional Info
While baking is all about joy and flavor, being mindful of nutritional aspects can be beneficial. Please note the following estimates per slice (assuming 12 servings):
- Calories: ~210
- Protein: 2g
- Fat: 9g
- Carbohydrates: 31g
- Sugar: 15g
And there you have it, beautiful bakers! A delightful journey through the delightful realm of Lemon Lavender Cake. Remember, the best ingredient in your kitchen is love—so bake with joy, share with friends, and savor every slice! Happy baking! 🍰🌼
PrintLemon Lavender Cake

A delightful dessert that combines the invigorating zest of lemons with delicate floral notes of lavender, topped with a silky glaze.
- Prep Time: 15 minutes
- Cook Time: 30 minutes
- Total Time: 45 minutes
- Yield: 12 servings 1x
- Category: Dessert
- Method: Baking
- Cuisine: American
- Diet: Vegetarian
Ingredients
- 1 1/2 cups all-purpose flour
- 1/2 teaspoon baking powder
- 1/4 teaspoon baking soda
- 1/4 teaspoon salt
- 1/2 cup unsalted butter, softened
- 1 cup granulated sugar
- 2 large eggs
- 1 tablespoon lemon zest
- 1/4 cup fresh lemon juice
- 1/2 teaspoon dried lavender flowers
- 1/2 cup buttermilk
- 1 teaspoon vanilla extract
- 1 cup powdered sugar
- 2 tablespoons lemon juice for glaze
- 1 tablespoon lavender flowers for garnish
Instructions
- Preheat your oven to 350°F (175°C).
- Grease and flour a 9-inch round cake pan.
- In a mixing bowl, whisk together the all-purpose flour, baking powder, baking soda, and salt.
- In another bowl, beat the softened butter and granulated sugar together until light and fluffy.
- Add the eggs, lemon zest, and lemon juice to the butter mixture. Mix until well combined.
- Gradually add the dry ingredients to the wet mixture, alternating with buttermilk. Begin and end with the flour mixture.
- Gently fold in the dried lavender flowers.
- Pour the batter into the prepared cake pan and level off the top.
- Bake in the preheated oven for 25-30 minutes, or until a toothpick inserted into the center comes out clean.
- Allow the cake to cool in the pan for 10 minutes, then transfer to a wire rack to cool completely.
- While the cake cools, prepare the glaze by whisking together powdered sugar and lemon juice until smooth.
- Once the cake is cool, pour the glaze over the top and let it drip down the sides. Garnish with lavender flowers.
Notes
Serve with a sprig of fresh lavender or a dollop of whipped cream for an elegant touch.
Nutrition
- Serving Size: 1 slice
- Calories: 210
- Sugar: 15g
- Sodium: 200mg
- Fat: 9g
- Saturated Fat: 5g
- Unsaturated Fat: 3g
- Trans Fat: 0g
- Carbohydrates: 31g
- Fiber: 1g
- Protein: 2g
- Cholesterol: 30mg
Keywords: cake, lemon, lavender, dessert, baking
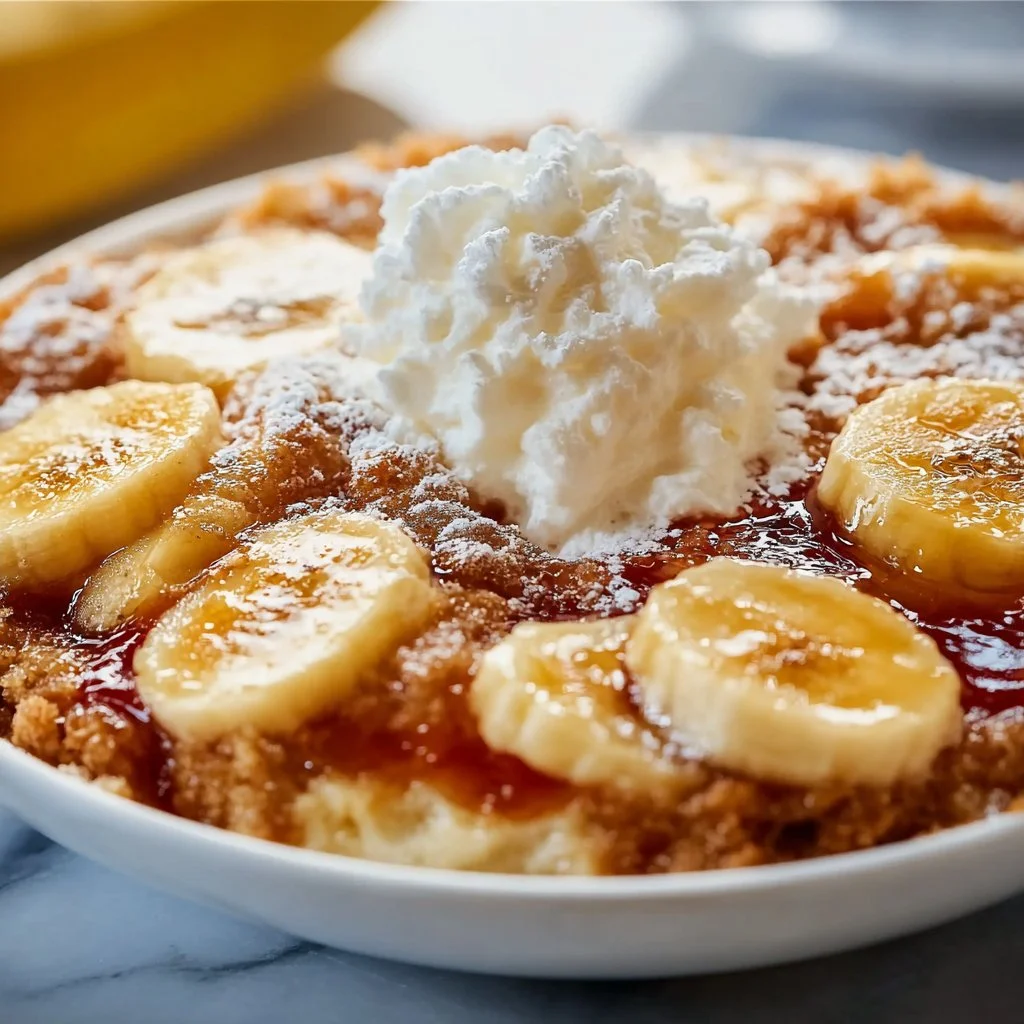
The Best Southern Banana Cobbler Dessert
The Best Southern Banana Cobbler Dessert: A Sweet Treat That’ll Make You Smile!
Hey there, fellow food lovers! Today, we’re diving into a classic Southern dessert that’s sure to warm your heart and tickle your taste buds: Southern Banana Cobbler. Now, I can already hear some of you saying, “Banana cobbler? Is that even a thing?” Yes, indeed! This cozy dessert is a delightful twist on the traditional cobbler, combining the lusciousness of ripe bananas with a comforting, buttery crust.
As we navigate through the recipe, you’ll find that it’s not just about the ingredients; it’s about the stories behind them, the memories they create, and the joy they bring when shared. Whether it’s a family gathering, a barbecue with friends, or a cozy evening at home, this dessert brings everyone together. So grab your aprons, put on your favorite tunes, and let’s whisk up some memories and deliciousness together!
A Personal Touch: A Nostalgic Favorite
There’s something about Southern desserts that feels like a warm hug. Growing up in the South, every family gathering was marked by the sweet aroma of freshly baked goods wafting through the air. One of my earliest memories is my grandmother’s kitchen—it was a magical place filled with laughter, love, and, of course, food.
I can vividly recall watching her prepare this banana cobbler as she recounted stories from her own childhood. The sizzle of melted butter in a pan was music to my ears, and the sight of those ripe bananas transformed into something whimsical was a sight to behold. She would always let me help—mashing the bananas, sprinkling sugar, and, of course, sneaking a taste here and there.
Now, as an adult, I’ve carried on this tradition, making this dessert for family and friends. It brings back warm memories every time I take a bite, and I hope that when you make it, it brings you that same feeling of nostalgia.
Ingredients: What You’ll Need
Before we really get into the cooking, let’s talk about the star players in this delightful dish. Here’s what you’ll need:
-
5 ripe bananas, sliced: The riper, the better! Look for bananas with plenty of brown spots—that means they’re extra sweet and perfect for baking! If you’re in a pinch, you can use frozen bananas; just make sure to thaw and drain excess liquid.
-
1 cup granulated sugar: This sweetener is essential for balancing the flavors. You can substitute it with coconut sugar or brown sugar for a deeper, caramel-like flavor.
-
½ cup unsalted butter, melted: Butter adds richness and depth to the cobbler. If you need a dairy-free option, coconut oil works beautifully in its place.
-
1 teaspoon vanilla extract: For a hint of warm, sweet flavor that elevates the dessert. Homemade vanilla extract is an easy DIY project if you’re feeling adventuresome!
-
1 teaspoon ground cinnamon: This warm spice adds a lovely aroma and enhances the flavor of the bananas. Feel free to experiment with cardamom for a unique twist!
-
¼ teaspoon salt: Just a pinch enhances all the other flavors in the dish. You can use sea salt or Himalayan salt—both work wonderfully.
-
1 cup self-rising flour: This is what gives the cobbler its structure. If you don’t have self-rising flour, you can easily make your own by mixing 1 cup of all-purpose flour with 1.5 teaspoons of baking powder and ½ teaspoon of salt.
-
1 cup whole milk: Adds moisture and richness. For a lighter version, you can substitute with almond milk or oat milk, but a little fat really helps with the creamy texture.
-
½ cup sugar for the topping: This creates a delightful crust on top. You can halve the amount if you prefer a less sweet dessert.
-
½ teaspoon ground nutmeg (optional): This spice adds depth and warmth; however, if you’re not a fan, it can be skipped entirely.
-
Vanilla ice cream (optional): A scoop on top is heavenly! Homemade or store-bought will work perfectly.
-
Whipped cream (optional): Light and fluffy, it’s a delightful complement to the warm cobbler.
-
Chopped pecans or walnuts (optional): A sprinkle adds crunch and a nutty flavor that pairs beautifully with bananas.
-
Caramel drizzle (optional): For that extra touch of sweetness—because why not?
Step-by-Step Instructions: Let’s Get Cooking!
Now that we have all our ingredients ready, let’s get into the nitty-gritty of crafting this fabulous Southern Banana Cobbler!
-
Preheat Your Oven: Set your oven to 350°F (175°C). This step is crucial! You want your oven hot and ready to create that golden, crispy top.
-
Prepare Your Baking Dish: Grab a 9×13 inch baking dish and grease it lightly with butter or cooking spray. This will ensure your cobbler doesn’t stick and it releases easily when it’s time to serve.
-
Mash Those Bananas: In a medium mixing bowl, mash the ripe bananas until mostly smooth with some small chunks remaining. You want to feel the texture when you dive in! A fork works like magic for this.
-
Mix Wet Ingredients: Add the melted butter, sugar, vanilla extract, and cinnamon to your mashed bananas. Stir until everything is well combined. The melted butter should help break down the sugar, making it nice and creamy.
-
Blend in Dry Ingredients: Gradually mix in the self-rising flour and milk until fully combined. It’s okay if it’s a bit lumpy; that’s part of the charm! Remember, mix gently to avoid overmixing—this can make your cobbler tough instead of tender.
-
Transfer to Baking Dish: Pour the cobbler mixture into your prepared baking dish, spreading it evenly. At this stage, you might notice how fragrant it is. The aromas are heavenly!
-
Bake That Sweetness: Pop the dish into the oven and let it bake for about 30-35 minutes, or until the top is golden brown and a toothpick inserted in the center comes out clean.
-
Cool and Serve: Once it’s baked, let it cool for roughly 10 minutes. This waiting period allows the flavors to meld perfectly. Serve warm with vanilla ice cream, whipped cream, or any toppings you fancy!
Serving Suggestions: The Art of Plating
When it comes to serving this delicious banana cobbler, a warm scoop of it in a bowl is all you really need—but why not elevate it a bit? Here are some friendly serving tips:
-
For a Rustic Look: Spoon servings into individual ramekins or small bowls. These little portions not only look adorable but make serving easy and inviting!
-
Garnish: Top each serving with a dollop of whipped cream and a sprinkle of chopped nuts. If you’re feeling fancy, a drizzle of caramel sauce adds a gourmet touch.
-
Ice Cream Love: Place a warm piece of cobbler in a bowl and top it off with a generous scoop of vanilla ice cream. The combination of hot and cold is absolutely irresistible!
Recipe Variations: Get Creative!
Looking to shake things up a bit? Here are some fun variations and twists you can try:
-
Nutty Banana Cobbler: Add a half cup of chopped walnuts or pecans to the batter for added crunch and flavor.
-
Chocolate Banana Cobbler: Sprinkle some chocolate chips over the top before baking for a rich dessert that will satisfy any sweet tooth.
-
Caribbean Twist: Use coconut milk instead of whole milk and add shredded coconut in with the bananas for a tropical vibe.
-
Berry Banana Cobbler: Toss in a cup of blueberries or raspberries for a fruity burst that pairs beautifully with bananas.
-
Vegan-Friendly Version: Substitute eggs with flax eggs and use almond milk instead of whole milk, plus coconut oil in place of butter for a delicious vegan cobbler!
Chef’s Notes: A Touch of Love
This Southern Banana Cobbler recipe has come a long way! Over the years, I’ve tried many variations, adding different spices, fruits, and toppings. One funny memory I have is the time I tried to impress my friends by adding a splash of bourbon into the mix for an adult twist. Let’s just say it turned out a bit too “spirited”—but we laughed, and it became a night to remember!
The beauty of this dessert is its flexibility. It’s a canvas for your creativity, and you can tweak it to suit your mood and taste preferences. So don’t hesitate to experiment; after all, the kitchen is meant for fun!
FAQs and Troubleshooting: Common Questions
Q1: My cobbler didn’t rise as much as I expected. What went wrong?
A: Make sure your self-rising flour is fresh! Old baking ingredients can lead to flat baked goods. Also, ensure you’ve mixed just until combined—overmixing can cause it to be dense.
Q2: Can I use plain flour instead of self-rising flour?
A: Absolutely! Just remember to add the appropriate baking powder and salt as mentioned in the ingredients section to achieve that delightful rise.
Q3: How do I store leftovers?
A: Once cooled, store any leftovers in an airtight container in the refrigerator for up to three days. To reheat, pop it in the microwave for a few seconds or in the oven at 350°F until warmed through.
Q4: What if I don’t have ripe bananas?
A: If your bananas aren’t ripe enough, you can speed up the ripening process by placing them in a brown paper bag for a day or two. Or, you can try baking them at 300°F for about 15-20 minutes until they’re soft.
Nutritional Info (Optional)
While this banana cobbler is a delightful treat, moderation is key. A serving (1/8 of the pan) typically contains approximately:
- Calories: 280
- Total Fat: 12g
- Carbohydrates: 42g
- Protein: 4g
- Sugars: 22g
Just remember, it’s all about balance, and a little indulgence now and then never hurt anyone!
So there you have it! A warm, delightful Southern Banana Cobbler recipe that’s sure to bring joy to your kitchen and your loved ones’ hearts. I can’t wait for you to try it and create your own stories around this charming dessert. Happy cooking, and don’t forget to share your cobbler adventures with me—I’d love to hear them! 🍌✨
PrintSouthern Banana Cobbler

A delightful Southern dessert that combines ripe bananas with a buttery crust, perfect for family gatherings and cozy evenings.
- Prep Time: 15 minutes
- Cook Time: 35 minutes
- Total Time: 50 minutes
- Yield: 8 servings 1x
- Category: Dessert
- Method: Baking
- Cuisine: Southern
- Diet: Vegetarian
Ingredients
- 5 ripe bananas, sliced
- 1 cup granulated sugar
- ½ cup unsalted butter, melted
- 1 teaspoon vanilla extract
- 1 teaspoon ground cinnamon
- ¼ teaspoon salt
- 1 cup self-rising flour
- 1 cup whole milk
- ½ cup sugar for the topping
- ½ teaspoon ground nutmeg (optional)
- Vanilla ice cream (optional)
- Whipped cream (optional)
- Chopped pecans or walnuts (optional)
- Caramel drizzle (optional)
Instructions
- Preheat your oven to 350°F (175°C).
- Prepare your baking dish by greasing it lightly with butter or cooking spray.
- Mash the ripe bananas until mostly smooth in a medium mixing bowl.
- Mix the melted butter, sugar, vanilla extract, and cinnamon into the mashed bananas until well combined.
- Blend in the self-rising flour and milk until fully combined, making sure not to overmix.
- Transfer the cobbler mixture into the prepared baking dish and spread it evenly.
- Bake for 30-35 minutes, or until the top is golden brown and a toothpick inserted in the center comes out clean.
- Cool for roughly 10 minutes before serving warm with optional toppings.
Notes
Feel free to add walnuts or pecans for crunch or top with ice cream and caramel drizzle for an extra treat.
Nutrition
- Serving Size: 1 serving
- Calories: 350
- Sugar: 20g
- Sodium: 200mg
- Fat: 12g
- Saturated Fat: 6g
- Unsaturated Fat: 4g
- Trans Fat: 0g
- Carbohydrates: 50g
- Fiber: 3g
- Protein: 5g
- Cholesterol: 30mg
Keywords: banana cobbler, Southern dessert, comfort food, easy banana recipe, baked dessert