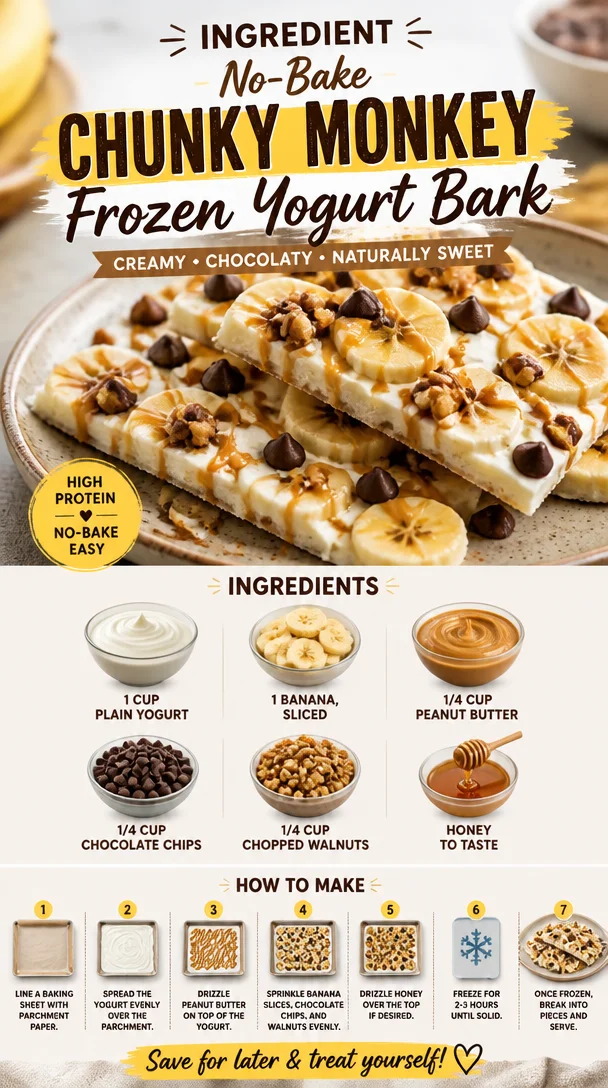
Ingredient No-Bake Chunky Monkey Frozen Yogurt Bark
Chunky Monkey Frozen Yogurt Bark: A Deliciously Fun Treat
Welcome back to the cozy corners of Clean Plate Cravings! Today, we’re diving into a delicious treat that’ll keep your taste buds dancing and your health goals on track: Chunky Monkey Frozen Yogurt Bark. Picture this: it’s a sunny afternoon, the kids (or the kid in you) are home from school, and you want something that feels indulgent without that post-snack guilt. This recipe checks all the boxes!
Chunky Monkey was inspired by a delightful flavor combination of peanut butter, bananas, and chocolate—an iconic trio that has been satisfying cravings for ages. The best part? You only need a few wholesome ingredients to whip up this cool snack. Not only is it a crowd-pleaser, but it also offers a perfect balance of protein, healthy fats, and a little sweetness. Plus, it’s super fun to make! So, in true Clean Plate Cravings style, let’s keep it fresh, simple, and seriously delicious.
Imagine the creamy yogurt melding beautifully with the sweet banana, a luscious drizzle of peanut butter, and the satisfying crunch of walnuts topped off with a sprinkle of chocolate chips. It’s like a party in your mouth! And you know what? This isn’t just a dessert; it’s a vibrant snack that you can feel good about enjoying. Whether you’re entertaining friends or looking to treat yourself after a long day, this Chunky Monkey Frozen Yogurt Bark is your go-to.
Now grab those mixing bowls and let’s jump into an adventure that brings the kitchen to life!
A Sweet Memory
Growing up, my kitchen was always a hub of laughter and experimentation. I remember those summer days spent with my grandmother, armed with an array of ingredients and a goal to make the sweetest treats. One particular afternoon, we decided to create a frozen yogurt bark after discovering the vibrant flavors of bananas and peanut butter together.
With the sun streaming through the window, we carefully layered yogurt, arranged banana slices, and creatively sprinkled on chocolate chips and walnuts. I can still hear her chuckling every time a chocolate chip rolled off the counter. Every scoop was filled with laughter and love as we taste-tested our creation and eagerly awaited it to freeze. That warm memory of a simple kitchen adventure keeps me inspired even today, and I’m excited to share this fun and easy recipe with all of you!
Ingredients
Here’s what you’ll need to create your own Chunky Monkey Frozen Yogurt Bark:
-
1 cup plain yogurt
A base for all delightful toppings! Greek yogurt adds a protein punch and a thicker texture, while non-dairy yogurt can replace it if you’re vegan or lactose intolerant. -
1 banana, sliced
Fresh bananas add natural sweetness and a creamy texture. Feel free to use frozen banana slices if you want to give it a frosty twist! -
1/4 cup peanut butter
Get that creamy, nutty goodness! You can swap this with almond butter or sunflower seed butter for nut-free options. -
1/4 cup chocolate chips
Because who doesn’t love a bit of chocolate? Dark chocolate is a great alternative if you’re looking for a healthier option. -
1/4 cup chopped walnuts
They offer that perfect crunch! You can use any nuts you like or skip them altogether for a nut-free bark. -
Honey to taste
A natural sweetener for balancing flavors. Substitute with maple syrup or agave nectar for a vegan option.
Step-by-Step Instructions
Ready to bring this fruity delight to life? Follow these steps for a super simple and fun process!
-
Prepare Your Baking Tray
Grab a baking sheet or pan (around 8×8 inches) and line it with parchment paper, letting the edges hang over for easy removal later. This will make your life much easier during the grand unveiling of your frozen bark! -
Mix the Yogurt
In a medium-sized bowl, scoop your plain yogurt and give it a quick stir to smooth it out. If you like, add a drizzle of honey to sweeten it to your liking. Mixing it a bit beforehand ensures you get that smooth, creamy consistency throughout the bark! -
Spread It Out
Pour the yogurt onto the prepared baking sheet and gently spread it out using a spatula or the back of a spoon. Make it around 1/2 inch thick, so it’s easy to break into pieces later. -
Add the Toppings
Here comes the fun part! Start by layering your banana slices evenly across the yogurt. Next, drizzle that glorious peanut butter on top. Don’t worry if it doesn’t look perfect—that’s part of its charm! Follow with a sprinkle of chocolate chips and chopped walnuts. -
Freeze!
Now it’s time for the freezer. Place your baking sheet in the freezer and let it chill for at least 3-4 hours, or until the yogurt is fully frozen. Pro tip: If you want to speed up the process, set it closer to the back of the freezer where it’s colder. -
Break and Enjoy
Once frozen solid, take it out and lift the bark using the parchment paper. Break it into chunks (or squares if you’re feeling fancy) and serve immediately. You can think of it as edible art—each piece is uniquely its own masterpiece!
Serving Suggestions
Serving this delicious Chunky Monkey Frozen Yogurt Bark is as easy as it gets! Place the pieces on a colorful plate or in a fun bowl, and don’t hesitate to drizzle a bit more peanut butter or a sprinkle of more chocolate chips on top. It’s perfect for a snack time treat, dessert for gatherings, or as a refreshing afternoon pick-me-up. Just imagine digging in with friends or family—it’s sure to lift everyone’s spirits!
Recipe Variations
Here are a few creative twists you can try to make this recipe your own:
- Fruity Fiesta: Swap out the bananas for strawberries or mixed berries to add a pop of color and extra flavor!
- Nutty Delight: Replace walnuts with pecans or hazelnuts for a different crunch or use seeds for a nut-free option.
- Chocolate Overload: Use dark chocolate chunks instead of chips for a more intense cocoa flavor or drizzle melted chocolate on top.
- Tropical Twist: Add some shredded coconut or use coconut yogurt for a dreamy tropical version.
- Sweet Spice: Sprinkle some cinnamon or nutmeg in the yogurt before spreading it for a warm, spiced flavor.
Chef’s Notes
Isn’t it amazing how recipes can evolve over time? I started making this frozen yogurt bark during hot summer days with friends. Over the years, I’ve played with flavors and ingredients, and each change has opened up a world of delicious possibilities! One time, I went a little wild and even added a dash of cayenne pepper to the peanut butter! It was surprisingly good—a little spicy kick with that sweet and creamy combo!
Remember, the best part about cooking is experimenting and having fun. Don’t ever hesitate to add your personal touch!
FAQs and Troubleshooting
Here are some common questions you might have while whipping up your Chunky Monkey Frozen Yogurt Bark:
-
What if my yogurt mixture is too runny?
It’s best to use thicker yogurt, like Greek, for the right consistency. If it’s too runny, let it sit in the fridge for a bit to thicken before spreading. -
How do I store leftovers?
Keep any leftovers in an airtight container in the freezer for up to 2 weeks. Just remember to separate the layers with parchment paper if you stack them! -
Can I make this dairy-free?
Absolutely! Simply swap out the plain yogurt for your favorite non-dairy alternative, like almond, coconut, or oat yogurt. -
Why is my bark breaking unevenly?
If the yogurt wasn’t fully frozen, you might end up with uneven breaks. Make sure to let it freeze completely before breaking!
Nutritional Info
While I usually focus on the fun aspect of food, here’s a quick glance at the nutritional benefits of this delightful snack:
- Calories: Approximately 150 per serving
- Protein: 6g
- Fat: 7g (primarily healthy fats from peanut butter and walnuts)
- Carbohydrates: 18g
- Fiber: 2g
There you have it—an effortlessly delicious recipe that’s bound to brighten up your days! Now prep this Chunky Monkey Frozen Yogurt Bark, sit back, and enjoy the fun, flavorful, and guilt-free treat. Happy snacking!
PrintChunky Monkey Frozen Yogurt Bark
A delicious and fun treat combining yogurt, bananas, peanut butter, and chocolate. Perfect for healthy snacking!
- Prep Time: 15 minutes
- Cook Time: 240 minutes
- Total Time: 255 minutes
- Yield: 4 servings 1x
- Category: Dessert
- Method: Freezing
- Cuisine: American
- Diet: Vegetarian
Ingredients
- 1 cup plain yogurt
- 1 banana, sliced
- 1/4 cup peanut butter
- 1/4 cup chocolate chips
- 1/4 cup chopped walnuts
- Honey to taste
Instructions
- Prepare your baking tray: Grab a baking sheet or pan (around 8×8 inches) and line it with parchment paper.
- Mix the yogurt: In a medium-sized bowl, scoop your plain yogurt and give it a quick stir. Add honey to sweeten if desired.
- Spread it out: Pour the yogurt onto the prepared baking sheet and gently spread it out to about 1/2 inch thick.
- Add the toppings: Layer banana slices, drizzle peanut butter, and sprinkle chocolate chips and walnuts on top.
- Freeze! Place your baking sheet in the freezer for 3-4 hours, or until fully frozen.
- Break and enjoy: Lift the bark using the parchment paper and break it into chunks.
Notes
You can substitute any toppings based on your preference. Store leftovers in an airtight container in the freezer for up to 2 weeks.
Nutrition
- Serving Size: 1 piece
- Calories: 150
- Sugar: 10g
- Sodium: 60mg
- Fat: 7g
- Saturated Fat: 1g
- Unsaturated Fat: 6g
- Trans Fat: 0g
- Carbohydrates: 18g
- Fiber: 2g
- Protein: 6g
- Cholesterol: 3mg
Keywords: frozen yogurt, healthy snack, dessert, peanut butter, banana, chocolate
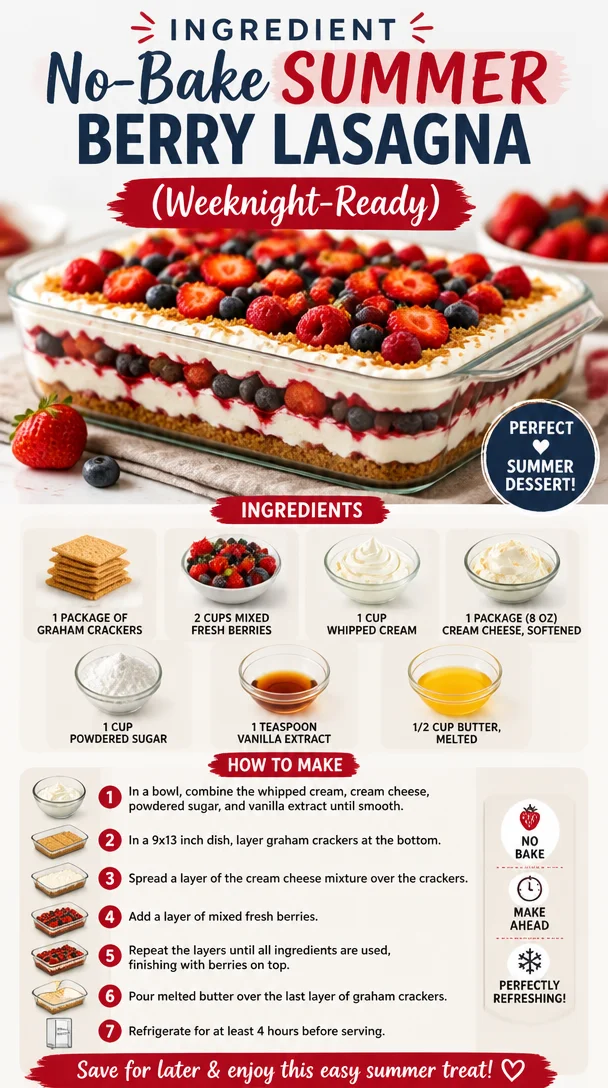
Ingredient No-Bake Summer Berry Lasagna (Weeknight-Ready)
No-Bake Summer Berry Lasagna: A Delightful Twist on a Classic
When the summer sun is shining, there’s nothing quite like the fresh taste of berries to brighten your day. And what better way to celebrate the season than with a dessert that’s not only simple to whip up but also a showstopper at any summer gathering? Welcome to the world of No-Bake Summer Berry Lasagna!
Picture this: layer upon layer of creamy goodness, tart fresh berries, and sweet, crunchy graham crackers weaving together to create a dessert that feels indulgently rich while being refreshingly light. This is the kind of dish that will have your friends oohing and aahing, wondering how you pulled it off without turning on the oven.
What I love about this recipe, aside from its incredible taste, is the way it brings people together. No-Bake Summer Berry Lasagna evokes memories of summer barbecues, potlucks, and family gatherings. You know those warm evenings where laughter fills the air and everyone is sharing stories over delicious food? That’s what this dessert is all about.
So, let’s dive into how you can create your very own No-Bake Summer Berry Lasagna. Trust me, once you make it, you’ll never look at a traditional lasagna the same way again.
A Slice of Nostalgia
Growing up, my family would gather every summer for what we called "Berry Days." My mom, armed with fresh berries from our garden, would invite neighbors over for a day of berry picking, baking, and laughter. We would rush inside, red-stained fingers from too many sweet-tart treats, and transform those freshly picked berries into all sorts of delicious concoctions.
Among all those cherished recipes, my favorite was this No-Bake Summer Berry Lasagna. I remember the first time I helped make it; the messy combinations of cream cheese and whipped cream, the sweet scent of berries wafting through the kitchen, and the fun of layering it all up like a sweet puzzle! It was an event, a celebration of summer, and an excuse to eat dessert first.
Every bite evokes those nostalgic summer afternoons filled with chatter, laughter, and a whole lot of love. And now, it’s your turn to create those same memories.
Ingredients
Here’s what you’ll need to make this scrumptious No-Bake Summer Berry Lasagna:
-
1 package of graham crackers
The base of your lasagna. These create that perfect crispy layer! Use cinnamon or honey variety for a twist. -
2 cups mixed fresh berries
A delightful combination of strawberries, blueberries, and raspberries for freshness. You can substitute with any berries you love! -
1 cup whipped cream
Adds a light and fluffy texture. If you’re short on time, store-bought whipped cream works; just make sure it’s light and airy! -
1 package (8 oz) cream cheese, softened
This creamy base is the heart of the lasagna. Make sure it’s soft for an easy mix. You can swap with a vegan cream cheese for a dairy-free option! -
1 cup powdered sugar
Sweetens up the cream cheese mixture. For a healthier alternative, you can use coconut sugar, which will add a hint of caramel flavor. -
1 teaspoon vanilla extract
Adds a lovely depth of flavor. Always use pure vanilla extract for the best taste! -
1/2 cup butter, melted
Helps hold the graham cracker crust together. If you’re looking for a lighter option, melted coconut oil works well here too!
Step-by-Step Instructions
-
Prepare the Cream Cheese Mixture:
In a large mixing bowl, beat the softened cream cheese until smooth. Add in the powdered sugar and vanilla extract, and continue mixing until it’s completely blended. You want a creamy, luscious texture, so don’t rush this step! Pro tip: Use an electric mixer to get that light airiness. -
Whip the Cream:
In a separate bowl, whip the cream until soft peaks form. You want it fluffy but still spreadable. For a hint of sweetness, consider adding a tablespoon of powdered sugar to the cream while whipping. -
Combine Cream Mixtures:
Gently fold the whipped cream into the cream cheese mixture. Here’s where the magic happens! Mix until just combined—no need to overdo it. You want to keep that puffiness from the cream. -
Prepare the Dish:
Grab a 9×13-inch glass dish (or whatever you have on hand). Start by laying down a single layer of graham crackers at the bottom. Break them if necessary to fit! -
Add the Cream Layer:
Spread about half of the cream cheese mixture evenly over the graham crackers. This is your first layer of creamy goodness. -
Berry Time:
Scatter one cup of your mixed berries over the cream cheese layer. Feel free to mix and match! Hint: crushing some of the berries slightly under your fingers releases even more flavor. -
Repeat Layers:
Repeat the process! Another layer of graham crackers, followed by the rest of the cream cheese mixture, and another cup of berries. You’re building a delicious masterpiece here! -
Top It Off:
Finish with a final layer of graham crackers and a sprinkle of fresh berries on top for a stunning presentation. -
Chill:
Cover the dish with plastic wrap and let it chill in the refrigerator for at least four hours, or overnight if you can wait! This allows all those flavors to meld beautifully. -
Serve and Enjoy:
When you’re ready to serve, slice into squares and watch as everyone digs into this delightful summer treat!
Serving Suggestions
To serve, I like to plate individual squares on a cute dessert plate. A sprinkle of mint on top provides a lovely color contrast and a fresh pop of flavor. You can also drizzle some berry sauce or a sprinkle of crushed graham crackers for added texture. Don’t forget a scoop of vanilla ice cream on the side for a truly decadent experience!
Recipe Variations
Feeling adventurous? Here are some creative twists to try with your No-Bake Summer Berry Lasagna:
- Citrus Burst: Add a bit of lemon or orange zest to the cream cheese mixture for a zesty kick.
- Chocolate Lovers: Sprinkle mini chocolate chips between layers or add cocoa powder to the whipped cream for a chocolatey twist.
- Nutty Crunch: Layer in chopped nuts like almonds or walnuts for a delightful crunch.
- Peachy Keen: Replace some of the berries with fresh peach slices for a juicy summer variation!
- Gluten-Free: Swap graham crackers with gluten-free cookies or your favorite gluten-free cracker for a suitable alternative.
Chef’s Notes
I’ve made this No-Bake Summer Berry Lasagna countless times, and it’s always a crowd-pleaser! One year, I decided to be adventurous and dyed the cream cheese mixture with a hint of pink food coloring for extra fun—it looked fabulous, though my kids still debate whether they liked it better in its natural state!
Cooking is about experimentation and finding what works for you. I encourage you to make this dessert your own; each variation has its own charm.
FAQs and Troubleshooting
1. Why did my cream cheese mixture turn out lumpy?
Make sure your cream cheese is truly softened. If it’s still cold from the fridge, it won’t mix well. Try placing it in the microwave for a few seconds or leaving it out for a bit longer.
2. Can I make this dessert ahead of time?
Absolutely! In fact, it’s best when made a day ahead. Just store it tightly wrapped in the fridge, and it will taste delicious after the flavors meld.
3. What if I don’t have fresh berries?
You can absolutely use frozen berries, but make sure to thaw and drain them first to avoid excess moisture. Canned berries work in a pinch too!
4. How should I store leftovers?
Keep any leftovers in an airtight container in the fridge. It will last for 2-3 days, though I doubt there will be much left with how good it is!
Nutritional Info
(Optional):
Per serving (based on 12 servings): Approximately 220 calories, 9g fat, 32g carbohydrates, 2g protein.
Whether you’re reminiscing about summer gatherings or getting together with friends for a fun evening, this No-Bake Summer Berry Lasagna is a vibrant, flavorful dessert that’s sure to bring joy to your table. So gather up those fresh berries, roll up your sleeves, and let’s get cooking! Here’s to delicious memories and flavor-filled adventures! 🍓💖
PrintNo-Bake Summer Berry Lasagna
A delightful twist on a classic dessert featuring layers of creamy goodness, fresh berries, and crunchy graham crackers, perfect for summer gatherings.
- Prep Time: 20 minutes
- Cook Time: 0 minutes
- Total Time: 240 minutes
- Yield: 12 servings 1x
- Category: Dessert
- Method: No-Bake
- Cuisine: American
- Diet: Vegetarian
Ingredients
- 1 package of graham crackers
- 2 cups mixed fresh berries (strawberries, blueberries, raspberries)
- 1 cup whipped cream
- 1 package (8 oz) cream cheese, softened
- 1 cup powdered sugar
- 1 teaspoon vanilla extract
- 1/2 cup butter, melted
Instructions
- Prepare the Cream Cheese Mixture: In a large mixing bowl, beat the softened cream cheese until smooth. Add in the powdered sugar and vanilla extract, and continue mixing until completely blended.
- Whip the Cream: In a separate bowl, whip the cream until soft peaks form.
- Combine Cream Mixtures: Gently fold the whipped cream into the cream cheese mixture until just combined.
- Prepare the Dish: Grab a 9×13-inch glass dish and lay down a single layer of graham crackers at the bottom.
- Add the Cream Layer: Spread half of the cream cheese mixture evenly over the graham crackers.
- Berry Time: Scatter one cup of mixed berries over the cream cheese layer.
- Repeat Layers: Add another layer of graham crackers followed by the rest of the cream cheese mixture and another cup of berries.
- Top It Off: Finish with a final layer of graham crackers and a sprinkle of fresh berries on top.
- Chill: Cover the dish with plastic wrap and let it chill in the refrigerator for at least 240 minutes (4 hours) or overnight.
- Serve and Enjoy: Slice into squares and serve.
Notes
For extra flavor, consider adding citrus zest or chocolate chips. This dessert can be made a day ahead for the best taste.
Nutrition
- Serving Size: 1 serving
- Calories: 220
- Sugar: 12g
- Sodium: 200mg
- Fat: 9g
- Saturated Fat: 5g
- Unsaturated Fat: 3g
- Trans Fat: 0g
- Carbohydrates: 32g
- Fiber: 2g
- Protein: 2g
- Cholesterol: 30mg
Keywords: no-bake dessert, summer dessert, berry lasagna, refreshing dessert, easy dessert

No-Bake Mango Cheesecake: 30-Minute Creamy Summer Treat
No Bake Mango Cheesecake: A Sweet Escape into Flavor
Welcome to another delightful episode of Clean Plate Cravings! Today, we’re diving into a dessert that’s not only a crowd-pleaser but also requires absolutely no baking—yes, you heard that right! This No Bake Mango Cheesecake is the epitome of summer joy captured in a creamy, dreamy slice of bliss. With its tropical vibes and luscious texture, this cheesecake is your ticket to a sun-soaked paradise, no matter what the season.
Now, let me ask you: Have you ever tasted something that instantly transported you back in time? For me, it’s the sweet, luscious flavor of mango. I still remember family gatherings at my aunt’s house, where she would whip up an array of exotic desserts that left us drooling in delight. The highlight? Her sensational mango cheesecake that had an incredibly smooth texture and a fruity zing that danced on our tongues. As kids, we’d scramble for seconds (and thirds!), not caring about our dessert limits as long as there was that velvety cheesecake to savor. It was a magical time filled with giggles, delicious food, and endless love—or at least, as endless as our appetites were!
Inspired by those cherished memories, I created this No Bake Mango Cheesecake to share with all of you (and to relive those delightful moments in a brand new way). Trust me, this dessert is easy to whip up and promises to impress your friends and family, leaving them begging for the recipe. Ready to jump in? Let’s create something sweet together!
Ingredients
Here’s what you’ll need to make your No Bake Mango Cheesecake:
-
2 cups graham cracker crumbs
These crunchy bits form the base of our cheesecake, providing a deliciously sweet and slightly salty foundation. If you want a gluten-free version, you can substitute with almond flour or gluten-free graham crackers. -
1/2 cup unsalted butter, melted
This golden goodness not only binds the graham cracker crumbs but also adds rich flavor. For a lighter option, consider using coconut oil—just make sure it’s melted and cooled! -
16 oz cream cheese, softened
The star of our show! Cream cheese gives its luxurious creaminess. If you want a lighter alternative, try using Greek yogurt, though the texture and flavor may differ slightly. -
1 cup powdered sugar
This sweetener creates a velvety texture and resists crystallization. You can substitute with honey or maple syrup, but reduce the liquid in the recipe slightly to maintain consistency. -
1 teaspoon vanilla extract
A splash of vanilla adds warmth and depth of flavor to our cheesecake. Feel free to use pure vanilla extract for the best flavor. -
1 cup heavy cream
Whipped to perfection, heavy cream creates that iconic fluffy texture. For a low-fat option, you can use whipped coconut cream, but the result may be less rich. -
2 cups mango puree
Fresh or canned mango—either option will infuse an amazing tropical flavor. If you can’t find mango, feel free to substitute with other fruits like peach or passionfruit. -
1 tablespoon lemon juice
This little add-in brightens the cheesecake, balancing the richness. Lime juice works well too for additional zest!
Step-by-Step Instructions
Let’s get this creamy masterpiece going! Follow these steps, and in no time, you’ll be indulging in your very own No Bake Mango Cheesecake.
-
Prepare the crust:
In a medium-sized bowl, combine 2 cups of graham cracker crumbs with 1/2 cup of melted unsalted butter. Mix until the crumbs are evenly coated and have a sandy consistency.
Chef Tip: If you prefer a more textured crust, you can add chopped nuts like almonds or walnuts for a delightful crunch! -
Press and chill the crust:
Press the crumb mixture firmly into the bottom of a 9-inch springform pan, ensuring it’s even. Use the flat bottom of a measuring cup for the best results. Place the crust in the refrigerator to chill while we work on the filling—the cold will help it set perfectly.
Chef Hack: Need to speed up the chilling? Pop it in the freezer for about 15 minutes! -
Make the filling:
In a large mixing bowl, beat 16 oz of softened cream cheese until smooth and creamy with a hand mixer. Gradually add in 1 cup of powdered sugar and continue beating until fully incorporated. Then add in that lovely 1 teaspoon of vanilla extract and 1 tablespoon of lemon juice, blending until well combined.
Tip from Ava: Scrape the sides of the bowl frequently to ensure everything blends evenly! -
Whip the cream:
In a separate bowl, whip 1 cup of heavy cream until soft peaks form. This step is key; aim for that light and airy texture to fold into your cheesecake mixture.
Quick Note: For even more volume, chill your mixing bowl and whisk beforehand! -
Combine and fold:
Gently fold the whipped cream into the cream cheese mixture—you want to maintain all that lightness. Once combined, add in 2 cups of mango puree and fold everything together until you have a smooth, luscious filling.
Chef Insight: Taste the filling at this point! If you prefer a stronger mango flavor, you can add a bit more puree or sweeten further to your liking. -
Fill the crust:
Pour the mango cheesecake filling on top of the chilled crust, spreading it evenly with a spatula. Give it a gentle tap to even it out.
Chef Tip: Create a decorative swirl by using a skewer or knife to gently mix the top layer if you’re in the mood for artsy cheesecake! -
Chill and set:
Cover your cheesecake with plastic wrap and let it chill in the refrigerator for at least 4-6 hours, or ideally overnight. This helps it set properly, ensuring you get those beautiful slices.
Pro Tip: If you’re short on time, a quick 1-hour chill in the freezer will help—but don’t forget to return it to the fridge afterward!
Serving Suggestions
Now that your No Bake Mango Cheesecake is perfectly set, it’s time to serve it up! Carefully run a knife around the edge of the springform pan before releasing the sides. Slice into generous pieces, and serve on a colorful dessert plate. Garnish with a dollop of whipped cream, fresh mango slices, and perhaps a sprig of mint for that wow factor. Trust me; your guests will be snapping photos before they even take a bite!
Recipe Variations
Want to experiment? Here are some creative twists you can incorporate into this mango cheesecake:
- Coconut Mango Cheesecake: Add shredded coconut into the crust for a tropical flair.
- Berry Swirl: Top your cheesecake with mixed berries or create a berry swirl in the filling for a burst of color and flavor.
- Vegan Version: Swap the cream cheese for coconut cream and use dairy-free whipped cream to make a delicious plant-based option.
- Chocolate Drizzle: Drizzle some melted dark chocolate over the top for an indulgent touch. It pairs beautifully with mango!
- Mango Passionfruit Fusion: Combine mango puree with passionfruit for a tangy, exotic twist.
Chef’s Notes
This No Bake Mango Cheesecake has a special place in my heart. I love how easy it is to make, especially when the mangoes are ripe and in season. The original recipe evolved when I wanted to bring the joy of that childhood dessert to modern kitchens. We all lead busy lives but that doesn’t mean giving up on delectable desserts. This cheesecake proves that you can have your cake and eat it too—without any hassle!
Fun fact: each time I make this recipe, I find myself reminiscing about those carefree childhood days, crafting new memories with friends and family over slices of this creamy delight.
FAQs and Troubleshooting
1. Can I use fresh mango instead of puree?
Absolutely! Just blend fresh mango until smooth and strain if necessary to remove any fibrous bits.
2. Why didn’t my cream cheese filling set?
Ensure your cream cheese is at room temperature and properly combined with the whipped cream. If it’s too soft, your dessert might not hold its shape.
3. How long can I store leftovers?
Your cheesecake can be stored in the fridge for up to 3 days, covered tightly. If left outside, it’s best enjoyed the same day!
4. Can I freeze the No Bake Mango Cheesecake?
Yes! You can freeze it for up to 2 months. Just make sure to let it thaw in the refrigerator before serving for the best texture.
Nutritional Info
While I typically focus more on flavors than numbers, here’s a rough nutritional breakdown for one slice (assuming you get 12 servings):
- Calories: 372
- Protein: 5g
- Carbohydrates: 35g
- Fat: 25g
- Sugar: 18g
And there you have it—a No Bake Mango Cheesecake that not only delights the taste buds but also rekindles warm memories and creates new ones. I can’t wait for you to try making it and hope it becomes a staple in your dessert repertoire. Happy baking, or should I say “happy mixing!” Enjoy every scrumptious bite, and let’s keep those cravings clean and delicious!
PrintNo Bake Mango Cheesecake

A delightful no-bake mango cheesecake that captures the essence of summer with its creamy texture and tropical flavors.
- Prep Time: 20 minutes
- Cook Time: 0 minutes
- Total Time: 360 minutes
- Yield: 12 servings 1x
- Category: Dessert
- Method: No Bake
- Cuisine: International
- Diet: Vegetarian
Ingredients
- 2 cups graham cracker crumbs
- 1/2 cup unsalted butter, melted
- 16 oz cream cheese, softened
- 1 cup powdered sugar
- 1 teaspoon vanilla extract
- 1 cup heavy cream
- 2 cups mango puree
- 1 tablespoon lemon juice
Instructions
- Prepare the crust: In a medium-sized bowl, combine 2 cups of graham cracker crumbs with 1/2 cup of melted unsalted butter. Mix until the crumbs are evenly coated.
- Press the crust: Press the crumb mixture firmly into the bottom of a 9-inch springform pan and chill in the refrigerator.
- Make the filling: In a large mixing bowl, beat 16 oz of softened cream cheese until smooth. Gradually add 1 cup of powdered sugar, then mix in 1 teaspoon of vanilla extract and 1 tablespoon of lemon juice.
- Whip the cream: In a separate bowl, whip 1 cup of heavy cream until soft peaks form.
- Combine: Gently fold the whipped cream into the cream cheese mixture, then add 2 cups of mango puree and mix until smooth.
- Fill the crust: Pour the mango cheesecake filling on top of the chilled crust, spreading it evenly.
- Chill and set: Cover and refrigerate for at least 4-6 hours or overnight to allow it to set.
Notes
For a decorative touch, garnish with a dollop of whipped cream and fresh mango slices. You can also freeze the cheesecake for up to 2 months.
Nutrition
- Serving Size: 1 slice
- Calories: 372
- Sugar: 18g
- Sodium: 200mg
- Fat: 25g
- Saturated Fat: 15g
- Unsaturated Fat: 5g
- Trans Fat: 0g
- Carbohydrates: 35g
- Fiber: 1g
- Protein: 5g
- Cholesterol: 60mg
Keywords: cheesecake, mango dessert, no bake dessert, summer dessert
Mango Tiramisu
Delectable Delight: Discovering Mango Tiramisu
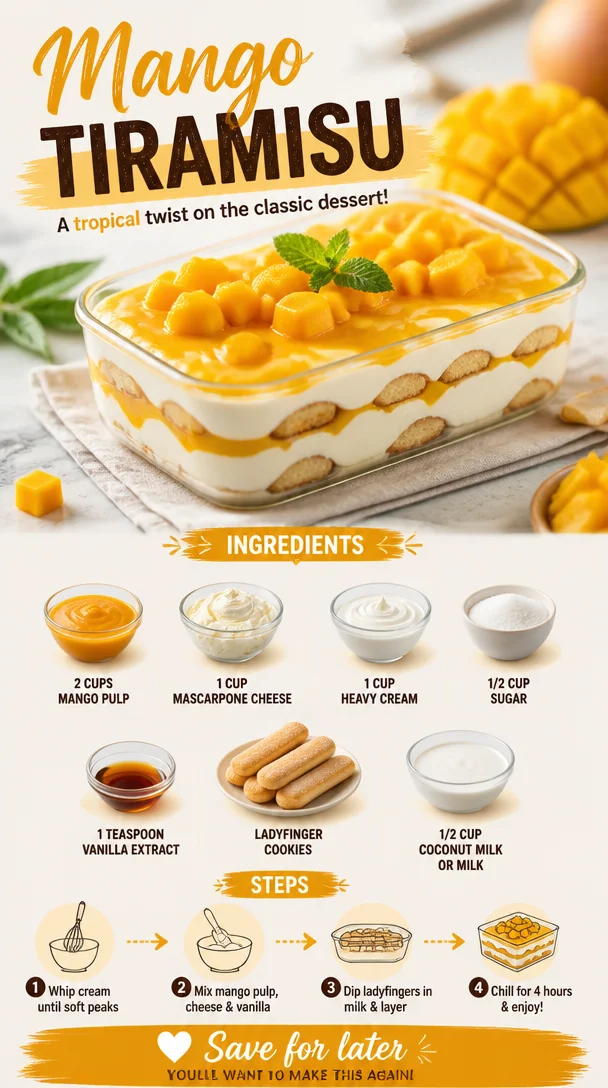
Welcome back to the cozy corner of Clean Plate Cravings, foodies! Today, we’re diving into a delightful twist on a classic dessert: Mango Tiramisu. Yes, you read that right! This vibrant, tropical take on the beloved Italian favorite combines creamy layers of mascarpone with luscious mango pulp, all wrapped together with airy ladyfingers. Let’s be real; who could resist that?
Picture this: the sun is shining, fragrant mangoes are in season, and the idea of a heavy dessert just doesn’t feel right on a sunny day. That’s where Mango Tiramisu comes in—a refreshing and flavorful alternative that’s beautiful enough to impress your dinner guests yet simple enough to whip up on a whim during the week.
The magic of this dessert lies not only in its delicious flavor but also in the nostalgia it evokes. As I prepare this dish, I can’t help but think of summer picnics with friends, where the world seems just a little bit brighter. This dessert is a reminder that food can transport us, evoke emotions, and create memories. So, roll up your sleeves, and let’s make some Mango Tiramisu that’s sure to leave everyone smiling!
A Whiff of Nostalgia
Before we get into the nitty-gritty of the recipe, let me share a little story. Growing up, mango season was like a carnival for my taste buds. Every summer, my grandpa would bring home crates full of ripe mangoes, their sweet perfume filling the air. He’d slice them into perfect wedges, and we would devour them while lounging in the backyard, sticky hands and all.
One day, he suggested we try something different with our beloved mangoes—something a bit more decadent. That’s when we stumbled upon the idea of a layered dessert. We merged our love for traditional tiramisu with those sweet, juicy mangoes, and voila! Our family gatherings turned into mango tiramisu parties, where the laughter and the flavors were equally intoxicating. That culinary adventure sparked my love for fusion desserts, and here I am today, sharing a version with you.
Ingredients
Here’s what you’ll need to create this delightful Mango Tiramisu:
-
2 cups mango pulp:
The star of the show! Use fresh, ripe mangoes for the best flavor, or opt for frozen mango puree if they’re out of season. Aim for the sweetest variety you can find—Haden, Kent, or Ataulfo are all great picks! -
1 cup mascarpone cheese:
This creamy Italian cheese provides the luxurious texture we crave in tiramisu. If you’re looking for a lighter option, try ricotta cheese blended with a splash of cream for a similar creaminess without the richness. -
1 cup heavy cream:
It gives our dessert its light and airy lift. If you need to lighten it up, consider using a thick coconut cream instead for a deliciously tropical twist. -
1/2 cup sugar:
A key ingredient to sweeten the mascarpone and lighten the flavors of the mango. You can adjust this depending on the sweetness of your mango puree. -
1 teaspoon vanilla extract:
A splash of vanilla enhances the creaminess and adds a warm depth. Feel free to substitute with almond extract for a unique flavor profile. -
Ladyfinger cookies:
These sponge-like cookies are perfect for soaking in our mango mixture. If gluten is a concern, look for gluten-free ladyfingers or try soft sponges cut into fingers. -
1/2 cup coconut milk or regular milk:
This will be used to moisten the ladyfingers before layering. If you want to highlight the coconut flavor, stick with coconut milk; otherwise, regular milk will do just fine!
Step-by-Step Instructions
Now, let’s get into the fun part—the cooking! Follow these steps for a stunning Mango Tiramisu:
-
Prepare the Mango Puree:
If you’re using fresh mangoes, peel and chop them, then blend them into a smooth puree. If you’re using frozen mango, let them thaw completely before blending! Taste the puree; you want it sweet with a hint of tartness. Add a drizzle of honey or a squeeze of lime if it’s not quite right! -
Whip the Cream:
In a medium bowl, beat the heavy cream until stiff peaks form. This will add the fluffy element to your tiramisu. Keep an eye on it; over-whipping can lead to butter! -
Mix Mascarpone and Sugar:
In another bowl, beat the mascarpone cheese with the sugar and vanilla extract until smooth and creamy. You want it to be light and airy—don’t overmix here, or it will lose its lovely texture. -
Fold in the Whipped Cream:
Gently fold one-third of the whipped cream into the mascarpone mixture to lighten it up, then fold in the remaining whipped cream until just combined. This is your luxurious filling! -
Prepare the Soaking Liquid:
In a shallow dish, mix the coconut milk (or regular milk) with a couple of tablespoons of the mango puree for added flavor. Dip the ladyfingers quickly into this mixture; you want them moist but not soggy! -
Layer the Tiramisu:
In a rectangular dish, place a layer of soaked ladyfingers at the bottom. Then, spread half of the mascarpone mixture over the ladyfingers, followed by a layer of mango puree. Repeat the layers until you reach the top, finishing with a layer of mascarpone. -
Chill the Tiramisu:
Cover the dish with plastic wrap and let it chill in the refrigerator for at least 4 hours, preferably overnight. This allows the flavors to meld beautifully and the dessert to set properly. -
Serve with Style:
Before serving, add some additional mango puree on top and garnish with fresh mango slices or mint leaves for a pop of color!
Serving Suggestions
When it comes to serving this Mango Tiramisu, less is more. Spoon generous servings onto plates and drizzle some extra mango puree around the edges for a decorative touch. You can even add a dollop of whipped cream or a sprinkle of toasted coconut to elevate the tropical vibe. Pair it with a chilled glass of white wine or tropical soda for a refreshing end to your meal!
Recipe Variations
Want to mix things up a bit? Here are some creative twists and variations to try:
- Tropical Fruit Tiramisu: Swap out the mango for other tropical fruits like passion fruit or pineapple for a different flavor.
- Coconut Flavored: Mix a tablespoon of shredded coconut into your mascarpone mixture for an extra coconut kick.
- Chocolate Mango: Add some cocoa powder or melted dark chocolate between the layers for a chocolatey contrast.
- Dairy-Free Version: Replace the mascarpone and heavy cream with cashew cream and coconut yogurt for a completely dairy-free dessert.
- Spiced Up: Add a pinch of cinnamon or nutmeg to the mascarpone mixture for a warm, spicy flavor that complements the sweetness of the mango.
Chef’s Notes
This Mango Tiramisu has been a crowd-pleaser in my household for years. I’ll never forget the first time I served it at a summer barbecue. The reactions were priceless—a mix of surprise and delight as guests dug into this unexpected twist on traditional tiramisu! Over the years, I’ve played around with different flavor profiles, and it never fails to impress.
Don’t be intimidated by the layers; they may seem extra, but they’re what make this dish sing. Plus, it’s a great way to get creative with what you have in your pantry. Who knows? You might just invent your version of this dazzling dessert!
FAQs and Troubleshooting
Q: Can I make the tiramisu a day in advance?
A: Absolutely! In fact, this dessert tastes even better the next day as the flavors meld together, making it a perfect make-ahead option!
Q: What if my ladyfingers are too hard?
A: Ladyfingers should be soft but not soggy. If yours are hard, try dipping them briefly in the soaking liquid for just a second longer, but be careful not to oversoak!
Q: Can I substitute the mascarpone cheese?
A: Yes! If mascarpone is hard to find, you can use cream cheese mixed with some whipped cream for a similar texture and taste.
Q: How can I make it gluten-free?
A: Look for gluten-free ladyfingers, or use soft sponge cakes cut into fingers! They’ll still give you that light texture without the gluten.
And there you have it—a colorful twist on a beloved classic! This Mango Tiramisu is the ultimate summer treat that proves desserts can be light and refreshing without sacrificing flavor. Dive in, make a mess, and love every bite! Happy cooking!
PrintMango Tiramisu
A refreshing and flavorful twist on the classic Italian dessert, combining creamy layers of mascarpone with luscious mango pulp and airy ladyfingers.
- Prep Time: 15 minutes
- Cook Time: 0 minutes
- Total Time: 240 minutes
- Yield: 8 servings 1x
- Category: Dessert
- Method: No-Bake
- Cuisine: Italian
- Diet: Vegetarian
Ingredients
- 2 cups mango pulp
- 1 cup mascarpone cheese
- 1 cup heavy cream
- 1/2 cup sugar
- 1 teaspoon vanilla extract
- Ladyfinger cookies
- 1/2 cup coconut milk or regular milk
Instructions
- Prepare the Mango Puree: If you’re using fresh mangoes, peel and chop them, then blend them into a smooth puree. If you’re using frozen mango, let them thaw completely before blending! Taste the puree; you want it sweet with a hint of tartness. Add a drizzle of honey or a squeeze of lime if it’s not quite right!
- Whip the Cream: In a medium bowl, beat the heavy cream until stiff peaks form. Keep an eye on it; over-whipping can lead to butter!
- Mix Mascarpone and Sugar: In another bowl, beat the mascarpone cheese with the sugar and vanilla extract until smooth and creamy. Don’t overmix here, or it will lose its lovely texture.
- Fold in the Whipped Cream: Gently fold one-third of the whipped cream into the mascarpone mixture to lighten it up, then fold in the remaining whipped cream until just combined.
- Prepare the Soaking Liquid: In a shallow dish, mix the coconut milk (or regular milk) with a couple of tablespoons of the mango puree for added flavor. Dip the ladyfingers quickly into this mixture; you want them moist but not soggy!
- Layer the Tiramisu: In a rectangular dish, place a layer of soaked ladyfingers at the bottom. Then, spread half of the mascarpone mixture over the ladyfingers, followed by a layer of mango puree. Repeat the layers until you reach the top, finishing with a layer of mascarpone.
- Chill the Tiramisu: Cover the dish with plastic wrap and let it chill in the refrigerator for at least 240 minutes, preferably overnight.
- Serve with Style: Before serving, add some additional mango puree on top and garnish with fresh mango slices or mint leaves for a pop of color!
Notes
This dessert tastes even better the next day as the flavors meld together, making it a perfect make-ahead option!
Nutrition
- Serving Size: 1 serving
- Calories: 320
- Sugar: 20g
- Sodium: 100mg
- Fat: 22g
- Saturated Fat: 12g
- Unsaturated Fat: 8g
- Trans Fat: 0g
- Carbohydrates: 30g
- Fiber: 1g
- Protein: 4g
- Cholesterol: 80mg
Keywords: Mango Tiramisu, Tropical Dessert, No-Bake Dessert
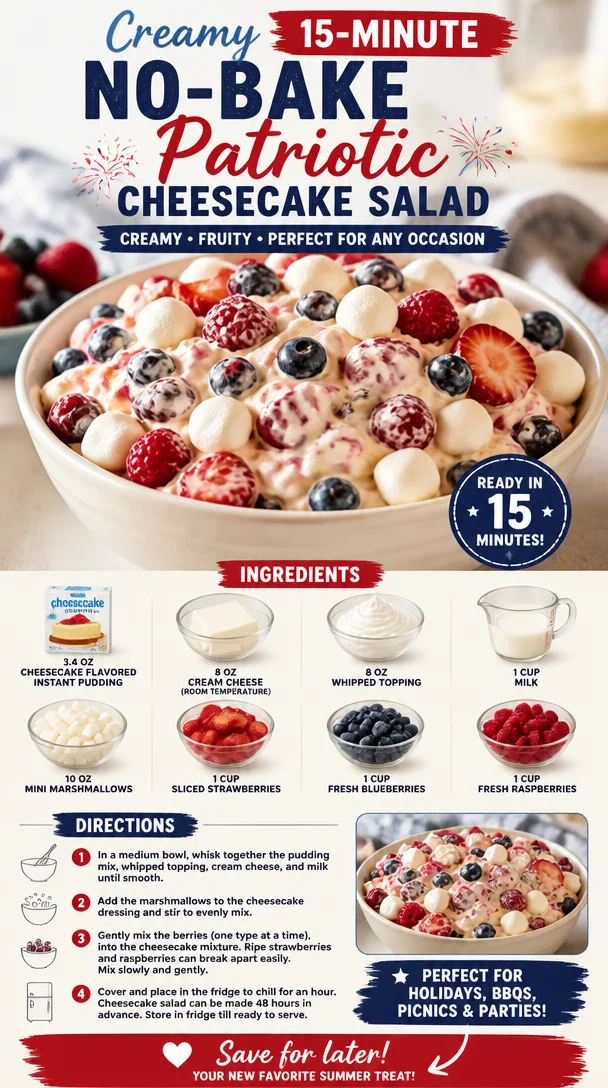
Creamy 15-Minute No-Bake Patriotic Cheesecake Salad
Red, White, and Blue Cheesecake Salad: A Festive Delight
Welcome to another exciting culinary journey with me, Ava Carter, here at Clean Plate Cravings! Today, we’re diving into a dish that’s not just a feast for your taste buds but also a delightful treat for the eyes. You guessed it—we’re making a Red, White, and Blue Cheesecake Salad! Perfect for all your summer gatherings, barbecues, and patriotic celebrations, this dessert combines the creamy goodness of cheesecake with the fresh, vibrant flavors of strawberries, blueberries, and raspberries.
Imagine a dish that has the richness of cheesecake yet feels light and refreshing. This salad is not just a dessert; it’s an experience that brings all the nostalgic flavors you love together in one colorful bowl. And the best part? It’s super easy to whip up! So grab your apron and let’s get started!
A Bite of Nostalgia
Growing up, my family took summer barbecues very seriously. One dish that almost always made an appearance was an eye-catching jello salad layered with fruit, whipped cream, and, of course, lots of love. Fast forward to my culinary adventures as an adult, and I realized that I wanted to capture that nostalgic summer magic but with a twist. Enter the Red, White, and Blue Cheesecake Salad!
I remember the first time I made it for a Fourth of July picnic. The sun was shining, the grill was sizzling, and I was feeling adventurous in the kitchen. As I mixed the creamy cheesecake filling, it brought back memories of my grandmother whisking up her iconic desserts. The laughter, the joy, and the aroma of good food filled my heart. When I laid it out on the picnic table, it was like I had created a work of art. The vibrant red, white, and blue colors sparkled in the sunlight, and I knew I had stumbled upon something special. It was an instant hit! Everyone dove in, and it felt amazing to share something that not only tasted good but also sparked happy memories. So let’s recreate that magic together today!
Ingredients
Here’s what you’ll need to make this delicious Red, White, and Blue Cheesecake Salad:
-
3.4 oz Cheesecake flavored instant pudding
This is the magic ingredient that gives our salad that rich cheesecake flavor without all the hassle of baking. If you can’t find cheesecake-flavored pudding, vanilla works well too! -
8 oz Cream Cheese (room temperature)
The creaminess of cream cheese is essential for achieving that dreamy texture. Make sure it’s softened to avoid lumps. You can substitute with a dairy-free cream cheese if you prefer. -
8 oz Whipped Topping
This brings the salad together and adds a light, airy feel. If you prefer a healthier alternative, you can use Greek yogurt or homemade whipped cream. -
1 cup Milk
Milk helps combine everything smoothly. Almond or soy milk can be a great substitute if you’re dairy-free. -
10 oz Mini Marshmallows
These little bites of fluffiness add a fun texture. You can opt for sugar-free marshmallows if you’re looking to cut down on sugar. -
1 cup Sliced Strawberries
Juicy and vibrant, strawberries offer that fresh sweetness. Feel free to swap out for cherries for a similar tangy-sweet flavor. -
1 cup Fresh Blueberries
They’re not just pretty; blueberries pack a nutritional punch too! If you can’t get fresh blueberries, frozen ones will work—just thaw them first. -
1 cup Fresh Raspberries
These tart beauties provide a lovely contrast to the sweetness of the cheesecake flavor. Blackberries are a suitable alternative if you prefer.
Step-by-Step Instructions
Now that we have our ingredients, let’s dive into the making of our Red, White, and Blue Cheesecake Salad! Follow these easy steps, and remember to have fun along the way.
-
Mix the Cheesecake Filling:
In a large mixing bowl, combine the room-temperature cream cheese and the cheesecake-flavored pudding mix. Using a hand mixer, beat them together on medium speed until smooth. This is where the magic begins! A tip: make sure your cream cheese is really soft so you don’t end up with lumps. Nobody wants a chunky cheesecake salad! -
Add the Milk:
Gradually pour in the milk while continuing to beat the mixture. This is going to make it nice and creamy. You want to achieve a smooth, pourable consistency. If you find it too thick, a splash more milk won’t hurt! -
Fold in the Whipped Topping:
Here comes the fun part! Carefully fold in the whipped topping using a spatula or wooden spoon to keep it light and fluffy. Think of this as adding air to your dessert—a light and airy cheesecakey hug! -
Incorporate the Marshmallows:
Next, stir in the mini marshmallows, allowing that delightful fluffiness to blend with the creamy filling. You’ll love the way they pop in your mouth! -
Add the Fresh Berries:
Throw in your sliced strawberries, blueberries, and raspberries. Fold them in gently to maintain their shape. The vibrant colors are essential for that stunning presentation! -
Chill:
Transfer your mixture to a large serving bowl or individual dessert cups. Cover it with plastic wrap and chill for at least 1 hour in the refrigerator. This helps the flavors meld together and gives you a refreshing salad! -
Serve and Admire:
Once it’s chilled and set, it’s time to dig in! Grab a big scoop—don’t be shy—and enjoy this beautiful cheesecake salad that’s sure to impress!
Serving Suggestions
Presentation is key, my friends! To take it up a notch, you can layer the salad in individual parfait glasses or jars for an extra touch. Drizzle with honey or sprinkle some crushed graham crackers on top for added crunch and a nod to traditional cheesecake crust. Garnish with a mint leaf or sprinkle a little extra fruit on top to make it look absolutely delectable!
Recipe Variations
Want to get creative? Here are some fun twists on this classic dessert:
-
Add Citrus: A splash of lemon or lime juice can brighten up the flavors beautifully—just be mindful to add it gradually!
-
Chocolate Drizzle: Drizzle some melted chocolate or chocolate sauce on top for a fudgey twist that pairs excellently with the cheesecake flavor.
-
Nutty Crunch: Toss in some chopped nuts like pecans or walnuts for a delightful crunch and added texture.
-
Different Pudding Flavors: Experiment with different pudding flavors like vanilla or chocolate for a unique take on the salad.
-
Vegan Version: Substitute all dairy ingredients with dairy-free alternatives to make this salad vegan-friendly while keeping it delicious!
Chef’s Notes
Oh, the joy of creating in the kitchen! This cheesecake salad was born from trial and error and a touch of whimsy. I remember the first time I plated it for a family gathering—the looks on everyone’s faces when they took their first bite was priceless. It’s delightful when a recipe becomes a family favorite, and it warms my heart to see it shared at gatherings year after year. Over time, I’ve adapted this recipe to accommodate dairy-free folks and to include even more vibrant fruits. It’s all about flexibility and making it your own!
FAQs and Troubleshooting
Q: My cheesecake salad turned out too runny; what went wrong?
A: The most common culprit is not using enough instant pudding mix. Make sure to stick to the recipe for the right texture or let it chill longer in the fridge to firm up.
Q: Can I prepare this salad in advance?
A: Absolutely! You can make it a day ahead; just make sure to store it in the fridge to keep it fresh. Just give it a light stir before serving; it might settle a bit.
Q: How long does this salad last in the fridge?
A: Typically, it stays fresh for about 3 days. But I doubt it will last that long—it’s too delicious to resist!
Q: Can I use frozen berries?
A: Yes! Just make sure to thaw and drain excess liquid before adding them to avoid making the salad watery.
Nutritional Info
For those curious about the nutritional aspect, here’s a quick breakdown per serving (based on 8 servings):
- Calories: 210
- Protein: 3g
- Fat: 9g
- Carbohydrates: 29g
- Fiber: 1g
- Sugars: 15g
This is a rough estimate, and variations can occur based on the specific ingredients used.
So there you have it, my culinary friends—a vibrant, creamy, delicious Red, White, and Blue Cheesecake Salad that’s perfect for any occasion! Remember to enjoy the process, have fun in the kitchen, and keep it fresh and fabulous. Until next time, happy cooking!
PrintRed, White, and Blue Cheesecake Salad
A festive and refreshing cheesecake salad perfect for summer gatherings and patriotic celebrations.
- Prep Time: 15 minutes
- Cook Time: 60 minutes
- Total Time: 75 minutes
- Yield: 8 servings 1x
- Category: Dessert
- Method: No-Bake
- Cuisine: American
- Diet: Vegetarian
Ingredients
- 3.4 oz Cheesecake flavored instant pudding
- 8 oz Cream Cheese (room temperature)
- 8 oz Whipped Topping
- 1 cup Milk
- 10 oz Mini Marshmallows
- 1 cup Sliced Strawberries
- 1 cup Fresh Blueberries
- 1 cup Fresh Raspberries
Instructions
- Mix the Cheesecake Filling: In a large mixing bowl, combine the room-temperature cream cheese and the cheesecake-flavored pudding mix. Using a hand mixer, beat them together on medium speed until smooth.
- Add the Milk: Gradually pour in the milk while continuing to beat the mixture until smooth and creamy.
- Fold in the Whipped Topping: Carefully fold in the whipped topping using a spatula to keep it light and fluffy.
- Incorporate the Marshmallows: Stir in the mini marshmallows until evenly mixed.
- Add the Fresh Berries: Gently fold in the sliced strawberries, blueberries, and raspberries.
- Chill: Transfer the mixture to a large serving bowl or individual cups and refrigerate for at least 1 hour.
- Serve and Admire: Once chilled, serve and enjoy your beautiful cheesecake salad!
Notes
Presentation can be enhanced by layering in parfait glasses and garnishing with mint.
Nutrition
- Serving Size: 1 serving
- Calories: 210
- Sugar: 15g
- Sodium: 300mg
- Fat: 9g
- Saturated Fat: 4g
- Unsaturated Fat: 4g
- Trans Fat: 0g
- Carbohydrates: 29g
- Fiber: 1g
- Protein: 3g
- Cholesterol: 30mg
Keywords: cheesecake salad, summer dessert, patriotic dessert, easy salad, no-bake dessert
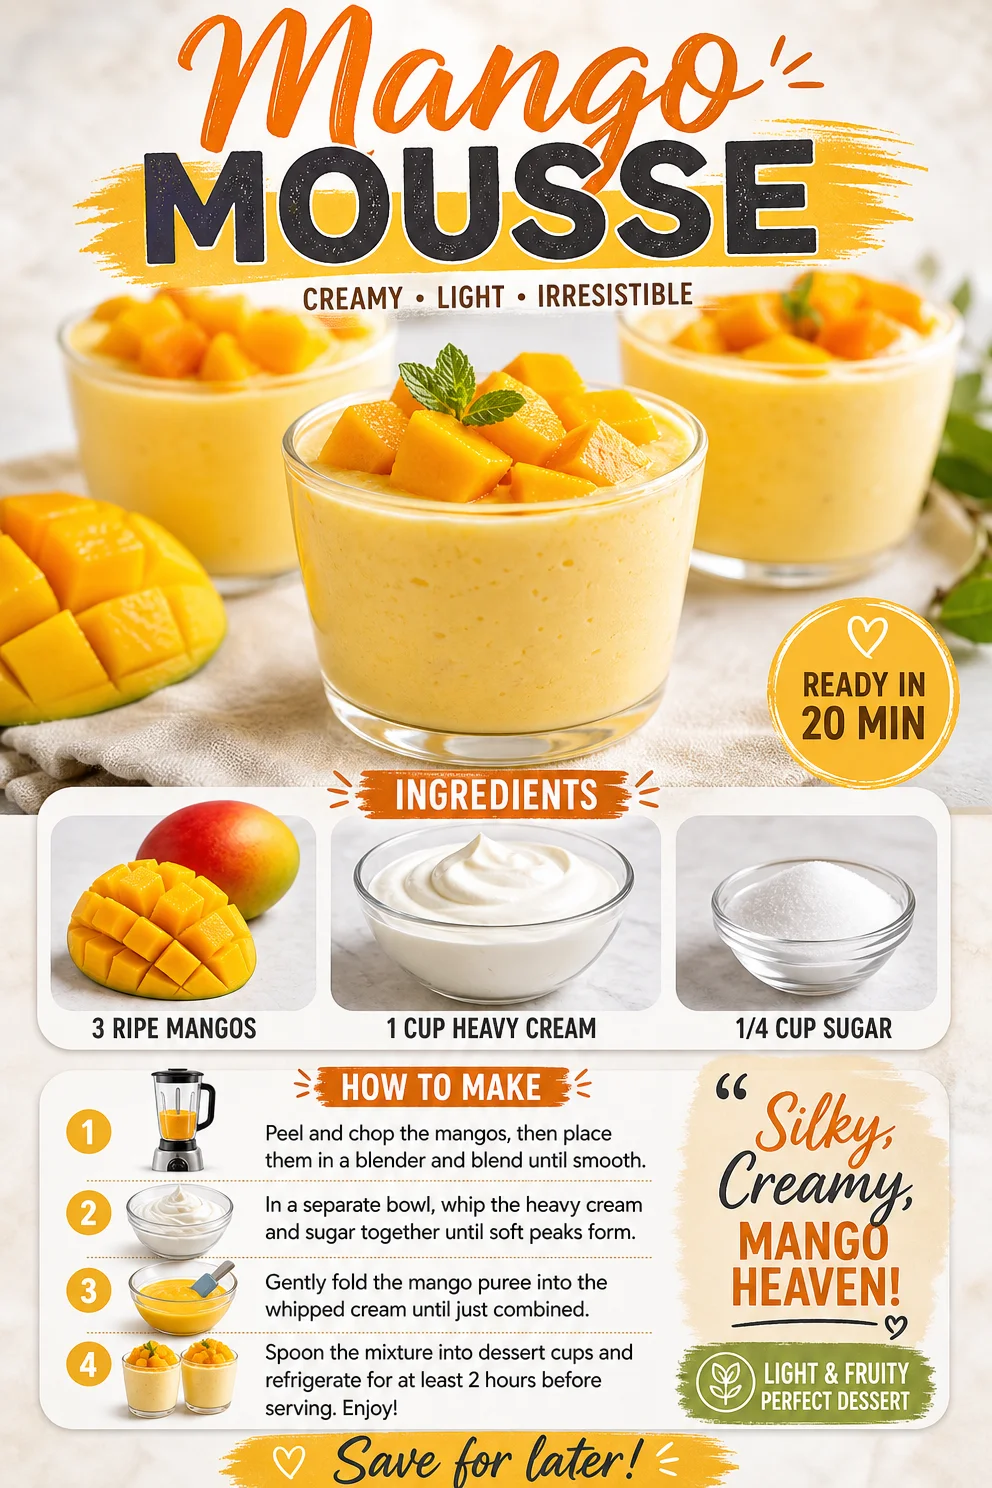
Mango Mousse
The Creamy Dream: Your Ultimate Guide to Mango Mousse
Welcome to Clean Plate Cravings, where today we’re diving into the world of sweet indulgence with a twist of tropical flair! We’re whipping up a Mango Mousse that’s not only light and refreshing but also feels like a little bite of heaven in every spoonful. If you’ve ever felt like dessert needs to be a heavy affair, I’m here to change that perception! This Mango Mousse is the answer to your sweet tooth without the guilt.
So, let’s talk about why mango mousse is the perfect dessert for any occasion. Imagine a warm summer evening, the air sweet with the scent of blooming flowers, and you gather around a table with friends and family. You want to serve something that not only looks stunning but also transports everyone to a sunny beach with every delicious bite! This mousse does just that! It’s not just food; it’s an experience wrapped in simple, fresh ingredients.
Picture this: fluffy, creamy, and oh-so-fruity mousse that melts in your mouth. It’s like a mini vacation with each spoonful—who wouldn’t want that? Plus, it’s a wonderful way to impress guests or just to treat yourself after a long day. You’ll find that making mousse can be uncomplicated and rewarding, making it ideal for both novice and seasoned chefs alike.
Ready to get your kitchen adventure started? Allow me to guide you through this delightful dish, and you’ll soon understand why I just can’t get enough of mango mousse!
A Sweet Memory of Mango Mousse
Growing up, I spent most of my summers at my grandma’s house. Among all her scrumptious treats—think fresh peach cobbler and blueberry pies—one dessert always stood out: her velvety mango mousse. The first time she served it, I remember being captivated! The bright orange color practically danced on the plate, promising bursts of flavor that were sure to excite my taste buds.
In her warm kitchen, filled with the sound of laughter and clinking glasses, I asked her how she made it. With a twinkle in her eye, she explained gently (as grandmas do), "It’s easy, my dear! You just let the mango shine through." And shine it did! That day she showed me that desserts don’t have to be complicated; they can be just as delightful when they highlight fresh ingredients.
To this day, whenever I whip up a batch of mango mousse, those summer days at Grandma’s house flood back into my memory. The mousse is not only a treat for the taste buds but also a fond reminder of the love and warmth shared in the kitchen. Now, it’s your turn to create your own beautiful memories with this delightful recipe.
Mango Mousse Ingredients
Let’s gather our ingredients before diving into the preparation! For our light and luscious mango mousse, you’ll need:
-
3 Ripe Mangos: The star of the show! Choose firm but slightly soft mangos with a sweet aroma. For substitutes, you can use frozen mango puree (just thaw it first) or other fruits like peaches or passionfruit for an interesting twist.
-
1 Cup Heavy Cream: This creates that luxuriously creamy texture. Need a lighter option? Substitute with coconut cream for a tropical flare, or use whipped coconut yogurt for a dairy-free version.
-
1/4 Cup Sugar: Just enough to elevate the natural sweetness of the mango. If you’re looking for alternatives, honey, agave syrup, or a sugar substitute can work, but remember they may alter the final flavor slightly!
Each ingredient, albeit simple, plays a significant role in creating a memorable and delicious dessert. By choosing fresh, quality ingredients, you’re not just making mousse; you’re creating a swoon-worthy experience ready to impress!
Step-by-Step Instructions
Now that we have our ingredients, let’s get started with the preparation! Ready? Let’s roll up those sleeves and create something magical!
-
Prepare the Mangos:
- First off, grab those luscious mangos! Carefully peel the skin with a sharp knife (watch those fingers!), then slice the flesh away from the pit.
- Chef Hack: Try cutting the mango into cubes and then gently scoring the flesh before scooping it out with a spoon—it’s a real game-changer!
-
Blend the Mangos:
- Toss the mango chunks into your blender or food processor. Blitz them until you have a smooth puree—this should take around 30 seconds if your mangos are ripe.
- For a unique touch, add a squeeze of lime juice! It brightens the flavor and gives it a refreshing zing.
-
Whip the Heavy Cream:
- In a separate mixing bowl, pour in the heavy cream. Using an electric mixer, whip on medium-high speed until soft peaks form.
- Tip: Make sure your bowl and beaters are cold for quicker whipping—any little tricks can go a long way!
-
Combine the Cream and Mango Puree:
- Gently fold the mango puree into the whipped cream using a spatula. Be careful not to deflate the cream; you want to maintain that light and airy texture.
- Chef Insight: Don’t rush this step! Folding slowly creates a lighter mousse!
-
Sweeten it Up:
- Sprinkle in the sugar and continue to fold until fully incorporated. Taste to check that sweetness is just right.
- Still too tart? A tad more sugar won’t hurt, but remember, the ripe mangos should provide most of the sweetness!
-
Chill the Mousse:
- Spoon your delightful mousse into serving glasses or bowls, then pop them into the refrigerator for at least an hour to set. This step helps flavor deepen and texture firm up.
- Chef Tip: If you want to be a little extra fancy, use a piping bag to fill your glasses for a beautiful presentation!
-
Garnish and Serve:
- Once set, garnish your mango mousse with fresh mint sprigs or a sprinkle of toasted coconut. Get creative here! Your beautiful work deserves to shine.
Serving Suggestions
Serving mango mousse is as simple and enjoyable as making it! You can present it in individual clear glasses or bowls to show off that gorgeous color. Layering with some crushed graham crackers will add a delightful crunch. A fresh slice of lime on the side adds a pop of color and an extra hint of freshness. Remember, presentation matters; take a moment to make it as visually appealing as it is delicious—your guests will appreciate it.
Recipe Variations
Want to shake things up? Here are some fun variations to twist your mango mousse:
-
Add Some Spice: Incorporate a pinch of cayenne pepper or cinnamon for a surprising kick!
-
Chocolate Lover’s Delight: Drizzle some melted dark chocolate on top or mix in cocoa powder for a tropical-chocolate fusion.
-
Coconut Cream: Replace heavy cream with coconut cream for a richer, coconut-infused version.
-
Berry Bliss: Mix in some pureed strawberries or blueberries for a fruity fusion that contrasts beautifully with mango.
-
Healthier Option: Swap sugar with honey or maple syrup and use Greek yogurt instead of heavy cream for a protein-packed pre-or post-workout treat.
Chef’s Notes
Over the years, my mango mousse has become a beloved staple, featuring at birthdays, summer barbecues, and spontaneous dessert dates with friends. It’s adapted and evolved with my culinary journey, often inspired by new ingredients or creative ideas from my kitchen crew.
And let me tell you, one memorable kitchen disaster occurred when I mistakenly grabbed salt instead of sugar. Let’s just say a salty mousse was definitely one to forget! But hey, that’s what makes cooking fun right? Take risks, learn, and above all, enjoy every moment—whether it turns out perfectly or not!
FAQs and Troubleshooting
Q: Can I use frozen mangos for this recipe?
A: Absolutely! Just make sure to thaw them beforehand and blend until smooth. Frozen mangos can sometimes be even sweeter!
Q: What can I do if my mousse doesn’t set?
A: If it doesn’t set properly, it might need more time in the fridge. You could also try adding gelatin (1 teaspoon dissolved in warm water) during the mixing stage for an extra firm mousse.
Q: How do I know when to stop whipping the cream?
A: Stop when you see soft peaks form! If you over-whip, you risk turning it into butter, which isn’t the goal here.
Q: Can I make this mousse dairy-free?
A: For sure! Just swap heavy cream with coconut cream and use a dairy-free sweetener if needed!
Nutritional Info
While I encourage enjoying this delightful treat, keep in mind that moderation is key for indulgence. A serving contains approximately 250 calories, depending on your specific ingredients and portions.
And there you have it! A vibrant, delicious, and soul-soothing Mango Mousse recipe crafted with love and memories. As you embark on this kitchen adventure, I hope you find it just as joyous as I always do! Remember, the kitchen is your playground. So, have fun, experiment, and, most importantly, enjoy every bite—whether savoring it solo or sharing it with loved ones! Happy cooking!
PrintMango Mousse

A light and refreshing mango mousse that’s a perfect dessert for any occasion, offering a taste of tropical delight.
- Prep Time: 15 minutes
- Cook Time: 0 minutes
- Total Time: 60 minutes
- Yield: 4 servings 1x
- Category: Dessert
- Method: Chilling
- Cuisine: Tropical
- Diet: Gluten Free
Ingredients
- 3 Ripe Mangos
- 1 Cup Heavy Cream
- 1/4 Cup Sugar
Instructions
- Prepare the Mangos: Carefully peel the skin and slice the flesh away from the pit.
- Blend the Mangos: Toss the mango chunks into your blender and blitz until smooth.
- Whip the Heavy Cream: In a bowl, whip the heavy cream until soft peaks form.
- Combine the Cream and Mango Puree: Gently fold the mango puree into the whipped cream.
- Sweeten it Up: Sprinkle in the sugar and fold until fully incorporated.
- Chill the Mousse: Spoon into serving glasses and refrigerate for at least an hour.
- Garnish and Serve: Garnish with fresh mint or toasted coconut before serving.
Notes
Serve in individual glasses and layer with crushed graham crackers for added crunch!
Nutrition
- Serving Size: 1 serving
- Calories: 250
- Sugar: 18g
- Sodium: 50mg
- Fat: 15g
- Saturated Fat: 10g
- Unsaturated Fat: 5g
- Trans Fat: 0g
- Carbohydrates: 28g
- Fiber: 2g
- Protein: 2g
- Cholesterol: 70mg
Keywords: mango mousse, dessert, tropical dessert, light mousse, refreshing dessert
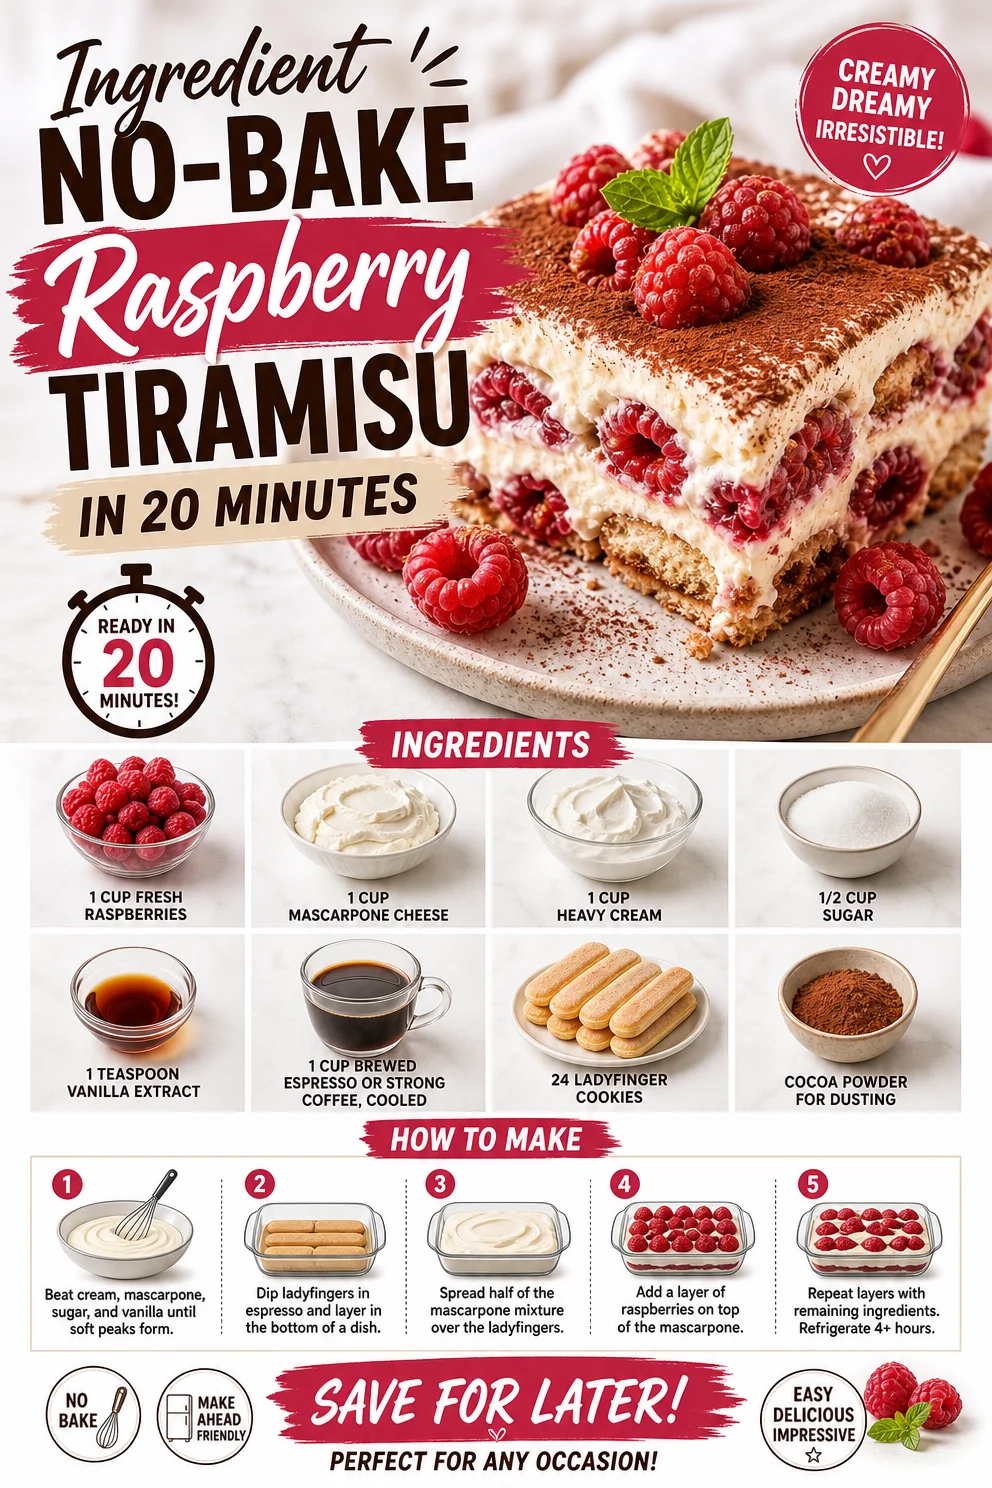
Ingredient No-Bake Raspberry Tiramisu in 20 Minutes
Raspberry Tiramisu: A Delightful Twist on a Classic
Hey there, food lovers! Ava here, ready to dive into one of the most delicious desserts you’ll ever make—Raspberry Tiramisu! If you’re like me and believe that indulgence can be both light and refreshing, then you’re in for a treat. This unique dessert takes the classic Italian Tiramisu and gives it a vibrant twist with fresh, juicy raspberries. Perfect for gatherings or simply treating yourself after a long day, this dessert is bound to impress your friends and satisfy your cravings.
So let’s take a stroll down memory lane, shall we? My first encounter with Tiramisu was at a little Italian café tucked in the heart of my hometown. The moment I took a bite, I was transported to a world of creamy mascarpone, rich espresso, and that glorious cocoa dusting on top. But let’s be real, I’ve always been a fan of fruits in desserts—it balances sweetness and adds a refreshing zing. That’s when I thought, “Why not infuse this classic with the tartness of raspberries?” And just like that, my Raspberry Tiramisu was born.
Picture this: a generous layer of creamy mascarpone laced with whipped cream and raspberries, delicately sandwiched between ladyfingers soaked in aromatic espresso. Can you taste it? Let’s get into the details so you can whip up this masterpiece in your kitchen!
A Sweet Memory in Every Bite
Growing up, my grandmother had a special place in her heart for Italian cuisine. Each Sunday, our family would gather at her cozy kitchen, where the aroma of freshly baked pastries filled the air. One day she surprised us all with Tiramisu, her version, of course, which was a labor of love involving layers upon layers of espresso-soaked goodness. As we dug in, my cousin and I decided to sneak in some fresh berries we had picked from the garden. The resulting combination was magic!
The tartness of the berries danced beautifully against the creamy layers, creating a flavor explosion that left us grinning from ear to ear. Although traditionalists may frown upon fruit in Tiramisu, I believe in breaking the rules when it comes to flavor! My Raspberry Tiramisu is a nod to that playful spirit and a reminder that cooking is all about experimenting and having fun.
Ingredients
Let’s gather our ingredients! Here’s what you’ll need:
-
1 cup fresh raspberries
Sweet and slightly tart, raspberries bring a burst of freshness to the dish. Feel free to use mixed berries if you want to switch things up! -
1 cup mascarpone cheese
This creamy Italian cheese is the heart of Tiramisu. If you can’t find mascarpone, you can substitute it with cream cheese mixed with a bit of sour cream for a similar texture. -
1 cup heavy cream
Whipped to perfection, heavy cream adds volume and richness. If you prefer a lighter version, you can use half-and-half, but the texture won’t be quite the same. -
1/2 cup sugar
Sweeten to taste! You can use coconut sugar or a sugar alternative like stevia if you’re looking to cut calories. -
1 teaspoon vanilla extract
This enhances the flavors beautifully. For a twist, try almond extract instead! -
1 cup brewed espresso or strong coffee, cooled
This gives Tiramisu its characteristic flavor. Make sure it’s strong so it doesn’t get overpowered by the other ingredients! -
24 ladyfinger cookies
These delightful sponge cookies soak up the coffee like nobodies’ business. If you’re gluten-free, look for gluten-free ladyfingers or make your own. -
Cocoa powder for dusting
A classic finishing touch that adds a nice bitter contrast to the sweetness.
Step-by-Step Instructions
Alright, let’s get cooking! Here’s how to assemble your Raspberry Tiramisu step-by-step.
-
Prepare Your Espresso
Brew a strong cup of espresso or coffee. Once it’s ready, set it aside to cool while you prep the cream. This helps retain the ladyfingers’ texture when they’re dipped. -
Whip the Cream
In a large mixing bowl, add the heavy cream and sugar. Using an electric mixer, whip until stiff peaks form. This will add air and create a delightful lightness that’s essential for Tiramisu. Make sure not to over-whip it; you don’t want butter! -
Mix in the Mascarpone
Gently fold in the mascarpone cheese and vanilla extract into your whipped cream. Use a rubber spatula and be careful not to deflate the whipped cream—this step is all about keeping that airy texture! -
Incorporate Fresh Raspberries
Now for the fun part! Stir in about 3/4 of your fresh raspberries gently into the mascarpone mixture. Reserve the rest for garnishing later. The vibrant color and tanginess will bring the whole dessert to life! -
Dip Ladyfingers in Coffee
Quickly dip each ladyfinger into the cooled espresso, ensuring they’re soaked but not soggy. Lay them side by side in a 9×13 inch dish, covering the bottom completely. Feel free to get a little creative with your layering! -
Layer the Cream Mixture
Once the ladyfingers are ready, spread half of the mascarpone-raspberry cream over the top. Use an offset spatula for a smooth finish—it’s all in the presentation! -
Repeat the Process
Layer another set of dipped ladyfingers on top of the cream, followed by the remaining raspberry cream mixture. Smooth it out nicely for a beautiful appearance. -
Chill, Chill, Chill!
Cover the dish with plastic wrap and let it chill in the refrigerator for at least 4-6 hours, or ideally overnight. This allows the flavors to meld together and the cream to firm up. -
Dust with Cocoa Powder
Just before serving, dust the top with cocoa powder. This step adds a bit of elegance and an inviting look that will have everyone excited to dive in! -
Garnish and Serve
Top with the remaining fresh raspberries for a pop of color and a delightful touch.
Serving Suggestions
To serve the Raspberry Tiramisu, cut into squares and plate on dessert plates. Add a few extra raspberries to the side for a beautiful pop of color and a sprig of mint for that extra touch of finesse. You might want to keep a dusting of cocoa powder on the table for guests to sprinkle on their servings!
Recipe Variations
Here are a few fun twists you can try:
-
Chocolate Raspberry Tiramisu: Add a layer of chocolate ganache between the cream layers for a rich, indulgent version.
-
Vegan Version: Substitute mascarpone with a mixture of soaked cashews blended with coconut cream. Use homemade vegan ladyfingers or sponge cake!
-
Citrus Twist: Add a tablespoon of lemon zest to the mascarpone mixture for a bright, zesty flavor.
-
Nutty Delight: Sprinkle crushed nuts, such as hazelnuts or almonds, between layers for added texture and flavor.
-
Berry Medley: Swap out raspberries for your fave berries or a mix; strawberries, blueberries, and blackberries all work wonderfully!
Chef’s Notes
As with all my favorite recipes, this Raspberry Tiramisu has evolved. In my early attempts, I was overly cautious about using fruit, but then I realized how complementary it can be. I’ve had friends tell me they prefer this fruity version to the classic! Just goes to show, there’s beauty in bending the rules.
And here’s a little tip: if you have any leftover mascarpone mixture, it makes an incredible fruit dip! Just store it in an airtight container in the fridge.
FAQs and Troubleshooting
Q: Can I make this Tiramisu in advance?
Absolutely! It’s best when made ahead of time, letting it develop all those wonderful flavors. Just keep it covered in the fridge.
Q: My ladyfingers fell apart?
If your ladyfingers are too soggy, try a quicker dip in the espresso next time. They should absorb the liquid but retain enough structure to hold layers.
Q: Can I use decaf coffee?
Of course! Decaf coffee works perfectly for a caffeine-free dessert without sacrificing flavor.
Q: How long can I store leftovers?
You can store leftovers in the fridge for up to 3 days. Just make sure to cover them well to keep the moisture in!
Nutritional Info
This delightful treat might just earn a place in your heart! Here’s the approximate nutritional info per serving (based on 8 servings):
- Calories: 350
- Protein: 5g
- Fat: 22g
- Carbohydrates: 30g
- Sugar: 20g
Remember, it’s all about balance. Enjoy in moderation, and savor every layer of this Raspberry Tiramisu!
So there you have it! A fresh, vibrant twist on Tiramisu that’s perfect for any occasion. This dessert is not just about the taste; it’s about sharing moments with loved ones. Get ready to wow your guests with this deliciously simple yet elegant dish—happy baking!
PrintRaspberry Tiramisu
A delightful twist on the classic Italian dessert, featuring fresh raspberries and creamy mascarpone layered with espresso-soaked ladyfingers.
- Prep Time: 30 minutes
- Cook Time: 10 minutes
- Total Time: 540 minutes
- Yield: 8 servings 1x
- Category: Dessert
- Method: No-Cook
- Cuisine: Italian
- Diet: Vegetarian
Ingredients
- 1 cup fresh raspberries
- 1 cup mascarpone cheese
- 1 cup heavy cream
- 1/2 cup sugar
- 1 teaspoon vanilla extract
- 1 cup brewed espresso or strong coffee, cooled
- 24 ladyfinger cookies
- Cocoa powder for dusting
Instructions
- Prepare your espresso. Brew a strong cup of espresso or coffee and set aside to cool.
- Whip the cream. In a bowl, add the heavy cream and sugar, and whip until stiff peaks form.
- Mix in the mascarpone. Gently fold in the mascarpone cheese and vanilla extract into your whipped cream.
- Incorporate fresh raspberries. Stir in 3/4 of the fresh raspberries into the mascarpone mixture.
- Dip ladyfingers in coffee. Quickly dip each ladyfinger into the cooled espresso and lay them side by side in a 9×13 inch dish.
- Layer the cream mixture. Spread half of the mascarpone-raspberry cream over the ladyfingers.
- Repeat the process. Layer another set of dipped ladyfingers followed by the remaining raspberry cream mixture.
- Chill in the refrigerator for at least 4-6 hours or ideally overnight.
- Dust with cocoa powder just before serving.
- Garnish with remaining fresh raspberries.
Notes
For a lighter version, you can use half-and-half instead of heavy cream. Experiment with different fruits for a unique flavor.
Nutrition
- Serving Size: 1 serving
- Calories: 350
- Sugar: 20g
- Sodium: 100mg
- Fat: 22g
- Saturated Fat: 13g
- Unsaturated Fat: 5g
- Trans Fat: 0g
- Carbohydrates: 30g
- Fiber: 2g
- Protein: 5g
- Cholesterol: 60mg
Keywords: tiramisu, raspberry dessert, Italian dessert, easy dessert, creamy dessert
Min No-Bake Key Lime Cheesecake Jars for Meal Prep
No-Bake Key Lime Cheesecake Jars: A Slice of Sunshine in Every Bite!
Hey there, fellow foodies! I’m so excited to share one of my absolute favorite desserts with you today: No-Bake Key Lime Cheesecake Jars! Picture this: a creamy, tart filling layered with sweet, buttery graham cracker crumbs, all served in adorable little jars. It’s like capturing the essence of summer in a deliciously dreamy dessert. Whether it’s a summer gathering, a relaxing weekend with friends, or just a little self-care after a long week, these jars of joy will make every moment feel special.
Imagine walking into your kitchen, the sun shining through the windows, and that warm breeze beckoning you to create something refreshing. This no-bake treat is super easy to whip up, allowing you to spend more time enjoying your creation rather than slaving over the stove. Perfect for those hot summer days when you want something scrumptious but don’t want to turn on the oven!
So grab your whisk and your favorite jars, and let’s dive into how to make this delightful dessert that will have everyone asking for seconds. Trust me, once you make this, you’ll find all the excuses to whip it out of your fridge!
A Sweet Memory to Cherish
Ah, key lime cheesecake – this dessert brings back so many lovely memories of summer beach trips with my family. I remember how we would drive down to the Florida coast with the windows down, the salty air blowing through the car, and a playlist of our favorite tunes blasting from the speakers. Our first stop would always be at this charming little cafe right by the shore, known for its homemade key lime pie.
I vividly remember the first time I took a bite of their cheesecake version. The tangy lime flavor hit my palate like the ocean waves crashing against the shore, and I was hooked! There was something so nostalgic about that creamy filling combined with the crunch of the graham cracker crust. Fast forward to today, and I’ve transformed that love for key lime cheesecake into these fun little jars. They embody that same luscious flavor, and they stir up wonderful memories with every bite.
Ingredients
Let’s gather our ingredients, shall we? This is a super simple list:
-
8 oz cream cheese, softened: This is the star of your cheesecake! Make sure to let it soften at room temperature, so it’s easy to mix and results in a smooth texture. If you’re in a pinch, you can use mascarpone cheese for a different flavor profile.
-
1/2 cup sugar: This will sweeten your filling perfectly! You can substitute it with honey or maple syrup for a more natural sweetness. Just keep in mind that the texture may vary a bit.
-
1 cup heavy cream: For that dreamy whipped topping on your cheesecake! You can swap it with coconut cream for a dairy-free option.
-
1/2 cup key lime juice: This gives the recipe its zesty kick! Freshly squeezed key limes are ideal, but if you can’t find them, bottled key lime juice works well too. Just check the ingredients for all-natural options.
-
1 tsp vanilla extract: A hint of vanilla enhances the flavor and makes everything more delightful.
-
Graham cracker crumbs: These create the crust! You can crush your own graham crackers or use store-bought crumbs. For a gluten-free version, try using almond flour or gluten-free graham crackers.
-
Lime zest for garnish: This is the cherry on top! Not only does it make your dessert pretty, but it also adds an extra layer of lime flavor.
Step-by-Step Instructions
Now that we have everything ready, let’s get cooking!
-
Mixing the Base: In a large bowl, combine the softened cream cheese and sugar. Use an electric mixer on medium speed to beat it together until it is smooth and creamy. This usually takes about 2-3 minutes. Chef’s tip: Make sure your cream cheese is at room temperature; cold cream cheese can leave lumps in your filling.
-
Whipping the Cream: In a separate bowl, whip the heavy cream until it forms stiff peaks. This might take about 3-5 minutes. You’ll know it’s ready when it holds its shape and doesn’t slosh around. A simple whisk will do if you’re feeling adventurous! This step adds lightness to your cheesecake.
-
Adding the Zesty Kick: Gently fold the whipped cream into the cream cheese mixture. Use a spatula and fold it in slowly to maintain the fluffiness of the whipped cream. Once combined, pour in the key lime juice and vanilla extract, and fold again until everything is well mixed. Your filling should be creamy and light!
-
Layering Time: Now for the fun part! In a jar or a glass, add a spoonful of graham cracker crumbs at the bottom. Then, layer on a generous scoop of your cream cheese mixture. You can use a piping bag for a fancy touch, but a regular spoon does just fine too! Repeat the layers until you reach the top of the jar, ending with a final layer of the cheesecake filling.
-
Chill and Set: Once your jars are assembled, pop them in the fridge for at least 2 hours (or overnight if you can wait!). This will help the cheesecake firm up and allow all those flavors to meld beautifully.
-
Garnish and Serve: Right before serving, sprinkle some extra graham cracker crumbs on top for garnish and finish it off with a sprinkle of lime zest. Serve chilled and watch your friends and family rave about how delicious it is!
Serving Suggestions
When it comes to serving these jars, presentation is key! I love to layer them up in clear glass jars, showcasing all those beautiful layers of creaminess and crunch. You can also use pretty dessert cups or small mason jars for a rustic touch. Pair them with fresh fruit like blueberries or strawberries on the side, or even a sprig of mint for a pop of color. These jars are not just a treat for the taste buds, but for the eyes too!
Recipe Variations
Now, let’s spice things up a bit! Here are a few creative spins on this recipe:
-
Chocolate Key Lime Cheesecake Jars: Add some melted chocolate to the cream cheese mixture, or use chocolate graham crackers to create a delicious chocolate crust for a rich twist.
-
Berry Swirl: Fold in some berry puree (like raspberry or strawberry) into the cream cheese mixture for a fruity surprise!
-
Tequila Key Lime Cheesecake: For the adults, add a splash of tequila to the cream cheese mixture to turn this dessert into a fun, boozy treat.
-
Coconut Cream Variation: Incorporate shredded coconut into the crust and the filling for a tropical coconut key lime experience.
-
Non-Dairy Version: Substitute cream cheese with cashew cream or silken tofu blended until smooth, and the heavy cream with coconut cream for a vegan-friendly option.
Chef’s Notes
I absolutely adore how this recipe has evolved over the years! My very first attempt was a full cheesecake, but it took forever to bake, cool, and slice perfectly. I decided to ditch the oven and embrace the joy of no-bake desserts, which is definitely more my style (and allows for more creativity!). Plus, no one can resist grabbing their own little jar of happiness! Feel free to be experimental with the layers—sometimes, I throw in some crushed candies or rotate the flavors. Get creative; the kitchen is your playground!
FAQs and Troubleshooting
-
What if my cream cheese is lumpy?
- If your cream cheese isn’t soft enough, you might end up with a few lumps. Just keep mixing until it’s smooth, or put it in the microwave for 10-15 seconds to soften it a bit more before mixing.
-
How can I make them less sweet?
- You can reduce the sugar in the filling to taste. Keep in mind that the tartness from the key lime juice will balance it out, so adjust according to your preference!
-
Can I use regular limes instead of key limes?
- Absolutely! Regular limes will work just fine. The flavor may not be as unique, but it’ll still taste great!
-
How long do they last in the fridge?
- These jars can be stored in the fridge for about 3-4 days. Just make sure they’re covered!
Nutritional Info
This no-bake key lime cheesecake jar is not only delicious but also carries a delightful nutritional profile that fits into a balanced lifestyle. Just remember to treat it as an indulgent dessert!
So there you have it, my friends! A fun, refreshing, and super easy recipe that you can whip up any time the mood strikes. I hope you enjoy making (and devouring) these No-Bake Key Lime Cheesecake Jars as much as I do. Here’s to blissful bites and sweet memories in the kitchen! Let’s keep it fresh, simple, and seriously delicious! Happy cooking!
PrintNo-Bake Key Lime Cheesecake Jars
A creamy, tart filling layered with sweet, buttery graham cracker crumbs served in adorable jars, perfect for summer gatherings.
- Prep Time: 15 minutes
- Cook Time: 0 minutes
- Total Time: 120 minutes
- Yield: 4 servings 1x
- Category: Dessert
- Method: No-Bake
- Cuisine: American
- Diet: Vegetarian
Ingredients
- 8 oz cream cheese, softened
- 1/2 cup sugar
- 1 cup heavy cream
- 1/2 cup key lime juice
- 1 tsp vanilla extract
- Graham cracker crumbs
- Lime zest for garnish
Instructions
- Mix the softened cream cheese and sugar in a large bowl until smooth and creamy using an electric mixer.
- Whip the heavy cream in a separate bowl until it forms stiff peaks.
- Fold the whipped cream gently into the cream cheese mixture, then add the key lime juice and vanilla extract.
- Layer graham cracker crumbs and cream cheese mixture in jars until full.
- Chill in the refrigerator for at least 2 hours.
- Garnish with extra graham cracker crumbs and lime zest before serving.
Notes
Serve in clear glass jars for a beautiful presentation. You can alter the layers and add fruits for decoration.
Nutrition
- Serving Size: 1 jar
- Calories: 320
- Sugar: 18g
- Sodium: 180mg
- Fat: 25g
- Saturated Fat: 14g
- Unsaturated Fat: 8g
- Trans Fat: 0g
- Carbohydrates: 32g
- Fiber: 1g
- Protein: 4g
- Cholesterol: 80mg
Keywords: no-bake cheesecake, key lime dessert, summer dessert