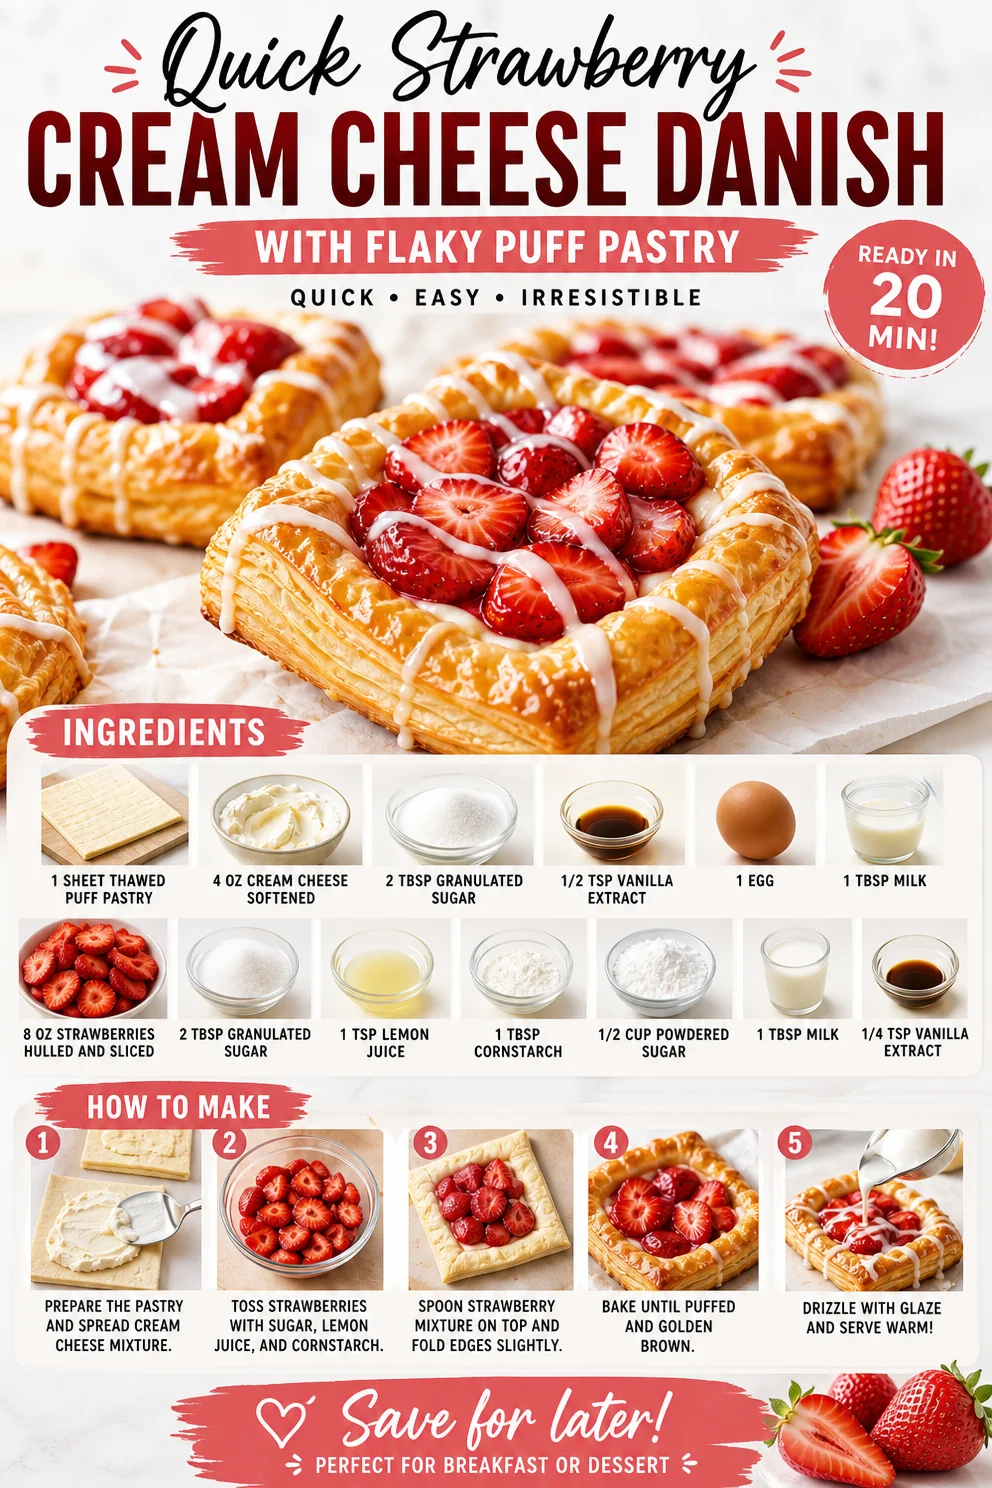
Quick Strawberry Cream Cheese Danish with Flaky Puff Pastry
Flaky Strawberry Cream Cheese Danish: A Sweet Treat for Any Day
Welcome back to Clean Plate Cravings, where we whip up deliciously fresh meals that spark joy—and today, I’m thrilled to share a staple that’s both indulgent and surprisingly light! We’re diving into the world of pastries with a recipe that has nostalgia written all over it: the Strawberry Cream Cheese Danish. This delightful treat combines the buttery, flaky goodness of puff pastry with a creamy filling and sweet, juicy strawberries. Perfect for breakfast, brunch, or a delightful afternoon snack, this Danish is sure to impress your family and friends. So, roll up those sleeves and let’s get started—we’re about to create some magic in the kitchen!
A Trip Down Memory Lane
As I sit here reminiscing, I can’t help but think of my grandmother’s kitchen, where the sweet smell of pastries wafted through the air every Sunday morning. I remember walking in, the sun shining through the window, and seeing her bustling around, arm deep in flour. She would always have a batch of Danish pastries on the table, each neatly arranged and bursting with flavor. Her secret? A touch of love and a whole lot of butter!
The highlight was always the strawberry version—bright ruby-red jewels peeking out from a golden swirl of dough. She’d invite us to gather around the table, and we’d share stories of our week over warm, flaky pastries and steaming cups of coffee. Those moments are precious to me, and now, I strive to recreate that same warmth and comfort in my own kitchen. This Strawberry Cream Cheese Danish is my way of honoring those memories while keeping things fresh and modern. I promise this recipe will fill your home with the same warmth and love my grandmother’s kitchen did when I was a child!
Ingredients
For this scrumptious Danish, you’ll need the following ingredients:
-
1 sheet thawed puff pastry: The star of the show! Puff pastry gives the Danish its flaky texture. If you don’t have puff pastry, you can use crescent roll dough for a slightly different, but still delicious, result.
-
4 ounces cream cheese, softened: This creates that rich, creamy filling! You could use mascarpone or ricotta as a substitute if you want to experiment with different flavors.
-
2 tablespoons granulated sugar: A little sweetness goes a long way in balancing flavors. If you’re looking to cut down on sugar, coconut sugar or a sugar substitute works great, too.
-
1/2 teaspoon vanilla extract: For a touch of warmth and depth. Feel free to infuse with almond extract for a nutty twist.
-
1 egg: Used to create a simple egg wash that gives the pastry a beautiful golden finish. If you need a vegan option, a tablespoon of non-dairy milk mixed with a bit of cornstarch works wonders!
-
1 tablespoon milk: This adds richness to the egg wash. Use an alternative milk, like almond or oat, for a dairy-free version.
-
8 ounces strawberries, hulled and sliced: The star of our topping! Fresh strawberries brighten up the pastry. No fresh strawberries? Frozen will do—just thaw and drain excess liquid before using.
-
2 tablespoons granulated sugar: This will sweeten the strawberries and complement their natural tartness. You can reduce the amount if your strawberries are super sweet!
-
1 teaspoon lemon juice: Adds bright acidity and enhances the strawberry flavor. Swap it out for lime juice if you’re feeling adventurous!
-
1 tablespoon cornstarch: This thickens the strawberry mixture and prevents it from becoming too watery.
-
1/2 cup powdered sugar: For our delightful glaze that brings everything together!
-
1 tablespoon milk: Adds creaminess to the glaze. Again, feel free to choose your favorite plant-based milk.
-
1/4 teaspoon vanilla extract: A hint of flavor for the glaze. It’s optional but highly encouraged for an extra kick!
Step-by-Step Instructions
Let’s get to the good stuff—time to assemble and bake our Danish!
1. Preheat and Prepare
Start by preheating your oven to 400°F (200°C). While that heats up, let’s get our workspace ready. Line a baking sheet with parchment paper—this will help our pastries bake evenly and prevent sticking.
2. Roll Out the Puff Pastry
Once your puff pastry is thawed, place it on a lightly floured surface. Gently roll it out to smooth any creases and increase its size slightly. I like to roll it into a rectangle, about 12 by 10 inches, but you can adapt based on your style!
3. Make the Cream Cheese Filling
In a bowl, mix the softened cream cheese, granulated sugar, and half a teaspoon of vanilla extract until smooth and creamy. Use a spatula for the best mixing results! This filling is so dreamy, I sometimes catch myself eating it straight from the bowl—so good!
4. Assemble the Danish
Carefully cut your rolled-out puff pastry into squares (about 3-4 inches each). For each square, make a small cut from each corner towards the center, but don’t cut all the way through. Spoon some of the cream cheese filling in the middle of each square. Fold the corners of each pastry square towards the center over the filling—this is where the magic happens! Pinch to seal. These little pockets of delight will puff up beautifully, giving you that characteristic Danish shape.
5. Prepare the Strawberry Topping
In a separate bowl, combine the sliced strawberries, granulated sugar, lemon juice, and cornstarch. Gently fold to mix. This step enhances the flavor of the strawberries while also keeping them juicy! Spoon this mixture over the cream cheese filling in each Danish, letting the strawberries nest comfortably amongst the folds.
6. Make the Egg Wash
Beat the egg with a tablespoon of milk in a small bowl. Lightly brush the egg wash over the pastry edges for a golden, glossy finish. This step might seem small, but trust me—your Danish will look like a million bucks!
7. Bake
Place your assembled Danishes on the prepared baking sheet and pop them in the oven. Bake for about 15-20 minutes or until the pastry is golden brown and puffed. The smell in your kitchen will be heavenly, trust me!
8. Prepare the Glaze
While the pastries are baking, whisk together powdered sugar, milk, and the remaining vanilla extract in a small bowl until smooth. You want a drizzle-able consistency, so adjust the amount of milk as needed.
9. Glaze and Serve
Once your Danish are out of the oven and cooled slightly, drizzle the glaze over the top with a spoon or a piping bag for that professional look. And voila! You’re ready to serve an Instagram-worthy treat that tastes as good as it looks.
Serving Suggestions
These Strawberry Cream Cheese Danishes are delightful on their own, but you could also serve them with whipped cream, a sprinkle of crushed nuts, or a side of yogurt for a breakfast treat. Pair them with a cup of freshly brewed coffee or tea for the perfect pick-me-up!
Recipe Variations
-
Berry Medley: Swap out strawberries for a mix of blueberries, raspberries, and blackberries for a colorful twist!
-
Chocolate Drizzle: Post-baking, add a rich chocolate drizzle over the top of your Danishes for an indulgent option.
-
Peachy Keen: Replace strawberries with sliced peaches and add a pinch of nutmeg for a summertime favorite.
-
Nutty Surprise: Mix in ground almonds or walnuts into your cream cheese filling for added crunch and flavor.
-
Vegan Version: Substitute cream cheese with a dairy-free option, use flax eggs instead of the real egg, and your favorite plant-based milk.
Chef’s Notes
This recipe has evolved over the years; I initially began baking Danishes for my family with store-bought pastry, but as I gained confidence, I started experimenting with homemade dough. Puff pastry is truly my go-to these days for its ease and flakiness. There’s something so satisfying about biting into that crispy texture combined with the creamy filling and fresh fruit. And don’t worry if you’ve got a few imperfect shapes—each one tells a story of love and effort!
FAQs and Troubleshooting
1. My puff pastry didn’t puff! What went wrong?
This could be due to a few reasons—make sure your pastry is kept cold before baking for the best rise. Also, ensure your oven is fully preheated before putting your pastries inside, as a good blast of heat is essential for puffing.
2. How do I prevent soggy bottoms?
Bake your Danishes on a preheated baking sheet for an extra crispy base. Using parchment paper also helps prevent sogginess.
3. Can I make these ahead of time?
Absolutely! You can assemble the Danishes in advance and either freeze them before baking or refrigerate them for a few hours before baking. Just add a few extra minutes to the baking time if they are chilled.
4. What if I don’t have cornstarch?
You can substitute cornstarch with flour, but be aware that the filling may be a bit runnier. Alternatively, tapioca starch or arrowroot powder works well too!
Nutritional Info
While enjoying these treats, it’s good to be aware of the nutritional aspects. Each Danish roughly contains:
- Calories: 230
- Protein: 4g
- Fats: 12g
- Carbohydrates: 28g
- Fiber: 1g
- Sugars: 10g
Again, feel free to adjust ingredients to suit your dietary needs!
There you have it—your Strawberry Cream Cheese Danish is ready to be devoured! I sincerely hope this recipe sparks joy and brings a slice of sweetness to your table, just like my grandmother’s did for me. Happy baking, and remember: cooking is all about enjoying the journey. Let me know how your Danishes turn out—I can’t wait to hear your kitchen stories! 🥐💕
PrintFlaky Strawberry Cream Cheese Danish
Indulgent yet light strawberry cream cheese danish, perfect for breakfast or a snack.
- Prep Time: 20 minutes
- Cook Time: 20 minutes
- Total Time: 40 minutes
- Yield: 4 servings 1x
- Category: Dessert
- Method: Baking
- Cuisine: American
- Diet: Vegetarian
Ingredients
- 1 sheet thawed puff pastry
- 4 ounces cream cheese, softened
- 2 tablespoons granulated sugar
- 1/2 teaspoon vanilla extract
- 1 egg
- 1 tablespoon milk
- 8 ounces strawberries, hulled and sliced
- 2 tablespoons granulated sugar
- 1 teaspoon lemon juice
- 1 tablespoon cornstarch
- 1/2 cup powdered sugar
- 1 tablespoon milk
- 1/4 teaspoon vanilla extract
Instructions
- Preheat your oven to 400°F (200°C) and line a baking sheet with parchment paper.
- Roll out the puff pastry on a floured surface to a rectangle, about 12 by 10 inches.
- Mix the cream cheese, granulated sugar, and vanilla extract until smooth.
- Cut the rolled-out pastry into squares and make small cuts from each corner towards the center.
- Spoon the cream cheese filling into the center of each square and fold the corners towards the center.
- Combine the strawberries, granulated sugar, lemon juice, and cornstarch in a bowl and mix.
- Beat the egg with milk to create an egg wash and brush it over the pastry edges.
- Bake for about 15-20 minutes until golden brown.
- Whisk together powdered sugar, milk, and vanilla for the glaze.
- Drizzle the glaze over the cooled Danishes and serve.
Notes
Feel free to mix up the fruit toppings or add chocolate drizzle for variation.
Nutrition
- Serving Size: 1 Danish
- Calories: 230
- Sugar: 10g
- Sodium: 250mg
- Fat: 12g
- Saturated Fat: 6g
- Unsaturated Fat: 4g
- Trans Fat: 0g
- Carbohydrates: 28g
- Fiber: 1g
- Protein: 4g
- Cholesterol: 70mg
Keywords: Danish, pastry, strawberry, cream cheese, dessert
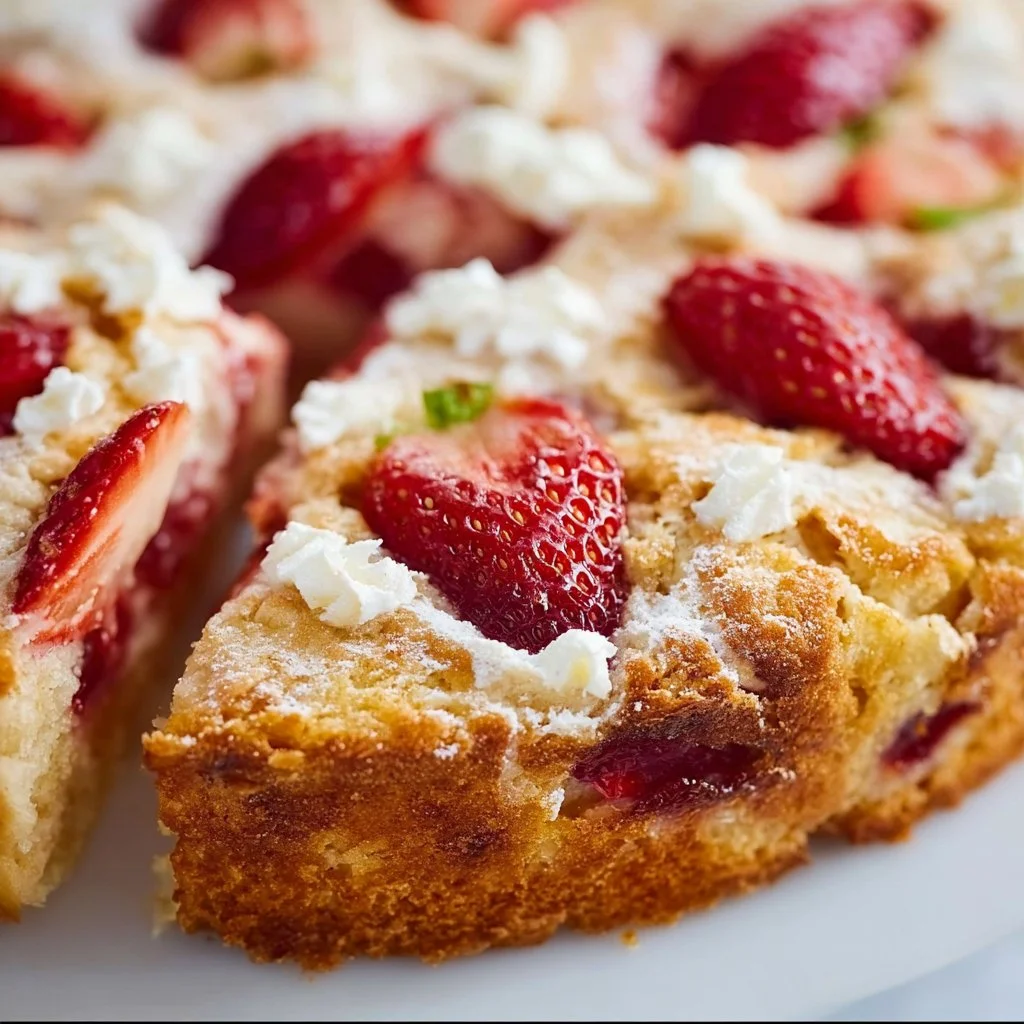
French Strawberry Cake Recipe: Quick, Elegant Summer Treat
The BEST French Strawberry Cake Recipe: A Slice of Nostalgia
Welcome to Clean Plate Cravings! I’m thrilled you’re here because today, I’m sharing a recipe that holds a special place in my heart: the BEST French Strawberry Cake. Imagine a soft, buttery cake, bursting with fresh strawberries and topped with a light, airy frosting that feels like summer on a plate. This recipe isn’t just about making dessert; it’s about the memories of baking with family, the aroma of strawberries filling the kitchen, and the smiles that come with every bite. So, let’s dive in!
When I was a kid, summer meant two things: long days spent outside and my grandmother’s annual strawberry picking trip. Those trips were magical! We would roam the fields, laughter intermingled with the sweet scent of ripe strawberries. Once we got home, my grandmother would whip up her famous strawberry cake, and I would be her little sous-chef, eagerly stirring batter while sprinkling in a little sugar and a lot of love. That cake—the one that could turn any ordinary day into a celebration—sparked my love for cooking and baking. Now, as an adult, I carry those memories with me every time I bake.
This French Strawberry Cake is my take on my grandmother’s classic recipe, modernized and made with a little flair while retaining that nostalgic charm. Trust me; you’ll want to keep this one in your repertoire!
Ingredients
Here’s what you’ll need for this delightful cake. Each ingredient plays a key role, so let’s break it down:
- 1 stick unsalted butter, softened (about 1/2 cup): Butter gives the cake its rich flavor and tender texture. If you need a dairy-free option, you can substitute with a plant-based butter.
- 1 cup granulated sugar: This sweetens the cake and helps create a lovely golden crust. You can use coconut sugar for a less refined option, but it may impart a caramel flavor.
- 2 large eggs: Eggs provide structure and moisture. If you’re vegan, you can substitute with 1/2 a mashed banana or a flaxseed egg (1 tablespoon ground flaxseed mixed with 2.5 tablespoons water, let sit until gel-like).
- 1 1/2 teaspoons vanilla extract: Vanilla brightens up the flavors in the cake. For a twist, use almond extract or a splash of citrus zest.
- 1 1/2 cups all-purpose flour: Essential for that fluffy cake texture. If you need a gluten-free version, swap in a gluten-free all-purpose flour blend.
- 1 1/4 teaspoon baking powder: This leavening agent helps the cake rise. Make sure it’s fresh for the best results!
- 1/4 teaspoon salt: Salt enhances flavors and balances sweetness. Don’t skip it!
- 1/2 cup sour cream: This adds moisture and tang, making the cake super soft. Greek yogurt can be a great substitute for that creamy texture.
- 16 ounces strawberries, sliced (about 2 cups): The star of the show! Fresh strawberries bring natural sweetness and flavor. You can use other berries if strawberries aren’t in season.
- 3 Tablespoons granulated sugar (for strawberries): This macerates the strawberries and brings out their juices, making them deliciously sweet.
- 2 Tablespoons powdered sugar (optional): For dusting on top, giving your cake that beautiful bakery finish.
Step-by-Step Instructions
Now let’s get to the fun part—baking this glorious cake!
- Preheat your oven to 350°F (175°C) and grease a 9-inch round cake pan. Nothing beats the smell of a warm oven, so let’s get that going!
- Cream together the butter and sugar in a large mixing bowl until light and fluffy—this should take about 3-4 minutes. This step is crucial as it helps to incorporate air, which gives your cake that fluffy texture. Don’t rush this step; it’s worth the extra time!
- Add in the eggs one at a time, mixing until fully combined before adding the next. Ensure each egg is fully incorporated, creating a smooth batter. This helps avoid any curdling, giving you a lovely consistent mixture.
- Stir in the vanilla, and then set the bowl aside. The aroma is already divine!
- In another bowl, whisk together the flour, baking powder, and salt. This step is often overlooked but mixing the dry ingredients separately ensures an even distribution of the leavening agent.
- Gradually add the dry ingredients to the butter mixture, alternating with the sour cream. Start and end with the flour mixture (dry-wet-dry). Use a spatula to gently fold it in until just combined. Be careful not to overmix; a few lumps are okay!
- Prepare the strawberries while the batter comes together: toss the sliced strawberries with 3 tablespoons of sugar in a bowl and let them sit for about 10 minutes. This will create a juicy syrup that’s pure magic.
- Gently fold the strawberries into the cake batter, taking care not to break them up too much. This adds a beautiful texture and flavor to every bite!
- Pour the batter into your prepared cake pan and smooth the top. Give it a little tap on the counter to settle it, and pop it in the oven.
- Bake for 30-35 minutes, or until a toothpick inserted in the center comes out clean. Watch your cake closely as oven times can vary. A golden top and a small bounce back should have you reaching for the toothpick!
- Once baked, let the cake cool in the pan for about 10 minutes, then carefully transfer it onto a wire rack to cool completely. I’ll let you in on a little secret: The smell of fresh cake can be hard to resist, so try not to sneak a bite yet!
Serving Suggestions
When it’s time to serve, I love to dust the top with powdered sugar for a pretty finish. Place the cake on a lovely cake stand or a platter and slice it into generous pieces—don’t forget to scoop out some of those delicious strawberries along with each slice! A dollop of whipped cream on the side wouldn’t hurt either.
Recipe Variations
Let’s get creative! Here are a few fun twists to switch things up:
- Berry Medley: Swap out the strawberries for raspberries or blueberries, or mix them for a berry bomb delight!
- Lemon Zest: Add the zest of one lemon to the batter for a fresh citrus flavor that complements the strawberries beautifully.
- Almond Joy: Sprinkle some sliced almonds on top before baking for a crunchy texture and nutty flavor.
- Minty Fresh: A few fresh mint leaves finely chopped into the batter or as a garnish can elevate the flavors to a whole new level.
Chef’s Notes
This recipe has evolved over the years from my early attempts in the kitchen. I remember my first French Strawberry Cake; I was so eager to get it right that I forgot to adjust the oven temperature, and it came out a bit dense. But even that cake was devoured, proving that even mishaps can lead to delicious results!
Going forward, I learned the importance of textures and flavors and how they work together. Today’s version is just the right balance of airy sweetness with a touch of nostalgia.
FAQs and Troubleshooting
- What if my cake sinks in the middle? This sometimes happens due to overmixing or using old leavening agents. Avoid overmixing when combining dry and wet ingredients, and always check the freshness of your baking powder.
- Can I make this cake ahead of time? Absolutely! The cake can be made a day in advance; just keep it covered at room temperature. You can even freeze it if you want to save it for later. Just make sure to wrap it tightly!
- Why are my strawberries not juicy? If your strawberries aren’t as sweet or juicy, it might be a sign that they’re out of season. Always try to use fresh, ripe strawberries for the best flavor.
- Can I use frozen strawberries? Yes, but make sure to thaw and drain them first to avoid extra moisture in your batter. I recommend fresh fruit for the best flavor and texture, though!
Nutritional Info
(For a standard slice assuming 12 slices in total)
- Calories: 250
- Protein: 4g
- Carbohydrates: 36g
- Fat: 10g
- Fiber: 1g
- Sugar: 15g
There you have it—the BEST French Strawberry Cake! The memories of baking this delight, the sweet fragrance filling your home, and sharing it with loved ones will be the icing on the cake. Happy baking, my fellow foodie friends!
PrintThe BEST French Strawberry Cake
A soft, buttery cake bursting with fresh strawberries and topped with a light, airy frosting, perfect for summer celebrations.
- Prep Time: 15 minutes
- Cook Time: 30 minutes
- Total Time: 45 minutes
- Yield: 12 servings 1x
- Category: Dessert
- Method: Baking
- Cuisine: French
- Diet: Vegetarian
Ingredients
- 1 stick unsalted butter, softened (about 1/2 cup)
- 1 cup granulated sugar
- 2 large eggs
- 1 1/2 teaspoons vanilla extract
- 1 1/2 cups all-purpose flour
- 1 1/4 teaspoon baking powder
- 1/4 teaspoon salt
- 1/2 cup sour cream
- 16 ounces strawberries, sliced (about 2 cups)
- 3 tablespoons granulated sugar (for strawberries)
- 2 tablespoons powdered sugar (optional)
Instructions
- Preheat your oven to 350°F (175°C) and grease a 9-inch round cake pan.
- Cream together the butter and sugar in a large mixing bowl until light and fluffy—this should take about 3-4 minutes.
- Add in the eggs one at a time, mixing until fully combined before adding the next.
- Stir in the vanilla, and then set the bowl aside.
- Whisk together the flour, baking powder, and salt in another bowl.
- Gradually add the dry ingredients to the butter mixture, alternating with the sour cream.
- Prepare the strawberries by tossing them with 3 tablespoons of sugar and letting them sit for about 10 minutes.
- Fold the strawberries gently into the cake batter.
- Pour the batter into your prepared cake pan and smooth the top.
- Bake for 30-35 minutes, or until a toothpick inserted in the center comes out clean.
- Let the cake cool in the pan for about 10 minutes before transferring it to a wire rack to cool completely.
Notes
Dust with powdered sugar before serving for a bakery finish. Pair with whipped cream for extra indulgence.
Nutrition
- Serving Size: 1 slice
- Calories: 250
- Sugar: 15g
- Sodium: 200mg
- Fat: 10g
- Saturated Fat: 6g
- Unsaturated Fat: 4g
- Trans Fat: 0g
- Carbohydrates: 36g
- Fiber: 1g
- Protein: 4g
- Cholesterol: 30mg
Keywords: French cake, strawberry dessert, summer cake, nostalgic recipe