
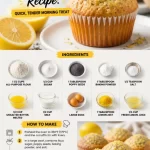
Lemon Poppy Seed Muffins Recipe: Quick, Tender Morning Treat
Lemon Poppy Seed Muffins: A Zesty Twist on a Classic Treat
Welcome, fellow food lovers! Today, we are diving into the delightful world of Lemon Poppy Seed Muffins. These little wonders are not just any ordinary muffins; they are fluffy, zesty, and bursting with a light, refreshing flavor that can whisk you away to a sunny afternoon. Each bite is a symphony of sweetness, nuttiness, and a tangy citrus kick that makes your taste buds dance. Whether you’re enjoying them with a cup of coffee for breakfast or as a snack in the afternoon, these muffins are sure to put a smile on your face.
I like to think of muffins as little packages of happiness. They’re versatile enough for any time of day and are easy to whip up on a whim. Plus, who doesn’t love that warm, home-baked aroma that fills the kitchen? It’s like a hug from the oven! And let’s be honest; there’s something utterly satisfying about transforming simple ingredients into a delightful treat.
My journey with lemon poppy seed muffins dates back to childhood. I remember sunny weekends spent with my grandmother, who had a special knack for baking. With her apron tied tightly around her waist, she would have me help her zest lemons and measure out the poppy seeds. It was during those moments that I learned the magic of cooking with love. Every muffin she made was a testament to her warm spirit and culinary skills. Even now, when I whip up these muffins, the tang of lemon and the crunch of poppy seeds take me back to those cherished days spent in her cozy kitchen. It’s amazing how food can connect us to memories, isn’t it?
Ingredients
Here’s what you’ll need to create these lemony delights:
-
1 1/2 cups all-purpose flour
This is your base. If you’re looking for a healthier option, try using whole wheat flour or almond flour for a nutty flavor. -
1/2 cup sugar
The sugar adds sweetness and helps the muffins rise. You can substitute coconut sugar or stevia for a healthier alternative, but keep in mind that it may alter the texture slightly. -
1 tablespoon poppy seeds
These little seeds bring a nutty crunch and a dash of visual appeal. If you can’t find them, chia seeds make for a lovely substitute, albeit with a different flavor profile. -
1 tablespoon baking powder
This is your leavening agent that helps the muffins rise beautifully. Make sure it’s fresh; old baking powder may lead to flat muffins. -
1/2 teaspoon salt
A pinch of salt enhances all the flavors. Sea salt or kosher salt works well too! -
1/2 cup unsalted butter, melted
Butter adds richness and moisture; you can swap it out for coconut oil or a plant-based butter if you’re aiming for a vegan version. -
1/2 cup milk
Dairy milk adds moisture; almond or oat milk are excellent alternatives for dairy-free muffins. -
2 large eggs
Eggs are essential for binding. If you need an egg substitute, 1/4 cup of applesauce or 1/4 cup of yogurt can work wonders. -
1 tablespoon lemon zest
This is where the magic happens! Freshly zested lemons will give your muffins that bright, zesty flavor. Avoid the zest from older lemons, as they lack vibrancy. -
1/4 cup fresh lemon juice
Fresh is key! Bottled lemon juice just doesn’t cut it when it comes to flavor – trust me!
Step-by-Step Instructions
Now, let’s get baking! Follow these steps closely for lemon poppy seed muffin perfection.
Step 1: Preheat the Oven
Start by preheating your oven to 350°F (175°C). This is an important step that ensures your muffins bake evenly.
Step 2: Prepare Your Muffin Tin
While the oven heats up, line a 12-cup muffin tin with paper liners or give it a good spray with non-stick cooking spray. If you’re a fan of paper-less baking, consider greasing the tin with a little butter, so they pop right out.
Step 3: Combine Dry Ingredients
In a large mixing bowl, whisk together the flour, sugar, baking powder, poppy seeds, and salt. This ensures that your dry ingredients are evenly distributed, which is key for consistent flavor in each muffin!
Step 4: Mix Wet Ingredients
In another bowl, combine the melted butter, milk, eggs, lemon zest, and lemon juice. Whisk them until they are well combined. Here’s a little tip: gently warm the milk before mixing to help create an even fluffier muffin.
Step 5: Combine the Mixtures
Pour the wet ingredients into the dry ingredients and stir until just combined. Be careful not to overmix; it’s okay if there are a few lumps—they’ll bake out! Overmixing can lead to dense muffins, and nobody wants a brick.
Step 6: Fill the Muffin Cups
Using a large spoon or an ice cream scoop, fill each muffin cup about 3/4 full. This gives them room to rise while keeping them perfectly muffin-shaped.
Step 7: Bake to Perfection
Pop the muffin tin into the preheated oven and bake for about 18-20 minutes, or until the tops are lightly golden and a toothpick inserted into the center comes out clean. Keep an eye on them as oven temperatures can vary!
Step 8: Cool and Enjoy
Once baked, let the muffins cool in the tin for about 5 minutes before transferring them to a wire rack to cool completely. This step is crucial for preventing sogginess!
Serving Suggestions
These lemon poppy seed muffins are best enjoyed warm. Serve them with a pat of butter or a drizzle of honey on top for an extra touch of sweetness. You can also pair them with a delightful cup of tea or coffee for the perfect afternoon pick-me-up. If you’re feeling a bit fancy, sprinkle some powdered sugar on top for a gorgeous finish!
Recipe Variations
Get ready to get creative! Here are a few fun ways to put your spin on these muffins:
-
Lemon Blueberry Muffins: Add 1 cup of fresh or frozen blueberries for a fruity twist.
-
Chia Seed Muffins: Replace poppy seeds with chia seeds for added health benefits and a slightly different texture.
-
Lemon Almond Muffins: Substitute half the flour with almond flour for a nutty flavor profile, and sprinkle slivered almonds on top before baking.
-
Coconut Lemon Muffins: Add shredded coconut into the batter for a tropical touch.
-
Glazed Lemon Poppy Seed Muffins: Drizzle a simple lemon glaze made from powdered sugar and lemon juice over the cooled muffins for extra zing.
Chef’s Notes
I have to say, these lemon poppy seed muffins have been a staple in my kitchen for years. They’ve evolved over time; each batch is a little different based on what I have on hand or what I feel like that day. Sometimes, I’ll throw some fresh herbs like rosemary into the mix for a unique flavor twist. It’s all about having fun and making the recipe your own!
I remember one time I was hosting a brunch and completely forgot the muffins in the oven. The kitchen filled with an, let’s say, robust aroma! Thankfully, with a little bit of creativity (and some powdered sugar), I managed to turn those burnt muffins into a “charred citrus concept” dessert. Sometimes, kitchen mishaps can lead to the best stories!
FAQs and Troubleshooting
Q: My muffins turned out dry. What did I do wrong?
A: This usually happens if the flour was over-measured or if they were overbaked. Be sure to fluff your flour and spoon it into your measuring cup rather than scooping directly to avoid packing it down. Always check for doneness a few minutes early!
Q: Can I make these ahead of time?
A: Absolutely! These muffins store well in an airtight container for up to three days. You can also freeze them for longer storage. Just let them cool completely, then wrap them tightly in plastic wrap and place them in a freezer bag.
Q: How can I make these muffins vegan?
A: You can easily make these vegan by substituting the eggs with 1/4 cup applesauce or your favorite egg replacer, using plant-based butter, and opting for non-dairy milk.
Q: My muffins didn’t rise very much. What went wrong?
A: There are a couple of culprits here! Make sure your baking powder is fresh, and double-check that you’re using the correct measurements. Also, don’t skip preheating your oven; putting the batter in a cold oven can significantly impact rising.
Nutritional Info (Optional)
- Serving Size: 1 muffin
- Calories: 180
- Protein: 3g
- Fat: 8g
- Total Carbohydrates: 25g
- Fiber: 1g
- Sugars: 8g
And there you have it! Your very own batch of scrumptious Lemon Poppy Seed Muffins, ready to share (or not!) with friends and family. I hope this recipe sparks joy and nostalgia in your kitchen, just like it has in mine. Happy baking, and until next time – keep it fresh, simple, and delicious!
PrintLemon Poppy Seed Muffins
Fluffy, zesty muffins bursting with refreshing lemon flavor and a delightful crunch from poppy seeds.
- Prep Time: 15 minutes
- Cook Time: 20 minutes
- Total Time: 35 minutes
- Yield: 12 muffins 1x
- Category: Breakfast
- Method: Baking
- Cuisine: American
- Diet: Vegetarian
Ingredients
- 1 1/2 cups all-purpose flour
- 1/2 cup sugar
- 1 tablespoon poppy seeds
- 1 tablespoon baking powder
- 1/2 teaspoon salt
- 1/2 cup unsalted butter, melted
- 1/2 cup milk
- 2 large eggs
- 1 tablespoon lemon zest
- 1/4 cup fresh lemon juice
Instructions
- Preheat the oven to 350°F (175°C).
- Prepare your muffin tin by lining it with paper liners or spraying with non-stick spray.
- Combine the flour, sugar, baking powder, poppy seeds, and salt in a large mixing bowl.
- Mix the melted butter, milk, eggs, lemon zest, and lemon juice in another bowl until well combined.
- Pour the wet ingredients into the dry ingredients and stir until just combined.
- Fill each muffin cup about 3/4 full with the batter.
- Bake for 18-20 minutes or until golden brown and a toothpick comes out clean.
- Cool in the tin for 5 minutes before transferring to a wire rack to cool completely.
Notes
These muffins are best enjoyed warm, optionally served with butter or honey. They can also be frozen for longer storage.
Nutrition
- Serving Size: 1 muffin
- Calories: 180
- Sugar: 8g
- Sodium: 200mg
- Fat: 8g
- Saturated Fat: 5g
- Unsaturated Fat: 3g
- Trans Fat: 0g
- Carbohydrates: 25g
- Fiber: 1g
- Protein: 3g
- Cholesterol: 50mg
Keywords: muffins, lemon poppy seed, baking, breakfast, snacks

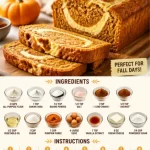
Seasonal Pumpkin Bread with Cream Cheese Swirl – Easy Bake
Whip Up Some Happiness: Pumpkin Bread with Cream Cheese
Hello, dear food lovers! Today, let’s dive into something that not only embodies the spirit of comfort baking but also fills your kitchen with the warm, inviting aroma of cozy fall days—yes, I’m talking about homemade Pumpkin Bread with Cream Cheese. This sweet treat perfectly balances the natural sweetness of pumpkin with a luscious cream cheese filling that will have your taste buds doing a dance. Whether you’re celebrating the arrival of autumn or simply seeking a delightful snack, this recipe is your ticket to flavor town!
Now, let’s take a moment to picture a scene we all know well: you’re standing in your kitchen, the sun streaming through the window, and your favorite playlist is gently humming in the background. You’ve gathered all your ingredients, and there’s a hint of excitement in the air. But wait—there’s something even more magical here. There’s a rich tapestry of memories that make this pumpkin bread recipe feel like a warm hug from the past.
A Taste of Nostalgia
Whenever I think about pumpkin bread, I am reminded of my childhood and the warm kitchen of my grandmother. She had a knack for creating delightful treats that filled our bellies and hearts alike. Fall was her favorite season, and for us, it meant pumpkin everything! I remember coming home from school on chilly afternoons, the scent of spices swirling in the air, and her cheerful voice inviting me to help.
Together, we would measure out flour and sugar, her gentle hands guiding mine as I eagerly mixed. But the best part was always the cream cheese filling. We would sneak spoonfuls when she wasn’t looking! As I watched her expertly swirl it into the batter, I learned that a little indulgence can go a long way in making something that’s already delicious even better. Those baking sessions instilled a love for flavors and an understanding of the joy food can bring into our lives.
This pumpkin bread with cream cheese is more than just a recipe; it’s a loving connection to those cherished memories—one that I’m excited to share with you!
Ingredients Breakdown
Let’s gather the ingredients for this delightful pumpkin bread. Below, you’ll find a breakdown of each element that will help us create this cozy masterpiece:
-
2 cups all-purpose flour
This is the base for our bread, providing structure. If you’re looking for a gluten-free option, you can substitute it with a 1-to-1 gluten-free flour blend. -
1 tsp baking soda
This will help our bread rise beautifully! Be sure it’s fresh; expired ingredients can dampen your baking dreams. -
1/2 tsp baking powder
A little added insurance for a fluffy texture! -
1/2 tsp salt
Balances the sweetness and enhances the flavors. Don’t skip this—salt is a flavor enhancer! -
1 tsp ground cinnamon
Warm, comforting, and downright essential in any pumpkin recipe! You can also mix in a pinch of allspice for a deeper flavor profile. -
1/2 tsp ground nutmeg
Adds a nutty warmth; it’s like a cozy blanket for your taste buds. Freshly grated nutmeg is a game changer if you have it on hand. -
1/2 cup vegetable oil
This keeps the bread moist and luscious. Feel free to use melted coconut oil or applesauce for a lighter option. -
1 cup sugar
Traditional white sugar works like a charm here, but consider swapping it out for brown sugar for a touch of caramel flavor. -
1 cup pumpkin puree
The star of our show! Make sure you use pure pumpkin puree (not pumpkin pie filling) for the best results. You can also make your own by roasting and pureeing fresh pumpkins if you’re feeling adventurous! -
4 large eggs
These provide moisture and richness. If you need an egg substitute, consider using flax eggs. -
1 tsp vanilla extract
This fragrant addition enhances overall flavor beautifully.
For the Cream Cheese Filling:
-
8 oz cream cheese
This creates the rich center that pairs so well with the spices in the bread. Allow it to soften at room temperature for easier mixing! -
1/4 cup powdered sugar
Sweetens the cream cheese filling and provides a lovely texture. If you’re looking for a sugar-free alternative, you can try a powdered erythritol or other sweeteners!
Step-by-Step Instructions
Now that we’ve gathered our ingredients, it’s time to get cooking! Follow these simple steps, and don’t hesitate to let your creativity flow—you can do this!
-
Preheat Your Oven
Begin by preheating your oven to 350°F (175°C). This sets the stage for our baking adventure! -
Prepare Your Pan
Grease a 9×5 inch loaf pan with non-stick spray or line it with parchment paper for effortless removal later. A little preparation goes a long way! -
Mix Dry Ingredients
In a medium bowl, whisk together the all-purpose flour, baking soda, baking powder, salt, cinnamon, and nutmeg. This ensures an even distribution of leavening agents and spices throughout the bread. -
Blend Wet Ingredients
In a separate, large bowl, combine the sugar and vegetable oil. Whisk them together until well combined. Next, add in the pumpkin puree, eggs, and vanilla extract, whisking until smooth and creamy. -
Combine Wet and Dry
Gradually add the dry ingredient mixture into the wet ingredients, stirring with a spatula until just combined. Don’t overmix; a few lumps are perfectly fine! This is a key tip to keep your bread light and fluffy. -
Make the Cream Cheese Filling
In another bowl, beat the softened cream cheese with the powdered sugar until smooth and creamy. You can also add a teaspoon of vanilla extract here if you want to elevate the flavor even more! -
Layer the Mixtures
Pour half of the pumpkin batter into your prepared loaf pan, ensuring it’s evenly spread. Then, dollop the cream cheese mixture on top, spreading it gently—aim for a mesmerizing swirl. Finally, pour the remaining pumpkin batter over the cream cheese layer, ensuring it’s covered. -
Bake to Perfection
Bake your pumpkin bread in the preheated oven for about 60-70 minutes. Keep an eye out, as ovens vary! A toothpick inserted into the center should come out clean with just a few moist crumbs attached. -
Cool it Down
Once baked, allow your pumpkin bread to cool in the pan for about 15 minutes, then transfer it to a wire rack to cool completely. This helps it set and enhances the flavors!
Serving Suggestions
Time to serve up that gorgeous pumpkin bread! Slice it into thick, warm pieces and enjoy it as is or with a dollop of whipped cream or a drizzle of maple syrup for an exciting twist. It pairs beautifully with a cup of coffee or tea, making it an excellent choice for a cozy brunch or an afternoon snack.
Recipe Variations
Feeling a little adventurous? Here are a few variations to switch things up:
-
Nutty Delight: Add 1/2 cup of chopped walnuts or pecans to the batter for a satisfying crunch.
-
Chocolate Lover’s: Stir in 1/2 cup of chocolate chips to bring a sweet surprise to your bread.
-
Dairy-Free Option: Replace cream cheese with a dairy-free cream cheese or a banana puree for a lighter filling.
-
Spicy Kick: Add a 1/4 teaspoon of ground ginger or a pinch of cayenne pepper for an unexpected spicy twist.
-
Cinnamon Sugar Topping: Mix 1/2 teaspoon of cinnamon with 2 tablespoons of sugar and sprinkle it on top before baking for a crunchy crust!
Chef’s Notes
This recipe has been a staple in my kitchen for years, evolving over time as I’ve experimented with different ingredients and variations. The cream cheese filling is inspired by my grandmother’s recipes; she always encouraged me to add my own twists. The joy of baking comes not just from following directions but from making a recipe your own. So feel free to get creative!
One of my funniest kitchen moments involved my little cousin trying to ‘help’ by adding salt instead of sugar—let’s just say our bread was very… interesting that day! It’s a reminder that cooking is about having fun and sharing joy, even when things don’t go perfectly.
FAQs and Troubleshooting
Q: My pumpkin bread didn’t rise! What went wrong?
A: This could be due to old leavening agents. Always check your baking soda and powder for freshness!
Q: How should I store my pumpkin bread?
A: Store it in an airtight container at room temperature for up to three days. For longer storage, wrap it tightly in plastic wrap and freeze for up to three months.
Q: Can I use fresh pumpkin instead of canned?
A: Absolutely! Roast fresh pumpkin, puree it, and use it in place of canned. Just ensure it’s well-drained to avoid excess moisture.
Q: The cream cheese filling was too runny. What did I do wrong?
A: Make sure your cream cheese is softened but not overly melty; the mixing should create a smooth, thick consistency.
Nutritional Info
(Optional as per your preference)
This pumpkin bread is not only delicious but also packed with nutrients from the pumpkin. Each slice provides a comforting taste of fall in every bite.
And there you have it! A heartfelt recipe for pumpkin bread with cream cheese that infuses kitchen magic into every bite. I hope you enjoy making—and eating—this delightful treat as much as I do! Remember, it’s about savoring each moment, sharing with loved ones, and letting your creativity shine in the kitchen. Happy baking!
PrintPumpkin Bread with Cream Cheese
Enjoy a delightful homemade Pumpkin Bread with a rich cream cheese filling that captures the essence of cozy fall days.
- Prep Time: 15 minutes
- Cook Time: 70 minutes
- Total Time: 85 minutes
- Yield: 8 servings 1x
- Category: Dessert
- Method: Baking
- Cuisine: American
- Diet: Vegetarian
Ingredients
- 2 cups all-purpose flour
- 1 tsp baking soda
- 1/2 tsp baking powder
- 1/2 tsp salt
- 1 tsp ground cinnamon
- 1/2 tsp ground nutmeg
- 1/2 cup vegetable oil
- 1 cup sugar
- 1 cup pumpkin puree
- 4 large eggs
- 1 tsp vanilla extract
- For the Cream Cheese Filling:
- 8 oz cream cheese
- 1/4 cup powdered sugar
Instructions
- Preheat your oven to 350°F (175°C).
- Grease a 9×5 inch loaf pan with non-stick spray or line with parchment paper.
- Mix the dry ingredients in a medium bowl: all-purpose flour, baking soda, baking powder, salt, cinnamon, and nutmeg.
- Blend the wet ingredients in a separate bowl: combine sugar and vegetable oil, then whisk in pumpkin puree, eggs, and vanilla extract.
- Combine the wet and dry ingredients, stirring until just mixed.
- Make the cream cheese filling by beating the softened cream cheese and powdered sugar until smooth.
- Layer half of the pumpkin batter into the loaf pan, then add dollops of the cream cheese mixture, topping with the remaining pumpkin batter.
- Bake for 60-70 minutes until a toothpick comes out clean with a few moist crumbs.
- Cool in the pan for 15 minutes before transferring to a wire rack.
Notes
Serve warm with whipped cream or a drizzle of maple syrup. You can also add nuts or chocolate chips for a twist.
Nutrition
- Serving Size: 1 slice
- Calories: 280
- Sugar: 18g
- Sodium: 200mg
- Fat: 10g
- Saturated Fat: 2g
- Unsaturated Fat: 8g
- Trans Fat: 0g
- Carbohydrates: 36g
- Fiber: 2g
- Protein: 4g
- Cholesterol: 50mg
Keywords: pumpkin bread, fall recipes, cream cheese filling
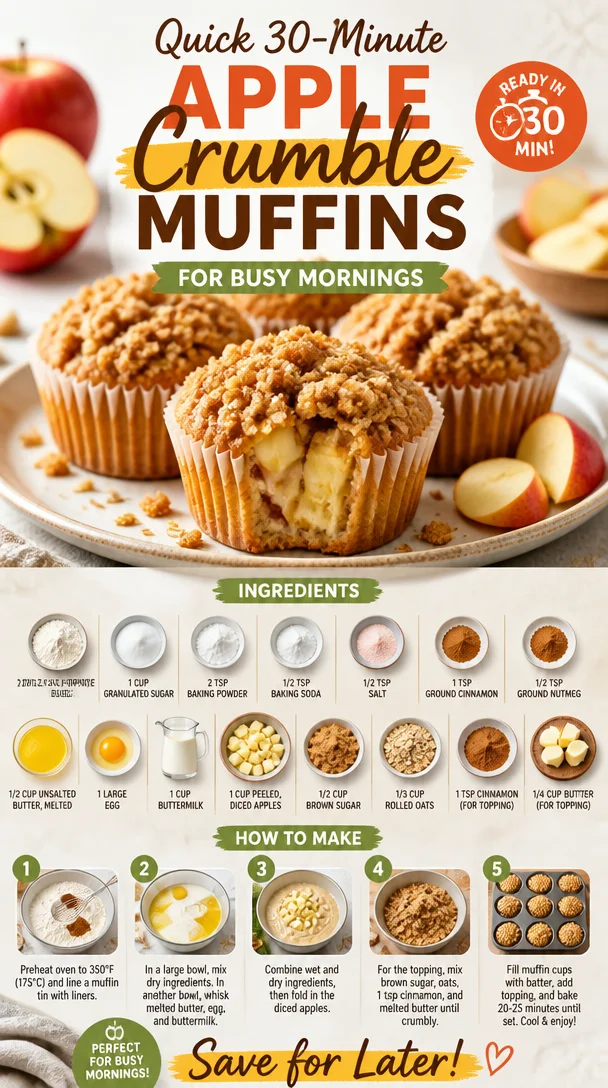
Quick 30-Minute Apple Crumble Muffins for Busy Mornings
Wholesome and Delicious: Apple Crumble Muffins Recipe
Welcome, dear food lover! Today, we’re diving into a delightful and heartwarming recipe that will illuminate your kitchen with cozy aromas: Apple Crumble Muffins. Imagine biting into a warm, golden muffin filled with juicy bits of apples and topped with a sweet, crumbly crust—all while sipping a cup of your favorite coffee or tea. Sounds dreamy, right?
These muffins are not just delicious; they’re also a nostalgia trip back to those crisp autumn days when harvests are bountiful, and sweet treats are aplenty. Baking is a form of love, and these Apple Crumble Muffins convey that message better than any fancy dessert ever could. So, grab your apron, and let’s channel our inner bakers and create something truly special together!
Whether you’re looking for a quick breakfast option, a sweet afternoon snack, or a marvelous treat for gathering friends, these muffins check all the boxes! They’re warm, inviting, and bursting with flavor. Plus, they’re easy to whip up, making them perfect for any cook out there—regardless of skill level. Let’s get started!
A Sweet Nostalgic Memory
I still remember the first time I made apple crumble—a recipe that my grandmother shared with me when I was just a kid. She had this quaint kitchen filled with the best aromas wafting from her oven. I was tasked with peeling apples, and though I had no idea what a great culinary adventure awaited, I loved every moment spent cooking with her.
The crunch of the apples being sliced, the warm hug of the cinnamon, and the joy of sprinkling the crumble topping made me feel like I was part of something magical. We’d devour the crumble fresh from the oven, and I’d always ask if we could have a scoop of vanilla ice cream on top. The combination was pure heaven!
As I grew older and ventured into my own kitchen, I found myself craving that same comforting taste but wanted to create something a bit more portable. Enter: Apple Crumble Muffins! They’re the perfect blend of that timeless recipe, bursting with flavor, but easy to share and enjoy any time of the day. I can’t wait to share them with you!
Ingredients
Let’s gather our ingredients. Here’s what you’ll need for these delightful Apple Crumble Muffins:
-
2 cups all-purpose flour
This is the base for our muffins. If you prefer a gluten-free option, you can substitute with a 1:1 gluten-free flour blend! -
1 cup granulated sugar
A classic choice for sweetness. You can reduce the amount if you prefer it less sweet, or use coconut sugar for a more caramel-like flavor! -
2 teaspoons baking powder
This is our leavening agent, giving the muffins that light, fluffy texture. -
1/2 teaspoon baking soda
Another leavening agent necessary for proper rise! Make sure it’s fresh for best results. -
1/2 teaspoon salt
Balancing flavors is key! Salt enhances the sweetness of the muffins. -
1 teaspoon ground cinnamon
The spice that brings warmth and nostalgia—feel free to add more if you’re a cinnamon lover! -
1/2 teaspoon ground nutmeg
A little goes a long way! This aromatic spice adds depth to our muffins. -
1/2 cup unsalted butter, melted
For moisture and richness. You can use coconut oil for a dairy-free option! -
1 large egg
This acts as a binding agent. If vegan, you can use a flax egg instead! -
1 cup buttermilk
The acidity in buttermilk keeps our muffins moist—no buttermilk? Just add a tablespoon of vinegar to regular milk and let it sit for 5 minutes! -
1 cup peeled, diced apples
I love using Granny Smith for their tartness, but feel free to use your favorite apples! -
1/2 cup brown sugar
This will create a lovely crumble topping. You can also substitute with coconut sugar. -
1/3 cup rolled oats
These add a delightful texture to the topping. You can use quick oats or even crushed nuts for a different twist! -
1 teaspoon cinnamon (for topping)
Cinnamon on the crumble—what could be better?! -
1/4 cup butter (for topping)
A bit more butter brings everything together in the crumble. You can try using vegan butter for a dairy-free version!
Step-by-Step Instructions
Now let’s dive into making these delightful muffins! Follow these steps for a scrumptious result:
-
Preheat Your Oven:
Preheat your oven to 350°F (175°C) and line a muffin tin with paper liners or grease it lightly. This step ensures your muffins bake evenly! -
Mix the Dry Ingredients:
In a large bowl, whisk together the flour, granulated sugar, baking powder, baking soda, salt, ground cinnamon, and nutmeg until well combined. This ensures our leavening agents are evenly distributed! -
Combine the Wet Ingredients:
In a separate bowl, mix the melted butter, egg, buttermilk, and diced apples. Be sure the butter isn’t too hot, or it could cook the egg! -
Bring It All Together:
Pour the wet ingredients into the dry ingredients, stirring gently until combined. Avoid over-mixing; a few lumps are totally okay! This keeps our muffins tender. -
Prepare the Crumble Topping:
In a small bowl, mix together the brown sugar, rolled oats, cinnamon, and cold butter. Use your fingers to crumble it together until it resembles coarse crumbs. (Pro tip: Cold butter works best here for that perfect crumble texture!) -
Fill the Muffin Tin:
Spoon the muffin batter into the prepared muffin tin, filling each about two-thirds full. Remember, they’ll rise! -
Top with Crumble:
Generously sprinkle the crumble topping over each muffin. You can also slightly tap it in—this helps adhere it better post-baking. -
Bake:
Place your muffin tin in the oven and bake for about 18-20 minutes, or until a toothpick inserted in the center comes out clean. The tops will be a beautiful golden brown! -
Cool and Serve:
Once baked, let them sit in the pan for a few minutes before transferring to a wire rack to cool completely. The aroma wafting through your kitchen will be absolutely glorious!
Serving Suggestions
These Apple Crumble Muffins are delightful warm, dusted with a bit of powdered sugar or served with a slather of butter. They also pair beautifully with a scoop of vanilla ice cream or a dollop of whipped cream for that extra indulgence.
For the ultimate breakfast experience, serve with a side of Greek yogurt and fresh fruit. You can even slice them in half and toast them for a crispy outside—yummy!
Recipe Variations
Feel like switching things up? Here are a few creative variations to try:
- Nutty Addition: Add 1/2 cup of chopped walnuts or pecans to the batter for added crunch and flavor.
- Dried Fruits: Swap in dried cranberries or raisins for a surprise sweetness!
- Spice it Up: Add a pinch of ginger or cloves to the spice mix for a different flavor profile.
- Fruit Fusion: Mix in other fruits, like chopped pears or berries, for a unique twist—berry apple crumble muffins, anyone?
- Gluten-Free: Substitute the all-purpose flour with a gluten-free flour blend, and you’re all set for gluten-free goodness!
Chef’s Notes
Oh, how these muffins have become a staple in my kitchen! There are countless versions that I’ve tinkered with and adjusted throughout the years, much to the delight of my family and friends. They’ve become a go-to recipe for gatherings, brunches, or even just when I need a little pick-me-up during the week.
Sometimes I like to add a dash of vanilla extract to the batter, elevating it to another level of deliciousness. And I’ve learned that, like any good dish, they’re best enjoyed with great company—so don’t forget to share!
FAQs and Troubleshooting
-
Why are my muffins dense?
If your muffins are dense, it often means the batter was over-mixed. Make sure to stir until just combined for a light and fluffy texture! -
Can I freeze these muffins?
Absolutely! Just let them cool completely, then place them in an airtight container or a freezer bag. They’ll keep their deliciousness for up to three months. Simply thaw at room temperature or pop them in the microwave to warm them up! -
What if I don’t have buttermilk?
Simple! Just add 1 tablespoon of vinegar or lemon juice to a cup of milk (any kind will do). Let it sit for five minutes, and you’ve got your own buttermilk substitute. -
Can I adjust the sugar content?
Yes, you can! Feel free to reduce the amount of sugar or substitute some sugar with unsweetened applesauce for a lower-sugar version.
Nutritional Info
This recipe yields about 12 muffins. A typical serving (one muffin) contains approximately:
- Calories: 220
- Total Fat: 9g
- Saturated Fat: 5g
- Cholesterol: 30mg
- Sodium: 150mg
- Total Carbohydrates: 33g
- Dietary Fiber: 1g
- Sugars: 14g
- Protein: 3g
Remember, these are estimates based on the ingredients listed and can vary based on substitutions or modifications made.
So there you have it, my friends—Apple Crumble Muffins made with love, nostalgia, and just the right amount of spice! I hope you enjoy baking (and eating!) these delightful treats as much as I do. Be sure to share your creations with me—I can’t wait to hear all about your baking adventures! Happy baking!
PrintApple Crumble Muffins
Delicious and heartwarming muffins filled with juicy apples and topped with a sweet crumble.
- Prep Time: 15 minutes
- Cook Time: 20 minutes
- Total Time: 35 minutes
- Yield: 12 muffins 1x
- Category: Breakfast
- Method: Baking
- Cuisine: American
- Diet: Vegetarian
Ingredients
- 2 cups all-purpose flour
- 1 cup granulated sugar
- 2 teaspoons baking powder
- 1/2 teaspoon baking soda
- 1/2 teaspoon salt
- 1 teaspoon ground cinnamon
- 1/2 teaspoon ground nutmeg
- 1/2 cup unsalted butter, melted
- 1 large egg
- 1 cup buttermilk
- 1 cup peeled, diced apples
- 1/2 cup brown sugar
- 1/3 cup rolled oats
- 1 teaspoon cinnamon (for topping)
- 1/4 cup butter (for topping)
Instructions
- Preheat your oven to 350°F (175°C) and line a muffin tin with paper liners or grease it lightly.
- Mix the dry ingredients in a large bowl: flour, granulated sugar, baking powder, baking soda, salt, ground cinnamon, and nutmeg.
- Combine the wet ingredients: melted butter, egg, buttermilk, and diced apples, in a separate bowl.
- Bring it all together by pouring the wet ingredients into the dry ingredients, stirring gently until combined.
- Prepare the crumble topping by mixing the brown sugar, rolled oats, cinnamon, and cold butter until it resembles coarse crumbs.
- Fill the muffin tin, spooning the batter in about two-thirds of the way full.
- Top each muffin with the crumble mixture.
- Bake for about 18-20 minutes or until a toothpick inserted comes out clean.
- Cool for a few minutes in the pan before transferring to a wire rack to cool completely.
Notes
These muffins are great warm with powdered sugar, butter, or even ice cream!
Nutrition
- Serving Size: 1 muffin
- Calories: 220
- Sugar: 14g
- Sodium: 150mg
- Fat: 9g
- Saturated Fat: 5g
- Unsaturated Fat: 3g
- Trans Fat: 0g
- Carbohydrates: 33g
- Fiber: 1g
- Protein: 3g
- Cholesterol: 30mg
Keywords: apple muffins, crumble muffins, baking, fall recipes, breakfast
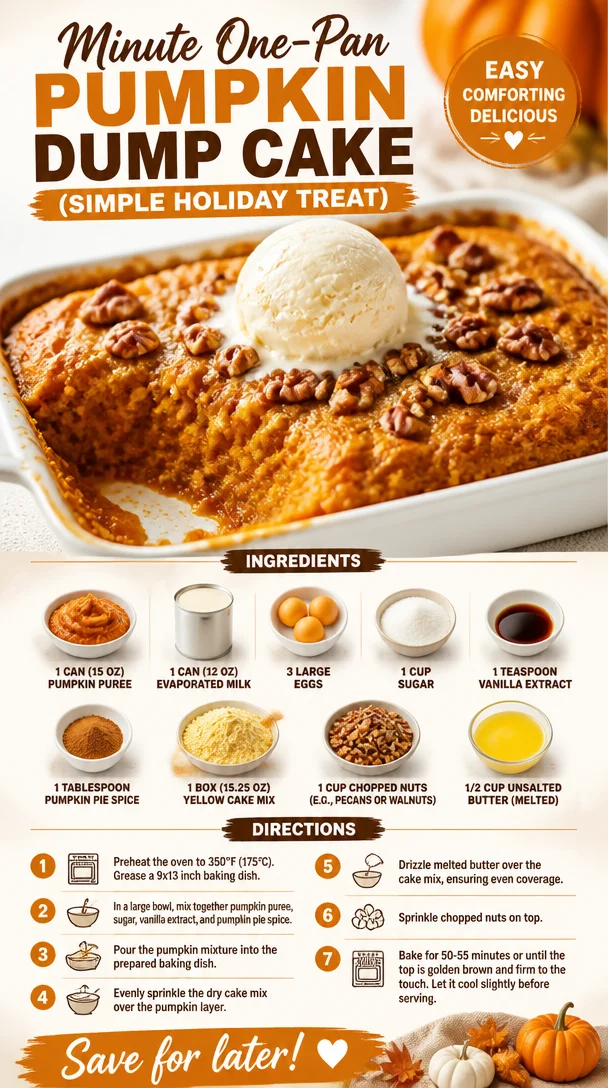
Minute One-Pan Pumpkin Dump Cake (Simple Holiday Treat)
The Joy of Baking: Pumpkin Dump Cake
Welcome to the cozy embrace of autumn, where leaves crunch underfoot, pumpkin spice reigns supreme, and our kitchens emanate warmth and sweetness. Today, I’m excited to share a recipe that’s not only easy to whip up but also a beloved classic that will have your family flocking to the table every time you make it. Enter the glorious Pumpkin Dump Cake, a dessert that captures the very essence of fall with its rich, spiced flavor and delightful texture.
Now, if you are wondering what exactly a "dump cake" is, let me tell you: it’s a glorious baking hack that involves “dumping” your ingredients into a pan without the fuss of layers or the worry of precision. This effortless method means you can spend more time savoring the season and less time sweating in the kitchen.
But pumpkin dump cake isn’t just any dessert; it holds a special place in my heart. As those cool breezes turn our thoughts to holiday gatherings and warm family moments, I can’t help but dive into the fond memories tied to this sweet treat.
A Slice of Nostalgia
I’ll never forget the first time I made pumpkin dump cake; it was a night that felt oddly magical. My best friend Sarah and I, fresh out of college and eager to impress our families, decided to hold a cozy fall dinner before heading off to our respective jobs. Armed with a few trusty recipes, pumpkin dump cake was our secret weapon.
We whipped it up in Sarah’s tiny apartment kitchen, laughter mingling with the scent of cinnamon and nutmeg wafting through the air. As we gently mixed the pumpkin puree with evaporated milk, sugar, and spice, we reminisced about our childhood—Halloween costumes, visits to pumpkin patches, and those endless nights of baking in her mom’s kitchen.
When our families came over, an enchanting aroma guided them straight to our dessert table. With every rich, creamy bite, we heard sighs of happiness and a chorus of “what is this deliciousness?”. They devoured every crumb, and Sarah and I shared knowing smiles. That night, we solidified our bond not just as friends, but as fellow food lovers. It was a slice of nostalgia I’ll carry with me forever, reminding me how food has the power to bring people together.
Ingredients
Let’s gather our ingredients for this delightful creation:
-
1 can (15 oz) pumpkin puree: The star of the show! Rich in flavor and nutrients, pumpkin puree provides that comforting taste we crave in autumn. For a twist, you could use butternut squash puree, which brings a slightly different sweetness.
-
1 can (12 oz) evaporated milk: This creamy ingredient adds richness to the cake. If you’re looking for a lighter option, feel free to swap in coconut milk or any non-dairy alternative.
-
3 large eggs: Eggs bind everything together and add a lovely fluffiness. If you’re doing a vegan version, substitute with flax eggs (1 tablespoon ground flaxseed mixed with 2.5 tablespoons water = 1 egg).
-
1 cup sugar: Sweetness is essential, but if you’re trying to reduce sugar, feel free to use coconut sugar or a sugar substitute that’s suitable for baking.
-
1 teaspoon vanilla extract: A dash of vanilla elevates the flavor. Consider using pure vanilla extract for more depth, or try almond extract for a unique twist!
-
1 tablespoon pumpkin pie spice: This fantastic mix should scream "fall." If you don’t have it on hand, mix your own with cinnamon, nutmeg, ginger, and cloves in equal parts.
-
1 box (15.25 oz) yellow cake mix: The foundation for our dump cake. You can swap this for a gluten-free cake mix or a spice cake mix for an extra flavor kick.
-
1 cup chopped nuts (e.g., pecans or walnuts): These add texture and nuttiness. This is optional; if you are nut-free, feel free to leave them out!
-
1/2 cup unsalted butter (melted): This step is key, as it creates a crispy, golden topping. For a vegan alternative, opt for melted coconut oil or dairy-free butter.
Step-by-Step Instructions
Let’s get down to the fun part! Here’s how to create your pumpkin dump cake:
-
Preheat Your Oven: Preheat your oven to 350°F (175°C). This allows for even baking from the get-go, ensuring your cake is moist and delicious.
-
Prepare the Baking Dish: Grab a 9×13 inch baking dish and lightly grease it with cooking spray or butter. This will make it easy to serve and clean up later.
-
Mix the Pumpkin Filling: In a large mixing bowl, combine the pumpkin puree, evaporated milk, sugar, eggs, vanilla extract, and pumpkin pie spice. Using a whisk, blend everything until smooth and homogenous. You want the mixture to be creamy and lovely.
-
Pour the Mixture: Pour this creamy pumpkin filling into the prepared baking dish and spread it evenly with a spatula.
-
Sprinkle the Cake Mix: Now for the “dump” part! Sprinkle the entire box of yellow cake mix over the pumpkin mixture. Don’t mix it! Just let the powder sit on top; this is what helps create that amazing crumbly topping.
-
Add the Nuts: If you’re using nuts, sprinkle them generously over the top. This adds a wonderful crunch that contrasts beautifully with the creamy pumpkin.
-
Drizzle with Butter: Melt your unsalted butter and drizzle it evenly over the cake mix and nuts. This is what makes it golden and delicious without needing to mix in!
-
Bake: Place the dish in the preheated oven and bake for about 50–60 minutes, or until the top is golden brown and a toothpick inserted comes out clean. The smell will fill your home, and you’ll be counting down the minutes!
-
Cool: Once baked, allow the cake to cool slightly in the dish. This makes it easier to slice and also helps the flavors meld.
Serving Suggestions
Slice into squares and serve warm, perhaps with a dollop of freshly whipped cream or a scoop of vanilla ice cream on top. For a more festive presentation, sprinkle some extra pumpkin spice or crushed nuts on top for that finishing touch. Trust me, your guests will be asking for seconds!
Recipe Variations
Feeling adventurous? Here are some creative twists to make this dish your own:
-
Add Chocolate: Sprinkle in some chocolate chips before baking for a delightful chocolate-pumpkin combo!
-
Coconut Flavor: Mix in shredded coconut for extra texture and a tropical hint.
-
Maple Glaze: Drizzle a warm maple syrup glaze over the top before serving for a rich finish.
-
Fruit Layer: Add a layer of fresh cranberries or sliced apples on top of the pumpkin filling for a pop of tartness.
-
Nut-Free Version: Swap in quick oats on the top layer rather than nuts for a hearty texture.
Chef’s Notes
Every time I bake this pumpkin dump cake, I’m reminded of all the simple joys of cooking—how it invites laughter and memories into the kitchen. Over the years, I’ve played around with flavors, tried various toppings, and even made it vegan on a few occasions. Each version has its own charm, but the classic remains close to my heart.
The best part? With virtually no cleanup, this recipe is ideal for a last-minute gathering or Thanksgiving dinner when time is of the essence!
FAQs and Troubleshooting
1. Why is my pumpkin dump cake too runny?
This might happen if the pumpkin puree is too watery. Always opt for high-quality pumpkin puree and drain any excess liquid if necessary before mixing.
2. Can I make this in advance?
Absolutely! You can prepare it the night before and bake it just before serving. Letting it sit overnight in the fridge allows those lovely flavors to meld together.
3. How do I store leftovers?
Cover the pan tightly with plastic wrap or transfer leftovers to an airtight container. It’ll last in the fridge for up to 5 days—but trust me, it’s unlikely to last that long!
4. Can I freeze the pumpkin dump cake?
Sure! Once cooled, you can freeze it for up to 3 months. Thaw in the refrigerator overnight before serving.
Nutritional Info
(If applicable; adjust based on actual ingredients used.)
Per serving: Approximately 250 calories, 10g fat, 35g carbohydrates, 3g protein. Keep in mind that this can vary based on ingredients and portion size!
So, whether you’re baking for a gathering, a cozy night in, or just because it’s a Tuesday, this pumpkin dump cake is sure to bring joy, comfort, and a heck of a lot of flavor to your table. Enjoy the process, share it with loved ones, and always keep it fresh, simple, and seriously delicious! Happy baking!
PrintPumpkin Dump Cake
An easy and delicious pumpkin dump cake that captures the essence of fall with its rich, spiced flavor and delightful texture.
- Prep Time: 15 minutes
- Cook Time: 60 minutes
- Total Time: 75 minutes
- Yield: 12 servings 1x
- Category: Dessert
- Method: Baking
- Cuisine: American
- Diet: Vegetarian
Ingredients
- 1 can (15 oz) pumpkin puree
- 1 can (12 oz) evaporated milk
- 3 large eggs
- 1 cup sugar
- 1 teaspoon vanilla extract
- 1 tablespoon pumpkin pie spice
- 1 box (15.25 oz) yellow cake mix
- 1 cup chopped nuts (e.g., pecans or walnuts)
- 1/2 cup unsalted butter (melted)
Instructions
- Preheat your oven to 350°F (175°C).
- Prepare a 9×13 inch baking dish by lightly greasing it with cooking spray or butter.
- Mix the pumpkin puree, evaporated milk, sugar, eggs, vanilla extract, and pumpkin pie spice in a large mixing bowl until smooth.
- Pour the pumpkin filling into the prepared baking dish and spread it evenly.
- Sprinkle the yellow cake mix over the pumpkin mixture without mixing.
- Add the chopped nuts on top, if using.
- Drizzle the melted butter evenly over the cake mix and nuts.
- Bake for 50–60 minutes or until golden brown and a toothpick inserted comes out clean.
- Cool slightly in the dish before slicing.
Notes
Serve warm with whipped cream or vanilla ice cream. Can be made in advance and frozen for up to 3 months.
Nutrition
- Serving Size: 1 serving
- Calories: 250
- Sugar: 10g
- Sodium: 300mg
- Fat: 10g
- Saturated Fat: 5g
- Unsaturated Fat: 3g
- Trans Fat: 0g
- Carbohydrates: 35g
- Fiber: 2g
- Protein: 3g
- Cholesterol: 50mg
Keywords: pumpkin cake, fall dessert, easy baking, Thanksgiving dessert, pumpkin recipes
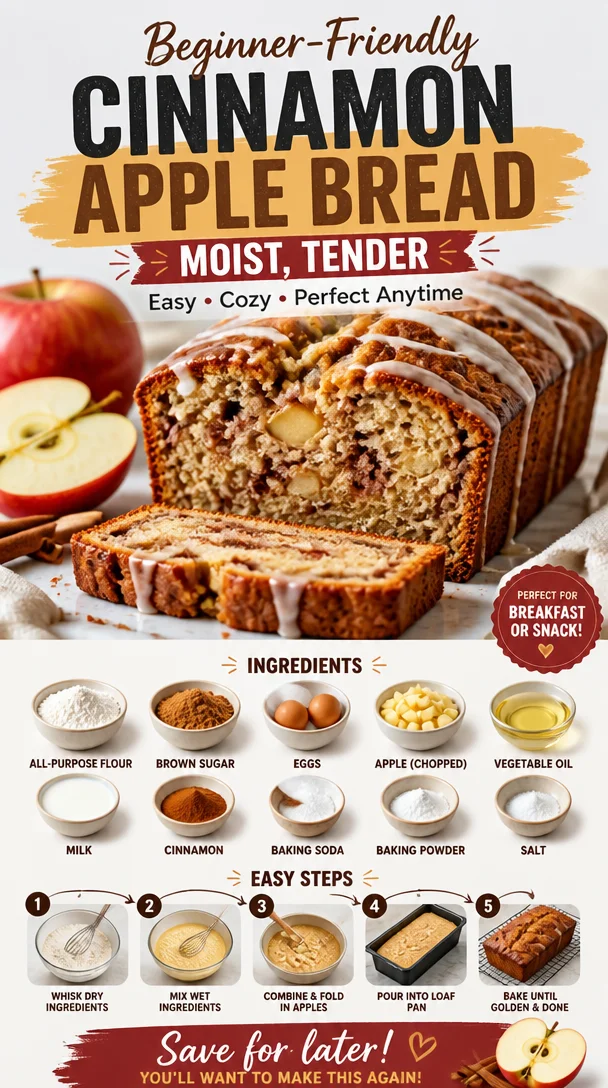
Beginner-Friendly Cinnamon Apple Bread: Moist, Tender
Moist and Tender Cinnamon Apple Bread: A Slice of Heaven
Welcome, fellow food lovers! Today, we’re diving into the delightful world of Moist and Tender Cinnamon Apple Bread. If you have ever walked into a bakery and been greeted by the warm, intoxicating aroma of freshly baked bread infused with cinnamon and warm apples, then you already know the kind of magic we’re talking about. This recipe captures that essence, transforming simple ingredients into an unforgettable experience that will make your taste buds dance!
In our fast-paced lives, the kitchen can sometimes feel like a chore, but I firmly believe it should be a joyful space where creativity flourishes. This cinnamon apple bread recipe is not just about indulging in nostalgic flavors; it’s about celebrating the joy of cooking and creating comfort food that brings people together. So, grab your apron and let’s get baking!
A Slice of Home: My Personal Story
I’ll always remember my grandmother’s kitchen in the fall—everything seemed like a scene from a cozy movie. It was bustling with warmth, love, and the incredible aroma of spices wafting through the air. One of my fondest memories is her whipping up a batch of cinnamon apple bread, and our family would gather around the kitchen table, eagerly waiting for that first slice to be revealed.
As I watched her carefully peel and chop apples while singing old tunes, I realized that cooking isn’t just about feeding our bodies; it’s about feeding our souls. Each ingredient she used seemed to carry a story, just like the hands that knead the dough. Fast forward to today, I still cherish those moments and replicate her cinnamon apple bread in my own kitchen, adding my little twists while holding on to the legacy she left me. Whenever I bake this bread now, it’s like wrapping myself in a warm hug, making memories all over again.
Ingredients: What You’ll Need
Let’s gather our ingredients! Here’s a breakdown of what you’ll need to create this delightful treat.
-
2 cups all-purpose flour
The backbone of this bread. You can swap with whole wheat flour for added nutrients or gluten-free all-purpose flour if you need a gluten-free option. Just remember, the texture might change slightly. -
1 tsp baking soda
This is your leavening agent that helps the bread rise to glorious heights. No substitutes here, as it’s crucial for the right texture! -
1 tsp baking powder
A little extra rise never hurts! For a gluten-free version, ensure your baking powder is also gluten-free—most are. -
1/2 tsp salt
Elevates flavors! Feel free to use sea salt or Himalayan salt for a gourmet touch. -
1 tsp ground cinnamon
The star of the show! If you want a spicier flavor profile, try adding a dash of nutmeg or allspice. -
1/2 cup unsalted butter, softened
This gives moisture and richness. If you’re looking for a dairy-free option, coconut oil is a great substitute, though it may slightly change the flavor. -
1 cup granulated sugar
Sweeten the deal! You could use brown sugar for a deeper flavor or coconut sugar for a more health-conscious choice. -
2 large eggs
Bind it all together! If you’re vegan, mashed bananas or unsweetened applesauce can work as substitutes; typically, 1/4 cup of either will replace one egg. -
1 tsp vanilla extract
Adds a lovely depth of flavor. Always opt for pure vanilla for the best taste! -
1 1/2 cups of peeled, diced apples
Fresh apples bring moisture and sweetness. Granny Smith are tart and perfect, but feel free to mix in your favorites like Honeycrisp or Fuji! -
1/2 cup chopped nuts (optional)
For a crunch! Walnuts or pecans are excellent choices. If you need it nut-free, simply omit them or add seeds like pumpkin or sunflower.
Step-by-Step Instructions: Let’s Bake!
Baking this Cinnamon Apple Bread is a breeze! Follow these easy steps, and I promise you’ll be left with a gorgeous loaf that will impress anyone.
-
Preheat your oven to 350°F (175°C). This step is crucial for getting that perfect bake, so don’t skip it!
-
Prepare your baking dish by greasing a 9×5 inch loaf pan with butter or non-stick spray. You can also line it with parchment paper for an easy release later—just make sure to leave some overhang for easy removal.
-
In a large bowl, whisk together the flour, baking soda, baking powder, salt, and cinnamon. This step is not just about mixing; it’s about awakening those aromas! As you whisk, breathe in that comforting scent!
-
In another bowl, cream together the softened butter and sugar until light and fluffy. This usually takes about 3-4 minutes. Want to feel like a pro? Use a hand mixer or stand mixer to make it easier. This step is vital for achieving a beautifully moist bread.
-
Add in the eggs, one at a time, mixing well after each addition. Follow this with the vanilla extract to bring that delightful flavor into the mix.
-
Gradually add the dry ingredient mixture into the wet mixture. Do this in three additions, stirring gently until just combined. Overmixing can lead to a denser texture—aim for a slightly lumpy consistency.
-
Fold in the diced apples and nuts if you’re using them. Imagine the crispy apples creating pockets of sweetness and freshness—it’s heavenly!
-
Pour the batter into your prepared loaf pan and use a spatula to smooth out the top.
-
Bake for 50-60 minutes, or until a toothpick inserted into the center comes out clean (or with just a few crumbs attached). Check around the 50-minute mark—nobody likes a dry loaf!
-
Once baked, let it cool in the pan for about 10 minutes before transferring it to a wire rack to cool completely. This helps to set the texture.
Now, how easy was that? Enjoy the sweet, spiced aroma filling your kitchen—trust me, the anticipation makes it all worth it!
Serving Suggestions: How to Present Your Bread
Once your loaf has cooled down, it’s time to slice and serve! I love to enjoy my cinnamon apple bread warm, slathered with a generous pat of butter or a drizzle of honey. For a fun twist, try toasting the slices just before serving; this adds a delightful crunch that makes each bite even more satisfying.
You can also dust powdered sugar on top for a touch of sophistication, or serve it alongside a scoop of vanilla ice cream for an indulgent dessert. The options are endless, and whatever you choose, it’ll look as good as it tastes!
Recipe Variations: Add Your Unique Twist
Now that you have the classic version perfected, let’s play around with some creative variations:
- Pumpkin Spice Twist: Add 1/2 cup of pumpkin puree for a fall-inspired version, adjusting the flour slightly to maintain consistency.
- Chocolate Chip Delight: Fold in 1/2 cup of chocolate chips—because who doesn’t love chocolate?
- Coconut Strudel: Add shredded coconut to the batter for a tropical flair, or sprinkle some on top before baking.
- Gluten-Free Goodness: Use a 1:1 gluten-free baking blend instead of all-purpose flour, making it great for those with gluten sensitivities.
- Nut-Free Alternative: Swap out nuts for seeds or simply leave them out completely—this doesn’t affect the overall flavor!
Get creative and make this recipe your own!
Chef’s Notes: My Kitchen Insights
Baking is a journey, and every recipe tells a story! This cinnamon apple bread has gone through various tweaks over the years. There was that one time I was in a hurry and forgot to cream the sugar and butter together—let me tell you, the texture was decidedly different! But you know what? It still tasted delicious, and that’s the beauty of cooking. Perfect doesn’t exist in my kitchen, only delicious.
So, if you find yourself overwhelmed or something doesn’t seem just right, don’t stress! The best meals often come from happy accidents. Life’s too short for perfect bread; it’s all about enjoying the process!
FAQs and Troubleshooting: Common Concerns
Q: My bread came out too dense. What did I do wrong?
A: This can happen if the batter is overmixed or the flour is packed too tightly. When incorporating dry ingredients, stir gently and only until combined.
Q: Can I use frozen apples?
A: Yes! Just make sure to thaw and drain excess moisture before adding them to your batter to avoid soggy bread.
Q: How do I store leftover bread?
A: Keeping the bread in an airtight container at room temperature will keep it fresh for 3-4 days. For longer storage, wrap it tightly in plastic wrap and freeze for up to 3 months. Just thaw at room temperature before enjoying!
Q: Can I halve this recipe?
A: Absolutely! Just follow the same steps but use a smaller loaf pan. You can also bake it in muffin tins for adorable mini breads!
Nutritional Info
While I encourage you to enjoy this delightful treat, it’s also good to be mindful of portions! Here’s a quick overview of what one serving (1 slice) contains (calculated on a typical loaf):
- Calories: 210
- Protein: 3g
- Fat: 8g
- Carbohydrates: 33g
- Fiber: 1g
- Sugar: 10g
Remember, these values can change based on ingredient substitutions.
Now you’re all set to make your very own Moist and Tender Cinnamon Apple Bread! I hope this delightful recipe brings as much joy to your kitchen as it has to mine over the years. So gather your ingredients, embrace the process, and most importantly—enjoy every bite! Happy baking!
PrintMoist and Tender Cinnamon Apple Bread
A delightful cinnamon apple bread filled with the nostalgic flavors of warm spices and sweet apples.
- Prep Time: 15 minutes
- Cook Time: 60 minutes
- Total Time: 75 minutes
- Yield: 8 servings 1x
- Category: Dessert
- Method: Baking
- Cuisine: American
- Diet: Vegetarian
Ingredients
- 2 cups all-purpose flour
- 1 tsp baking soda
- 1 tsp baking powder
- 1/2 tsp salt
- 1 tsp ground cinnamon
- 1/2 cup unsalted butter, softened
- 1 cup granulated sugar
- 2 large eggs
- 1 tsp vanilla extract
- 1 1/2 cups peeled, diced apples
- 1/2 cup chopped nuts (optional)
Instructions
- Preheat your oven to 350°F (175°C).
- Prepare your baking dish by greasing a 9×5 inch loaf pan with butter or non-stick spray.
- In a large bowl, whisk together the flour, baking soda, baking powder, salt, and cinnamon.
- In another bowl, cream together the softened butter and sugar until light and fluffy.
- Add in the eggs, one at a time, mixing well after each addition.
- Gradually add the dry ingredient mixture into the wet mixture.
- Fold in the diced apples and nuts if you’re using them.
- Pour the batter into your prepared loaf pan and smooth out the top.
- Bake for 50-60 minutes, or until a toothpick comes out clean.
- Once baked, let it cool in the pan for about 10 minutes before transferring it to a wire rack to cool completely.
Notes
Serve warm with butter or a drizzle of honey. Toasting slices adds a delightful crunch.
Nutrition
- Serving Size: 1 slice
- Calories: 210
- Sugar: 10g
- Sodium: 200mg
- Fat: 8g
- Saturated Fat: 5g
- Unsaturated Fat: 3g
- Trans Fat: 0g
- Carbohydrates: 33g
- Fiber: 1g
- Protein: 3g
- Cholesterol: 30mg
Keywords: cinnamon apple bread, dessert, baking, comfort food, fall recipes
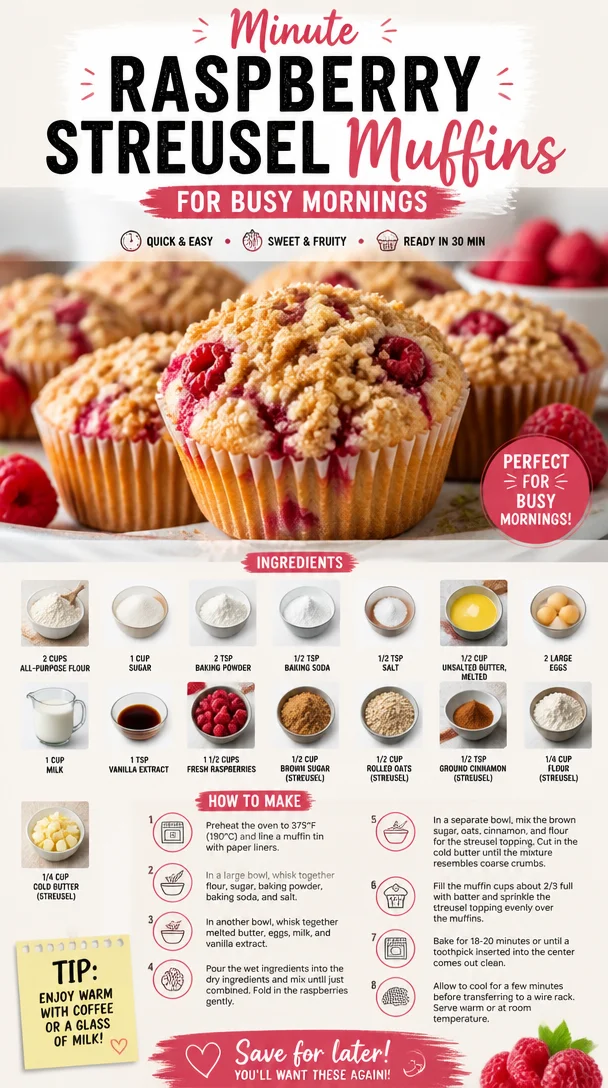
Minute Raspberry Streusel Muffins for Busy Mornings
Raspberry Streusel Muffins: A Berry Delicious Journey
Welcome to a sweet little corner of the kitchen where fresh berries and buttery goodness come together in the form of fluffy raspberry streusel muffins! If your mornings call for a delightfully sweet pick-me-up that doesn’t compromise on flavor or that scrumptious homemade charm, you’ve landed in just the right spot. As we dive into this recipe, let me take you on a journey filled with nostalgia, a sprinkle of culinary wisdom, and the joy of baking—because who doesn’t love starting their day with a berry-licious treat?
A Sweet Memory
Growing up, the scent of freshly baked goods wafting through the house was a signal that something magical was happening in the kitchen. My mom was the queen of muffins, and Saturday mornings were our little tradition. She’d pull out her trusty mixing bowl, and soon the kitchen would fill with laughter and the comforting aroma of baked delights. One of my personal favorites? You guessed it—raspberry muffins! I remember sitting at the kitchen table, my finger poised for the very first taste, while she lovingly sprinkled the streusel topping, her secret weapon for that perfect crumbly finish.
Fast forward to today, and every time I whip up a batch of these raspberry streusel muffins, I’m transported back to those carefree weekends filled with love and laughter. This recipe is not just about creating something delicious; it’s about evoking those cherished memories and sharing that warmth with all of you. So, grab your apron, and let’s make some magic in the kitchen!
Ingredients
-
2 cups all-purpose flour: This forms the base of our muffins. Feel free to substitute with whole wheat flour for a heartier texture or a gluten-free blend if you’re avoiding gluten.
-
1 cup sugar: Sweetness is key for our muffins! You can use coconut sugar or a sugar substitute if you’re looking to cut back on refined sugars.
-
2 teaspoons baking powder: This is our rising agent; it gives muffins their fluffy texture. Just make sure it’s fresh for the best results!
-
1/2 teaspoon baking soda: Works alongside the baking powder to help the muffins rise nicely.
-
1/2 teaspoon salt: A crucial balance to enhance the sweetness without being overpowering.
-
1/2 cup unsalted butter, melted: This provides richness and moisture. If you prefer a dairy-free option, melted coconut oil works wonderfully.
-
2 large eggs: Essential for binding the ingredients together and enriching the flavor. Chia eggs are an easy vegan substitute for a similar effect.
-
1 cup milk: Whole milk adds creaminess, but almond milk or oat milk are fantastic alternatives for a lighter twist.
-
1 teaspoon vanilla extract: The secret ingredient that brings warmth and enhances the flavor of the muffins.
-
1 1/2 cups fresh raspberries: The star of the show! Fresh is best for that burst of berry flavor, though frozen raspberries can also work in a pinch—just allow them to defrost first.
-
For the Streusel Topping:
- 1/2 cup brown sugar: This creates that deliciously sweet, caramel-like finish.
- 1/2 cup rolled oats: Provides texture and a wholesome feel to the crumb topping. Quick oats can be used, too.
- 1/2 teaspoon ground cinnamon: Adds a lovely warmth; feel free to adjust this based on how spicy you like it!
- 1/4 cup flour: Helps bind the streusel together without turning it into pudding.
- 1/4 cup cold butter: Cold butter is key here for that crumbly streusel texture; you can use a vegan butter substitute if desired.
Step-by-Step Instructions
-
Preheat Your Oven to 375°F (190°C): That’s right! This is your essential first step. Preheating ensures an evenly baked muffin from the moment you place them in the oven.
-
Prep Your Muffin Tin: Line a standard muffin tin with paper liners or give it a generous spritz of non-stick spray. Don’t skip this step; nobody wants to be scraping muffins out of the tin on a Sunday morning!
-
Mix Dry Ingredients: In a large mixing bowl, whisk together the flour, sugar, baking powder, baking soda, and salt until combined. This step ensures every muffin is evenly flavored—no lumps allowed!
-
Combine Wet Ingredients: In another bowl, mix the melted butter, eggs, milk, and vanilla extract. Whisk until smooth and creamy. You want a unified mixture that sings with sweet vanilla notes.
-
Combine the Mixtures: Pour the wet ingredients into the dry ingredients, gently folding them together. This is where the magic happens! Mix until just combined—over-mixing can lead to dense muffins, and we want fluffy delights!
-
Add the Raspberries: Gently fold in the fresh raspberries. Take care not to crush them; we want those gorgeous berry bursts intact!
-
Prepare the Streusel Topping: In a small bowl, combine the brown sugar, rolled oats, ground cinnamon, flour, and cold butter. Use your fingers or a pastry cutter to mix until crumbly. This topping is where your muffins will get their divine texture.
-
Fill the Muffin Tin: Spoon the batter evenly into the prepared muffin tin, filling each cup about two-thirds full. Then, sprinkle a generous amount of streusel topping over each muffin.
-
Bake: Pop the muffin tin into your preheated oven and bake for 18-20 minutes, or until golden brown and a toothpick inserted into the center comes out clean. Keep an eye on them; every oven is different!
-
Cool & Serve: Allow the muffins to cool in the tin for about 5 minutes before transferring them to a wire rack. Don’t rush this; the cooling really helps the muffins set!
Serving Suggestions
Serve these raspberry streusel muffins warm with a drizzle of honey or a spread of your favorite jam for an extra treat on the side. They pair wonderfully with a freshly brewed cup of coffee or a refreshing iced tea. You can even plate them on a lovely cake stand as a centerpiece for brunch—it’s almost too pretty to eat… almost!
Recipe Variations
-
Berry Medley: Swap out the raspberries for any combination of your favorite berries—blueberries, blackberries, or strawberries all work great!
-
Zesty Twist: Add the zest of one lemon or orange to the batter for a refreshing citrus kick that complements the berries beautifully.
-
Nutty Crumble: Toss in some chopped nuts, like walnuts or pecans, for an extra crunch in both the muffins and the streusel topping.
-
Chocolate Lover’s Delight: Mix in some dark chocolate chips for those days when you want an indulgent treat.
-
Vegan Version: Substitute the eggs with flax eggs (1 tbsp ground flaxseed + 2.5 tbsp water = 1 egg) and use your favorite plant-based milk and butter.
Chef’s Notes
These muffins have evolved over time in my kitchen—what started as a simple raspberry muffin recipe has transformed into an award-winning brunch item in my home! I remember one morning I had a few extra berries on hand, and in a moment of inspiration, I decided to throw them in. That’s when I realized that cooking is all about embracing the moment and going with your gut. Every iteration of this recipe has been a joy, each bringing a new twist that adds to the family lore. And trust me, nothing feels better than watching loved ones enjoying every delicious bite of something you’ve made with care.
FAQs and Troubleshooting
1. Why are my muffins dense?
Dense muffins may be due to overmixing the batter. Mix until just combined to maintain that fluffy texture!
2. Can I use frozen raspberries?
Absolutely! Just make sure to let them thaw and drain excess moisture to prevent the batter from getting too wet.
3. How can I tell when my muffins are done baking?
A toothpick inserted into the center should come out clean or with a few moist crumbs—not wet batter. Keep an eye on the tops; they should be golden brown!
4. Can I store these muffins? How long do they last?
Yes! Store cooled muffins in an airtight container at room temperature for up to 3 days or in the fridge for about a week. They freeze beautifully too—just pop them in a freezer bag for up to 3 months!
Nutritional Info (optional)
While I focus on flavor and enjoyment, it’s nice to keep the nutritional balance in mind. Each muffin (without added toppings) generally contains:
- Calories: 250
- Protein: 5g
- Carbs: 36g
- Fiber: 2g
- Sugar: 12g
- Fat: 10g
Enjoy these delightful raspberry streusel muffins guilt-free, knowing they are a tasty treat to fuel your day!
So there you have it, friends! A recipe that’s more than just a set of instructions—it’s about creating memories, nourishing your body, and most importantly, indulging your taste buds in a delightful berry adventure. Whether you’re sharing these with family, friends, or just treating yourself, every bite is sure to bring joy. Happy baking! 🌟
PrintRaspberry Streusel Muffins
Delightful raspberry streusel muffins that evoke sweet memories and fill your mornings with flavor.
- Prep Time: 15 minutes
- Cook Time: 20 minutes
- Total Time: 35 minutes
- Yield: 12 muffins 1x
- Category: Breakfast
- Method: Baking
- Cuisine: American
- Diet: Vegetarian
Ingredients
- 2 cups all-purpose flour
- 1 cup sugar
- 2 teaspoons baking powder
- 1/2 teaspoon baking soda
- 1/2 teaspoon salt
- 1/2 cup unsalted butter, melted
- 2 large eggs
- 1 cup milk
- 1 teaspoon vanilla extract
- 1 1/2 cups fresh raspberries
- 1/2 cup brown sugar (for streusel topping)
- 1/2 cup rolled oats (for streusel topping)
- 1/2 teaspoon ground cinnamon (for streusel topping)
- 1/4 cup flour (for streusel topping)
- 1/4 cup cold butter (for streusel topping)
Instructions
- Preheat your oven to 375°F (190°C).
- Prep your muffin tin by lining it with paper liners or spraying with non-stick spray.
- Mix dry ingredients: In a large bowl, whisk together the flour, sugar, baking powder, baking soda, and salt.
- Combine wet ingredients: In another bowl, mix the melted butter, eggs, milk, and vanilla extract until smooth.
- Combine the mixtures: Pour wet ingredients into dry ingredients and gently fold until just combined.
- Add the raspberries, folding gently to keep them intact.
- Prepare the streusel topping in a small bowl by mixing brown sugar, oats, ground cinnamon, flour, and cold butter until crumbly.
- Fill the muffin tin with batter and top with streusel.
- Bake for 18-20 minutes until golden and a toothpick comes out clean.
- Cool for 5 minutes in the tin before transferring to a wire rack.
Notes
For extra flavors, add lemonade zest or swap out the raspberries for other berries!
Nutrition
- Serving Size: 1 muffin
- Calories: 250
- Sugar: 12g
- Sodium: 150mg
- Fat: 10g
- Saturated Fat: 6g
- Unsaturated Fat: 3g
- Trans Fat: 0g
- Carbohydrates: 36g
- Fiber: 2g
- Protein: 5g
- Cholesterol: 70mg
Keywords: muffins, raspberry muffins, breakfast recipes, baking, sweet treats

Quick 1-Pan Cherry Amaretto Upside-Down Cake for Weeknights
Flavorful Cherry Amaretto Upside-Down Cake: Your New Go-To Dessert
Hello, my dear food lovers! Today, we’re diving into a delightful dessert that will surely make your tastebuds dance with joy: Cherry Amaretto Upside-Down Cake. This cake is not just a dessert; it’s a celebration of flavor, nostalgia, and pure joy. Trust me, once you sink your fork into this beauty, you’ll be craving it again and again.
There’s something inherently magical about the combination of cherries and amaretto. Each bite is like a sweet hug that warms your heart! Whether you’re whipping this up for a casual weeknight treat or impressing guests at your next gathering, this cake promises to bring smiles all around. So, put on your favorite apron, and let’s make some kitchen magic!
A Slice of Nostalgia
This recipe brings back wonderful memories for me, and I’m excited to share them with you! Growing up, my grandmother had a special way of celebrating life’s little moments, and her Cherry Amaretto Upside-Down Cake was a recurring star at family get-togethers. I can vividly remember the aroma wafting through her cozy kitchen as it baked.
It always felt like a festive occasion, and we would gather around the table, excitedly waiting for her to flip the cake over. The joy on her face as she unveiled the golden crust dotted with glistening cherries and a luscious caramelized topping was priceless. It was a cake that spoke of love, family, and the simple pleasure of sharing a treat with one another.
Now, as I recreate this dish in my own kitchen, I’m not just baking; I’m weaving a tapestry of cherished memories and flavors. And the best part? I get to share this deliciousness with all of you! Get ready to experience that same joy in your own home!
Ingredients
Here’s the star-studded cast of ingredients that will join forces to create this delicious Cherry Amaretto Upside-Down Cake.
-
2 cups maraschino cherries, drained: These juicy cherries are the highlight of our cake! They’ll bring sweetness and a pop of color. If you want a more natural flavor, you can substitute with fresh or frozen cherries (just pit them first!).
-
1/4 cup unsalted butter (for browning and richness): Butter adds a creamy, rich flavor that balances the sweetness. Feel free to use vegan butter if you’re looking for a dairy-free option.
-
1/2 cup brown sugar, packed: Brown sugar brings moisture and a touch of caramel flavor, which complements the cherries beautifully. If you’re out of brown sugar, you can make your own by mixing white sugar with a bit of molasses!
-
2 tbsp amaretto liqueur: The secret ingredient that adds a lovely almond flavor to your cake! If you prefer not to use alcohol, you can substitute with a bit of almond extract (1 tsp) and increase the sugar by a tablespoon or two.
-
1/2 cup unsalted butter (for cake batter): Just like before, this butter gives our cake a tender crumb. Use ghee or coconut oil for a dairy-free twist!
-
1 cup granulated sugar: This is our main sweetener. You can use coconut sugar for a lower glycemic alternative.
-
2 large eggs, room temperature: Eggs are crucial in binding the ingredients and providing structure to the cake. For a vegan option, you can use flax eggs (1 tbsp flaxseed meal + 3 tbsp water = 1 egg).
-
1 1/2 cups all-purpose flour: The foundation of our cake! For those with gluten sensitivities, a 1:1 gluten-free blend will work wonderfully.
-
1 1/2 tsp baking powder: This is what makes our cake rise and gives it that fluffy texture. Ensure your baking powder is fresh!
-
1/4 tsp salt: A little pinch of salt enhances all the flavors, making the cake even more delicious!
-
1/2 cup whole milk (or dairy-free milk like oat milk): This add moisture to our cake. Almond milk or soy milk are excellent dairy-free alternatives that will work well.
-
1 tsp pure vanilla extract: Vanilla adds warmth and depth. For a more robust flavor, you can use vanilla beans!
-
1 tbsp amaretto liqueur (optional): This adds an additional layer of amaretto goodness to your cake batter. Your choice, but trust me, you won’t regret adding it!
Each ingredient plays a special role in the symphony of flavors that make this cake unforgettable. Now that we’ve gathered our ingredients, let’s start baking!
Step-by-Step Instructions
-
Preheat Your Oven: Preheat your oven to 350°F (175°C). This ensures that your cake bakes evenly once we pop it in. While your oven warms up, grease a 9-inch round cake pan so the cake can slide right out once it’s done!
-
Prepare the Cherry Layer: In a medium saucepan, melt 1/4 cup of butter over medium heat. Once melted, stir in 1/2 cup of brown sugar until it’s completely dissolved and slightly bubbly. Add your cherries and the 2 tablespoons of amaretto liqueur, stirring gently to coat them in that heavenly caramel. Allow the mixture to simmer for just a couple of minutes. This step enhances the flavor and makes those cherries ultra luscious! Pour this mix into your prepared cake pan, spreading it evenly.
-
Make the Cake Batter: In a large mixing bowl, cream together 1/2 cup of softened butter and 1 cup of granulated sugar until it’s light and fluffy. This step brings air into the mixture, leading to a tender cake. Next, add in the eggs, one at a time, mixing well after each addition. Then, pour in the milk, 1 tablespoon of amaretto (if using), and 1 teaspoon of vanilla extract. Mix until smooth!
-
Combine Dry Ingredients: In a separate bowl, whisk together your all-purpose flour, baking powder, and salt. Gradually add the dry ingredients to the wet mixture, folding gently with a spatula until just combined. Be careful not to overmix; a little lumps will keep your cake fluffy and light!
-
Pour Batter Over Cherries: Carefully pour the batter over the cherry topping in your cake pan. Use the spatula to ensure it’s evenly spread. At this point, your kitchen should be smelling divine!
-
Bake: Slide your cake into the preheated oven and bake for about 35-40 minutes, or until a toothpick inserted into the center comes out clean. Keep an eye on it towards the end—overbaking can lead to a dry cake!
-
Cool and Flip: Once baked, remove the cake from the oven and allow it to cool in the pan for about 10 minutes. This step is crucial—if you flip it too soon, the cherries might stick! Carefully place a plate over the pan and flip it over. The cherry topping will now be on top, glistening and gorgeous.
-
Serve and Enjoy: Let the cake cool slightly before slicing. You can serve it warm or at room temperature, and it pairs beautifully with a scoop of vanilla ice cream or a dollop of whipped cream!
Serving Suggestions
When it comes to serving this Cherry Amaretto Upside-Down Cake, presentation is key! You want your cake to be as stunning as it is delicious. Serve slices on elegant plates, and don’t forget to drizzle a bit of the caramel from the pan over each piece for an extra touch of decadence. For added flair, garnish with a light dusting of powdered sugar or a sprinkle of chopped almonds—it adds a delightful crunch!
Recipe Variations
Ready to put your own spin on this classic? Here are some fun variations to try:
-
Berry Medley: Swap out the cherries for a mix of berries like raspberries, blueberries, and strawberries for a vibrant summer twist!
-
Chocolate Cherry: Add cocoa powder (1/4 cup) to the batter for a chocolatey flair. Who doesn’t love chocolate and cherry together?
-
Nutty Crunch: Mix chopped pecans or walnuts into the cake batter for a delightful crunch and added flavor.
-
Citrus Zing: Add some grated lemon or orange zest to the batter for a refreshing citrus twist that brightens the flavor profile.
-
Vegan Delight: Substitute cherries with a mix of bananas and nuts, use flax eggs, and dairy-free milk for a fantastic vegan version that won’t disappoint!
Chef’s Notes
This recipe is one that has evolved over time, much like any good relationship in the kitchen! I still remember the first attempt—I may have used twice the sugar, and let’s just say the result was a sugar bomb! However, through practice and a lot of delicious taste testing, I’ve perfected this version. Each time I make it, it brings a wave of nostalgia and sweetness, reminding me of those cherished family moments.
One of my funniest kitchen stories involves the time I forgot to add the baking powder completely. Picture me frantically watching it bake, only to realize that I’d essentially made a dense cherry pancake! But hey, while that cake was a flop, the memories it created were worth every lesson learned.
FAQs and Troubleshooting
1. My cake stuck to the pan! What went wrong?
Make sure you thoroughly grease your cake pan. You can also use parchment paper to line the bottom, which will make it super easy to lift the cake out once it cools.
2. Why did my cake turn out dense?
Dense cakes are often a result of overmixing or not adding enough leavening agent. Remember to mix until just combined and check your baking powder for freshness.
3. Can I make this ahead of time?
Absolutely! This cake actually tastes better the next day as the flavors meld together. Just store it in an airtight container at room temperature.
4. Can I freeze this cake?
Yes, you can freeze the cake! Just make sure to wrap it well in plastic wrap and store it in an airtight container. Thaw in the fridge overnight before serving.
Nutritional Info
If you’re keeping an eye on nutrition, here’s a rough breakdown (per slice based on 12 servings):
- Calories: 250
- Protein: 3g
- Fat: 10g
- Carbohydrates: 38g
- Fiber: 1g
Keep in mind that nutritional values may vary based on ingredient substitutions!
And there you have it, my friend! A delicious Cherry Amaretto Upside-Down Cake full of flavor and rich in memories. Make this dessert your own, and don’t be afraid to experiment in the kitchen. After all, cooking is about joy and creativity. Happy baking, and I can’t wait to hear about your culinary adventures!
PrintCherry Amaretto Upside-Down Cake
A delightful dessert that combines juicy cherries and amaretto for a nostalgic and flavorful experience.
- Prep Time: 20 minutes
- Cook Time: 40 minutes
- Total Time: 60 minutes
- Yield: 12 servings 1x
- Category: Dessert
- Method: Baking
- Cuisine: American
- Diet: Vegetarian
Ingredients
- 2 cups maraschino cherries, drained
- 1/4 cup unsalted butter (for browning)
- 1/2 cup brown sugar, packed
- 2 tbsp amaretto liqueur
- 1/2 cup unsalted butter (for cake batter)
- 1 cup granulated sugar
- 2 large eggs, room temperature
- 1 1/2 cups all-purpose flour
- 1 1/2 tsp baking powder
- 1/4 tsp salt
- 1/2 cup whole milk (or dairy-free alternative)
- 1 tsp pure vanilla extract
- 1 tbsp amaretto liqueur (optional)
Instructions
- Preheat your oven to 350°F (175°C) and grease a 9-inch round cake pan.
- Prepare the cherry layer by melting 1/4 cup of butter, then stirring in 1/2 cup of brown sugar. Add cherries and amaretto, simmer, and pour into the cake pan.
- Make the cake batter by creaming together 1/2 cup softened butter and 1 cup sugar, then adding eggs, milk, amaretto, and vanilla extract.
- Combine the dry ingredients in a separate bowl and gradually fold them into the wet mixture.
- Pour the cake batter over the cherry topping in the pan.
- Bake for 35-40 minutes or until a toothpick comes out clean.
- Cool the cake in the pan for 10 minutes, then flip it onto a plate.
- Serve warm or at room temperature, optionally with ice cream or whipped cream.
Notes
Store leftovers in an airtight container at room temperature or freeze for later enjoyment.
Nutrition
- Serving Size: 1 slice
- Calories: 250
- Sugar: 20g
- Sodium: 150mg
- Fat: 10g
- Saturated Fat: 6g
- Unsaturated Fat: 4g
- Trans Fat: 0g
- Carbohydrates: 38g
- Fiber: 1g
- Protein: 3g
- Cholesterol: 30mg
Keywords: cake, dessert, cherry, amaretto, upside-down cake
Minute Blueberry Muffins for Busy Weekday Mornings
The Best Blueberry Muffins: A Sweet Journey
Welcome to my cozy kitchen, where the air is always fragrant with the wonderful scent of baked goodies. If there’s one thing that brings joy and comfort like nothing else, it’s the irresistible aroma of freshly baked blueberry muffins wafting through the house. These muffins are not just a breakfast staple; they are a warm hug in the form of baked goods. Throughout the years, they’ve become a beloved treat for family gatherings, lazy Sunday mornings, and even surprise brunches. Today, I’m thrilled to share my foolproof recipe for the best blueberry muffins that are guaranteed to make your taste buds sing!
You might be wondering, what makes these blueberry muffins so special? Well, not only are they fluffy, moist, and bursting with juicy berries, but they also come together quickly and easily—perfect for those busy mornings or impromptu baking sessions. Oh, and did I mention they’re endlessly customizable? You could keep the classic vibe with just blueberries or mix it up with spices and zests. Whatever you choose, you’re in for a treat!
Now, let’s dive into this delicious journey and whip up a batch of blueberry bliss. But before we start mixing, allow me to share a little personal story about my love for these muffins.
A Trip Down Memory Lane
Growing up, my weekends were often filled with the comforting ritual of baking with my grandmother, a true kitchen queen. One of my fondest memories was the day we decided to whip up blueberry muffins from scratch because we had just come back from a berry-picking adventure. We had buckets overflowing with fresh, succulent blueberries, and she thought, “Why not turn these into something delicious?”
With flour dusting the countertops and berry juice streaked across our aprons, we mixed, poured, and baked—but not without her many anecdotes about the “secret ingredient” in her famous muffins: love. I remember that day vividly; the muffins rose beautifully in the oven, and when they finally cooled enough to taste, we couldn’t wait. As we sunk our teeth into the warm, fluffy treasures, the blend of sweetness and tartness exploded in my mouth—it was pure heaven.
Ever since that day, blueberry muffins have held a special place in my heart. They remind me of family, creativity, and the simple joy of baking together. Today, I’m excited to share that joy with you because I believe everyone should experience the magic of these delightful muffins!
Ingredients
Let’s gather our ingredients, shall we? Here’s what you’ll need to bake these scrumptious blueberry muffins:
-
2 cups all-purpose flour: The foundation of our muffins. For a lighter muffin, you could swap in half of the all-purpose flour for whole wheat flour, or even a gluten-free blend if you’re accommodating dietary restrictions.
-
1 cup sugar: This adds sweetness but can easily be adjusted to your taste. Feel free to cut it down to ¾ cup for a less sweet muffin or use coconut sugar for a more wholesome option.
-
1 tablespoon baking powder: Our trusty leavening agent. Be sure it’s fresh for maximum rise; an easy way to check is to drop a bit in warm water and see if it bubbles.
-
½ teaspoon salt: Balances the sweetness and enhances flavor. If you’re watching your sodium intake, you can reduce it to ¼ teaspoon without losing too much flavor.
-
½ cup unsalted butter, melted: Adds richness and moisture. You can substitute with coconut oil for a dairy-free version, or applesauce for a lighter option!
-
1 cup milk: Provides moisture. You can easily switch to almond milk, oat milk, or any other non-dairy milk if you’re vegan or lactose intolerant.
-
2 large eggs: Helps bind everything together. If you’re looking for a vegan option, you can replace each egg with ¼ cup of unsweetened applesauce or 1 tablespoon of ground flaxseed mixed with 2.5 tablespoons of water (let it sit for a few minutes to thicken).
-
1 teaspoon vanilla extract: For an aromatic twist. Feel free to experiment with almond extract or even a bit of citrus zest for an added pop of flavor!
-
1 cup fresh blueberries: The stars of the show! While fresh is best, you can use frozen blueberries if that’s what you have on hand. Just make sure to toss them in a little flour to prevent them from sinking.
-
Optional: coarse sugar for topping: For that bakery-style finish. If you’re feeling extra fancy, a sprinkle of cinnamon alongside the coarse sugar can be delightful!
By keeping these ingredients handy, you’re well on your way to muffin heaven!
Step-by-Step Instructions
Alright, let’s get to the fun part: baking! Follow these step-by-step instructions, and you’ll have a batch of warm blueberry muffins ready in no time.
-
Preheat your oven: First things first, preheat your oven to 375°F (190°C). This ensures a perfect bake from the start. Don’t forget to line your muffin tin with paper liners or grease them if you prefer a more rustic, crumbly muffin.
-
Mix the dry ingredients: In a large mixing bowl, whisk together the flour, sugar, baking powder, and salt. Make sure there are no lumps in the flour. This is crucial for the proper rise and fluffy texture of your muffins.
-
Combine the wet ingredients: In another bowl, whisk the melted butter, milk, eggs, and vanilla extract until everything is blended nicely. Just as my grandma used to say, the secret to moist muffins is combining wet and dry ingredients well but not overmixing.
-
Combine wet and dry: Pour the wet ingredients into the dry ingredients. With a rubber spatula, gently fold them together until just combined. It’s okay if there are a few lumps! Overmixing can lead to dense muffins, and we want fluffy goodness.
-
Add the blueberries: Carefully fold in the blueberries until evenly distributed. Pro tip: You can toss them lightly in flour before this step. It helps them stay suspended in the batter rather than sinking to the bottom!
-
Fill the muffin tins: Scoop the batter into the prepared muffin tins, filling each cup about two-thirds full. This allows room for rising without overflowing. For that bakery-touch, sprinkle a bit of coarse sugar on top of each muffin.
-
Bake: Place your muffin tin in the preheated oven and bake for 18-22 minutes or until a toothpick inserted in the center comes out clean. You might experience the heavenly aroma wafting through your house during this time—it’s absolutely worth the wait!
-
Cool and enjoy: Once baked, remove the muffins from the oven and allow them to cool in the tin for a few minutes. Transfer them to a wire rack to cool completely or dive in while they’re still warm, like I usually do!
Serving Suggestions
Now that your muffins are beautifully golden and fragrant, how do you serve them? They’re delightful on their own, fresh out of the oven, or spread with a touch of butter or cream cheese for some extra indulgence. These muffins shine at breakfast but can also be enjoyed as a delicious snack or dessert. Pair them with a hot cup of coffee or a glass of cold milk, and you’ve got an exquisite treat that works any time of the day!
Recipe Variations
The beauty of blueberry muffins lies in their adaptability! Here are a few creative twists you can consider:
-
Lemon Blueberry Muffins: Add the zest of one lemon and a tablespoon of lemon juice to the batter for a refreshing zing.
-
Nutty Muffins: Mix in chopped walnuts or pecans for added crunch and nutrition. They pair wonderfully with the blueberries!
-
Double Berry Swirl: Combine blueberries with raspberries or strawberries for a mixed berry surprise. Just adjust the amount to balance the flavors.
-
Chocolate Chip Blueberry Muffins: Because chocolate makes everything better! Fold in a half cup of chocolate chips along with the blueberries for a decadent touch.
-
Vegan Blueberry Muffins: Simply substitute the eggs and milk with plant-based options, and you’ve got a delightful vegan version that everyone will love!
Chef’s Notes
These blueberry muffins have traveled with me through various stages of life—from that cherished kitchen with my grandmother to my cozy apartment filled with the sound of excited friends and family as they devour them. Over time, I’ve tweaked the recipe a bit, sometimes experimenting with different fillings or spices. What remains constant is the joyous reaction they evoke in everyone who tastes them.
You may even find me making these muffins with my little ones, creating new memories just as my grandmother did with me. And it never fails—there’s always flour on their cheeks and grins on their faces!
FAQs and Troubleshooting
Q: Why are my muffins dense?
A: Dense muffins usually result from overmixing your batter or not adding enough leavening agent. Ensure you mix until just combined and check that your baking powder is fresh!
Q: How do I prevent my blueberries from sinking to the bottom?
A: Tossing the berries in a little flour before adding them to the batter helps. This creates a barrier that keeps them suspended in the muffin while baking.
Q: Can I make these muffins ahead of time?
A: Absolutely! These muffins store well in an airtight container at room temperature for up to three days. You can also freeze them for up to three months. Simply reheat in the oven or microwave when you’re ready to enjoy!
Q: How can I ensure my muffins are perfectly baked?
A: Stick a toothpick in the center of a muffin; if it comes out clean or with just a few crumbs, they’re done! Avoid opening the oven door too often, as that can cause temperature fluctuations.
Nutritional Info
While exact nutritional values can vary based on your ingredient choices and portion sizes, here’s a rough estimate per muffin (assuming 12 muffins):
- Calories: 200
- Protein: 3g
- Carbohydrates: 28g
- Fat: 9g
Note: Adjust ingredients for a healthier option, like substituting less sugar or butter, to lighten up your muffins without sacrificing flavor!
Now it’s time for you to grab those ingredients and start baking! I can’t wait to hear how your blueberry muffins turn out. Happy baking!
PrintThe Best Blueberry Muffins

Fluffy, moist blueberry muffins bursting with juicy berries, perfect for breakfast or a snack.
- Prep Time: 15 minutes
- Cook Time: 22 minutes
- Total Time: 37 minutes
- Yield: 12 servings 1x
- Category: Breakfast
- Method: Baking
- Cuisine: American
- Diet: Vegetarian
Ingredients
- 2 cups all-purpose flour
- 1 cup sugar
- 1 tablespoon baking powder
- ½ teaspoon salt
- ½ cup unsalted butter, melted
- 1 cup milk
- 2 large eggs
- 1 teaspoon vanilla extract
- 1 cup fresh blueberries
- Optional: coarse sugar for topping
Instructions
- Preheat your oven to 375°F (190°C) and line muffin tin with paper liners.
- Mix the dry ingredients: In a bowl, whisk together flour, sugar, baking powder, and salt.
- Combine the wet ingredients: In another bowl, whisk melted butter, milk, eggs, and vanilla extract.
- Combine the wet and dry ingredients until just combined.
- Add the blueberries and fold them in gently.
- Fill the muffin tins about two-thirds full and sprinkle with coarse sugar if desired.
- Bake for 18-22 minutes or until a toothpick comes out clean.
- Cool the muffins for a few minutes before transferring to a wire rack.
Notes
These muffins can be customized with spices, zests, or other berries.
Nutrition
- Serving Size: 1 muffin
- Calories: 200
- Sugar: 10g
- Sodium: 180mg
- Fat: 9g
- Saturated Fat: 5g
- Unsaturated Fat: 4g
- Trans Fat: 0g
- Carbohydrates: 28g
- Fiber: 1g
- Protein: 3g
- Cholesterol: 40mg
Keywords: blueberry muffins, breakfast, baked goods
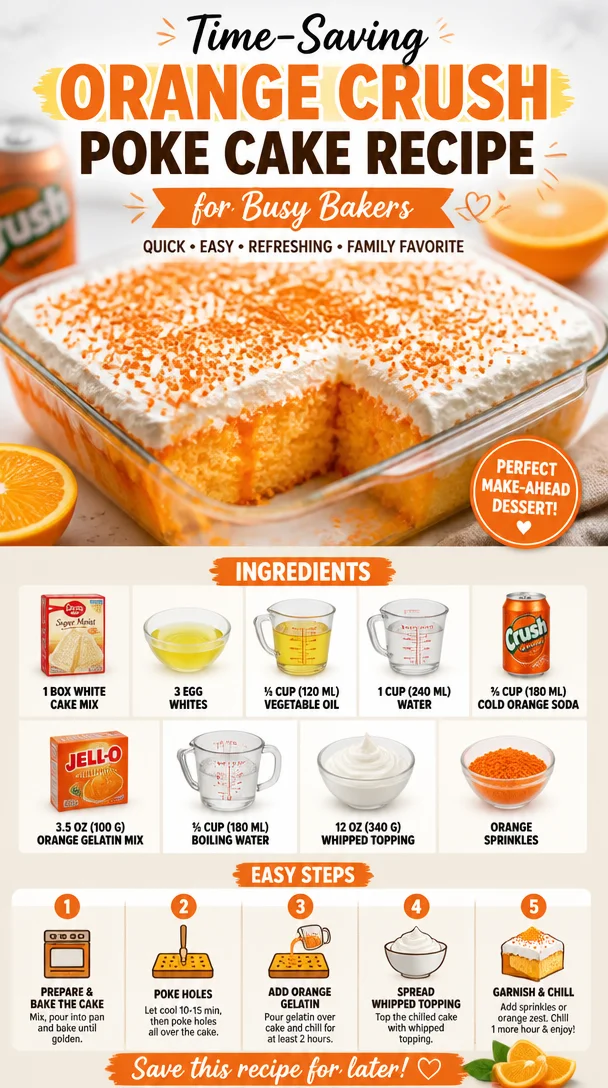
Time-Saving Orange Crush Poke Cake Recipe for Busy Bakers
Orange Crush Poke Cake Recipe: A Sweet and Tangy Delight
Ah, the joy of cake! There’s just something magical about dessert that brings people together, fills the room with warmth, and creates heartwarming memories. If you’re on a quest for a dessert that’s not just delicious but also a little nostalgic, pour yourself a glass of orange soda and get ready to dive into my Orange Crush Poke Cake recipe! This delightful cake combines the lightness of a white cake with the sweet, tangy essence of zesty orange—taking your taste buds on a vibrant journey.
Picture this: It’s a sunny summer afternoon with laughter echoing in the air. Friends and family are gathered for a backyard barbecue, and as the aroma of grilled burgers wafts through the air, the pièce de résistance is revealed—a radiant, orange-hued poke cake topped with fluffy whipped cream and orange sprinkles! The first slice is served, and you can see the excitement in everyone’s eyes as they dig in. This is not just any cake; it’s a celebration of flavors, reminiscent of those carefree summer days filled with laughter and sunshine.
This Orange Crush Poke Cake is not just a dessert; it’s a canvas for creativity and fun. Each poke in the cake is filled with sweet, tangy goodness, soaking through with a burst of citrus flavor that’s guaranteed to revive your spirit. It’s the kind of dessert that sparks conversation, reminiscing about childhood memories of sipping on fizzy orange sodas and enjoying sweet treats at family gatherings. It’s simple yet sophisticated, and it’s perfect for any occasion—from summer BBQs to birthday parties!
Are you ready to create some sweet memories? Let’s roll up our sleeves and get baking this scrumptious Orange Crush Poke Cake!
A Sweet Memory
Before we get into the nitty-gritty of baking, I can’t resist sharing a little story that gives this cake its soul. Growing up, my family had a tradition of hosting summer gatherings in our backyard. The highlight? My grandmother’s dessert table filled with her famous cakes. But the star of the show was always the poke cake—the one everyone swooned over!
Every year, she would make it for my birthday. There was something about that vibrant glaze made from orange soda that transported me back to childhood—innocent laughter, warm sunshine, and the scent of blooming flowers. My cousins and I would gather around the table, compete for the biggest slice, and dive right in, the whipped topping and sprinkles making it all the more exciting.
This Orange Crush Poke Cake is my homage to those blissful days filled with family, laughter, and the sweet anticipation of biting into that first squishy slice. I guarantee it will bring back fond memories of your own!
Ingredients
Here’s what you’ll need to whip up this radiant treat:
-
1 box white cake mix: This is the base of our cake. Opt for a high-quality mix for the best results. You can substitute it with a gluten-free cake mix if you’re catering to dietary restrictions.
-
3 egg whites: Egg whites add structure and volume to the cake. You could use two whole eggs instead, but the cake might be a bit denser. If you prefer a lighter texture, stick to the egg whites!
-
½ cup (120 milliliters) vegetable oil: Oil keeps the cake moist and tender. If you want a healthier option, you can swap it for unsweetened applesauce or Greek yogurt.
-
1 cup (240 milliliters) water: This provides the needed moisture for the cake. If you really want to elevate the orange flavor, you can substitute water with fresh orange juice!
-
¾ cup (180 milliliters) cold orange soda: The star ingredient! The fizz adds an exciting component to the cake. You can use any citrus soda if Orange Crush isn’t available.
-
3.5 ounces (100 grams) orange gelatin mix: This adds extra flavor and a lovely sweetness that seeps into the cake. If you want an alternative, try using lemon or lime gelatin for a twist!
-
¾ cup (180 milliliters) boiling water: This helps dissolve the gelatin perfectly.
-
12 ounces (340 grams) whipped topping: This fluffy topping makes the cake feel indulgent. If you’re feeling adventurous, use whipped cream for a more homemade touch.
-
Orange sprinkles: These are for the perfect finishing touch, adding visual appeal and a hint of fun! You can also use crushed candies or nuts for some extra texture.
Step-by-Step Instructions
Now that we have our ingredients, let’s bake this delicious cake together, step by step!
-
Preheat Your Oven: Set your oven to 350°F (175°C). This is an essential first step—you don’t want your cake to sit in a cold oven!
-
Mix the Cake Batter: In a large mixing bowl, combine the white cake mix, egg whites, vegetable oil, and water. Using a hand mixer or stand mixer, beat on medium speed until everything is well blended, about 2-3 minutes. Here’s a little tip: Scrape the sides of the bowl to ensure no dry mix sticks around!
-
Bake the Cake: Pour the batter into a greased 9×13-inch baking pan. Bake for 25-30 minutes, or until a toothpick inserted in the center comes out clean. Don’t forget to check it at the lower end of the time range—you want it moist, not dry!
-
Prep the Gelatin: While your cake is baking, let’s prepare the orange gelatin mix. In a medium bowl, dissolve the gelatin in the boiling water, stirring until it’s completely dissolved. Let it cool slightly while you wait for the cake to come out of the oven.
-
Poke the Cake: Once the cake has cooled—about 15 minutes—use the handle of a wooden spoon (or a skewer) to poke holes all over the top of the cake. You want enough holes for the gelatin to seep in, but don’t poke too hard—you want the structure to remain!
-
Pour the Gelatin: Slowly pour the prepared gelatin evenly over the poked cake. Let it soak in for about 30 minutes. This is where the magic happens; the gelatin will seep into those holes and create a flavorful filling!
-
Top It Off: After the cake has cooled completely and the gelatin is set, spread the whipped topping over the entire cake. It should be fluffy and light! Here’s a hack: Use a spatula dipped in hot water to smooth the topping easily.
-
Sprinkle It: Finally, sprinkle the orange sprinkles all over for that fun finishing touch!
-
Chill and Serve: Pop the cake into the fridge for at least an hour before serving. This helps all the flavors meld together beautifully!
Serving Suggestions
When it’s time to serve your vibrant Orange Crush Poke Cake, slice it into generous pieces while it’s still cold. You can garnish each slice with some additional orange slices, whipped cream dollops, or even a cherry on top for a retro throwback. Serve it alongside some vanilla ice cream for an extra-special treat. You’ll see the smiles light up on everyone’s faces as they dig in!
Recipe Variations
Bored of the classic Orange Crush? No problem! Here are some fun twists to make this cake your own:
-
Lemon-Lime Poke Cake: Swap out the orange soda and gelatin for lemon-lime soda and gelatin for a refreshing citrus twist.
-
Berry Delight: Add a mixed berry topping instead of whipped cream—strawberries, blueberries, or raspberries can give it a summer flair.
-
Coconut Cream: Incorporate some coconut extract into your whipped topping for a tropical twist. You could also sprinkle some toasted coconut on top!
-
Nutty Indulgence: Add chopped walnuts or almonds to the whipped topping for a crunchy texture that plays beautifully with the soft cake.
-
Chocolate Lover: Drizzle a little chocolate syrup over the whipped topping for a decadent touch—chocolate and orange are surprisingly delightful together!
Chef’s Notes
This recipe holds a special place in my heart, and I love how it continues to evolve! When I first started making poke cakes, I would grab whatever soda was close by. Over time, I discovered the joy of enhancing flavors and making each cake even more vibrant. You might find me experimenting with different gelatins or sodas depending on the season—trust me, a cherry soda version for the holidays is AMAZING!
And let’s not forget about my favorite kitchen blunder! I once mistook salt for sugar while trying to whip up a quick frosting for this cake. The moment my family bit into their slices, I saw their faces turn to pure confusion, followed by uncontrollable laughter. We still tease each other about that one!
FAQs and Troubleshooting
To help you on your baking adventure, here are some common questions and answers:
1. Why did my cake sink in the middle?
This could happen if the oven temperature is too low or if the batter was over-mixed. Ensure your oven is correctly preheated and mix just until combined.
2. How do I know when my cake is done baking?
Stick a toothpick into the center of the cake. If it comes out clean or with a few moist crumbs, it’s done! If not, give it a few more minutes in the oven.
3. Can I make this cake ahead of time?
Absolutely! You can bake the cake a day in advance, poke the holes, and store it covered in the refrigerator. Just add the whipped topping when you’re ready to serve!
4. My gelatin didn’t dissolve properly. What should I do?
If your gelatin didn’t dissolve completely, make sure you’re using boiling water and stirring it vigorously until fully dissolved. If it solidifies again, you may need to reheat gently on the stove—just don’t let it boil!
Nutritional Info (Optional)
While this Orange Crush Poke Cake is a fun treat, it’s always good to be aware of what’s in it! Each slice contains approximately:
- Calories: 250
- Total Fat: 10g
- Saturated Fat: 2g
- Carbohydrates: 37g
- Sugar: 20g
- Protein: 2g
The nutritional information will vary based on portion size and specific ingredient brands, so it’s always good to check!
And there you have it! Your guide to creating a delightful Orange Crush Poke Cake filled with memories, flavors, and smiles. I can’t wait to hear about your baking adventures and the memories you create along the way. So, grab your apron, turn on some music, and let’s get baking! Happy cooking!
PrintOrange Crush Poke Cake

A delightful poke cake combining the lightness of white cake with the zesty essence of orange, perfect for summer gatherings.
- Prep Time: 15 minutes
- Cook Time: 30 minutes
- Total Time: 45 minutes
- Yield: 12 servings 1x
- Category: Dessert
- Method: Baking
- Cuisine: American
- Diet: Vegetarian
Ingredients
- 1 box white cake mix
- 3 egg whites
- ½ cup (120 milliliters) vegetable oil
- 1 cup (240 milliliters) water
- ¾ cup (180 milliliters) cold orange soda
- 3.5 ounces (100 grams) orange gelatin mix
- ¾ cup (180 milliliters) boiling water
- 12 ounces (340 grams) whipped topping
- Orange sprinkles
Instructions
- Preheat your oven to 350°F (175°C).
- Mix the white cake mix, egg whites, vegetable oil, and water in a large bowl until well blended, about 2-3 minutes.
- Bake the cake in a greased 9×13-inch pan for 25-30 minutes, or until a toothpick comes out clean.
- Prep the orange gelatin by dissolving it in boiling water, stirring until fully dissolved.
- Poke holes all over the top of the cooled cake using the handle of a wooden spoon.
- Pour the gelatin evenly over the poked cake and let it soak for about 30 minutes.
- Top the cake with whipped topping once the gelatin has set.
- Sprinkle orange sprinkles on top for the finishing touch.
- Chill the cake in the fridge for at least 1 hour before serving.
Notes
Feel free to experiment with different soda and gelatin flavors or add toppings like mixed berries or coconut for variation.
Nutrition
- Serving Size: 1 slice
- Calories: 250
- Sugar: 20g
- Sodium: 200mg
- Fat: 10g
- Saturated Fat: 2g
- Unsaturated Fat: 8g
- Trans Fat: 0g
- Carbohydrates: 37g
- Fiber: 0g
- Protein: 2g
- Cholesterol: 0mg
Keywords: Orange Poke Cake, Citrus Cake, Summer Dessert, Orange Crush Cake
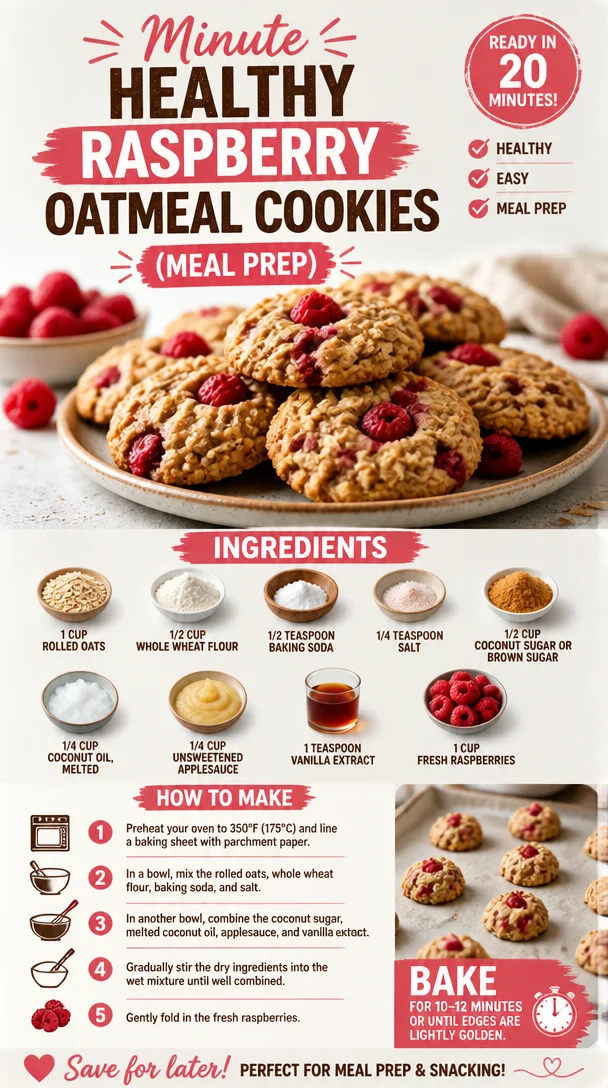
Minute Healthy Raspberry Oatmeal Cookies (Meal Prep)
Healthy Raspberry Oatmeal Cookies: A Feel-Good Delight
Hey there, foodie friends! Today I’m super excited to share a recipe that’s truly close to my heart—Healthy Raspberry Oatmeal Cookies. If you’re anything like me, you cherish those moments when you can indulge without the guilt. And trust me, these cookies bring all the deliciousness while keeping it wholesome. Let’s dive into the world of vibrant flavors, good-for-you ingredients, and a sprinkle of nostalgia!
Introduction
As someone who believes that healthy eating can be a true delight, I’m always on the lookout for recipes that are both nourishing and scrumptious. Cookies might typically be seen as a guilty pleasure, but today, we’re flipping the script! These Healthy Raspberry Oatmeal Cookies are not only packed with wholesome ingredients, but they also deliver that sweet satisfaction we all crave.
Picture this: You walk into your kitchen, and the tangy aroma of fresh raspberries fills the air. The sun is shining, birds are chirping outside, and you’ve got your favorite tunes playing. You pull these cookies out of the oven, and they are warm, chewy, and just a little crispy on the edges. Yes, my friends, this is what life is all about!
I created this recipe with the idea that healthful eating should be accessible and enjoyable. With just a handful of simple ingredients, you can whip up a batch that’s perfect for breakfast, an afternoon snack, or even a guilt-free dessert. They’re bursting with juicy raspberries, bringing you not just flavor but also a boost of antioxidants. And the best part? You can feel good about every single bite!
So, grab your apron, and let’s get baking! You’ll want to make a double batch because these cookies won’t last long.
Personal Story
This recipe reminds me of carefree afternoons spent in my grandmother’s kitchen. She was the queen of baking, whipping up a storm with whatever she had on hand. I can still hear her laughter as we baked together, flour dusting our hair and the joyful chaos of mixing bowls and spoons filling the air. One day, I remember her pulling out a colorful basket of freshly picked raspberries from her garden. “We’re making cookies!” she exclaimed, her eyes twinkling with excitement.
We mashed those sweet little berries into a simple dough, and within an hour, the house was filled with the most heavenly aroma. It was the first time I learned that you could create magic with just a few staple ingredients and a lot of love. Ever since then, I’ve treasured the idea of incorporating fresh fruits into baked goods—something that’s easy, delicious, and beautifully nostalgic. This recipe is a tribute to those memories, sharing the love and joy of baking with raspberries in every bite!
Ingredients
Let’s gather our ingredients and get cooking! Here’s what you’ll need:
-
1 cup rolled oats: The heart of our cookies! Rolled oats provide a chewy texture and significant health benefits. They’re packed with fiber, keeping you full and satisfied. If you need a gluten-free option, you can easily find gluten-free rolled oats.
-
1/2 cup whole wheat flour: This adds a nutty flavor and extra nutrients compared to all-purpose flour. You can swap for almond flour or oat flour for a gluten-free twist!
-
1/2 teaspoon baking soda: This will help our cookies rise and give them the perfect texture. Remember, fresh baking soda is key—check that expiration date!
-
1/4 teaspoon salt: A pinch of salt enhances the flavors in our sweet cookies. If you prefer a sweet-savory combo, a sprinkle of sea salt on top after baking is divine.
-
1/2 cup coconut sugar or brown sugar: Either option adds a lovely caramel flavor. Coconut sugar is lower on the glycemic index, making it a great alternative.
-
1/4 cup coconut oil, melted: This brings richness and moisture to our cookies. If you prefer, you could also use unsalted butter or even nut butter for a different taste.
-
1/4 cup unsweetened applesauce: This is our secret ingredient! It keeps the cookies soft and moist while adding natural sweetness. You can make your own if you’re feeling adventurous!
-
1 teaspoon vanilla extract: Always a must for bakery vibes! Use pure vanilla extract for the best flavor.
-
1 cup fresh raspberries: The stars of the show! They burst with juicy flavor and provide antioxidants. Frozen raspberries work in a pinch, just remember to thaw and drain them first.
Step-by-Step Instructions
Now that we have our ingredients lined up, let’s jump into the making of these delightful cookies—follow these steps, and you’ll be a cookie champion in no time!
-
Preheat your oven: Set your oven to 350°F (175°C) and line a baking sheet with parchment paper. This will ensure our cookies don’t stick and have a lovely golden color.
-
Mix the dry ingredients: In a large mixing bowl, combine the rolled oats, whole wheat flour, baking soda, and salt. Give them a good stir with a whisk—it’s like a warm-up for our cookie dough!
-
Combine the wet ingredients: In another bowl, whisk together the melted coconut oil, coconut sugar (or brown sugar), applesauce, and vanilla extract until smooth. It should be a lovely, creamy texture!
-
Combine the mixtures: Gradually add the wet ingredients to the dry mixture, stirring until well combined. This is where the magic starts to happen—watch as it transforms into a cohesive dough.
-
Fold in the raspberries: Gently fold in the fresh raspberries, careful not to break them too much. You want those juicy pockets of goodness throughout each cookie!
-
Scoop the dough: Using a cookie scoop or two tablespoons, drop rounds of cookie dough onto the prepared baking sheet, spacing them about 2 inches apart. Remember, they’ll spread a little bit, so give them room to breathe!
-
Bake and cool: Pop them in the oven for about 12-15 minutes, until the edges are golden and the centers look set. Let them cool on the baking sheet for a few minutes before transferring them to a wire rack to cool completely.
-
Enjoy!: Now comes the best part—sink your teeth into these warm, chewy delights. You might want to hide some away for later, but no judgment if you can’t resist!
Serving Suggestions
These cookies are delightful on their own but can also be plated in fun ways! Serve them warm with a dollop of Greek yogurt or a drizzle of honey for extra deliciousness. They’re perfect for breakfast alongside your morning coffee or as a satisfying midday snack. Feel free to stack them on a beautiful plate to impress your friends or family—they’ll think you’re a professional baker!
Recipe Variations
Want to switch things up? Here are some fun variations you can try out!
-
Chocolate Chip Raspberry: Mix in a handful of dark chocolate chips for a delightful chocolate-raspberry combo. Who doesn’t love chocolate, right?
-
Nutty Delight: Add 1/2 cup of chopped nuts like walnuts or almonds for added crunch and nutrition.
-
Coconut Bliss: Fold in some unsweetened shredded coconut for an extra tropical flavor.
-
Spiced Up: Add a pinch of cinnamon or nutmeg to the dry ingredients for a warm, cozy flavor.
-
Zesty Lemon: Add a teaspoon of lemon zest to brighten up the flavors and create a refreshing twist!
Chef’s Notes
As a chef, I love experimenting in the kitchen, and this recipe has come a long way since my early days of baking. I remember my first batch being a bit crumbly—too much flour and not enough moisture! Through trial and error, I’ve perfected this mix to achieve the ideal chewy and tender cookie. You can play around with the sweetness, too. If you prefer a less sugary option, reduce the sugar and add a touch more applesauce.
Oh, and here’s a funny tidbit—I once swapped the coconut sugar for regular white sugar without realizing it, and they turned out so much sweeter! My taste testers loved it, but I learned to stick to my trusty coconut sugar for that perfect balance.
FAQs and Troubleshooting
1. Can I use frozen raspberries?
Absolutely! Just make sure to thaw and drain them thoroughly to avoid excessive moisture in your cookies.
2. How do I store these cookies?
Store them in an airtight container at room temperature for about a week. They also freeze well—just layer them with parchment paper and pop them in a freezer bag for up to three months!
3. Can I make these vegan?
Yes! Substitute the coconut oil with a plant-based butter alternative and ensure your sugar is vegan-friendly.
4. Why are my cookies falling apart?
This might happen if you’ve added too much flour or not enough moisture. Next time, try measuring your flour properly or adding a tad more applesauce until you get the right consistency.
Nutritional Info (Optional)
(This section may be omitted if not applicable)
Each cookie has roughly:
- Calories: 120
- Protein: 2g
- Fats: 5g
- Carbohydrates: 18g
- Fiber: 2g
- Sugar: 6g
There you have it, my foodie friends! A delightful recipe for Healthy Raspberry Oatmeal Cookies that’s sure to bring a little joy to your day. These cookies are not just delicious; they encapsulate the spirit of home baking and the joy of nourishing our bodies. So, roll up those sleeves, gather your ingredients, and bake away! Happy baking!
PrintHealthy Raspberry Oatmeal Cookies
Wholesome and delicious cookies packed with juicy raspberries and rolled oats. Perfect for breakfast or a guilt-free snack.
- Prep Time: 15
- Cook Time: 15
- Total Time: 30
- Yield: 12 cookies 1x
- Category: Dessert
- Method: Baking
- Cuisine: American
- Diet: Vegetarian
Ingredients
- 1 cup rolled oats
- 1/2 cup whole wheat flour
- 1/2 teaspoon baking soda
- 1/4 teaspoon salt
- 1/2 cup coconut sugar or brown sugar
- 1/4 cup coconut oil, melted
- 1/4 cup unsweetened applesauce
- 1 teaspoon vanilla extract
- 1 cup fresh raspberries
Instructions
- Preheat your oven: Set your oven to 350°F (175°C) and line a baking sheet with parchment paper.
- Mix the dry ingredients: In a large mixing bowl, combine the rolled oats, whole wheat flour, baking soda, and salt.
- Combine the wet ingredients: In another bowl, whisk together the melted coconut oil, coconut sugar, applesauce, and vanilla extract until smooth.
- Combine the mixtures: Gradually add the wet ingredients to the dry mixture, stirring until well combined.
- Fold in the raspberries: Gently fold in the fresh raspberries.
- Scoop the dough: Drop rounds of cookie dough onto the prepared baking sheet, spacing them about 2 inches apart.
- Bake and cool: Bake for about 12-15 minutes, until the edges are golden and the centers look set.
- Enjoy: Sink your teeth into these warm, chewy delights.
Notes
Store cookies in an airtight container at room temperature for about a week. They also freeze well for up to three months.
Nutrition
- Serving Size: 1 cookie
- Calories: 120
- Sugar: 6g
- Sodium: 120mg
- Fat: 5g
- Saturated Fat: 4g
- Unsaturated Fat: 1g
- Trans Fat: 0g
- Carbohydrates: 18g
- Fiber: 2g
- Protein: 2g
- Cholesterol: 0mg
Keywords: raspberry, oatmeal, cookies, healthy, dessert