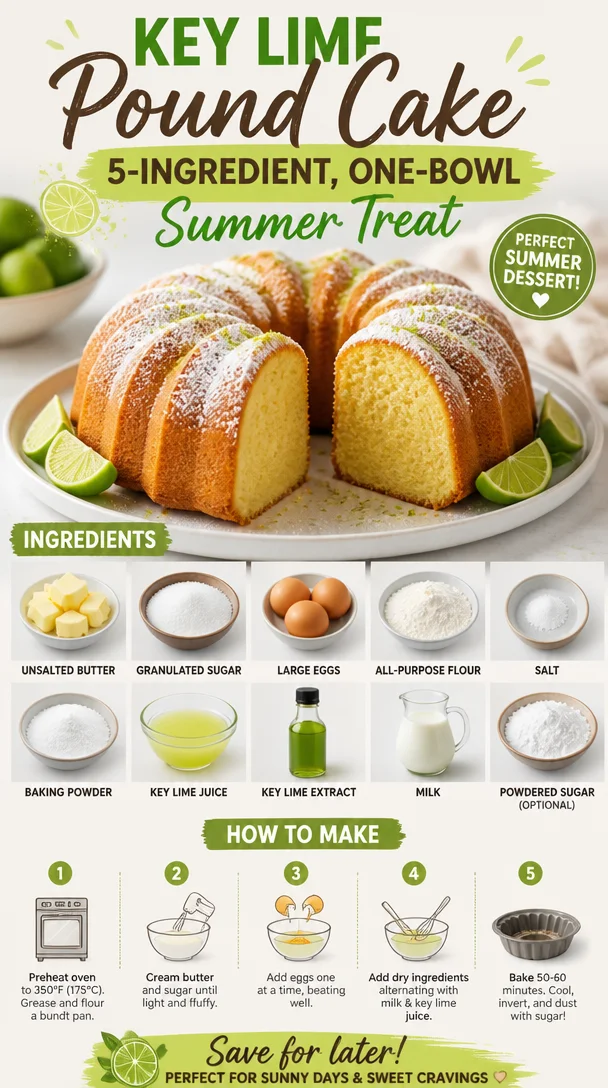
Key Lime Pound Cake: 5-Ingredient, One-Bowl Summer Treat
Key Lime Pound Cake: A Slice of Sunshine
Hello, fellow food lovers! Today, we’re diving into a vibrant and tangy treat that will awaken your taste buds and bring a ray of sunshine into your kitchen: Key Lime Pound Cake. Oh, how I love this cake! It’s like a little slice of the tropics, transporting you straight to a serene beach setting with every bite. Not only is this cake incredibly delightful and bursting with flavor, but it also boasts a texture that’s perfectly dense and moist—ideal for any occasion, be it a family gathering, a cozy afternoon tea, or simply a treat for yourself.
As the name suggests, this cake carries the bright, zesty sweetness of key limes—a unique fruit celebrated in Florida and known for its distinct tartness that makes it all the more refreshing. Trust me, once you bake this cake, your house will be filled with an aroma that could warm the coldest of hearts! So, let’s roll up our sleeves and get to baking this cheerful confection that’s sure to impress.
A Taste of Nostalgia
Let me take you back to my childhood when my grandma would whip up her famous Key Lime Pie on special occasions. Those family gatherings were filled with laughter, love, and, of course, the intoxicating scent of citrus wafting through the air. I remember rushing to the kitchen, excited to help mix the ingredients—my little hands covered in flour and my face smudged with whatever I could ‘taste test.’
One summer, she decided to switch things up and introduced us to her Key Lime Pound Cake. I was hesitant at first because, for me, pie was queen. But the moment I took my first bite, I was hooked! The cake was airy yet rich, sweet yet tangy. It was bursting with flavor and the perfect way to end a warm summer evening. Even now, every time I bake this cake, I can hear her cheerful laugh and see her twinkling eyes, and it brings such warmth and joy to my heart. So, let’s create a piece of that memory together with this delicious Key Lime Pound Cake recipe!
Ingredients
Before we get into the cooking, let’s gather our ingredients to ensure we create the best Key Lime Pound Cake ever:
-
1 cup unsalted butter, softened
The base of our cake! It gives the cake that wonderful richness. If you’re looking for a lighter option, you can substitute it with equal parts of Greek yogurt or applesauce for a healthier twist. -
2 cups granulated sugar
This sweetener is essential for balancing the tartness of the key lime. If you’re in the mood for natural sugars, coconut sugar or honey can make decent alternatives, but they might alter the texture slightly. -
4 large eggs
Eggs add moisture and richness. If you prefer an egg-free version, try using flax eggs (1 tablespoon of ground flaxseed mixed with 3 tablespoons of water), which work surprisingly well in baked goods. -
3 cups all-purpose flour
This will give structure to the cake. You can easily substitute with a gluten-free flour blend if you’re gluten-sensitive. -
1/2 teaspoon salt
Just a pinch! Salt enhances all the flavors and balances out the sweetness. -
1 teaspoon baking powder
This is our leavening agent, which helps the cake rise. Don’t confuse it with baking soda, as they serve different purposes. -
1/2 cup key lime juice
Fresh key lime juice is the star of our show! If you can’t find key limes, regular lime juice will do—just remember, it’s a bit less tart! -
2 teaspoons key lime extract
This boosts the key lime flavor! You could leave it out if you’re using fresh key limes, but it adds an extra punch. -
1/2 cup milk
Whole milk works best, but almond milk or oat milk are great dairy-free alternatives that won’t change the cake’s texture much. -
Powdered sugar for dusting (optional)
A lovely finishing touch! It adds a delicate sweetness and visual appeal—perfect for a sprinkle on top right before serving.
Step-by-Step Instructions
Alright, let’s get this cake baking! Follow along with these steps:
-
Preheat Your Oven
Start by preheating your oven to 350°F (175°C). This is an essential leap because we want our cake to bake evenly. While it’s warming up, you can prep the pan! -
Prep the Pan
Grab a 9×5-inch loaf pan and grease it well with butter or cooking spray. You can also line it with parchment paper for extra protection against sticking. I always find that a parchment lining helps make the cake come out without a hitch. -
Cream the Butter and Sugar
In a large mixing bowl, beat the softened butter and granulated sugar together until the mixture is pale and fluffy—this should take about 3-5 minutes. It’s all about incorporating air for a light texture. Pro tip: Use room temperature butter for the best results! -
Add the Eggs
One at a time, add the eggs to the butter and sugar mixture, beating well after each addition. This allows the eggs to incorporate fully and prevents a curdled batter. Don’t forget to scrape down the sides of the bowl! -
Mix Dry Ingredients
In a separate bowl, whisk together the flour, salt, and baking powder. This ensures that the leavening agent is evenly distributed throughout the flour, which is crucial for a good rise. -
Incorporate the Dry Mixture
Gradually add the dry ingredients to the wet mixture, alternating with the milk, and mix on low speed. Be careful not to overmix; you want a smooth batter without lumps but not a gluten-glutened mess. -
Bring in the Zest and Juice
Now it’s time for the star players—add the key lime juice and key lime extract! This is where your batter transforms into a delightful citrus party. Fold it in gently with a spatula to keep that airy texture. -
Pour the Batter
Transfer the batter into your prepared loaf pan, smoothing the top with a spatula. Give it a little wiggle to settle the batter in all corners. -
Bake the Cake
Pop that cake into your preheated oven and bake for around 60-70 minutes, or until a toothpick inserted into the center comes out clean. The aroma at this point will have you dancing in the kitchen, I promise! -
Cool Down
Once baked, let the cake cool in the pan for about 10 minutes before transferring it to a wire rack to cool completely. This cooling step is vital; letting it rest too long in the pan could trap moisture and make it soggy.
Serving Suggestions
When your Key Lime Pound Cake is cooled and ready to go, it’s time to serve! I love to slice it thick and dust the top with some powdered sugar for that charming touch. Pair each slice with a dollop of whipped cream or a scoop of vanilla ice cream for a decadent treat. You could also garnish it with thin slices of fresh key lime or zest for that mouthwatering presentation. Serve it at a summer picnic or with a cup of coffee—trust me, it’s the perfect match!
Recipe Variations
Feeling adventurous? Here are a few fun twists you could try with your Key Lime Pound Cake:
-
Coconut Infusion: Toss in some shredded coconut to the batter for a tropical flair that pairs beautifully with the lime.
-
Berry Bliss: Fold in some fresh raspberries or blueberries for a delightful burst of flavor and color.
-
Cream Cheese Swirl: Before baking, swirl some cream cheese mixture (just beat together cream cheese, sugar, and a bit of lime juice) into the batter for a rich, tangy surprise in each slice.
-
Lime Glaze: Create a simple glaze with powdered sugar and key lime juice to drizzle over the cake once it’s cooled for extra sweetness and a citrusy kick.
-
Gluten-Free Version: Swap all-purpose flour with a gluten-free blend for a delicious dessert anyone can enjoy!
Chef’s Notes
Every time I bake this cake, I think of my grandma’s warm hugs and her delightful laughter. This recipe has evolved a lot over the years, from those summer baking days in her cozy kitchen to me whipping it up in my modern space. Each ingredient carries a bit of nostalgia and joy, and I love the memories that come alive while baking. Feel free to experiment—I’ve honestly had friends ask for a cake this simple off my blog just because they wanted to recreate the cheerful vibes of family gatherings. Food is love, right?
FAQs and Troubleshooting
Q: My cake is sinking in the middle! What happened?
A: A sinking cake can be due to several reasons: overmixing the batter, too much leavening agent, or underbaking. Make sure to follow the step-by-step mixing and check for doneness with a toothpick!
Q: How can I store leftovers?
A: To maintain freshness, wrap the cooled cake tightly in plastic wrap or foil and store it at room temperature for up to 3 days or in the refrigerator for up to a week.
Q: Can I freeze this cake?
A: Absolutely! Wrap each slice individually and place them in an airtight container. You can freeze them for up to three months. Just let them thaw in the fridge, and they’ll taste as good as fresh!
Q: Why is my cake dry?
A: Dry cake can result from overbaking or using old ingredients (like flour). Always double-check your oven temperature and the date on your baking powder!
Nutritional Info (Optional)
While indulging in desserts is a special treat, knowing the nutritional aspect is always helpful. A slice of this delicious Key Lime Pound Cake has approximately:
- Calories: 320
- Fat: 15g
- Carbohydrates: 45g
- Sugar: 25g
- Protein: 4g
Now grab those ingredients, tie that apron tight, and let’s bake up some sunshine in cake form! Your kitchen (and heart) will thank you. Happy baking! 🍰✨
PrintKey Lime Pound Cake

A vibrant and tangy Key Lime Pound Cake that transports you to the tropics with every bite. Moist, dense, and bursting with flavor, it’s perfect for any occasion.
- Prep Time: 15 minutes
- Cook Time: 70 minutes
- Total Time: 85 minutes
- Yield: 8 servings 1x
- Category: Dessert
- Method: Baking
- Cuisine: American
- Diet: Vegetarian
Ingredients
- 1 cup unsalted butter, softened
- 2 cups granulated sugar
- 4 large eggs
- 3 cups all-purpose flour
- 1/2 teaspoon salt
- 1 teaspoon baking powder
- 1/2 cup key lime juice
- 2 teaspoons key lime extract
- 1/2 cup milk
- Powdered sugar for dusting (optional)
Instructions
- Preheat your oven to 350°F (175°C).
- Grab a 9×5-inch loaf pan and grease it with butter or cooking spray.
- Cream the softened butter and granulated sugar together until pale and fluffy.
- Add the eggs one at a time, beating well after each addition.
- Whisk together the flour, salt, and baking powder in a separate bowl.
- Gradually add the dry ingredients to the wet mixture, alternating with the milk.
- Add the key lime juice and extract, folding gently to combine.
- Transfer the batter into the prepared loaf pan and smooth the top.
- Bake for 60-70 minutes, or until a toothpick inserted comes out clean.
- Cool in the pan for about 10 minutes before transferring to a wire rack.
Notes
Serve with whipped cream or vanilla ice cream and garnish with key lime slices for an even more delightful presentation.
Nutrition
- Serving Size: 1 slice
- Calories: 320
- Sugar: 25g
- Sodium: 200mg
- Fat: 15g
- Saturated Fat: 9g
- Unsaturated Fat: 5g
- Trans Fat: 0g
- Carbohydrates: 45g
- Fiber: 1g
- Protein: 4g
- Cholesterol: 100mg
Keywords: cake, dessert, key lime, pound cake, tropical, summer, baked goods
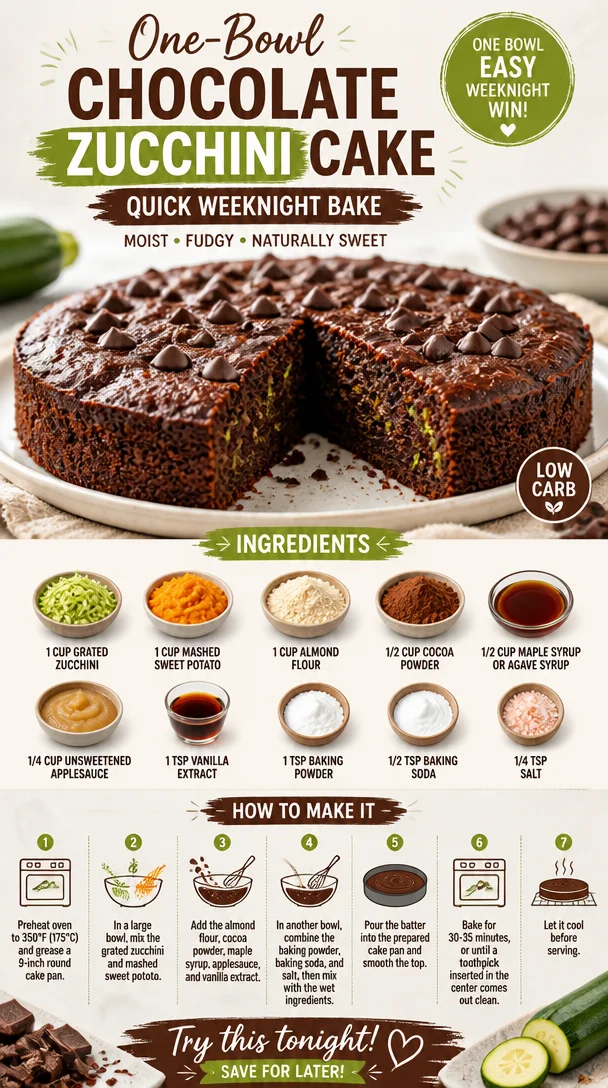
One-Bowl Chocolate Zucchini Cake: Quick Weeknight Bake
A Decadent Delight: Chocolate Zucchini Cake Recipe
Welcome back, fellow foodies! Today, we’re diving into an absolute gem of a recipe that’s not only a feast for your taste buds but also a sneaky way to sneak in some nutrition – we’re talking about Chocolate Zucchini Cake! Yes, you heard that right. This luscious cake combines rich chocolatey goodness with the moisture of zucchini, making it incredibly moist and fluffy. Whether you’re trying to use up some surplus zucchini from your garden (or your next-door neighbor’s garden), or you just have a craving for something sweet and delicious, this cake is here to satisfy.
So, let’s roll up our sleeves and get baking! But first, let me share a little backstory that makes this recipe even more special.
A Slice of Nostalgia
This Chocolate Zucchini Cake recipe brings back fond memories from my childhood when my grandmother would whip it up on lazy summer afternoons. I can still see her in the kitchen, apron tied snugly around her waist, a mischievous twinkle in her eye as she beckoned me closer to the counter. The smell of chocolate wafted through the air, an intoxicating blend of sweetness and warmth that made my heart flutter.
“Trust me, my dear,” she would say, sliding a slice of still-warm cake in front of me. “You’ll never know there’s zucchini in it!” I often wondered how she pulled off this chocolate magic trick. As a kid, I was skeptical, but one bite into that cake and I was convinced! The rich flavor and moist texture were utterly irresistible.
Those afternoons were filled with laughter, flour-covered countertops, and the pure joy of creating something together. Now, as I share this recipe with you, I feel connected to those memories every time I bake it. It’s a reminder that cooking is about love, creativity, and, of course, a touch of sweetness.
Ingredients
Let’s check out the ingredients you’ll need for this decadent Chocolate Zucchini Cake!
-
1 cup grated zucchini: Zucchini adds moisture and a subtle sweetness. You can use yellow squash as a fun substitute if you’re looking for a little variety! Just be sure to squeeze out any excess moisture beforehand to avoid a soggy batter.
-
1 cup mashed sweet potato: This natural sweetener adds creaminess and depth of flavor. Canned sweet potato works perfectly here but feel free to roast and mash your own if you’re looking for that homemade touch!
-
1 cup almond flour: Almond flour gives this cake a lovely nutty flavor and keeps it gluten-free. If you need a substitution, oat flour or a gluten-free all-purpose blend can do the trick.
-
1/2 cup cocoa powder: You can’t have a chocolate cake without cocoa powder! For a deeper flavor, opt for Dutch-processed cocoa. But if you’re going for an intense chocolate hit, feel free to use a mix of cocoa and dark chocolate.
-
1/2 cup maple syrup or agave syrup: This natural sweetener elevates the cake while keeping it moist. Honey can work too, but it’s a bit sweeter, so adjust to taste.
-
1/4 cup unsweetened applesauce: Applesauce adds moisture with a subtle sweet flavor. You can substitute it with more mashed banana or additional sweet potato if you wish.
-
1 tsp vanilla extract: This aromatic ingredient amplifies flavors and gives the cake a warm, inviting essence. Make sure to go for real vanilla extract – your taste buds will thank you!
-
1 tsp baking powder: This leavening agent helps the cake rise beautifully. Always double-check its freshness for the best results!
-
1/2 tsp baking soda: A little extra oomph for rising! If you’re out of baking soda, you can replace it with more baking powder at a 1:3 ratio.
-
1/4 tsp salt: A pinch of salt enhances all the flavors; it’s like a secret weapon in baking! Feel free to use sea salt for a more robust taste.
Step-by-Step Instructions
Now that we have our ingredients lined up like a culinary dream team, let’s get into the magic of making this cake!
-
Preheat Your Oven
Preheat your oven to 350°F (175°C). This is crucial, as it allows your cake to rise and bake evenly. It’s like a warm-up for your batter! -
Prepare Your Baking Pan
Grab an 8-inch square cake pan (or round if you prefer) and grease it lightly with oil or cooking spray. You can also line it with parchment paper for easy removal. Trust me; you don’t want a beautiful cake stuck in the pan! -
Grate the Zucchini
Using a box grater or food processor, grate your zucchini finely. Once you’ve got a cup, place it in a clean kitchen towel and wring out any excess moisture. This step is super important for achieving that perfect cake consistency. -
Mash the Sweet Potato
If using fresh sweet potatoes, roast them until tender, then scoop the flesh into a bowl and mash. If you prefer the canned version, make sure it’s unsweetened and mash it up until smooth. -
Mix the Wet Ingredients
In a large mixing bowl, combine the grated zucchini, mashed sweet potato, maple syrup (or agave), applesauce, and vanilla extract. Use a whisk or spatula to combine until the mixture is smooth and well-combined. I love getting my hands in here too – the texture is so satisfying! -
Combine the Dry Ingredients
In another bowl, sift together the almond flour, cocoa powder, baking powder, baking soda, and salt. Sifting helps remove lumps and guarantees a lighter cake. Just think of it as a mini workout! -
Combine Wet and Dry
Gradually incorporate the dry mixture into the wet ingredients. Gently fold them together using a spatula or wooden spoon, taking care not to overmix. You want a beautifully blended batter, not a tough one! -
Pour and Bake
Pour the batter into your prepared cake pan, smoothing the top with a spatula. Pop it in the preheated oven and bake for about 25-30 minutes, or until a toothpick inserted in the center comes out clean. The smell wafting through your kitchen will be pure bliss! -
Cool Down
Once done, remove the cake from the oven and let it cool in the pan for about 10 minutes. Then, carefully turn it out onto a wire rack to cool completely – if you can resist not diving in right away!
Serving Suggestions
When it comes to serving this chocolatey creation, presentation is key! Dust the top with a sprinkle of powdered sugar for a fancy touch, or drizzle with a little melted dark chocolate. For an extra indulgent treat, serve a slice warm with a dollop of whipped coconut cream or your favorite ice cream. Your friends and family will be in chocolate heaven!
Recipe Variations
Here are a few delicious twists to keep this Chocolate Zucchini Cake vibrant and exciting:
- Add Mix-Ins: Toss in a handful of chocolate chips or chopped walnuts for added texture.
- Nut Butter Swirl: Dollop some almond or peanut butter into the batter before baking for a surprise creamy center.
- Spiced Delight: Add a pinch of cinnamon or espresso powder to the batter to deepen the flavors.
- Frosting Options: Top with a light frosting made from Greek yogurt and cocoa powder for a yogurt-based treat, or keep it simple with a vegan cream cheese frosting.
Chef’s Notes
This recipe has evolved over time, and I can’t help but smile every time I bake it. Initially, I made it just for myself during my health-conscious foodie phase, but soon my friends caught wind of this chocolate delight. It became an instant favorite at gatherings, and I love seeing the surprised expressions when I reveal the star ingredient: zucchini!
There was one time I forgot to strain the zucchini, and let’s just say it was a very "moist" cake! But hey, those moments are what make cooking so adventurous, right? Each time I bake, I remember my grandmother’s laughter and love infusing each bite.
FAQs and Troubleshooting
1. Why is my cake too dense?
If your cake is dense, it might be due to overmixing the batter or not measuring the ingredients accurately. Make sure to fold gently and use the right measurements, especially with the flour!
2. Can I freeze this cake?
Absolutely! This Chocolate Zucchini Cake freezes beautifully. Wrap it tightly in plastic wrap and foil to prevent freezer burn. When you’re ready, thaw it in the fridge overnight.
3. What if I don’t have almond flour?
No worries! You can substitute almond flour with any other nut flour, or a gluten-free all-purpose flour work perfectly if you’re aiming for a gluten-free alternative.
4. Can I use other vegetables?
Definitely! Carrots are a fantastic swap if you want to try a veggie twist. Just prepare them similarly by grating, and you’ll end up with a deliciously moist cake.
Nutritional Info
While I won’t delve too deeply into numbers, I will say this Chocolate Zucchini Cake is a delightful treat that provides a nice serving of fiber thanks to the veggies! It’s a little less sweet and heavy than traditional cakes, making it a great guilt-free indulgence.
So there you have it! A fun and fabulous recipe for Chocolate Zucchini Cake that’s sure to impress and delight. Let me know when you try it and if you make any variations! Happy baking, and remember to keep it fresh and delicious.
PrintChocolate Zucchini Cake
A decadent and moist chocolate zucchini cake that is both delicious and nutritious.
- Prep Time: 15 minutes
- Cook Time: 30 minutes
- Total Time: 45 minutes
- Yield: 8 servings 1x
- Category: Dessert
- Method: Baking
- Cuisine: American
- Diet: Vegetarian
Ingredients
- 1 cup grated zucchini
- 1 cup mashed sweet potato
- 1 cup almond flour
- 1/2 cup cocoa powder
- 1/2 cup maple syrup or agave syrup
- 1/4 cup unsweetened applesauce
- 1 tsp vanilla extract
- 1 tsp baking powder
- 1/2 tsp baking soda
- 1/4 tsp salt
Instructions
- Preheat your oven to 350°F (175°C).
- Prepare an 8-inch square or round cake pan by greasing it lightly with oil or cooking spray.
- Grate the zucchini finely and squeeze out excess moisture using a clean kitchen towel.
- Mash the sweet potato until smooth.
- Mix the wet ingredients: zucchini, sweet potato, maple syrup (or agave), applesauce, and vanilla extract in a large bowl.
- Combine the dry ingredients: almond flour, cocoa powder, baking powder, baking soda, and salt in another bowl.
- Combine the wet and dry mixtures gently without overmixing.
- Pour the batter into the prepared pan and smooth the top.
- Bake for about 25-30 minutes, or until a toothpick comes out clean.
- Cool in the pan for 10 minutes, then transfer to a wire rack to cool completely.
Notes
Top with powdered sugar or melted dark chocolate for serving. Can add chocolate chips or nuts for extra texture.
Nutrition
- Serving Size: 1 slice
- Calories: 250
- Sugar: 14g
- Sodium: 180mg
- Fat: 9g
- Saturated Fat: 1g
- Unsaturated Fat: 5g
- Trans Fat: 0g
- Carbohydrates: 38g
- Fiber: 4g
- Protein: 4g
- Cholesterol: 0mg
Keywords: Chocolate Zucchini Cake, Healthy Dessert, Moist Cake, Baking, Zucchini Recipes

Quick Strawberry Cream Cheese Danish with Flaky Puff Pastry
Flaky Strawberry Cream Cheese Danish: A Sweet Treat for Any Day
Welcome back to Clean Plate Cravings, where we whip up deliciously fresh meals that spark joy—and today, I’m thrilled to share a staple that’s both indulgent and surprisingly light! We’re diving into the world of pastries with a recipe that has nostalgia written all over it: the Strawberry Cream Cheese Danish. This delightful treat combines the buttery, flaky goodness of puff pastry with a creamy filling and sweet, juicy strawberries. Perfect for breakfast, brunch, or a delightful afternoon snack, this Danish is sure to impress your family and friends. So, roll up those sleeves and let’s get started—we’re about to create some magic in the kitchen!
A Trip Down Memory Lane
As I sit here reminiscing, I can’t help but think of my grandmother’s kitchen, where the sweet smell of pastries wafted through the air every Sunday morning. I remember walking in, the sun shining through the window, and seeing her bustling around, arm deep in flour. She would always have a batch of Danish pastries on the table, each neatly arranged and bursting with flavor. Her secret? A touch of love and a whole lot of butter!
The highlight was always the strawberry version—bright ruby-red jewels peeking out from a golden swirl of dough. She’d invite us to gather around the table, and we’d share stories of our week over warm, flaky pastries and steaming cups of coffee. Those moments are precious to me, and now, I strive to recreate that same warmth and comfort in my own kitchen. This Strawberry Cream Cheese Danish is my way of honoring those memories while keeping things fresh and modern. I promise this recipe will fill your home with the same warmth and love my grandmother’s kitchen did when I was a child!
Ingredients
For this scrumptious Danish, you’ll need the following ingredients:
-
1 sheet thawed puff pastry: The star of the show! Puff pastry gives the Danish its flaky texture. If you don’t have puff pastry, you can use crescent roll dough for a slightly different, but still delicious, result.
-
4 ounces cream cheese, softened: This creates that rich, creamy filling! You could use mascarpone or ricotta as a substitute if you want to experiment with different flavors.
-
2 tablespoons granulated sugar: A little sweetness goes a long way in balancing flavors. If you’re looking to cut down on sugar, coconut sugar or a sugar substitute works great, too.
-
1/2 teaspoon vanilla extract: For a touch of warmth and depth. Feel free to infuse with almond extract for a nutty twist.
-
1 egg: Used to create a simple egg wash that gives the pastry a beautiful golden finish. If you need a vegan option, a tablespoon of non-dairy milk mixed with a bit of cornstarch works wonders!
-
1 tablespoon milk: This adds richness to the egg wash. Use an alternative milk, like almond or oat, for a dairy-free version.
-
8 ounces strawberries, hulled and sliced: The star of our topping! Fresh strawberries brighten up the pastry. No fresh strawberries? Frozen will do—just thaw and drain excess liquid before using.
-
2 tablespoons granulated sugar: This will sweeten the strawberries and complement their natural tartness. You can reduce the amount if your strawberries are super sweet!
-
1 teaspoon lemon juice: Adds bright acidity and enhances the strawberry flavor. Swap it out for lime juice if you’re feeling adventurous!
-
1 tablespoon cornstarch: This thickens the strawberry mixture and prevents it from becoming too watery.
-
1/2 cup powdered sugar: For our delightful glaze that brings everything together!
-
1 tablespoon milk: Adds creaminess to the glaze. Again, feel free to choose your favorite plant-based milk.
-
1/4 teaspoon vanilla extract: A hint of flavor for the glaze. It’s optional but highly encouraged for an extra kick!
Step-by-Step Instructions
Let’s get to the good stuff—time to assemble and bake our Danish!
1. Preheat and Prepare
Start by preheating your oven to 400°F (200°C). While that heats up, let’s get our workspace ready. Line a baking sheet with parchment paper—this will help our pastries bake evenly and prevent sticking.
2. Roll Out the Puff Pastry
Once your puff pastry is thawed, place it on a lightly floured surface. Gently roll it out to smooth any creases and increase its size slightly. I like to roll it into a rectangle, about 12 by 10 inches, but you can adapt based on your style!
3. Make the Cream Cheese Filling
In a bowl, mix the softened cream cheese, granulated sugar, and half a teaspoon of vanilla extract until smooth and creamy. Use a spatula for the best mixing results! This filling is so dreamy, I sometimes catch myself eating it straight from the bowl—so good!
4. Assemble the Danish
Carefully cut your rolled-out puff pastry into squares (about 3-4 inches each). For each square, make a small cut from each corner towards the center, but don’t cut all the way through. Spoon some of the cream cheese filling in the middle of each square. Fold the corners of each pastry square towards the center over the filling—this is where the magic happens! Pinch to seal. These little pockets of delight will puff up beautifully, giving you that characteristic Danish shape.
5. Prepare the Strawberry Topping
In a separate bowl, combine the sliced strawberries, granulated sugar, lemon juice, and cornstarch. Gently fold to mix. This step enhances the flavor of the strawberries while also keeping them juicy! Spoon this mixture over the cream cheese filling in each Danish, letting the strawberries nest comfortably amongst the folds.
6. Make the Egg Wash
Beat the egg with a tablespoon of milk in a small bowl. Lightly brush the egg wash over the pastry edges for a golden, glossy finish. This step might seem small, but trust me—your Danish will look like a million bucks!
7. Bake
Place your assembled Danishes on the prepared baking sheet and pop them in the oven. Bake for about 15-20 minutes or until the pastry is golden brown and puffed. The smell in your kitchen will be heavenly, trust me!
8. Prepare the Glaze
While the pastries are baking, whisk together powdered sugar, milk, and the remaining vanilla extract in a small bowl until smooth. You want a drizzle-able consistency, so adjust the amount of milk as needed.
9. Glaze and Serve
Once your Danish are out of the oven and cooled slightly, drizzle the glaze over the top with a spoon or a piping bag for that professional look. And voila! You’re ready to serve an Instagram-worthy treat that tastes as good as it looks.
Serving Suggestions
These Strawberry Cream Cheese Danishes are delightful on their own, but you could also serve them with whipped cream, a sprinkle of crushed nuts, or a side of yogurt for a breakfast treat. Pair them with a cup of freshly brewed coffee or tea for the perfect pick-me-up!
Recipe Variations
-
Berry Medley: Swap out strawberries for a mix of blueberries, raspberries, and blackberries for a colorful twist!
-
Chocolate Drizzle: Post-baking, add a rich chocolate drizzle over the top of your Danishes for an indulgent option.
-
Peachy Keen: Replace strawberries with sliced peaches and add a pinch of nutmeg for a summertime favorite.
-
Nutty Surprise: Mix in ground almonds or walnuts into your cream cheese filling for added crunch and flavor.
-
Vegan Version: Substitute cream cheese with a dairy-free option, use flax eggs instead of the real egg, and your favorite plant-based milk.
Chef’s Notes
This recipe has evolved over the years; I initially began baking Danishes for my family with store-bought pastry, but as I gained confidence, I started experimenting with homemade dough. Puff pastry is truly my go-to these days for its ease and flakiness. There’s something so satisfying about biting into that crispy texture combined with the creamy filling and fresh fruit. And don’t worry if you’ve got a few imperfect shapes—each one tells a story of love and effort!
FAQs and Troubleshooting
1. My puff pastry didn’t puff! What went wrong?
This could be due to a few reasons—make sure your pastry is kept cold before baking for the best rise. Also, ensure your oven is fully preheated before putting your pastries inside, as a good blast of heat is essential for puffing.
2. How do I prevent soggy bottoms?
Bake your Danishes on a preheated baking sheet for an extra crispy base. Using parchment paper also helps prevent sogginess.
3. Can I make these ahead of time?
Absolutely! You can assemble the Danishes in advance and either freeze them before baking or refrigerate them for a few hours before baking. Just add a few extra minutes to the baking time if they are chilled.
4. What if I don’t have cornstarch?
You can substitute cornstarch with flour, but be aware that the filling may be a bit runnier. Alternatively, tapioca starch or arrowroot powder works well too!
Nutritional Info
While enjoying these treats, it’s good to be aware of the nutritional aspects. Each Danish roughly contains:
- Calories: 230
- Protein: 4g
- Fats: 12g
- Carbohydrates: 28g
- Fiber: 1g
- Sugars: 10g
Again, feel free to adjust ingredients to suit your dietary needs!
There you have it—your Strawberry Cream Cheese Danish is ready to be devoured! I sincerely hope this recipe sparks joy and brings a slice of sweetness to your table, just like my grandmother’s did for me. Happy baking, and remember: cooking is all about enjoying the journey. Let me know how your Danishes turn out—I can’t wait to hear your kitchen stories! 🥐💕
PrintFlaky Strawberry Cream Cheese Danish

Indulgent yet light strawberry cream cheese danish, perfect for breakfast or a snack.
- Prep Time: 20 minutes
- Cook Time: 20 minutes
- Total Time: 40 minutes
- Yield: 4 servings 1x
- Category: Dessert
- Method: Baking
- Cuisine: American
- Diet: Vegetarian
Ingredients
- 1 sheet thawed puff pastry
- 4 ounces cream cheese, softened
- 2 tablespoons granulated sugar
- 1/2 teaspoon vanilla extract
- 1 egg
- 1 tablespoon milk
- 8 ounces strawberries, hulled and sliced
- 2 tablespoons granulated sugar
- 1 teaspoon lemon juice
- 1 tablespoon cornstarch
- 1/2 cup powdered sugar
- 1 tablespoon milk
- 1/4 teaspoon vanilla extract
Instructions
- Preheat your oven to 400°F (200°C) and line a baking sheet with parchment paper.
- Roll out the puff pastry on a floured surface to a rectangle, about 12 by 10 inches.
- Mix the cream cheese, granulated sugar, and vanilla extract until smooth.
- Cut the rolled-out pastry into squares and make small cuts from each corner towards the center.
- Spoon the cream cheese filling into the center of each square and fold the corners towards the center.
- Combine the strawberries, granulated sugar, lemon juice, and cornstarch in a bowl and mix.
- Beat the egg with milk to create an egg wash and brush it over the pastry edges.
- Bake for about 15-20 minutes until golden brown.
- Whisk together powdered sugar, milk, and vanilla for the glaze.
- Drizzle the glaze over the cooled Danishes and serve.
Notes
Feel free to mix up the fruit toppings or add chocolate drizzle for variation.
Nutrition
- Serving Size: 1 Danish
- Calories: 230
- Sugar: 10g
- Sodium: 250mg
- Fat: 12g
- Saturated Fat: 6g
- Unsaturated Fat: 4g
- Trans Fat: 0g
- Carbohydrates: 28g
- Fiber: 1g
- Protein: 4g
- Cholesterol: 70mg
Keywords: Danish, pastry, strawberry, cream cheese, dessert
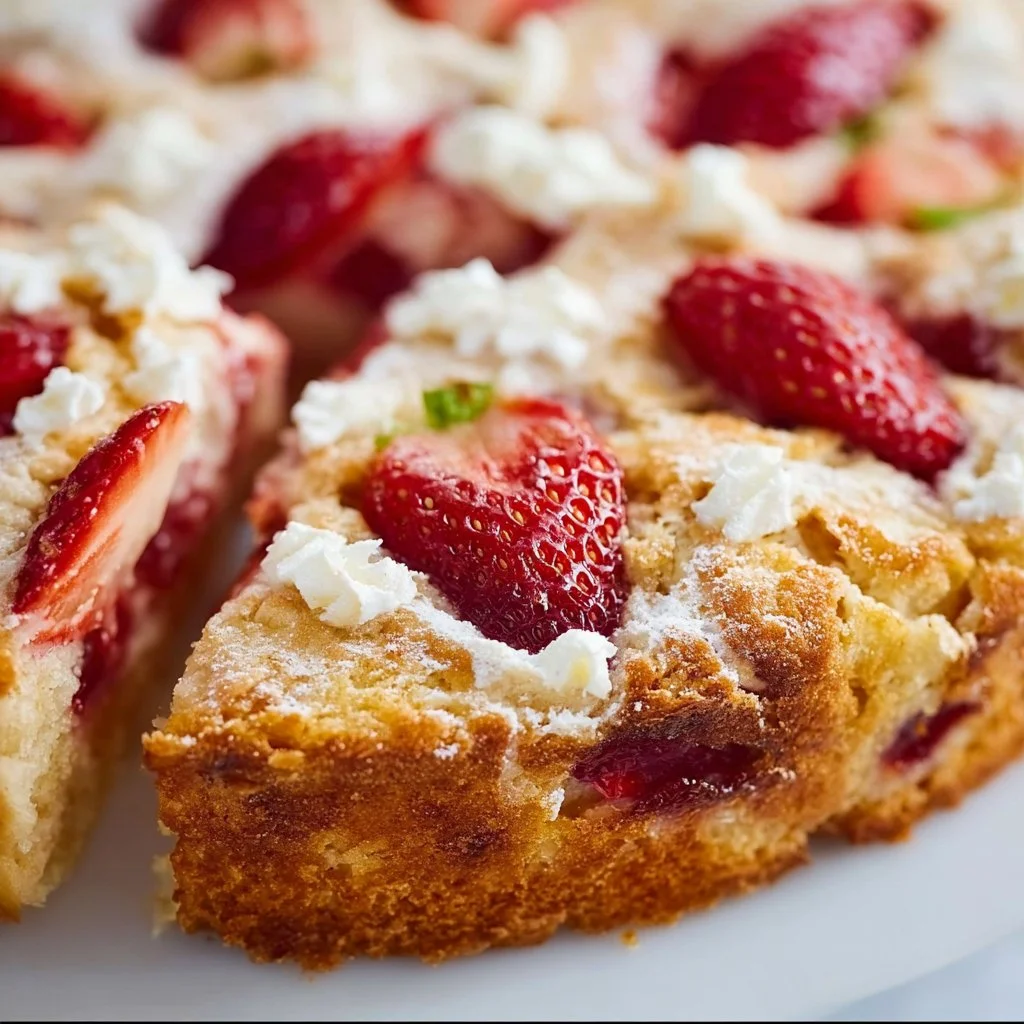
French Strawberry Cake Recipe: Quick, Elegant Summer Treat
The BEST French Strawberry Cake Recipe: A Slice of Nostalgia
Welcome to Clean Plate Cravings! I’m thrilled you’re here because today, I’m sharing a recipe that holds a special place in my heart: the BEST French Strawberry Cake. Imagine a soft, buttery cake, bursting with fresh strawberries and topped with a light, airy frosting that feels like summer on a plate. This recipe isn’t just about making dessert; it’s about the memories of baking with family, the aroma of strawberries filling the kitchen, and the smiles that come with every bite. So, let’s dive in!
When I was a kid, summer meant two things: long days spent outside and my grandmother’s annual strawberry picking trip. Those trips were magical! We would roam the fields, laughter intermingled with the sweet scent of ripe strawberries. Once we got home, my grandmother would whip up her famous strawberry cake, and I would be her little sous-chef, eagerly stirring batter while sprinkling in a little sugar and a lot of love. That cake—the one that could turn any ordinary day into a celebration—sparked my love for cooking and baking. Now, as an adult, I carry those memories with me every time I bake.
This French Strawberry Cake is my take on my grandmother’s classic recipe, modernized and made with a little flair while retaining that nostalgic charm. Trust me; you’ll want to keep this one in your repertoire!
Ingredients
Here’s what you’ll need for this delightful cake. Each ingredient plays a key role, so let’s break it down:
- 1 stick unsalted butter, softened (about 1/2 cup): Butter gives the cake its rich flavor and tender texture. If you need a dairy-free option, you can substitute with a plant-based butter.
- 1 cup granulated sugar: This sweetens the cake and helps create a lovely golden crust. You can use coconut sugar for a less refined option, but it may impart a caramel flavor.
- 2 large eggs: Eggs provide structure and moisture. If you’re vegan, you can substitute with 1/2 a mashed banana or a flaxseed egg (1 tablespoon ground flaxseed mixed with 2.5 tablespoons water, let sit until gel-like).
- 1 1/2 teaspoons vanilla extract: Vanilla brightens up the flavors in the cake. For a twist, use almond extract or a splash of citrus zest.
- 1 1/2 cups all-purpose flour: Essential for that fluffy cake texture. If you need a gluten-free version, swap in a gluten-free all-purpose flour blend.
- 1 1/4 teaspoon baking powder: This leavening agent helps the cake rise. Make sure it’s fresh for the best results!
- 1/4 teaspoon salt: Salt enhances flavors and balances sweetness. Don’t skip it!
- 1/2 cup sour cream: This adds moisture and tang, making the cake super soft. Greek yogurt can be a great substitute for that creamy texture.
- 16 ounces strawberries, sliced (about 2 cups): The star of the show! Fresh strawberries bring natural sweetness and flavor. You can use other berries if strawberries aren’t in season.
- 3 Tablespoons granulated sugar (for strawberries): This macerates the strawberries and brings out their juices, making them deliciously sweet.
- 2 Tablespoons powdered sugar (optional): For dusting on top, giving your cake that beautiful bakery finish.
Step-by-Step Instructions
Now let’s get to the fun part—baking this glorious cake!
- Preheat your oven to 350°F (175°C) and grease a 9-inch round cake pan. Nothing beats the smell of a warm oven, so let’s get that going!
- Cream together the butter and sugar in a large mixing bowl until light and fluffy—this should take about 3-4 minutes. This step is crucial as it helps to incorporate air, which gives your cake that fluffy texture. Don’t rush this step; it’s worth the extra time!
- Add in the eggs one at a time, mixing until fully combined before adding the next. Ensure each egg is fully incorporated, creating a smooth batter. This helps avoid any curdling, giving you a lovely consistent mixture.
- Stir in the vanilla, and then set the bowl aside. The aroma is already divine!
- In another bowl, whisk together the flour, baking powder, and salt. This step is often overlooked but mixing the dry ingredients separately ensures an even distribution of the leavening agent.
- Gradually add the dry ingredients to the butter mixture, alternating with the sour cream. Start and end with the flour mixture (dry-wet-dry). Use a spatula to gently fold it in until just combined. Be careful not to overmix; a few lumps are okay!
- Prepare the strawberries while the batter comes together: toss the sliced strawberries with 3 tablespoons of sugar in a bowl and let them sit for about 10 minutes. This will create a juicy syrup that’s pure magic.
- Gently fold the strawberries into the cake batter, taking care not to break them up too much. This adds a beautiful texture and flavor to every bite!
- Pour the batter into your prepared cake pan and smooth the top. Give it a little tap on the counter to settle it, and pop it in the oven.
- Bake for 30-35 minutes, or until a toothpick inserted in the center comes out clean. Watch your cake closely as oven times can vary. A golden top and a small bounce back should have you reaching for the toothpick!
- Once baked, let the cake cool in the pan for about 10 minutes, then carefully transfer it onto a wire rack to cool completely. I’ll let you in on a little secret: The smell of fresh cake can be hard to resist, so try not to sneak a bite yet!
Serving Suggestions
When it’s time to serve, I love to dust the top with powdered sugar for a pretty finish. Place the cake on a lovely cake stand or a platter and slice it into generous pieces—don’t forget to scoop out some of those delicious strawberries along with each slice! A dollop of whipped cream on the side wouldn’t hurt either.
Recipe Variations
Let’s get creative! Here are a few fun twists to switch things up:
- Berry Medley: Swap out the strawberries for raspberries or blueberries, or mix them for a berry bomb delight!
- Lemon Zest: Add the zest of one lemon to the batter for a fresh citrus flavor that complements the strawberries beautifully.
- Almond Joy: Sprinkle some sliced almonds on top before baking for a crunchy texture and nutty flavor.
- Minty Fresh: A few fresh mint leaves finely chopped into the batter or as a garnish can elevate the flavors to a whole new level.
Chef’s Notes
This recipe has evolved over the years from my early attempts in the kitchen. I remember my first French Strawberry Cake; I was so eager to get it right that I forgot to adjust the oven temperature, and it came out a bit dense. But even that cake was devoured, proving that even mishaps can lead to delicious results!
Going forward, I learned the importance of textures and flavors and how they work together. Today’s version is just the right balance of airy sweetness with a touch of nostalgia.
FAQs and Troubleshooting
- What if my cake sinks in the middle? This sometimes happens due to overmixing or using old leavening agents. Avoid overmixing when combining dry and wet ingredients, and always check the freshness of your baking powder.
- Can I make this cake ahead of time? Absolutely! The cake can be made a day in advance; just keep it covered at room temperature. You can even freeze it if you want to save it for later. Just make sure to wrap it tightly!
- Why are my strawberries not juicy? If your strawberries aren’t as sweet or juicy, it might be a sign that they’re out of season. Always try to use fresh, ripe strawberries for the best flavor.
- Can I use frozen strawberries? Yes, but make sure to thaw and drain them first to avoid extra moisture in your batter. I recommend fresh fruit for the best flavor and texture, though!
Nutritional Info
(For a standard slice assuming 12 slices in total)
- Calories: 250
- Protein: 4g
- Carbohydrates: 36g
- Fat: 10g
- Fiber: 1g
- Sugar: 15g
There you have it—the BEST French Strawberry Cake! The memories of baking this delight, the sweet fragrance filling your home, and sharing it with loved ones will be the icing on the cake. Happy baking, my fellow foodie friends!
PrintThe BEST French Strawberry Cake

A soft, buttery cake bursting with fresh strawberries and topped with a light, airy frosting, perfect for summer celebrations.
- Prep Time: 15 minutes
- Cook Time: 30 minutes
- Total Time: 45 minutes
- Yield: 12 servings 1x
- Category: Dessert
- Method: Baking
- Cuisine: French
- Diet: Vegetarian
Ingredients
- 1 stick unsalted butter, softened (about 1/2 cup)
- 1 cup granulated sugar
- 2 large eggs
- 1 1/2 teaspoons vanilla extract
- 1 1/2 cups all-purpose flour
- 1 1/4 teaspoon baking powder
- 1/4 teaspoon salt
- 1/2 cup sour cream
- 16 ounces strawberries, sliced (about 2 cups)
- 3 tablespoons granulated sugar (for strawberries)
- 2 tablespoons powdered sugar (optional)
Instructions
- Preheat your oven to 350°F (175°C) and grease a 9-inch round cake pan.
- Cream together the butter and sugar in a large mixing bowl until light and fluffy—this should take about 3-4 minutes.
- Add in the eggs one at a time, mixing until fully combined before adding the next.
- Stir in the vanilla, and then set the bowl aside.
- Whisk together the flour, baking powder, and salt in another bowl.
- Gradually add the dry ingredients to the butter mixture, alternating with the sour cream.
- Prepare the strawberries by tossing them with 3 tablespoons of sugar and letting them sit for about 10 minutes.
- Fold the strawberries gently into the cake batter.
- Pour the batter into your prepared cake pan and smooth the top.
- Bake for 30-35 minutes, or until a toothpick inserted in the center comes out clean.
- Let the cake cool in the pan for about 10 minutes before transferring it to a wire rack to cool completely.
Notes
Dust with powdered sugar before serving for a bakery finish. Pair with whipped cream for extra indulgence.
Nutrition
- Serving Size: 1 slice
- Calories: 250
- Sugar: 15g
- Sodium: 200mg
- Fat: 10g
- Saturated Fat: 6g
- Unsaturated Fat: 4g
- Trans Fat: 0g
- Carbohydrates: 36g
- Fiber: 1g
- Protein: 4g
- Cholesterol: 30mg
Keywords: French cake, strawberry dessert, summer cake, nostalgic recipe