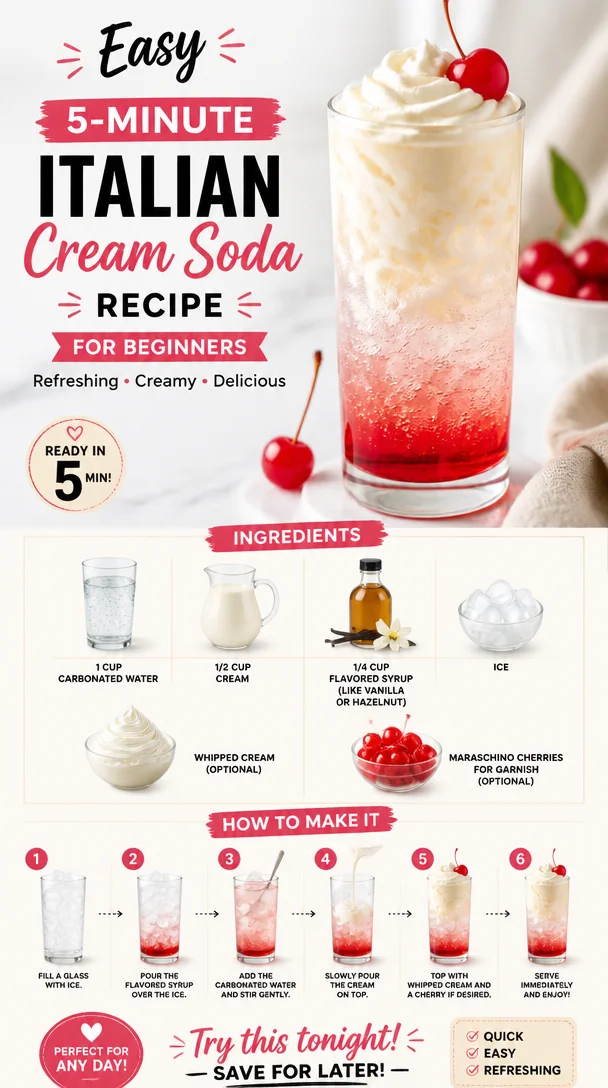
Easy 5-Minute Italian Cream Soda Recipe for Beginners
The Magic of Italian Cream Soda: A Sweet Sip of Nostalgia
Welcome to the delightful world of Italian Cream Soda, where bubbles dance and flavors mingle in the most refreshing way! If you’re like me, you probably have a fondness for those effervescent drinks that combine a creamy richness with a sweet syrupy charm. There’s something utterly delightful about sipping a fizzy treat like this, especially on a warm sunny day or during a cozy movie night.
Allow me to take you on a journey through the process of making this deliciously indulgent drink. It’s simple, yet invigorating and versatile enough to be a favorite among both children and adults alike! So get comfy, because we’re going to stir up some delightful memories and flavors together.
A Sweet Memory from My Childhood
I still remember the first time I had Italian Cream Soda. It was during my childhood at a small Italian café tucked away in a quaint corner of my hometown. The atmosphere inside was warm and inviting, filled with the aroma of fresh pastries and coffee. The moment the waitress set that beautiful glass before me, I was captivated. The layer of creamy foam glistened, and the deep, rich color of the syrup peeked through the fizzy bubbles.
As I took my first sip, the cool sweetness danced on my tongue, instantly transporting me to a sunny afternoon in Italy. That drink was not just a beverage; it was a doorway to memories of laughter, warmth, and the simple pleasures of life. I remember my parents letting me enjoy my own little glass while they savored their coffee — it felt like a rite of passage of sorts.
Now, making Italian Cream Soda at home carries that nostalgia, enabling me to recreate those joyful moments any time I want. Plus, it’s a fantastic way to share that happiness with friends and family. Let’s dive into creating our own delicious version of this delightful drink, shall we?
Ingredients
Here’s what you’ll need to whip up your very own Italian Cream Soda:
-
1 cup carbonated water
The star of the show! It adds a refreshing fizz and lightness to the drink. You can use flavored sparkling water for an extra kick or even a tonic water for a different twist. -
1/2 cup cream
This gives the cream soda its dreamy, velvety texture. You can substitute with half-and-half for a lighter option, or use coconut cream for a dairy-free alternative. -
1/4 cup flavored syrup (like vanilla or hazelnut)
Flavored syrups are what make this drink pop! You can go classic with vanilla, try hazelnut for a nutty depth, or experiment with raspberry or peach for something fruity. A homemade syrup is easy to whip up, too! -
Ice
Essential for keeping your drink nice and chilled. Use regular ice cubes or crushed ice for a more festive look. -
Whipped cream (optional)
For that extra touch of indulgence! Dollop some whipped cream on top, and feel free to use store-bought or make your own. -
Maraschino cherries (optional, for garnish)
Who can resist a cherry on top? It adds a lovely pop of color and sweetness to your drink.
Step-by-Step Instructions
Now that we’ve gathered our ingredients, let’s get to the fun part—making our Italian Cream Soda. Here’s how to do it step-by-step:
-
Fill a Glass with Ice
Start by filling a tall glass with ice cubes. About halfway full should do the trick! This ensures your drink stays cold and refreshing. The sound of ice clinking is already setting a cheerful mood! -
Pour in the Flavored Syrup
Add 1/4 cup of your chosen flavored syrup over the ice. This is where the magic begins! As you pour, watch the vibrant colors swirl together, creating a beautiful layer beneath the ice. Feel free to adjust the syrup amount according to your taste—more for a sweeter soda! -
Add the Carbonated Water
Slowly pour in 1 cup of carbonated water. Here’s a little chef hack: for the fizziest result, pour it gently down the side of the glass to keep that bubbly charm intact! You’ll see that delightful fizzing action as the syrup and soda mingle. -
Stir It Up
Take a spoon and give your drink a gentle stir to combine the syrup and bubbly water. You want to ensure every sip packs that flavored punch! -
Add the Cream
Next, drizzle in 1/2 cup of cream. You can pour this slowly on top, or mix it in—the choice is yours! I love seeing the cream create a beautiful marbled effect before it melds into the fizzy concoction. -
Finish with Whipped Cream and a Cherry
If you’re feeling extra fancy (and who wouldn’t?), top your drink with a generous dollop of whipped cream and a maraschino cherry on top. This last touch turns your Italian Cream Soda into a stunning drink that looks as good as it tastes! -
Serve and Enjoy!
Serve your delightful drink with a straw or spoon, and get ready to savor each fizzy sip! Take a moment to appreciate your creation before diving in — it’s a feast for both the eyes and taste buds.
Serving Suggestions
To make your Italian Cream Soda even more special, consider serving it alongside a light summer dessert like fruit tarts or fresh sorbet. You could also throw a DIY soda bar at your next gathering, allowing guests to customize their drinks with different flavored syrups and toppings. Adding some colorful straws or garnishes like mint leaves can elevate the presentation even further.
Recipe Variations
- Fruit-Infused Cream Soda: Replace the flavored syrup with a homemade fruit syrup using berries or citrus for a fresh twist.
- Iced Coffee Cream Soda: For coffee lovers, mix in a shot of your favorite espresso. The combination of coffee and cream is simply divine!
- Herbic Twist: Add some fresh basil or mint to your preparation for an aromatic burst that complements the sweet creaminess perfectly.
- Dairy-Free Delight: Swap out the cream for coconut milk or almond milk for a lighter, dairy-free version. Use plant-based whipped topping for a finished look.
- Chocolate Lover’s Soda: Use chocolate syrup instead of flavored syrup for a decadent treat that satisfies your sweet tooth.
Chef’s Notes
This recipe holds a special place in my heart, as it fuels the cozy nostalgia of family bonding and summertime fun. Over time, I’ve experimented with different syrups and flavors to keep things interesting. My kids love peach and raspberry variants, and I must admit, those fruity tweaks might now rival the classic vanilla.
Also, I once spilled a whole batch of syrup on my countertop while trying to pour it into a bottle—what a sticky situation that was! But it led to a sweet “kitchen dance party” with my kiddos to clean up the mess and enjoy our creation. Life in the kitchen is always an adventure, isn’t it?
FAQs and Troubleshooting
Q: Can I make this drink ahead of time?
A: I recommend making this drink fresh for the best fizz and creaminess. However, you can prep the syrup and have everything ready to mix!
Q: What is the best syrup to use?
A: It truly depends on your taste! Vanilla is classic, but hazelnut and fruity syrups like raspberry or peach can really elevate the drink.
Q: My cream soda tastes too sweet; what can I do?
A: If your drink is overly sweet, try adding a splash more carbonated water or a dash of lemon juice to balance the sweetness.
Q: Can I use non-carbonated water instead?
A: You can, but it won’t have the same refreshing effect! The fizz is essential to an authentic Italian Cream Soda experience.
Nutritional Info (Optional)
While I won’t dive deep into nutritional specifics, here’s a helpful overview: a standard Italian Cream Soda can range from about 200 to 300 calories depending on the syrup and cream used. It’s a delightful treat meant to be enjoyed, so don’t fret too much over the numbers. Play around with low-calorie syrups or lighter creams if you’re looking to cut back!
There you have it, my friend! Your very own Italian Cream Soda, worthy of all the sunshine-filled days and cozy gatherings ahead. Remember, every sip tells a story, so enjoy the process and share the joy of this bubbly delight with those you cherish! Cheers to delicious memories made in the kitchen!
PrintItalian Cream Soda

A delightful, fizzy drink combining cream and flavored syrup, perfect for warm days or cozy nights.
- Prep Time: 5 minutes
- Cook Time: 0 minutes
- Total Time: 5 minutes
- Yield: 1 serving 1x
- Category: Beverage
- Method: Mixing
- Cuisine: Italian
- Diet: Vegetarian
Ingredients
- 1 cup carbonated water
- 1/2 cup cream
- 1/4 cup flavored syrup (like vanilla or hazelnut)
- Ice
- Whipped cream (optional)
- Maraschino cherries (optional, for garnish)
Instructions
- Fill a tall glass with ice cubes.
- Pour in 1/4 cup of your chosen flavored syrup over the ice.
- Add 1 cup of carbonated water slowly.
- Stir gently to combine the syrup and bubbly water.
- Add 1/2 cup of cream.
- Finish with whipped cream and a maraschino cherry on top.
- Serve with a straw or spoon and enjoy!
Notes
For variations, try using homemade fruit syrups or adding coffee for a unique twist. Enjoy fresh for the best fizz.
Nutrition
- Serving Size: 1 serving
- Calories: 250
- Sugar: 30g
- Sodium: 10mg
- Fat: 12g
- Saturated Fat: 7g
- Unsaturated Fat: 5g
- Trans Fat: 0g
- Carbohydrates: 32g
- Fiber: 0g
- Protein: 2g
- Cholesterol: 40mg
Keywords: Italian Cream Soda, soda, refreshing drink, summer beverage
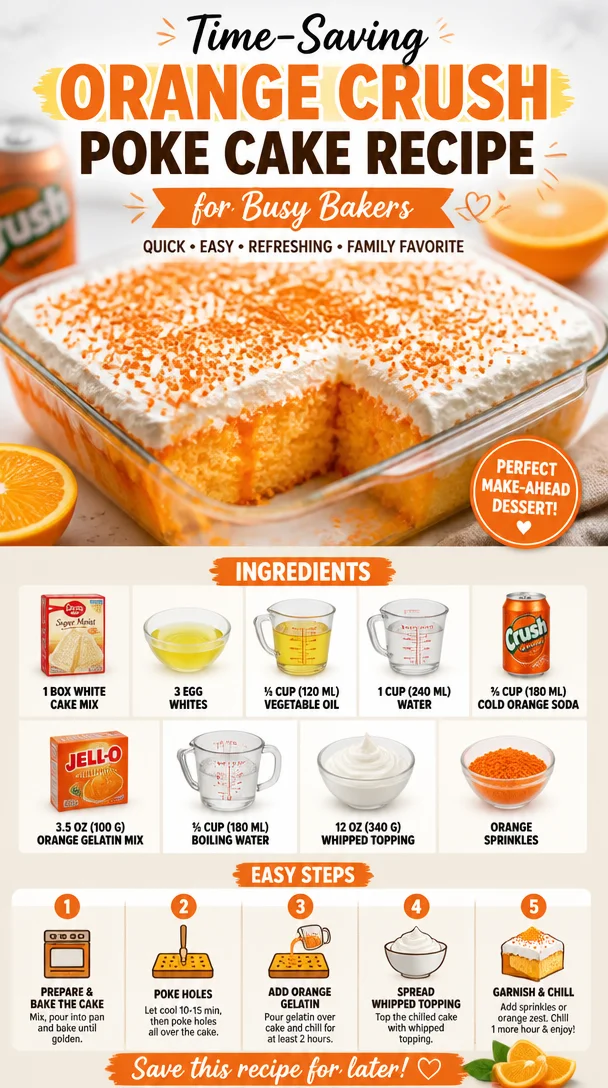
Time-Saving Orange Crush Poke Cake Recipe for Busy Bakers
Orange Crush Poke Cake Recipe: A Sweet and Tangy Delight
Ah, the joy of cake! There’s just something magical about dessert that brings people together, fills the room with warmth, and creates heartwarming memories. If you’re on a quest for a dessert that’s not just delicious but also a little nostalgic, pour yourself a glass of orange soda and get ready to dive into my Orange Crush Poke Cake recipe! This delightful cake combines the lightness of a white cake with the sweet, tangy essence of zesty orange—taking your taste buds on a vibrant journey.
Picture this: It’s a sunny summer afternoon with laughter echoing in the air. Friends and family are gathered for a backyard barbecue, and as the aroma of grilled burgers wafts through the air, the pièce de résistance is revealed—a radiant, orange-hued poke cake topped with fluffy whipped cream and orange sprinkles! The first slice is served, and you can see the excitement in everyone’s eyes as they dig in. This is not just any cake; it’s a celebration of flavors, reminiscent of those carefree summer days filled with laughter and sunshine.
This Orange Crush Poke Cake is not just a dessert; it’s a canvas for creativity and fun. Each poke in the cake is filled with sweet, tangy goodness, soaking through with a burst of citrus flavor that’s guaranteed to revive your spirit. It’s the kind of dessert that sparks conversation, reminiscing about childhood memories of sipping on fizzy orange sodas and enjoying sweet treats at family gatherings. It’s simple yet sophisticated, and it’s perfect for any occasion—from summer BBQs to birthday parties!
Are you ready to create some sweet memories? Let’s roll up our sleeves and get baking this scrumptious Orange Crush Poke Cake!
A Sweet Memory
Before we get into the nitty-gritty of baking, I can’t resist sharing a little story that gives this cake its soul. Growing up, my family had a tradition of hosting summer gatherings in our backyard. The highlight? My grandmother’s dessert table filled with her famous cakes. But the star of the show was always the poke cake—the one everyone swooned over!
Every year, she would make it for my birthday. There was something about that vibrant glaze made from orange soda that transported me back to childhood—innocent laughter, warm sunshine, and the scent of blooming flowers. My cousins and I would gather around the table, compete for the biggest slice, and dive right in, the whipped topping and sprinkles making it all the more exciting.
This Orange Crush Poke Cake is my homage to those blissful days filled with family, laughter, and the sweet anticipation of biting into that first squishy slice. I guarantee it will bring back fond memories of your own!
Ingredients
Here’s what you’ll need to whip up this radiant treat:
-
1 box white cake mix: This is the base of our cake. Opt for a high-quality mix for the best results. You can substitute it with a gluten-free cake mix if you’re catering to dietary restrictions.
-
3 egg whites: Egg whites add structure and volume to the cake. You could use two whole eggs instead, but the cake might be a bit denser. If you prefer a lighter texture, stick to the egg whites!
-
½ cup (120 milliliters) vegetable oil: Oil keeps the cake moist and tender. If you want a healthier option, you can swap it for unsweetened applesauce or Greek yogurt.
-
1 cup (240 milliliters) water: This provides the needed moisture for the cake. If you really want to elevate the orange flavor, you can substitute water with fresh orange juice!
-
¾ cup (180 milliliters) cold orange soda: The star ingredient! The fizz adds an exciting component to the cake. You can use any citrus soda if Orange Crush isn’t available.
-
3.5 ounces (100 grams) orange gelatin mix: This adds extra flavor and a lovely sweetness that seeps into the cake. If you want an alternative, try using lemon or lime gelatin for a twist!
-
¾ cup (180 milliliters) boiling water: This helps dissolve the gelatin perfectly.
-
12 ounces (340 grams) whipped topping: This fluffy topping makes the cake feel indulgent. If you’re feeling adventurous, use whipped cream for a more homemade touch.
-
Orange sprinkles: These are for the perfect finishing touch, adding visual appeal and a hint of fun! You can also use crushed candies or nuts for some extra texture.
Step-by-Step Instructions
Now that we have our ingredients, let’s bake this delicious cake together, step by step!
-
Preheat Your Oven: Set your oven to 350°F (175°C). This is an essential first step—you don’t want your cake to sit in a cold oven!
-
Mix the Cake Batter: In a large mixing bowl, combine the white cake mix, egg whites, vegetable oil, and water. Using a hand mixer or stand mixer, beat on medium speed until everything is well blended, about 2-3 minutes. Here’s a little tip: Scrape the sides of the bowl to ensure no dry mix sticks around!
-
Bake the Cake: Pour the batter into a greased 9×13-inch baking pan. Bake for 25-30 minutes, or until a toothpick inserted in the center comes out clean. Don’t forget to check it at the lower end of the time range—you want it moist, not dry!
-
Prep the Gelatin: While your cake is baking, let’s prepare the orange gelatin mix. In a medium bowl, dissolve the gelatin in the boiling water, stirring until it’s completely dissolved. Let it cool slightly while you wait for the cake to come out of the oven.
-
Poke the Cake: Once the cake has cooled—about 15 minutes—use the handle of a wooden spoon (or a skewer) to poke holes all over the top of the cake. You want enough holes for the gelatin to seep in, but don’t poke too hard—you want the structure to remain!
-
Pour the Gelatin: Slowly pour the prepared gelatin evenly over the poked cake. Let it soak in for about 30 minutes. This is where the magic happens; the gelatin will seep into those holes and create a flavorful filling!
-
Top It Off: After the cake has cooled completely and the gelatin is set, spread the whipped topping over the entire cake. It should be fluffy and light! Here’s a hack: Use a spatula dipped in hot water to smooth the topping easily.
-
Sprinkle It: Finally, sprinkle the orange sprinkles all over for that fun finishing touch!
-
Chill and Serve: Pop the cake into the fridge for at least an hour before serving. This helps all the flavors meld together beautifully!
Serving Suggestions
When it’s time to serve your vibrant Orange Crush Poke Cake, slice it into generous pieces while it’s still cold. You can garnish each slice with some additional orange slices, whipped cream dollops, or even a cherry on top for a retro throwback. Serve it alongside some vanilla ice cream for an extra-special treat. You’ll see the smiles light up on everyone’s faces as they dig in!
Recipe Variations
Bored of the classic Orange Crush? No problem! Here are some fun twists to make this cake your own:
-
Lemon-Lime Poke Cake: Swap out the orange soda and gelatin for lemon-lime soda and gelatin for a refreshing citrus twist.
-
Berry Delight: Add a mixed berry topping instead of whipped cream—strawberries, blueberries, or raspberries can give it a summer flair.
-
Coconut Cream: Incorporate some coconut extract into your whipped topping for a tropical twist. You could also sprinkle some toasted coconut on top!
-
Nutty Indulgence: Add chopped walnuts or almonds to the whipped topping for a crunchy texture that plays beautifully with the soft cake.
-
Chocolate Lover: Drizzle a little chocolate syrup over the whipped topping for a decadent touch—chocolate and orange are surprisingly delightful together!
Chef’s Notes
This recipe holds a special place in my heart, and I love how it continues to evolve! When I first started making poke cakes, I would grab whatever soda was close by. Over time, I discovered the joy of enhancing flavors and making each cake even more vibrant. You might find me experimenting with different gelatins or sodas depending on the season—trust me, a cherry soda version for the holidays is AMAZING!
And let’s not forget about my favorite kitchen blunder! I once mistook salt for sugar while trying to whip up a quick frosting for this cake. The moment my family bit into their slices, I saw their faces turn to pure confusion, followed by uncontrollable laughter. We still tease each other about that one!
FAQs and Troubleshooting
To help you on your baking adventure, here are some common questions and answers:
1. Why did my cake sink in the middle?
This could happen if the oven temperature is too low or if the batter was over-mixed. Ensure your oven is correctly preheated and mix just until combined.
2. How do I know when my cake is done baking?
Stick a toothpick into the center of the cake. If it comes out clean or with a few moist crumbs, it’s done! If not, give it a few more minutes in the oven.
3. Can I make this cake ahead of time?
Absolutely! You can bake the cake a day in advance, poke the holes, and store it covered in the refrigerator. Just add the whipped topping when you’re ready to serve!
4. My gelatin didn’t dissolve properly. What should I do?
If your gelatin didn’t dissolve completely, make sure you’re using boiling water and stirring it vigorously until fully dissolved. If it solidifies again, you may need to reheat gently on the stove—just don’t let it boil!
Nutritional Info (Optional)
While this Orange Crush Poke Cake is a fun treat, it’s always good to be aware of what’s in it! Each slice contains approximately:
- Calories: 250
- Total Fat: 10g
- Saturated Fat: 2g
- Carbohydrates: 37g
- Sugar: 20g
- Protein: 2g
The nutritional information will vary based on portion size and specific ingredient brands, so it’s always good to check!
And there you have it! Your guide to creating a delightful Orange Crush Poke Cake filled with memories, flavors, and smiles. I can’t wait to hear about your baking adventures and the memories you create along the way. So, grab your apron, turn on some music, and let’s get baking! Happy cooking!
PrintOrange Crush Poke Cake

A delightful poke cake combining the lightness of white cake with the zesty essence of orange, perfect for summer gatherings.
- Prep Time: 15 minutes
- Cook Time: 30 minutes
- Total Time: 45 minutes
- Yield: 12 servings 1x
- Category: Dessert
- Method: Baking
- Cuisine: American
- Diet: Vegetarian
Ingredients
- 1 box white cake mix
- 3 egg whites
- ½ cup (120 milliliters) vegetable oil
- 1 cup (240 milliliters) water
- ¾ cup (180 milliliters) cold orange soda
- 3.5 ounces (100 grams) orange gelatin mix
- ¾ cup (180 milliliters) boiling water
- 12 ounces (340 grams) whipped topping
- Orange sprinkles
Instructions
- Preheat your oven to 350°F (175°C).
- Mix the white cake mix, egg whites, vegetable oil, and water in a large bowl until well blended, about 2-3 minutes.
- Bake the cake in a greased 9×13-inch pan for 25-30 minutes, or until a toothpick comes out clean.
- Prep the orange gelatin by dissolving it in boiling water, stirring until fully dissolved.
- Poke holes all over the top of the cooled cake using the handle of a wooden spoon.
- Pour the gelatin evenly over the poked cake and let it soak for about 30 minutes.
- Top the cake with whipped topping once the gelatin has set.
- Sprinkle orange sprinkles on top for the finishing touch.
- Chill the cake in the fridge for at least 1 hour before serving.
Notes
Feel free to experiment with different soda and gelatin flavors or add toppings like mixed berries or coconut for variation.
Nutrition
- Serving Size: 1 slice
- Calories: 250
- Sugar: 20g
- Sodium: 200mg
- Fat: 10g
- Saturated Fat: 2g
- Unsaturated Fat: 8g
- Trans Fat: 0g
- Carbohydrates: 37g
- Fiber: 0g
- Protein: 2g
- Cholesterol: 0mg
Keywords: Orange Poke Cake, Citrus Cake, Summer Dessert, Orange Crush Cake
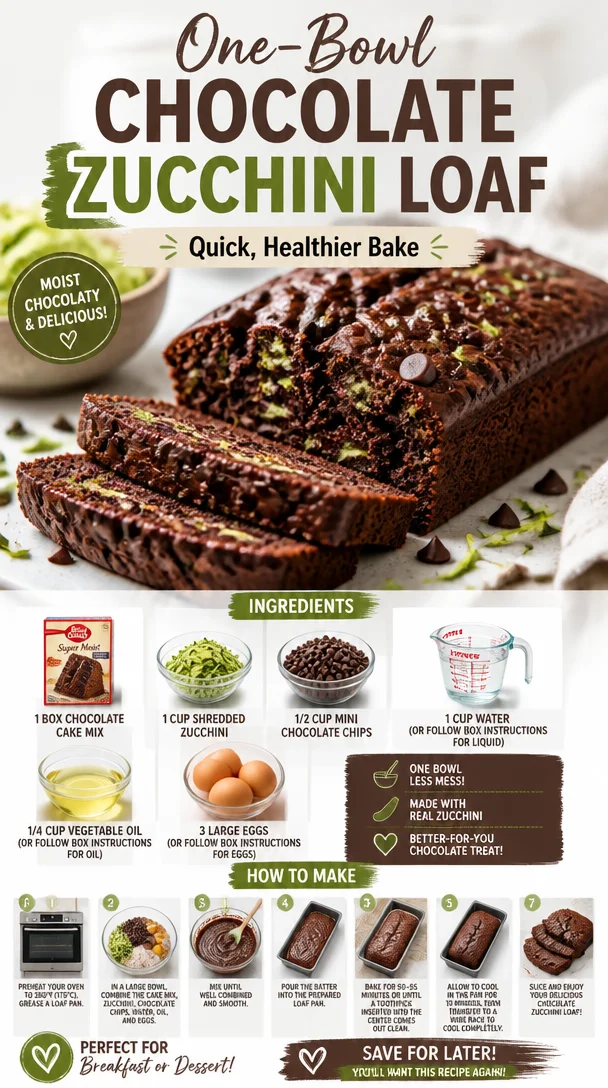
One-Bowl Chocolate Zucchini Loaf (Quick, Healthier Bake)
Dive Into Deliciousness with Chocolate Zucchini Loaf
Welcome back, food lovers! Today, we’re diving into one of my favorite guilty pleasures turned wholesome treat: Chocolate Zucchini Loaf. Yes, you heard me right—zucchini and chocolate in one glorious bite! If you’re wondering how on earth these two ingredients can coexist in a mouthwatering way, then stick around. This delightful loaf not only showcases the rich and decadent flavor of chocolate, but it also sneaks in that wonderful, nutrient-packed green veggie we know as zucchini.
Picture the moment you slice into this beautifully baked loaf and reveal its moist, chocolatey interior, dotted with mini chocolate chips. As the smell wafts through your kitchen, it’s hard to believe you just made something that, at first glance, sounds like a quirky health food hybrid. But trust me, this loaf is anything but dull. You’re going to want to make it over and over, whether it’s for brunch, dessert, or just a midday pick-me-up. Plus, I promise your family and friends will love it—without even realizing they’re getting a boost of veggies!
In today’s post, not only will I walk you through how to whip up this indulgent treat, but I’ll also share a bit of my personal experience with this recipe. You’ll understand why it’s one of my go-to favorites. Let’s get our aprons on, grab some ingredients, and jump into this adventure of flavors and nostalgia. Trust me, you’ll want to join me in this chocolatey escapade!
A Slice of Nostalgia
Ah, chocolate zucchini bread! The first time I tasted this enchanting loaf was years ago at my best friend’s birthday party. Her mom was a baking wizard, always concocting recipes that had us wide-eyed and begging for more. I’ll never forget walking into their kitchen, where the scent of warm chocolate enveloped me like a cozy hug. Little did I know, that delicious aroma was coming from a humble zucchini loaf that her mom insisted I try.
At that moment, my skepticism about veggies in desserts was swept away with one bite of that tender, rich bread. It was moist, not overly sweet, and the chocolate bliss danced on my taste buds, balanced perfectly by the faint earthy flavor of zucchini. I was hooked! Since then, I’ve taken that timeless recipe and infused it with my own twists, but the love for that initial loaf remains firmly etched in my memory. It’s proof that good food can create lasting connections and joyful experiences.
Now, let’s bring this memory to life in our own kitchens!
Gather Your Ingredients
Before we get started, let’s round up our ingredients, shall we? Here’s what you’ll need to make this irresistible Chocolate Zucchini Loaf:
-
1 box chocolate cake mix
This forms the base of our loaf, giving you that rich chocolate flavor easily. You can swap it out for a gluten-free cake mix if you’re looking for a gluten-free version. -
1 cup shredded zucchini
Don’t let this humble vegetable fool you! It adds moisture and nutrients to the loaf. If you’re out of zucchini, you can substitute it with applesauce, but it will change the flavor profile slightly. -
1/2 cup mini chocolate chips
Because, let’s be honest, you can never have too much chocolate! Feel free to use dark chocolate or even white chocolate for a different spin. -
1 cup water (or follow box instructions for liquid)
Check the cake mix instructions here, but water generally gets the job done for extra moisture. -
1/4 cup vegetable oil (or follow box instructions for oil)
Vegetable oil keeps our loaf tender and light, but you can swap it for melted coconut oil for a hint of tropical flavor. -
3 large eggs (or follow box instructions for eggs)
Eggs provide structure and stability to our bake. For a vegan twist, consider using flax eggs or chia eggs as an egg substitute.
Now that we’ve got our ingredients laid out like a picture-perfect grocery ad, let’s get baking!
Step-by-Step Instructions to Chocolate Heaven
Step 1: Prepping the Zucchini
Quick Tip: Before you dive into mixing, take a moment to prep our star player—the zucchini! Wash it thoroughly, and then grate it using the large holes of a box grater. Don’t forget to squeeze out any excess moisture using a clean kitchen towel or cheesecloth. This keeps our loaf from getting too soggy!
Step 2: Preheat and Prepare
Preheat your oven to 350°F (175°C). While the oven warms up, grab a loaf pan and grease it lightly with cooking spray or butter. You could also line it with parchment paper for easy removal—your future self will thank you!
Step 3: Mixing the Ingredients
In a large mixing bowl, combine the box chocolate cake mix, shredded zucchini, and mini chocolate chips. Then, add in the water, vegetable oil, and eggs. Using a spatula or spoon, mix gently until everything is just combined. Be careful not to overmix; we want our loaf to stay light and fluffy!
Pro Chef Hack: If you want a few extra flavor notes, consider adding a splash of vanilla extract or a sprinkle of cinnamon.
Step 4: Pouring and Baking
Pour the batter into your prepped loaf pan, smoothing it out with that trusty spatula. Bake in the preheated oven for 50-60 minutes, or until a toothpick inserted in the center comes out clean. Keep an eye on it as it bakes—nothing better than the smell of chocolate wafting through your house, right?
Step 5: Cooling it Down
Once the loaf is baked to perfection, remove it from the oven and let it cool in the pan for about 10-15 minutes. Then, carefully transfer it to a cooling rack to cool completely. This helps the loaf set and makes slicing a breeze!
Step 6: Slice, Serve, and Enjoy!
Once it’s cooled, slice up your loaf into thick, delicious pieces and serve with a dollop of whipped cream or a scoop of vanilla ice cream for an indulgent dessert. Remember, the beauty of this Chocolate Zucchini Loaf is that it’s perfect for breakfast, snack time—anytime, really!
Serving Suggestions
Ready to impress your friends and family with your beautiful Chocolate Zucchini Loaf? Try plating it alongside fresh berries for a pop of color. A light dusting of powdered sugar on top adds an elegant touch, and don’t forget a drizzle of chocolate sauce for those chocolate lovers!
Recipe Variations
Here are a few creative twists to shake things up with your loaf:
- Nutty Chocolate Zucchini Loaf: Fold in 1/2 cup of walnuts or pecans for a crunchy texture.
- Spicy Kick: Add a pinch of cayenne pepper for a surprising burst of heat that complements the chocolate beautifully.
- Banana Boost: Replace half of the zucchini with mashed ripe bananas for a delightful banana-chocolate combination.
- Herbal Infusion: A tablespoon of fresh mint or even basil can add a unique flavor twist if you’re feeling adventurous!
Chef’s Notes
One of the beautiful things about this recipe is how adaptable it is! Over the years, I’ve tried variations with different cake mixes and spices, and each time it still brings me back to that lovely memory of my best friend’s birthday.
Back in the day, I once tried to sneak in a bit of espresso powder into the batter for a "mocha" spin—and oh boy, was it divine! So don’t hesitate to get experimental; the kitchen is your playground!
FAQs and Troubleshooting
Here are a few common questions you might have as you embark on your baking journey:
Q1: My loaf didn’t rise much; what went wrong?
A: This may happen if your baking mix is expired, or the batter was overmixed. Make sure you gently mix until combined, and check your mix’s expiration date!
Q2: How can I keep my zucchini moist without being soggy?
A: Remember to squeeze out excess moisture. This step is key to achieving the perfect consistency in your loaf!
Q3: Can I freeze this loaf?
A: Absolutely! Once cooled, wrap it tightly in plastic wrap and place it in a freezer-safe bag for up to 3 months. Just thaw before serving!
Q4: Can I use whole-wheat flour instead of cake mix?
A: Yes, but this will alter the texture and moisture level. You may need to adjust the liquid and oil to ensure it’s not too dry.
Nutritional Info (Optional)
While I prefer to savor this Chocolate Zucchini Loaf without counting calories, I know many of you cherish this info. A single slice (based on typical uses for the ingredients) roughly contains:
- Calories: 220
- Total Fat: 7g
- Carbohydrates: 35g
- Protein: 3g
- Fiber: 2g
Just remember that all good things are best enjoyed in moderation!
So there you have it, my friends! A truly sensational Chocolate Zucchini Loaf that brings together comfort, nostalgia, and health in every slice. By sharing this recipe, I hope you create your own memorable moments in the kitchen and find joy in every bite. Happy baking, and as always, stay delicious!
PrintChocolate Zucchini Loaf
A moist and delightful bread blending rich chocolate with nutrient-rich zucchini. Perfect for brunch, dessert, or a fun snack.
- Prep Time: 15 minutes
- Cook Time: 60 minutes
- Total Time: 75 minutes
- Yield: 8 servings 1x
- Category: Dessert
- Method: Baking
- Cuisine: American
- Diet: Vegetarian
Ingredients
- 1 box chocolate cake mix
- 1 cup shredded zucchini
- 1/2 cup mini chocolate chips
- 1 cup water
- 1/4 cup vegetable oil
- 3 large eggs
Instructions
- Prep the zucchini by washing and grating it; squeeze out excess moisture.
- Preheat your oven to 350°F (175°C) and prepare a loaf pan.
- Mix the chocolate cake mix, zucchini, and chocolate chips in a bowl.
- Add water, vegetable oil, and eggs; mix until just combined.
- Pour the batter into the loaf pan and smooth it out.
- Bake for 50-60 minutes, or until a toothpick comes out clean.
- Cool the loaf in the pan for 10-15 minutes before transferring to a cooling rack.
- Slice and serve with whipped cream or ice cream.
Notes
Try adding nuts or spices for variations. Best enjoyed fresh, but you can freeze leftovers for up to 3 months.
Nutrition
- Serving Size: 1 slice
- Calories: 220
- Sugar: 12g
- Sodium: 300mg
- Fat: 7g
- Saturated Fat: 1g
- Unsaturated Fat: 3g
- Trans Fat: 0g
- Carbohydrates: 35g
- Fiber: 2g
- Protein: 3g
- Cholesterol: 30mg
Keywords: chocolate zucchini loaf, chocolate bread, healthy dessert, zucchini recipes
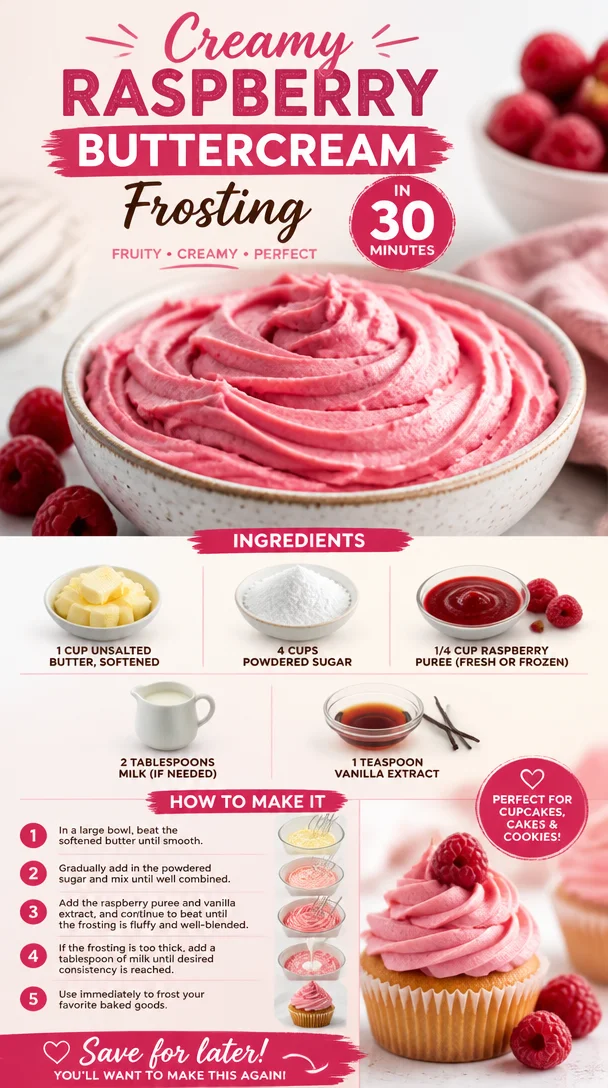
Creamy Raspberry Buttercream Frosting in 30 Minutes
The Sweet Symphony of Raspberry Buttercream Frosting
Welcome to another delicious adventure at Clean Plate Cravings! Today, we’re diving into the world of baking with a recipe that will elevate your desserts and make any occasion feel special: Raspberry Buttercream Frosting. There’s something almost magical about a velvety frosting that sweetens the deal and adds that burst of flavor we all crave. And if you’re like me, you know that frosting can make or break your cake, cupcakes, or even brownies.
Picture this: it’s a warm summer afternoon, and you’re gathered in the kitchen with your family. You can hear laughter filling the air and the sweet scent of baked goods wafting through the open windows. You’re preparing something special for a birthday, family gathering, or just because it’s Tuesday! The cakes are frosted, and you can’t help but steal a lick of the bowl. That rich, creamy buttercream mingled with the bright taste of raspberries—it’s downright intoxicating.
That’s the moment I want to recreate for you all with this Raspberry Buttercream Frosting recipe. It’s not just about slathering frosting on your baked goods; it’s about creating memories, sharing sweetness, and enjoying each bite of life’s delicious moments. With every dollop, you’re adding a splash of color and a dollop of love that makes the everyday extraordinary!
So, grab your whisk, slide on your apron, and let’s transform a simple cake into a vibrant masterpiece with this luscious raspberry buttercream. It’s creamy, dreamy, and full of personality. Ready? Let’s get started!
A Sprinkle of Nostalgia
As a child, I always looked forward to baking days with my mom. We’d gather in our cozy kitchen, flour dusting the countertops and the sweet melodies of our favorite tunes playing softly in the background. I can still picture the bright pink frosting that adorned my birthday cake each year. It was my absolute favorite, made with raspberries we picked from the backyard, bursting with flavor and memories.
One summer, we decided to throw a little garden party, inviting friends and family to join us under the twinkling lights. The star of the show was a grand layered cake topped with that glorious raspberry buttercream. I remember standing on a chair to reach the table, eagerly waiting for everyone to take a slice. The smiles that lit up their faces when they tasted that rich, fruity frosting instantly gave me a warm glow.
Those moments sparked a love for baking that still fuels my passion today. Now, I’m so excited to share this raspberry buttercream frosting recipe with you—perfect for any occasion and guaranteed to make your desserts shine with an unforgettable touch.
Ingredients
To whip up this delightful Raspberry Buttercream Frosting, gather the following ingredients:
-
1 cup unsalted butter, softened
This is the base of your frosting, creating that creamy texture. Make sure it’s softened to room temperature for easy whipping. If you’re looking for a dairy-free option, you can substitute this with coconut oil or plant-based butter. -
4 cups powdered sugar
This sweet ingredient provides the structure and sweetness. If you’re in a pinch, you can make your own by blending granulated sugar until it’s fine. -
1/4 cup raspberry puree (fresh or frozen)
This brings the fruity flavor to life! Feel free to use store-bought puree, or make your own by blending fresh or thawed frozen raspberries. Just pass it through a sieve to remove the seeds for a smooth finish. -
2 tablespoons milk (if needed)
Use this to lighten the consistency if your frosting is too thick. Non-dairy milk works too, like almond or oat milk. -
1 teaspoon vanilla extract
This adds depth and enhances the overall flavor. You can swap it with almond extract if you’re feeling adventurous!
Step-by-Step Instructions
Let’s get to the fun part—the actual frosting-making! Here’s how to create this delicious raspberry buttercream frosting, step by step:
-
Prepare your ingredients
Before you turn on that mixer, gather all your ingredients. Having everything ready will make the process smoother and more enjoyable. Pro tip: Make sure your butter is soft; if it’s too cold, you’ll end up with lumps in your frosting! -
Cream the butter
In a large bowl, add your softened unsalted butter. Use a hand mixer or stand mixer fitted with a paddle attachment. Beat it on medium speed for about 2-3 minutes until it’s light and fluffy. This step is crucial—it incorporates air into the butter, giving your frosting a light texture. -
Add the powdered sugar
Gradually add the powdered sugar, one cup at a time, while mixing on low speed to avoid a sugary cloud. Once you’ve added all the sugar, increase the speed to medium and beat until combined. You should see a soft, thick mixture forming. -
Incorporate raspberry puree
Now for the fun part—add that gorgeous raspberry puree! Mix on medium speed until the color is evenly distributed and the frosting becomes a beautiful pink hue. If the frosting seems too thick, this is when you can add a tablespoon of milk to achieve your desired consistency. -
Flavor it up
Pour in the vanilla extract for that touch of warmth. Mix it lightly to ensure it’s fully incorporated. Taste your frosting. If you want more raspberry flavor, feel free to add a bit more puree, adjusting sugar as needed. -
Final touch-up
Once you’re happy with the flavor and texture, give it one last whip for about 30 seconds on high speed. This will ensure everything is well combined and airy. Now it’s ready for action!
Serving Suggestions
When it comes to serving your raspberry buttercream frosting, the sky’s the limit! Use it generously to frost cakes, dollop it on cupcakes, or spread it between layers of fresh cookies. Not only does it taste amazing, but the vibrant pink color is a showstopper and can turn any dessert into a masterpiece. For an extra touch, you might add fresh raspberries or edible flowers on top for a delightful decoration.
Recipe Variations
Ready to put a twist on your frosting? Here are a few fun variations to keep things exciting:
-
Lemon Raspberry Twist: Add some lemon zest to your buttercream for a zesty contrast to the raspberry sweetness.
-
Chocolate Raspberry: Mix in some cocoa powder to create a rich chocolate raspberry frosting that’s perfect for chocolate cakes or cupcakes.
-
Minty Fresh: Add a drop of peppermint extract along with the vanilla for a refreshing mint raspberry flavor.
-
Berry Bliss: Swap the raspberry puree for other berry purees, like strawberry or blueberry, to create new flavors.
Chef’s Notes
This raspberry buttercream frosting has been a staple in my kitchen for years. Initially, I played around a lot with the ratios and ingredients until I found the perfect balance that produced a fluffy yet stable frosting. I’ve used it for everything from birthday cakes to casual weeknight desserts, and it’s never disappointed!
One funny memory I have is from a baking competition I participated in years ago, where I was up against some seasoned pros. I decided to use this frosting as my secret weapon! Their eyes widened when they tasted it, and I proudly walked away with first place. A berry-based frosting can charm anyone with its sweetness, but the best part is still seeing the joy on people’s faces when they take that first bite.
FAQs and Troubleshooting
-
Why is my frosting too thin?
If your frosting is runny, you likely added too much raspberry puree. Just add a little more powdered sugar until you reach your desired consistency. -
Can I make this frosting ahead of time?
Absolutely! You can prepare the frosting a day in advance. Just store it in an airtight container in the fridge. When you’re ready to use it, simply re-whip it to bring it back to that fluffy texture. -
What if my frosting is too thick?
If your frosting turns out too thick, add milk one tablespoon at a time until you achieve the desired consistency. Avoid adding too much liquid at once! -
How do I store leftover frosting?
Store any leftover frosting in an airtight container in the fridge for up to a week. Alternatively, you can freeze it for up to three months. Just make sure to let it thaw in the fridge and re-whip before using!
Nutritional Info
While I advise enjoying frosting in moderation, here’s a quick nutritional breakdown per serving (about 2 tablespoons):
- Calories: 120
- Total Fat: 7g
- Saturated Fat: 4g
- Carbohydrates: 14g
- Sugars: 12g
- Protein: 0g
Now that you’re armed with this luscious Raspberry Buttercream Frosting recipe, I hope you’re inspired to whip up something wonderful in your kitchen. Remember, cooking is all about experimentation and joy, so don’t hesitate to make this frosting your own! Let’s make every treat a celebration, one dollop at a time. Happy baking!
PrintRaspberry Buttercream Frosting
A luscious and vibrant raspberry buttercream frosting that brings sweetness and flavor to any dessert.
- Prep Time: 15 minutes
- Cook Time: 0 minutes
- Total Time: 15 minutes
- Yield: 2 cups 1x
- Category: Dessert
- Method: Mixing
- Cuisine: American
- Diet: Vegetarian
Ingredients
- 1 cup unsalted butter, softened
- 4 cups powdered sugar
- 1/4 cup raspberry puree (fresh or frozen)
- 2 tablespoons milk (if needed)
- 1 teaspoon vanilla extract
Instructions
- Prepare your ingredients
- Cream the butter until light and fluffy
- Add the powdered sugar gradually while mixing
- Incorporate raspberry puree for flavor
- Flavor it up with vanilla extract
- Final touch-up with a last whip
Notes
This frosting is perfect for cakes and cupcakes. For a fun twist, try adding lemon zest or cocoa powder.
Nutrition
- Serving Size: 2 tablespoons
- Calories: 120
- Sugar: 12g
- Sodium: 10mg
- Fat: 7g
- Saturated Fat: 4g
- Unsaturated Fat: 3g
- Trans Fat: 0g
- Carbohydrates: 14g
- Fiber: 0g
- Protein: 0g
- Cholesterol: 30mg
Keywords: frosting, raspberry, buttercream, dessert, baking, sweet
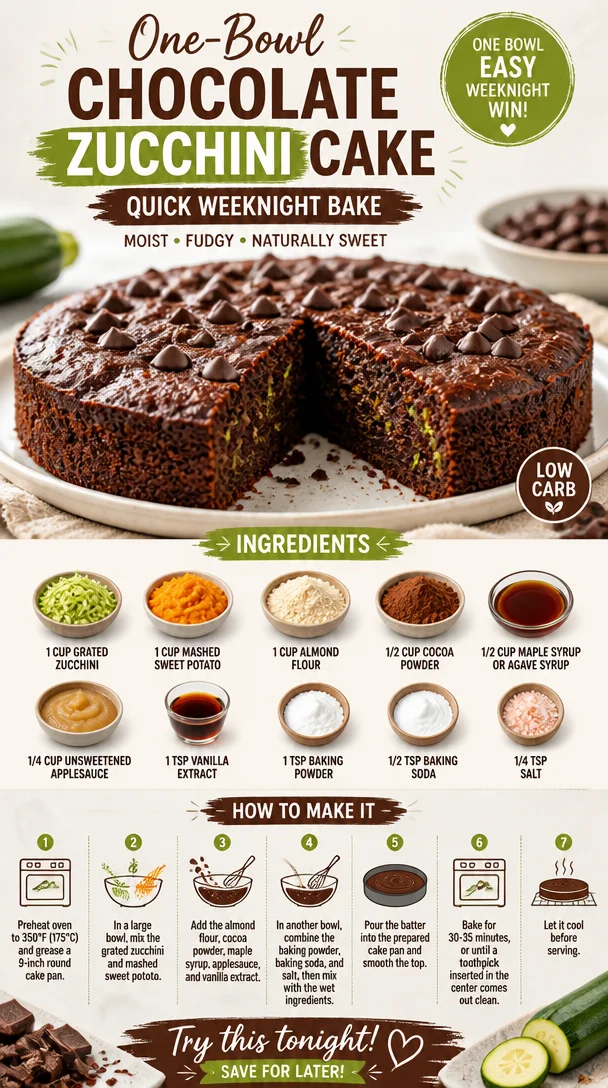
One-Bowl Chocolate Zucchini Cake: Quick Weeknight Bake
A Decadent Delight: Chocolate Zucchini Cake Recipe
Welcome back, fellow foodies! Today, we’re diving into an absolute gem of a recipe that’s not only a feast for your taste buds but also a sneaky way to sneak in some nutrition – we’re talking about Chocolate Zucchini Cake! Yes, you heard that right. This luscious cake combines rich chocolatey goodness with the moisture of zucchini, making it incredibly moist and fluffy. Whether you’re trying to use up some surplus zucchini from your garden (or your next-door neighbor’s garden), or you just have a craving for something sweet and delicious, this cake is here to satisfy.
So, let’s roll up our sleeves and get baking! But first, let me share a little backstory that makes this recipe even more special.
A Slice of Nostalgia
This Chocolate Zucchini Cake recipe brings back fond memories from my childhood when my grandmother would whip it up on lazy summer afternoons. I can still see her in the kitchen, apron tied snugly around her waist, a mischievous twinkle in her eye as she beckoned me closer to the counter. The smell of chocolate wafted through the air, an intoxicating blend of sweetness and warmth that made my heart flutter.
“Trust me, my dear,” she would say, sliding a slice of still-warm cake in front of me. “You’ll never know there’s zucchini in it!” I often wondered how she pulled off this chocolate magic trick. As a kid, I was skeptical, but one bite into that cake and I was convinced! The rich flavor and moist texture were utterly irresistible.
Those afternoons were filled with laughter, flour-covered countertops, and the pure joy of creating something together. Now, as I share this recipe with you, I feel connected to those memories every time I bake it. It’s a reminder that cooking is about love, creativity, and, of course, a touch of sweetness.
Ingredients
Let’s check out the ingredients you’ll need for this decadent Chocolate Zucchini Cake!
-
1 cup grated zucchini: Zucchini adds moisture and a subtle sweetness. You can use yellow squash as a fun substitute if you’re looking for a little variety! Just be sure to squeeze out any excess moisture beforehand to avoid a soggy batter.
-
1 cup mashed sweet potato: This natural sweetener adds creaminess and depth of flavor. Canned sweet potato works perfectly here but feel free to roast and mash your own if you’re looking for that homemade touch!
-
1 cup almond flour: Almond flour gives this cake a lovely nutty flavor and keeps it gluten-free. If you need a substitution, oat flour or a gluten-free all-purpose blend can do the trick.
-
1/2 cup cocoa powder: You can’t have a chocolate cake without cocoa powder! For a deeper flavor, opt for Dutch-processed cocoa. But if you’re going for an intense chocolate hit, feel free to use a mix of cocoa and dark chocolate.
-
1/2 cup maple syrup or agave syrup: This natural sweetener elevates the cake while keeping it moist. Honey can work too, but it’s a bit sweeter, so adjust to taste.
-
1/4 cup unsweetened applesauce: Applesauce adds moisture with a subtle sweet flavor. You can substitute it with more mashed banana or additional sweet potato if you wish.
-
1 tsp vanilla extract: This aromatic ingredient amplifies flavors and gives the cake a warm, inviting essence. Make sure to go for real vanilla extract – your taste buds will thank you!
-
1 tsp baking powder: This leavening agent helps the cake rise beautifully. Always double-check its freshness for the best results!
-
1/2 tsp baking soda: A little extra oomph for rising! If you’re out of baking soda, you can replace it with more baking powder at a 1:3 ratio.
-
1/4 tsp salt: A pinch of salt enhances all the flavors; it’s like a secret weapon in baking! Feel free to use sea salt for a more robust taste.
Step-by-Step Instructions
Now that we have our ingredients lined up like a culinary dream team, let’s get into the magic of making this cake!
-
Preheat Your Oven
Preheat your oven to 350°F (175°C). This is crucial, as it allows your cake to rise and bake evenly. It’s like a warm-up for your batter! -
Prepare Your Baking Pan
Grab an 8-inch square cake pan (or round if you prefer) and grease it lightly with oil or cooking spray. You can also line it with parchment paper for easy removal. Trust me; you don’t want a beautiful cake stuck in the pan! -
Grate the Zucchini
Using a box grater or food processor, grate your zucchini finely. Once you’ve got a cup, place it in a clean kitchen towel and wring out any excess moisture. This step is super important for achieving that perfect cake consistency. -
Mash the Sweet Potato
If using fresh sweet potatoes, roast them until tender, then scoop the flesh into a bowl and mash. If you prefer the canned version, make sure it’s unsweetened and mash it up until smooth. -
Mix the Wet Ingredients
In a large mixing bowl, combine the grated zucchini, mashed sweet potato, maple syrup (or agave), applesauce, and vanilla extract. Use a whisk or spatula to combine until the mixture is smooth and well-combined. I love getting my hands in here too – the texture is so satisfying! -
Combine the Dry Ingredients
In another bowl, sift together the almond flour, cocoa powder, baking powder, baking soda, and salt. Sifting helps remove lumps and guarantees a lighter cake. Just think of it as a mini workout! -
Combine Wet and Dry
Gradually incorporate the dry mixture into the wet ingredients. Gently fold them together using a spatula or wooden spoon, taking care not to overmix. You want a beautifully blended batter, not a tough one! -
Pour and Bake
Pour the batter into your prepared cake pan, smoothing the top with a spatula. Pop it in the preheated oven and bake for about 25-30 minutes, or until a toothpick inserted in the center comes out clean. The smell wafting through your kitchen will be pure bliss! -
Cool Down
Once done, remove the cake from the oven and let it cool in the pan for about 10 minutes. Then, carefully turn it out onto a wire rack to cool completely – if you can resist not diving in right away!
Serving Suggestions
When it comes to serving this chocolatey creation, presentation is key! Dust the top with a sprinkle of powdered sugar for a fancy touch, or drizzle with a little melted dark chocolate. For an extra indulgent treat, serve a slice warm with a dollop of whipped coconut cream or your favorite ice cream. Your friends and family will be in chocolate heaven!
Recipe Variations
Here are a few delicious twists to keep this Chocolate Zucchini Cake vibrant and exciting:
- Add Mix-Ins: Toss in a handful of chocolate chips or chopped walnuts for added texture.
- Nut Butter Swirl: Dollop some almond or peanut butter into the batter before baking for a surprise creamy center.
- Spiced Delight: Add a pinch of cinnamon or espresso powder to the batter to deepen the flavors.
- Frosting Options: Top with a light frosting made from Greek yogurt and cocoa powder for a yogurt-based treat, or keep it simple with a vegan cream cheese frosting.
Chef’s Notes
This recipe has evolved over time, and I can’t help but smile every time I bake it. Initially, I made it just for myself during my health-conscious foodie phase, but soon my friends caught wind of this chocolate delight. It became an instant favorite at gatherings, and I love seeing the surprised expressions when I reveal the star ingredient: zucchini!
There was one time I forgot to strain the zucchini, and let’s just say it was a very "moist" cake! But hey, those moments are what make cooking so adventurous, right? Each time I bake, I remember my grandmother’s laughter and love infusing each bite.
FAQs and Troubleshooting
1. Why is my cake too dense?
If your cake is dense, it might be due to overmixing the batter or not measuring the ingredients accurately. Make sure to fold gently and use the right measurements, especially with the flour!
2. Can I freeze this cake?
Absolutely! This Chocolate Zucchini Cake freezes beautifully. Wrap it tightly in plastic wrap and foil to prevent freezer burn. When you’re ready, thaw it in the fridge overnight.
3. What if I don’t have almond flour?
No worries! You can substitute almond flour with any other nut flour, or a gluten-free all-purpose flour work perfectly if you’re aiming for a gluten-free alternative.
4. Can I use other vegetables?
Definitely! Carrots are a fantastic swap if you want to try a veggie twist. Just prepare them similarly by grating, and you’ll end up with a deliciously moist cake.
Nutritional Info
While I won’t delve too deeply into numbers, I will say this Chocolate Zucchini Cake is a delightful treat that provides a nice serving of fiber thanks to the veggies! It’s a little less sweet and heavy than traditional cakes, making it a great guilt-free indulgence.
So there you have it! A fun and fabulous recipe for Chocolate Zucchini Cake that’s sure to impress and delight. Let me know when you try it and if you make any variations! Happy baking, and remember to keep it fresh and delicious.
PrintChocolate Zucchini Cake
A decadent and moist chocolate zucchini cake that is both delicious and nutritious.
- Prep Time: 15 minutes
- Cook Time: 30 minutes
- Total Time: 45 minutes
- Yield: 8 servings 1x
- Category: Dessert
- Method: Baking
- Cuisine: American
- Diet: Vegetarian
Ingredients
- 1 cup grated zucchini
- 1 cup mashed sweet potato
- 1 cup almond flour
- 1/2 cup cocoa powder
- 1/2 cup maple syrup or agave syrup
- 1/4 cup unsweetened applesauce
- 1 tsp vanilla extract
- 1 tsp baking powder
- 1/2 tsp baking soda
- 1/4 tsp salt
Instructions
- Preheat your oven to 350°F (175°C).
- Prepare an 8-inch square or round cake pan by greasing it lightly with oil or cooking spray.
- Grate the zucchini finely and squeeze out excess moisture using a clean kitchen towel.
- Mash the sweet potato until smooth.
- Mix the wet ingredients: zucchini, sweet potato, maple syrup (or agave), applesauce, and vanilla extract in a large bowl.
- Combine the dry ingredients: almond flour, cocoa powder, baking powder, baking soda, and salt in another bowl.
- Combine the wet and dry mixtures gently without overmixing.
- Pour the batter into the prepared pan and smooth the top.
- Bake for about 25-30 minutes, or until a toothpick comes out clean.
- Cool in the pan for 10 minutes, then transfer to a wire rack to cool completely.
Notes
Top with powdered sugar or melted dark chocolate for serving. Can add chocolate chips or nuts for extra texture.
Nutrition
- Serving Size: 1 slice
- Calories: 250
- Sugar: 14g
- Sodium: 180mg
- Fat: 9g
- Saturated Fat: 1g
- Unsaturated Fat: 5g
- Trans Fat: 0g
- Carbohydrates: 38g
- Fiber: 4g
- Protein: 4g
- Cholesterol: 0mg
Keywords: Chocolate Zucchini Cake, Healthy Dessert, Moist Cake, Baking, Zucchini Recipes
Minute Strawberry Cheesecake Dump Cake (Easy Weeknight)
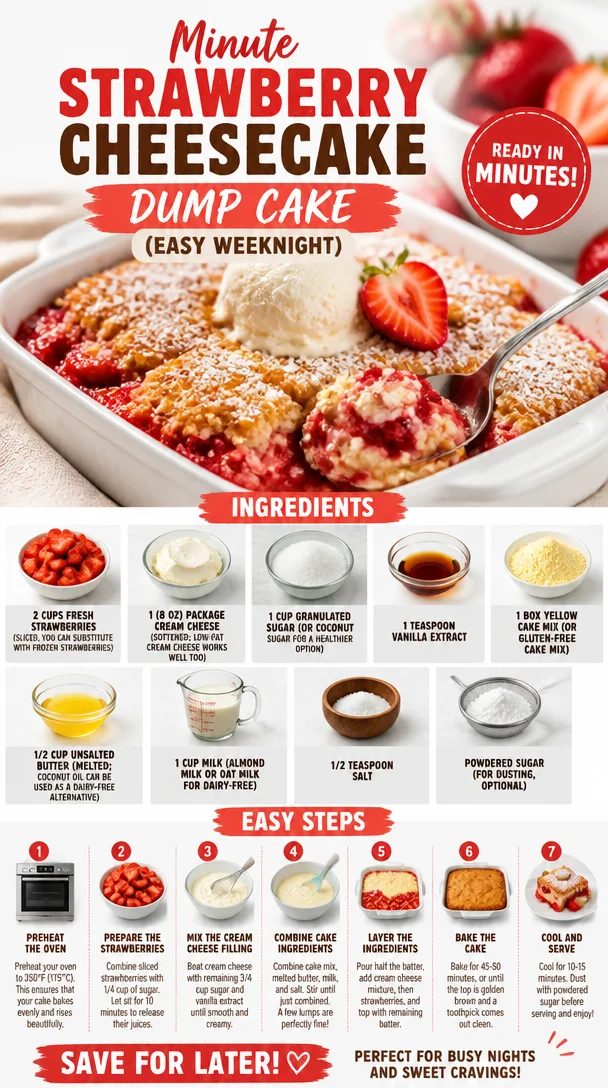
Strawberry Cheesecake Dump Cake Recipe: A Deliciously Simple Treat
Welcome back to Clean Plate Cravings, where we turn fresh ingredients into feel-good dishes that satisfy both the heart and the taste buds! Today, I’m thrilled to share one of my all-time favorite desserts: the Strawberry Cheesecake Dump Cake. If you’ve never had a dump cake, you’re in for a treat! This beautiful dessert blends the creamy richness of cheesecake with the fresh sweetness of strawberries, all while being ridiculously easy to whip up.
Now, let’s talk about why I love this dessert so much! First of all, it’s perfect for those days when life gets a little hectic and you need something delicious with minimal effort. What’s better than a dessert that requires just a few ingredients and a simple mix? Plus, it’s a crowd-pleaser—whether you’re serving a small family gathering or a big backyard barbecue, you can rest assured everyone will love it.
A Taste of Nostalgia
Growing up, summer meant family picnics in the park, where my grandma would always bring her famous strawberry cheesecake. I remember running around with my cousins, the scent of barbecued burgers filling the air, and my grandma, with her trademark sun hat, carefully arranging her desserts on a colorful picnic blanket. When it came time for dessert, there was always a race to get a slice before it disappeared! Fast forward to today, and I’ve taken those cherished memories and turned them into a dessert that captures all that joy without all the fuss. This Strawberry Cheesecake Dump Cake brings the essence of those picnics right to your kitchen and ensures each bite is as heartwarming as my grandma’s original.
Ingredients
Let’s gather our ingredients for this scrumptious dessert! Here’s what you’ll need:
-
2 cups fresh strawberries (sliced): If strawberries are out of season or you prefer convenience, feel free to substitute with frozen strawberries. Just make sure to thaw and drain them before using.
-
1 (8 oz) package cream cheese (softened): Cream cheese adds that luscious cheesecake texture. Want a healthier option? Low-fat cream cheese works beautifully too!
-
1 cup granulated sugar: This sweetener marries the cheesecake layer and cake. For a healthier twist, use coconut sugar—it has a lovely caramel flavor!
-
1 teaspoon vanilla extract: A splash of vanilla elevates the flavor profile. You can also use almond extract for a different note.
-
1 box yellow cake mix: The base of our cake! If gluten is a concern, there are gluten-free options available; just make sure to check the packaging.
-
1/2 cup unsalted butter (melted): Butter leads to a moist cake; coconut oil is a fantastic dairy-free alternative if that’s your preference.
-
1 cup milk: It can be any kind—whole, almond milk, or oat milk all work wonderfully.
-
1/2 teaspoon salt: A pinch of salty goodness offsets the sweetness for a balanced flavor.
-
Powdered sugar (for dusting, optional): This adds a lovely finishing touch. Feel free to skip it for a less sweet option!
Step-by-Step Instructions
Now that our ingredients are ready, let’s dive into the kitchen and create this delightful dessert!
-
Preheat the Oven: Preheat your oven to 350°F (175°C). This ensures that our cake bakes evenly from the moment it goes in.
-
Prepare the Baking Dish: Grab a 9×13 inch baking dish. Lightly grease it with cooking spray or butter; this helps prevent any sticking, ensuring we can serve our cake without any fuss.
-
Mix the Cheesecake Layer: In a medium bowl, beat the softened cream cheese, granulated sugar, and vanilla extract together until smooth and creamy. If you have a hand mixer, it’s a lifesaver for this step! Make sure there are no lumps. You’ll want this layer to be velvety and dreamy.
-
Layer the Strawberries: Spread the sliced strawberries evenly over the bottom of your prepared baking dish. This fruity layer is the heart of our dessert, so take your time arranging them.
-
Add the Cheesecake Layer: Pour the cream cheese mixture over the strawberries, spreading it evenly with a spatula. Just imagine those strawberries soaking up all that creamy goodness!
-
Prepare the Cake Layer: In a separate bowl, combine the cake mix and salt. Next, sprinkle the cake mixture evenly over the cheesecake layer—don’t worry about getting it perfect! The magic happens when it bakes.
-
Melt the Butter: Drizzle the melted butter evenly over the top of the cake mix. This step is crucial; the butter will help to create a golden crust as the cake bakes.
-
Add Milk: Finally, pour the milk over everything. Don’t mix—this is a dump cake, after all! The milk will create a beautiful texture once it’s baked.
-
Bake: Place the dish in the oven and bake for about 40–45 minutes or until the top is golden brown and the center is set. Your kitchen will fill with the heavenly aroma of strawberries and sweet cake—trust me, it’s hard to wait!
-
Cool: Once baked, bring the cake out and let it cool for about 10–15 minutes. This cooling time is essential for the layers to settle and come together.
Serving Suggestions
To serve this gorgeous Strawbery Cheesecake Dump Cake, scoop generous portions into dessert bowls or plates. If you’re feeling a bit fancy, top with a dollop of whipped cream and a sprinkle of powdered sugar for that café-style presentation! Fresh mint leaves or a few extra strawberry slices on top make it look even more irresistible. Your guests will be impressed, and you know what? They won’t even have to know how simple it was to make!
Recipe Variations
Want to switch things up? Here are a few creative twists on this recipe:
-
Berry Blast: Swap out strawberries for blueberries, raspberries, or mixed berries for a berry medley dump cake.
-
Chocolate Chip Variation: Add a cup of chocolate chips in the cheesecake layer for a deliciously rich contrast.
-
Nutty Crunch: Stir in some chopped nuts, like pecans or walnuts, with the cake mix for added texture.
-
Coconut Delight: Sprinkle shredded coconut on top of the cake mix for a tropical touch.
-
Lemon Zing: Add a tablespoon of lemon juice and some zest to the cheesecake layer for a refreshing citrus twist.
Chef’s Notes
As with any recipe, it’s fun to play around and make it your own! I’ve made this dump cake countless times, and each version brings back those summer memories. The best part? You can whip it up with whatever fruit is in season or even your favorite frozen options in the freezer.
I once experimented with peaches and a hint of cinnamon, and let me tell you, it was a new summer favorite! The recipe continues to evolve with my cravings and the seasons—and it never fails to impress.
FAQs and Troubleshooting
Can I make this ahead of time?
Absolutely! You can prepare it a day in advance and store it in the fridge. Just let it sit at room temperature for a bit before serving.
What if my cake mix clumps?
If you notice lumps while sprinkling the cake mix, simply break them up gently with a fork. Do not worry about it being perfectly layered; it’ll bake beautifully regardless!
Can I use another type of cheese?
You can try ricotta or mascarpone as alternatives to cream cheese. The texture will change slightly, but it’ll still deliver a delicious flavor!
Why is my dump cake too soggy?
If your fruit was too wet, you might need to drain them a bit before using. Also, ensure that your oven temperature is accurate—an oven thermometer can help if you have any doubts.
Nutritional Info
Although this recipe’s main focus is indulgence, incorporating fresh strawberries does provide some nutritional benefits. Strawberries are rich in antioxidants, vitamins, and fiber!
So, there you have it! My go-to recipe for a Strawberry Cheesecake Dump Cake that’s as scrumptious as it is simple. I hope you enjoy making this delightful dessert just as much as I do. Now grab your ingredients and get ready to create sweet, joyful moments in your kitchen. Happy baking!
PrintStrawberry Cheesecake Dump Cake
A deliciously simple dessert that combines creamy cheesecake and fresh strawberries in an easy dump cake.
- Prep Time: 15 minutes
- Cook Time: 45 minutes
- Total Time: 60 minutes
- Yield: 8 servings 1x
- Category: Dessert
- Method: Baking
- Cuisine: American
- Diet: Vegetarian
Ingredients
- 2 cups fresh strawberries (sliced)
- 1 (8 oz) package cream cheese (softened)
- 1 cup granulated sugar
- 1 teaspoon vanilla extract
- 1 box yellow cake mix
- 1/2 cup unsalted butter (melted)
- 1 cup milk
- 1/2 teaspoon salt
- Powdered sugar (for dusting, optional)
Instructions
- Preheat the oven to 350°F (175°C).
- Prepare a 9×13 inch baking dish by lightly greasing it.
- Mix the cream cheese, granulated sugar, and vanilla extract until smooth.
- Layer the sliced strawberries evenly in the baking dish.
- Add the cheesecake mixture over the strawberries.
- Prepare the cake mix with salt and sprinkle it over the cheesecake layer.
- Melt the butter and drizzle it over the cake mix.
- Add the milk over everything without mixing.
- Bake for 40–45 minutes or until golden brown and set.
- Cool for 10–15 minutes before serving.
Notes
Top with whipped cream and powdered sugar before serving. For variations, try different berries or add chocolate chips!
Nutrition
- Serving Size: 1 serving
- Calories: 350
- Sugar: 25g
- Sodium: 300mg
- Fat: 16g
- Saturated Fat: 8g
- Unsaturated Fat: 6g
- Trans Fat: 0g
- Carbohydrates: 45g
- Fiber: 2g
- Protein: 5g
- Cholesterol: 30mg
Keywords: strawberry, cheesecake, dump cake, dessert, easy dessert
Quick Lemon Cheesecake Desserts for Busy Beginners
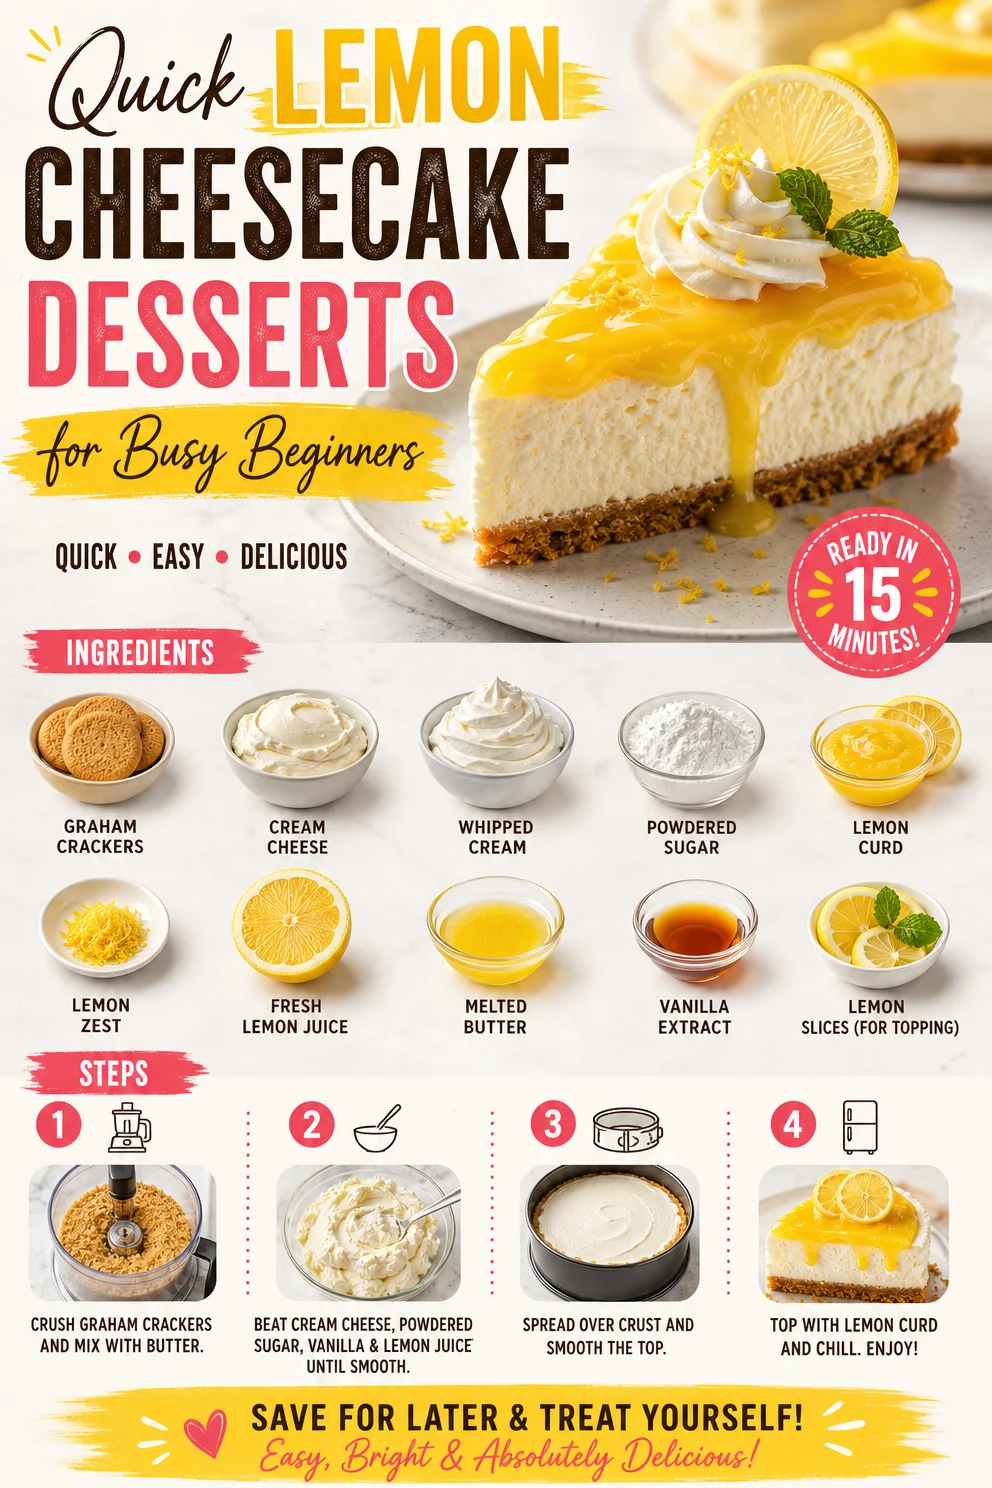
Creamy Lemon Cheesecake: Brighten Your Day with a Slice of Happiness
Welcome, fellow food lovers! Today, we’re diving into a delightful dessert that promises to brighten up your day: Creamy Lemon Cheesecake. Whether it’s a sunny afternoon, a special occasion, or just a little pick-me-up after a long day, this cheesecake is here to bring a splash of zest and a whole lot of happiness to your table.
Now, let’s talk about why cheesecake is one of those desserts that resonates with so many of us. It combines the smooth, rich texture of cream cheese with a graham cracker crust that gives a nod to nostalgia. But add fresh, zesty lemon into the mix, and you’ve created something that dances on your palate—a perfect balance of creamy and refreshing.
A Journey Down Memory Lane
Let me share a quick story with you.Growing up, there was no special occasion my family celebrated without my mom whipping up her famous lemon cheesecake. We gathered around the table, the air filled with the sweet and tangy aroma of citrus. I can still picture our tiny kitchen, laughter bouncing off the walls as my siblings and I eagerly awaited the cooling cheesecake. My mom would always say, "A little zest makes life zestier!" And boy, was she right!
One summer afternoon, after a long day of helping mom in the garden, we decided to surprise her. We harvested fresh lemons to make her signature cheesecake, but we were so excited that we accidentally put an extra dose of zest in the mix! When she tried it, she laughed and said, “This is the kind of happy accident I can get behind!” And to this day, that lemon cheesecake brings back a flurry of warm memories, reminding me that cooking is all about joy and love.
Ingredients You’ll Need
Let’s get to the heart of the matter—what you need to bring this creamy lemon cheesecake to life. Here’s the scoop:
-
For the Crust:
- Graham Crackers (1 ½ cups, crushed): The classic choice for a cheesecake crust. For a gluten-free option, swap in gluten-free graham crackers or ground nuts.
- Granulated Sugar (¼ cup): Adds sweetness and helps bind the crust. Coconut sugar can be a great substitute for a hint of caramel flavor.
- Unsalted Butter (½ cup, melted): This buttery goodness brings the crust together. If you’re vegan, you can use coconut oil or a vegan butter alternative.
-
For the Filling:
- Cream Cheese (16 oz, softened): The star of the show! Use full-fat for richness; Neufchâtel can lighten it up without sacrificing too much flavor.
- Granulated Sugar (¾ cup): Standard sweetness; brown sugar can add depth if you’re feeling adventurous.
- Eggs (3 large, at room temperature): Essential for setting the cheesecake. For a vegan version, try aquafaba or a flax egg (1 tbsp flaxseed meal + 2.5 tbsp water).
- Sour Cream (1 cup): For that luscious creaminess. Substitute with Greek yogurt for a healthier twist if you’d like.
- Fresh Lemon Juice (½ cup): This zesty liquid is the soul of the cheesecake! Freshly squeezed is best; bottled lemon juice doesn’t quite cut it.
- Lemon Zest (2 tablespoons): For an extra punch of flavor. Feel free to adjust based on your lemon-loving preferences.
Step-by-Step Instructions
Let’s get cooking! Follow these steps to whip up your own creamy lemon cheesecake. Grab your apron, and let’s do this!
Step 1: Preheat Your Oven
Preheat the oven to 325°F (163°C). This step is crucial for ensuring your cheesecake bakes evenly, giving it that perfectly creamy texture we all crave.
Step 2: Prepare the Crust
In a mixing bowl, combine the crushed graham crackers, granulated sugar, and melted butter. Mix until the crumbs are evenly moistened. Here’s a little tip: if you want a more complex flavor, consider adding a pinch of cinnamon or nutmeg for a warm spice undertone!
Step 3: Press the Crust
Press this mixture into the bottom of a 9-inch springform pan, ensuring it’s packed tightly and evenly. You can use the bottom of a measuring cup for a seamless look and to avoid gaps.
Step 4: Bake the Crust
Bake in the preheated oven for about 10 minutes, or until lightly golden. Then, remove from the oven and allow it to cool while you prep the filling. This will help the crust stay crispy and give that lovely crunch against the creamy filling.
Step 5: Make the Filling
In a large bowl, beat the softened cream cheese with an electric mixer until smooth and creamy (about 2-3 minutes). Gradually add the sugar and mix until blended. Don’t skimp on this step! Incorporating air into the cream cheese will give your cheesecake a dreamy texture.
Step 6: Add the Eggs
Add the eggs one at a time, mixing on low speed after each addition until just incorporated. It’s important not to overbeat the eggs. Too much air can lead to cracks in your finished cheesecake, and we want a smooth, crack-free surface!
Step 7: Stir in the Sour Cream, Lemon Juice, and Zest
Lower the mixer speed and gently fold in the sour cream, lemon juice, and lemon zest until well combined. Tasting is essential here. Feel free to add a bit more lemon juice or zest if you want an extra zing!
Step 8: Pour the Filling into the Crust
Carefully pour the cheesecake filling over the cooled crust. Smooth the top with a spatula for an even finish.
Step 9: Bake the Cheesecake
Bake the cheesecake in your preheated oven for about 55-60 minutes. You’ll know it’s done when the edges are set, and the center still has a slight jiggle. No need to fret—this jiggle will firm up as it cools!
Step 10: Cool and Set
Once baked, turn off the oven and leave the cheesecake inside to cool for about 1 hour, which helps prevent cracks. After an hour, remove it from the oven and let it cool to room temperature. Then, transfer it to the fridge and chill for at least 4 hours (or overnight for best results). Patience is key, folks!
Serving Suggestions
When it comes to serving this masterpiece, simple is best! Slice your cheesecake into wedges and place them on individual plates. For a touch of elegance, top each slice with a handful of fresh berries, a dollop of whipped cream, or a drizzle of lemon curd. You could also sprinkle some toasted coconut on top for that extra flair.
Recipe Variations
While this lemon cheesecake is nothing short of fabulous, here are some fun twists to keep your taste buds guessing:
- Berry Bliss: Swirl in a raspberry or blueberry compote before baking for a fruity infusion.
- Chocolate Lover: Add melted chocolate to the filling or make a chocolate crust using Oreo cookies (just crush them up instead of graham crackers).
- Herbaceous Touch: Infuse the cheesecake with finely chopped basil or mint for an unexpected herbal zing.
- Savory Option: Try a hint of savory by adding a pinch of salt or swapping some sugar for a bit of honey in the crust.
- No-Bake Version: Replace the eggs and bake step with gelatin to create a chilled no-bake cheesecake—perfect for summer days!
Chef’s Notes
Every recipe tells a story, and this creamy lemon cheesecake has evolved over the years. Originally, my mom’s version was simple as can be, but I love to experiment, playing around with flavors and twists to make it my own. Each time I bake it, the scent reminds me of those joyful summer afternoons, connecting me back to my roots. Don’t be afraid to make it your story—every sprinkle of zest is a chance to add your own flair.
FAQs and Troubleshooting
Q: Why did my cheesecake crack?
A: Cracking typically occurs when the cheesecake is overmixed or baked at too high a temperature. To avoid this, mix just until combined and bake at a low temp with the oven door slightly ajar during the cooling phase.
Q: How can I tell when my cheesecake is done?
A: It should be set around the edges but still have a slight jiggle in the center when you gently shake the pan.
Q: Can I make this cheesecake ahead of time?
A: Absolutely! It’s the perfect make-ahead dessert. Just be sure to store it in the fridge and cover it to keep it fresh.
Q: How should I store leftovers?
A: Keep any leftover cheesecake tightly wrapped in plastic wrap or an airtight container in the fridge. It typically lasts for 3-5 days—if it lasts that long!
Nutritional Info
Of course! Each slice of this cheesecake packs a bit of indulgence, but it’s all about balance, right? A slice (about 1/12 of the cheesecake) generally contains approximately:
- Calories: 320
- Total Fat: 22g
- Saturated Fat: 12g
- Cholesterol: 90mg
- Carbohydrates: 28g
- Fiber: 1g
- Sugars: 20g
- Protein: 6g
Now that you’ve got the recipe, a sprinkle of patience, and the zest for making memories in the kitchen, you’re all set to create a delicious creamy lemon cheesecake! I hope this journey inspires you to whip up your version and share it with loved ones.
Here’s to amazing flavors, joyful memories, and, of course, a slice (or two) of creamy lemon goodness! Happy baking!
PrintCreamy Lemon Cheesecake

A delightful dessert that combines smooth cream cheese with a refreshing lemon flavor, perfect for any occasion.
- Prep Time: 20 minutes
- Cook Time: 70 minutes
- Total Time: 90 minutes
- Yield: 12 servings 1x
- Category: Dessert
- Method: Baking
- Cuisine: American
- Diet: Vegetarian
Ingredients
- 1 ½ cups Graham Crackers, crushed
- ¼ cup Granulated Sugar
- ½ cup Unsalted Butter, melted
- 16 oz Cream Cheese, softened
- ¾ cup Granulated Sugar
- 3 large Eggs, at room temperature
- 1 cup Sour Cream
- ½ cup Fresh Lemon Juice
- 2 tablespoons Lemon Zest
Instructions
- Preheat the oven to 325°F (163°C).
- Combine the crushed graham crackers, granulated sugar, and melted butter in a mixing bowl.
- Press the mixture into the bottom of a 9-inch springform pan.
- Bake in the preheated oven for about 10 minutes.
- Beat the softened cream cheese with an electric mixer until smooth and creamy.
- Add the sugar gradually and mix until blended.
- Add the eggs one at a time, mixing on low speed after each addition.
- Stir in the sour cream, lemon juice, and zest until well combined.
- Pour the filling over the cooled crust.
- Bake the cheesecake for about 55-60 minutes.
- Cool the cheesecake in the oven for about 1 hour.
- Chill in the fridge for at least 4 hours or overnight.
Notes
Serve with fresh berries, whipped cream, or lemon curd for added flavor.
Nutrition
- Serving Size: 1 slice
- Calories: 320
- Sugar: 20g
- Sodium: 300mg
- Fat: 22g
- Saturated Fat: 12g
- Unsaturated Fat: 8g
- Trans Fat: 0g
- Carbohydrates: 28g
- Fiber: 1g
- Protein: 6g
- Cholesterol: 90mg
Keywords: cheesecake, lemon dessert, creamy dessert, American dessert
Beginner-Friendly No-Bake Oreo Cheesecake Cups (Quick Prep)
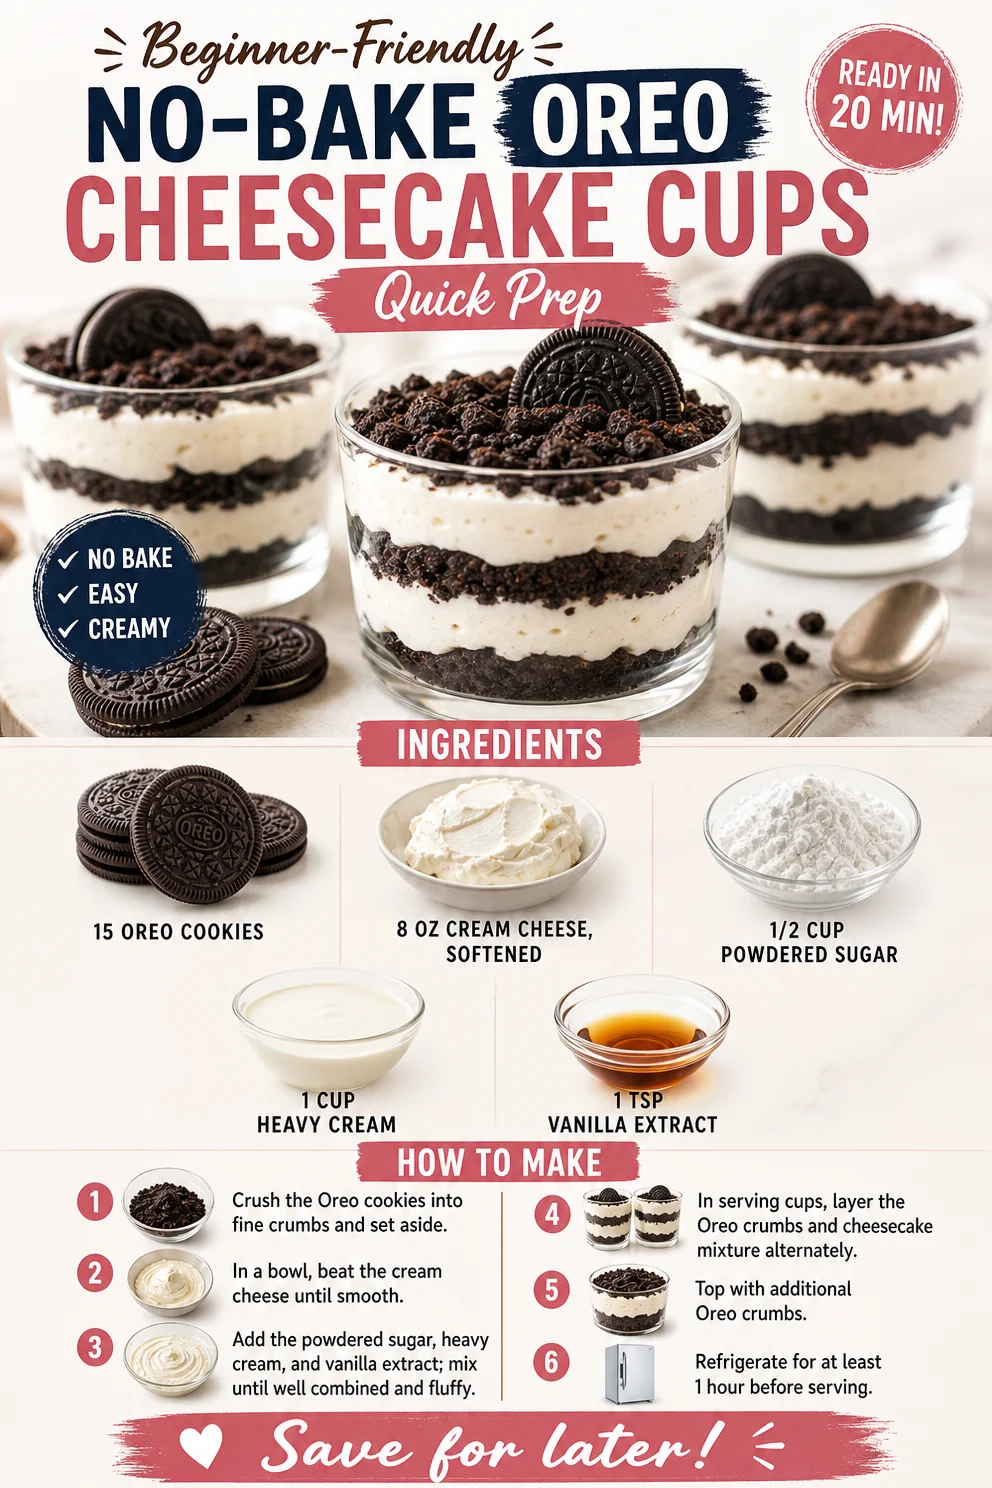
No Bake Oreo Cheesecake Cups: A Dessert to Crave
Welcome back to Clean Plate Cravings, where we whip up delightful, fresh, and feel-good recipes for every occasion! Today, I’m excited to share a delectable treat that’s bound to bring a smile to your face and joy to your taste buds: No Bake Oreo Cheesecake Cups. These heavenly little cups are not only a breeze to make, but they’re also packed with flavor and irresistible creaminess. So let’s roll up our sleeves, dive into the kitchen, and create something truly special together!
A Sweet Nostalgic Memory
Before we jump into the recipe, let me take you on a little trip down memory lane. I remember the first time I had an Oreo cheesecake. I was at a summer picnic, and one of my friends brought this divine dessert. It was a hot day, and the lush, creamy texture of the cheesecake paired with the crunchy Oreo crust was sheer bliss. I took my first bite and immediately knew I had discovered something magical!
Every summer since then, I’ve made it my mission to recreate that perfect cheesecake. After countless experiments and some hilarious kitchen fails (thank goodness for forgiving friends!), I landed on this no-bake version that’s indeed the star of the show. So, let’s bring that nostalgic flavor into our kitchens!
Ingredients
Here’s what you’ll need to make these delightful No Bake Oreo Cheesecake Cups:
-
15 Oreo cookies: A classic cookie that provides the perfect base with its crunchy texture and sweet cocoa flavor. Don’t have Oreos? Try any chocolate sandwich cookie!
-
8 oz cream cheese, softened: Cream cheese gives our cheesecake its rich and creamy texture. To make it lighter, use mascarpone cheese or even a dairy-free cream cheese alternative.
-
1/2 cup powdered sugar: This sweet component gives balance without being overly sweet. If you need a sugar alternative, powdered erythritol works beautifully!
-
1 cup heavy cream: Heavy cream is whipped to create that light and fluffy texture. For a lighter version, you can use whipped coconut cream.
-
1 tsp vanilla extract: The essence of vanilla infuses warmth and sweetness into the cheesecake. Pure vanilla extract is always the best choice, but imitation vanilla will work in a pinch!
Step-by-Step Instructions
Ready to bring these Oreo Cheesecake Cups to life? Here’s how to do it!
-
Crush the Oreos: Start by placing your Oreo cookies in a zip-top bag. Seal it tightly and give them a good crush with a rolling pin or a heavy object until you have fine crumbs. Not only will this release stress, but it’ll also create a fantastic crust! Alternatively, you can use a food processor for this job.
-
Make the Cookie Crust: In a mixing bowl, combine the crushed Oreos with 2 tablespoons of melted butter. Stir until everything is moistened. This is your delicious crust! Spoon a heaping tablespoon of the mixture into the bottom of each serving cup or jar and press down gently.
-
Prepare the Cheesecake Filling: In another bowl, beat the softened cream cheese with an electric mixer until smooth. Add the powdered sugar and vanilla extract, blending well until combined. You’ll find the mixture becoming thick and creamy—don’t worry, you’re on the right track!
-
Whip the Heavy Cream: In a separate bowl, whip the heavy cream until stiff peaks form. You’ll know it’s ready when you turn the bowl upside down, and nothing falls out! This fluffy whipped cream will lighten our cheesecake mixture beautifully.
-
Fold it All Together: Gently fold the whipped cream into the cream cheese mixture. Use a spatula and be gentle—the key here is to maintain that light, airy texture. Keep folding until just incorporated.
-
Assemble the Cups: Now comes the fun part! Layer the cheesecake filling over the Oreo crust in each cup. You can use a piping bag for a more polished look or just spoon it in (we’re keeping it relaxed here!). Add another layer of crushed Oreos on top for that lovely crunch.
-
Chill and Enjoy: Refrigerate the Oreo cheesecake cups for at least 2 hours or until set. The waiting is the hardest part, but believe me, it’s worth it!
Serving Suggestions
When it’s time to serve, it’s all about presentation! You can keep it simple by adding a dollop of whipped cream on top and maybe a sprinkle of crushed Oreos for visual appeal. If you’re feeling extra indulgent, drizzle some chocolate syrup or a touch of caramel sauce. Voilà! Your dreamy dessert is ready to impress!
Recipe Variations
Want to change things up? Here are a few creative twists to consider:
-
Mint Chocolate Oreo Cheesecake Cups: Use mint-flavored Oreos for a refreshing spin!
-
Peanut Butter Lover’s Variation: Add a few tablespoons of creamy peanut butter to the cheesecake filling for added richness.
-
Fruit-Filled Delight: Layer in some fresh strawberries or raspberries in between the crust and filling for a fruity touch.
-
Chocolate Lovers’ Dream: Incorporate mini chocolate chips into the filling or top with chocolate shavings for an extra decadence.
Chef’s Notes
This recipe has become my go-to dessert for gatherings, family celebrations, and even cozy nights in! Each time, I love to tweak the ingredients based on what I have at hand or the mood of the occasion. One memorable moment was when I accidentally added too much cream cheese—who knew it could turn into a super creamy masterpiece? My friends loved the unexpected twist!
FAQs and Troubleshooting
-
Can I prepare these cups in advance?
Absolutely! These cheesecake cups can be made a day ahead and stored in the refrigerator until you’re ready to serve. -
What if my mixture is too thick?
If it’s too thick, try adding a splash of milk or cream to loosen it up while still maintaining its structure. -
Can I use low-fat cream cheese?
Yes, you can! Just remember that the texture may be slightly different, but it will still be delicious. -
Can I freeze these cheesecake cups?
Yes, they can be frozen! Just make sure to cover them well. When you’re ready to enjoy, thaw them in the fridge overnight before serving.
Nutritional Info
While I always advocate for enjoying dessert without guilt, if you’re curious about the nutritional info per serving (assuming 6 cups total), each cup contains approximately:
- Calories: 250
- Protein: 3g
- Carbohydrates: 28g
- Fat: 15g
- Sugar: 8g
And there you have it, my friends! I can’t wait for you to try these No Bake Oreo Cheesecake Cups; they’re a delightful treat that feels just like a hug in dessert form. So, grab your ingredients, get your friends or family involved, and enjoy the fantastic flavors of this creamy treat. Happy indulging!
PrintNo Bake Oreo Cheesecake Cups
Delightful no bake Oreo cheesecake cups that are creamy, packed with flavor, and incredibly easy to make.
- Prep Time: 20 minutes
- Cook Time: 0 minutes
- Total Time: 120 minutes
- Yield: 6 servings 1x
- Category: Dessert
- Method: No-Bake
- Cuisine: American
- Diet: Vegetarian
Ingredients
- 15 Oreo cookies
- 8 oz cream cheese, softened
- 1/2 cup powdered sugar
- 1 cup heavy cream
- 1 tsp vanilla extract
Instructions
- Crush the Oreos: Place the Oreo cookies in a zip-top bag, seal tightly, and crush until fine crumbs form.
- Make the Cookie Crust: Combine the crushed Oreos with 2 tablespoons of melted butter in a mixing bowl.
- Prepare the Cheesecake Filling: Beat the softened cream cheese with an electric mixer until smooth, then add in the powdered sugar and vanilla extract.
- Whip the Heavy Cream: In a separate bowl, whip the heavy cream until stiff peaks form.
- Fold it All Together: Gently fold the whipped cream into the cream cheese mixture until incorporated.
- Assemble the Cups: Layer the cheesecake filling over the Oreo crust in each cup, adding more crushed Oreos on top.
- Chill and Enjoy: Refrigerate for at least 2 hours or until set before serving.
Notes
These cheesecake cups can be made in advance and kept in the refrigerator. Perfect for gatherings or as a family treat!
Nutrition
- Serving Size: 1 cup
- Calories: 250
- Sugar: 8g
- Sodium: 200mg
- Fat: 15g
- Saturated Fat: 9g
- Unsaturated Fat: 5g
- Trans Fat: 0g
- Carbohydrates: 28g
- Fiber: 1g
- Protein: 3g
- Cholesterol: 30mg
Keywords: Oreo cheesecake, no bake dessert, easy cheesecake recipe, creamy dessert
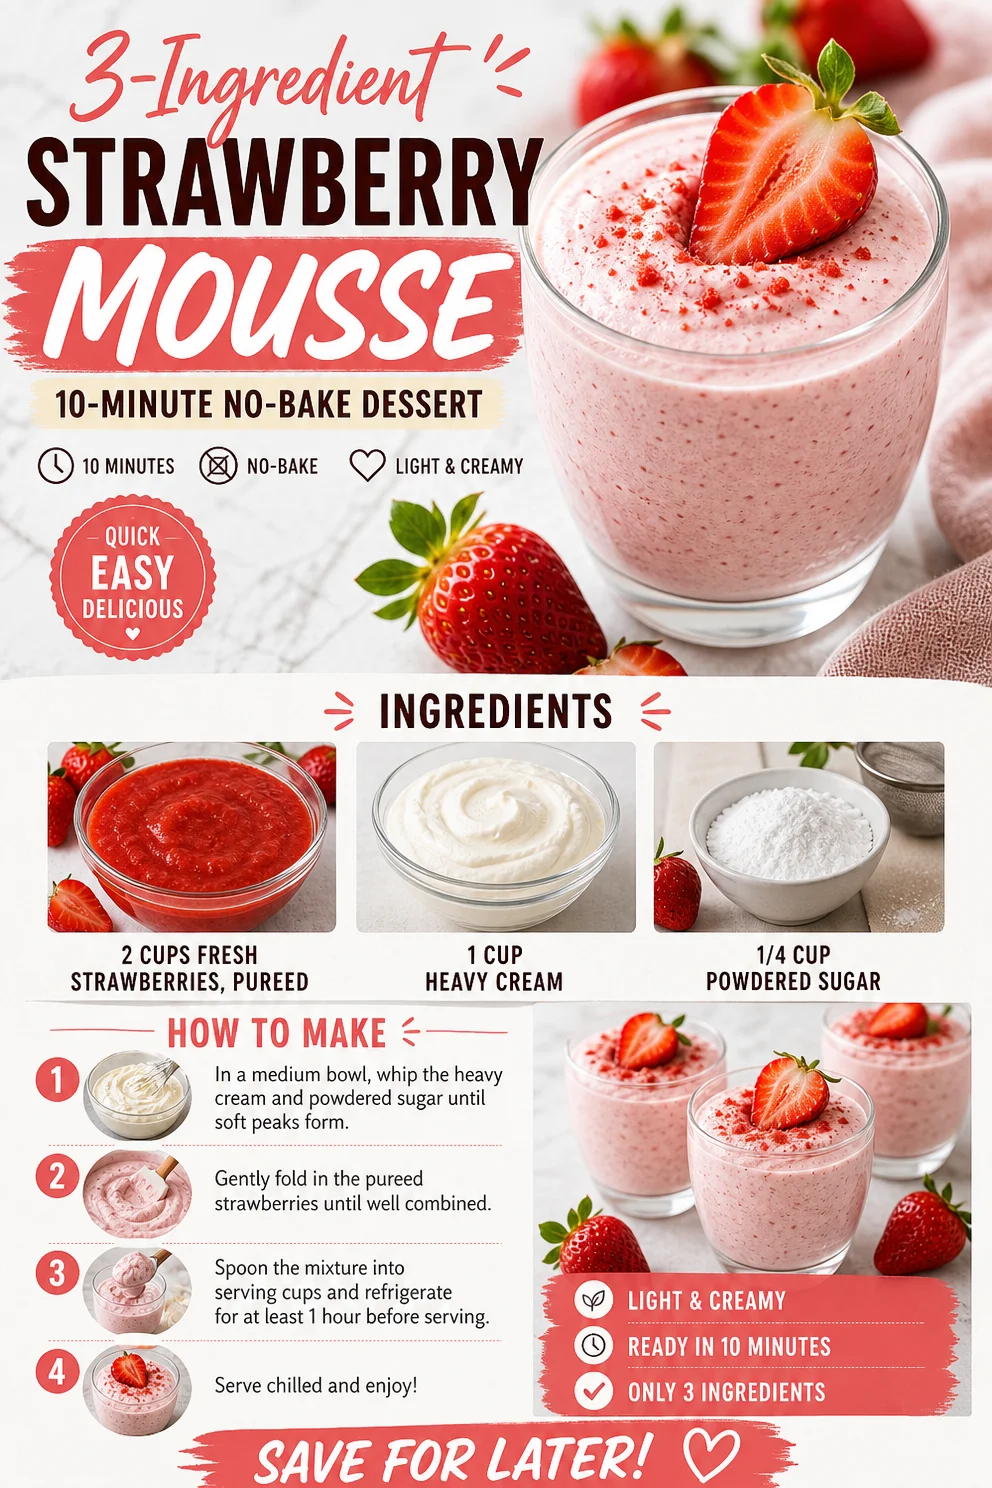
Ingredient Strawberry Mousse: 10-Minute No-Bake Dessert
The Ultimate 3-Ingredient Strawberry Mousse: Your New Favorite Dessert!
Welcome to Clean Plate Cravings! If you have a sweet tooth and a love for fresh ingredients, buckle up—you’re about to dive into the world of glorious, creamy strawberry mousse. Trust me, this isn’t just any old dessert. This is a silky, dreamy, and oh-so-simple treat crafted with just three ingredients that will have your taste buds dancing in delight. And here’s the best part: it’s as easy to whip up as it is delicious!
A Love Affair with Strawberries
Let’s take a moment to chat about strawberries. There’s something magical about them, isn’t there? I still remember the first time I plucked a ripe strawberry straight from the vine on my grandmother’s farm. I was probably eight years old, and that burst of sweetness lingered in my mind long after the sun set. My grandma would toss those fresh berries into delectable desserts, but my favorite was her strawberry mousse—made with just a few simple ingredients, of course, still using that secret that I recently rediscovered: simplicity is key.
Now, every time I make this mousse, it reminds me of those sunny afternoons spent picking strawberries and blending flavors in a way that’s both fun and nourishing. This dessert celebrates that nostalgic joy while also fitting seamlessly into our modern lives. No need to fuss over complicated techniques or hard-to-find ingredients; with just two cups of fresh strawberries, one cup of heavy cream, and a bit of powdered sugar, you’ll have a show-stopping dessert ready in no time!
Ingredients
Let’s get down to business! Here’s what you’ll need for this blissful three-ingredient strawberry mousse:
-
2 cups fresh strawberries, pureed
Fresh strawberries are the star of our show! Choose ripe, sweet berries for the best flavor. If strawberries aren’t in season, you can use frozen strawberries—just thaw and drain them before pureeing. -
1 cup heavy cream
This is what’s going to give our mousse that rich, creamy texture. Want to lighten it up? You can substitute half of the heavy cream with Greek yogurt for a slightly tangy flavor and fewer calories. -
1/4 cup powdered sugar
Sugar is essential to sweeten up that luscious cream and balanced flavors. If you’re avoiding sugar, feel free to use a sugar substitute like monk fruit or erythritol to keep things sweet without the guilt.
Step-by-Step Instructions
Ready to create some magic in your kitchen? Let’s get to it! Follow these easy steps for a delightful dessert that will have you reminiscing about those farm days.
-
Prep Your Strawberries
Rinse your strawberries thoroughly under cold water to remove any dirt. Remove the green tops and hull the strawberries. Now, slice them in half to make them easier to puree. This little extra step helps to get a smoother blend! -
Puree the Strawberries
Transfer those beautifully hulled berries into a blender or food processor. Blend until smooth! You want a luscious puree that’s bright red and slightly chunky. If you prefer a more refined texture, you can strain the puree through a fine mesh sieve to remove any seeds, but that’s totally up to you! -
Whip the Heavy Cream
In a mixing bowl, pour in your heavy cream. Using an electric mixer or whisk (a little muscle never hurt!), whip the cream until soft peaks form. This step is crucial—it creates that airy texture that makes mousse so dreamily light! Just be careful not to over-whip, or you’ll end up with butter instead of a smooth cream. -
Add Powdered Sugar and Strawberry Puree
Sprinkle the powdered sugar into the whipped cream and gently fold it in using a spatula. This helps sweeten the cream without losing its fluffiness. Once incorporated, add in your strawberry puree. Fold it gently until just combined; you want to maintain that airy texture while combining flavors. -
Chill and Set
Transfer your mousse into serving dishes or a large bowl and cover with plastic wrap. Pop it in the refrigerator for at least 1-2 hours. This chill time allows the flavors to meld together beautifully and for the mousse to set.
Voilà! Your 3-ingredient strawberry mousse is all set. Now, this is where the waiting game begins, and I know it’s hard to resist digging in right away! But trust me, the time spent chilling is worth it for that decadent taste.
Serving Suggestions
Serving this mousse is as delightful as eating it! For that extra special touch, use a piping bag to dollop the mousse into your favorite dessert cups or glasses. A sprinkle of fresh strawberry slices on top and a mint leaf or two will elevate the presentation. Want to go all out? Add a drizzle of dark chocolate sauce or a sprinkle of graham cracker crumbs for contrast—your guests will be impressed!
Recipe Variations
Now that you’ve mastered the classic strawberry mousse, let me share some fun ways to switch it up:
-
Chocolate Strawberry Mousse: Add two tablespoons of cocoa powder to the whipped cream before folding in the strawberry puree. It’s a decadent twist that chocolate lovers will adore!
-
Coconut Strawberry Mousse: Replace the heavy cream with coconut cream for a tropical vibe. You’ll be transported to a beach paradise with every bite!
-
Berry Medley Mousse: Swap some of the strawberries for other berries like raspberries or blueberries. It’s a refreshing burst of flavors—feel free to mix and match!
-
Lemon Zest Surprise: Add a teaspoon of lemon zest to the strawberry puree for a zesty twist that will brighten up the flavors.
Chef’s Notes
This recipe holds a special place in my heart not only because of the flavors but because of the ease it offers! I remember once bringing this mousse to a friend’s picnic, and everyone was in disbelief when I revealed how simple it was to make. It’s amazing how a few ingredients can create something so luxurious.
Over the years, I’ve adjusted this recipe to fit my pantry needs—like substituting Greek yogurt for heavy cream when I’m feeling extra health-conscious. It’s been a life-saver for those last-minute dessert craves when I want to impress guests but don’t have hours to spend in the kitchen.
FAQs and Troubleshooting
1. Can I use frozen strawberries?
Absolutely! Just remember to thaw and drain them well before pureeing to keep the mousse from getting too watery.
2. Can I make this ahead of time?
Yes, you can! This mousse stores beautifully in the refrigerator for up to 3 days. Just keep it covered to maintain freshness.
3. What if my mousse isn’t thick enough?
Make sure you’re whipping the cream to soft peaks before incorporating it with the puree. If it doesn’t look thick enough after chilling, gently fold in some more whipped cream to lighten it up.
4. How can I make this dairy-free?
Substituting heavy cream with coconut cream works wonders! Just chill a can of coconut milk overnight and scoop out the solid cream for this recipe.
Nutritional Info
While exact nutritional values can vary based on your ingredient choices, here’s a quick overview of what you can expect per serving (based on 8 servings):
- Calories: 140
- Carbohydrates: 15g
- Protein: 2g
- Fat: 8g
Feel free to adjust and tweak as needed to suit your dietary preferences.
And there you have it! A simple, yet utterly delightful 3-ingredient strawberry mousse that brings both joy and sweetness into your kitchen. Whether you’re treating yourself after a long day, hosting friends, or looking to impress during a special occasion, this dessert is sure to make any gathering a success. So grab those strawberries, and let’s create something delicious together! Happy cooking!
PrintUltimate 3-Ingredient Strawberry Mousse
A silky, dreamy dessert made with just three ingredients: fresh strawberries, heavy cream, and powdered sugar.
- Prep Time: 15 minutes
- Cook Time: 0 minutes
- Total Time: 120 minutes
- Yield: 8 servings 1x
- Category: Dessert
- Method: No Bake
- Cuisine: American
- Diet: Vegetarian
Ingredients
- 2 cups fresh strawberries, pureed
- 1 cup heavy cream
- 1/4 cup powdered sugar
Instructions
- Prep your strawberries by rinsing and hulling them.
- Puree the strawberries in a blender until smooth.
- Whip the heavy cream until soft peaks form.
- Add powdered sugar to the whipped cream and fold in.
- Chill the mousse in the refrigerator for at least 1-2 hours.
Notes
For a lighter version, substitute half the heavy cream with Greek yogurt. This mousse can also be made ahead of time and stored in the refrigerator for up to 3 days.
Nutrition
- Serving Size: 1 serving
- Calories: 140
- Sugar: 10g
- Sodium: 50mg
- Fat: 8g
- Saturated Fat: 5g
- Unsaturated Fat: 3g
- Trans Fat: 0g
- Carbohydrates: 15g
- Fiber: 1g
- Protein: 2g
- Cholesterol: 30mg
Keywords: strawberry mousse, easy dessert, 3-ingredient dessert
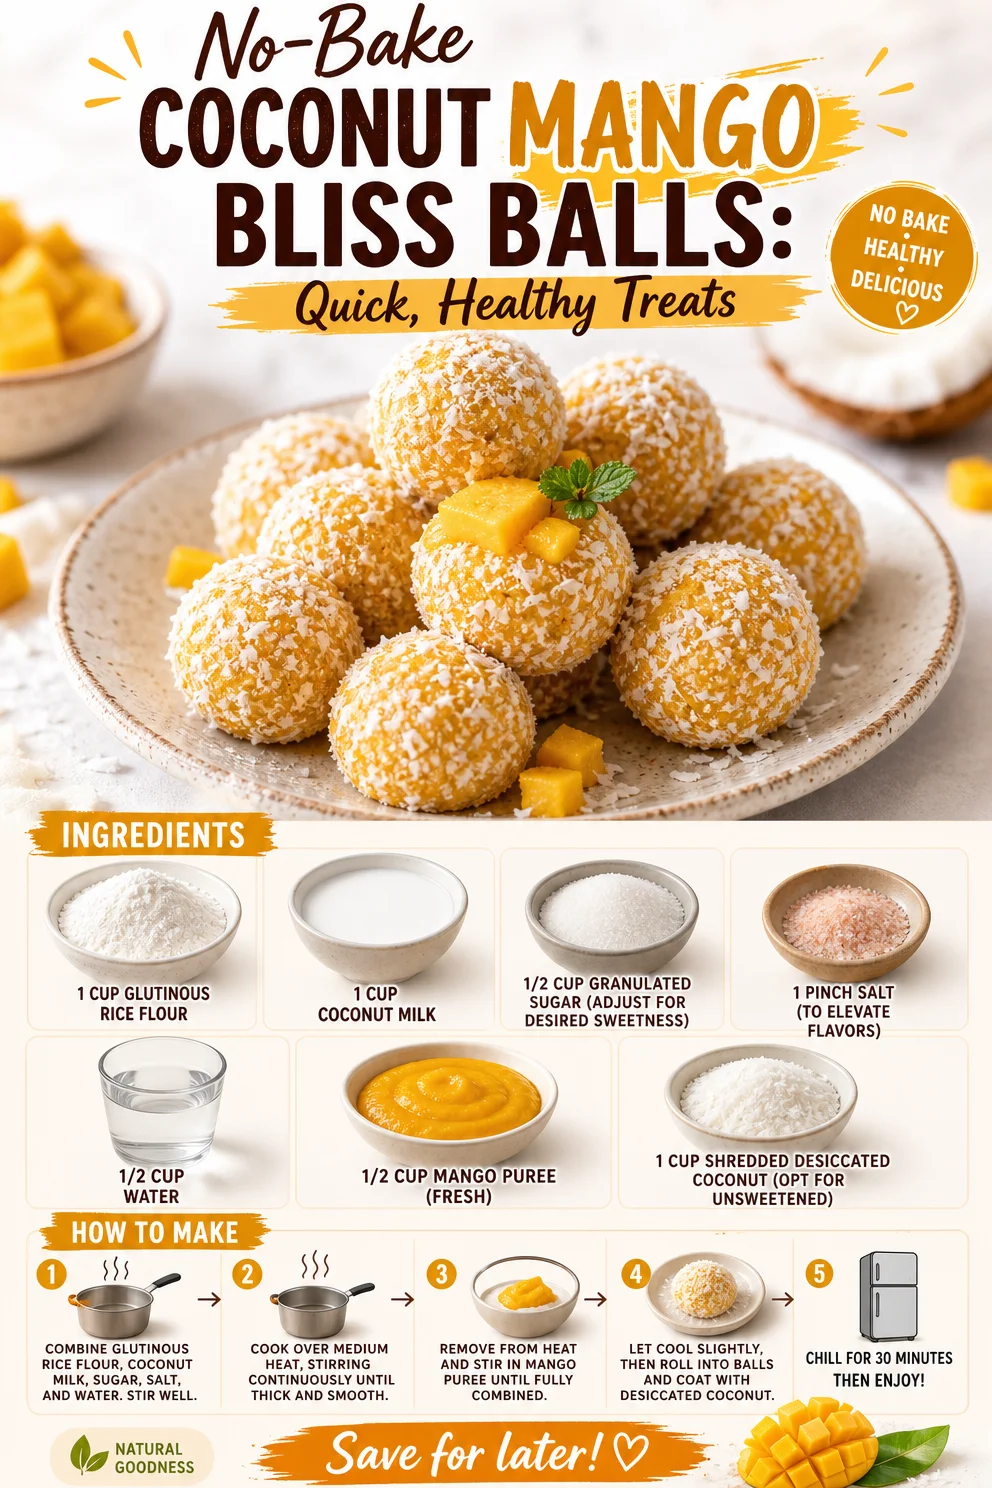
No-Bake Coconut Mango Bliss Balls: Quick, Healthy Treats
Coconut Mango Bliss Balls: A Sweet Escape to Paradise
Welcome to the sunny side of life! If you’re someone who has ever dreamt of being whisked away to a tropical paradise, you’re in for a delightful treat. Today, we’re diving into a recipe that brings the beach to your kitchen: Coconut Mango Bliss Balls. These little bites of joy are not only a beautiful combination of flavors but also carry a touch of nostalgia that makes cooking all the more exciting.
Introduction
I can still remember standing in my grandmother’s kitchen when I was a kid, the warm sun spilling through the windows as she whipped up one of her famous treats. There was something magical about how a few simple ingredients could transform into something so delicious. One particular recipe that always stood out was her tropical coconut and mango concoction. She would often make these blissful little bites during family gatherings, and I’d watch her create these mouthwatering goodies, a twinkle of joy in her eyes.
Now, fast-forward to today, and I’m thrilled to share an evolved version of those cherished treats with you! Coconut Mango Bliss Balls are not just your average snack; they embody everything I love about food: bright flavors, ease of preparation, and the power to transport you to a blissful place with one delightful bite.
These bliss balls are perfect for an afternoon snack, a healthy dessert, or even as a fun addition to your meal prep routine. Plus, they’re super customizable—healthy eating should bring joy, not restrictions! So, puff out your chest, grab that apron, and let’s turn your kitchen into a tropical retreat!
Personal Story
Every time I roll these Coconut Mango Bliss Balls, I’m greeted by a wave of nostalgia. It reminds me of my first trip to the beach with my family. As kids, my siblings and I raced across the warm, golden sand, chasing after the crashing waves while our parents lounged nearby, sipping on tropical drinks. My grandmother had prepared a cooler packed with snacks, including her famous coconut and mango goodies.
There’s a vivid memory of biting into those bliss balls as I sat on the sand, the salty breeze brushing against my face, while the sheer sweetness of the coconut and mango danced on my tongue. It felt like encapsulating summer in one delicious bite! It’s not just about the taste but the memories and the experiences we share around food. That’s why I adore creating and sharing recipes—because every meal has the potential to create a fond memory.
Ingredients
Let’s gather our ingredients and start this delicious journey! Here’s what you’ll need:
-
1 cup glutinous rice flour
This flour gives our bliss balls a chewy texture. If you can’t find glutinous rice flour, feel free to use regular rice flour, but the texture might be slightly different. -
1 cup coconut milk
Creamy and rich, coconut milk lends a lusciousness to our mixture. For a lighter option, you can substitute with coconut almond milk or even oat milk. -
1/2 cup granulated sugar
Adjust the sweetness to your liking! You may want to swap it for coconut sugar or even a natural sweetener like maple syrup for a less refined option. -
1 pinch salt
Just a sprinkle to enhance all those fabulous flavors; trust me, you won’t regret it! -
1/2 cup water
This helps bring the mixture together and dissolve the sugar. It’s your liquid magic. -
1/2 cup mango puree (fresh)
Use ripe, juicy mangoes for the best flavor! If fresh mango isn’t available, consider using thawed frozen mango, or even store-bought puree. -
1 cup shredded desiccated coconut (unsweetened)
This adds texture and a delightful coconutty flavor to our bliss balls. Unsweetened coconut is preferred to keep things healthy without adding refined sugars.
Step-by-Step Instructions
Alright, let’s get cooking! These bliss balls are not only simple to make but ridiculously fun to prepare. Here’s how to whip them up:
-
Combine Dry Ingredients
In a large mixing bowl, combine the glutinous rice flour and salt. Give it a gentle whisk to mix them well; think of it as giving your rice flour a spa day! -
Mix Wet Ingredients
In a separate bowl, whisk together the coconut milk, water, and granulated sugar. Stir until the sugar is dissolved. This is where the magic begins! -
Combine and Form the Dough
Gradually add the wet mixture to the dry ingredients. Use a spatula or your hands to combine everything until you form a cohesive dough. It should be slightly sticky but manageable. Don’t be afraid to get your hands dirty! -
Add Mango Puree
Gently fold in the mango puree. This is where the flavor explosion occurs! The aroma of ripe mango will whisk you away to a tropical paradise even before you take a bite. -
Shape the Bliss Balls
Use your hands to form small balls, about the size of a tablespoon. Roll them between your palms until they’re nice and smooth. If you need a little extra coconut coating on the outside, feel free to roll them in shredded desiccated coconut for an extra touch of tropical bliss! -
Chill and Set
Place your bliss balls on a plate lined with parchment paper and refrigerate for about 30 minutes. This will help them firm up. While they chill, you can clean up the kitchen (or sneak a taste of the leftover dough—no judgment here!).
Serving Suggestions
These Coconut Mango Bliss Balls delight the senses, not just in taste but also in presentation. Serve them on a vibrant platter, perhaps surrounded by fresh mango slices or sprinkled with extra shredded coconut for a fun, tropical vibe! Add a sprig of mint for a pop of color, and you’ve got yourself a stunning treat that’s just as pleasing to the eyes as it is to the taste buds.
Recipe Variations
Let’s get creative! Here are a few ideas to switch things up:
-
Chocolate Coconut Bliss Balls: Add 1-2 tablespoons of cocoa powder to the dry ingredients for a chocolatey twist. You can also drizzle melted dark chocolate over the finished balls for a decadent treat.
-
Protein-Packed Version: Incorporate a scoop of your favorite protein powder to boost nutrition!
-
Tropical Fruit Fusion: Mix in diced pineapple or a splash of lime juice for an extra zing!
-
Nutty Addition: Fold in some crushed cashews or almonds into the mixture for added crunch.
-
Vegan Swaps: Ensure all ingredients are labeled vegan, swapping granulated sugar for coconut sugar or maple syrup to keep it plant-based.
Chef’s Notes
As with any recipe, feel free to adapt it to your taste. When I first started making these bliss balls, I accidentally added too much coconut milk and turned them into a delectable coconut-mango pudding instead! Not everything has to come out perfectly—to me, that’s the essence of home cooking. So if you find yourself in a sticky situation (pun intended!), don’t be afraid to play around.
These bliss balls have also evolved beyond just a sweet treat; they’re now a staple in my meal prep rotation, enjoyed on busy days when I need a quick fuel-up. They quickly went from being a summer treat to a year-round favorite, embodying the goal of Clean Plate Cravings: keeping food exciting and adaptable!
FAQs and Troubleshooting
How do I store Coconut Mango Bliss Balls?
Keep them in an airtight container in the fridge for up to a week. You can also freeze them for up to a month; just thaw when you’re ready to enjoy!
The dough is too sticky; what should I do?
If your dough feels overly sticky, simply sprinkle in a bit more glutinous rice flour, a tablespoon at a time, until you can easily roll them into balls.
Can I use fresh mango instead of puree?
You can! Just blend fresh mango until smooth, or finely chop it and fold it into the mixture for a chunkier texture.
What if I want a sweeter bite?
Feel free to increase the sugar to 3/4 cup or replace it with a sweeter fruit puree, like banana or apple sauce for added flavor without the extra sugar!
Nutritional Info (Optional)
These bliss balls are not just delectable—they also pack a nutritional punch! Each serving contains healthy fats from the coconut, natural sugars from mango, and fiber from the rice flour. With mindful portioning, they make for an energizing snack that keeps you feeling fulfilled.
There you have it! Your sweet escape to paradise in the form of Coconut Mango Bliss Balls. I hope you enjoy making them as much as I love sharing this recipe with you. Remember, the kitchen is a place for joy, creativity, and delicious experimentation. Happy cooking!
PrintCoconut Mango Bliss Balls

Delightful tropical treats made with coconut and mango, perfect for snacking or as a healthy dessert.
- Prep Time: 15 minutes
- Cook Time: 0 minutes
- Total Time: 45 minutes
- Yield: 20 servings 1x
- Category: Snack
- Method: No-Cook
- Cuisine: Tropical
- Diet: Vegan
Ingredients
- 1 cup glutinous rice flour
- 1 cup coconut milk
- 1/2 cup granulated sugar
- 1 pinch salt
- 1/2 cup water
- 1/2 cup mango puree (fresh)
- 1 cup shredded desiccated coconut (unsweetened)
Instructions
- Combine Dry Ingredients: In a large mixing bowl, combine the glutinous rice flour and salt. Give it a gentle whisk to mix them well.
- Mix Wet Ingredients: In a separate bowl, whisk together the coconut milk, water, and granulated sugar until the sugar is dissolved.
- Combine and Form the Dough: Gradually add the wet mixture to the dry ingredients, mixing with a spatula or your hands to form a cohesive dough.
- Add Mango Puree: Gently fold in the mango puree until well incorporated.
- Shape the Bliss Balls: Use your hands to form small balls, about the size of a tablespoon.
- Chill and Set: Place the bliss balls on a plate lined with parchment paper and refrigerate for about 30 minutes.
Notes
Feel free to customize with chocolate, nuts, or additional fruits for a variety of flavors.
Nutrition
- Serving Size: 1 ball
- Calories: 120
- Sugar: 6g
- Sodium: 5mg
- Fat: 6g
- Saturated Fat: 5g
- Unsaturated Fat: 1g
- Trans Fat: 0g
- Carbohydrates: 15g
- Fiber: 1g
- Protein: 2g
- Cholesterol: 0mg
Keywords: Coconut, Mango, Bliss Balls, Healthy Snacks, Vegan Dessert