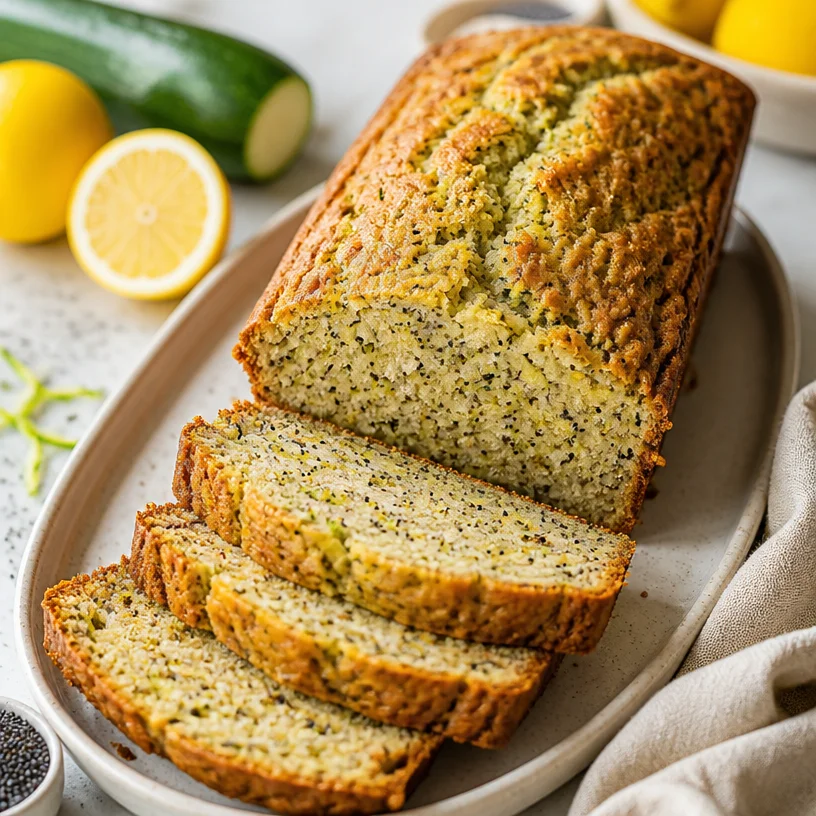
Lemon Poppy Seed Zucchini Bread (One-Bowl Breakfast)
Lemon Poppy Seed Zucchini Bread: A Slice of Sunshine
Welcome, food lovers! Today, I’m thrilled to introduce you to a delightful treat that’ll brighten your day and tickle your taste buds: Lemon Poppy Seed Zucchini Bread. If you’re searching for a perfect balance between zesty lemon and warm, comforting baked goodness, you’ve just hit the jackpot. This recipe is not only delicious, but it’s also a great way to sneak in some veggies without sacrificing flavor—who doesn’t love that?
Growing up, my summer days were often filled with the sweet aroma of baking wafting through my family’s kitchen. My grandmother had a knack for incorporating fresh produce into her baking, believing it made everything healthier and more delicious. One of her standout creations was a moist zucchini bread, usually bursting with flavors that could challenge a sunny day itself.
One afternoon, I decided to take her classic recipe and give it a little twist. I added lemon and poppy seeds for a refreshing zing, and oh, my stars! The combination was magical. The sweet, citrusy tang of the lemon paired with the earthy undertones of the zucchini created a symphony of flavors. Poppy seeds added a lovely crunch that is almost like a mini celebration in every bite. You could just feel the sun shining in the kitchen as I poured my heart into that batter.
So, whether you’re enjoying this for breakfast, as a midday snack, or even as a dessert, I’m here to guide you through creating this lemony dream. Grab your mixing bowls and spatula—it’s time to make some Lemon Poppy Seed Zucchini Bread!
Personal Story
Ah, zucchini bread! This take on a classic recipe brings a rush of nostalgia and warm memories flooding back. I remember one summer when my grandmother decided to have a "zucchini battle" with my uncle, who was known for his monstrous zucchini plants. Every family get-together turned into a challenge of who could bake the best zucchini dish. The kitchen would be alive with laughter, friendly competition, and a hint of rivalry over who used Grandma’s secret spices correctly!
It was during one of these spirited sessions that I stumbled upon the idea of adding lemon and poppy seeds. Standing by the kitchen counter, covered in flour and a mix of chopped zucchini, I squeezed in the juice of a fresh lemon and added a handful of poppy seeds—I was simply experimenting! When the bread came out of the oven, golden and fragrant, Grandma couldn’t stop raving about it. In that moment, I fell in love with the idea of cooking not just to nourish, but to create connections and unforgettable memories. Who would have thought a simple zucchini could inspire such culinary creativity?
Ingredients
Here’s what you’ll need to gather for this zesty delight:
-
2 cups grated zucchini
Fresh zucchini adds moisture to the bread. You can substitute it with grated carrots or even apples if you’d like a different twist! -
1/2 cup vegetable oil
This keeps the bread tender. If you prefer, you can use melted coconut oil or even unsweetened applesauce for a lighter option. -
1 cup granulated sugar
This is essential for sweetness. If you’re looking for a healthier option, coconut sugar or a sugar substitute can work, though it may slightly alter the flavor. -
2 large eggs
Eggs bind the ingredients and help with rising. If you’re vegan, use flaxseed meal mixed with water as a substitute (1 tablespoon flaxseed meal + 2.5 tablespoons water = 1 egg). -
1/2 cup buttermilk
Buttermilk adds richness and flavors the bread beautifully. You can easily make a substitute with milk mixed with a splash of vinegar or lemon juice. -
1 teaspoon vanilla extract
This enhances the overall flavor. You could opt for almond extract for a different note if you’re feeling adventurous! -
2 cups all-purpose flour
This forms the base. For a gluten-free option, you might swap out the flour for a good-quality gluten-free blend. -
1 teaspoon baking powder
Helps the bread rise. Make sure it’s fresh for the best results! -
1 teaspoon baking soda
This reacts with the acidity of the buttermilk for lift. -
1/2 teaspoon salt
Balances the sweetness. You can omit it if you’re watching your sodium intake. -
1 tablespoon poppy seeds
These bring crunch and a fun visual appeal. Chia seeds can be used as a substitute if needed. -
Zest of 1 lemon
This is where the lemony brightness comes from! You can use other citrus zest like orange for variety. -
Juice of 1 lemon
Fresh lemon juice gives the bread its signature tang.
Step-by-Step Instructions
Now, let’s dive into making this scrumptious Lemon Poppy Seed Zucchini Bread! Turn on that oven to 350°F (175°C), and let’s get cooking.
-
Prepare your zucchini:
Start by grating your zucchini. You can use a box grater or a food processor. Make sure to squeeze out any excess moisture with a clean kitchen towel or cheese cloth—it helps prevent your bread from being soggy! -
Mix the wet ingredients:
In a large mixing bowl, whisk together the vegetable oil and sugar until well combined. Now crack in the eggs one by one, beating them into the mixture. Add in your buttermilk and vanilla extract.Chef hack: If you want an extra boost of flavor, add a sprinkle of salt here. It enhances the sweetness and helps balance the flavors!
-
Combine the dry ingredients:
In another bowl, combine your all-purpose flour, baking powder, baking soda, and salt. Stir until well mixed. It’s a good idea to pour this mixture through a sieve to incorporate air, ensuring your bread rises beautifully. -
Mix it all together:
Gradually add the dry ingredient mixture into your wet ingredients, stirring gently. Be careful not to overmix—just until those ingredients come together!Tip: Think of it like a hug—gentle and loving, not a wrestling match!
-
Add those embellishments:
Now, fold in the grated zucchini, lemon zest, lemon juice, and poppy seeds. Your batter should be thick, fragrant, and looking pretty irresistible. -
Pour into the baking pan:
Lightly grease a 9×5-inch loaf pan or line it with parchment paper for easy removal. Pour your batter into the prepared pan, smoothing it out on top. -
Bake to perfection:
Place the pan in the preheated oven and bake for about 50-60 minutes. To check for doneness, insert a toothpick into the center; if it comes out clean, you’re good to go!Pro tip: If the top starts to brown too quickly, cover it with aluminum foil halfway through baking.
-
Cool and slice:
Once done, let the bread cool in the pan for about 10-15 minutes, then transfer it to a wire rack to cool completely. Slice and serve when it’s still slightly warm—I assure you, it’s the best way to enjoy it!
Serving Suggestions
Now, how to enjoy this zesty creation? Slice it warm and spread a little pat of butter on top for that creamy goodness, or try it drizzled with honey or a dollop of Greek yogurt for a protein-packed snack. Feeling fancy? Top with some lemon glaze for a beautiful finish!
Recipe Variations
This recipe is super versatile! Here are a few ways you can switch it up:
- Add nuts: Toss in some chopped walnuts or pecans for a delightful crunch.
- Dried fruits: A handful of blueberries or cranberries can add a lovely burst of sweetness and color.
- Herbal kick: Incorporate fresh herbs like rosemary for a unique flavor profile.
- Spices: A dash of cinnamon or cardamom can elevate the taste, adding warmth.
- Gluten-free option: Use a gluten-free baking blend to cater to dietary needs without sacrificing taste.
Chef’s Notes
This Lemon Poppy Seed Zucchini Bread has been my go-to for years. It’s one of those recipes that has seen its fair share of household adaptations—sometimes I even toss in leftover lemon curd for an extra zing. The best part? It freezes beautifully, so you can have a slice of sunshine any time you please!
Speaking of memories, I’ll never forget the time I got a bit too confident with my lemon zest and ended up with zest all over the floor. My dog was ecstatic; it was like a citrus party just for him! So, if your kitchen gets a bit messy, don’t stress—it’s all part of the fun!
FAQs and Troubleshooting
-
Q: My bread didn’t rise. What went wrong?
A: Your baking soda or powder might be old and lost its potency. Always check expiration dates for freshness! -
Q: How do I prevent my bread from being soggy?
A: Make sure to squeeze out excess moisture from your grated zucchini. Also, avoid over-mixing the batter. -
Q: Can I make this ahead of time?
A: Absolutely! This bread keeps well in an airtight container for up to a week or freezes perfectly for future indulgence. -
Q: What if I don’t have buttermilk?
A: No worries! Mix milk with a tablespoon of vinegar or lemon juice; let it sit for about 5-10 minutes, and voilà—instant buttermilk!
Nutritional Info
This recipe yields approximately 10 slices. Each slice contains:
- Calories: ~180
- Protein: 3g
- Total Fat: 7g
- Saturated Fat: 1g
- Carbohydrates: 26g
- Fiber: 1g
- Sugars: 10g
And there you have it, my foodie friends! You’re now armed with the joy of Lemon Poppy Seed Zucchini Bread. It’s more than just a recipe; it’s a celebration of flavors, memories, and those little moments that make life delicious. I can’t wait for you to try this and share your own stories in the kitchen. Happy baking!
PrintLemon Poppy Seed Zucchini Bread
A delightful treat that balances zesty lemon and comforting baked goodness, perfect for breakfast, a snack, or dessert.
- Prep Time: 15 minutes
- Cook Time: 60 minutes
- Total Time: 75 minutes
- Yield: 10 servings 1x
- Category: Dessert
- Method: Baking
- Cuisine: American
- Diet: Vegetarian
Ingredients
- 2 cups grated zucchini
- 1/2 cup vegetable oil
- 1 cup granulated sugar
- 2 large eggs
- 1/2 cup buttermilk
- 1 teaspoon vanilla extract
- 2 cups all-purpose flour
- 1 teaspoon baking powder
- 1 teaspoon baking soda
- 1/2 teaspoon salt
- 1 tablespoon poppy seeds
- Zest of 1 lemon
- Juice of 1 lemon
Instructions
- Preheat the oven to 350°F (175°C).
- Grate the zucchini and squeeze out excess moisture.
- Whisk together the vegetable oil and sugar in a large mixing bowl.
- Crack in the eggs one by one, beating them into the mixture, then add buttermilk and vanilla extract.
- Combine the all-purpose flour, baking powder, baking soda, and salt in another bowl.
- Gradually add the dry ingredients to the wet ingredients, stirring gently.
- Fold in the grated zucchini, lemon zest, lemon juice, and poppy seeds.
- Pour the batter into a greased 9×5-inch loaf pan.
- Bake for 50-60 minutes or until a toothpick comes out clean.
- Cool in the pan for 10-15 minutes, then transfer to a wire rack to cool completely.
Notes
For an extra boost of flavor, consider adding a sprinkle of salt to the wet ingredients.
Nutrition
- Serving Size: 1 slice
- Calories: 180
- Sugar: 10g
- Sodium: 400mg
- Fat: 7g
- Saturated Fat: 1g
- Unsaturated Fat: 6g
- Trans Fat: 0g
- Carbohydrates: 26g
- Fiber: 1g
- Protein: 3g
- Cholesterol: 30mg
Keywords: zucchini bread, lemon bread, dessert, baking, vegetarian, poppy seeds

Ingredient Apple Fritter Muffins for Busy Weekday Mornings
Easy Apple Fritter Muffins to Make Your Mornings Delightful
Welcome, food lovers! If you’re stumbling upon this post while dreaming of tempting treats that brighten up your mornings, you’re in for a sweet surprise. Today, we’re diving into the world of Easy Apple Fritter Muffins. You know, those fluffy bites of heaven that perfectly balance the sweetness of apples and the warm spice of cinnamon? Yes, those! Whether you’re looking for a special breakfast to share with loved ones or just something to add a little joy to your weekday routine, I guarantee these muffins will become an instant favorite.
Now, let’s set the scene. Picture this: it’s a crisp autumn morning, the golden sunlight is filtering through the leaves, and the scent of fresh apples fills the air as I preheat the oven. My fingers are dusted with flour, and soon my kitchen will be transformed into a cozy haven of warmth and delicious aromas. With the first batch of Apple Fritter Muffins baking in the oven, I can’t help but share my excitement with you, as I’m pretty sure you’ll want to experience the magic of these delightful muffins. So, grab your apron, and let’s get baking!
A Memorable Kitchen Story
Let me take you back to one of my fondest childhood memories: the day my grandpa introduced me to apple fritters. It was a Saturday morning, and there was no school—just sweet freedom and the delightful smell of cinnamon wafting from the kitchen. Grandpa turned flour and sugar into magic. I still remember how he would peel the apples carefully, letting me do the fun part of dicing them into tiny cubes. We laughed and shared stories as the batter came together.
His secret was a touch of nutmeg, which gave the fritters a flavor like nothing I’d tasted before. Watching those fritters puff up in the hot oil was mesmerizing; they seemed to shimmer with sweetness, begging to be devoured. Later, he’d glaze them while they were still warm. Those moments were more than just about the food—they were bonding time filled with laughter, love, and the sweetest memories. Now, as I recreate this nostalgic recipe into muffin form, I honor those cherished moments every time.
Ingredients
Here’s what you’ll need to make those scrumptious Apple Fritter Muffins:
-
2 cups All-Purpose Flour
(Best to sift for light, fluffy muffins. If you prefer whole wheat, it adds a nutty flavor to the mix.) -
1 cup Granulated Sugar
(Feel free to adjust based on your preference. You can even use coconut sugar for a healthier twist.) -
2 teaspoons Baking Powder
(Ensure it’s fresh for that perfect rise. If you’re using something old, you might want a trip to the store!) -
0.5 teaspoon Salt
(Just a pinch goes a long way! Don’t skip it; it enhances all the flavors.) -
1 teaspoon Ground Cinnamon
(Use fresh for the best flavor impact. I love buying it from the local spice shop!) -
0.25 teaspoon Ground Nutmeg
(A little goes a long way; it adds that cozy warmth. Some even use freshly grated nutmeg if they’re feeling fancy!) -
1 Large Egg
(Substitute with a flax egg for a vegan option: mix 1 tablespoon ground flaxseed with 2.5 tablespoons water and let it sit until it thickens.) -
0.5 cup Milk (or Dairy-Free Alternative)
(Almond or oat milk works well. Experiment with different types until you find your favorite!) -
0.25 cup Vegetable Oil (or Melted Coconut Oil)
(They can be switched interchangeably. Coconut oil will add a subtle coconut flavor!) -
1 teaspoon Vanilla Extract
(Opt for pure extract for the best taste. Trust me, it’s worth it!) -
2 cups Peeled, Diced Apples
(Choose Granny Smith or Honeycrisp for optimal sweetness and texture. Feel free to mix varieties!) -
1 cup Powdered Sugar
(Sift for a smoother texture—nobody likes chunky glaze!) -
2-4 tablespoons Milk (for Glaze)
(Adjust quantity for desired glaze consistency. Start with less, adding more until it’s just right!)
Step-by-Step Instructions
Alright, let’s bring this recipe to life! Here’s how to make these delectable muffins:
-
Preheat the Oven:
Set your oven to 350°F (175°C) and line a muffin tin with paper liners. This saves you from the dreaded muffin cleanup later! -
Mix the Dry Ingredients:
In a large bowl, whisk together the flour, sugar, baking powder, salt, cinnamon, and nutmeg. This step ensures that all the dry ingredients are well incorporated and gives every muffin a consistent flavor. -
Combine Wet Ingredients:
In another bowl, beat the egg (or flax egg), then add the milk, vegetable oil, and vanilla extract. Stir until well combined. This part is super fun; feel free to sneak a little taste of the batter—just remember to save enough for the muffins! -
Combine Dry and Wet Mixtures:
Pour the wet ingredients into the dry ones and mix gently until just combined. Be careful—overmixing can lead to dense muffins. It’s all about those tender crumbs. -
Fold in the Apples:
Add those diced apples and fold them into the batter. This is where you get to enjoy the crunch of fresh, juicy apples. If you’re using multiple apple varieties, feel free to mix them; it adds visual flair and flavor depth! -
Fill the Muffin Tin:
Using a spoon or ice cream scoop, fill each muffin slot about 2/3 full. This allows room for them to rise beautifully without overflowing. -
Bake:
Pop the muffin tin into the preheated oven and bake for 18 to 22 minutes or until a toothpick inserted into the center of a muffin comes out clean. Keep an eye on them during the last few minutes; nobody wants a dry muffin! -
Cool and Prepare the Glaze:
Once baked, allow the muffins to cool in the tin for about 5 minutes before transferring them to a wire rack. To prepare your glaze, whisk together powdered sugar and milk until smooth—make it as thick or thin as you prefer! -
Drizzle the Glaze:
Drizzle that sweet glaze over the muffins, letting it cascade down the sides for an irresistible finish. You might want to make extra glaze because… yum!
Serving Suggestions
To serve these delightful Apple Fritter Muffins, arrange them on a pretty platter or wooden board for a rustic vibe. You can even garnish them with some extra diced apples on the side or a sprinkle of cinnamon. For an extra touch, pair them with a dollop of whipped cream or a scoop of vanilla yogurt. Trust me, your guests will be oooh-ing and aaah-ing over this spectacular morning treat!
Recipe Variations
Feel adventurous? Here are a few ways to twist the classic Apple Fritter Muffins:
- Cranberry Apple Delight: Toss in a cup of fresh or dried cranberries for that sweet-tart combination.
- Nutty Goodness: Add a handful of chopped walnuts or pecans for some crunch.
- Spiced Up Muffins: Experiment with ginger or cardamom for an unexpected flavor boost.
- Caramel Drizzle: Drizzle warm caramel sauce over the muffins instead of glaze for an indulgent treat.
- Vegan Swap: Create a fully plant-based version by substituting the egg, milk, and oil with their vegan counterparts.
Chef’s Notes
As I mentioned earlier, making these Apple Fritter Muffins takes me back to my childhood. Each time I bake them, I’m transported to that cozy kitchen, laughing and creating with my grandpa. Over the years, I’ve adapted this recipe to suit my palate and lifestyle—swapping out refined sugar for coconut sugar occasionally, or even bulking it up with some oats for added fiber. As always, feel free to adjust to your liking!
One of my favorite kitchen stories involves a minor mishap with too much nutmeg. Let’s just say, you can definitely overdo it! So, be gentle with those spices, or you might end up with muffins that taste like holiday potpourri!
FAQs and Troubleshooting
-
Why are my muffins dense?
If your muffins turned out dense, it might be because you overmixed the batter or used too much flour. Make sure to scoop the flour gently rather than packing it into the cup. -
Can I use other fruits?
Absolutely! You can swap apples for peaches, blueberries, or even bananas. Just adjust the quantity based on moisture content—bananas tend to be wetter than apples. -
How can I store them?
These muffins can stay fresh in an airtight container at room temperature for a couple of days. For longer storage, pop them in the fridge or freeze them for those busy mornings when you need a treat pronto! -
What can I do if they stick to the pan?
Make sure to grease your muffin tray well or use paper liners. If they still stick, run a butter knife around the edges to help loosen them while still warm.
Nutritional Info
Each muffin is approximately:
- Calories: 180
- Protein: 2g
- Carbohydrates: 28g
- Sugar: 10g
- Fat: 8g
Feel free to adjust based on your ingredient swaps!
And there you have it—deliciously Easy Apple Fritter Muffins that will make your mornings delightful! I hope you enjoy baking them and savoring every bite as much as I do. Remember, kitchen magic happens with love and a dash of creativity, so let that passion flow! Happy baking, friends!
PrintEasy Apple Fritter Muffins

Delightful apple fritter muffins that perfectly balance the sweetness of apples and warm cinnamon spice, ideal for a cozy morning treat.
- Prep Time: 15 minutes
- Cook Time: 20 minutes
- Total Time: 35 minutes
- Yield: 12 muffins 1x
- Category: Breakfast
- Method: Baking
- Cuisine: American
- Diet: Vegetarian
Ingredients
- 2 cups All-Purpose Flour
- 1 cup Granulated Sugar
- 2 teaspoons Baking Powder
- 0.5 teaspoon Salt
- 1 teaspoon Ground Cinnamon
- 0.25 teaspoon Ground Nutmeg
- 1 Large Egg
- 0.5 cup Milk (or Dairy-Free Alternative)
- 0.25 cup Vegetable Oil (or Melted Coconut Oil)
- 1 teaspoon Vanilla Extract
- 2 cups Peeled, Diced Apples
- 1 cup Powdered Sugar
- 2–4 tablespoons Milk (for Glaze)
Instructions
- Preheat the oven to 350°F (175°C) and line a muffin tin with paper liners.
- Mix the dry ingredients in a large bowl: flour, sugar, baking powder, salt, cinnamon, and nutmeg.
- Combine the wet ingredients in another bowl: beat the egg, then add the milk, vegetable oil, and vanilla extract.
- Pour the wet ingredients into the dry ingredients and mix gently until just combined.
- Fold in the diced apples into the batter.
- Fill each muffin slot about 2/3 full with the batter.
- Bake for 18 to 22 minutes or until a toothpick inserted comes out clean.
- Cool the muffins in the tin for about 5 minutes before transferring them to a wire rack.
- Whisk together powdered sugar and milk for the glaze.
- Drizzle the glaze over the muffins once cooled.
Notes
For a vegan option, substitute the egg with a flax egg and use a dairy-free milk alternative. Feel free to adjust the sugar according to taste.
Nutrition
- Serving Size: 1 muffin
- Calories: 180
- Sugar: 10g
- Sodium: 200mg
- Fat: 8g
- Saturated Fat: 2g
- Unsaturated Fat: 6g
- Trans Fat: 0g
- Carbohydrates: 28g
- Fiber: 1g
- Protein: 2g
- Cholesterol: 30mg
Keywords: apple muffins, breakfast muffins, easy muffins, baked goods
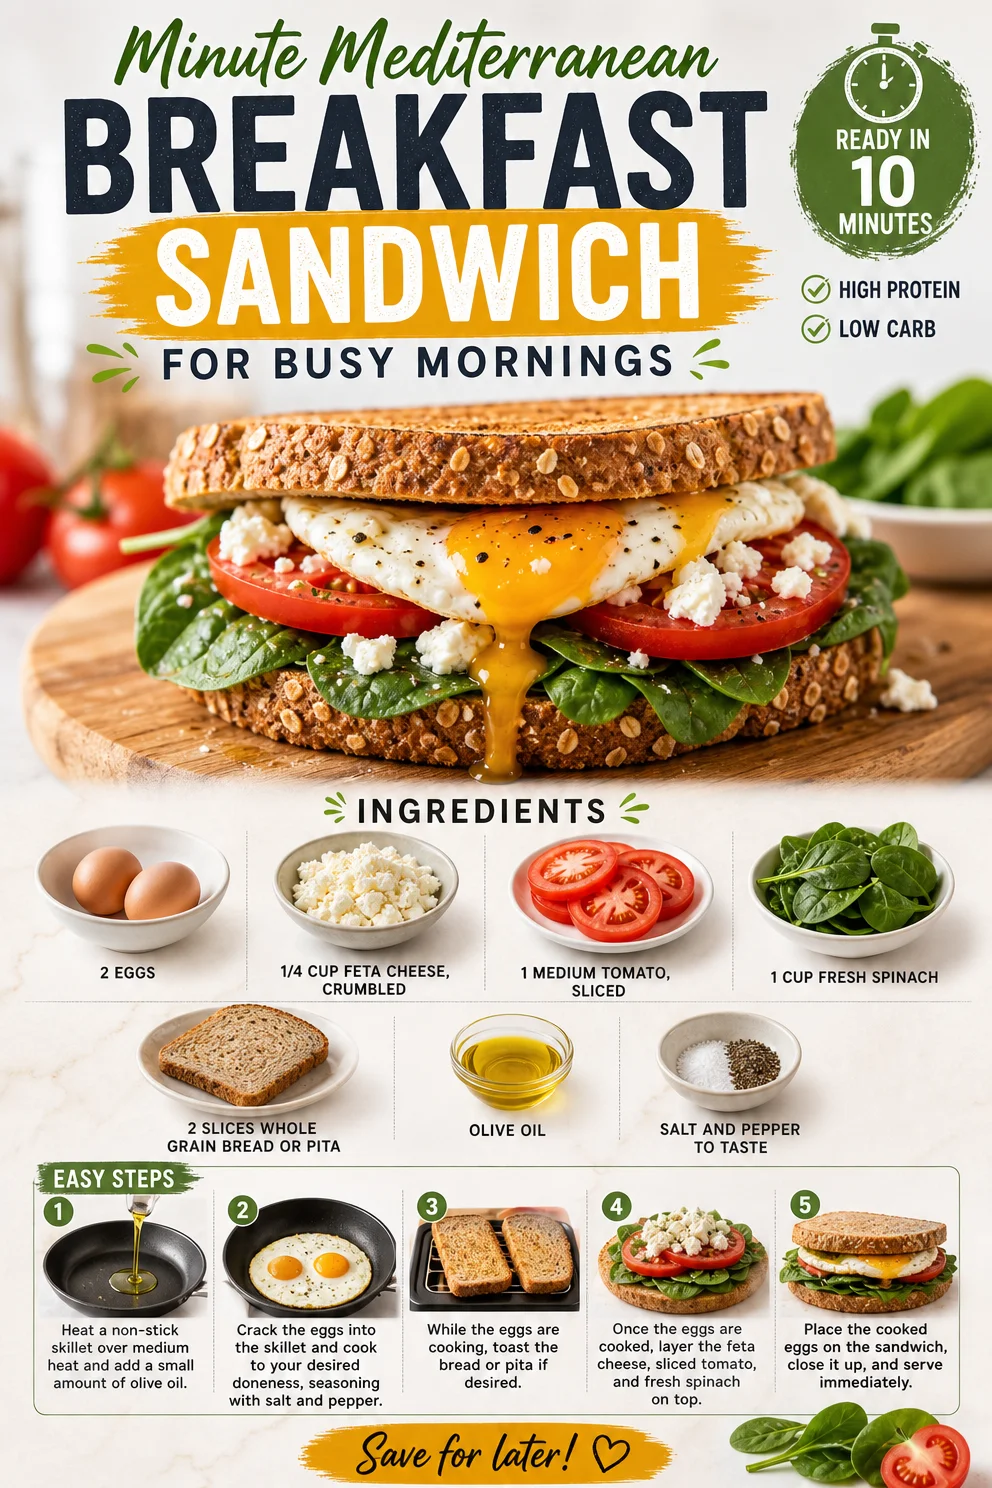
Minute Mediterranean Breakfast Sandwich for Busy Mornings
Rise and Shine with a Mediterranean Breakfast Sandwich
Welcome, food lovers! If you’re all about simple, tasty meals that make breakfast feel like a mini-vacation, you’re in the right spot. Today, we’re diving into the delicious world of Mediterranean flavors with a breakfast sandwich that’s not just easy to whip up but also packed with vibrant ingredients that’ll fuel your day. Trust me, once you take a bite, you’ll never think of breakfast the same way again.
Now, let’s set the stage: picture a bright morning, with sunlight streaming through your kitchen window. You’re craving something more than a plain ol’ bowl of cereal. It’s time to get creative! With just a few fresh ingredients—think eggs, feta, and bright veggies—you can create a breakfast masterpiece. This Mediterranean Breakfast Sandwich is all about that quick culinary getaway, where every bite takes you to sun-drenched shores and delightful brunch spots.
A Toast to Nostalgia
Before we dive into the recipe, let me share a little story. Growing up, my mom had this way of turning breakfast into an experience. Saturdays were reserved for slow mornings where we’d gather around the kitchen table, and she’d whip up all sorts of delightful dishes. One of the standouts was her version of the Mediterranean sandwich. I remember the smell of eggs sizzling in olive oil, the way the feta crumbled and melded with fresh tomatoes, and the vibrant green of spinach all coming together in a soft pita or toasted bread.
One particular Saturday, I was feeling adventurous, and I decided to experiment with her recipe. Armed with piggy banks worth of pocket money, I headed to the local market to pick out the freshest ingredients. By the time I returned with my haul, I was a whirlwind of energy and excitement. Little did I know that day would spark a lifelong love for Mediterranean flavors. That first bite of my version was magical—it was everything breakfast should be: comforting, invigorating, and oh-so-delicious. Now, every time I make this sandwich, it takes me back to those cherished mornings spent in the kitchen with my mom, and I’m excited to pass along that joy to you!
Ingredients to Gather
Let’s talk about what you’ll need for this Mediterranean Breakfast Sandwich—each ingredient plays a crucial role:
-
2 Eggs
Eggs are the star of the show! Packed with protein and healthy fats, they’re essential for a satisfying breakfast. For a lighter option, you can replace one egg with egg whites or a plant-based egg substitute. -
1/4 cup Feta Cheese, Crumbled
Feta adds a wonderful tangy flavor that complements the other ingredients beautifully. If you can’t find feta or want a vegan option, try using crumbled tofu or a dairy-free feta. -
1 Medium Tomato, Sliced
Fresh tomatoes bring juiciness and acidity to the table! If tomatoes aren’t in season, roasted red peppers are a fantastic alternative, providing a sweet and rich flavor. -
1 cup Fresh Spinach
Spinach is loaded with nutrients, adding both color and a nutrient boost to your sandwich. You can also swap it out for arugula or kale for a slightly peppery twist. -
2 Slices Whole Grain Bread or Pita
Whole grain bread offers fiber and texture. If you’re gluten-free, use gluten-free bread or any grain-free wraps! -
Olive Oil
The Mediterranean staple! Use extra-virgin olive oil for cooking the eggs for that rich flavor. If you want to mix it up, try avocado oil for a mild taste. -
Salt and Pepper to Taste
The essential finishing touch! Feel free to experiment with spices like paprika or Italian herbs if you want to take it up a notch.
Step-by-Step Instructions
Now, let’s get to the good stuff—cooking! Grab your apron and let’s make your kitchen smell heavenly.
-
Prep Your Ingredients
Start by slicing your tomato and crumbling your feta cheese. Wash your spinach if you haven’t already. Setting everything up beforehand makes the cooking process smoother and quicker! -
Heat the Olive Oil
In a non-stick skillet, add a drizzle of olive oil—about 1 tablespoon should do. Heat it up over medium heat. You want to feel that gentle sizzle when you add the eggs, so don’t rush this step. -
Cook the Eggs
Crack those eggs right into the hot skillet. Let them sit for a minute to cook on the bottom, and then gently stir with a spatula. For a perfectly soft scramble, keep them moving, but for that gorgeous runny yolk, leave them almost undisturbed! -
Season
Sprinkle in a pinch of salt and a dash of pepper while they cook. Feel free to add a sprinkle of your favorite herbs for extra flair! Oregano or basil can really lift the flavors. -
Add Spinach and Feta
Once the eggs are nearly done but still a bit runny, toss in the fresh spinach and crumble in the feta cheese. The residual heat will wilt the spinach and warm the feta nicely. Stir just until combined—yummy! -
Toast Your Bread
While your eggs are cooking, pop your whole grain bread slices or pita into a toaster until golden brown. If you prefer, you can also toast them in the skillet for a couple of minutes. -
Assemble Your Sandwich
Top your toasted bread with the heavenly egg, spinach, and feta mixture. Add the tomato slices on top and sprinkle a bit more salt and pepper, if desired. -
Finish with a Drizzle of Olive Oil
For an extra touch of Mediterranean flair, drizzle a bit more olive oil over the top before placing the second slice of bread or folding the pita. Yum! -
Serve and Enjoy!
This sandwich is best served warm, right after you make it. Grab a plate, take a moment to admire your creation, and dig in!
Serving Suggestions
Serving up this Mediterranean Breakfast Sandwich is a treat for the eyes, too! Plate it on a colorful dish and add a handful of fresh herbs—like parsley or basil—on the side for a pop of color. You can also pair it with a refreshing fruit salad or a dollop of Greek yogurt sprinkled with honey for a complete breakfast experience.
Recipe Variations
Want to switch things up? Here are some fun ideas to customize your sandwich:
-
Avocado Twist: Mash some ripe avocado and spread it on your bread before layering the egg mixture. Creamy deliciousness!
-
Spicy Kick: Add sliced jalapeños or a dash of hot sauce for a spicy breakfast that’ll wake up your taste buds!
-
Herbed Delight: Swap out basil and use fresh dill or mint for a fresh burst of flavor that takes you straight to the Mediterranean coast.
-
Veggie-Packed: Add sautéed bell peppers, mushrooms, or zucchini to amp up the nutrition and color!
-
Protein Boost: For extra protein, add slices of smoked salmon or turkey on top—it elevates the sandwich from breakfast to brunch!
Chef’s Notes
This Mediterranean Breakfast Sandwich has been my go-to for busy mornings and lazy weekends alike. I love how versatile it is, and it’s one of those recipes that evolves as you discover new ingredients. I once threw in some olives I had left over from a dinner party, and oh boy, was that a game-changer! Now, I keep olives on hand just in case I want that briny flavor.
I also love making this for friends; it’s a delightful way to start off brunch gatherings. Whenever I serve it, I have to remind myself to make a double batch because everyone asks for seconds!
FAQs and Troubleshooting
Q: Why are my eggs rubbery?
A: Overcooking eggs is the main culprit of rubbery textures. Take them off the heat while they’re still slightly undercooked to allow residual heat to finish the cooking!
Q: Can I make this sandwich ahead of time?
A: For the freshest results, I recommend cooking the eggs and assembling the sandwich right before serving. However, you can prep the ingredients ahead and store them separately.
Q: What if I don’t have spinach?
A: No problem! Any leafy green will work. Swiss chard, kale, or even arugula are great substitutes.
Q: How do I keep my bread from getting soggy?
A: Toast your bread until it’s nice and crispy, and try to assemble the sandwich right before eating. You can also let the egg mixture cool for a minute before layering to avoid sogginess.
Nutritional Info
(Feel free to adjust this section based on your preferred format.)
- Calories: ~350 kcal
- Protein: ~22g
- Fat: ~18g
- Carbs: ~30g
- Fiber: ~6g
So go ahead, give this Mediterranean Breakfast Sandwich a try! Your mornings deserve to be bright, delicious, and full of flavor. Enjoy every bite and let the flavors transport you to the sun-drenched Mediterranean coast! Happy cooking, foodies!