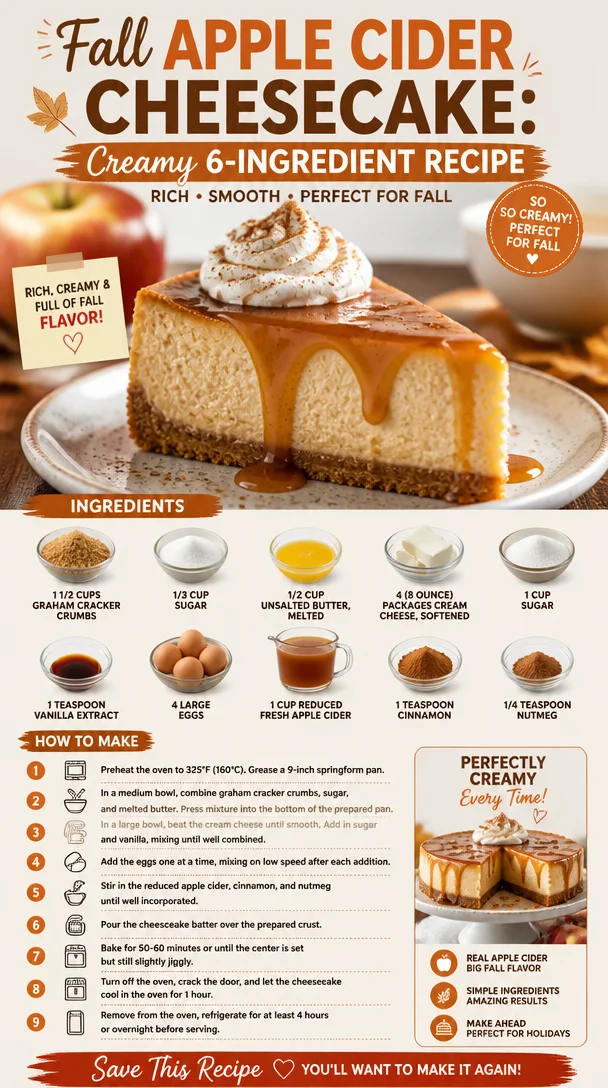
Fall Apple Cider Cheesecake: Creamy 6-Ingredient Recipe
Apple Cider Cheesecake: A Slice of Fall in Every Bite
Welcome to the cozy world of dessert! There’s something magical about fall—crisp air, vibrant leaves, and of course, the delightful flavors of apples and warm spices. One of my favorite treats that perfectly embodies this season is none other than Apple Cider Cheesecake. If you’re searching for a dessert that embraces the spirit of autumn while making you feel all warm and fuzzy inside, you’re in for a real treat!
Now, cheesecake is often thought of as a heavy, indulgent dessert, but this version blends the rich creaminess of a classic cheesecake with the vibrant zest of apple cider. Can you imagine biting into a creamy slice of cheesecake that brings the taste of freshly pressed apple cider straight to your palate? Trust me, it’s a game-changer!
I remember the first time I made Apple Cider Cheesecake. It was during a chilly October weekend, and I was hosting a small gathering for some friends. As the smell of cinnamon and apples wafted through the air, it felt like a warm hug. I’d just pulled the cheesecake out of the oven, and it looked so glorious, my friends couldn’t help but squeal with delight. The best part? The first bite caused some happy dance moves around my kitchen! That moment solidified my love for this dessert, and it quickly became a staple during the fall months.
Today, I’m sharing my fail-proof recipe with you. Prepare your taste buds for a delicious blend of creaminess and warmth. Let’s make this fall favorite together!
Ingredients
Gather these simple ingredients for your Apple Cider Cheesecake. Each element plays a crucial role in creating that delicious, silky texture and flavorful experience!
-
1 1/2 cups graham cracker crumbs
The base of our cheesecake! They add a lovely crunch and subtle sweetness. If you’re feeling adventurous, you can substitute with crushed gingersnaps or vanilla wafers for a fun twist. -
1/3 cup sugar
A little sweetness to balance the tanginess of the cream cheese. If you’re looking for a healthier version, consider using coconut sugar. -
1/2 cup unsalted butter, melted
This creates that luscious, buttery flavor in the crust. Always go for unsalted to control the saltiness—your cheesecake will love you for it! -
4 (8-ounce) packages cream cheese, softened
The star of the show! Cream cheese creates that smooth and creamy texture we crave. If you want a lighter version, feel free to use low-fat cream cheese; just don’t cut it completely out! -
1 cup sugar
More sweetness here! You can use granulated or superfine sugar, the latter dissolves easily, ensuring a smooth filling. -
1 teaspoon vanilla extract
Vanilla rounds out the flavors beautifully. For a gourmet twist, try using vanilla bean paste for those beautiful specks of vanilla throughout your cheesecake. -
4 large eggs
Eggs are binding agents that help your cheesecake maintain its shape. You can use egg substitutes for a vegan option, but the texture will vary slightly. -
1 cup reduced fresh apple cider
This is where the magic happens! The concentrated flavor of apple cider brings the essence of fall directly into each bite. This can also be substituted with apple juice if that’s what you have on hand. -
1 teaspoon cinnamon
The warm spice that evokes memories of cozy autumn afternoons. Feel free to add more if you’re a cinnamon lover! -
1/4 teaspoon nutmeg
This fragrant spice pairs beautifully with cinnamon, adding depth to your cheesecake. Just a pinch goes a long way!
Step-by-Step Instructions
Ready to dive into the cheesecakemaking process? Let’s create some magic!
1. Preheat your oven to 325°F (160°C).
This initial step is crucial! A well-heated oven ensures even cooking. As you get things rolling, let the comforting smell of warm spices fill your kitchen!
2. Prepare the crust.
In a medium bowl, combine the graham cracker crumbs, 1/3 cup sugar, and melted butter. Mix until the crumbs are thoroughly coated and resemble wet sand.
Chef tip: Don’t skimp on mixing! This will ensure a firm crust that holds its shape beautifully.
3. Press the crust into a springform pan.
Evenly spread the crumb mixture into the bottom of your pan, pressing it down firmly with the back of a measuring cup. Bake in the preheated oven for about 10 minutes until golden and fragrant.
Little hack: Let the crust cool while you whip up the filling; this way, you’ll get a perfectly layered cheesecake.
4. Make the filling.
In a large bowl, beat the softened cream cheese until creamy and smooth. Gradually add in 1 cup of sugar, whipping until light and fluffy. If you’re feeling the groove, dance a little while you mix!
Tip: Make sure your cream cheese is at room temperature; cold cream cheese can lead to lumps.
5. Add the eggs, one at a time.
Mixing on low speed, add the eggs, fully incorporating one before adding the next. This ensures a smooth filling!
Chef insight: Avoid overmixing at this stage; you want your cheesecake to be fluffy, not dense.
6. Incorporate the vanilla, apple cider, cinnamon, and nutmeg.
Blend these in until well combined. The aroma will be divine!
Hack: Save a spoonful of apple cider to drizzle on top as a finishing touch before serving—it adds a lovely glaze!
7. Pour the cheesecake filling over the crust.
Gently smooth the surface with a spatula. This is your time to shine—make it pretty!
Tip: If air bubbles form, give the pan a tap on the counter to release them.
8. Bake the cheesecake.
Place it in the oven and bake for about 50-60 minutes or until the edges are set but the center still has a slight jiggle. This slight wobble is your cue for a creamy texture!
Chef’s note: For a perfect cheesecake, consider a water bath—it helps maintain moisture.
9. Cool down.
Let the cheesecake cool slowly in the pan for about an hour before transferring it to the fridge. Chill for at least 4 hours, preferably overnight, to let those flavors meld. Patience is key, but I promise it’s worth it!
Serving Suggestions
When you’re ready to serve your Apple Cider Cheesecake, remove it from the springform pan and place it on a beautiful cake stand. Drizzle a little reduced apple cider glaze and sprinkle some cinnamon or chopped nuts on top for that extra flair. Pair it with a dollop of freshly whipped cream or vanilla ice cream to make it a showstopper!
Recipe Variations
This recipe is versatile and can easily be transformed. Here are some ideas to switch things up:
- Caramel Swirl: Drizzle caramel sauce on top before serving for a sweet contrast to the tanginess of the cream cheese.
- Nutty Crust: Add finely chopped nuts, like pecans or walnuts, to the crust for added crunch and flavor.
- Pumpkin Spice Twist: Replace the apple cider with pumpkin puree and add extra pumpkin spice for a seasonal twist.
- Vegan Version: Substitute cream cheese with vegan cream cheese and eggs with a flaxseed meal or chia seed mix combined with water.
Chef’s Notes
This recipe has evolved over the years, starting as a traditional cheesecake and morphing into this apple cider delight. The first time I made it, I made a rookie mistake: I forgot to add the spices! The resulting plain cheesecake was good, but it lacked the autumn warmth I craved. Learning from that, I now encourage everyone to play with flavors!
One of my favorite kitchen stories involves a chaotic Thanksgiving prep where I ended up using spiced cider instead of regular apple cider—it turned the whole cheesecake into a flavor bomb! Lesson learned: sometimes mistakes lead to the best creations.
FAQs and Troubleshooting
-
Why did my cheesecake crack?
Cracks can arise from drastic temperature changes. Try cooling your cheesecake gradually and avoid opening the oven door while it bakes. -
How can I tell when it’s done?
Look for a set perimeter with a slightly jiggly center. The cheesecake will continue to firm up as it cools. -
Why does my cheesecake feel dense?
Overmixing the batter or using cold cream cheese can lead to a dense texture. Aim for smooth, but don’t go overboard! -
How long does the cheesecake last?
Your delicious creation can last up to 4-5 days in an airtight container in the fridge. If it lasts that long!
Nutritional Info
Though I aim for balance and flavor, here’s a quick glance at the nutritional info (per slice, based on 12 slices):
- Calories: ~350
- Total Fat: 25g
- Saturated Fat: 15g
- Cholesterol: 80mg
- Sodium: 250mg
- Total Carbohydrates: 28g
- Dietary Fiber: 1g
- Sugars: 20g
- Protein: 6g
And there you have it—your very own Apple Cider Cheesecake recipe! I hope you whip this up in your kitchen, share it with loved ones, and create beautiful, sweet memories. Remember, the best ingredient is always a sprinkle of love. Enjoy every creamy, delicious bite!
PrintApple Cider Cheesecake
A delightful blend of creamy cheesecake with the flavors of apple cider and warm spices, perfect for autumn.
- Prep Time: 15 minutes
- Cook Time: 60 minutes
- Total Time: 75 minutes
- Yield: 12 servings 1x
- Category: Dessert
- Method: Baking
- Cuisine: American
- Diet: Vegetarian
Ingredients
- 1 1/2 cups graham cracker crumbs
- 1/3 cup sugar
- 1/2 cup unsalted butter, melted
- 4 (8-ounce) packages cream cheese, softened
- 1 cup sugar
- 1 teaspoon vanilla extract
- 4 large eggs
- 1 cup reduced fresh apple cider
- 1 teaspoon cinnamon
- 1/4 teaspoon nutmeg
Instructions
- Preheat your oven to 325°F (160°C).
- Prepare the crust by combining the graham cracker crumbs, 1/3 cup sugar, and melted butter.
- Press the crust into a springform pan, spreading evenly and baking for about 10 minutes.
- Make the filling by beating the softened cream cheese until creamy and smooth.
- Add the eggs, one at a time, mixing on low speed.
- Incorporate the vanilla, apple cider, cinnamon, and nutmeg until well combined.
- Pour the cheesecake filling over the crust.
- Bake the cheesecake for about 50-60 minutes or until edges are set.
- Cool down for about an hour before refrigerating for at least 4 hours.
Notes
Serve with drizzled apple cider glaze and a dollop of whipped cream.
Nutrition
- Serving Size: 1 slice
- Calories: 350
- Sugar: 20g
- Sodium: 250mg
- Fat: 25g
- Saturated Fat: 15g
- Unsaturated Fat: 10g
- Trans Fat: 0g
- Carbohydrates: 28g
- Fiber: 1g
- Protein: 6g
- Cholesterol: 80mg
Keywords: cheesecake, apple cider, fall dessert, autumn recipe, sweet treat
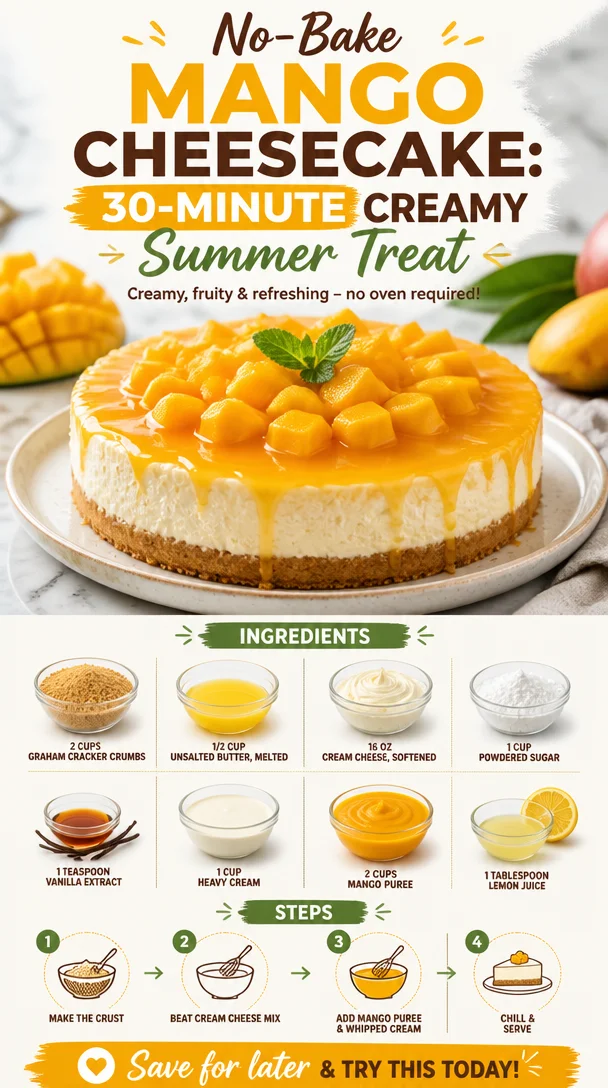
No-Bake Mango Cheesecake: 30-Minute Creamy Summer Treat
No Bake Mango Cheesecake: A Sweet Escape into Flavor
Welcome to another delightful episode of Clean Plate Cravings! Today, we’re diving into a dessert that’s not only a crowd-pleaser but also requires absolutely no baking—yes, you heard that right! This No Bake Mango Cheesecake is the epitome of summer joy captured in a creamy, dreamy slice of bliss. With its tropical vibes and luscious texture, this cheesecake is your ticket to a sun-soaked paradise, no matter what the season.
Now, let me ask you: Have you ever tasted something that instantly transported you back in time? For me, it’s the sweet, luscious flavor of mango. I still remember family gatherings at my aunt’s house, where she would whip up an array of exotic desserts that left us drooling in delight. The highlight? Her sensational mango cheesecake that had an incredibly smooth texture and a fruity zing that danced on our tongues. As kids, we’d scramble for seconds (and thirds!), not caring about our dessert limits as long as there was that velvety cheesecake to savor. It was a magical time filled with giggles, delicious food, and endless love—or at least, as endless as our appetites were!
Inspired by those cherished memories, I created this No Bake Mango Cheesecake to share with all of you (and to relive those delightful moments in a brand new way). Trust me, this dessert is easy to whip up and promises to impress your friends and family, leaving them begging for the recipe. Ready to jump in? Let’s create something sweet together!
Ingredients
Here’s what you’ll need to make your No Bake Mango Cheesecake:
-
2 cups graham cracker crumbs
These crunchy bits form the base of our cheesecake, providing a deliciously sweet and slightly salty foundation. If you want a gluten-free version, you can substitute with almond flour or gluten-free graham crackers. -
1/2 cup unsalted butter, melted
This golden goodness not only binds the graham cracker crumbs but also adds rich flavor. For a lighter option, consider using coconut oil—just make sure it’s melted and cooled! -
16 oz cream cheese, softened
The star of our show! Cream cheese gives its luxurious creaminess. If you want a lighter alternative, try using Greek yogurt, though the texture and flavor may differ slightly. -
1 cup powdered sugar
This sweetener creates a velvety texture and resists crystallization. You can substitute with honey or maple syrup, but reduce the liquid in the recipe slightly to maintain consistency. -
1 teaspoon vanilla extract
A splash of vanilla adds warmth and depth of flavor to our cheesecake. Feel free to use pure vanilla extract for the best flavor. -
1 cup heavy cream
Whipped to perfection, heavy cream creates that iconic fluffy texture. For a low-fat option, you can use whipped coconut cream, but the result may be less rich. -
2 cups mango puree
Fresh or canned mango—either option will infuse an amazing tropical flavor. If you can’t find mango, feel free to substitute with other fruits like peach or passionfruit. -
1 tablespoon lemon juice
This little add-in brightens the cheesecake, balancing the richness. Lime juice works well too for additional zest!
Step-by-Step Instructions
Let’s get this creamy masterpiece going! Follow these steps, and in no time, you’ll be indulging in your very own No Bake Mango Cheesecake.
-
Prepare the crust:
In a medium-sized bowl, combine 2 cups of graham cracker crumbs with 1/2 cup of melted unsalted butter. Mix until the crumbs are evenly coated and have a sandy consistency.
Chef Tip: If you prefer a more textured crust, you can add chopped nuts like almonds or walnuts for a delightful crunch! -
Press and chill the crust:
Press the crumb mixture firmly into the bottom of a 9-inch springform pan, ensuring it’s even. Use the flat bottom of a measuring cup for the best results. Place the crust in the refrigerator to chill while we work on the filling—the cold will help it set perfectly.
Chef Hack: Need to speed up the chilling? Pop it in the freezer for about 15 minutes! -
Make the filling:
In a large mixing bowl, beat 16 oz of softened cream cheese until smooth and creamy with a hand mixer. Gradually add in 1 cup of powdered sugar and continue beating until fully incorporated. Then add in that lovely 1 teaspoon of vanilla extract and 1 tablespoon of lemon juice, blending until well combined.
Tip from Ava: Scrape the sides of the bowl frequently to ensure everything blends evenly! -
Whip the cream:
In a separate bowl, whip 1 cup of heavy cream until soft peaks form. This step is key; aim for that light and airy texture to fold into your cheesecake mixture.
Quick Note: For even more volume, chill your mixing bowl and whisk beforehand! -
Combine and fold:
Gently fold the whipped cream into the cream cheese mixture—you want to maintain all that lightness. Once combined, add in 2 cups of mango puree and fold everything together until you have a smooth, luscious filling.
Chef Insight: Taste the filling at this point! If you prefer a stronger mango flavor, you can add a bit more puree or sweeten further to your liking. -
Fill the crust:
Pour the mango cheesecake filling on top of the chilled crust, spreading it evenly with a spatula. Give it a gentle tap to even it out.
Chef Tip: Create a decorative swirl by using a skewer or knife to gently mix the top layer if you’re in the mood for artsy cheesecake! -
Chill and set:
Cover your cheesecake with plastic wrap and let it chill in the refrigerator for at least 4-6 hours, or ideally overnight. This helps it set properly, ensuring you get those beautiful slices.
Pro Tip: If you’re short on time, a quick 1-hour chill in the freezer will help—but don’t forget to return it to the fridge afterward!
Serving Suggestions
Now that your No Bake Mango Cheesecake is perfectly set, it’s time to serve it up! Carefully run a knife around the edge of the springform pan before releasing the sides. Slice into generous pieces, and serve on a colorful dessert plate. Garnish with a dollop of whipped cream, fresh mango slices, and perhaps a sprig of mint for that wow factor. Trust me; your guests will be snapping photos before they even take a bite!
Recipe Variations
Want to experiment? Here are some creative twists you can incorporate into this mango cheesecake:
- Coconut Mango Cheesecake: Add shredded coconut into the crust for a tropical flair.
- Berry Swirl: Top your cheesecake with mixed berries or create a berry swirl in the filling for a burst of color and flavor.
- Vegan Version: Swap the cream cheese for coconut cream and use dairy-free whipped cream to make a delicious plant-based option.
- Chocolate Drizzle: Drizzle some melted dark chocolate over the top for an indulgent touch. It pairs beautifully with mango!
- Mango Passionfruit Fusion: Combine mango puree with passionfruit for a tangy, exotic twist.
Chef’s Notes
This No Bake Mango Cheesecake has a special place in my heart. I love how easy it is to make, especially when the mangoes are ripe and in season. The original recipe evolved when I wanted to bring the joy of that childhood dessert to modern kitchens. We all lead busy lives but that doesn’t mean giving up on delectable desserts. This cheesecake proves that you can have your cake and eat it too—without any hassle!
Fun fact: each time I make this recipe, I find myself reminiscing about those carefree childhood days, crafting new memories with friends and family over slices of this creamy delight.
FAQs and Troubleshooting
1. Can I use fresh mango instead of puree?
Absolutely! Just blend fresh mango until smooth and strain if necessary to remove any fibrous bits.
2. Why didn’t my cream cheese filling set?
Ensure your cream cheese is at room temperature and properly combined with the whipped cream. If it’s too soft, your dessert might not hold its shape.
3. How long can I store leftovers?
Your cheesecake can be stored in the fridge for up to 3 days, covered tightly. If left outside, it’s best enjoyed the same day!
4. Can I freeze the No Bake Mango Cheesecake?
Yes! You can freeze it for up to 2 months. Just make sure to let it thaw in the refrigerator before serving for the best texture.
Nutritional Info
While I typically focus more on flavors than numbers, here’s a rough nutritional breakdown for one slice (assuming you get 12 servings):
- Calories: 372
- Protein: 5g
- Carbohydrates: 35g
- Fat: 25g
- Sugar: 18g
And there you have it—a No Bake Mango Cheesecake that not only delights the taste buds but also rekindles warm memories and creates new ones. I can’t wait for you to try making it and hope it becomes a staple in your dessert repertoire. Happy baking, or should I say “happy mixing!” Enjoy every scrumptious bite, and let’s keep those cravings clean and delicious!
PrintNo Bake Mango Cheesecake
A delightful no-bake mango cheesecake that captures the essence of summer with its creamy texture and tropical flavors.
- Prep Time: 20 minutes
- Cook Time: 0 minutes
- Total Time: 360 minutes
- Yield: 12 servings 1x
- Category: Dessert
- Method: No Bake
- Cuisine: International
- Diet: Vegetarian
Ingredients
- 2 cups graham cracker crumbs
- 1/2 cup unsalted butter, melted
- 16 oz cream cheese, softened
- 1 cup powdered sugar
- 1 teaspoon vanilla extract
- 1 cup heavy cream
- 2 cups mango puree
- 1 tablespoon lemon juice
Instructions
- Prepare the crust: In a medium-sized bowl, combine 2 cups of graham cracker crumbs with 1/2 cup of melted unsalted butter. Mix until the crumbs are evenly coated.
- Press the crust: Press the crumb mixture firmly into the bottom of a 9-inch springform pan and chill in the refrigerator.
- Make the filling: In a large mixing bowl, beat 16 oz of softened cream cheese until smooth. Gradually add 1 cup of powdered sugar, then mix in 1 teaspoon of vanilla extract and 1 tablespoon of lemon juice.
- Whip the cream: In a separate bowl, whip 1 cup of heavy cream until soft peaks form.
- Combine: Gently fold the whipped cream into the cream cheese mixture, then add 2 cups of mango puree and mix until smooth.
- Fill the crust: Pour the mango cheesecake filling on top of the chilled crust, spreading it evenly.
- Chill and set: Cover and refrigerate for at least 4-6 hours or overnight to allow it to set.
Notes
For a decorative touch, garnish with a dollop of whipped cream and fresh mango slices. You can also freeze the cheesecake for up to 2 months.
Nutrition
- Serving Size: 1 slice
- Calories: 372
- Sugar: 18g
- Sodium: 200mg
- Fat: 25g
- Saturated Fat: 15g
- Unsaturated Fat: 5g
- Trans Fat: 0g
- Carbohydrates: 35g
- Fiber: 1g
- Protein: 5g
- Cholesterol: 60mg
Keywords: cheesecake, mango dessert, no bake dessert, summer dessert