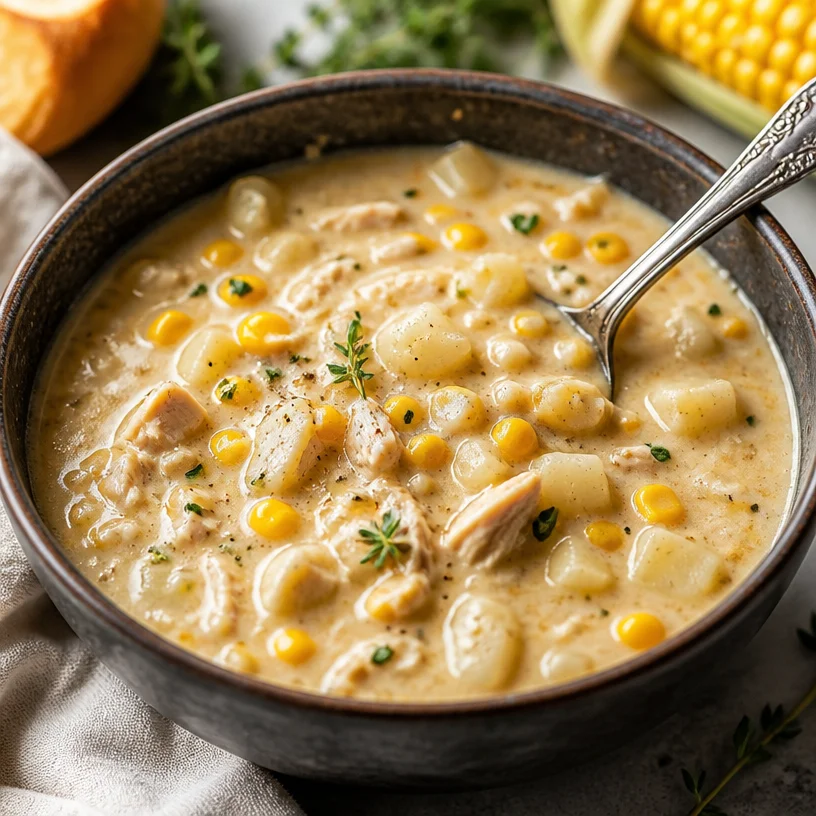
One-Pot Creamy Chicken Corn Chowder for Weeknights
The Comfort of Chicken Corn Chowder: A Cozy Bowl of Happiness
Nothing says comfort food quite like a warm bowl of chicken corn chowder. As a self-proclaimed soup enthusiast, I can confidently declare that there’s a magic about this dish that warms the soul and brings back fond memories. Whether it’s a chilly evening or you’re just craving something hearty, this creamy concoction is guaranteed to hit the spot!
I remember the first time I had chicken corn chowder. I was a child, curled up on the couch after a long day of playing outside. My grandma would whip up a big pot of it, and that smell wafting through the kitchen was the ultimate signal that it was time to gather around the table. Each spoonful was filled with tender chicken, sweet corn, and creamy goodness, making me feel safe and adored. To this day, no matter where I am, if I have a bowl of chicken corn chowder in front of me, I’m transported back to those cozy evenings with my family.
A Journey Through Flavors: What You’ll Need
To make this delightful chicken corn chowder, gather these simple yet impactful ingredients. Each of them plays a special role in making this dish bright, creamy, and utterly satisfying.
-
Chicken: Use boneless, skinless chicken breasts or thighs. Breasts are leaner, while thighs bring more flavor. If you want to save time, use a rotisserie chicken!
-
Corn: Fresh is best, but frozen or canned corn can work beautifully too. Always rinse canned corn to reduce sodium.
-
Potatoes: Yukon gold or russet potatoes add a creamy texture. If you’re looking for a twist, try sweet potatoes for a hint of natural sweetness.
-
Cream: Heavy cream adds the rich, velvety texture we love in chowder. You can use half-and-half for a lighter version, or even coconut milk for dairy-free!
-
Onions: Sweet onions like Vidalia or yellow onions will caramelize beautifully for that sweet base flavor.
-
Garlic: Fresh garlic brings depth to your dish. Feel free to add extra—more garlic, more love!
-
Broth: Chicken or vegetable broth enhances the flavor profile. Homemade broth works wonders but store-bought is just fine for weeknight ease.
-
Seasonings: Fresh thyme, salt, and pepper enhance the overall flavor. If you want a hint of spice, throw in some paprika!
-
Optional Toppings: Fresh herbs, crispy bacon, or a dollop of sour cream add that extra special touch before serving.
Step-by-Step Instructions: Let’s Get Cooking!
Ready to dive into this comfort food magic? Grab your apron and let’s get started!
-
Prep the Ingredients: Start by dicing your chicken into bite-sized pieces. This will help it cook evenly. Also, chop your onion, mince the garlic, and dice the potatoes. This step is crucial because we want everything prepped and ready for a smooth cooking experience!
-
Cook the Chicken: In a large pot or Dutch oven, heat a drizzle of olive oil over medium heat. Add the chicken pieces and season with a pinch of salt and pepper. Cook until golden brown, about 5-7 minutes. Chef tip: Don’t overcrowd the pan; cook in batches if needed. This ensures that the chicken has a nice sear!
-
Sauté the Aromatics: Once the chicken is cooked through, add the chopped onion and minced garlic to the pot. Sauté for about 3-4 minutes until the onions are translucent and the garlic is fragrant. Those aromas will make your kitchen smell divine!
-
Add the Potatoes and Broth: Toss in the diced potatoes and pour in your broth. You want just enough broth to cover the ingredients. Bring it to a gentle simmer, cover, and let it cook for about 15 minutes, or until the potatoes are fork-tender. Quick chef hack: If you want to speed this process up, dice your potatoes into smaller pieces!
-
Stir in the Corn and Cream: After the potatoes are tender, stir in the corn and pour in the cream. Allow it to simmer for another 5-10 minutes. This is where the magic happens, and your chowder begins to thicken beautifully. Note: For a thicker chowder, mash a few of the potatoes against the side of the pot—instant creamy texture!
-
Season to Taste: Taste the chowder and adjust seasonings to your liking. A little more salt? A sprinkle of fresh thyme? Maybe even a pinch of cayenne for some heat?
-
Serve Warm: Once the chowder has reached your desired flavor and thickness, ladle it into bowls. Top with fresh herbs, crispy bacon, or a drizzle of olive oil for that finishing touch.
Serving Suggestions: A Beautiful Bowl
Presentation matters! Serve your chicken corn chowder in deep, rustic bowls for that cozy appeal. Garnish with freshly chopped chives or parsley for color and brightness. A slice of crusty bread on the side will elevate the whole experience. Trust me, you’ll want to soak up every last drop!
Recipe Variations: Switch It Up!
Looking to customize this chowder to your taste? Here are some fun variations:
-
Spicy Twist: Add some diced jalapeños for a delicious kick.
-
Herbastic Blend: Swap out thyme for fresh dill or add in fresh basil for a bright flavor.
-
Vegetarian Delight: Substitute chicken for chickpeas or white beans, and use vegetable broth for a meatless option.
-
Cheesy Goodness: Stir in shredded cheddar cheese for a rich, cheesy version. Just be careful not to boil once it’s added—nobody likes curdled cheese!
Chef’s Notes: A Personal Touch
This chicken corn chowder has evolved over the years in my kitchen. I originally followed my grandma’s traditional recipe, but as I started cooking for my friends, I experimented! Adding different spices, using bold flavors, and even prepping my ingredients differently made this dish truly my own. One time, I attempted to make it "skinny" by cutting down on the cream, but my friends insisted I kick it up a notch. Sometimes, you just need to embrace the yum!
FAQs and Troubleshooting: Your Cooking Questions Answered
-
Can I make this chowder ahead of time? Absolutely! In fact, it often tastes even better the next day as the flavors meld together. Just store it in the fridge and reheat gently.
-
Why did my chowder come out too thin? If your chowder is too thin, try mashing some of the potatoes against the side of the pot or let it simmer uncovered for a bit to help thicken.
-
Can I freeze the chowder? Yes, but be aware that the cream may separate when reheating. If you plan to freeze it, consider adding the cream when you reheat.
-
What can I use instead of chicken? You can substitute with tofu, beans, or more vegetables. Just make sure to adjust cooking times accordingly!
Nutritional Info (Optional)
This chicken corn chowder is a hearty meal that packs a nutritional punch. While specific values will depend on the exact ingredients and portions used, you can expect a dish that’s high in protein (thanks to the chicken), carbohydrates (from potatoes and corn), and a satisfying amount of healthy fats from the cream.
Chicken corn chowder isn’t just a recipe; it’s a story, a memory, a moment of connection with the people we love. I hope this dish warms your heart and fills your belly with joy. So grab a bowl—it’s time to enjoy some cozy comfort food! Happy cooking!
PrintChicken Corn Chowder

A warm and comforting bowl of chicken corn chowder, perfect for chilly evenings and family gatherings.
- Prep Time: 15 minutes
- Cook Time: 30 minutes
- Total Time: 45 minutes
- Yield: 4 servings 1x
- Category: Soup
- Method: Stovetop
- Cuisine: American
- Diet: Gluten Free
Ingredients
- 1 lb boneless, skinless chicken breasts or thighs
- 2 cups fresh or frozen corn
- 2 medium Yukon gold or russet potatoes, diced
- 1 cup heavy cream or half-and-half
- 1 large sweet onion, chopped
- 3 cloves garlic, minced
- 4 cups chicken or vegetable broth
- Salt and pepper to taste
- 1 tsp fresh thyme
- Optional: diced jalapeños, fresh herbs, crispy bacon, or sour cream for topping
Instructions
- Prep the ingredients: Dice the chicken, chop the onion, mince the garlic, and dice the potatoes.
- Cook the chicken: In a large pot, heat olive oil over medium heat, add chicken and season with salt and pepper, cooking until golden brown (5-7 minutes).
- Sauté the aromatics: Add onion and garlic to the pot and sauté for 3-4 minutes until translucent.
- Add the potatoes and broth, cover, bringing to a gentle simmer for about 15 minutes or until potatoes are fork-tender.
- Stir in the corn and cream, allowing it to simmer for 5-10 minutes to thicken.
- Season to taste and adjust as preferred.
- Serve warm, garnished with fresh herbs or toppings of choice.
Notes
For a thicker chowder, mash some of the potatoes against the side of the pot. This chowder can be made ahead of time and reheats well.
Nutrition
- Serving Size: 1 bowl
- Calories: 400
- Sugar: 6g
- Sodium: 450mg
- Fat: 18g
- Saturated Fat: 10g
- Unsaturated Fat: 6g
- Trans Fat: 0g
- Carbohydrates: 35g
- Fiber: 4g
- Protein: 22g
- Cholesterol: 70mg
Keywords: chicken chowder, corn chowder, comfort food, soup recipe, cozy meals
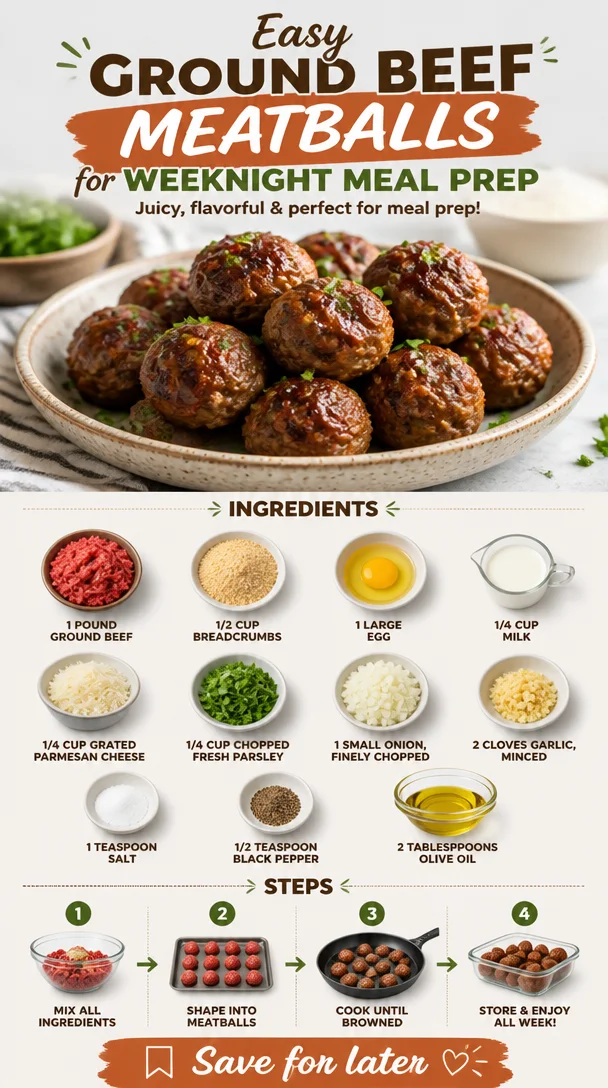
Easy Ground Beef Meatballs for Weeknight Meal Prep
Juicy Homemade Ground Beef Meatballs: Your New Favorite Recipe
Welcome to Clean Plate Cravings! Today, we’re diving into a dish that truly embodies comfort, heartiness, and flavor: Juicy Homemade Ground Beef Meatballs. If you’ve ever wanted a recipe that brings family and friends together, you’ve found it! There’s something magical about homemade meatballs that warms the heart and fills the belly. Whether served with spaghetti, nestled in a sub, or enjoyed on their own, meatballs are the culinary hug we all need.
Introduction: A Love Story with Meatballs
Oh, meatballs. Just hearing the word conjures images of cozy family dinners and my grandmother’s kitchen filled with the aromatic scent of garlic and simmering tomato sauce. Growing up, weekends at my grandma’s house were an epicurean adventure. She was the queen of the kitchen, and the highlight of those days was always her meatballs. She’d say, “The secret is in the love you put into them,” and boy, did I take that to heart!
As a kid, my job was to mix the meat and breadcrumbs, getting my hands all gooey while listening to her share stories of how she learned to cook. Each meatball was crafted with care, seasoned perfectly, and shaped with her caring hands. Those moments turned meal prep into sweet memories, and to this day, I strive to recreate that same magic in my own kitchen.
Now, as an adult, I’ve experimented with recipes, adding my twist to her classic. My goal remains unchanged: to capture the warmth and nostalgia of those family dinners while making the process approachable for everyone. So, grab your apron, and let’s make some juicy homemade ground beef meatballs!
Ingredients: What You’ll Need
To whip up these delicious meatballs, here’s what you’ll need:
- 1 pound ground beef
- Look for 80/20 ground beef for the perfect balance of flavor and juiciness. Leaner cuts can lead to drier meatballs.
- 1/2 cup breadcrumbs
- Use plain or Italian-seasoned breadcrumbs. If you’re gluten-free, substitute with almond flour or gluten-free breadcrumbs for a yummy twist!
- 1 large egg
- The egg acts as a binder to keep your meatballs together, preventing them from falling apart during cooking.
- 1/4 cup milk
- This keeps the meatballs moist. You can use any kind of milk—dairy or plant-based works just fine!
- 1/4 cup grated Parmesan cheese
- Adds an incredible depth of flavor. If you’re a cheese lover, feel free to increase this amount!
- 1/4 cup chopped fresh parsley
- For that fresh flavor! You can substitute with dried parsley; just remember to use less—herbs are usually more potent dried.
- 1 small onion, finely chopped
- Infuses the meatballs with sweetness and moisture. If you’re not a fan of onion, try shallots for a milder flavor.
- 2 cloves garlic, minced
- A must for that beautiful, aromatic punch! Fresh garlic is best, but in a pinch, garlic powder works too.
- 1 teaspoon salt
- Essential for bringing flavors to life. Adjust to your taste!
- 1/2 teaspoon black pepper
- For a slight kick! Feel free to adjust based on your spice tolerance.
- 2 tablespoons olive oil
- For cooking. You can substitute with canola or avocado oil for a different flavor profile.
Let’s get cooking!
Step-by-Step Instructions: Crafting Your Meatballs
-
Preheat Your Oven
Set your oven to 400°F (200°C). A hot oven is crucial for getting those deliciously browned meatballs! -
Prep Your Tools
Get a large mixing bowl ready, along with a baking sheet lined with parchment paper (or lightly greased) to catch those meatballs once they’re shaped. -
Mix Ingredients
In your large mixing bowl, combine the ground beef, breadcrumbs, egg, milk, Parmesan cheese, parsley, chopped onion, minced garlic, salt, and black pepper.Chef Hack: Instead of using your hands and getting messy right away, start by using a fork to mix everything gently. This prevents overworking the meat, which can lead to tougher meatballs!
-
Shape the Meatballs
Once your ingredients are combined, it’s time to roll! Use about 2 tablespoons of the mixture to form each meatball—think the size of a golf ball.Tip: Wet your hands with a bit of water to help prevent the mixture from sticking, making it easier to form perfect meatballs!
-
Place on Baking Sheet
Arrange your meatballs on the prepared baking sheet, making sure they’re spaced apart evenly. This allows for even cooking. -
Drizzle with Olive Oil
Lightly drizzle olive oil over the meatballs. This helps them get golden and crisp without drying out! -
Bake
Pop them into the preheated oven, and let them bake for 20-25 minutes until they are cooked through and browned to your liking.Chef’s Tip: Using a meat thermometer, check for an internal temperature of 160°F (70°C) for perfectly cooked meatballs!
-
Serve and Enjoy!
Once they’re done, take a moment to admire your handiwork! Serve those beautiful meatballs on a platter or in a cozy bowl with sauce, pasta, or even on their own.
Serving Suggestions: Plating Like a Pro
For a truly impressive presentation, serve your juicy meatballs with a ladle of marinara sauce over them. Drum up some excitement by garnishing with fresh parsley and a sprinkle of additional Parmesan cheese. You can also serve them with spaghetti for a classic dish, or as hoagies with melted cheese on a crusty roll for a fun twist.
Recipe Variations: Get Creative!
-
Spicy Italian Meatballs
Add red pepper flakes to the mixture for a spicy kick, or swap regular breadcrumbs for spicy Italian ones. -
Herbed Chicken Meatballs
Substitute ground chicken for ground beef and add Italian seasoning for a lighter option. -
BBQ Meatballs
Mix in your favorite barbecue sauce into the meatball mixture for a fun twist, then serve them with extra sauce on the side! -
Cheesy Stuffed Meatballs
Insert a small cube of mozzarella cheese into the center of each meatball before rolling it. When baked, it’ll ooze delicious cheese! -
Vegetarian Twist
Replace the ground beef with lentils or chickpeas combined with breadcrumbs and spices for a veggie option that’s equally delicious.
Chef’s Notes: A Personal Touch
Funny story: the first time I attempted to make meatballs as an adult, I forgot the egg! I mixed everything up, rolled those beauties, and they crumbled apart when I tried to cook them. After a minor kitchen meltdown, I realized that even the most experienced cooks have their off days—or maybe a cooking disaster that turns into a good laugh!
Over the years, I kept refining this recipe, adapting it to suit my tastes and those of the people I love to cook for. The comforting aroma and flavors remind me of my grandma and the countless times we shared in the kitchen. So, feel free to sprinkle on your personality while making these meatballs; cooking should be about joy and expression!
FAQs and Troubleshooting
Q1: Why did my meatballs fall apart?
A: Most likely, they didn’t have enough binding! Make sure you include the egg and breadcrumbs. Also, handle the mixture with care—overmixing can make them tough!
Q2: Can I make these meatballs in advance?
A: Absolutely! You can prepare them ahead of time and refrigerate for up to 24 hours before cooking. You can also freeze them uncooked, then bake when you’re ready to enjoy.
Q3: What’s the best way to reheat meatballs?
A: To keep them moist, reheat in a covered skillet with a splash of marinara or broth over medium-low heat. This prevents them from drying out!
Q4: Can I bake meatballs instead of frying them?
A: Yes! Baking is a great method. It’s healthier and less messy than frying. Plus, you get those delicious roasted flavors!
Nutritional Info (Optional)
Each meatball (approximately 1 oz) contains about:
- Calories: 100
- Protein: 7g
- Fat: 6g
- Carbs: 3g
- Fiber: 0g
So gather your ingredients and bring a little bit of warmth and joy into your kitchen with my Juicy Homemade Ground Beef Meatballs. Happy cooking! Let’s create something delicious together!
PrintJuicy Homemade Ground Beef Meatballs
Delicious homemade meatballs perfect for family dinners, packed with flavor and nostalgia.
- Prep Time: 15 minutes
- Cook Time: 25 minutes
- Total Time: 40 minutes
- Yield: 4 servings 1x
- Category: Main Course
- Method: Baking
- Cuisine: Italian
- Diet: Non-Vegetarian
Ingredients
- 1 pound ground beef
- 1/2 cup breadcrumbs
- 1 large egg
- 1/4 cup milk
- 1/4 cup grated Parmesan cheese
- 1/4 cup chopped fresh parsley
- 1 small onion, finely chopped
- 2 cloves garlic, minced
- 1 teaspoon salt
- 1/2 teaspoon black pepper
- 2 tablespoons olive oil
Instructions
- Preheat your oven to 400°F (200°C).
- Prep a large mixing bowl and a baking sheet lined with parchment paper.
- Mix the ground beef, breadcrumbs, egg, milk, Parmesan cheese, parsley, chopped onion, minced garlic, salt, and black pepper in the mixing bowl.
- Shape about 2 tablespoons of the mixture into each meatball.
- Place the meatballs on the prepared baking sheet, spaced evenly.
- Drizzle olive oil over the meatballs.
- Bake for 20-25 minutes until cooked through and browned.
- Serve and enjoy!
Notes
You can prepare the meatballs in advance and refrigerate them. They can also be frozen uncooked and baked when ready.
Nutrition
- Serving Size: 1 meatball
- Calories: 100
- Sugar: 1g
- Sodium: 400mg
- Fat: 6g
- Saturated Fat: 2g
- Unsaturated Fat: 4g
- Trans Fat: 0g
- Carbohydrates: 3g
- Fiber: 0g
- Protein: 7g
- Cholesterol: 30mg
Keywords: meatballs, beef, Italian, comfort food, homemade, family dinner