
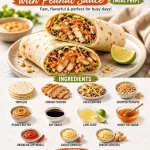
Minute Asian Chicken Wraps with Peanut Sauce (Meal Prep)
Asian Chicken Wraps with Peanut Sauce: A Flavorful Journey
Welcome back to Clean Plate Cravings! Today, we’re diving into a dish that’s not only delicious but also packed with vibrant flavors and textures: Asian Chicken Wraps with Peanut Sauce. This recipe is perfect for those busy weeknights or lazy weekends when you want something that’s light, satisfying, and oh-so-tasty. Let’s get into it!
A Nostalgic Kitchen Memory
Growing up, my family had a tradition of making wrap-style dinners on Friday nights. There was something about rolling up your own meal that made it feel like a party! My mom would lay out all the fillings, from seasoned meats to fresh veggies, and we would gather around the table to create our own concoctions. One of my favorites was always anything with chicken and a mouthwatering peanut sauce. The crunchy texture of the coleslaw mixed with tender chicken wrapped in a warm tortilla is something I still crave today.
Fast forward to now, and I’ve created my own version, inspired by those fantastic family memories. Each time I make these Asian Chicken Wraps, I’m reminded of the joy of assembling my food, the laughter shared around the table, and the delightful crunch of the fresh ingredients. Plus, the peanut sauce? Oh, it just brings everything together in a way that puts a smile on your face. So, get ready to embrace your inner wrap artist and let’s create something fantastic together!
Ingredients
Here’s what you’ll need to whip up these tasty wraps:
-
Tortillas: The foundation of our wraps! Flour tortillas provide a soft and pliable base, but feel free to swap for whole wheat or even gluten-free tortillas if needed.
-
Cooked Chicken (sliced or shredded): The star protein! You can use rotisserie chicken, grilled, or roasted chicken. Need a vegetarian option? Sub with crispy tofu!
-
Coleslaw Mix (cabbage and carrots): This adds a wonderful crunch! You can buy pre-packaged coleslaw mix or make your own—just thinly slice green cabbage and shred some carrots.
-
Chopped Peanuts: They add a delightful texture and nutty flavor. If you’re allergic to peanuts, try sunflower seeds or toasted sesame seeds as alternatives.
-
Peanut Butter: Creamy or crunchy, it’s up to you! Natural peanut butter gives the best flavor, but any variety will do. If you want less nutty flavor, sunflower butter is a great alternative.
-
Soy Sauce: This provides a savory kick! If you’re watching your sodium, opt for low-sodium soy sauce or tamari for a gluten-free option.
-
Lime Juice: Fresh lime juice lifts the dish with brightness. You can substitute with lemon juice if that’s what you have on hand.
-
Honey or Sugar: To balance the flavors and add a hint of sweetness. Agave nectar works too for a vegan alternative!
-
Sriracha (optional): For those who love a little heat! You can adjust the amount according to your spice level preference.
-
Garlic (minced): A must-have for flavor! You can also use garlic powder in a pinch.
-
Ginger (grated): Fresh ginger brings a unique warmth and aroma to the sauce. Ground ginger can work in a pinch, but fresh is always best!
Step-by-Step Instructions
Alright! Let’s get into the nitty-gritty of making these wraps. Follow these steps, and you’ll be enjoying a delicious meal in no time!
-
Prepare the Chicken:
- If you’re using rotisserie chicken, simply shred or slice it into bite-sized pieces. For grilled chicken, cook it up with your favorite seasonings. The key here is to ensure it’s juicy and easily bite-sized!
-
Make the Peanut Sauce:
- In a bowl, whisk together:
- 1/2 cup of peanut butter
- 3 tablespoons of soy sauce
- 2 tablespoons of lime juice
- 1 tablespoon of honey or sugar
- 1 clove of minced garlic
- 1 teaspoon of grated ginger
- Add sriracha here if you like it spicy!
- Adjust the consistency with a splash of hot water if it’s too thick. You want it smooth but pourable!
- In a bowl, whisk together:
-
Prepare Your Coleslaw:
- In a large mixing bowl, combine your coleslaw mix. You can add a bit of lime juice, salt, and pepper for extra flavor. Toss it all together and let it sit for a few minutes so the flavors meld together.
-
Warm Your Tortillas:
- Heat a non-stick skillet over medium heat. Place one tortilla in for about 30 seconds on each side, just until warm and pliable. Repeat with all tortillas. This step makes them easier to roll and prevents tears.
-
Assemble Your Wraps:
- Lay a warm tortilla on a plate. Add a generous portion of sliced chicken, a handful of coleslaw, a drizzle of peanut sauce, and a sprinkle of chopped peanuts.
-
Roll It Up:
- Fold in the sides of the tortilla and then roll from the bottom up, tucking in the filling as you go. Secure it with a toothpick if needed, but I find just holding it together works when enjoying immediately!
-
Serve:
- Slice the wraps in half for easier eating. You can serve these with extra peanut sauce on the side for dipping, because who wouldn’t want more of that goodness?!
Serving Suggestions
To plate these wraps beautifully, try arranging them on a colorful platter. You can drizzle some extra peanut sauce over the top for a touch of elegance, and maybe some lime wedges for a pop of color. Garnish with fresh cilantro or green onions to elevate the experience! Serve alongside a chilled cucumber salad for a refreshing contrast.
Recipe Variations
Want to mix things up? Here are a few variations that keep it exciting:
- Spicy Thai Chicken Wraps: Add crushed red pepper flakes to the peanut sauce for an extra kick.
- Vegan Delight: Use marinated tofu instead of chicken, and maple syrup instead of honey for a fully plant-based version.
- Tropical Twist: Include sliced mango or pineapple for a sweet and fruity bite in your wraps.
- Crunchy Additions: Throw in some sliced bell peppers or snap peas for added texture and flavor!
- Zesty Lime: Mix lime zest into the peanut sauce to amplify that zesty flavor!
Chef’s Notes
These wraps hold a special place in my heart. I remember the first time I tried to make them on my own. The peanut sauce turned out way too thick, and I may have underestimated the amount of ginger! But it was hilarious experimenting, and I learned the value of adjusting flavors as I went. This recipe has evolved so much since then—it’s become a weeknight staple. Every time I’m in a pinch for a quick meal, I can count on this dish to satisfy my cravings.
FAQs and Troubleshooting
-
What if my peanut sauce is too thick?
- No worries! Just add a bit of warm water, a teaspoon at a time, until you reach the desired consistency.
-
Can I make these wraps ahead of time?
- Absolutely! Assemble your wraps and keep them wrapped in plastic wrap in the fridge for a few hours before serving. Just add fresh sauce right before eating!
-
How can I make this allergen-friendly?
- Substitute peanut butter with sunflower butter, and ensure your soy sauce is gluten-free. Always read labels for hidden allergens.
-
What’s the best way to store leftovers?
- Store any unassembled components separately in airtight containers. The wraps can get soggy if left combined for too long.
Nutritional Info
(Note: This section can vary greatly depending on specific ingredients and brands used. Here’s a general idea: For one wrap, you might find around 350 calories, 15g protein, 45g carbs, and 15g fat. For precise nutritional information, you might consider using a recipe calculator!)
And there you have it! Whip up these delightful Asian Chicken Wraps with Peanut Sauce and enjoy the experience of rolling your dinner. Thank you for joining me in the kitchen today—happy cooking, and don’t forget to savor every bite!
PrintAsian Chicken Wraps with Peanut Sauce
Delicious and vibrant Asian Chicken Wraps with a creamy peanut sauce, perfect for busy weeknights or leisurely weekends.
- Prep Time: 20 minutes
- Cook Time: 10 minutes
- Total Time: 30 minutes
- Yield: 4 servings
- Category: Main Course
- Method: Wrapping
- Cuisine: Asian
- Diet: Gluten-Free
Ingredients
- Flour Tortillas
- Cooked Chicken (sliced or shredded)
- Coleslaw Mix (cabbage and carrots)
- Chopped Peanuts
- Peanut Butter
- Soy Sauce
- Lime Juice
- Honey or Sugar
- Sriracha (optional)
- Garlic (minced)
- Ginger (grated)
Instructions
- Prepare the Chicken: If you’re using rotisserie chicken, simply shred or slice it into bite-sized pieces. For grilled chicken, cook it up with your favorite seasonings. The key here is to ensure it’s juicy and easily bite-sized!
- Make the Peanut Sauce: In a bowl, whisk together: 1/2 cup of peanut butter, 3 tablespoons of soy sauce, 2 tablespoons of lime juice, 1 tablespoon of honey or sugar, 1 clove of minced garlic, 1 teaspoon of grated ginger. Add sriracha here if you like it spicy! Adjust the consistency with a splash of hot water if it’s too thick.
- Prepare Your Coleslaw: In a large mixing bowl, combine your coleslaw mix. You can add a bit of lime juice, salt, and pepper for extra flavor. Toss it all together and let it sit for a few minutes.
- Warm Your Tortillas: Heat a non-stick skillet over medium heat. Place one tortilla in for about 30 seconds on each side, just until warm and pliable. Repeat with all tortillas.
- Assemble Your Wraps: Lay a warm tortilla on a plate, add a generous portion of sliced chicken, a handful of coleslaw, a drizzle of peanut sauce, and a sprinkle of chopped peanuts.
- Roll It Up: Fold in the sides of the tortilla and then roll from the bottom up, tucking in the filling. Secure it with a toothpick if needed.
- Serve: Slice the wraps in half for easier eating and serve with extra peanut sauce on the side.
Notes
These wraps can be made ahead of time and stored separately to maintain crispness. Use sunflower butter if allergic to peanuts.
Nutrition
- Serving Size: 1 wrap
- Calories: 350
- Sugar: 5g
- Sodium: 600mg
- Fat: 15g
- Saturated Fat: 3g
- Unsaturated Fat: 9g
- Trans Fat: 0g
- Carbohydrates: 45g
- Fiber: 4g
- Protein: 15g
- Cholesterol: 30mg
Keywords: chicken wraps, peanut sauce, Asian cuisine, quick meal, healthy wraps
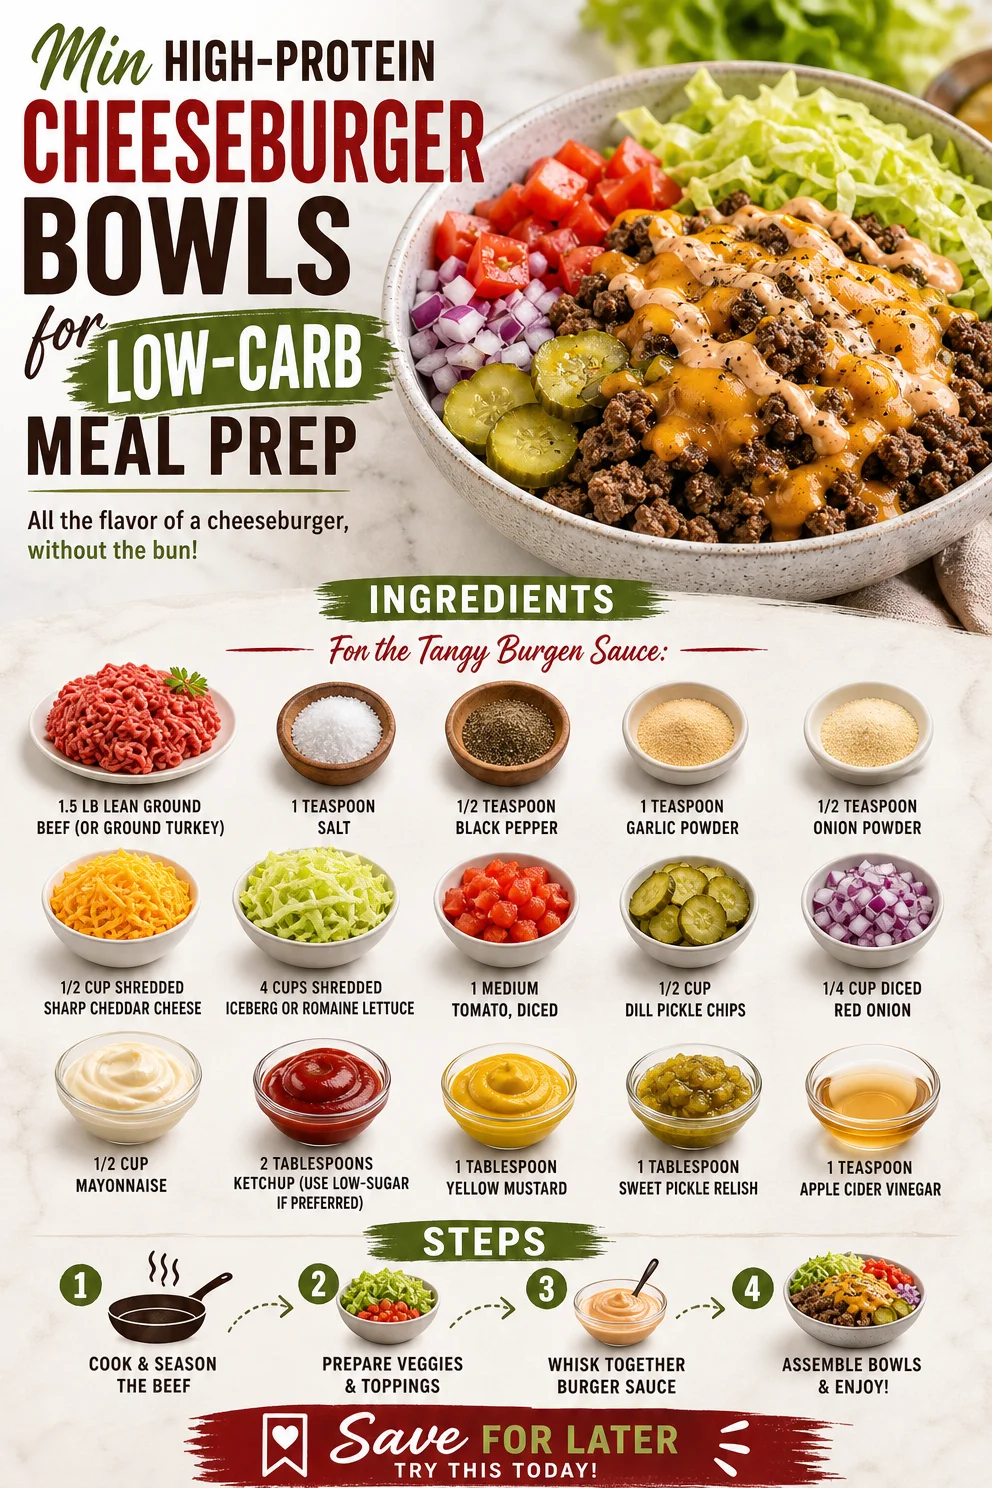
Min High-Protein Cheeseburger Bowls for Low-Carb Meal Prep
High-Protein Cheeseburger Bowls: Easy Low-Carb Meal Prep
Welcome to another delicious adventure here at Clean Plate Cravings! Today, we’re diving into the world of comfort food with a healthful twist – High-Protein Cheeseburger Bowls. This recipe is all about enjoying the classic flavors of a cheeseburger while keeping it low-carb and nutritious. Picture this: a vibrant bowl brimming with lean protein, crisp veggies, and draped in a tangy sauce that’ll make your taste buds dance. Whether you’re meal prepping for the week or whipping up a quick dinner, these cheeseburger bowls are going to become a staple in your kitchen.
Now, before we jump into the cooking, let me share a little story that captures my passion for this dish.
Personal Story
Ah, cheeseburgers! They hold a special place in my heart (and stomach). I remember my dad firing up the grill on Saturday afternoons while the tantalizing aroma of sizzling beef wafted through our backyard. We’d gather around, laughter echoing, while dad flipped patties to perfection. He had this secret blend of seasonings that made every bite nothing short of magical. Each burger was a masterpiece topped with melty cheese and all the fixings.
As I grew older, I realized my love for burgers wasn’t just about the taste; it was about those shared moments, the joy of good food bringing people together. Fast forward to today, I’ve concocted a healthier twist on that family favorite. These High-Protein Cheeseburger Bowls capture the essence of those delightful afternoons, minus the heavy carbs. So grab your apron, and let’s recreate this nostalgic dish together!
Ingredients
For the Bowls:
-
1.5 lb lean ground beef (or ground turkey)
This is the star of your bowl! Lean meat helps keep the protein high and the fat lower. If you’re looking for an even leaner option, ground turkey is a fantastic substitute. You can also use plant-based ground meat for a vegetarian version. -
1 teaspoon salt
Essential for enhancing the flavors of your meat. Feel free to tweak the amount based on your taste preference, or try a seasoned salt for an extra kick! -
1/2 teaspoon black pepper
A key seasoning that brings depth to the meat. You can use white pepper for a milder flavor, or add red pepper flakes if you like a little heat. -
1 teaspoon garlic powder
Adds a warm, aromatic flavor. You can substitute with fresh minced garlic if you prefer a bolder garlic hit—just adjust the quantity since fresh garlic is more potent. -
1/2 teaspoon onion powder
This enhances the savory flavor profile. Fresh onions can be used here too; just sauté them with the meat until they soften for a sweeter, richer taste. -
1/2 cup shredded sharp cheddar cheese
Because what’s a cheeseburger without cheese? Opt for a low-fat version if you want to cut down on calories, or experiment with other types like pepper jack for a spicy twist. -
4 cups shredded iceberg or romaine lettuce
The perfect crunchy base for your bowl! If you’re feeling adventurous, swap it for spinach or kale for added nutrients. -
1 medium tomato, diced
Fresh tomatoes add a juicy burst. Cherry tomatoes work well too; just halve them for a sweet pop of flavor. -
1/2 cup dill pickle chips
These provide a zesty crunch that really elevates the dish. If you prefer a bit of sweetness, you can use bread-and-butter pickles instead. -
1/4 cup diced red onion
A little kick of sharpness. You can use green onions for a milder taste or leave them out entirely if you’re not a fan.
For the Tangy Burger Sauce:
-
1/2 cup mayonnaise
A creamy base for our sauce. Try using Greek yogurt for a lighter version rich in protein. -
2 tablespoons ketchup
Adds a hint of sweetness. Choose low-sugar ketchup if you’re watching your sugar intake. -
1 tablespoon yellow mustard
Brings tang and depth to the sauce. You can swap for Dijon for a more sophisticated flavor. -
1 tablespoon sweet pickle relish
This is what adds that classic burger flavor. If you want to skip it, a teaspoon of honey can add a sweet touch instead. -
1 teaspoon apple cider vinegar
For a touch of acidity that balances the flavors. If you don’t have it on hand, white vinegar can work, but adjust to taste as it’s a bit sharper.
Step-by-Step Instructions
Step 1: Cook the Meat
Start by heating a large skillet over medium heat. Add your lean ground beef (or turkey) to the pan. Season it with salt, black pepper, garlic powder, and onion powder. Use a spatula to break the meat into crumbles as it cooks. You’re looking for a nice brown color, which typically takes about 8-10 minutes. Stir occasionally to prevent sticking. This step is crucial; browning the meat adds amazing flavor!
Step 2: Prepare the Sauce
While the meat is cooking, let’s whip up our tangy burger sauce. In a medium bowl, combine the mayonnaise, ketchup, mustard, sweet pickle relish, and apple cider vinegar. Stir well until everything is smooth and combined. Give it a taste—feel free to adjust ingredients based on your preferences. You might like it a little sweeter or tangier!
Step 3: Assemble the Bowls
Once the meat is fully cooked, it’s assembly time! Start with a generous handful of shredded lettuce at the bottom of each bowl. This is your base, and it’s going to add crunch and freshness. Top the lettuce with a scoop of the seasoned meat, then sprinkle the shredded cheddar cheese over the hot beef. The cheese will melt slightly, creating that delicious cheeseburger effect.
Step 4: Add Fresh Toppings
Next, it’s time for the fun part—adding your toppings! Dice the tomato and scatter it over the bowl along with the dill pickle chips and diced red onion. Each bite will be a delightful mix of flavors and textures.
Step 5: Drizzle with Sauce
Finally, drizzle the tangy burger sauce generously over the top. You can also serve some on the side for dipping, which is always a hit!
Step 6: Dig In!
There you have it—your High-Protein Cheeseburger Bowls are ready to be enjoyed! Serve them warm, and don’t forget to take the first bite to savor the symphony of flavors. You’ll be transported straight back to those backyard barbecues with every mouthful!
Serving Suggestions
These cheeseburger bowls are versatile! For a colorful presentation, you can serve them in vibrant bowls or even on a bed of seasoned quinoa for added nutrition and texture. For guests, consider adding some crusty bread or whole-grain buns on the side for the ultimate burger experience.
Recipe Variations
- BBQ Cheeseburger Bowls: Add barbecue sauce to the beef while it cooks for a smoky twist!
- Southwest Style: Mix in black beans and corn, and add avocado slices for a Tex-Mex flair.
- Mediterranean Variation: Swap the cheddar for feta and add olives and cucumber—yum!
- Vegan Option: Use a plant-based ground meat substitute and cashew mayo for the sauce.
- Spicy Kick: Toss in jalapeños or chili powder for an extra kick of heat.
Chef’s Notes
Creating these cheeseburger bowls has been a labor of love for me. Initially, I started with a traditional burger recipe, but as I embraced healthier eating habits, I knew I had to find a way to keep the comfort without the carbs. Over time, I discovered that by using fresh ingredients and crafting a flavorful sauce, I could satisfy that cheeseburger craving without the guilt! Plus, these bowls make for quick meal prep—an added win in my busy kitchen life.
FAQs and Troubleshooting
1. Can I make this ahead of time?
Absolutely! These bowls are perfect for meal prep. Just store everything separately in airtight containers and assemble when you’re ready to eat. The toppings keep well for a few days, and the flavors meld beautifully.
2. What if I don’t have all the spices?
Don’t worry! You can always customize the spices based on what you have on hand. Italian seasoning or a dash of paprika can also work wonders.
3. How can I make it spicy?
Want to add some heat? Incorporate diced jalapeños into the bowls or mix spicy mustard into your sauce. You could also blend in some Sriracha!
4. My ground meat is dry—what did I do wrong?
Overcooking can dry out meat, especially lean varieties! Make sure to cook it just until it’s no longer pink. If it happens, try mixing in a bit of your tangy sauce to bring some moisture back.
Nutritional Info
(Approximate per serving – based on 4 servings with ground beef, excluding optional toppings)
- Calories: 400
- Protein: 35g
- Carbohydrates: 8g (Net carbs: 5g)
- Fat: 25g
So there you have it—High-Protein Cheeseburger Bowls! With every flavorful bite, you’ll not only be nourishing your body but also reminiscing about those cherished grilled moments. Happy cooking, my food-loving friends!
PrintHigh-Protein Cheeseburger Bowls
Enjoy the classic flavors of a cheeseburger while keeping it low-carb and nutritious with these High-Protein Cheeseburger Bowls.
- Prep Time: 15 minutes
- Cook Time: 10 minutes
- Total Time: 25 minutes
- Yield: 4 servings 1x
- Category: Main Course
- Method: Cooking
- Cuisine: American
- Diet: Low Carb
Ingredients
- 1.5 lb lean ground beef (or ground turkey)
- 1 teaspoon salt
- 1/2 teaspoon black pepper
- 1 teaspoon garlic powder
- 1/2 teaspoon onion powder
- 1/2 cup shredded sharp cheddar cheese
- 4 cups shredded iceberg or romaine lettuce
- 1 medium tomato, diced
- 1/2 cup dill pickle chips
- 1/4 cup diced red onion
- 1/2 cup mayonnaise
- 2 tablespoons ketchup
- 1 tablespoon yellow mustard
- 1 tablespoon sweet pickle relish
- 1 teaspoon apple cider vinegar
Instructions
- Cook the meat: Heat a large skillet over medium heat. Add your lean ground beef (or turkey) to the pan. Season it with salt, black pepper, garlic powder, and onion powder. Cook until browned, about 8-10 minutes.
- Prepare the sauce: In a medium bowl, combine the mayonnaise, ketchup, mustard, sweet pickle relish, and apple cider vinegar. Stir well until smooth and combined.
- Assemble the bowls: Start with a handful of shredded lettuce at the bottom of each bowl. Top with a scoop of the seasoned meat, then sprinkle the shredded cheddar cheese over the hot beef.
- Add fresh toppings: Dice the tomato and scatter it over the bowl along with the dill pickle chips and diced red onion.
- Drizzle with sauce: Generously drizzle the tangy burger sauce over the top.
- Dig in and enjoy: Serve warm and savor the delicious flavors!
Notes
These bowls are perfect for meal prep. Store ingredients separately and assemble when ready to eat.
Nutrition
- Serving Size: 1 serving
- Calories: 400
- Sugar: 4g
- Sodium: 700mg
- Fat: 25g
- Saturated Fat: 9g
- Unsaturated Fat: 9g
- Trans Fat: 0g
- Carbohydrates: 8g
- Fiber: 3g
- Protein: 35g
- Cholesterol: 90mg
Keywords: cheeseburger bowls, low-carb, meal prep, high-protein