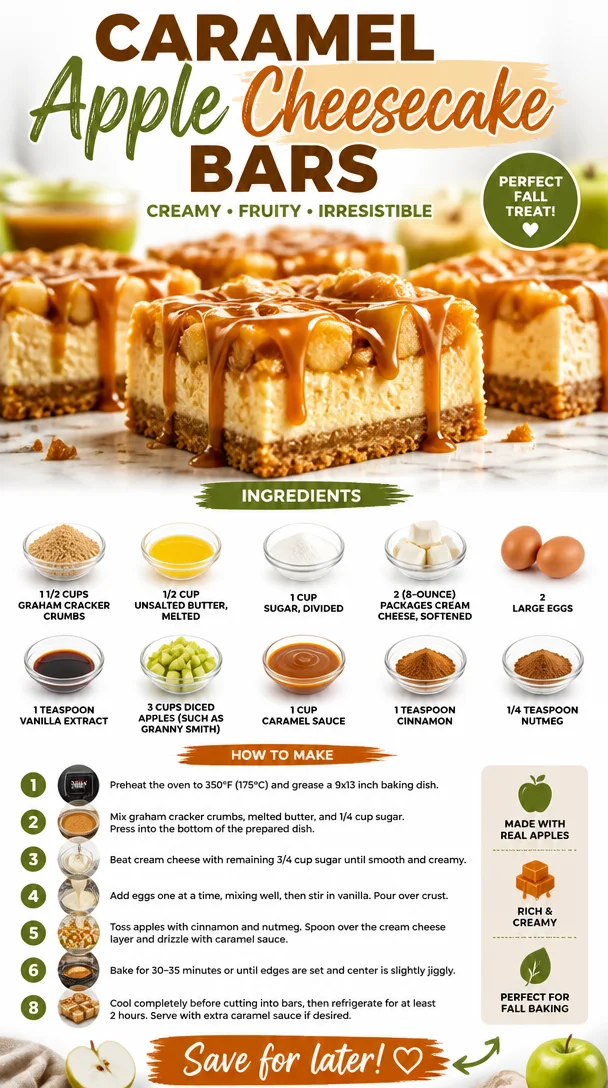
Caramel Apple Cheesecake Bars
Caramel Apple Cheesecake Bars: A Slice of Nostalgia and Flavor
Welcome to the cozy corner of my kitchen, where we’re about to whip up something truly delicious: Caramel Apple Cheesecake Bars! Imagine a dessert that combines the creamy richness of cheesecake with the nostalgic flavors of apple pie and the sweet, gooey goodness of caramel. Sounds heavenly, right? Well, trust me when I say these bars are not just delicious—they’re a warm hug for your taste buds!
Every bite of these cheesecake bars brings me back to crisp autumn days spent at the local apple orchard with my family. I can still smell the air thick with fresh apples and cinnamon as we picked out our favorites for pies, sauces, and, of course, a little baking project to do together at home. My mom had this way of making everything feel special, whether it was her obvious love for cooking or the way she turned the ordinary into something magical.
Back then, it was all about the iconic apple pie, but as I grew older—and a bit bolder in the kitchen—I found myself wanting to blend traditions and create something that brought all those flavors together in a new way. Enter these Caramel Apple Cheesecake Bars, a dessert that perfectly encapsulates the essence of autumn but is truly loved year-round. They’re super easy to make and guaranteed to impress!
So grab your apron, and let’s dive into this delightful recipe that’s sure to become a cherished favorite in your home!
A Sweet Memory
I still remember my first time making cheesecake from scratch. It was a rainy Saturday afternoon, and I felt a sense of adventure bubbling inside me. I had a hunch that combining my love for apples with this dreamy cheesecake would yield something incredible. I decided to give it a whirl. With the help of my trusty vintage mixer and a few snack breaks (I mean, who can resist a slice of apple while baking?), I mixed, blended, and baked my way through the recipe.
Once it was ready, I pulled that golden-brown cheesecake out of the oven, drizzled caramel all over it, and let it cool. My family gathered around the dining table, and the moment I served those first slices, everyone’s eyes lit up. It was an instant hit! That day struck a chord within me, igniting a passion for baking that continues to this day. There’s something special about sharing food with loved ones—these Caramel Apple Cheesecake Bars are a throwback to that beautiful memory, and I’m thrilled to share it with you!
Ingredients
Here’s what you’ll need to create these luscious Caramel Apple Cheesecake Bars:
-
1 1/2 cups graham cracker crumbs: The perfect base for our crust. If you’re in a pinch, you can swap these for digestive biscuits or even gluten-free graham crackers for a gluten-free variation.
-
1/2 cup unsalted butter, melted: This adds richness and binds the crumbs together. You can substitute coconut oil for a dairy-free option if needed.
-
1 cup sugar, divided: Half will sweeten the filling and half for the caramel drizzle (more on that later). If you prefer it less sweet, use less or try coconut sugar for a deeper flavor.
-
2 (8-ounce) packages cream cheese, softened: Cream cheese brings that delightful creaminess. Neufchâtel cheese can work in its place if you’re looking for a lighter option.
-
2 large eggs: These are crucial for setting the cheesecake. Flax eggs or applesauce can be used as a vegan alternative if you want to avoid eggs.
-
1 teaspoon vanilla extract: Because every delicious dessert needs this heavenly flavor. Pure vanilla extract is best, but you can use vanilla bean paste in a pinch.
-
3 cups diced apples (such as Granny Smith): Tart apples add a nice tangy flavor and a lovely texture. Feel free to mix in some sweeter varieties like Gala or Honeycrisp if you like!
-
1 cup caramel sauce: Ready-made caramel sauce makes it easy to whip this up, but you can also make your own if you’re feeling adventurous!
-
1 teaspoon cinnamon: This is the spice that amplifies those warm autumn flavors. You can use apple pie spice for a more complex flavor if you have it on hand.
-
1/4 teaspoon nutmeg: A pinch of nutmeg adds depth. If you’re not a fan, feel free to skip it, or replace it with a hint of allspice for a different floral note.
Let’s gather our ingredients, roll up our sleeves, and get started on these irresistible bars!
Step-by-Step Instructions
Here’s how to create these Caramel Apple Cheesecake Bars step by step—let’s get cooking!
-
Preheat the Oven: Preheat your oven to 325°F (160°C). This step is essential for ensuring that our cheesecake bakes evenly.
-
Prepare the Crust: In a mixing bowl, combine the graham cracker crumbs and melted butter. Here’s where the magic begins! Mix until the crumbs resemble wet sand. If it’s too dry, add a bit more melted butter.
-
Press the Mixture into the Pan: Line a 9×9-inch baking pan with parchment paper for easy removal. Pour the crust mixture into the pan and press it firmly into an even layer using your hands or the bottom of a glass. Make sure it’s packed tightly!
-
Bake the Crust: Pop it in the oven for about 10 minutes, until it’s golden and fragrant. Keep an eye on it—the aroma will be hard to resist!
-
Make the Cheesecake Filling: While the crust is cooling, mix softened cream cheese and 1/2 cup of sugar in a clean mixing bowl. Beat until smooth. The trick here is to make sure there are no lumps, so aim for a creamy, luscious texture.
-
Add Eggs and Vanilla: Crack in the eggs one at a time, mixing thoroughly after each addition. Then add the vanilla extract. This is where the filling starts to get that beautiful richness!
-
Mix in Diced Apples: Gently fold in the diced apples, cinnamon, and nutmeg. The apples will soften and release juices while baking, making each bite of cheesecake delightfully fruity.
-
Pour the Filling over the Crust: Carefully pour the apple cheesecake mixture onto the crust, spreading it evenly with a spatula.
-
Bake the Bars: Bake for about 40-45 minutes or until the center is just set (it might have a slight jiggle). If you see cracks, don’t worry—those will be disguised by our caramel topping!
-
Cool Down: Remove from the oven and let the bars cool at room temperature for about an hour, then transfer them to the fridge for at least 2 hours. Trust me; they’re worth the wait!
-
Drizzle with Caramel: Once chilled, it’s time for the star of the show! Drizzle the cooled cheesecake with caramel sauce—generous amounts, of course.
-
Slice and Serve: Carefully lift the bars out of the pan using the parchment paper edges. Slice into squares, serve, and watch everyone fall in love.
Serving Suggestions
These Caramel Apple Cheesecake Bars are perfect for sharing! Serve them at gatherings, potlucks, or just for a cozy night in. To elevate the serving, garnish with a sprinkle of cinnamon or a dollop of freshly whipped cream. And don’t forget a little extra caramel drizzle on top for that wow factor!
Recipe Variations
Want to switch things up? Here are a few fun variations to try:
-
Nutty Crunch: Add 1/2 cup of chopped pecans or walnuts to the crust for added crunch and nutty flavor.
-
S’mores Twist: Replace some of the graham cracker crumbs with mini marshmallows, chocolate chips, and a bit of cocoa powder for a delicious s’mores-inspired treat.
-
Pumpkin Spice: Substitute some of the apples with pumpkin puree and add a tablespoon of pumpkin spice for a seasonal delight.
-
Chocolate Drizzle: Feeling extra indulgent? Drizzle melted dark chocolate over the caramel drizzle for a rich flavor combination.
-
Swap the Apples: Try pears or even berries instead of apples for a delightful twist on flavor!
Chef’s Notes
Making these Caramel Apple Cheesecake Bars brings back so many memories of laughter and family bonding in the kitchen. Each time I make them, I find myself tweaking the recipe just a touch—maybe a different blend of spices or a sprinkle of sea salt on top for an added flavor kick.
There was a time when my friends and I attempted to make these cheesecake bars for the first time at a small get-together. A tiny misunderstanding led to an over-the-top amount of caramel sauce, but instead of worrying, we embraced the gooey goodness! We laughed our way through the chaos, and those bars turned out delicious anyway. That’s what cooking is all about, after all—embracing imperfections and having fun!
FAQs and Troubleshooting
1. Why did my cheesecake crack?
Cracks can happen for a few reasons: overmixing the batter, baking at too high a temperature, or cooling too quickly. If you see cracks, don’t fret! They’ll be covered by caramel, and the flavor remains fantastic.
2. Can I freeze these bars?
Absolutely! You can freeze these bars for up to 3 months. Just make sure to wrap them tightly in plastic wrap and place them in an airtight container. Thaw in the fridge before serving.
3. Can I use other types of apples?
Definitely! Granny Smith apples add tartness, but feel free to mix and match with your favorite varieties. Sweeter apples like Fuji or Honeycrisp will create a different but delightful flavor.
4. How do I tell if my cheesecake is done?
The edges should be set, while the center will still have a slight jiggle. Avoid overbaking as this could lead to a dry texture.
Nutritional Info
While this delightful treat is a bit indulgent, it’s meant for sharing and enjoyment, so enjoy it in moderation! These Caramel Apple Cheesecake Bars are packed with good vibes and nostalgia, making every bite feel worth it.
And there you have it—a delicious journey to make Caramel Apple Cheesecake Bars from scratch, weaving together flavors, memories, and a touch of creativity. Bonus points for sharing them with loved ones—these bars are sure to spread joy! Happy baking!
PrintCaramel Apple Cheesecake Bars
A delightful dessert combining the creamy richness of cheesecake, nostalgic flavors of apple pie, and sweet caramel goodness, perfect for autumn or year-round.
- Prep Time: 15 minutes
- Cook Time: 50 minutes
- Total Time: 65 minutes
- Yield: 16 servings 1x
- Category: Dessert
- Method: Baking
- Cuisine: American
- Diet: Vegetarian
Ingredients
- 1 1/2 cups graham cracker crumbs
- 1/2 cup unsalted butter, melted
- 1 cup sugar, divided
- 2 (8-ounce) packages cream cheese, softened
- 2 large eggs
- 1 teaspoon vanilla extract
- 3 cups diced apples (such as Granny Smith)
- 1 cup caramel sauce
- 1 teaspoon cinnamon
- 1/4 teaspoon nutmeg
Instructions
- Preheat the oven to 325°F (160°C).
- Combine graham cracker crumbs and melted butter.
- Press the mixture into the bottom of a lined 9×9-inch baking pan.
- Bake the crust for about 10 minutes.
- Mix cream cheese and 1/2 cup of sugar until smooth.
- Add eggs one at a time, mixing thoroughly, then add vanilla extract.
- Fold in diced apples, cinnamon, and nutmeg.
- Pour the filling over the crust.
- Bake for 40-45 minutes until the center is just set.
- Cool the bars at room temperature for about an hour, then refrigerate for at least 2 hours.
- Drizzle with caramel sauce before serving.
- Slice into squares and serve.
Notes
These bars can be enjoyed as is or garnished with whipped cream and extra caramel. For variations, try adding nuts, chocolate, or pumpkin.
Nutrition
- Serving Size: 1 bar
- Calories: 320
- Sugar: 20g
- Sodium: 250mg
- Fat: 14g
- Saturated Fat: 8g
- Unsaturated Fat: 4g
- Trans Fat: 0g
- Carbohydrates: 45g
- Fiber: 2g
- Protein: 4g
- Cholesterol: 60mg
Keywords: cheesecake, caramel, apple, dessert, fall recipes, baking
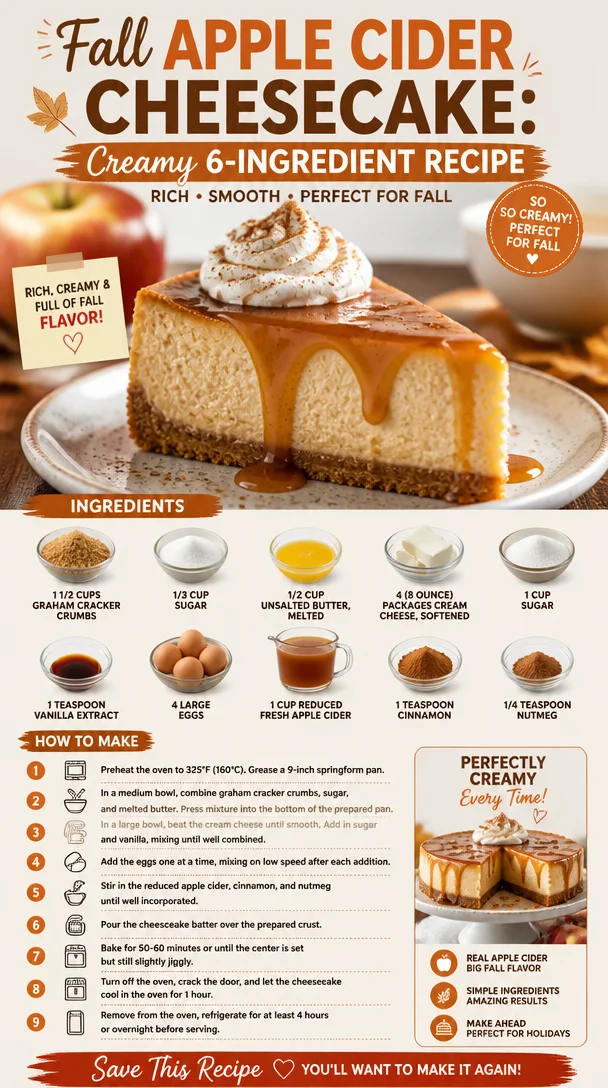
Fall Apple Cider Cheesecake: Creamy 6-Ingredient Recipe
Apple Cider Cheesecake: A Slice of Fall in Every Bite
Welcome to the cozy world of dessert! There’s something magical about fall—crisp air, vibrant leaves, and of course, the delightful flavors of apples and warm spices. One of my favorite treats that perfectly embodies this season is none other than Apple Cider Cheesecake. If you’re searching for a dessert that embraces the spirit of autumn while making you feel all warm and fuzzy inside, you’re in for a real treat!
Now, cheesecake is often thought of as a heavy, indulgent dessert, but this version blends the rich creaminess of a classic cheesecake with the vibrant zest of apple cider. Can you imagine biting into a creamy slice of cheesecake that brings the taste of freshly pressed apple cider straight to your palate? Trust me, it’s a game-changer!
I remember the first time I made Apple Cider Cheesecake. It was during a chilly October weekend, and I was hosting a small gathering for some friends. As the smell of cinnamon and apples wafted through the air, it felt like a warm hug. I’d just pulled the cheesecake out of the oven, and it looked so glorious, my friends couldn’t help but squeal with delight. The best part? The first bite caused some happy dance moves around my kitchen! That moment solidified my love for this dessert, and it quickly became a staple during the fall months.
Today, I’m sharing my fail-proof recipe with you. Prepare your taste buds for a delicious blend of creaminess and warmth. Let’s make this fall favorite together!
Ingredients
Gather these simple ingredients for your Apple Cider Cheesecake. Each element plays a crucial role in creating that delicious, silky texture and flavorful experience!
-
1 1/2 cups graham cracker crumbs
The base of our cheesecake! They add a lovely crunch and subtle sweetness. If you’re feeling adventurous, you can substitute with crushed gingersnaps or vanilla wafers for a fun twist. -
1/3 cup sugar
A little sweetness to balance the tanginess of the cream cheese. If you’re looking for a healthier version, consider using coconut sugar. -
1/2 cup unsalted butter, melted
This creates that luscious, buttery flavor in the crust. Always go for unsalted to control the saltiness—your cheesecake will love you for it! -
4 (8-ounce) packages cream cheese, softened
The star of the show! Cream cheese creates that smooth and creamy texture we crave. If you want a lighter version, feel free to use low-fat cream cheese; just don’t cut it completely out! -
1 cup sugar
More sweetness here! You can use granulated or superfine sugar, the latter dissolves easily, ensuring a smooth filling. -
1 teaspoon vanilla extract
Vanilla rounds out the flavors beautifully. For a gourmet twist, try using vanilla bean paste for those beautiful specks of vanilla throughout your cheesecake. -
4 large eggs
Eggs are binding agents that help your cheesecake maintain its shape. You can use egg substitutes for a vegan option, but the texture will vary slightly. -
1 cup reduced fresh apple cider
This is where the magic happens! The concentrated flavor of apple cider brings the essence of fall directly into each bite. This can also be substituted with apple juice if that’s what you have on hand. -
1 teaspoon cinnamon
The warm spice that evokes memories of cozy autumn afternoons. Feel free to add more if you’re a cinnamon lover! -
1/4 teaspoon nutmeg
This fragrant spice pairs beautifully with cinnamon, adding depth to your cheesecake. Just a pinch goes a long way!
Step-by-Step Instructions
Ready to dive into the cheesecakemaking process? Let’s create some magic!
1. Preheat your oven to 325°F (160°C).
This initial step is crucial! A well-heated oven ensures even cooking. As you get things rolling, let the comforting smell of warm spices fill your kitchen!
2. Prepare the crust.
In a medium bowl, combine the graham cracker crumbs, 1/3 cup sugar, and melted butter. Mix until the crumbs are thoroughly coated and resemble wet sand.
Chef tip: Don’t skimp on mixing! This will ensure a firm crust that holds its shape beautifully.
3. Press the crust into a springform pan.
Evenly spread the crumb mixture into the bottom of your pan, pressing it down firmly with the back of a measuring cup. Bake in the preheated oven for about 10 minutes until golden and fragrant.
Little hack: Let the crust cool while you whip up the filling; this way, you’ll get a perfectly layered cheesecake.
4. Make the filling.
In a large bowl, beat the softened cream cheese until creamy and smooth. Gradually add in 1 cup of sugar, whipping until light and fluffy. If you’re feeling the groove, dance a little while you mix!
Tip: Make sure your cream cheese is at room temperature; cold cream cheese can lead to lumps.
5. Add the eggs, one at a time.
Mixing on low speed, add the eggs, fully incorporating one before adding the next. This ensures a smooth filling!
Chef insight: Avoid overmixing at this stage; you want your cheesecake to be fluffy, not dense.
6. Incorporate the vanilla, apple cider, cinnamon, and nutmeg.
Blend these in until well combined. The aroma will be divine!
Hack: Save a spoonful of apple cider to drizzle on top as a finishing touch before serving—it adds a lovely glaze!
7. Pour the cheesecake filling over the crust.
Gently smooth the surface with a spatula. This is your time to shine—make it pretty!
Tip: If air bubbles form, give the pan a tap on the counter to release them.
8. Bake the cheesecake.
Place it in the oven and bake for about 50-60 minutes or until the edges are set but the center still has a slight jiggle. This slight wobble is your cue for a creamy texture!
Chef’s note: For a perfect cheesecake, consider a water bath—it helps maintain moisture.
9. Cool down.
Let the cheesecake cool slowly in the pan for about an hour before transferring it to the fridge. Chill for at least 4 hours, preferably overnight, to let those flavors meld. Patience is key, but I promise it’s worth it!
Serving Suggestions
When you’re ready to serve your Apple Cider Cheesecake, remove it from the springform pan and place it on a beautiful cake stand. Drizzle a little reduced apple cider glaze and sprinkle some cinnamon or chopped nuts on top for that extra flair. Pair it with a dollop of freshly whipped cream or vanilla ice cream to make it a showstopper!
Recipe Variations
This recipe is versatile and can easily be transformed. Here are some ideas to switch things up:
- Caramel Swirl: Drizzle caramel sauce on top before serving for a sweet contrast to the tanginess of the cream cheese.
- Nutty Crust: Add finely chopped nuts, like pecans or walnuts, to the crust for added crunch and flavor.
- Pumpkin Spice Twist: Replace the apple cider with pumpkin puree and add extra pumpkin spice for a seasonal twist.
- Vegan Version: Substitute cream cheese with vegan cream cheese and eggs with a flaxseed meal or chia seed mix combined with water.
Chef’s Notes
This recipe has evolved over the years, starting as a traditional cheesecake and morphing into this apple cider delight. The first time I made it, I made a rookie mistake: I forgot to add the spices! The resulting plain cheesecake was good, but it lacked the autumn warmth I craved. Learning from that, I now encourage everyone to play with flavors!
One of my favorite kitchen stories involves a chaotic Thanksgiving prep where I ended up using spiced cider instead of regular apple cider—it turned the whole cheesecake into a flavor bomb! Lesson learned: sometimes mistakes lead to the best creations.
FAQs and Troubleshooting
-
Why did my cheesecake crack?
Cracks can arise from drastic temperature changes. Try cooling your cheesecake gradually and avoid opening the oven door while it bakes. -
How can I tell when it’s done?
Look for a set perimeter with a slightly jiggly center. The cheesecake will continue to firm up as it cools. -
Why does my cheesecake feel dense?
Overmixing the batter or using cold cream cheese can lead to a dense texture. Aim for smooth, but don’t go overboard! -
How long does the cheesecake last?
Your delicious creation can last up to 4-5 days in an airtight container in the fridge. If it lasts that long!
Nutritional Info
Though I aim for balance and flavor, here’s a quick glance at the nutritional info (per slice, based on 12 slices):
- Calories: ~350
- Total Fat: 25g
- Saturated Fat: 15g
- Cholesterol: 80mg
- Sodium: 250mg
- Total Carbohydrates: 28g
- Dietary Fiber: 1g
- Sugars: 20g
- Protein: 6g
And there you have it—your very own Apple Cider Cheesecake recipe! I hope you whip this up in your kitchen, share it with loved ones, and create beautiful, sweet memories. Remember, the best ingredient is always a sprinkle of love. Enjoy every creamy, delicious bite!
PrintApple Cider Cheesecake
A delightful blend of creamy cheesecake with the flavors of apple cider and warm spices, perfect for autumn.
- Prep Time: 15 minutes
- Cook Time: 60 minutes
- Total Time: 75 minutes
- Yield: 12 servings 1x
- Category: Dessert
- Method: Baking
- Cuisine: American
- Diet: Vegetarian
Ingredients
- 1 1/2 cups graham cracker crumbs
- 1/3 cup sugar
- 1/2 cup unsalted butter, melted
- 4 (8-ounce) packages cream cheese, softened
- 1 cup sugar
- 1 teaspoon vanilla extract
- 4 large eggs
- 1 cup reduced fresh apple cider
- 1 teaspoon cinnamon
- 1/4 teaspoon nutmeg
Instructions
- Preheat your oven to 325°F (160°C).
- Prepare the crust by combining the graham cracker crumbs, 1/3 cup sugar, and melted butter.
- Press the crust into a springform pan, spreading evenly and baking for about 10 minutes.
- Make the filling by beating the softened cream cheese until creamy and smooth.
- Add the eggs, one at a time, mixing on low speed.
- Incorporate the vanilla, apple cider, cinnamon, and nutmeg until well combined.
- Pour the cheesecake filling over the crust.
- Bake the cheesecake for about 50-60 minutes or until edges are set.
- Cool down for about an hour before refrigerating for at least 4 hours.
Notes
Serve with drizzled apple cider glaze and a dollop of whipped cream.
Nutrition
- Serving Size: 1 slice
- Calories: 350
- Sugar: 20g
- Sodium: 250mg
- Fat: 25g
- Saturated Fat: 15g
- Unsaturated Fat: 10g
- Trans Fat: 0g
- Carbohydrates: 28g
- Fiber: 1g
- Protein: 6g
- Cholesterol: 80mg
Keywords: cheesecake, apple cider, fall dessert, autumn recipe, sweet treat
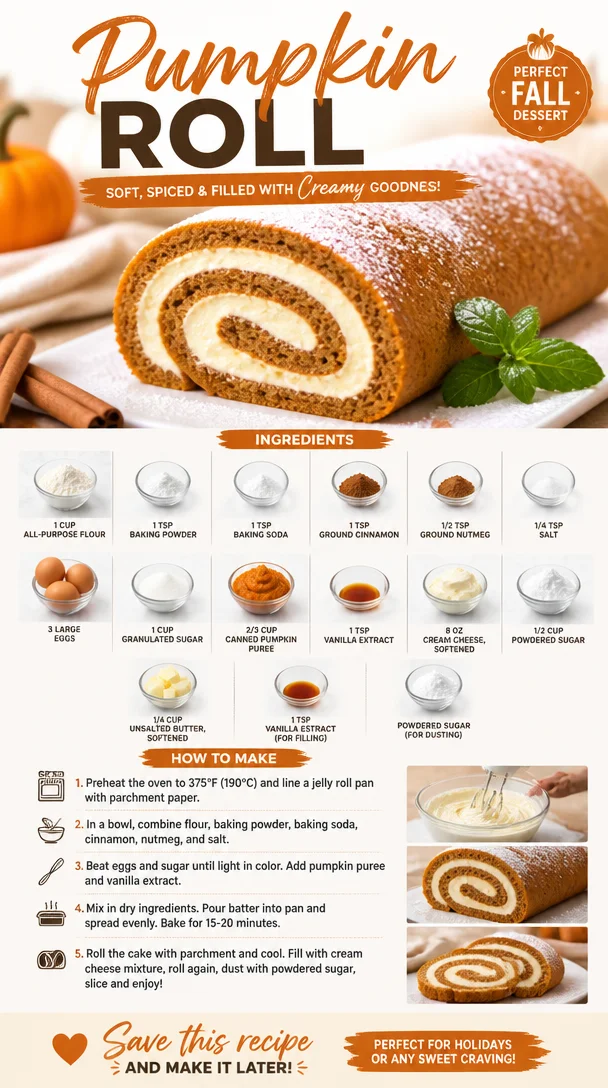
Pumpkin Roll
The Perfect Fall Treat: A Cozy Pumpkin Roll
Ah, autumn! The season where leaves turn golden, sweaters make their grand appearance, and the air fills with the sweet, spicy aroma of pumpkin everything. As a self-proclaimed pumpkin enthusiast, I can’t help but let my love for this versatile gourd shine through in the form of my favorite fall dessert: the Pumpkin Roll. It’s not just a beautiful centerpiece for any gathering; it’s a nostalgic bite of my childhood wrapped in a delightful spiral of cake and cream cheese filling.
Imagine this: it’s a crisp October afternoon, and my mom is in the kitchen, her apron dusted with flour as she expertly whips up a batch of pumpkin goodness. The warm cinnamon and nutmeg wafting through the house was an invitation for the whole family to gather. Those moments, surrounded by the people I love, with smiles, laughter, and the promise of a delicious dessert to come, are the very reason I cook. I created this recipe so everyone can experience that joy, and I can’t wait to share the journey with you.
So, grab your baking tools and let’s dive into crafting this show-stopping Pumpkin Roll that will not only brighten your autumn festivities but also bring a sense of warmth and comfort.
A Slice of Nostalgia: My Pumpkin Roll Memory
The first time I made a Pumpkin Roll on my own was a rite of passage. I was about 12 years old, and I decided to surprise my family with a homemade dessert inspired by my mom’s cherished recipe. Armed with her handwritten notes, a mixing bowl, and an alarming amount of excitement, I declared that I would whip up the pumpkin cake that united our family season after season.
As I started combining ingredients, the mishaps began. My attempt to add the eggs ended in a slight eggy explosion, which left the counter covered in batter. My little brother, perched on a stool, was my ever-patient sous chef, offering encouraging words between fits of laughter.
But despite the chaos, we finally rolled the cake and filled it with cream cheese frosting, and when we took that first bite together, the sense of pride and joy was palpable. It wasn’t just about the dessert—it was about the memories, the laughter, and the feeling that we were all part of something wonderful. That sticky kitchen adventure sticks with me to this day, and I can promise you this—if you approach this recipe with love, laughter, and a spoonful of enthusiasm, your kitchen will be a magical place, too.
Ingredients You’ll Need
Let’s get started! Here’s the lineup for our pumpkin roll. Gather these ingredients, and you’ll be on your way to baking glory!
-
1 cup all-purpose flour: This is the base of our cake. You can substitute with whole wheat flour for a heartier version, but the texture will be a bit denser.
-
1 tsp baking powder: This adds just the right amount of lift. If you’re out, you can use 1/3 tsp of baking soda instead, but make sure to adjust your acid ingredients (like pumpkin) accordingly.
-
1 tsp baking soda: Essential for helping our cake rise. Again, if you’re out, follow the same substitution advice.
-
1 tsp ground cinnamon: Ah, the warm, cozy spice that screams “fall” to me. If you want to mix it up, you can try pumpkin pie spice for an extra layer of flavor.
-
1/2 tsp ground nutmeg: This spice adds warmth and depth. If you don’t have nutmeg, a pinch of cloves can work in a pinch.
-
1/4 tsp salt: Enhances flavors! Never skip this; it’s essential for balancing sweetness.
-
3 large eggs: The binding agents! For a vegan option, you can replace each egg with 1/4 cup of unsweetened applesauce.
-
1 cup granulated sugar: Provides sweetness. If you want to cut back on sugar, you can use coconut sugar or a sugar substitute, but the results may vary in texture.
-
2/3 cup canned pumpkin puree: Make sure it’s pure pumpkin and not pie filling! This is the star of our roll. You can substitute with sweet potato puree for a twist.
-
1 tsp vanilla extract: This adds depth. Feel free to use almond extract for a unique flavor.
-
8 oz cream cheese, softened: The luscious filling of our roll! Double-check that it’s softened to avoid lumps.
-
1/2 cup powdered sugar: Sweetens our cream cheese filling. You can substitute with a sugar alternative, but it may alter the texture.
-
1/4 cup unsalted butter, softened: This provides creaminess to our filling. If needed, vegan butter can work as a substitute.
-
1 tsp vanilla extract (for filling): Because you can never have enough vanilla!
-
Powdered sugar (for dusting): A little touch of sweetness on top adds elegance. Optional but highly recommended for presentation!
Step-by-Step Instructions
Alright, let’s get to the good part—the baking! Here’s your guide to making the perfect Pumpkin Roll, with all the little chef tips along the way.
-
Preheat Your Oven: Set your oven to 375°F (190°C). While it’s heating, you can prep your baking sheet. Line a 15×10-inch jelly roll pan with parchment paper and spray it lightly with cooking spray to ensure our roll doesn’t stick.
-
Mix the Dry Ingredients: In a medium bowl, whisk together the flour, baking powder, baking soda, cinnamon, nutmeg, and salt. This is a crucial step! Whisking ensures that the leavening agents and spices are evenly distributed. Set this bowl aside while we work on the wet ingredients.
-
Beat the Eggs and Sugar: In a large mixing bowl, beat the eggs and granulated sugar on high speed until fluffy and pale in color, about 5 minutes. The air you’re incorporating here is essential; it’s what creates that delightful spongy texture in the cake!
-
Add in the Good Stuff: Gently fold in the pumpkin puree and vanilla extract. Once incorporated, you can gradually add in the dry ingredients. Use a spatula to fold the mixture just until it’s blended. Avoid overmixing to keep the cake light and tender!
-
Bake It Up: Pour the batter into the prepared jelly roll pan and spread it evenly. Bake it for about 15-20 minutes, or until a toothpick inserted in the center comes out clean. Your kitchen will start to smell heavenly!
-
Roll It Up: Once baked, remove it from the oven and let it cool for about 5 minutes. Then, carefully flip the cake onto a clean kitchen towel, gently peel off the parchment paper, and roll the cake tightly in the towel. Allow it to cool completely in the towel—this helps our beautiful shape set!
-
Make the Filling: In a medium bowl, beat the softened cream cheese and butter until creamy. Then add powdered sugar and the additional vanilla extract, mixing until smooth. Taste it—feel free to adjust the sweetness if you’re feeling jazzy!
-
Unroll and Fill: Once the cake has completely cooled, carefully unroll it. Spread the cream cheese filling evenly over the surface, leaving about half an inch at the edges. It’s time for that delicious swirl, so roll it back up (without the towel this time!), starting from the shorter end.
-
Chill Out: Wrap your rolled cake in plastic wrap and refrigerate for at least an hour to let the flavors meld and the cream cheese filling firm up.
-
Dust and Slice: When you’re ready to serve, dust the rolled cake with powdered sugar for that lovely presentation. Slice it into thick rounds and prepare to impress!
Serving Suggestions
This Pumpkin Roll is not just a dessert; it’s a work of art! Serve slices on a beautiful platter, and consider pairing it with a scoop of vanilla ice cream for added decadence. A dollop of whipped cream and a sprinkle of cinnamon on top elevate the experience even more. If you’re feeling fancy, garnish the platter with sliced apples or candied pecans to bring a little fall flavor to your spread.
Recipe Variations
Looking to switch things up? Here are some creative twists that will keep this recipe fresh:
-
Caramel Pumpkin Roll: Drizzle caramel sauce over the cream cheese filling for a decadent topping that mixes wonderfully with pumpkin flavors.
-
Nutty Twist: Add chopped pecans or walnuts into the filling for a delightful crunch.
-
Chocolate Lovers Unite: Incorporate chocolate chips into the batter for a rich, chocolatey surprise with each bite.
-
Lemon Zest: For a tangy twist, add lemon zest to the cream cheese filling—this brightens the flavors beautifully and adds a refreshing contrast.
-
Spiced Up: Don’t be shy—experiment with different spices such as ginger or cardamom to create your unique flavor profile.
Chef’s Notes
Let me remind you, perfection is in the eye of the beholder! This Pumpkin Roll has graced my kitchen table for years, and each time I make it, I am reminded of how we can all put our unique spin on things. I’ve learned that the key to a great pumpkin roll lies in patience—letting it cool, roll gently (no rush!), and savor each slice! I once tried to cut it straight out of the oven! With a sticky mess of filling everywhere, I quickly learned that good things come to those who wait.
FAQs and Troubleshooting
1. My cake cracked while rolling, what did I do wrong?
Cracking can occur if the cake is too dry or overbaked. Make sure to keep an eye on the bake time and let the cake cool a bit before rolling. It should be soft and pliable.
2. How do I prevent my cream cheese filling from being lumpy?
Make sure to fully soften your cream cheese and butter before mixing. Using an electric mixer helps achieve that smooth consistency you’ll love.
3. Can I freeze my pumpkin roll?
Yes! You can wrap it tightly in plastic wrap and store it in the freezer for up to 3 months. Thaw overnight in the refrigerator before serving.
4. What’s the best way to slice the roll?
Use a serrated knife and slice gently—this will prevent squashing the roll and helps maintain that beautiful spiral.
Nutritional Info
While I generally focus on the deliciousness of food rather than the numbers, a slice of this Pumpkin Roll has approximately:
- Calories: 280
- Protein: 3g
- Fat: 12g
- Carbohydrates: 40g
- Sugar: 20g
Just remember—this is a treat to enjoy on special occasions!
So there you have it! A cozy journey through the delightful art of making a Pumpkin Roll. I hope this recipe becomes a cherished addition to your fall traditions, just as it has in mine. Dive into this delicious adventure, embrace those kitchen messes, and share this special dessert with the people you love. Happy baking! 🍂🥰
PrintThe Perfect Fall Treat: A Cozy Pumpkin Roll
A nostalgic and delightful dessert featuring a spiced pumpkin cake rolled with creamy filling, perfect for autumn gatherings.
- Prep Time: 20 minutes
- Cook Time: 20 minutes
- Total Time: 60 minutes
- Yield: 12 servings 1x
- Category: Dessert
- Method: Baking
- Cuisine: American
- Diet: Vegetarian
Ingredients
- 1 cup all-purpose flour
- 1 tsp baking powder
- 1 tsp baking soda
- 1 tsp ground cinnamon
- 1/2 tsp ground nutmeg
- 1/4 tsp salt
- 3 large eggs
- 1 cup granulated sugar
- 2/3 cup canned pumpkin puree
- 1 tsp vanilla extract
- 8 oz cream cheese, softened
- 1/2 cup powdered sugar
- 1/4 cup unsalted butter, softened
- 1 tsp vanilla extract (for filling)
- Powdered sugar (for dusting)
Instructions
- Preheat your oven to 375°F (190°C). Line a 15×10-inch jelly roll pan with parchment paper.
- Mix the dry ingredients: whisk flour, baking powder, baking soda, cinnamon, nutmeg, and salt in a medium bowl.
- Beat the eggs and sugar in a large mixing bowl on high speed until fluffy and pale, about 5 minutes.
- Add the pumpkin puree and vanilla extract, then fold in the dry ingredients until just blended.
- Pour the batter into the jelly roll pan and bake for 15-20 minutes, or until a toothpick comes out clean.
- Roll the cake in a clean kitchen towel after cooling for 5 minutes.
- Make the filling by beating cream cheese and butter, adding powdered sugar and vanilla until smooth.
- Unroll the cooled cake and spread the cream cheese filling evenly before rolling it back up.
- Chill the rolled cake wrapped in plastic wrap in the refrigerator for at least an hour.
- Dust with powdered sugar before slicing and serving.
Notes
Let the cake cool completely before filling for easier rolling and to avoid cracks.
Nutrition
- Serving Size: 1 slice
- Calories: 280
- Sugar: 20g
- Sodium: 300mg
- Fat: 12g
- Saturated Fat: 7g
- Unsaturated Fat: 3g
- Trans Fat: 0g
- Carbohydrates: 40g
- Fiber: 1g
- Protein: 3g
- Cholesterol: 40mg
Keywords: pumpkin roll, fall dessert, autumn recipe, pumpkin cake, cream cheese filling
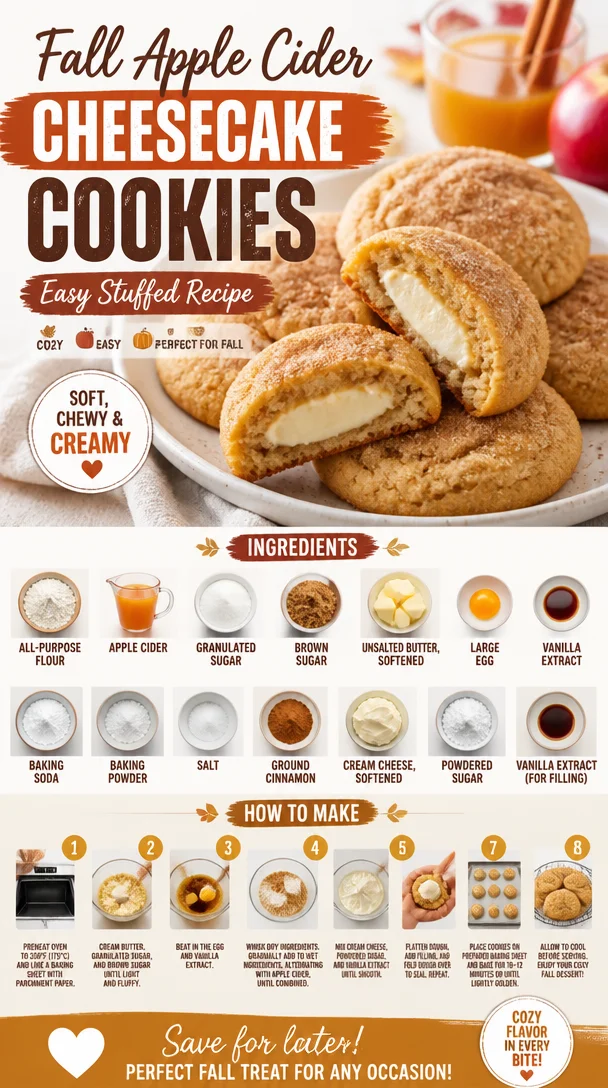
Fall Apple Cider Cheesecake Cookies: Easy Stuffed Recipe
Cheesecake-Stuffed Apple Cider Cookies: A Fall Treat to Remember
Welcome to Clean Plate Cravings! I’m so thrilled to share a recipe with you today that brings a wave of nostalgia and comfort all at once. Picture this: the crisp autumn air, leaves crunching beneath your feet, and the rich aroma of apple cider wafting through the house. These feelings all come rushing back when I think about my Cheesecake-Stuffed Apple Cider Cookies—the ultimate seasonal treat that combines two of my favorite flavors.
Sure, cookies are always a good idea, but add in the flavors of spiced apple cider and creamy cheesecake, and you’ve got a dessert that stands out from the rest. When I bake these cookies, it feels like a hug in cookie form, perfect for sharing (or indulging in all by yourself, no judgment here!).
There’s something wonderfully cozy about this time of year, don’t you think? It makes every bite feel like falling into a soft, warm blanket. Plus, this recipe is easy enough to whip up on a busy fall afternoon, perfect for after school snacks, cozy gatherings, or simply to remind yourself that you deserve something delicious. So grab your apron, and let’s dive into the world of flavors that could make every day feel like autumn!
A Sweet Memory
Every recipe holds a memory, and these Cheesecake-Stuffed Apple Cider Cookies are no exception. Growing up, my grandmother had this tradition of baking right at the start of autumn. The kitchen would be filled with laughter, and the smell of cinnamon and apples danced through the air. I distinctly remember one year when my grandma decided to experiment with a cookie recipe. She had a stash of creamy cheesecake filling left from an earlier dessert and thought, “Why not?” It was an idea that changed our cookie game forever!
As we pulled those cookies out of the oven, the blend of sweet and tart, warm and gooey, was nothing short of magical. I remember sinking my teeth into the soft cookie, surprised by the luscious cheesecake oozing out, and thinking, “This is pure bliss!” Now, I carry that joy forward, recreating and refining that recipe while keeping our family traditions alive. And today, we get to share that same bliss together.
Ingredients
Here’s what you’ll need to whip up these tantalizing cookies:
-
2 cups all-purpose flour
This is your cookie base! Look for a good quality flour; it helps maintain the perfect structure while keeping the cookies soft. You can substitute with a 1:1 gluten-free flour blend if you need to go gluten-free. -
1/2 cup apple cider
The star of the show! Apple cider infuses the cookies with a spicy, sweet flavor. If you can’t find apple cider, try using fresh apple juice for a similar taste. -
1/2 cup granulated sugar
Standard sugar adds sweetness and a lovely texture to our cookies. If you’d like, you could swap in coconut sugar for a deeper caramel note. -
1/2 cup brown sugar
Brown sugar adds moisture and enhances the depth of flavor. You can use light or dark brown sugar based on your preference. For the closest substitute, mix white sugar with a little molasses. -
1/2 cup unsalted butter, softened
The fat in the butter creates that rich, melt-in-your-mouth texture. If you’re dairy-free, coconut oil works surprisingly well. -
1 large egg
Eggs help bind the ingredients together and keep our cookies moist. For a vegan option, replace it with a flax egg (1 tbsp flaxseed meal mixed with 2.5 tbsp water). -
1 tsp vanilla extract
Pure vanilla extract adds a lovely flavor. Feel free to switch it up with almond extract if you’re looking for a twist! -
1 tsp baking soda
A leavening agent that helps the cookies rise. Make sure it’s fresh for best results. -
1/2 tsp baking powder
Another boost to help our cookies rise. Like baking soda, check the expiration date! -
1/2 tsp salt
A crucial component that enhances sweetness and balances flavors. -
1 tsp ground cinnamon
This will add warmth and spice that’s perfect for fall. You can also try pumpkin spice or apple pie spice for a delightful variation. -
1/2 cup cream cheese, softened
The creamy filling that takes these cookies over the top! For a lighter alternative, use Neufchâtel cheese or a vegan cream cheese version. -
1/4 cup powdered sugar
This will sweeten the cream cheese filling to perfection. You can omit the sugar for a less sweet filling or use a powdered sugar substitute. -
1/2 tsp vanilla extract (for filling)
Just like above, this brings out the flavor in our cream cheese filling; you really can’t go wrong with more vanilla!
Step-by-Step Instructions
Ready to get started? Let’s make some magic happen in the kitchen!
-
Preheat your oven: First things first, preheat your oven to 350°F (175°C). This is crucial for getting those cookies nice and fluffy!
-
Mix the dry ingredients: In a medium bowl, whisk together the all-purpose flour, baking soda, baking powder, salt, and ground cinnamon. The aroma of cinnamon will immediately transport you to a cozy autumn afternoon. Set it aside for now.
-
Cream the butter and sugars: In a large mixing bowl, cream together the softened butter, granulated sugar, and brown sugar using an electric mixer. Mix on medium speed until the mixture is light and fluffy, about 3-4 minutes. This step is key for aeration, which helps your cookies rise beautifully.
-
Add the egg and vanilla: Now, add in the large egg and vanilla extract to the creamed butter and sugars. Mix until just incorporated. The batter will start to look creamy and luscious!
-
Incorporate the dry ingredients: Gradually add the flour mixture to the wet ingredients, mixing just until combined. Overmixing can lead to tough cookies—so remember to keep it gentle. The dough should be soft but manageable.
-
Stir in the apple cider: Pour in the apple cider and mix until it’s fully incorporated. At this point, your kitchen should smell heavenly.
-
Prepare the filling: In a separate bowl, combine the softened cream cheese, powdered sugar, and vanilla extract for the filling. Mix until smooth and creamy. You could even give it a quick taste—it’s like cheesecake dip!
-
Scoop the dough: Line a baking sheet with parchment paper, and using a cookie scoop, drop about 2 tablespoons of dough onto the prepared sheet.
-
Add the filling: With your fingers, make a small indentation in the center of each dough ball. Place about a teaspoon of the cream cheese filling in the center. Then, scoop another tablespoon of cookie dough on top, sealing the filling inside. This is where the magic happens!
-
Bake: Bake in your preheated oven for about 12-15 minutes, or until the edges are golden brown. Keep an eye on them—the smell will remind you to check sooner than later!
-
Cool and devour: Once baked, allow the cookies to cool on the baking sheet for a few minutes before transferring them to a wire rack. Try not to devour them immediately (but I won’t blame you if you do!).
Serving Suggestions
Once your Cheesecake-Stuffed Apple Cider Cookies have cooled, it’s time to present these delightful treats! Arrange them on a beautiful serving platter, perhaps alongside a small bowl of caramel sauce drizzled over the top for that extra touch. Pair it with warm apple cider or even a scoop of vanilla bean ice cream for a delicious dessert that’s sure to impress!
Recipe Variations
Let’s get creative! Here are some fun variations to try:
-
Add nuts: For a bit of crunch, consider incorporating finely chopped walnuts or pecans into the cookie dough.
-
Chocolate chips: Toss in some mini chocolate chips into the mix for an extra touch of decadence, creating a flavor combination you won’t forget.
-
Pumpkin Spice: In place of cinnamon, add pumpkin spice to the cookie dough for a seasonal twist that’s perfect for fall.
-
Gluten-Free: Use a gluten-free flour blend that measures cup-for-cup as a substitute for the all-purpose flour.
-
Dairy-Free: Replace the butter with coconut oil and use a dairy-free cream cheese alternative for a completely dairy-free version.
Chef’s Notes
As with every recipe, this one has evolved in my kitchen over the years. Originally inspired by my grandma’s simple cookies, I’ve tried numerous fillings and spices to find that perfect balance. The balance of sweet cream cheese and the warm spices of autumn is what makes these cookies shine!
For a funny kitchen story: the first time I attempted these cookies, I got so caught up on introducing my own twists that I accidentally put double the amount of baking soda. Let’s just say they turned into fluffy little biscuits rather than cookies! But in that moment, I learned that every mishap is an opportunity to learn and adapt—so embrace the journey!
FAQs and Troubleshooting
-
Why are my cookies flat?
If your cookies are spreading out too much, check that your butter wasn’t too warm. It should be softened, not melted. Also, check the freshness of your baking soda and baking powder. If they’re past their expiration dates, they won’t help your cookies rise. -
Can I make the dough ahead of time?
Absolutely! You can prepare the cookie dough ahead of time and keep it chilled in the refrigerator for 1-2 days. Just remember, freshly baked cookies are always the best! -
What can I use instead of apple cider?
If apple cider isn’t available, fresh apple juice works well, but make sure it’s slightly unsweetened to keep the flavor balanced. -
How do I store leftover cookies?
Store your cookies in an airtight container at room temperature for up to a week, or refrigerate them for a longer shelf life. Just remember to let them warm up a bit before indulging!
Nutritional Info
These cookies are a bit indulgent with the cream cheese filling, but remember that everything is best in moderation! While I don’t have exact nutritional values at this moment, one cookie will surely provide a delightful balance of sweetness and flavor that you’ll savor!
Now, armed with all this knowledge and a little love, you’re all set to create your very own Cheesecake-Stuffed Apple Cider Cookies! Enjoy every bite and every moment in the kitchen because that’s what it’s all about—bringing people together over fresh, delicious food. Happy baking, my fellow foodies! 🍏🍪
PrintCheesecake-Stuffed Apple Cider Cookies

Delightful cookies filled with creamy cheesecake and infused with spiced apple cider, perfect for fall.
- Prep Time: 15 minutes
- Cook Time: 15 minutes
- Total Time: 30 minutes
- Yield: 24 cookies 1x
- Category: Dessert
- Method: Baking
- Cuisine: American
- Diet: Vegetarian
Ingredients
- 2 cups all-purpose flour
- 1/2 cup apple cider
- 1/2 cup granulated sugar
- 1/2 cup brown sugar
- 1/2 cup unsalted butter, softened
- 1 large egg
- 1 tsp vanilla extract
- 1 tsp baking soda
- 1/2 tsp baking powder
- 1/2 tsp salt
- 1 tsp ground cinnamon
- 1/2 cup cream cheese, softened
- 1/4 cup powdered sugar
- 1/2 tsp vanilla extract (for filling)
Instructions
- Preheat your oven: First things first, preheat your oven to 350°F (175°C).
- Mix the dry ingredients: In a medium bowl, whisk together the all-purpose flour, baking soda, baking powder, salt, and ground cinnamon.
- Cream the butter and sugars: In a large mixing bowl, cream together the softened butter, granulated sugar, and brown sugar using an electric mixer.
- Add the egg and vanilla: Now, add in the large egg and vanilla extract to the creamed butter and sugars.
- Incorporate the dry ingredients: Gradually add the flour mixture to the wet ingredients, mixing just until combined.
- Stir in the apple cider: Pour in the apple cider and mix until it’s fully incorporated.
- Prepare the filling: In a separate bowl, combine the softened cream cheese, powdered sugar, and vanilla extract for the filling.
- Scoop the dough: Line a baking sheet with parchment paper, and using a cookie scoop, drop about 2 tablespoons of dough onto the prepared sheet.
- Add the filling: With your fingers, make a small indentation in the center of each dough ball, place about a teaspoon of the cream cheese filling in the center.
- Bake: Bake in your preheated oven for about 12-15 minutes, or until the edges are golden brown.
- Cool and devour: Once baked, allow the cookies to cool on the baking sheet for a few minutes before transferring them to a wire rack.
Notes
These cookies can be stored in an airtight container at room temperature for up to a week.
Nutrition
- Serving Size: 1 cookie
- Calories: 180
- Sugar: 11g
- Sodium: 150mg
- Fat: 6g
- Saturated Fat: 4g
- Unsaturated Fat: 2g
- Trans Fat: 0g
- Carbohydrates: 26g
- Fiber: 0g
- Protein: 2g
- Cholesterol: 30mg
Keywords: cookies, fall dessert, cheesecake, apple cider, baking