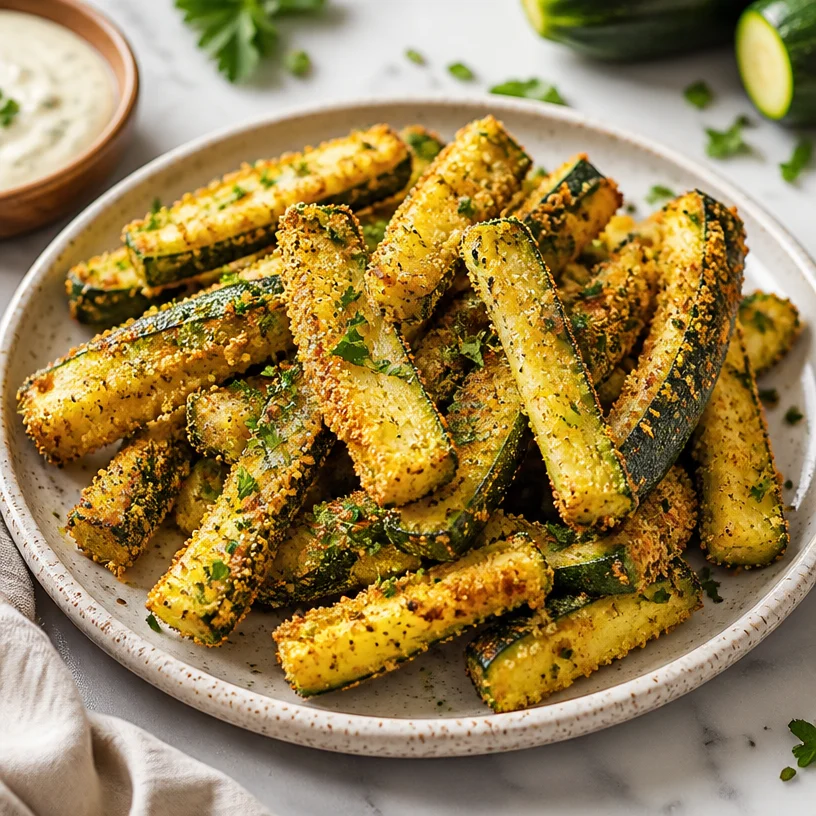
Minute Crispy Air Fryer Zucchini Fries (Low-Carb)
Air Fryer Zucchini: A Fresh Twist on a Classic Dish
Welcome, fellow food lovers! Today, we’re diving into a dish that’s all about celebrating fresh, vibrant flavors—Air Fryer Zucchini. If you’re looking for a way to enjoy this versatile veggie with a delectable crunch, you’ve come to the right spot! As we explore this delightful recipe, I promise you’ll find cooking it the most rewarding experience, filled with nostalgia, creativity, and some serious yum factor.
Introduction
Now, let’s be real—zucchini sometimes gets a bad rap. I mean, who hasn’t confronted a mountain of bland, overcooked zucchini on their plate at some point? But I’m here to tell you that when prepared right, this humble green squash can steal the show! Today, we’re going to air fry it to perfection, achieving a delightful crispiness while keeping the inside tender and juicy. The air fryer makes this recipe faster and healthier without sacrificing flavor.
This dish could become your new go-to side, snack, or even a light meal on its own. Not to mention, it’s super versatile—great for busy weekdays or laid-back weekends. Picture this: a platter of golden, crispy zucchini, ready to be enjoyed as you catch up with friends or family. Ah, yes, that’s how we do it here at Clean Plate Cravings!
Let’s get started by uncovering a little story that makes this dish even more special.
Personal Story
Growing up, my mom had a garden that was the pride of our home. Every summer, I would rush outside after school to see what had ripened. Zucchini seemed to grow overnight! We had zucchini bread, zucchini fritters, and my ultimate favorite—zucchini sautéed in olive oil with garlic and just a hint of lemon. The sizzling sound and that incredible fragrance still evoke warm memories of lazy summer afternoons, laughter, and family dinners.
Fast forward to adulthood, and I once found myself with a more health-conscious mindset. Inspired by my mom’s cooking but wanting something a bit lighter, I decided to elevate my beloved zucchini dish using an air fryer. The result was a stunning twist that stayed true to the freshness I cherished while adding that delightful crunch I adore. It’s become a staple in my kitchen, and I’m thrilled to share this recipe with you!
Ingredients
Here’s what you’ll need to whip up these scrumptious Air Fryer Zucchini bites:
-
2 pounds zucchini (diced into ½-inch pieces)
Zucchini is your star here! Not only is it low in calories, but it’s packed with vitamins A and C. Opt for young, firm zucchinis with shiny skin for the best flavor. If you don’t have zucchini, yellow squash works beautifully too! -
1 tablespoon olive oil (extra-virgin; other oils work as well)
Olive oil adds a rich flavor and helps achieve that crispy texture. Feel free to swap in avocado oil or any neutral oil if that’s what you have on hand. -
1 teaspoon onion powder
This brings a subtle sweetness and depth to your dish. If you prefer a fresher taste, swap it for one small finely chopped onion, adjusting cooking times slightly. -
1 teaspoon garlic powder
Garlic powder packs a flavorful punch without the fuss of peeling and chopping fresh garlic. You can also substitute with fresh minced garlic (just sauté it briefly with the zucchini to prevent burning). -
1 teaspoon salt
Salt helps to draw out moisture and enhance flavors. Feel free to use sea salt or kosher salt based on your preference. -
¼ teaspoon black pepper
Just a touch of black pepper to give your zucchini a little kick. If you’re feeling adventurous, add red pepper flakes for a spicy twist!
This combination of ingredients might seem simple, but trust me—great things come from keeping it clean and straightforward.
Step-by-Step Instructions
Now that we’ve gathered our ingredients, let’s roll up our sleeves and start cooking!
-
Prep Your Zucchini
Begin by washing your zucchini thoroughly under running water to remove any dirt. It’s essential to keep that fresh, healthy vibe! Next, diced the zucchini into ½-inch pieces. The size is key here—it allows for even cooking. Too small and you risk mushy zucchini; too large, and they won’t crisp up properly. -
Drying the Zucchini
After dicing, spread the zucchini pieces out on a clean kitchen towel, and let them sit for about 10-15 minutes. This step is crucial for removing excess moisture, which can lead to sogginess.Chef Tip: If you’re in a hurry, you can pat them dry with paper towels instead!
-
Season the Zucchini
In a large mixing bowl, combine the dried zucchini with olive oil, onion powder, garlic powder, salt, and black pepper. Toss everything together until every piece is evenly coated.Quick Hack: Want to keep your hands clean? Use a large zip-top bag to toss the zucchini with the oil and spices!
-
Preheat Your Air Fryer
Preheat your air fryer to 400°F (200°C) for about 5 minutes. This ensures that your zucchini cooks evenly and achieves that golden-brown finish. -
Air Fry the Zucchini
Spread the zucchini in a single layer in the air fryer basket, making sure not to overcrowd it. If necessary, cook in batches. Air fry them for about 10-12 minutes, shaking the basket halfway through to promote even cooking.Chef Insight: Keep an eye on them in the last few minutes! Each air fryer is different, and you want that lovely crispiness without burning.
-
Serve and Enjoy!
Once your zucchini is beautifully golden and crips, remove them from the air fryer. You can always season with a bit more salt or a sprinkle of parmesan cheese if you’d like.
Voilà! Your Air Fryer Zucchini is ready to enjoy.
Serving Suggestions
How you serve your Air Fryer Zucchini can make it even more special. For a fun twist, you can snack on these crispy bites as finger food, toss them with pasta for a light summer dish, or serve them as a side with grilled chicken or fish. A sprinkle of fresh herbs like basil or parsley adds a vibrant touch, linking the dish beautifully to your sunny memories just like those afternoons with my mom in the garden.
Recipe Variations
If you’re feeling adventurous (or simply want to switch things up), here are a few fun variations to customize your Air Fryer Zucchini:
- Add Cheese: Toss in grated Parmesan or mozzarella before air frying for a cheesy twist.
- Herb Infusion: Experiment with fresh or dried herbs! Oregano, thyme, or Italian seasoning work wonders.
- Spice things up: Add smoked paprika or chili powder for a kick, or even a pinch of cumin for an earthy flavor.
- Zucchini Fries: Cut the zucchini into sticks—perfect for dipping in your favorite sauces!
- Buffalo Style: Toss cooked zucchini in buffalo sauce for a spicy, addictive snack.
Chef’s Notes
This recipe has become a staple not just for its ease but also for its flexibility. One day, it’s a side for grilled salmon; the next, it’s an afternoon snack I can munch on while watching my favorite show. The first time I made this, I was convinced I’d burnt them, but they turned out to be the most flavorful batch I ever made! Embrace the imperfect moments in the kitchen; they tend to lead to the best outcomes.
FAQs and Troubleshooting
Q: Why did my zucchini come out soggy?
A: The secret is in the drying process. Moisture is the enemy of crispiness! Make sure to dry your zucchini thoroughly before seasoning and air frying.
Q: Can I use other vegetables?
A: Absolutely! Bell peppers, asparagus, and even mushrooms can be air-fried using similar techniques and times—just keep an eye on cooking times, as they may vary.
Q: What dipping sauces go well with air-fried zucchini?
A: Try a zesty yogurt dip, ranch dressing, or even marinara sauce! The options are endless; get creative with flavors you love.
Q: Is it okay to use frozen zucchini?
A: Fresh zucchini works best for this recipe to retain that crunch, but if you’re in a pinch, just make sure to thoroughly thaw and drain any excess water before air frying.
Nutritional Info
This recipe is not only delicious but also nutritious! Here’s a quick breakdown per serving (based on a standard serving size):
- Calories: Approximately 80
- Protein: 2 grams
- Carbohydrates: 4 grams
- Fat: 7 grams
- Fiber: 2 grams
Packed with essential vitamins and a lovely boost of fiber, this dish offers a guilt-free way to enjoy your vegetables!
There you have it—a delightful Air Fryer Zucchini recipe that’s easy, flavorful, and sure to impress! I can’t wait for you to try it and make it your own. Remember, cooking is all about enjoyment, experimenting, and sharing with those you love. So fire up that air fryer and get ready for some serious kitchen fun! Happy cooking!
PrintAir Fryer Zucchini
A fresh and crispy twist on classic zucchini, air fried to perfection, creating a delightful side or snack.
- Prep Time: 15 minutes
- Cook Time: 12 minutes
- Total Time: 27 minutes
- Yield: 4 servings 1x
- Category: Side Dish
- Method: Air Frying
- Cuisine: American
- Diet: Vegetarian
Ingredients
- 2 pounds zucchini (diced into ½-inch pieces)
- 1 tablespoon olive oil (extra-virgin)
- 1 teaspoon onion powder
- 1 teaspoon garlic powder
- 1 teaspoon salt
- ¼ teaspoon black pepper
Instructions
- Prep Your Zucchini: Wash zucchini and dice into ½-inch pieces.
- Drying the Zucchini: Spread zucchini on a kitchen towel and let sit for 10-15 minutes.
- Season the Zucchini: Mix zucchini with olive oil, onion powder, garlic powder, salt, and black pepper in a bowl.
- Preheat Your Air Fryer: Preheat to 400°F (200°C) for 5 minutes.
- Air Fry the Zucchini: Cook in a single layer for 10-12 minutes, shaking halfway through.
- Serve and Enjoy!: Sprinkle with more salt or parmesan as desired.
Notes
For extra flavor, try adding cheese or seasonings like smoked paprika. Squeeze fresh lemon juice before serving for brightness.
Nutrition
- Serving Size: 1 serving
- Calories: 80
- Sugar: 3g
- Sodium: 300mg
- Fat: 7g
- Saturated Fat: 1g
- Unsaturated Fat: 6g
- Trans Fat: 0g
- Carbohydrates: 4g
- Fiber: 2g
- Protein: 2g
- Cholesterol: 0mg
Keywords: zucchini, air fryer, healthy snack, vegetarian recipe, crispy vegetables
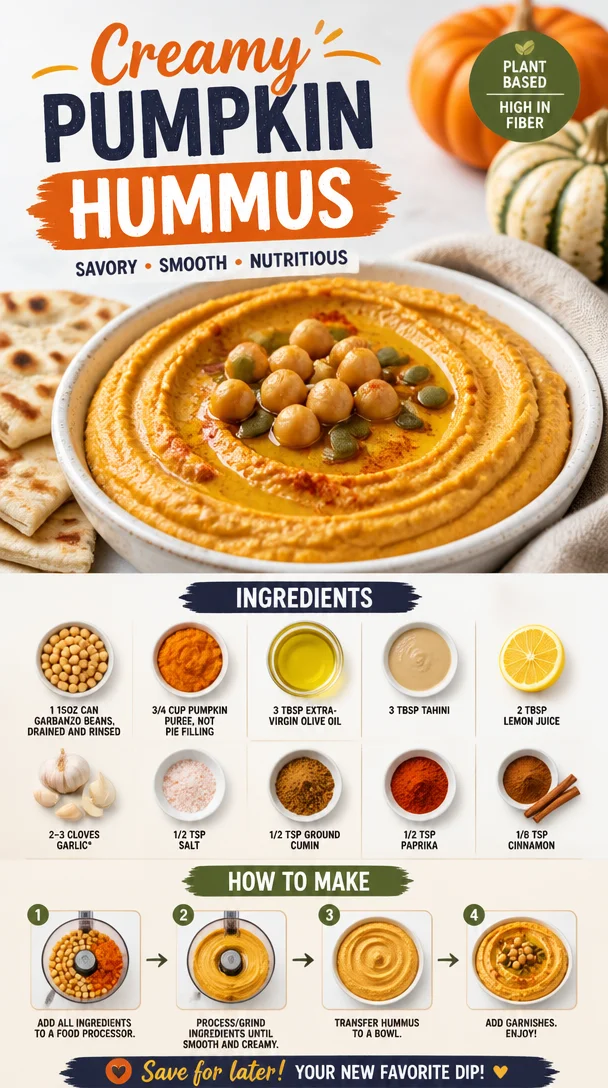
Pumpkin Hummus
Whip Up a Batch of Pumpkin Hummus: A Flavorful Adventure Awaits!
Welcome back to Clean Plate Cravings, my fellow food enthusiasts! Today, I’m thrilled to take you on a delicious journey into the cozy, comforting world of pumpkin hummus. With the leaves turning golden and the air getting a tad crisp, there’s no better time to embrace the warm, earthy flavors that pumpkin brings to our plates. This dish is not only a fantastic way to cheer up any snack time, but it’s also packed with nutrients, creativity, and a whole lot of satisfaction!
Now, I know what you might be thinking: pumpkin in hummus? Why not? This blend is a delightful twist on the classic chickpea dip, adding a seasonal flair that elevates your snack game. Below, I’ll share everything from my personal story with pumpkin hummus to the straightforward ingredients and step-by-step instructions that’ll have you whipping it up in no time.
Let’s get rolling!
A Fun Memory: My First Encounter with Pumpkin Hummus
Picture this: It was a crisp fall afternoon, and I found myself at a cozy little farmers’ market booth with the sweet aroma of roasted pumpkin wafting through the air. A vendor was showcasing a seasonal lineup that highlighted all things pumpkin, and there it was—pumpkin hummus. The vibrant orange dip caught my eye, and the vendor offered me a sample on a crunchy pita chip. I remember that first bite so vividly! It was creamy, spiced just right, and had that delightful warmth that only pumpkin can bring.
That tantalizing taste ignited a culinary curiosity within me, and I immediately went home to experiment with my own version. I played around with flavors, added my own twist, and there you have it: a pumpkin hummus recipe that not only reminds me of that fun, foodie day but has become a staple in my kitchen ever since!
Ingredients
Here’s what you’ll need to whip up this scrumptious pumpkin hummus at home:
-
1 (15 oz) can garbanzo beans: The star of your hummus! Chickpeas are packed with protein and fiber. If you prefer, you can cook your own from dried beans; just remember to soak them beforehand.
-
3/4 cup pumpkin puree: This adds a velvety texture and seasonal flavor. Make sure it’s pure pumpkin puree, not pumpkin pie filling, which contains added sugars and spices.
-
3 tbsp extra-virgin olive oil: For that rich, smooth mouthfeel and a boost of healthy fats! You can substitute it with avocado oil for a different flavor profile.
-
3 tbsp tahini: A sesame seed paste that gives depth and creaminess. If you’re nut-free, sunflower seed butter or pumpkin seed butter works nicely too.
-
2 tbsp lemon juice: Freshly squeezed lemon juice brightens the flavors and adds a zesty kick. Lime juice can be a fun substitute if you’re feeling adventurous!
-
2-3 cloves garlic: The aromatic hero of the dish! If you’re not a garlic lover, roasted garlic will provide a milder, sweeter flavor.
-
1/2 tsp salt: Essential for flavor balance. Remember to start small—you can always add more to taste!
-
1/2 tsp ground cumin: This adds warmth and depth. For a twist, try smoked paprika for a slightly different flavor profile.
-
1/2 tsp paprika: Adds a lovely visual appeal and a hint of sweetness. You can also use spicy paprika for an extra kick.
-
1/8 tsp cinnamon: Just a dash lends warmth and a unique twist to the overall taste! It’s optional, but trust me, it’s worth it.
Step-by-Step Instructions
Ready to bring your pumpkin hummus to life? Let’s dive into the cooking process!
-
Rinse the Chickpeas: Start by draining and rinsing the canned chickpeas under cool water. This helps to remove some of the salt and any canning liquid. Plus, it can make the hummus smoother! If you prefer to use dried chickpeas, soak them overnight and cook until tender.
-
Blend the Base Ingredients: In a food processor or high-powered blender, combine the rinsed chickpeas, pumpkin puree, extra-virgin olive oil, tahini, lemon juice, garlic, salt, ground cumin, paprika, and cinnamon. Tip: Start with less garlic to avoid overpowering the other flavors, especially if it’s fresh garlic.
-
Blend Away!: Pulse the mixture a few times to get things moving, then blend on high until smooth. Chef Hack: If your hummus seems too thick, add a tablespoon of water or olive oil at a time until you reach your desired creaminess.
-
Taste and Adjust: Stop the blender and taste your hummus. This is where the magic happens! Depending on your preference, you may want to add more salt, lemon juice, or garlic. Don’t be shy; it’s your masterpiece!
-
Chill Out: For the best flavor, let your hummus chill in the refrigerator for at least 30 minutes. This allows the flavors to meld together beautifully.
-
Serve and Enjoy: When you’re ready, scoop your velvety hummus into a bowl, drizzle with a little extra olive oil, sprinkle with additional paprika, and maybe even toss on some roasted pumpkin seeds for extra texture!
Serving Suggestions
Let’s get this pumpkin hummus on the party table! Serve it with warm pita bread, crunchy veggie sticks (think carrots, cucumbers, and bell peppers), or spread it on your favorite sandwich or wrap. For a fun twist, you can even use it as a spread for breakfast on toast topped with avocado!
Recipe Variations
Feeling adventurous? Here are some creative twists on the classic pumpkin hummus:
-
Spicy Pumpkin Hummus: Add a pinch of cayenne pepper or a dash of hot sauce for some heat!
-
Herbed Version: Mix in fresh herbs like parsley, cilantro, or even a bit of dill for a fresh touch.
-
Smoky Pumpkin Hummus: Swap out regular paprika for smoked paprika, and you can even add some roasted red peppers for a flavor explosion.
-
Sweet Pumpkin Hummus: Yes! You can create a sweet version by adding a bit of maple syrup or honey and a sprinkle of nutmeg.
-
Lentil Hummus: Substitute half the chickpeas with cooked red lentils for an extra protein punch.
Chef’s Notes
This pumpkin hummus has become a beloved staple in my kitchen. I can’t tell you how many times it has saved me from snack-time boredom! Over the years, I’ve experimented with it, tweaking the spices here and there. I even added a swirl of pesto one day out of whimsy, and it was a hit!
So, if you’re ever in a pinch for a quick appetizer or an easy meal prep option, remember this gem of a recipe.
FAQs and Troubleshooting
Q: Why is my hummus grainy?
A: This can happen when the chickpeas haven’t been blended long enough, or they didn’t get rinsed well. Keep blending or add a little more olive oil or water to smooth the texture.
Q: Can I make pumpkin hummus in advance?
A: Absolutely! It will taste even better after chilling overnight, so feel free to prep ahead of time. Just give it a good stir before serving.
Q: How long will my hummus last in the fridge?
A: Typically, it keeps well for about a week. Just make sure to store it in an airtight container.
Q: Can I freeze pumpkin hummus?
A: Yes! Scoop it into containers or ice cube trays for individual portions. Just remember to thaw it in the fridge overnight before eating, and give it a stir to revive the texture!
Nutritional Info
While I don’t usually get into the nitty-gritty of nutrition, it’s helpful to know that a serving of this delightful pumpkin hummus is lower in calories than many snack foods, rich in protein, fiber, and vitamin A thanks to the pumpkin. Serve it up alongside fresh veggies, and you have a wholesome treat that feels indulgent without the guilt!
So there you have it, my friends! An irresistible pumpkin hummus that’s easy, satisfying, and truly delicious. Embrace the flavors of fall, gather your ingredients, and let’s create a culinary masterpiece together. Happy cooking, and remember: keep it fresh, simple, and seriously delicious!
PrintPumpkin Hummus
A delightful twist on classic hummus, packed with seasonal pumpkin flavors and creamy texture, perfect for snacks or appetizers.
- Prep Time: 15 minutes
- Cook Time: 0 minutes
- Total Time: 15 minutes
- Yield: 4 servings 1x
- Category: Appetizer
- Method: Blending
- Cuisine: Middle Eastern
- Diet: Vegan
Ingredients
- 1 (15 oz) can garbanzo beans
- 3/4 cup pumpkin puree
- 3 tbsp extra-virgin olive oil
- 3 tbsp tahini
- 2 tbsp lemon juice
- 2–3 cloves garlic
- 1/2 tsp salt
- 1/2 tsp ground cumin
- 1/2 tsp paprika
- 1/8 tsp cinnamon
Instructions
- Rinse the chickpeas: Start by draining and rinsing the canned chickpeas under cool water.
- Blend the base ingredients: In a food processor, combine the rinsed chickpeas, pumpkin puree, olive oil, tahini, lemon juice, garlic, salt, cumin, paprika, and cinnamon.
- Blend away!: Pulse a few times, then blend on high until smooth.
- Taste and adjust: Stop the blender and taste your hummus; adjust the seasoning as needed.
- Chill out: Refrigerate for at least 30 minutes to meld the flavors.
- Serve and enjoy: Scoop into a bowl, drizzle with olive oil, sprinkle with paprika, and add toppings if desired.
Notes
Refrigerate for up to a week in an airtight container. Great for meal prep and can be frozen in portions.
Nutrition
- Serving Size: 1 serving
- Calories: 250
- Sugar: 3g
- Sodium: 350mg
- Fat: 10g
- Saturated Fat: 1g
- Unsaturated Fat: 9g
- Trans Fat: 0g
- Carbohydrates: 30g
- Fiber: 8g
- Protein: 9g
- Cholesterol: 0mg
Keywords: pumpkin hummus, easy appetizer, vegan dip, fall recipes