Crispy 15-Minute Baked Pumpkin Fritter Bites for Fall Snacks
Easy Baked Pumpkin Fritter Bites: A Flavorful Fall Twist
Welcome to another delicious adventure in the kitchen! Today, I’m excited to share a recipe that not only warms the heart but also captures the spirit of fall—Easy Baked Pumpkin Fritter Bites. As the leaves turn and the air gets crisper, there’s something truly magical about incorporating pumpkin into our meals. These little bites of joy are fluffy, slightly sweet, and delightful—all without the fuss of frying.
Now, you might be wondering why I’m raving about baked fritters when the traditional route takes the plunge into hot oil. Well, let me tell you, these baked beauties retain that comforting fritter experience while being lighter and healthier. Plus, they come together in a snap, making them perfect for busy mornings, afternoon snacks, or cozy gatherings with friends. Who doesn’t love a treat that’s both good for you and totally satisfying?
Join me as we embark on a culinary journey filled with warmth, nostalgia, and of course, flavor! I’ll share a personal story that’ll tickle your taste buds, walk you through the ingredients, and guide you every step of the way to ensure your fritters turn out deliciously perfect. So grab your apron, and let’s get started!
A Slice of My Culinary Memory
Let me take you back to my childhood, where the scent of pumpkin pie wafted through the air every autumn. My Grandma June had a way of making everything feel special, and during pumpkin season, her kitchen was the heart of our family gatherings. Each year, we’d huddle around the kids’ table, eagerly waiting to help her mix, pour, and taste test. The joy on her face when we “helped” was priceless—though we mostly just enjoyed sneaking spoonfuls of batter!
One of my fondest memories involves Grandma’s famous pumpkin fritters. She usually would whip them up as a post-harvest treat, and we’d devour them with warm maple syrup and a sprinkle of powdered sugar. I can still hear her laughter as we fought over the last bite. Fast forward to today, and I find myself recreating those moments with a healthy twist through these baked pumpkin fritter bites. They might not be as heavy or greasy as Grandma’s version, but they carry the essence of her warmth in every scrumptious bite.
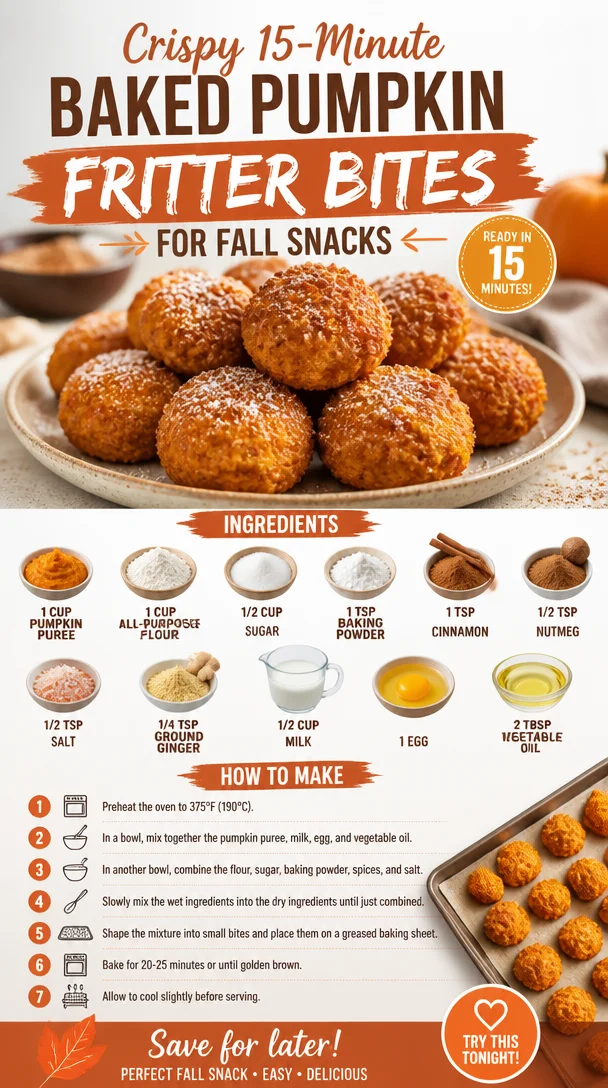
Ingredients
Let’s gather our ingredients for these Easy Baked Pumpkin Fritter Bites. Here’s what you’ll need:
-
1 cup pumpkin puree: The star of the show! This is what makes your fritters moist and flavorful. You can use canned puree or roast fresh pumpkin—both work beautifully.
-
1 cup all-purpose flour: The base of your batter. If you want to add a whole grain element, substitute half with whole wheat flour for added fiber.
-
1/2 cup sugar: This adds sweetness. For a healthier spin, consider using honey or maple syrup (just adjust the liquid content).
-
1 teaspoon baking powder: This gives your fritters that much-loved rise and fluffy texture.
-
1 teaspoon cinnamon: A warm spice that enhances the autumn vibe. Feel free to swap with pumpkin spice for an extra flavor punch!
-
1/2 teaspoon nutmeg: This adds a nuttiness and depth of flavor. It’s warming and pairs beautifully with the pumpkin.
-
1/2 teaspoon salt: A tiny helper to balance the sweetness and enhance every flavor.
-
1/4 teaspoon ground ginger: This adds a little zing! Ginger is optional, but it gives a nice, warm kick.
-
1/2 cup milk: Helps to moisten your batter. You can swap this with a plant-based alternative or even pumpkin spice latte for a fun twist!
-
1 egg: This helps hold everything together and adds richness. For a vegan option, you can replace it with a flax egg (1 tablespoon ground flaxseed mixed with 2.5 tablespoons water).
-
2 tablespoons vegetable oil: This keeps your fritters moist; feel free to use melted coconut oil or applesauce for a lighter version.
Step-by-Step Instructions
Now comes the fun part—let’s dive into making our Easy Baked Pumpkin Fritter Bites! Follow these steps, and let’s whip up some delightful treats that will have everyone coming back for seconds.
1. Preheat your oven
Start by preheating your oven to 400°F (200°C). This ensures that your fritters bake evenly and become perfectly golden. While the oven is warming up, line a baking sheet with parchment paper—it helps with easy clean-up and gives the fritters a nice, crisp texture.
2. Combine your dry ingredients
In a medium-sized mixing bowl, whisk together the flour, sugar, baking powder, cinnamon, nutmeg, salt, and ground ginger. Mixing your dry ingredients first helps evenly distribute the leavening agents and spices throughout the batter, ensuring that each bite is full of flavor!
3. Mix the wet ingredients
In a separate bowl, mix your pumpkin puree, milk, egg, and vegetable oil. If you’re using a flax egg for a vegan option, mix the flaxseed with water and let it sit for a few minutes before adding it to the mix. This little trick will give you that necessary binding effect!
4. Combine wet and dry ingredients
Now, pour your wet mixture into the dry ingredients. Gently fold them together with a spatula until just combined. Make sure not to overmix—this keeps your fritters light and fluffy! Trust me, a few lumps here and there are perfectly okay.
5. Scoop your batter onto the baking sheet
Using a cookie scoop or a spoon, drop rounded tablespoons of batter onto your prepared baking sheet, leaving a bit of space between each one. They don’t spread much, so be generous but not too crowded!
6. Bake until golden brown
Pop your sheet in the oven and bake for about 15-20 minutes or until the fritters are puffed up and golden. You can do the toothpick test—just poke one in the center; if it comes out clean, you’re good to go!
7. Cool and serve
Once baked, remove them from the oven and let them cool for a few minutes. Then, transfer to a wire rack to cool completely—if you can resist the temptation, that is!
Serving Suggestions
These Easy Baked Pumpkin Fritter Bites are perfect for sharing, so consider serving them warm. You can dust them with powdered sugar or dip them in maple syrup for an extra treat. For a more gourmet touch, drizzle some honey or a cream cheese glaze over the top and watch everyone swoon with delight!
Recipe Variations
Get creative with your fritters! Here are a few fun twists you can try:
-
Add-ins: Mix in chopped nuts like walnuts or pecans for a delightful crunch.
-
Dried fruits: Toss in some dried cranberries or raisins for sweetness and texture contrast.
-
Spices: Experiment with cardamom or allspice to add a new dimension to your flavors.
-
Cheese twist: Try incorporating mild cheese (like feta or goat cheese) for a savory twist!
-
Gluten-free: Swap out all-purpose flour for a gluten-free blend, and voila! You’ve got a gluten-free version!
Chef’s Notes
Oh, how I love this recipe! It has evolved from Grandma June’s deep-fried fritters to these lightened-up bites that everyone can enjoy. You know, the beauty of cooking lies in its ability to bring people together and create lasting memories. I’m always experimenting in the kitchen—I once tossed in some cranberries, and they were an instant hit! Cooking should be fun and flexible, so don’t hesitate to make this recipe your own.
If you have kids (or just sprinkle some whimsical joy in your life), let them help out! Mixing and scooping are easy tasks for little hands and a chance to create memories together, just like I did with Grandma.
FAQs and Troubleshooting
-
My fritters didn’t rise. What happened?
Ensure your baking powder is fresh. An expired baking powder will lead to flat fritters. Also, make sure not to overmix your batter; this can lead to dense fritters. -
Can I use fresh pumpkin instead of canned?
Absolutely! Just roast your pumpkin, scoop, and puree until smooth—it adds a wonderful fresh flavor that’s hard to beat! -
Why are my fritters too dry?
They might have baked too long, so keep an eye on them during the last few minutes. If they’re dry, consider adding a bit more milk next time or reducing the baking time slightly. -
Can these be made ahead?
Yes! You can prepare the batter ahead of time and refrigerate it for up to 24 hours before baking them fresh. They’re best enjoyed warm, straight from the oven!
Nutritional Info
One fritter (approximately 30g) consists of approximately:
- Calories: 80
- Protein: 1g
- Total Fat: 3g
- Saturated Fat: 0.5g
- Carbohydrates: 12g
- Fiber: 1g
- Sugar: 3g
Keep in mind that these values are just a ballpark, so adjust based on your ingredient swaps and serving size.
And there you have it—a delightful journey through my favorite baked pumpkin fritter bites! Remember, cooking is all about love, experimentation, and feeding your soul. I hope you enjoy making (and devouring) these treats as much as I do. Happy cooking, fellow foodies!
PrintEasy Baked Pumpkin Fritter Bites
These fluffy, slightly sweet pumpkin bites are a healthier twist on traditional fritters, perfect for fall gatherings or cozy snacking.
- Prep Time: 10 minutes
- Cook Time: 20 minutes
- Total Time: 30 minutes
- Yield: 4 servings 1x
- Category: Snack
- Method: Baking
- Cuisine: American
- Diet: Vegetarian
Ingredients
- 1 cup pumpkin puree
- 1 cup all-purpose flour
- 1/2 cup sugar
- 1 teaspoon baking powder
- 1 teaspoon cinnamon
- 1/2 teaspoon nutmeg
- 1/2 teaspoon salt
- 1/4 teaspoon ground ginger
- 1/2 cup milk
- 1 egg
- 2 tablespoons vegetable oil
Instructions
- Preheat your oven to 400°F (200°C) and line a baking sheet with parchment paper.
- Combine your dry ingredients: In a bowl, whisk together flour, sugar, baking powder, cinnamon, nutmeg, salt, and ginger.
- Mix your wet ingredients: In another bowl, mix pumpkin puree, milk, egg, and vegetable oil.
- Combine wet and dry ingredients until just mixed.
- Scoop batter onto the prepared baking sheet.
- Bake for 15-20 minutes until golden brown.
- Cool on a wire rack before serving.
Notes
Serve warm with powdered sugar or maple syrup. Kids can help with mixing and scooping!
Nutrition
- Serving Size: 1 fritter
- Calories: 80
- Sugar: 3g
- Sodium: 200mg
- Fat: 3g
- Saturated Fat: 0.5g
- Unsaturated Fat: 2g
- Trans Fat: 0g
- Carbohydrates: 12g
- Fiber: 1g
- Protein: 1g
- Cholesterol: 30mg
Keywords: pumpkin fritters, baked fritters, healthy snacks, fall recipes, vegetarian
Crustless Pumpkin Pie
Crustless Pumpkin Pie: A Flavorful & Easy Fall Treat
Ah, fall. The air turns crisp, leaves don brilliant hues, and everywhere you turn, pumpkin spice reigns supreme. But let’s talk about something even better than a pumpkin spice latte—Crustless Pumpkin Pie! If you’re thinking, “Wait, no crust? How will that work?”—trust me, my friend, this pie is like a warm hug during the chilly season. It’s rich, creamy, and boasts all the delightful flavors of traditional pumpkin pie, sans the fuss of making a crust.
Now, I know what you might be imagining—is it really pumpkin pie without that flaky, buttery crust? Absolutely! It’s all the flavor you love with none of the heavy lifting. Imagine the ease of whipping up a delicious dessert that not only tastes divine but also accommodates your friends who might be counting calories or avoiding gluten. Consider this recipe as your secret weapon for holiday gatherings or cozy nights in. Get ready for a slice of pumpkin paradise!
Personal Story
Let me take you back to my grandmother’s kitchen during the autumn months. The scent of cinnamon and nutmeg would dance around the room like the falling leaves outside. Grandma would pull out her vintage mixing bowl and gather her ingredients like it was a ritual—a sprinkle of this, a dash of that—always with a twinkle in her eye.
It was the one time of year when nothing else mattered but that magical pie made from her secret recipe. She never liked fussing with crusts; to her, the filling was the star of the show. I remember one particular Thanksgiving when she decided to try making her crustless pumpkin pie for the first time, and despite my initial skepticism, as soon as I tasted it, I was a believer. The creaminess of the pumpkin mingling with the warm spices? Instant bliss! We devoured it, and it became an instant family favorite, proving that sometimes, simplicity brings the most joy.
Now, every time I whip up this crustless pumpkin pie, I can’t help but smile and think of those warm, cozy memories. This recipe is not just a dish—it’s a celebration of comfort food and nostalgia.
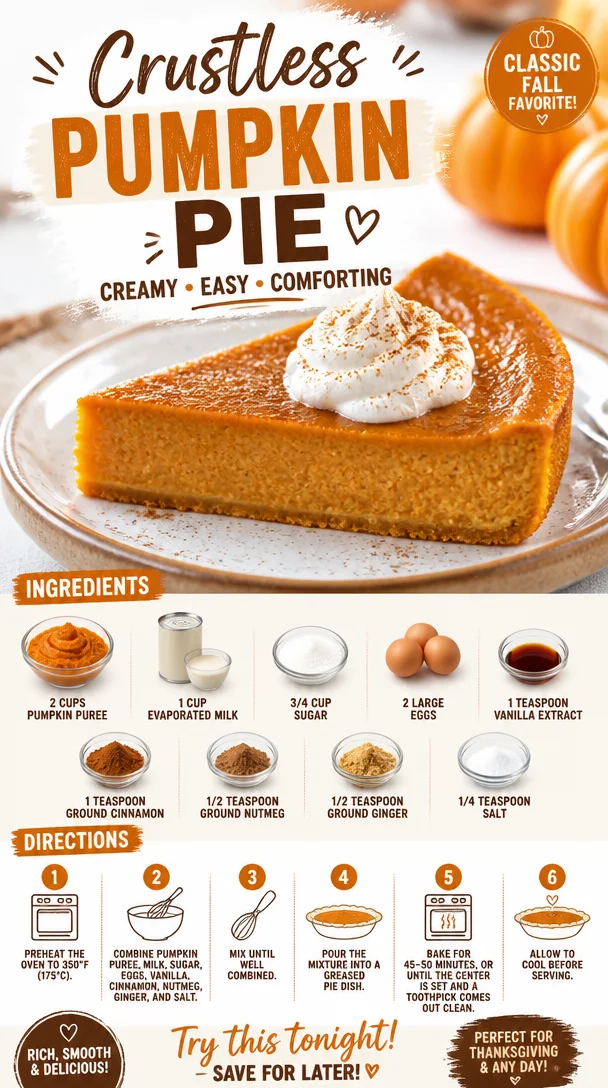
Ingredients
-
2 cups pumpkin puree
This is the star of the show! Canned pumpkin puree is convenient and consistent. If you’re feeling adventurous, you can make your own by roasting sugar pumpkins—just scoop out the flesh and blend until smooth! -
1 cup evaporated milk
This ingredient adds creaminess without the heaviness of heavy cream. If you’re dairy-free, try using coconut milk for a tropical twist or almond milk for a lighter version. -
3/4 cup sugar
Regular granulated sugar works perfectly. If you’re looking for a lower-calorie option, you can try using coconut sugar or a sugar substitute like Stevia. -
2 large eggs
Eggs help bind everything together. If you’re looking for an egg-free version, you can use flaxseed meal (1 tablespoon of flaxseed mixed with 2.5 tablespoons of water for each egg) or a commercial egg replacer. -
1 teaspoon vanilla extract
Always opt for pure vanilla extract for the best flavor. If you want a hint of something unique, try almond extract for a delightful twist. -
1 teaspoon ground cinnamon
A must-have spice that brings warmth to the pie. If you’re feeling spicy, mix in some cardamom for an unexpected flavor profile. -
1/2 teaspoon ground nutmeg
Nutmeg adds a nutty, slightly sweet flavor that’s synonymous with pumpkin pie. Freshly grated nutmeg is even more aromatic, so if you have some, go for it! -
1/2 teaspoon ground ginger
Ginger enhances the pie’s overall warmth. For a spicier kick, you can add a touch of fresh grated ginger instead. -
1/4 teaspoon salt
A pinch of salt elevates the sweetness and balances the flavors beautifully.
Step-by-Step Instructions
-
Preheat Your Oven
Preheat your oven to 350°F (175°C). This will ensure your pie bakes evenly, giving you that perfect texture. -
Prepare the Mixing Bowl
Grab a large mixing bowl—this is where the magic happens! Combine the pumpkin puree, evaporated milk, and sugar. Mix well until everything is smooth. Using a whisk will help incorporate air, making your pie light and fluffy. -
Add the Eggs and Vanilla
Crack in the eggs one at a time, whisking them in thoroughly after each addition. You want to ensure everything is well combined. Then, drizzle in the vanilla extract—this will enhance the overall flavor profile beautifully! -
Incorporate the Spices
Sprinkle in the ground cinnamon, nutmeg, ginger, and salt. The aroma here is divine! Mix until everything is evenly distributed. You want all those warm spices singing together in harmony! -
Grease Your Baking Dish
Lightly grease a 9-inch pie dish or an equivalent baking dish with cooking spray or butter. This will help the pie slide out easily once it’s baked—nobody likes a stuck pie! -
Pour It All In
Gently pour the pumpkin mixture into the greased pie dish, making sure to spread it evenly. Don’t worry about making it perfect; the magic happens in the oven! -
Bake Your Pie
Pop your pie in the preheated oven and bake for about 60-70 minutes. You’ll know it’s done when the edges are set, and the center has a slight jiggle but isn’t runny. -
Cool and Serve
Once baked, take it out of the oven and let it cool for at least 30 minutes. This cooling time helps it set—plus, you want to avoid burning your tongue, right? Serve it at room temperature or refrigerate it for later; it’s just as delicious chilled!
Serving Suggestions
To serve this delightful crustless pumpkin pie, slice it into wedges and dust a little powdered sugar on top for a fancy finish. For an extra touch of decadence, add a dollop of whipped cream or a scoop of vanilla ice cream on the side. Drizzle a bit of caramel sauce over it, and you have an irresistible treat that everyone will love!
Recipe Variations
- Spiced Rum Variation: Add a splash of spiced rum to the mixture for an adult twist.
- Chocolate Chip Twist: Fold in some dark chocolate chips to the batter for a sweet surprise.
- Nuts & Seeds: Add chopped pecans or walnuts on top before baking for a crunchy contrast.
- Maple Sweetened: Substitute the sugar with maple syrup for a richer flavor.
- Coconut Crust: Press shredded coconut at the bottom of the dish before pouring in the filling for a unique texture.
Chef’s Notes
Reflecting back on my first attempts at making this pie, I recall a not-so-funny moment when I mistakenly grabbed salt instead of sugar. The taste was… well, let’s say it’s a family joke now! I learned quickly that not all ingredients can afford to be swapped. Over the years, though, I’ve refined this recipe, adapting it based on what I have on hand or the tastes of those around my table. It’s a testament to how adaptable recipes can be, and how each pie can tell a different story.
FAQs and Troubleshooting
Q: My pie is too watery. What went wrong?
A: This can happen if the pumpkin puree you used was too watery. Always check the label to ensure you’re using 100% pumpkin.
Q: Can I make this pie ahead of time?
A: Absolutely! This pie holds up wonderfully in the fridge for up to a week. Just cover it tightly with plastic wrap or foil.
Q: Why did my pie not set?
A: If it’s not set in the center after baking, it may need more time in the oven. Just stick it back in, checking every 5-10 minutes until it’s done.
Q: Can I freeze this pie?
A: Yes! Once cooled, tightly wrap it in plastic wrap and aluminum foil and it can be frozen for up to 2 months. Just thaw before serving.
Enjoy this delightful Crustless Pumpkin Pie while creating memories in your own kitchen. Whether you serve it for a family gathering or enjoy it all to yourself—trust me, no one will miss the crust! Let me know how yours turns out, and happy baking!
PrintCrustless Pumpkin Pie
Enjoy a rich and creamy Crustless Pumpkin Pie that combines all your favorite fall flavors without the fuss of a crust.
- Prep Time: 15 minutes
- Cook Time: 70 minutes
- Total Time: 85 minutes
- Yield: 8 servings 1x
- Category: Dessert
- Method: Baking
- Cuisine: American
- Diet: Vegetarian
Ingredients
- 2 cups pumpkin puree
- 1 cup evaporated milk
- 3/4 cup sugar
- 2 large eggs
- 1 teaspoon vanilla extract
- 1 teaspoon ground cinnamon
- 1/2 teaspoon ground nutmeg
- 1/2 teaspoon ground ginger
- 1/4 teaspoon salt
Instructions
- Preheat your oven to 350°F (175°C).
- Grab a large mixing bowl and combine the pumpkin puree, evaporated milk, and sugar. Mix well until smooth.
- Crack in the eggs one at a time, whisking thoroughly after each addition. Then drizzle in the vanilla extract.
- Sprinkle in the ground cinnamon, nutmeg, ginger, and salt, mixing until evenly distributed.
- Lightly grease a 9-inch pie dish with cooking spray or butter.
- Gently pour the pumpkin mixture into the greased pie dish.
- Pop your pie in the preheated oven and bake for about 60-70 minutes.
- Once baked, let it cool for at least 30 minutes before serving.
Notes
For added indulgence, serve with whipped cream or vanilla ice cream. This pie can be made ahead of time and stores well in the fridge.
Nutrition
- Serving Size: 1 slice
- Calories: 280
- Sugar: 25g
- Sodium: 150mg
- Fat: 5g
- Saturated Fat: 2g
- Unsaturated Fat: 2g
- Trans Fat: 0g
- Carbohydrates: 50g
- Fiber: 3g
- Protein: 5g
- Cholesterol: 50mg
Keywords: pumpkin pie, dessert, fall recipe, Thanksgiving, crustless dessert
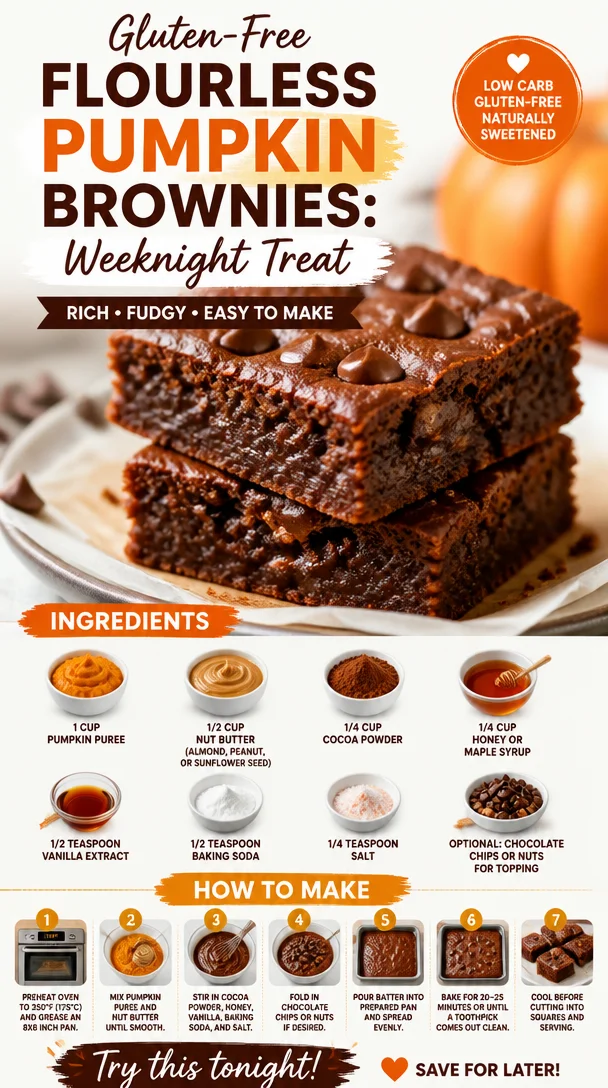
Gluten-Free Flourless Pumpkin Brownies: Weeknight Treat
Indulge Guilt-Free: Flourless Pumpkin Brownies Recipe
Welcome back to Clean Plate Cravings, where fresh, feel-good food meets real life! Today, I’m bringing you a soul-warming treat that’s a perfect blend of seasonal flavor and wholesome goodness: Flourless Pumpkin Brownies. If you’re like me, you love indulging in sweets but don’t want to sacrifice your health or well-being for a decadent dessert. These brownies are the ultimate solution. They are fudgy, rich, and as comforting as that favorite sweater you can’t bear to part with come springtime.
Imagine indulging in a sweet that not only satisfies your cravings but also packs in some nutrients. That’s right, folks—these brownies are made with pumpkin puree, so they’re not just delicious but also come with a hidden dose of vitamins and fiber! Plus, they’re quick to whip up, making them perfect for impromptu get-togethers or cozy nights in. You don’t need fancy ingredients or hours in the kitchen. Just simple, wholesome, and approachable ingredients, which is exactly how I like to roll.
So, grab your mixing bowl and let’s dive into this indulgent yet nutritious recipe together. You won’t believe how easy it is to create these heavenly delights—let’s get started!
A Slice of Nostalgia: My Pumpkin Love Affair
Oh, where do I even begin? My love for pumpkin started in childhood during the crisp autumn months. There was something magical about the transition into fall—the leaves changing color, the air getting just a little bit cooler, and most importantly, the smell of pumpkin baking in the oven. My family had this tradition of making pumpkin bread every Thanksgiving. The whole house would be filled with that warm, spicy aroma, and I remember waiting anxiously for it to come out of the oven, practically salivating as I imagined slathering butter on it.
Fast forward to now, and I wanted to embrace the essence of those autumn days but in a more indulgent form. Enter the flourless pumpkin brownies! These brownies capture that nostalgic feeling in a new, exciting way—satisfying that sweet tooth while still feeling good about what I’m eating. Every bite reminds me of the warmth of family gatherings and cozy evenings spent around the kitchen table, sharing laughter and stories. And now, I can create that magic with these brownies anytime I want!
Ingredients: What You’ll Need
Here’s what you’ll need to whip up these delightful flourless pumpkin brownies:
-
1 cup pumpkin puree
A nutrient-packed powerhouse! Opt for fresh pumpkin or canned—just make sure it’s 100% pumpkin purée with no added sugar. If you’re looking for a substitute, sweet potato puree works beautifully too! -
1/2 cup nut butter (almond, peanut, or sunflower seed)
Nut butter adds that fudgy texture and keeps things rich. Almond and peanut butters give a nice flavor, while sunflower seed butter is a great nut-free alternative for allergy-friendly options. -
1/4 cup cocoa powder
The star ingredient for that deep, chocolatey flavor. Unsweetened cocoa or dark cocoa powder delivers the richest taste. If you want a twist, try using cacao powder for a more intense cocoa flavor. -
1/4 cup honey or maple syrup
This natural sweetener balances the flavors. Honey adds a hint of its floral essence, while maple syrup provides an autumnal twist. If you’re vegan, sticking to maple syrup is your best bet! -
1/2 teaspoon vanilla extract
This adds warmth and depth to the brownies. For an even more vibrant flavor, try using vanilla bean paste for that extra touch of sweetness. -
1/2 teaspoon baking soda
This is your leavening agent, ensuring those brownies don’t come out as dense as a brick. If you need a gluten-free alternative, cream of tartar works as a leavening agent too—just mix it with baking soda in equal parts. -
1/4 teaspoon salt
A little salt enhances all the flavors in your brownies. If you’re watching your sodium, you can reduce this to just a pinch, but I recommend keeping it for the heavenly balance it provides. -
Optional: chocolate chips or nuts for topping
The choice is yours! Add a sprinkle of chocolate chips for an extra indulgent brownie or some chopped nuts for crunch. Pecans or walnuts bring a delicious nutty flavor that complements the pumpkin beautifully.
Step-by-Step Instructions: Get Cooking!
Ready to make some magic? Follow these simple steps, and I promise you’ll be on your way to brownie bliss!
-
Preheat your oven to 350°F (175°C). This is key for getting a perfect, fudgy texture. While it heats up, line an 8×8-inch baking pan with parchment paper or grease it lightly.
-
Mix the wet ingredients. In a large mixing bowl, combine 1 cup of pumpkin puree, 1/2 cup of your chosen nut butter, 1/4 cup of honey or maple syrup, and 1/2 teaspoon of vanilla extract. Grab a whisk and stir until well-blended! You want a creamy, smooth texture—almost like a lovely pumpkin smoothie.
Chef Tip: If your nut butter is a little stiff, pop it in the microwave for 10-15 seconds to warm it up. It’ll blend beautifully with the other ingredients.
-
Sift in the dry ingredients. Add the 1/4 cup cocoa powder, 1/2 teaspoon baking soda, and 1/4 teaspoon salt to the wet mixture. Gently fold everything together using a spatula. You don’t want to overmix—just until everything is well incorporated and no dry spots remain.
Chef Hack: For an even richer brownie, consider adding a tablespoon of espresso powder here! It deepens the chocolate flavor without turning your brownies into coffee-flavored ones.
-
Pour and spread. Transfer the brownie batter into your prepared baking pan. Use a spatula to spread the mixture evenly—get in there and make sure it’s all the way to the corners!
-
Add your toppings. If you’re feeling adventurous, sprinkle some chocolate chips or chopped nuts on top. This is where the creativity can really shine.
-
Bake! Pop the pan into your preheated oven and bake for about 20-25 minutes. Keep an eye on them; they’re ready when a toothpick comes out with just a couple of moist crumbs.
Pro Chef Insight: Don’t overbake! We want these beauties to stay fudgy, so if you’ve got a few moist crumbs on that toothpick, you’re in the clear.
-
Cool and slice. Once baked, remove the brownies from the oven and let them cool in the pan for about 10-15 minutes. Transfer them to a wire rack to cool completely before slicing into squares. Trust me; allowing them to cool fully gives you that perfect fudgy texture!
Serving Suggestions
Now that your brownies are baked and cooled, it’s time to serve them up! Cut them into delightful squares and arrange them on a pretty plate. Drizzle some extra melted nut butter or chocolate sauce on top for an indulgent touch. Pair these brownies with a scoop of vanilla ice cream or a dollop of whipped cream for an even more amazing dessert experience!
Recipe Variations
Feeling a little adventurous? Here are a few fun twists you can add to elevate your flourless pumpkin brownies:
-
Spice it up: Add 1 teaspoon of pumpkin pie spice or a dash of cinnamon for that warm, cozy flavor that complements pumpkin beautifully.
-
Nutty chocolate delight: Fold in some chopped walnuts or pecans into the batter for added crunch and earthy flavors.
-
Boost with dried fruit: Toss in a handful of dried cranberries or raisins into the batter for a pop of sweetness and chewiness.
-
Minty fresh: Add a drop of peppermint extract for a refreshing twist on these brownies—perfect for the holidays!
Chef’s Notes
As I reflect on the journey of creating these flourless pumpkin brownies, I’m reminded how recipes evolve over time. The first version I tried was… well, let’s just say it didn’t quite hit the mark. It was a textbook brownie, dense and slightly crumbly. After several tweaking sessions, I realized that the key was the balance of moisture from the pumpkin and the richness from the nut butter.
And while my kids can turn their noses up at veggies sometimes, they absolutely gobble these brownies up! It’s a joy seeing them enjoy a dessert that’s not just about satisfying a sweet tooth but is also filled with wholesome ingredients. These brownies have become a staple in our household, and I love sharing this recipe with friends and family.
FAQs and Troubleshooting
Q1: Why are my brownies too dense?
A1: If you find your brownies turning out too dense, it might be due to overmixing after adding the dry ingredients. Make sure to mix just until incorporated!
Q2: Can I make these brownies ahead of time?
A2: Absolutely! Store them in an airtight container for up to five days at room temperature or refrigerate them for up to a week. They can also be frozen for up to three months—just make sure to thaw them in the fridge when you’re ready to snack!
Q3: How do I know when the brownies are done?
A3: The trick is to check for moist crumbs on a toothpick inserted in the center. If it comes out clean, they might be overbaked! You want that perfectly fudgy consistency.
Q4: Can I substitute pumpkin with something else?
A4: Yes! Sweet potato or mashed bananas work as great substitutes, though the flavor will change slightly. Each option brings its unique taste while keeping the brownies moist.
Nutritional Info
(Per Brownie—makes about 12 servings)
- Calories: 130
- Protein: 4g
- Fat: 8g
- Carbs: 15g
- Fiber: 2g
- Sugar: 4g
So there you have it—the perfect recipe for Flourless Pumpkin Brownies that are not only easy to make but also incredibly delicious. I hope you take as much joy in making these as I do! Enjoy each rich, fudgy bite, and remember, healthy eating should be about comfort, joy, and of course, deliciousness. Happy baking, my fellow foodies!
PrintFlourless Pumpkin Brownies
These fudgy, rich flourless pumpkin brownies are a guilt-free dessert packed with nutrients and perfect for any occasion.
- Prep Time: 10 minutes
- Cook Time: 25 minutes
- Total Time: 35 minutes
- Yield: 12 servings 1x
- Category: Dessert
- Method: Baking
- Cuisine: American
- Diet: Vegetarian
Ingredients
- 1 cup pumpkin puree
- 1/2 cup nut butter (almond, peanut, or sunflower seed)
- 1/4 cup cocoa powder
- 1/4 cup honey or maple syrup
- 1/2 teaspoon vanilla extract
- 1/2 teaspoon baking soda
- 1/4 teaspoon salt
- Optional: chocolate chips or nuts for topping
Instructions
- Preheat your oven to 350°F (175°C) and line an 8×8-inch baking pan with parchment paper.
- Mix the wet ingredients: combine pumpkin puree, nut butter, honey or maple syrup, and vanilla extract in a bowl.
- Sift in the cocoa powder, baking soda, and salt, folding gently until incorporated.
- Pour the brownie batter into the prepared baking pan, spreading it evenly.
- Add any toppings such as chocolate chips or chopped nuts.
- Bake for 20-25 minutes or until a toothpick comes out with a couple of moist crumbs.
- Cool the brownies in the pan for 10-15 minutes, then transfer to a wire rack to cool completely before slicing.
Notes
These brownies can be stored in an airtight container for up to five days at room temperature or can be refrigerated for up to a week. They also freeze well for up to three months.
Nutrition
- Serving Size: 1 brownie
- Calories: 130
- Sugar: 4g
- Sodium: 120mg
- Fat: 8g
- Saturated Fat: 1g
- Unsaturated Fat: 7g
- Trans Fat: 0g
- Carbohydrates: 15g
- Fiber: 2g
- Protein: 4g
- Cholesterol: 0mg
Keywords: pumpkin brownies, flourless dessert, healthy dessert, chocolate pumpkin, vegetarian brownies