Minute No-Bake Mini Cheesecake Cups (Creamy & Easy)
Irresistible No-Bake Mini Cheesecake Cups in 15 Minutes
Introduction
Hey there, fellow food lovers! If you’re anything like me, you probably have a constant craving for something sweet, creamy, and utterly delicious. Lucky for you, I have just the treat in mind: No-Bake Mini Cheesecake Cups! These little gems are all about enjoying the rich, decadent flavor of cheesecake without the fuss of baking. And the best part? You can whip them up in just 15 minutes!
I’ve always been a huge fan of cheesecakes, but there’s something extra special about the mini version that brings a delightful playfulness to dessert time. Picture this: a buttery graham cracker crust cradling a velvety cream cheese filling, topped with fresh, juicy berries. It’s the kind of dessert that makes your taste buds dance and your heart sing.
Making these No-Bake Mini Cheesecake Cups is not only a treat for yourself but also a fantastic way to impress friends and family. Whether you’re hosting a casual gathering, celebrating a special occasion, or just need a sweet pick-me-up after a long day, these mini cheesecakes are about to become your go-to recipe.
In this post, I’ll share a little backstory that will take you on a trip down memory lane, guide you through the ingredients needed, and offer step-by-step instructions that will make you feel like a pro in the kitchen. So grab your apron, and let’s dive into the delicious world of no-bake cheesecake!
Personal Story
Let me take you back to a particularly memorable summer afternoon from my childhood. My grandmother, a passionate baker with an unbeatable sweet tooth, was preparing her famous cheesecake for our family BBQ. I can still picture the sun shining through the kitchen window, illuminating her apron as she expertly mixed cream cheese with sugar. The rich aroma filled the air, and I was captivated by the creamy filling as it piled up high in her springform pan.
However, in true grandma fashion, she insisted on letting it bake for hours before it was ready to serve, leaving me with a long wait—and an even longer craving! Fast forward to today, while I cherish her traditional recipe, I often find myself reminiscing about those lazy summers spent waiting for that first slice. The idea of a mini cheesecake that doesn’t require an oven was born out of my desire to indulge in that classic dessert quickly!
These No-Bake Mini Cheesecake Cups evoke those tender memories, allowing me to recreate the joy of cheesecake anytime I want without the long wait. Best of all, I can share this delightful treat with friends and family, just like my grandmother did with me. So, let’s create our own cherished moments together—one mini cheesecake cup at a time!
Ingredients
-
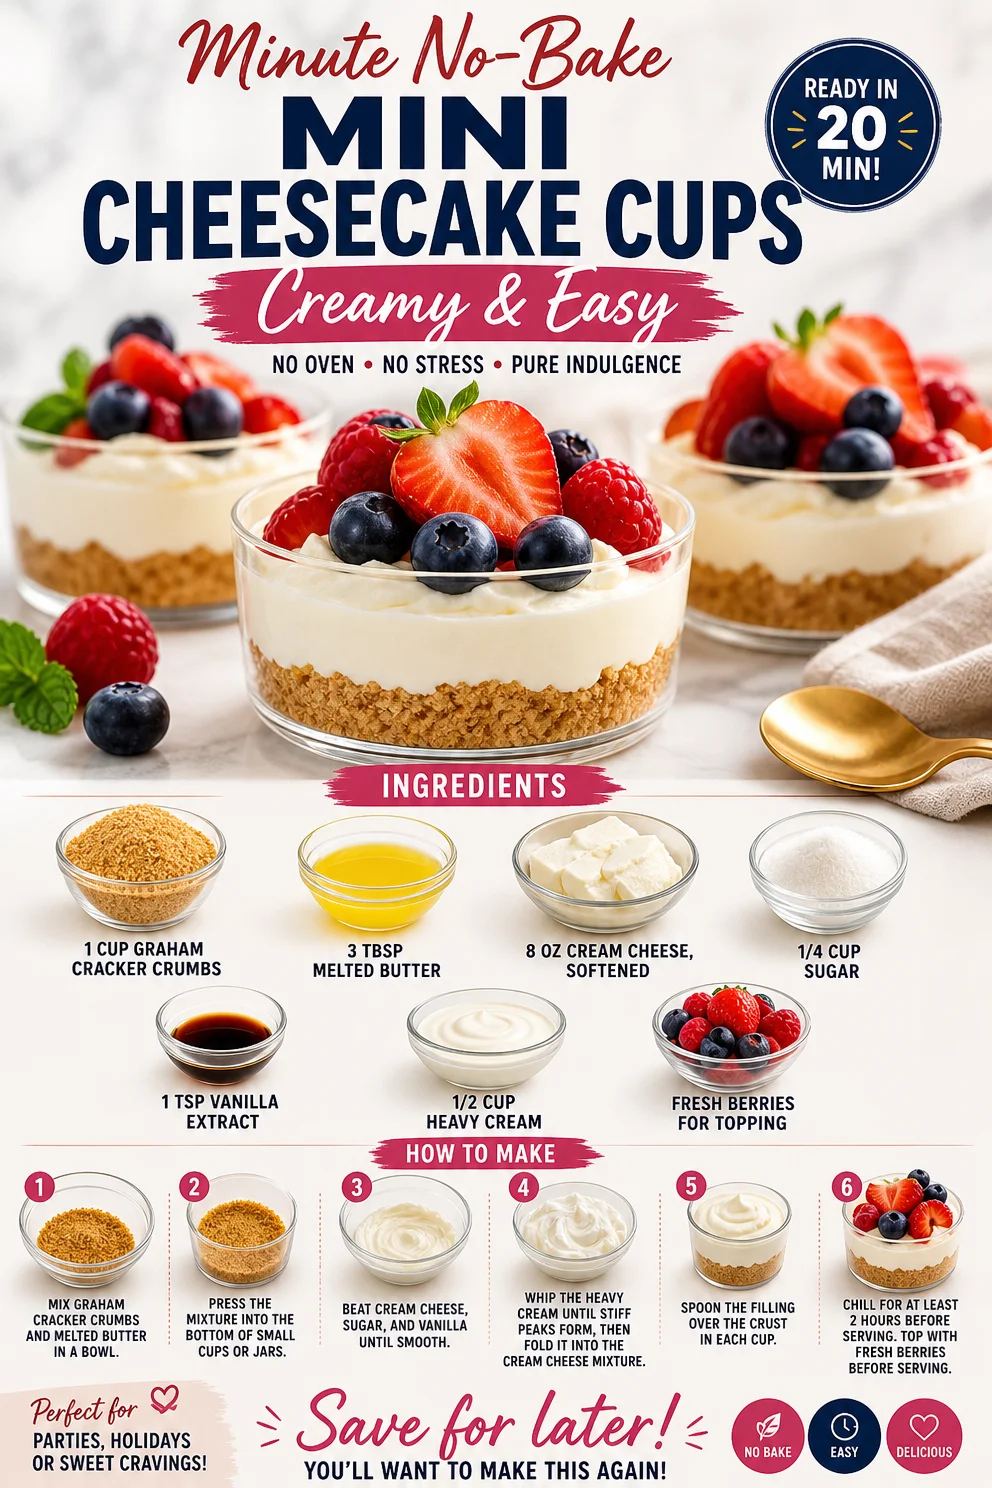
1 cup graham cracker crumbs
- This creates the crunchy crust! You can easily make your own by crushing whole graham crackers in a food processor or using store-bought crumbs for convenience.
-
3 tbsp melted butter
- The butter adds richness and helps bind the crust together. If you’re looking for a lighter option, you can swap it with coconut oil or even applesauce for a healthier twist.
-
8 oz cream cheese, softened
- The star of the show! Softening the cream cheese makes it easier to mix and creates that smooth, creamy texture we all crave. For a lighter version, try using low-fat cream cheese or yogurt.
-
1/4 cup sugar
- This adds sweetness to the filling. Feel free to adjust the sweetness based on your preference—honey or maple syrup can be great substitutes!
-
1 tsp vanilla extract
- Vanilla enhances the flavor, infusing it with warmth. If you’re feeling adventurous, consider adding a splash of almond or lemon extract for a unique twist.
-
1/2 cup heavy cream
- This is what gives our cheesecake filling its luscious texture. For a dairy-free alternative, you might opt for coconut cream instead.
-
Fresh berries for topping
- Berries not only enhance the aesthetics but also add a burst of freshness to each bite. Feel free to use strawberries, blueberries, raspberries, or whatever is in season!
Step-by-Step Instructions
-
Prepare the Crust:
Start by mixing the graham cracker crumbs and melted butter in a medium bowl until combined. You want the texture to resemble wet sand. If it feels too dry, drizzle in a bit more melted butter. This will help the crumbs stick together. -
Distribute into Cups:
Using a spoon or your fingers, press the crumb mixture firmly into the bottom of your mini dessert cups or muffin tins. Make sure to pack it tightly so your crust holds its shape. A flat-bottomed glass works wonders for this! -
Mix the Filling:
In another bowl, beat the softened cream cheese until smooth and creamy. I recommend using an electric mixer for this step to avoid any lumps. Gradually add the sugar and vanilla extract, mixing until fully incorporated. -
Whip the Cream:
In a separate bowl, whip the heavy cream until soft peaks form. This is where the magic happens! Gently fold the whipped cream into the cream cheese mixture. Use a spatula in a gentle upward motion to keep the mixture light and airy. -
Combine Fillings:
Once the whipped cream is incorporated, your cheesecake filling is ready! Spoon the mixture into your pre-prepared cups, filling each one generously. You can go as high as you want—these mini cheesecakes are meant to be decadent! -
Chill in the Fridge:
Cover your mini cheesecake cups with plastic wrap and let them chill in the fridge for at least 1 hour. This will help set the filling. If you’re in a rush, even 30 minutes will do the trick. -
Top with Berries:
Just before serving, load up each cheesecake with fresh berries. This not only looks beautiful but adds a refreshing touch to every rich bite.
And voilà! Your No-Bake Mini Cheesecake Cups are ready to dazzle your taste buds and impress your guests!
Serving Suggestions
To serve these adorable cheesecake cups, arrange them on a colorful platter for an eye-catching display. You can also drizzle some homemade berry sauce or a sprinkle of powdered sugar on top for added flair. If you want to create a more interactive experience, set out extra berries and toppings so your guests can customize their mini cheesecakes. Enjoy with a fork, or for the adventurous, dig in directly with a spoon!
Recipe Variations
-
Chocolate Lovers’ Delight:
Swirl in some melted chocolate into your cheesecake filling for a chocolate version! You can even top it with chocolate shavings. -
Citrus Twist:
Add a teaspoon of lemon or orange zest to the filling for a bright, zesty flavor that’ll perk up your palate. -
Nutty Crust:
Mix in crushed nuts, like pecans or almonds, with the graham cracker crumbs for a nutty crunch. You can also use crushed cookies like Oreos for a fun twist! -
Vegan Version:
Replace the cream cheese with a vegan cream cheese alternative, use coconut cream instead of heavy cream, and sweeten with maple syrup for a delicious dairy-free option. -
Mini Layered Cheesecake:
Layer the filling with different flavored yogurt for a fun and colorful presentation! Each layer can have a unique flavor profile that keeps things exciting.
Chef’s Notes
Food has a funny way of transporting us back in time. Whenever I make these Mini Cheesecake Cups, I think about my grandma’s kitchen, that summer day, and the family gatherings filled with laughter. This recipe has evolved over the years—what started as a simple cheesecake has transformed into a crowd-pleasing, no-bake delight that’s perfect for any occasion. Plus, it’s a time-saver that lets you focus on what really matters: savouring those sweet moments with loved ones.
FAQs and Troubleshooting
-
What if my cheesecake filling is lumpy?
Make sure you’re mixing the cream cheese until it’s really smooth before adding the sugar. If you find lumps after combining everything, you can quickly whip it with a blender! -
Can I make these ahead of time?
Absolutely! You can make them a day in advance. Just keep them in the fridge, covered, until you’re ready to serve them. -
What if I don’t have mini cups?
No worries! You can use a muffin tin or even a large dessert dish for a family-style cheesecake. Just adjust the chilling time accordingly. -
How long can I store these?
They’ll stay fresh in an airtight container in the fridge for about 3-4 days. Although, I doubt they’ll last that long—the taste is simply irresistible!
Nutritional Info
While I’m not a dietitian, I can tell you these No-Bake Mini Cheesecake Cups are a delightful treat worth enjoying in moderation! If you’re interested in specific nutritional info (calories, sugar content, etc.), feel free to use an online calculator based on the ingredients you choose.
So there you have it! No-Bake Mini Cheesecake Cups that are quick, easy, and utterly delicious. Now it’s your turn to create some sweet memories in the kitchen. Happy baking (or, should I say, chilling)! Enjoy!
PrintNo-Bake Mini Cheesecake Cups
Quick and easy no-bake mini cheesecake cups topped with fresh berries, perfect for satisfying your sweet cravings in just 15 minutes.
- Prep Time: 15 minutes
- Cook Time: 0 minutes
- Total Time: 75 minutes
- Yield: 4 servings 1x
- Category: Dessert
- Method: No-Bake
- Cuisine: American
- Diet: Vegetarian
Ingredients
- 1 cup graham cracker crumbs
- 3 tbsp melted butter
- 8 oz cream cheese, softened
- 1/4 cup sugar
- 1 tsp vanilla extract
- 1/2 cup heavy cream
- Fresh berries for topping
Instructions
- Prepare the crust: Start by mixing the graham cracker crumbs and melted butter in a medium bowl until combined.
- Distribute into cups: Press the crumb mixture firmly into the bottom of mini dessert cups or muffin tins.
- Mix the filling: Beat the softened cream cheese until smooth, then add the sugar and vanilla extract.
- Whip the cream: In a separate bowl, whip the heavy cream until soft peaks form, then fold into the cream cheese mixture.
- Combine fillings: Spoon the mixture into the prepared cups, filling each one generously.
- Chill in the fridge: Cover with plastic wrap and chill for at least 1 hour.
- Top with berries: Just before serving, add fresh berries on top of each cheesecake.
Notes
These mini cheesecakes can be made a day in advance and are perfect for any occasion.
Nutrition
- Serving Size: 1 cup
- Calories: 220
- Sugar: 10g
- Sodium: 200mg
- Fat: 14g
- Saturated Fat: 8g
- Unsaturated Fat: 6g
- Trans Fat: 0g
- Carbohydrates: 22g
- Fiber: 1g
- Protein: 3g
- Cholesterol: 40mg
Keywords: cheesecake, no-bake dessert, mini cheesecake, easy dessert, quick recipe