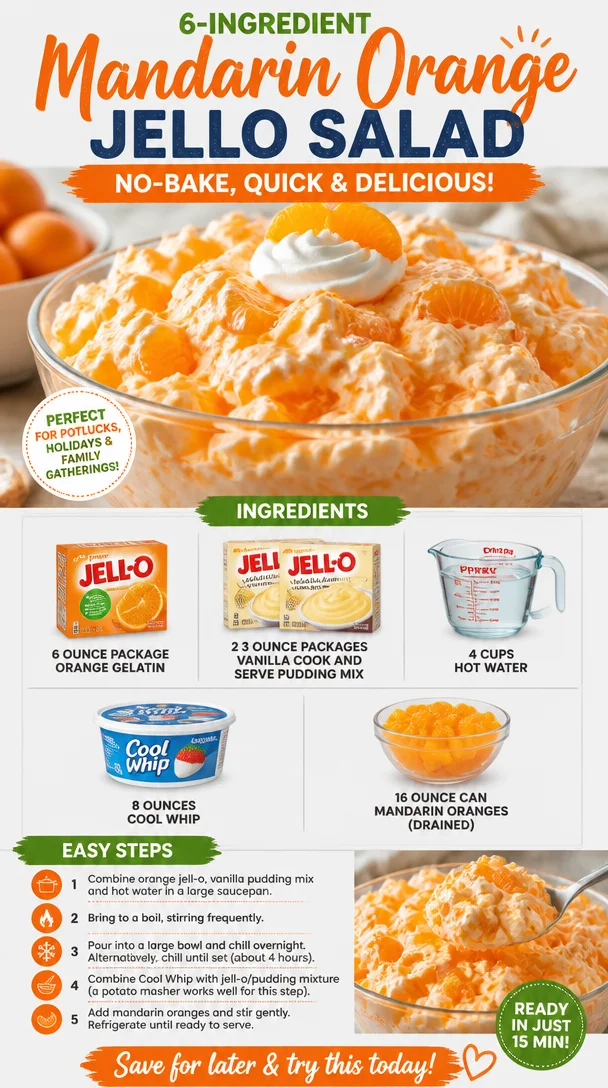
Ingredient Mandarin Orange Jello Salad (No-Bake, Quick)
Whip Up Nostalgia with Mandarin Orange Jello Salad
Hey there, fellow foodies! Today, I’m diving into those nostalgic recipes that not only bring a smile to our faces but also a little warmth to our hearts. You know which one I’m talking about—Mandarin Orange Jello Salad! This delightful, colorful dish is the ultimate throwback to family gatherings and potlucks, where it often sat proudly among the main dishes and desserts. It’s a dish that screams comfort with a hint of whimsy, and trust me, it’s as easy to make as it is to enjoy.
Picture this: a vibrant salad made with orange gelatin, creamy pudding, and bursts of fruity goodness from mandarin oranges, all jazzed up with a fluffy blanket of Cool Whip. It’s the perfect combination of flavors and textures—it’s bright, it’s creamy, and let’s be honest, it’s just plain fun to eat! Whether you’re whipping it up for a family dinner or a summer barbecue, this dish will quickly become a favorite for all ages.
And here’s the best part: this recipe is more than just a dish. It’s a walk down memory lane. The colors remind me of summer picnics under the sun—not a care in the world! The laughter and chatter of family around the table, the clinking of spoons against glass dishes, and my aunt declaring that yes, she makes the best version of this salad. It’s a festival of flavors and textures that adds joy to any meal.
So, are you ready to roll up your sleeves and bring some sunshine into your kitchen? Let’s get started!
Personal Story
While I was growing up, our family gatherings were rich with tradition and filled with beloved recipes passed down through generations. But then there was this one dish—my grandmother’s Mandarin Orange Jello Salad—that became a legend all on its own. I can’t tell you how many times I heard my relatives debating whose version was the best!
I still remember standing on my tiptoes to sneak a taste of the salad before it made its way to the dinner table, its vibrant orange hue practically beckoning me. The tangy sweetness of the orange gelatin coupled with the smooth, creamy pudding was an irresistible combination. It was more than a side dish; it was a cherished recipe that evoked joy and laughter, and it was always the first to disappear!
As I started cooking, I vowed to make this dish my own—modernizing it just a bit while still holding onto its nostalgic roots. Today, I’m excited to share that version with you, seasoned with love and my own personal twists!
Ingredients
-
6-ounce package orange gelatin
The star of the show! This adds a sweet, tangy flavor and a vibrant color to your salad. If you’re looking for an alternative, you can try using sugar-free gelatin for a lighter option. -
2 (3-ounce) packages vanilla cook and serve pudding mix
This gives the salad its creaminess. You can substitute with a sugar-free version if you’re aiming to cut down on sugar or use a different flavor like coconut for a fun twist. -
4 cups hot water
Needed to dissolve the gelatin and pudding mix properly. Make sure the water is hot, not boiling, to ensure everything combines smoothly. -
8 ounces Cool Whip
This fluffy topping brings everything together. You can easily swap this with homemade whipped cream if you’re feeling adventurous! -
16-ounce can mandarin oranges (drained)
These little gems add a fresh, fruity burst. If you can’t find canned, fresh mandarin oranges (or even peaches!) make a great alternative.
Step-by-Step Instructions
-
Dissolve the gelatin
Start by boiling 4 cups of water. In a large mixing bowl, pour in the 6-ounce package of orange gelatin. Once the water is hot, gradually pour it into the bowl, stirring continuously until the gelatin is fully dissolved. You’ll know it’s ready when the mixture is smoothly bright orange. Chef’s tip: using a whisk instead of a spoon can speed up this process! -
Add the pudding mix
Next, sprinkle in the 2 packages of vanilla cook and serve pudding mix. Stir well to combine, ensuring there are no lumps. The pudding will start to thicken as you mix. Pro tip: if it seems too thick, it’s okay to add a little more hot water. -
Cool the mixture
Allow your gelatin and pudding mixture to cool at room temperature for about 10 minutes. This step is important because you don’t want to melt the Cool Whip when you mix it in! Remember, patience is key here! -
Fold in the Cool Whip
After cooling, gently fold in the 8 ounces of Cool Whip until it’s evenly combined. This step adds that heavenly creaminess while keeping the mix light and airy. Be gentle—overmixing will deflate the beautiful texture you’ve created! -
Incorporate the oranges
Now, it’s time to add the star fruit! Carefully fold in the 16-ounce can of drained mandarin oranges. Take a moment to admire how the round golden pieces pop against the orange backdrop—it’s like sunshine in a bowl! Hint: reserve a few oranges for garnish later! -
Refrigerate
Transfer the mixture to a lovely serving dish or individual cups for a classy touch. Cover with plastic wrap and refrigerate for at least 4 hours or until it’s set. Chef’s note: overnight chilling is even better! Allergies? Make sure to check your canned fruits for any additives! -
Serve and enjoy
Once the salad is set and delightful, scoop it into bowls. You can garnish with a few extra mandarin oranges or even a sprig of mint for a pop of color. Grab your favorite spoon, and dive in! This is the best part—enjoying the fruits of your labor with friends and family is what it’s all about!
Serving Suggestions
When it comes to serving this Mandarin Orange Jello Salad, it’s all about presentation! Serve it in a glass bowl or individual dessert cups for a fun, party-ready feel. You can even add a drizzle of honey or sprinkle some chopped nuts on top for a little crunch. Pair it with a savory dish like grilled chicken or a fresh salad, and you have a winning combination perfect for any gathering!
Recipe Variations
Now, let’s spice things up a bit! Here are a few fun twists to this classic recipe:
-
Berry Bliss: Replace the mandarin oranges with a mix of fresh berries (strawberries, blueberries, and raspberries) for a tangy twist.
-
Tropical Paradise: Add crushed pineapple and a splash of coconut extract for an island-inspired version.
-
Nutty Delight: Fold in some chopped walnuts or pecans for added crunch and nuttiness.
-
Citrus Medley: Mix in some lemon or lime zest along with the oranges for an extra burst of zesty flavor.
-
Light and Fresh: Use Greek yogurt instead of some of the Cool Whip to make it even more nutritious while keeping that lovely creaminess!
Chef’s Notes
My journey with Mandarin Orange Jello Salad has certainly evolved over the years. I used to make it just like my grandmother did, but as my cooking skills grew, I started experimenting a bit—adding a hint of lime zest here, swapping in fresh fruit there.
One of my most memorable kitchen fails was when I decided to try a low-carb version using gelatin and cream cheese. Let’s just say, the texture wasn’t quite what I hoped for, and my family dubbed it "orange sludge." Lesson learned, right? Sometimes, sticking to tradition holds its own charm!
FAQs and Troubleshooting
1. Can I make this salad ahead of time?
Absolutely! In fact, it tastes even better the next day after the flavors have had time to meld together. Just cover it well and store it in the refrigerator.
2. What do I do if my Jello doesn’t set?
This can happen if the gelatin wasn’t fully dissolved or if the mixture didn’t cool adequately before adding the Cool Whip. Keep it in the fridge longer to see if it firms up.
3. Can I replace the Cool Whip?
Yes! You can whip heavy cream until soft peaks form and fold it in instead, but keep in mind that it may not be as sweet. Adjust sugar to taste if needed.
4. What’s the best way to store leftovers?
Keep any leftovers in an airtight container in the refrigerator for up to 3 days. Just be aware that the texture might change slightly, but it’ll still be delicious!
Nutritional Info
While I won’t get too bogged down in numbers, this refreshing salad is a delightful treat that’s perfect for special occasions without the guilt. It packs a punch of vitamins from the oranges and can easily be adjusted to fit various dietary needs!
I hope you are as excited to make this Mandarin Orange Jello Salad as I am to share it! It’s not just a recipe, but a way to celebrate the connections between food, family, and friends. Enjoy this light, refreshing dish with loved ones, and may it become a cherished favorite in your home just like it did in mine! Happy cooking! 🍊✨
PrintMandarin Orange Jello Salad
A vibrant, nostalgic salad featuring orange gelatin, creamy pudding, and mandarin oranges, all topped with Cool Whip.
- Prep Time: 15 minutes
- Cook Time: 0 minutes
- Total Time: 240 minutes
- Yield: 8 servings 1x
- Category: Dessert
- Method: Refrigeration
- Cuisine: American
- Diet: Vegetarian
Ingredients
- 1 (6-ounce) package orange gelatin
- 2 (3-ounce) packages vanilla cook and serve pudding mix
- 4 cups hot water
- 8 ounces Cool Whip
- 1 (16-ounce) can mandarin oranges (drained)
Instructions
- Dissolve the gelatin by boiling 4 cups of water and pouring it over the orange gelatin in a mixing bowl, stirring until fully dissolved.
- Add the pudding mix and stir well to combine, ensuring no lumps remain.
- Cool the mixture at room temperature for about 10 minutes.
- Fold in the Cool Whip gently until combined.
- Incorporate the drained mandarin oranges, folding them in carefully.
- Refrigerate for at least 4 hours or until set.
- Serve the salad in bowls, optionally garnishing with extra mandarin oranges or mint.
Notes
For variations, try adding fresh berries, crushed pineapple, or nuts for added crunch. Make ahead for best flavor.
Nutrition
- Serving Size: 1 serving
- Calories: 200
- Sugar: 25g
- Sodium: 150mg
- Fat: 6g
- Saturated Fat: 3g
- Unsaturated Fat: 3g
- Trans Fat: 0g
- Carbohydrates: 35g
- Fiber: 1g
- Protein: 2g
- Cholesterol: 10mg
Keywords: jello salad, orange salad, dessert, nostalgic recipes, family gatherings
No-Bake 4th of July Swirl Pie
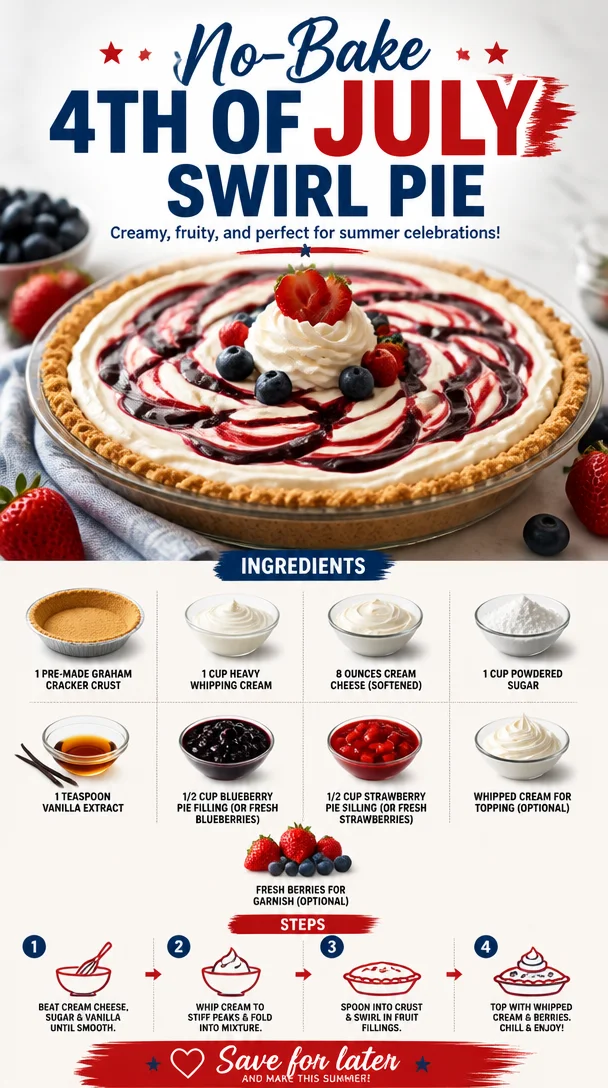
No-Bake 4th of July Swirl Pie: A Fresh, Festive Sweet Treat
Introduction
Hey there, fellow food enthusiasts! With Independence Day just around the corner, it’s time to kick off those summer celebrations with some absolutely delicious—and oh-so-festive—food! And what better way to sweeten up your celebrations than with a delightful No-Bake 4th of July Swirl Pie? This dessert is not only a breeze to whip up; it also proudly showcases the gorgeous red, white, and blue that we all know and love!
Imagine this: you’re lounging outside with friends, the smell of burgers sizzling on the grill wafting through the air, and laughter filling the yard. You bring out this show-stopping pie, and everyone’s eyes light up. The beauty of this No-Bake Swirl Pie is in its vibrant colors and creamy, dreamy texture—whether you’re watching fireworks or hosting a backyard BBQ, it’s guaranteed to steal the spotlight!
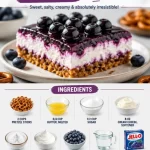
This pie combines a rich, creamy filling with sweet blueberry and strawberry swirls, all nestled in a crunchy graham cracker crust. Better yet, it requires no baking! Yes, you heard that right. With just a handful of ingredients and a little bit of love, you can create a celebratory dessert that everyone will adore.
As we dive into the flavors and techniques of this fun dessert, I’ll also sprinkle in some stories, tips, and tricks from my own kitchen. So, roll up those sleeves, and let’s create a No-Bake 4th of July Swirl Pie that’s sure to be the highlight of your festive gathering!
Personal Story
Oh, how I cherish the summertime memories of my childhood! One beautiful July 4th, my family decided to host a backyard party that brought together friends, neighbors, and an impressive array of dishes. While there were classic BBQ favorites on the grill—juicy burgers, smoky ribs, and grilled corn—I can still vividly recall the star of the dessert table: a colorful pie that my mom lovingly prepared. I remember the excitement as she swirled the vibrant strawberry and blueberry fillings into the creamy base.
As a kid, I didn’t fully appreciate the culinary artistry that went into that dessert, but I sure knew how much I loved the flavors! With each bite, the freshness of the berries paired with the sweetness of the cream cheese filling transported me to a happy place. That pie became a staple of our 4th of July celebrations, an annual tradition that made the day feel extra special.
Fast forward to today, and I’m excited to share my take on this nostalgic dessert with all of you. My No-Bake 4th of July Swirl Pie captures all those flavors and memories while making it easy for anyone to create their own sweet traditions. You’ll be amazed at how simple and satisfying it is to bring this slice of happiness to your own holiday gatherings!
Ingredients
Let’s gather our ingredients for this delightful No-Bake 4th of July Swirl Pie. Here’s what you’ll need:
-
1 pre-made graham cracker crust: You can use store-bought for convenience or make your own at home if you’re feeling adventurous! A homemade crust will elevate the flavor, but either option works beautifully.
-
1 cup heavy whipping cream (for whipping): The heavy cream is key for creating a light, fluffy texture. If you want a lighter option, you can swap half of the heavy cream with Greek yogurt for a tangy twist.
-
8 ounces cream cheese (softened): Softened cream cheese provides rich creaminess. Make sure it’s at room temperature for easy mixing; otherwise, you’ll end up with lumps. An alternative could be using mascarpone cheese for an upscale touch!
-
1 cup powdered sugar: This sweetens the filling and gives it that melt-in-your-mouth quality. If you prefer a less sweet version, feel free to adjust the sugar to taste.
-
1 teaspoon vanilla extract: Vanilla adds a warm, aromatic touch to the filling that balances out the sweetness. Don’t skip it!
-
1/2 cup blueberry pie filling (or fresh blueberries): If using filling, opt for a high-quality brand for the best flavor. Fresh blueberries are a great alternative, adding a delightful pop of freshness!
-
1/2 cup strawberry pie filling (or fresh strawberries): As with the blueberries, feel free to use your favorite brand of filling or, if in season, fresh strawberries for an extra natural sweetness.
-
Whipped cream for topping (optional): Because who doesn’t love a little extra whipped cream? You can make it from scratch using heavy cream or use store-bought.
-
Fresh berries for garnish (optional): Not only does this make the pie look stunning, but it also adds extra fruity flair!
Step-by-Step Instructions
Now that we have our gorgeous array of ingredients laid out, let’s get started on making this incredible No-Bake 4th of July Swirl Pie! Follow these simple steps:
-
Prepare your crust: If you’re using a store-bought graham cracker crust, go ahead and take it out of the packaging. If you’re making your own (which I highly recommend for that homemade touch) combine crushed graham crackers with melted butter and a little sugar to bind it, then press it firmly into a pie dish. Allow it to chill in the fridge while you make the filling. This step is crucial as it helps the crust set properly.
-
Whip that cream: In a large mixing bowl, pour in 1 cup of heavy whipping cream. Using a hand mixer or a stand mixer on medium to high speed, whip the cream until soft peaks form—this usually takes about 3-4 minutes. Keeping the bowl chilled beforehand can help the cream whip up faster. Once ready, set it aside. This step builds the light, airy texture that we’re aiming for!
-
Mix the cream cheese: In another mixing bowl, add the softened cream cheese. Beat it with a mixer until it’s completely smooth and creamy—about 2 minutes. Make sure there are no lumps, as they will carry over to the filling.
-
Sweeten the filling: Gradually add the powdered sugar and vanilla extract to the cream cheese, beating well until everything is thoroughly incorporated. You should have a lovely, creamy mixture at this point!
-
Fold in the whipped cream: Now, gently fold in your whipped cream into the cream cheese mixture. Be cautious not to deflate the whipped cream; use a spatula to incorporate it until you see no more streaks. This gives you that heavenly, fluffy filling we’re after!
-
Create the pie layers: Pour half of the creamy filling into the prepared graham cracker crust and spread it evenly across the bottom. Now, you’ll want to drop spoonfuls of blueberry pie filling (or fresh blueberries) and strawberry pie filling (or fresh strawberries) onto the filling. Use a knife or a skewer to gently swirl them in without fully mixing, creating that beautiful, marbled effect on top.
-
Add the remaining filling: Pour the rest of the cream filling over the top, smoothing it out carefully. You can add a few more dollops of the berry fillings and swirl again! The goal is to create an eye-catching swirl that will wow your guests.
-
Chill out: Cover the pie with plastic wrap and place it in the refrigerator for at least 4 hours or overnight to set. This waiting period is key for the flavors to meld beautifully.
-
Garnish and serve: Once ready to serve, top the pie with a generous dollop of whipped cream, and scatter some fresh berries on top for a vibrant finish. Trust me, everyone will be clamoring for a slice!
Serving Suggestions
To make your No-Bake 4th of July Swirl Pie shine, serve it chilled straight from the fridge. A bright, sunny plate is always ideal to showcase those festive colors. If you want to be extra fancy, you can layer additional fresh berries around the pie, creating a beautiful border as a salute to summer. And if you’re feeling fun, slice the pie into wedges, and use a small flag or toothpick decor to play up that Independence Day spirit!
Recipe Variations
Now that you’ve mastered the classic version, why not try some fun twists on this No-Bake Pie? Here are a few ideas:
-
Chocolate Lover’s Dream: Swap the graham cracker crust for an Oreo crust, and add a layer of chocolate pudding between the cream cheese filling and the fruit.
-
Tropical Twist: Swap out strawberries and blueberries for fresh mango and pineapple. Add a hint of coconut extract to your filling for a tropical vibe.
-
Nutty Crunch: Add chopped nuts like pecans or walnuts into the crust for a delightful crunch or sprinkle them atop the whipped cream before serving.
-
Dairy-Free Version: Use coconut cream instead of heavy whipping cream and cashew cream in place of cream cheese for a tasty dairy-free alternative.
Chef’s Notes
This No-Bake 4th of July Swirl Pie has certainly evolved over the years from my family’s original recipe. While it used to be a bit daunting, I’ve simplified it down to its most delightful components—one that maintains that irresistible flavor but with much less fuss! One funny memory that comes to mind is when my cousin attempted to add even more fruit on top without consideration for proportionality. Let’s just say, we ended up having to sample a lot of “delicious mistakes” that day! But hey, as I always say, sometimes the best recipes come from the creative moments in the kitchen.
FAQs and Troubleshooting
Q: Can I make this pie ahead of time?
Absolutely! This pie is perfect for prepping a day in advance. Just keep it wrapped tightly in the fridge to ensure freshness.
Q: What if my filling isn’t firm enough?
If you find your filling isn’t setting properly, it could be due to over-adding the whipped cream or under-whipping it. Always aim for those soft peaks and fold gently into your cream cheese mixture.
Q: How do I store leftovers?
You can keep leftover pie tightly covered in the refrigerator for up to 3 days. Just be warned, it might not last that long—it’s that good!
Q: Is there a gluten-free option for the crust?
Absolutely! Simply use gluten-free graham crackers or a nut-based crust for a delicious alternative.
Nutritional Info
This festive pie offers a balance of sweetness and creaminess while being relatively light compared to traditional baked pies. Each slice provides a satisfying treat for your cravings while still allowing you to indulge guilt-free.
So there you have it—your guide to creating a stunning No-Bake 4th of July Swirl Pie! With fresh flavors and a no-fuss method, this dessert will surely be a highlight of your summer celebrations. Embrace the joy of cooking, enjoy the beautiful moments with friends and family, and keep the kitchen filled with laughter and love! Happy Independence Day, and happy eating!
PrintNo-Bake 4th of July Swirl Pie
A festive and delicious no-bake pie featuring creamy swirls of blueberry and strawberry in a graham cracker crust, perfect for summer celebrations.
- Prep Time: 15 minutes
- Cook Time: 0 minutes
- Total Time: 240 minutes
- Yield: 8 servings 1x
- Category: Dessert
- Method: No-Bake
- Cuisine: American
- Diet: Vegetarian
Ingredients
- 1 pre-made graham cracker crust
- 1 cup heavy whipping cream
- 8 ounces cream cheese (softened)
- 1 cup powdered sugar
- 1 teaspoon vanilla extract
- 1/2 cup blueberry pie filling (or fresh blueberries)
- 1/2 cup strawberry pie filling (or fresh strawberries)
- Whipped cream for topping (optional)
- Fresh berries for garnish (optional)
Instructions
- Prepare your crust: If you’re using a store-bought graham cracker crust, take it out of the packaging. If making your own, combine crushed graham crackers with melted butter and a little sugar, then press into a pie dish and chill.
- Whip that cream: In a large bowl, pour in 1 cup of heavy whipping cream and whip until soft peaks form, about 3-4 minutes.
- Mix the cream cheese: In another mixing bowl, beat softened cream cheese until smooth, about 2 minutes.
- Sweeten the filling: Gradually add powdered sugar and vanilla to cream cheese, mixing until combined.
- Fold in the whipped cream: Gently fold the whipped cream into the cream cheese mixture until no streaks remain.
- Create the pie layers: Pour half of the filling into the crust, then drop spoonfuls of blueberry and strawberry fillings and gently swirl them in.
- Add the remaining filling and swirl more if desired.
- Chill the pie: Cover and refrigerate for at least 4 hours or overnight to set.
- Garnish and serve: Top with whipped cream and fresh berries before serving.
Notes
This pie can be made a day ahead and stored in the fridge. For gluten-free options, use gluten-free graham crackers or a nut-based crust.
Nutrition
- Serving Size: 1 slice
- Calories: 280
- Sugar: 24g
- Sodium: 150mg
- Fat: 18g
- Saturated Fat: 10g
- Unsaturated Fat: 6g
- Trans Fat: 0g
- Carbohydrates: 32g
- Fiber: 1g
- Protein: 3g
- Cholesterol: 40mg
Keywords: no-bake pie, 4th of July dessert, summer dessert, festive pie
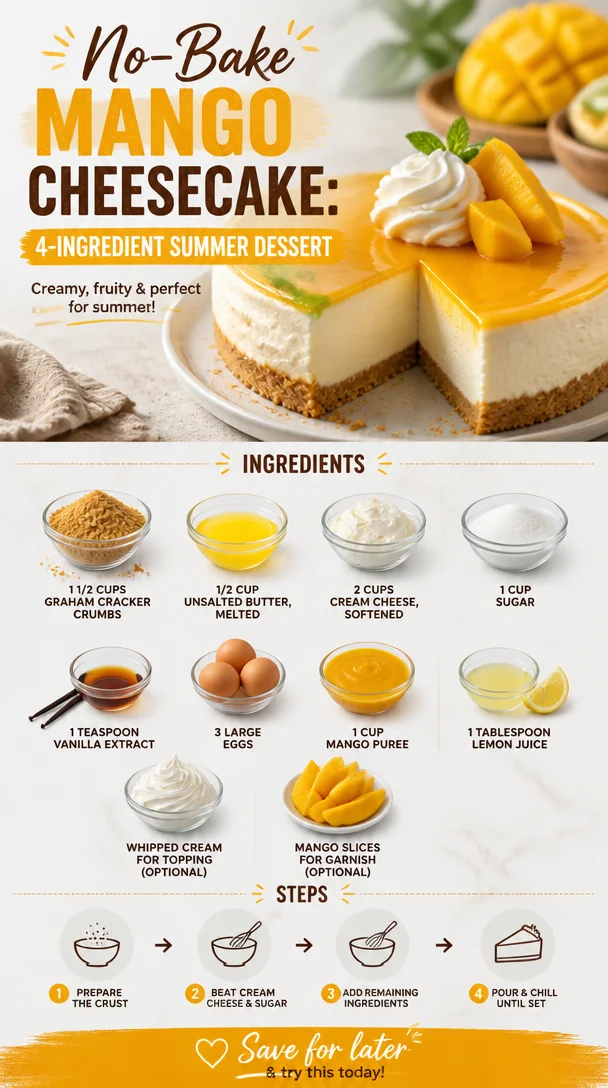
No-Bake Mango Cheesecake: 4-Ingredient Summer Dessert
Indulge in Paradise: Your Ultimate Mango Cheesecake Recipe
Welcome to the tropical oasis of flavor that is Mango Cheesecake! With its creamy texture, vibrant mango flavor, and a buttery graham cracker crust, this dessert takes you straight to a sun-kissed beach with every delightful bite. I’m Ava Carter, your kitchen companion on this delicious journey, and I’m excited to share my recipe that celebrates the incredible taste of mango while keeping things light and refreshing.
If you’re like me, you believe that dessert can be satisfying and still feel great—especially when it features fresh, juicy mangoes. Whether it’s a sunny afternoon or a cozy evening with friends, this Mango Cheesecake will fit right in, offering a sweet, tangy escape anyone can enjoy.
Now, let’s dive into this unforgettable recipe—trust me, your taste buds are in for a treat!
A Sweet Slice of Nostalgia
Every bite of this Mango Cheesecake takes me back to my childhood days spent in my grandmother’s kitchen. She was the queen of desserts, and her love for fresh fruits was infectious. One summer, while visiting her in a small coastal town, we discovered a local mango festival. It was magic—mango ice creams, smoothies, salsas, and yes, the most divine mango cheesecake I had ever tasted.
That dessert was rich yet light, with a perfect blend of sweet and tart, just like a summer day. Inspired by this memory, I decided to create my own version that retains that same spirit but with a lighter twist. So let’s roll up our sleeves and get ready to whip up a Mango Cheesecake that carries the joy of those sunny afternoons right into your home!
Ingredients
Here’s what you’ll need for this tropical delight:
-
1 1/2 cups graham cracker crumbs
The base of our cheesecake, providing a sweet crunch. If you’re gluten-free, consider using gluten-free graham crackers or even crushed almonds! -
1/2 cup unsalted butter, melted
This binds the crumbs together and adds richness. You can substitute coconut oil for a tropical twist! -
2 cups cream cheese, softened
The star of the cheesecake! Ensure it’s at room temperature for smooth mixing. For a lighter option, try using Greek yogurt. -
1 cup sugar
Adds sweetness; you can swap this for coconut sugar or a sugar substitute if you’re looking to cut down on sweetness. -
1 teaspoon vanilla extract
Enhances the flavor profile; consider using pure vanilla for the best results. -
3 large eggs
These will provide stability and richness to the cheesecake. For a vegan version, use flax eggs or aquafaba. -
1 cup mango puree
The hero ingredient; fresh or canned works well! If using canned, opt for those without added sugar. -
1 tablespoon lemon juice
Brightens up the flavors—don’t skip it! If you have limes, they can work just as well. -
Whipped cream for topping (optional)
A fluffy addition; try flavored whipped cream for extra pizzazz! -
Mango slices for garnish (optional)
These add a beautiful finish and a burst of freshness.
Step-by-Step Instructions
Ready to get started? Let’s turn that vibrant vision into a reality!
-
Preheat the Oven: Begin by preheating your oven to 325°F (163°C). This ensures that your cheesecake bakes evenly, resulting in a silky texture.
-
Prepare the Crust: In a medium bowl, combine the graham cracker crumbs and melted butter. Mix until fully coated. This mixture should resemble wet sand. Press it firmly into the bottom of a 9-inch springform pan. A flat-bottomed glass or measuring cup can help you achieve a nice, even layer. Bake for 10 minutes and then let it cool, allowing the crust to firm up.
-
Make the Cheesecake Filling: In a large mixing bowl, blend the cream cheese and sugar using an electric mixer. Start on low speed to avoid splattering (trust me on this one!). Gradually increase to medium speed until it’s smooth and creamy, around 2 minutes.
-
Add Vanilla and Eggs: Mix in the vanilla extract. Then, one at a time, add the eggs, blending well after each addition. Make sure to scrape down the sides of the bowl to ensure everything is well combined.
-
Incorporate Mango and Lemon Juice: Add the mango puree and lemon juice to the bowl. Blend until your mixture is smooth and vibrant (the color is pure sunshine!). Give it a taste; if you need a little more sweetness, feel free to sprinkle in some extra sugar.
-
Pour and Bake: Pour the cheesecake mixture over the cooled crust, smoothing the top with a spatula. Bake in the preheated oven for 55-60 minutes. The edges should be set, but the center might still be a little wobbly—it will firm up as it cools!
-
Cool Down: Once baked, turn off the oven and crack the door open slightly. Let the cheesecake cool in the oven for an hour. This helps prevent cracks. Afterward, refrigerate for at least four hours—overnight is best for the flavors to develop.
-
Serve It Up: Before serving, top with whipped cream and decorate with fresh mango slices. Slice with a hot, wet knife to get clean edges.
Serving Suggestions
When it’s time to serve, cut the Mango Cheesecake into generous slices and place them on colorful dessert plates. A dollop of whipped cream on top adds a playful touch, and the bright mango slices provide that final pop of color. Pair it with a refreshing glass of iced tea or a fruity cocktail for a delightful dessert experience!
Recipe Variations
Feeling like mixing things up? Here are a few fun twists you can explore:
- Coconut Mango Cheesecake: Add shredded coconut into the crust for an added tropical crunch. You can even replace some cream cheese with coconut cream.
- Chocolate Rock: Drizzle melted dark chocolate on top of your mango cheesecake for a rich contrast.
- Spicy Kick: Incorporate a pinch of cayenne or chili powder into the crust for a surprising heat that enhances the mango flavor.
- Berry Fusion: Layer some mixed berries on the cheesecake before serving for a colorful and tangy contrast.
- Savory Twist: Try adding a touch of fresh basil or mint into the mango puree for a unique herbal edge.
Chef’s Notes
I have to admit, this Mango Cheesecake recipe has evolved over the years. I initially struggled to achieve that creamy texture without it feeling too heavy. I experimented with various creams and fruits, and each trial made me fall in love with mango even more. A good friend of mine, who is a tropical fruit enthusiast, once challenged me to make a cheesecake without feeling guilty about indulging. That sparked my journey to create this delightfully satisfying dessert. Every time I make it, I feel a rush of gratitude for the fresh ingredients and the memories they evoke.
FAQs and Troubleshooting
-
Why did my cheesecake crack?
Cracking can happen if the filling is overbeaten, or if it cools down too quickly. Be gentle when mixing, and ensure to cool it gradually in the oven. -
Can I use frozen mango?
Absolutely! Just thaw and drain excess moisture before pureeing. Fresh mango will give you the best flavor, but frozen works in a pinch. -
How do I prevent the crust from getting soggy?
Bake the crust for 10 minutes before adding the filling. Also, be sure not to oversaturate it with the filling. -
How should I store leftovers?
Keep this cheesecake covered and refrigerated; it should stay fresh for 5-7 days. You can also freeze it for longer storage—just wrap it tightly!
Nutritional Info
While I believe in enjoying desserts without stressing too much about calories, it’s always good to have an idea of what you’re indulging in. Each slice of this Mango Cheesecake is approximately 300 calories. But remember, it’s packed with goodness courtesy of those bright, fresh mangoes!
So there you have it—a dessert that’s not just a treat, but also a heartwarming experience. I hope you find joy in making this Mango Cheesecake as much as I do. Sharing it with friends or family brings back the essence of those summer days, and trust me, your loved ones will adore it. Happy baking!
PrintMango Cheesecake
A creamy and vibrant Mango Cheesecake with a buttery graham cracker crust, transporting you to a tropical paradise with every bite.
- Prep Time: 20 minutes
- Cook Time: 60 minutes
- Total Time: 80 minutes
- Yield: 8 servings 1x
- Category: Dessert
- Method: Baking
- Cuisine: Fusion
- Diet: Vegetarian
Ingredients
- 1 1/2 cups graham cracker crumbs
- 1/2 cup unsalted butter, melted
- 2 cups cream cheese, softened
- 1 cup sugar
- 1 teaspoon vanilla extract
- 3 large eggs
- 1 cup mango puree
- 1 tablespoon lemon juice
- Whipped cream for topping (optional)
- Mango slices for garnish (optional)
Instructions
- Preheat the oven to 325°F (163°C).
- Prepare the crust by combining the graham cracker crumbs and melted butter, then press into a 9-inch springform pan. Bake for 10 minutes and let cool.
- Make the cheesecake filling by blending cream cheese and sugar until smooth, about 2 minutes.
- Add vanilla extract and eggs one at a time, blending well after each addition.
- Incorporate mango puree and lemon juice until the mixture is smooth.
- Pour the cheesecake mixture over the cooled crust and bake for 55-60 minutes.
- Cool the cheesecake in the oven for an hour, then refrigerate for at least four hours.
- Serve topped with whipped cream and fresh mango slices.
Notes
For a lighter option, consider using Greek yogurt instead of cream cheese. You can also replace sugar with coconut sugar or a substitute if desired.
Nutrition
- Serving Size: 1 slice
- Calories: 300
- Sugar: 20g
- Sodium: 250mg
- Fat: 18g
- Saturated Fat: 10g
- Unsaturated Fat: 7g
- Trans Fat: 0g
- Carbohydrates: 34g
- Fiber: 1g
- Protein: 4g
- Cholesterol: 90mg
Keywords: mango cheesecake, dessert, tropical dessert, creamy cheesecake, summer dessert
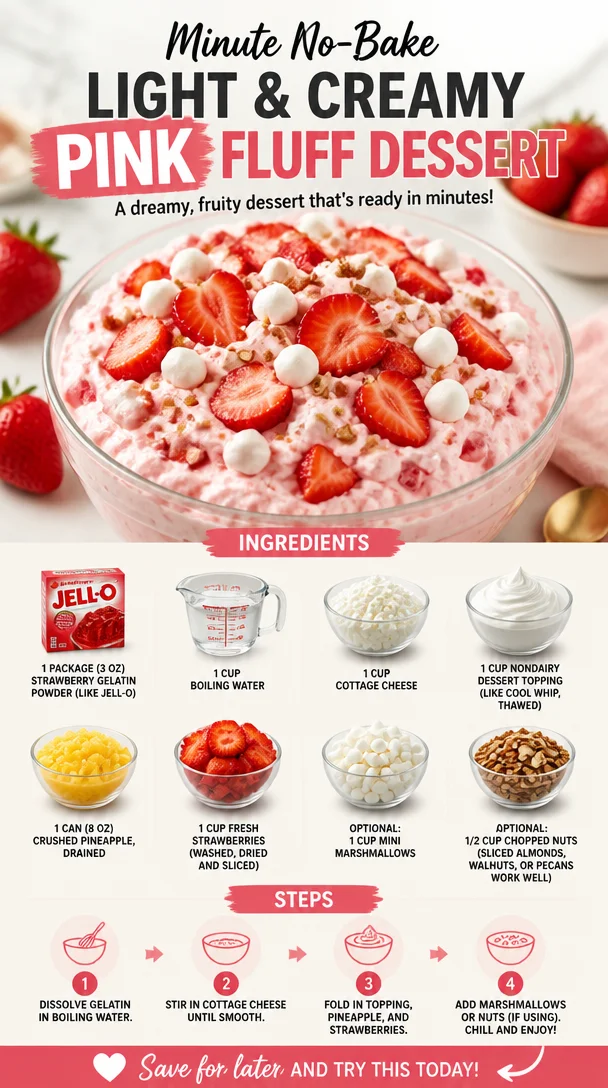
Minute No-Bake Light and Creamy Pink Fluff Dessert
Light and Creamy Pink Fluff Recipe: A Nostalgic Delight
Introduction
Hey there, fellow food enthusiasts! Welcome back to Clean Plate Cravings, where we’re diving headfirst into the delightfully whimsical world of desserts with my favorite Light and Creamy Pink Fluff recipe. This dish always takes me back to my childhood, where every gathering, picnic, and BBQ felt more vibrant and festive with this sweet, fluffy delight gracing the table. As summer approaches, this retro dish makes a perfect statement—a dessert that feels light, refreshing, and oh-so-delicious!
If you’ve never tried Pink Fluff, let me paint you a picture. Imagine fluffy clouds of sweetness, bursts of juicy strawberries, and a creamy texture that dances on your taste buds. This is not just a dish; it’s a memory-maker! Whether you serve it as a side at a potluck or as a light dessert, it radiates happiness. Plus, it’s simple to throw together, making it a fantastic choice for busy weekdays or relaxed weekends.
What I love most about Pink Fluff is how versatile it is. You can whip it up in less than 30 minutes, and it requires no advanced culinary skills—perfect for chefs of all levels! Plus, its vibrant pink hue adds a splash of color to any table setting, giving your meal an extra festive touch.
Ready to create some delicious nostalgia? Grab your mixing bowls and let’s dive into this recipe, sharing kitchen stories and tips along the way. You’ll be sharing your own memories of this delightful dish in no time!
Personal Story
I can clearly recall the first time I experienced Pink Fluff—it was at my Aunt Millie’s annual summer barbecue. The scent of grilled burgers and fresh corn filled the air as family and friends gathered in the backyard, laughter echoing against the sun-soaked sky. And there it was—a large, fluffy bowl shimmering like a pink cloud amidst the spread of savory dishes.
As a kid, it felt like a treasure waitin’ to be uncovered. Once Aunt Millie called everyone to dig in, my cousins and I dove into it, loving how the tiny marshmallows popped in our mouths while the pineapple added a slight tang. Each bite seemed to burst with sweetness and summer vibes, making it an instant favorite.
Years later, I found myself flipping through my grandma’s recipe book, discovering that Aunt Millie had passed down her Pink Fluff recipe. A wave of nostalgia washed over me as I got ready to recreate this family classic. Now, each time I make it, it’s a wonderful reminder of those carefree days spent laughing with family, while also setting the stage for new memories to be made. Let’s create this delicious dish together!
Ingredients
-
1 package (3 oz) strawberry gelatin powder (like Jell-O): The star of the show! This powder gives Pink Fluff its vibrant color and sweet flavor. If you’re in the mood for something different, feel free to experiment with other fruity flavors like raspberry or peach!
-
1 cup boiling water: Used to dissolve the gelatin powder. You can boil water in a kettle or on the stovetop—just ensure it’s good and hot to make the gelatin dissolve perfectly!
-
1 cup cottage cheese: This adds a lovely creaminess and protein boost to the dish. If you’re looking for a less tangy option, you could swap it for Greek yogurt or even a vegan cream cheese.
-
1 cup nondairy dessert topping (like Cool Whip, thawed): This gives our Pink Fluff a fluffy texture. No dairy? No worries! There are great coconut or almond whipped toppings available that work just as well.
-
1 can (8 oz) crushed pineapple, drained: The pineapple lends a fantastic tropical twist and juicy texture. If fresh pineapple is in season, go ahead and use that instead for an even fresher taste!
-
1 cup fresh strawberries (washed, dried, and sliced): Strawberries are a must for their sweetness and flavor. You could also use blueberries, raspberries, or even a mix of berries if you’re feeling adventurous!
-
Optional: 1 cup mini marshmallows or 1/2 cup chopped nuts (like sliced almonds, walnuts, or pecans): These are great for added texture and sweetness—mini marshmallows are perfect for that nostalgic touch. If you prefer a nuttier version, the chopped nuts add a delightful crunch.
Step-by-Step Instructions
-
Prepare the Gelatin: In a mixing bowl, combine the strawberry gelatin powder with the boiling water. Give it a good stir until it’s fully dissolved—about 2 minutes. Make sure there are no clumps! This is the foundation of our Pink Fluff.
-
Chill the Mixture: Once the gelatin is dissolved, let it cool down for about 10-15 minutes. This helps to thicken it up a bit before we add the creamy components. It’s like letting a movie build up anticipation before the big reveal!
-
Mix in the Cottage Cheese: Once the gelatin has cooled, fold in the cottage cheese gently. Don’t whisk it aggressively, as you want to maintain a fluffy texture. This is where the creaminess starts to shine through, making it both luscious and comforting!
-
Add the Whipped Topping: Now, fold in the thawed nondairy dessert topping. This step will lighten up the mixture and bind everything in fluffy harmony. Take your time here to ensure it’s well incorporated, giving the final dish a light fluffiness.
-
Incorporate the Pineapple and Strawberries: Drain any excess juice from the crushed pineapple before folding it into the mixture along with the fresh strawberries. The fruity freshness brings a delightful counterbalance to the sweetness. Mmm, just picture that color popping!
-
Optionally Add Marshmallows and Nuts: If you’re using marshmallows or nuts, this is the time to gently fold them in. The marshmallows provide a nostalgic feel, while nuts add crunch—choose whichever vibe you’re feeling that day.
-
Set it in the Fridge: Pour the mixture into a serving bowl or individual cups, and cover with plastic wrap. Pop it in the refrigerator for at least 2 hours, or until it’s set. Try to resist the urge to sneak a taste—you want the full experience!
-
Serve and Enjoy: Once it’s set, scoop it into bowls or serve it directly from the dish. Top with extra fresh strawberries if you like, and get ready to bask in the smiles this dessert will bring.
Serving Suggestions
To serve your Light and Creamy Pink Fluff, you can scoop it into individual dessert cups for a fun presentation at a gathering or serve it from a large bowl for a more laid-back vibe. A sprig of mint makes a beautiful garnish, and don’t hesitate to sprinkle a few extra mini marshmallows on top for that whimsical touch. Trust me, this dish is as much about the presentation as it is about the flavor!
Recipe Variations
-
Berry Blast: Swap out the strawberries for mixed berries like blueberries, raspberries, and blackberries. This gives a lovely color contrast and a burst of flavors!
-
Tropical Twist: Replace the strawberries with diced mango and add shredded coconut for a tropical vibe. You could even use coconut-flavored whipped topping!
-
Nutty Delight: Add a cup of chopped nuts like pecans or walnuts, which adds a nice crunch and flavor depth. Just make sure to keep an eye on those allergies!
-
Vegan Version: Use vegan whipped topping and a dairy-free cottage cheese alternative (tofu works well) to make this dish entirely plant-based without sacrificing taste.
Chef’s Notes
As I think back on my culinary journey, it’s incredible to see how classic recipes like Pink Fluff can withstand the test of time! My version has slightly evolved over the years—sometimes I switch up the gelatin flavors or add different fruits based on the season. I even had a phase where I experimented with adding a splash of lime juice for a zesty twist!
The memories that accompany this dessert never fade, and it’s a joy to share this recipe with you so you can create your own memories. After all, sweet dishes like this carry laughter, love, and warmth that fuels our lives. So whether it’s a family barbecue, a cozy night in, or something special for a friend, Pink Fluff always has a place in my heart and kitchen.
FAQs and Troubleshooting
1. Can I make Pink Fluff ahead of time?
Absolutely! Pink Fluff is great when made a day in advance. Just make sure to store it in an airtight container in the fridge to keep it fresh.
2. What if my gelatin won’t dissolve?
Make sure the water is at a rolling boil before adding it to the gelatin. If clumps persist, you may need to stir it longer or reheat it slightly.
3. My Pink Fluff seems too runny—what went wrong?
If you’re facing a runny consistency, it may be that the gelatin didn’t fully set or that it was too warm when combined with the toppings. Ensure the gelatin is completely cooled and has been in the fridge for long enough to solidify.
4. How can I store leftovers?
To store any leftovers, simply cover the bowl tightly with plastic wrap or transfer it to an airtight container. It generally lasts up to three to four days in the refrigerator.
Nutritional Info
While specific values can vary based on ingredient brands and measurements, a typical serving of this Pink Fluff (about 1/2 cup) contains roughly:
- Calories: 90
- Protein: 2g
- Fat: 3g
- Carbohydrates: 15g
- Fiber: 1g
Enjoy finding your own culinary happy place with this delightful Light and Creamy Pink Fluff recipe! Whether it evokes nostalgia or inspires new memories, it’s sure to be a hit in your kitchen. Happy cooking, friends!
PrintLight and Creamy Pink Fluff

A nostalgic dessert featuring fluffy clouds of sweetness, juicy strawberries, and a creamy texture.
- Prep Time: 15 minutes
- Cook Time: 0 minutes
- Total Time: 135 minutes
- Yield: 8 servings 1x
- Category: Dessert
- Method: No Cook
- Cuisine: American
- Diet: Vegetarian
Ingredients
- 1 package (3 oz) strawberry gelatin powder
- 1 cup boiling water
- 1 cup cottage cheese
- 1 cup nondairy dessert topping (like Cool Whip, thawed)
- 1 can (8 oz) crushed pineapple, drained
- 1 cup fresh strawberries, sliced
- Optional: 1 cup mini marshmallows or 1/2 cup chopped nuts
Instructions
- Prepare the Gelatin: In a mixing bowl, combine the strawberry gelatin powder with the boiling water. Stir until fully dissolved, about 2 minutes.
- Chill the Mixture: Let it cool down for about 10-15 minutes.
- Mix in the Cottage Cheese: Fold in the cottage cheese gently to maintain a fluffy texture.
- Add the Whipped Topping: Fold in the thawed nondairy dessert topping until well incorporated.
- Incorporate the Pineapple and Strawberries: Fold in the drained crushed pineapple and fresh strawberries.
- Optionally Add Marshmallows and Nuts: Fold in mini marshmallows or nuts if using.
- Set it in the Fridge: Pour the mixture into a serving bowl, cover, and refrigerate for at least 2 hours.
- Serve and Enjoy: Serve in bowls and enjoy the smiles!
Notes
For a fun presentation, scoop into individual dessert cups, and garnish with mint or extra marshmallows.
Nutrition
- Serving Size: 1/2 cup
- Calories: 90
- Sugar: 10g
- Sodium: 120mg
- Fat: 3g
- Saturated Fat: 1g
- Unsaturated Fat: 2g
- Trans Fat: 0g
- Carbohydrates: 15g
- Fiber: 1g
- Protein: 2g
- Cholesterol: 5mg
Keywords: pink fluff, dessert, summer recipe, nostalgia, easy dessert
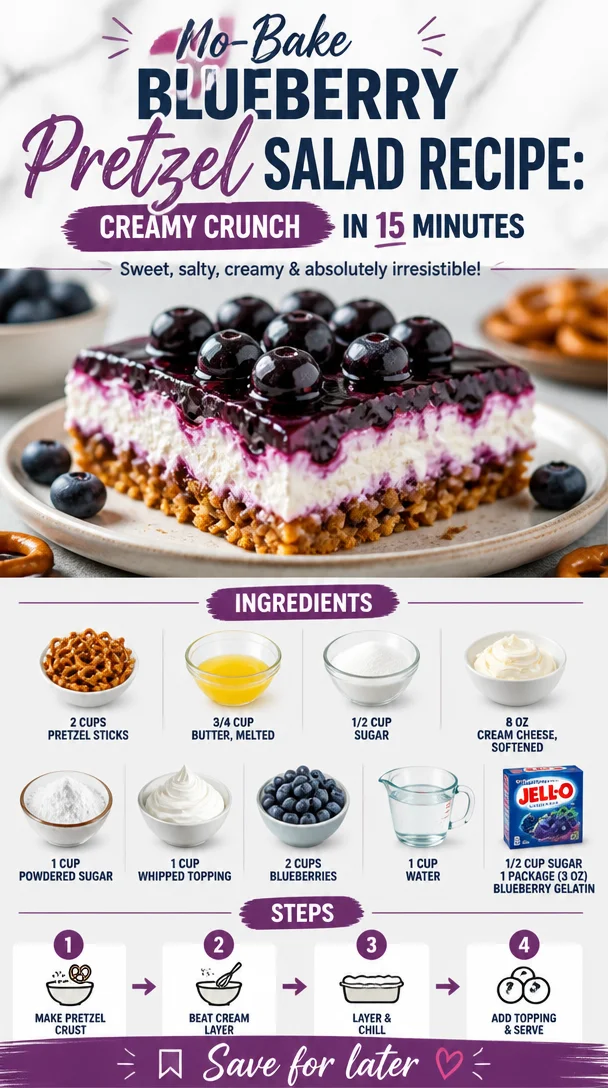
No-Bake Blueberry Pretzel Salad Recipe: Creamy Crunch in 15 Minutes
Blueberry Pretzel Salad: A Cool Summer Treat!
Welcome to my kitchen, where we’re diving into a classic dessert that plays a sweet symphony on your taste buds while bringing a wave of nostalgia: Blueberry Pretzel Salad! Now, this isn’t your ordinary salad filled with leafy greens—oh no! This is a delightful blend of sweet, salty, and creamy goodness that feels like a celebration in a bowl. Whether you serve it at a summer picnic, a holiday gathering, or simply as a refreshing treat at home, this dessert salad is bound to leave everyone smiling and craving more.
Picture this: It’s a warm summer day, and the sun is shining. The air is filled with the laughter of friends and family, and you’re seated at a long table adorned with a colorful spread of delicious food. In the center, there’s a bowl of that beautiful blueberry pretzel salad—the eye-catching layers of salty pretzels, creamy filling, and vibrant blueberries beckoning everyone to dig in. This dish isn’t just about flavor; it’s encapsulated with memories, love, and moments shared around the table.
This delightful dessert is so easy to make, you’ll wonder why you didn’t whip it up sooner! Not only does it tantalize your taste buds, but it also brings a sense of joy and nostalgia that keeps you coming back for more. Are you ready to create your own Blueberry Pretzel Salad that will be the star of your next gathering? Let’s roll up our sleeves and get into the kitchen—trust me, it’s going to be a delicious journey!
A Taste of Nostalgia
Growing up, summer gatherings with my family were always a treat, but the highlight was undoubtedly my grandma’s famous Blueberry Pretzel Salad. Every time she’d make it, the aroma of melted butter combined with the crunch of salty pretzels filled the room, setting the stage for something truly special. I remember standing on tiptoes, peeking into the fridge, eagerly waiting for our after-meal dessert.
With each bite of that sweet and creamy salad, I was transported to a world where everything felt light and joyful. The crunch of the pretzels perfectly balanced the velvety cream cheese mixture, and the blueberries provided a burst of flavor that was always refreshing. It wasn’t just a dessert; it was a family tradition that united us, sparking laughter and stories as we savored every last bite.
To this day, I love recreating that same dish, evoking those cherished memories while adding my own twist. It’s amazing how food has this magical ability to transport us back in time, don’t you think? So grab your apron and let’s make some new memories around this timeless dessert!
Ingredients
Here’s what you’ll need to whip up your very own Blueberry Pretzel Salad. Each component brings something special to this dish!
-
2 cups pretzel sticks
These provide that delicious salty crunch! You can substitute with gluten-free pretzels if you need a gluten-free option. -
3/4 cup butter, melted
This forms the base for our pretzel crust and adds richness. If you’re looking for a healthier option, you can try coconut oil for a tropical twist. -
1/2 cup sugar
Sugar balances the saltiness of the pretzels and enhances the flavors of our cream cheese filling. You can swap it with maple syrup or agave nectar for a more natural sweetener. -
8 oz cream cheese, softened
This creamy base is what makes our salad luscious and decadent. Neufchâtel cheese is a great lower-fat substitute! -
1 cup powdered sugar
For that smooth sweetness! If you want a grain-free alternative, powdered erythritol will work too. -
1 cup whipped topping
This adds a light and airy texture. If you prefer a homemade touch, use freshly whipped cream instead! -
2 cups blueberries
Fresh or frozen—both work wonderfully. Swap with raspberries or strawberries for a unique flavor twist. -
1 cup water
This will be used to dissolve our gelatin. -
1/2 cup sugar
Another layer of sweetness for the blueberry layer! Same sweetener options apply here. -
1 package (3 oz) blueberry gelatin
This packs a punch of blueberry flavor, giving our salad its beautiful color and sweetness. If you’d like to avoid artificial sweeteners, look for natural gelatin options.
Step-by-Step Instructions
Ready to create this beautiful Blueberry Pretzel Salad? Here’s how to bring it all together!
-
Preheat your oven to 350°F (175°C).
Preheating is essential for an even bake, so don’t skip this step! -
Crush the pretzel sticks.
Place the pretzel sticks in a large zip-top bag and crush them gently with a rolling pin or meat mallet. You want a mixture of large and small pieces for texture. Trust me, the crunch will be amazing! -
Combine pretzels and butter.
In a bowl, mix the crushed pretzels, melted butter, and 1/2 cup sugar until fully combined. This will create that irresistible salty crust. The melted butter helps hold everything together! -
Spread mixture in a baking dish.
Press the pretzel mixture evenly into the bottom of a 9×13-inch baking dish. It’s important to pack it down well, as this will serve as the crust for our salad. -
Bake the pretzel crust.
Pop the baking dish into your preheated oven and bake for about 10 minutes until golden brown. Keep an eye on it—over-baking can lead to a hard crust! -
Let it cool.
Remove the dish from the oven and let it cool completely while you prepare the filling. This is the perfect time to snag a sip of your favorite drink! -
Make the cream cheese filling.
In a large bowl, beat the softened cream cheese and powdered sugar together until smooth and creamy. You want a smooth texture—this is the heart of our salad! A handheld mixer works wonderfully here. -
Fold in the whipped topping.
Gently fold in the whipped topping until fully incorporated. This will add lightness to our mixture! Take care not to deflate the fluffiness of the whipped topping. -
Spread the cream cheese mixture.
Once your pretzel crust has cooled, spread the cream cheese mixture evenly over the crust. Use a spatula to get it nice and smooth. -
Prepare the blueberry layer.
In a separate bowl, dissolve the blueberry gelatin in hot water, stirring until completely dissolved. Then, add 1/2 cup of sugar and mix well. This step is essential, as it brings that vibrant blueberry flavor to life! -
Add the blueberries.
Stir in the blueberries gently, ensuring they’re evenly distributed throughout the mixture. -
Pour the blueberry mixture over the cream cheese layer.
Gently pour the gelatin mixture over the cream cheese layer in your baking dish, spreading it out evenly. You want it to set beautifully atop the creamy filling. -
Chill and set.
Cover with plastic wrap and place in the refrigerator for at least 4 hours, or overnight if possible. This allows all the flavors to meld beautifully! -
Serve and Enjoy!
Slice into squares or scoop into bowls, and serve chilled. This dessert is ready to impress with its layered beauty!
Serving Suggestions
Plating your Blueberry Pretzel Salad is easy and fun! You can serve it directly from the baking dish or scoop individual servings into glass dessert cups for an elegant touch. Add a sprig of mint or a sprinkle of fresh blueberries on top for a pop of color and freshness. Enjoy every delightful layer, and watch the smiles grow with each delicious bite!
Recipe Variations
Feeling adventurous? Here are a few creative twists you can try with your Blueberry Pretzel Salad:
- Mixed Berry Medley: Swap out blueberries for a mix of your favorite berries like strawberries, raspberries, or blackberries for a colorful twist.
- Nutty Crunch: Add some chopped nuts like pecans or walnuts into the pretzel crust for an additional crunch and flavor.
- Infused Cream Cheese: Try adding lemon zest or a splash of almond extract to the cream cheese mixture for an elevated flavor profile.
- Chocolate Drizzle: For a decadent treat, drizzle melted chocolate over the top before chilling.
- Vegan Version: Use dairy-free cream cheese and whipped topping for a fabulous vegan-friendly option!
Chef’s Notes
This Blueberry Pretzel Salad has been a staple in my family for as long as I can remember, and I love how every batch seems to come out a little differently. Sometimes I’ll add a bit of lemon zest to brighten the flavor, while other times, I keep it classic. One memorable occasion was when I accidentally used sea salt instead of regular sugar on the crust—they say trial and error is the best teacher! The sweet and salty combination turned out to be deliciously surprising, and I’m still sticking with it for a little extra flair! Every time I make it, I’m reminded of those lovely summer gatherings and the joy of sharing food with loved ones.
FAQs and Troubleshooting
-
Can I use fresh blueberries instead of frozen?
Absolutely! Fresh blueberries are perfect for this recipe—just make sure to rinse and dry them lightly before adding them to your gelatin mixture. -
How can I store leftovers?
Store any leftovers in an airtight container in the refrigerator. Enjoy them within 3-4 days for the best freshness. -
What should I do if my gelatin doesn’t set?
If your gelatin isn’t setting, make sure you’re using the correct amount of water. If the layers don’t firm up, you can place it back in the refrigerator for additional time. -
Can I make this ahead of time?
Yes! This salad is perfect for make-ahead; preparing it the day before lets all the flavors meld beautifully.
Nutritional Info (Optional)
(Nutritional information may vary based on specific ingredients and serving sizes but here’s a rough estimate per serving, based on 12 servings)
- Calories: 215
- Total Fat: 11g
- Saturated Fat: 6g
- Cholesterol: 30mg
- Sodium: 150mg
- Total Carbohydrates: 29g
- Dietary Fiber: 1g
- Sugars: 15g
With this Blueberry Pretzel Salad, you’re not just creating a dessert; you’re crafting an experience filled with laughter and warmth. So grab your ingredients, gather your loved ones, and let’s make some delicious memories together! Happy cooking!
PrintBlueberry Pretzel Salad
A delightful blend of sweet, salty, and creamy goodness, this Blueberry Pretzel Salad is the perfect cool summer treat that everyone will love.
- Prep Time: 20 minutes
- Cook Time: 10 minutes
- Total Time: 240 minutes
- Yield: 12 servings 1x
- Category: Dessert
- Method: Baking
- Cuisine: American
- Diet: Vegetarian
Ingredients
- 2 cups pretzel sticks
- 3/4 cup butter, melted
- 1/2 cup sugar
- 8 oz cream cheese, softened
- 1 cup powdered sugar
- 1 cup whipped topping
- 2 cups blueberries
- 1 cup water
- 1/2 cup sugar
- 1 package (3 oz) blueberry gelatin
Instructions
- Preheat your oven to 350°F (175°C).
- Crush the pretzel sticks.
- Combine pretzels and butter.
- Spread mixture in a baking dish.
- Bake the pretzel crust for about 10 minutes until golden brown.
- Let it cool.
- Make the cream cheese filling.
- Fold in the whipped topping.
- Spread the cream cheese mixture.
- Prepare the blueberry layer.
- Add the blueberries.
- Pour the blueberry mixture over the cream cheese layer.
- Chill and set for at least 4 hours.
- Serve and Enjoy!
Notes
This dessert can be made ahead of time and stored in the refrigerator. For an extra twist, try mixing in different berries or adding nuts.
Nutrition
- Serving Size: 1 serving
- Calories: 215
- Sugar: 15g
- Sodium: 150mg
- Fat: 11g
- Saturated Fat: 6g
- Unsaturated Fat: 5g
- Trans Fat: 0g
- Carbohydrates: 29g
- Fiber: 1g
- Protein: 3g
- Cholesterol: 30mg
Keywords: blueberry, pretzel, salad, dessert, summer treat
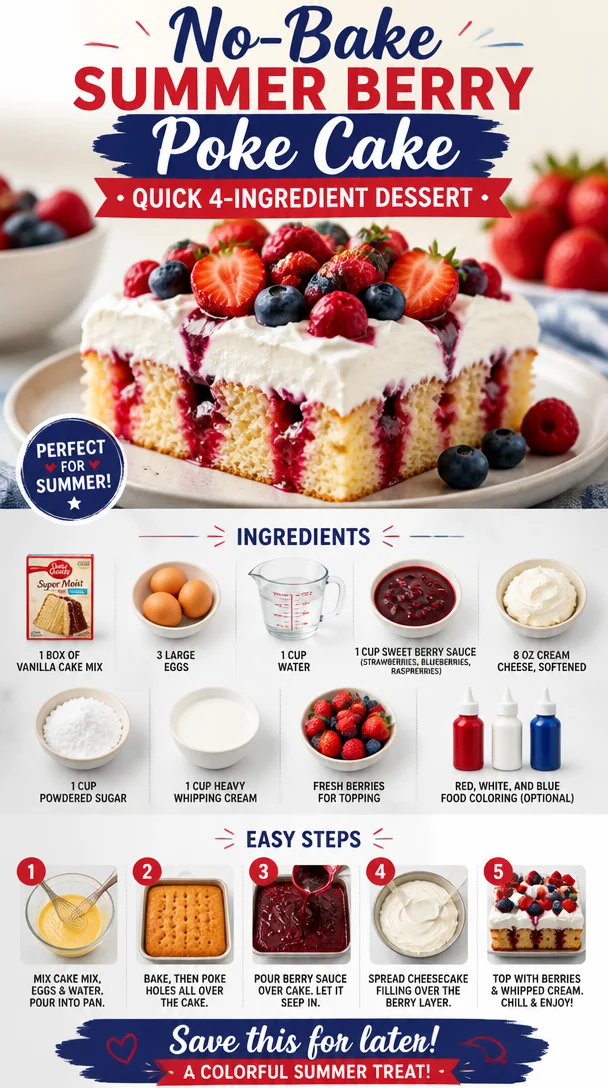
No-Bake Summer Berry Poke Cake: Quick 4-Ingredient Dessert
Get Ready to Dive into Summer with This Scrumptious Summer Berry Poke Cake!
Hey there, fellow foodies! It’s Ava Carter here, your go-to chef for all things delicious and nutritious. Today, I’m super excited to share a recipe that’s not only easy to whip up but also perfect for beating the summer heat—my delightful Summer Berry Poke Cake! This cake is a burst of flavor that screams sunshine and joy, making it an absolute hit for those warm weather gatherings, picnics, or even just a cozy day at home.
Imagine this: a soft, moist vanilla cake soaked in a luscious berry sauce, topped with a heavenly cream cheese frosting and crowned with fresh berries. Sounds dreamy, right? And let me tell you, the best part about this cake is that it’s not just about taste; it’s about creating memories too. So, grab your apron, and let’s get baking!
A Slice of Nostalgia: The Story Behind My Summer Berry Poke Cake
Every time I make this Summer Berry Poke Cake, I’m transported back to my childhood summers spent in Grandma’s kitchen. Oh, the memories! Grandma would whip this cake up on warm afternoons when my cousins and I would come running in from the backyard, our faces flushed from play and our tummies rumbling. The air would be filled with the sweet aroma of fluffy cake and berries, enticing us into the kitchen like moths to a flame.
We’d watch in awe as she poked tiny holes into the freshly baked cake, pouring that vibrant berry sauce all over. I remember the giggles as we fought over who got to add the freshest strawberries and blueberries on top. That special family tradition became a summer staple, a delicious reminder that food is more than just sustenance—it’s a way to connect, celebrate, and create joy. Today, I’m sharing that same joy with you, hoping you’ll create your own cherished moments with this ever-delicious berry beauty!
Ingredients You’ll Need
-
1 box of vanilla cake mix
A classic base for our cake, rich and fluffy! If you’re feeling adventurous, you could substitute with a lemon cake mix for a zesty twist. -
3 large eggs
Adding richness and acting as a binder, the eggs will help your cake rise beautifully. For an egg-free alternative, try flax eggs (1 tablespoon ground flaxseed mixed with 2.5 tablespoons water per egg). -
1 cup water
This keeps the cake moist. You can swap plain water for milk if you want a little extra richness in the flavor. -
1 cup sweet berry sauce
A blend of strawberries, blueberries, and raspberries creates that signature summer flavor. You can make your own sauce or pick up a store-bought version. -
8 oz cream cheese, softened
Essential for our frosting, adding creamy texture and tanginess. If you need a dairy-free option, use vegan cream cheese. -
1 cup powdered sugar
Sweetening things up! Sifting it can help achieve that perfect smooth frosting texture. -
1 cup heavy whipping cream
For fluffy frosting that holds its shape. If you’re low on cream, you can mix in some Greek yogurt for a lighter option. -
Fresh berries for topping
Think of it as nature’s confetti! Any combination of strawberries, blueberries, and raspberries works. -
Red, white, and blue food coloring (optional)
Perfect for a festive touch, especially around the Fourth of July! A few drops can make your cake even more visually stunning.
Step-by-Step Instructions
1. Preheat Your Oven:
Start by preheating your oven to 350°F (175°C). This ensures that your cake gets that perfect rise as soon as it hits the heat. A well-prepped oven is key to a fluffy, perfect cake!
2. Prepare the Cake Mix:
In a large mixing bowl, combine the box of vanilla cake mix, 3 large eggs, and 1 cup of water. Use an electric mixer on medium speed for about 2 minutes until the batter is smooth and blended. Tip: Don’t overmix! This can lead to a dense cake. Your batter should be light and airy.
3. Bake the Cake:
Pour the batter into a greased 9×13-inch baking pan. Bake in the preheated oven for 25-30 minutes or until a toothpick inserted in the center comes out clean. Chef’s hack: Set a timer for 25 minutes; check for doneness, and be careful not to open the oven door too soon!
4. Poke the Cake:
Once baked, allow the cake to cool in the pan for about 10 minutes. Then, take a fork or the handle of a wooden spoon and poke holes all over the top of the cake. This is where the magic happens! The holes will allow the berry sauce to seep in, making the cake super moist and flavorful.
5. Pour on the Berry Sauce:
In a separate bowl, mix your sweet berry sauce until it’s well combined. Pour this luscious sauce all over the entire poke cake, making sure to cover it evenly. Let it soak in as it cools completely—this is the star moment of your cake!
6. Make the Frosting:
In a clean mixing bowl, beat the softened cream cheese with an electric mixer until smooth and creamy. Gradually add powdered sugar, then mix in the heavy whipping cream until you achieve that luxurious frosting consistency. Little tip: Start slow to avoid a powdered sugar cloud!
7. Frost the Cake:
Once the cake is completely cooled, spread the cream cheese frosting evenly across the top. Use a spatula for a smooth finish, or get creative with a swirl pattern!
8. Add Fresh Berries:
Now comes the fun part! Top your frosted cake with fresh berries of your choice. Arrange them in a colorful pattern! Don’t skimp on the berries—this is a berry poke cake, after all!
Serving Suggestions
Slice up your Summer Berry Poke Cake and serve it chilled, perhaps with a dollop of whipped cream on the side. It’s perfect for afternoon gatherings or as a light dessert after a summer barbecue. For an extra touch, consider dusting with powdered sugar before serving—who doesn’t love that elegant finish?
Recipe Variations
-
Berry Swirl Cake: Instead of a plain berry sauce, swirl it right into the cake batter before baking for a delightful marbled effect.
-
Coconut Cream Frosting: Mix in some coconut cream with your frosting for a tropical twist.
-
Lemon Zest Add-In: Add zest from one lemon to your cake batter for a refreshing zing!
-
Gluten-Free Option: Use a gluten-free vanilla cake mix for a lovely gluten-free alternative that everyone can enjoy.
-
Sugar Alternatives: If you’re watching sugar intake, replace powdered sugar with a sugar-free version.
Chef’s Notes
This Summer Berry Poke Cake has truly evolved over the years. I remember the first time I attempted to create it—I accidentally forgot to add the eggs! The cake turned out dense and flat, but I added double the frosting and fresh berries, and guess what? Everyone loved it! That mistake taught me that a little creativity in the kitchen goes a long way. It’s all about having fun, experimenting, and not taking things too seriously.
FAQs and Troubleshooting
1. My cake didn’t rise. What went wrong?
Ensure that your baking powder and other ingredients are fresh and still active! Also, check that you mixed it just enough—over-mixing can lead to a dense texture.
2. How can I get a smooth frosting?
Make sure your cream cheese is at room temperature, and sift your powdered sugar to avoid lumps—this gives you that beautifully smooth texture.
3. Can I make this cake a day ahead?
Absolutely! Just keep it covered in the fridge. The flavors often blend overnight, making it even more delicious!
4. What if my berry sauce is too runny?
Try thickening it with a bit of cornstarch mixed with water, simmered on low heat until it reaches your desired consistency.
Nutritional Info
Per serving, roughly: 300 calories, 15g fat, 40g carbohydrates, 3g protein. (Nutritional values can vary based on specific brands and measurements.)
So there you have it, my dear food lovers! Dive into the season with this fabulous Summer Berry Poke Cake, and let it bring a little sunshine to your kitchen. Embrace the flavors, share the joy, and remember—food is all about love, laughter, and those cozy moments spent with family and friends. Happy baking! 🌟
PrintSummer Berry Poke Cake
A delightful and moist vanilla cake soaked in berry sauce, topped with cream cheese frosting and fresh berries, perfect for summer gatherings.
- Prep Time: 15 minutes
- Cook Time: 30 minutes
- Total Time: 45 minutes
- Yield: 12 servings 1x
- Category: Dessert
- Method: Baking
- Cuisine: American
- Diet: Vegetarian
Ingredients
- 1 box of vanilla cake mix
- 3 large eggs
- 1 cup water
- 1 cup sweet berry sauce
- 8 oz cream cheese, softened
- 1 cup powdered sugar
- 1 cup heavy whipping cream
- Fresh berries for topping
- Red, white, and blue food coloring (optional)
Instructions
- Preheat your oven to 350°F (175°C).
- Combine the vanilla cake mix, eggs, and water in a large mixing bowl and mix for about 2 minutes until smooth.
- Pour the batter into a greased 9×13-inch baking pan and bake for 25-30 minutes.
- Cool the cake in the pan for 10 minutes, then poke holes all over the top.
- Mix your sweet berry sauce until well combined and pour it over the cake.
- Beat the softened cream cheese until smooth, gradually add powdered sugar, then mix in heavy whipping cream until you achieve a luxurious frosting.
- Spread the cream cheese frosting evenly across the top of the cooled cake.
- Top the cake with fresh berries in a colorful pattern.
Notes
Serve chilled with a dollop of whipped cream on the side. For added elegance, dust with powdered sugar before serving.
Nutrition
- Serving Size: 1 slice
- Calories: 300
- Sugar: 20g
- Sodium: 350mg
- Fat: 15g
- Saturated Fat: 8g
- Unsaturated Fat: 5g
- Trans Fat: 0g
- Carbohydrates: 40g
- Fiber: 2g
- Protein: 3g
- Cholesterol: 90mg
Keywords: berry poke cake, summer dessert, vanilla cake, berry sauce, cream cheese frosting
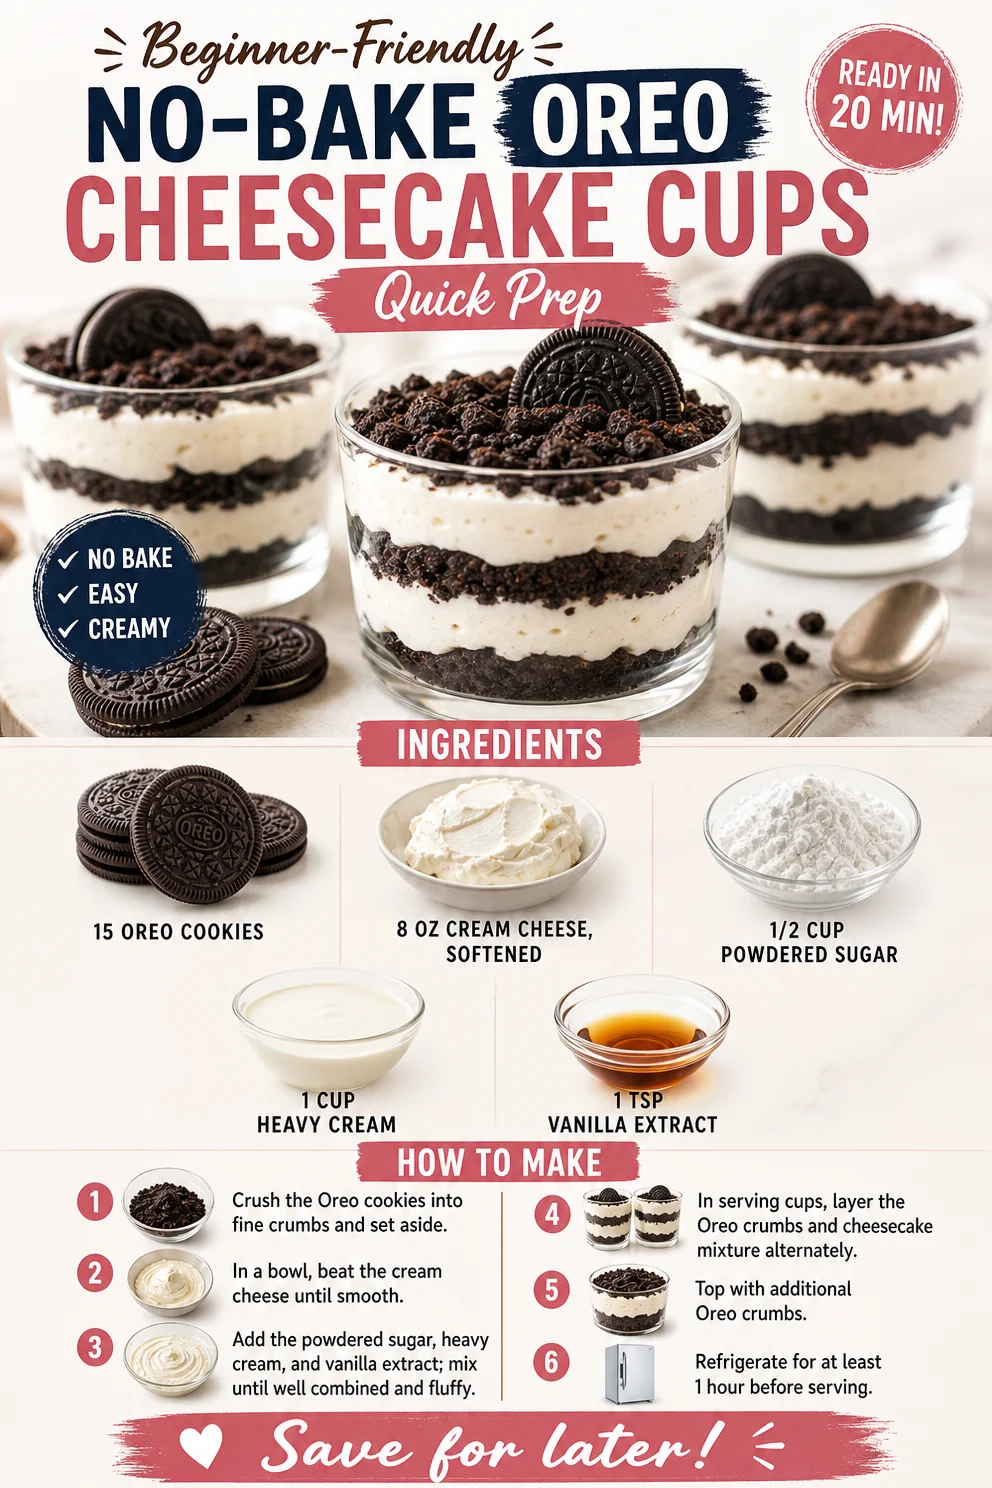
Beginner-Friendly No-Bake Oreo Cheesecake Cups (Quick Prep)
No Bake Oreo Cheesecake Cups: A Dessert to Crave
Welcome back to Clean Plate Cravings, where we whip up delightful, fresh, and feel-good recipes for every occasion! Today, I’m excited to share a delectable treat that’s bound to bring a smile to your face and joy to your taste buds: No Bake Oreo Cheesecake Cups. These heavenly little cups are not only a breeze to make, but they’re also packed with flavor and irresistible creaminess. So let’s roll up our sleeves, dive into the kitchen, and create something truly special together!
A Sweet Nostalgic Memory
Before we jump into the recipe, let me take you on a little trip down memory lane. I remember the first time I had an Oreo cheesecake. I was at a summer picnic, and one of my friends brought this divine dessert. It was a hot day, and the lush, creamy texture of the cheesecake paired with the crunchy Oreo crust was sheer bliss. I took my first bite and immediately knew I had discovered something magical!
Every summer since then, I’ve made it my mission to recreate that perfect cheesecake. After countless experiments and some hilarious kitchen fails (thank goodness for forgiving friends!), I landed on this no-bake version that’s indeed the star of the show. So, let’s bring that nostalgic flavor into our kitchens!
Ingredients
Here’s what you’ll need to make these delightful No Bake Oreo Cheesecake Cups:
-
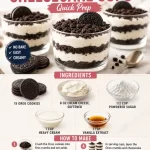
15 Oreo cookies: A classic cookie that provides the perfect base with its crunchy texture and sweet cocoa flavor. Don’t have Oreos? Try any chocolate sandwich cookie!
-
8 oz cream cheese, softened: Cream cheese gives our cheesecake its rich and creamy texture. To make it lighter, use mascarpone cheese or even a dairy-free cream cheese alternative.
-
1/2 cup powdered sugar: This sweet component gives balance without being overly sweet. If you need a sugar alternative, powdered erythritol works beautifully!
-
1 cup heavy cream: Heavy cream is whipped to create that light and fluffy texture. For a lighter version, you can use whipped coconut cream.
-
1 tsp vanilla extract: The essence of vanilla infuses warmth and sweetness into the cheesecake. Pure vanilla extract is always the best choice, but imitation vanilla will work in a pinch!
Step-by-Step Instructions
Ready to bring these Oreo Cheesecake Cups to life? Here’s how to do it!
-
Crush the Oreos: Start by placing your Oreo cookies in a zip-top bag. Seal it tightly and give them a good crush with a rolling pin or a heavy object until you have fine crumbs. Not only will this release stress, but it’ll also create a fantastic crust! Alternatively, you can use a food processor for this job.
-
Make the Cookie Crust: In a mixing bowl, combine the crushed Oreos with 2 tablespoons of melted butter. Stir until everything is moistened. This is your delicious crust! Spoon a heaping tablespoon of the mixture into the bottom of each serving cup or jar and press down gently.
-
Prepare the Cheesecake Filling: In another bowl, beat the softened cream cheese with an electric mixer until smooth. Add the powdered sugar and vanilla extract, blending well until combined. You’ll find the mixture becoming thick and creamy—don’t worry, you’re on the right track!
-
Whip the Heavy Cream: In a separate bowl, whip the heavy cream until stiff peaks form. You’ll know it’s ready when you turn the bowl upside down, and nothing falls out! This fluffy whipped cream will lighten our cheesecake mixture beautifully.
-
Fold it All Together: Gently fold the whipped cream into the cream cheese mixture. Use a spatula and be gentle—the key here is to maintain that light, airy texture. Keep folding until just incorporated.
-
Assemble the Cups: Now comes the fun part! Layer the cheesecake filling over the Oreo crust in each cup. You can use a piping bag for a more polished look or just spoon it in (we’re keeping it relaxed here!). Add another layer of crushed Oreos on top for that lovely crunch.
-
Chill and Enjoy: Refrigerate the Oreo cheesecake cups for at least 2 hours or until set. The waiting is the hardest part, but believe me, it’s worth it!
Serving Suggestions
When it’s time to serve, it’s all about presentation! You can keep it simple by adding a dollop of whipped cream on top and maybe a sprinkle of crushed Oreos for visual appeal. If you’re feeling extra indulgent, drizzle some chocolate syrup or a touch of caramel sauce. Voilà! Your dreamy dessert is ready to impress!
Recipe Variations
Want to change things up? Here are a few creative twists to consider:
-
Mint Chocolate Oreo Cheesecake Cups: Use mint-flavored Oreos for a refreshing spin!
-
Peanut Butter Lover’s Variation: Add a few tablespoons of creamy peanut butter to the cheesecake filling for added richness.
-
Fruit-Filled Delight: Layer in some fresh strawberries or raspberries in between the crust and filling for a fruity touch.
-
Chocolate Lovers’ Dream: Incorporate mini chocolate chips into the filling or top with chocolate shavings for an extra decadence.
Chef’s Notes
This recipe has become my go-to dessert for gatherings, family celebrations, and even cozy nights in! Each time, I love to tweak the ingredients based on what I have at hand or the mood of the occasion. One memorable moment was when I accidentally added too much cream cheese—who knew it could turn into a super creamy masterpiece? My friends loved the unexpected twist!
FAQs and Troubleshooting
-
Can I prepare these cups in advance?
Absolutely! These cheesecake cups can be made a day ahead and stored in the refrigerator until you’re ready to serve. -
What if my mixture is too thick?
If it’s too thick, try adding a splash of milk or cream to loosen it up while still maintaining its structure. -
Can I use low-fat cream cheese?
Yes, you can! Just remember that the texture may be slightly different, but it will still be delicious. -
Can I freeze these cheesecake cups?
Yes, they can be frozen! Just make sure to cover them well. When you’re ready to enjoy, thaw them in the fridge overnight before serving.
Nutritional Info
While I always advocate for enjoying dessert without guilt, if you’re curious about the nutritional info per serving (assuming 6 cups total), each cup contains approximately:
- Calories: 250
- Protein: 3g
- Carbohydrates: 28g
- Fat: 15g
- Sugar: 8g
And there you have it, my friends! I can’t wait for you to try these No Bake Oreo Cheesecake Cups; they’re a delightful treat that feels just like a hug in dessert form. So, grab your ingredients, get your friends or family involved, and enjoy the fantastic flavors of this creamy treat. Happy indulging!
PrintNo Bake Oreo Cheesecake Cups
Delightful no bake Oreo cheesecake cups that are creamy, packed with flavor, and incredibly easy to make.
- Prep Time: 20 minutes
- Cook Time: 0 minutes
- Total Time: 120 minutes
- Yield: 6 servings 1x
- Category: Dessert
- Method: No-Bake
- Cuisine: American
- Diet: Vegetarian
Ingredients
- 15 Oreo cookies
- 8 oz cream cheese, softened
- 1/2 cup powdered sugar
- 1 cup heavy cream
- 1 tsp vanilla extract
Instructions
- Crush the Oreos: Place the Oreo cookies in a zip-top bag, seal tightly, and crush until fine crumbs form.
- Make the Cookie Crust: Combine the crushed Oreos with 2 tablespoons of melted butter in a mixing bowl.
- Prepare the Cheesecake Filling: Beat the softened cream cheese with an electric mixer until smooth, then add in the powdered sugar and vanilla extract.
- Whip the Heavy Cream: In a separate bowl, whip the heavy cream until stiff peaks form.
- Fold it All Together: Gently fold the whipped cream into the cream cheese mixture until incorporated.
- Assemble the Cups: Layer the cheesecake filling over the Oreo crust in each cup, adding more crushed Oreos on top.
- Chill and Enjoy: Refrigerate for at least 2 hours or until set before serving.
Notes
These cheesecake cups can be made in advance and kept in the refrigerator. Perfect for gatherings or as a family treat!
Nutrition
- Serving Size: 1 cup
- Calories: 250
- Sugar: 8g
- Sodium: 200mg
- Fat: 15g
- Saturated Fat: 9g
- Unsaturated Fat: 5g
- Trans Fat: 0g
- Carbohydrates: 28g
- Fiber: 1g
- Protein: 3g
- Cholesterol: 30mg
Keywords: Oreo cheesecake, no bake dessert, easy cheesecake recipe, creamy dessert
No-Bake Strawberry Cheesecake Mousse (5 Ingredients)
Indulge in Strawberry Cheesecake Mousse: A Sweet Symphony of Flavor and Nostalgia
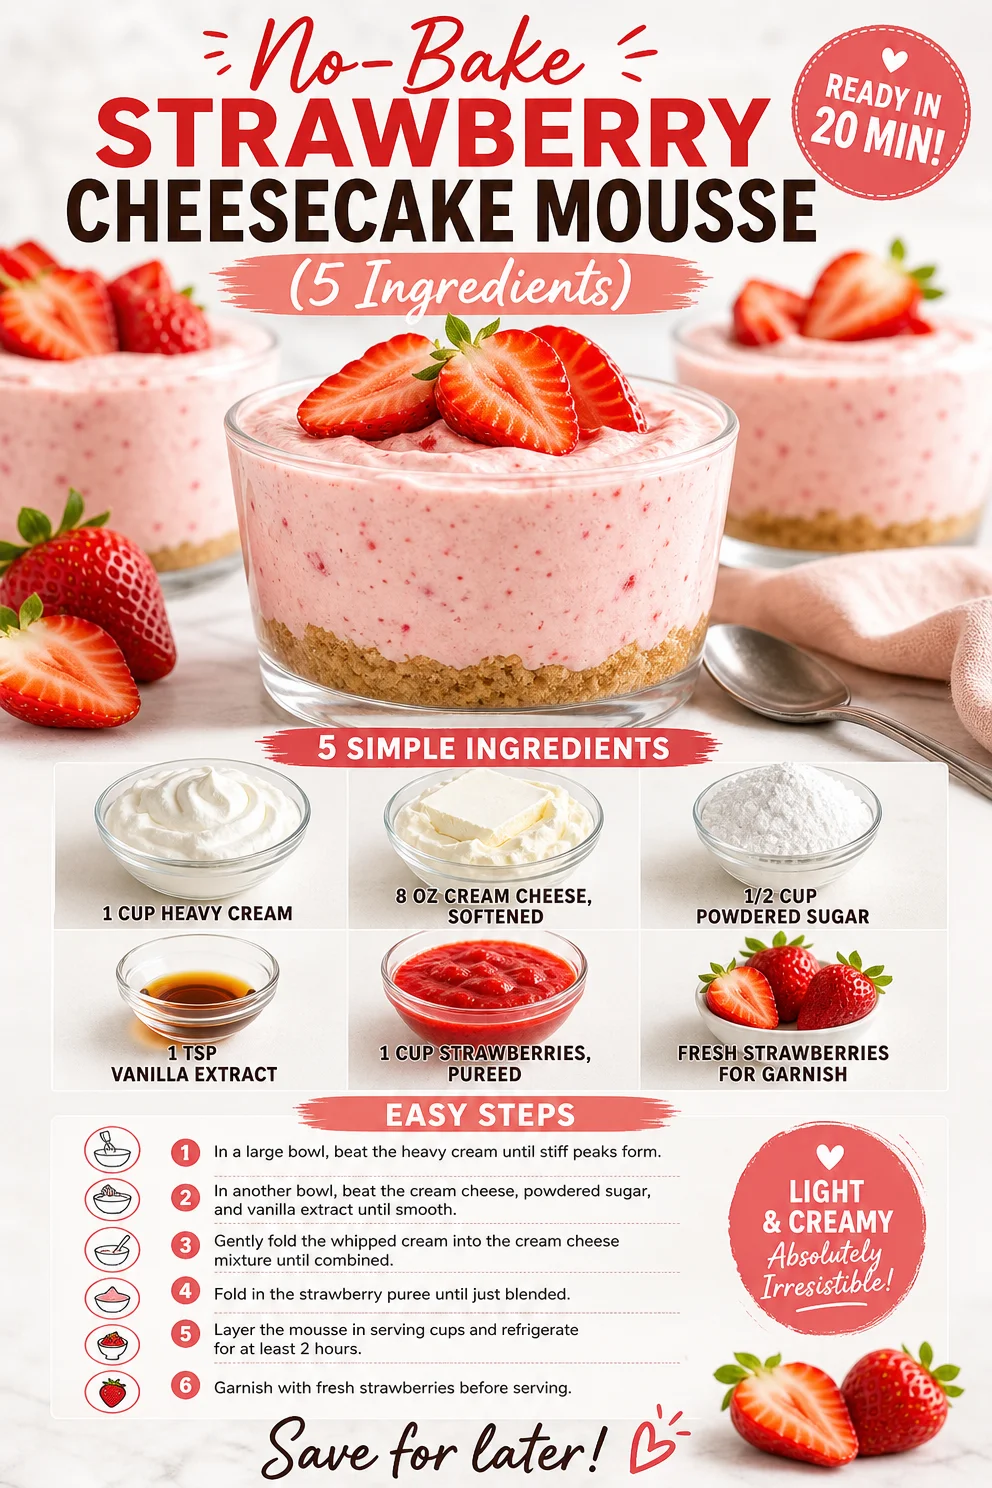
Welcome back to Clean Plate Cravings, food lovers! Today, we’re diving headfirst into a delightful treat that dances around your taste buds like a summer breeze—Strawberry Cheesecake Mousse. Yes, you read that right! This dessert is a luscious combination of creamy cheesecake and fresh strawberries, whipped up into an airy mousse that’s as satisfying to make as it is to devour.
Imagine sinking into a fluffy cloud of this sweet, fruity mousse after a long day. It’s light yet indulgent, satisfying your sweet tooth without weighing you down. Plus, it’s incredibly simple to whip up, making it a perfect choice for both casual dinners and fancy gatherings. The best part? You don’t even need to be a professional chef to impress your family and friends with this delectable treat!
The flavor profile is a marriage of sweet and creamy, punctuated with the tartness of fresh strawberries that makes it the perfect showstopper for any occasion. I’ll guide you through every step, sharing tips and tricks along the way, so you will feel like an absolute rock star in the kitchen. So grab your mixing bowl and spatula, and let’s make some magic happen!
A Sweet Memory to Share
Before we dive into the recipe, I want to take you back to a cherished memory of mine. Growing up, my family had a sweet tradition of having dessert every Sunday evening. My grandma would whip up a variety of fabulous treats, but the showstopper was always her famous strawberry cheesecake. It was a no-bake delight, rich and creamy, just like me!
I remember the smell of fresh strawberries filling the kitchen as we mashed them down to a pulpy bliss, mixing them with cream cheese and sugar while waiting for the mouse to firm up. Sundays became a celebration—not just of dessert, but of family and laughter. My cousins and I would sit eagerly at the table, with our forks poised, as grandma presented her masterpiece.
This Strawberry Cheesecake Mousse is inspired by that beloved tradition, making it a fitting tribute to those warm, nostalgic Sundays filled with family bonding and deliciousness. I hope this dessert brings you similar joy, creating sweet memories with your loved ones.
Ingredients
Here’s what you’ll need to craft this delicious Strawberry Cheesecake Mousse:
-
1 cup heavy cream: The star ingredient for that rich and fluffy mousse texture. You can substitute it with full-fat coconut milk for a dairy-free option, but it might alter the flavor a bit.
-
8 oz cream cheese, softened: This brings the classic cheesecake flavor. For a lighter option, you can use Neufchatel cheese, which has less fat but retains the creamy consistency.
-
1/2 cup powdered sugar: Sweetens the deal! You can use granulated sugar if you prefer; just be sure to whip it longer to dissolve the sugar completely.
-
1 tsp vanilla extract: Adds a warm, vanilla flavor that complements the strawberries beautifully. Feel free to use almond extract for a different taste twist!
-
1 cup strawberries, pureed: Fresh strawberries are best, but you can also use frozen berries; just make sure to thaw and drain them well before pureeing to remove excess moisture.
-
Fresh strawberries for garnish: Because what’s a dessert without a little bling on top?
Step-by-Step Instructions
Alright, let’s get down to the nitty-gritty of creating this heavenly mousse! Follow these steps, and you’ll have a spectacular dessert ready to impress.
-
Prep your ingredients: Gather all your ingredients, ensuring the cream cheese is at room temperature (this makes it easier to blend). A quick tip: you can soften cream cheese in the microwave for about 15-20 seconds—just be careful not to melt it!
-
Whip the cream: In a mixing bowl, pour in the heavy cream. Using an electric mixer (or a whisk if you’re up for a workout!), whip the cream until stiff peaks form. This step usually takes about 3-5 minutes. The texture should be airy and hold its shape well. Tip: Start on low speed to avoid splattering cream everywhere!
-
Mix the cream cheese: In another large bowl, combine the softened cream cheese and powdered sugar. Use the electric mixer to blend until smooth and creamy, about 2-3 minutes. This is where the magic happens, transforming your ingredients into a dreamy, cheesecake-like base.
-
Add vanilla and strawberries: Now it’s time to add the vanilla extract and the pureed strawberries to the cream cheese mixture. Stir gently until all ingredients are well incorporated. This is your opportunity to taste and adjust sweetness if needed!
-
Fold in the whipped cream: This is a crucial step to ensure your mousse stays light and fluffy. Gently fold the whipped cream into the strawberry mixture using a spatula. You want to retain the airiness, so fold gently without over-mixing.
-
Chill your mousse: Once everything is combined, divide the lovely mousse into serving dishes or glasses. Cover them with plastic wrap and refrigerate for at least an hour, allowing the flavors to meld together and the mousse to firm up. This is a great time to relax and wipe down your kitchen—because we all love a clean workspace!
-
Garnish and serve: Once chilled, it’s time to serve! Top each mousse with a fresh strawberry for that pop of color and vibrant flavor. Get ready to dig in!
Serving Suggestions
To elevate the presentation and make it even more appealing, consider serving the mousse in clear glasses to showcase those beautiful layers. Swirl in some pureed strawberries or drizzle with a bit of chocolate sauce for an elegant touch. You could also pair this mousse with a shortbread cookie or some crushed graham crackers for an added crunch.
This dessert is perfect for dinner parties, special gatherings, or simply to indulge yourself after a long day!
Recipe Variations
Feeling adventurous? Here are some fun twists you can try:
-
Berry Medley Mousse: Substitute the strawberries with a mix of raspberries, blueberries, and blackberries for a vibrant berry medley.
-
Chocolate Strawberry Cheesecake Mousse: Melt some dark chocolate and swirl it into the cream cheese mixture for an enticing chocolatey hit.
-
Minty Fresh Mousse: Toss in some fresh mint leaves into the puree for a refreshing flavor that pairs beautifully with strawberries.
-
Lemon Zest Twist: Add a teaspoon of lemon zest which complements the strawberries and cheesecake flavors beautifully.
Chef’s Notes
This recipe holds a special place in my heart because it’s one of those simple indulgences that never fails to make an appearance during family gatherings. Over the years, I’ve played around with the base—a dash of lemon juice here or some chocolate there. One time, I even threw in some crushed pretzels for a salty crunch, and it was a hit!
I cherish the lightness of this dessert. It’s satisfying without the heaviness of a traditional cheesecake, making it perfect year-round. Plus, it can easily be made ahead of time, freeing up your day for more fun activities or simply lounging in your favorite chair!
FAQs and Troubleshooting
1. My mousse turned out runny! What happened?
This usually happens if the heavy cream wasn’t whipped enough or if it was folded too vigorously with the cream cheese mixture. Make sure to whip it until stiff peaks form and gently fold to retain the airiness.
2. Can I use low-fat cream cheese?
You can! Just remember that the texture and flavor may be slightly different, but it’ll still be delicious.
3. How long can I store leftovers?
You can keep the mousse covered in the fridge for up to 2-3 days. Just give it a quick stir before serving again.
4. Can I freeze this mousse?
While it’s best served fresh, you can freeze the mousse. Just make sure to store it in an airtight container. When ready to enjoy, let it thaw overnight in the fridge for the best texture.
Nutritional Info
Each serving (based on 4 servings) contains approximately:
- Calories: 275
- Protein: 5g
- Carbohydrates: 23g
- Fat: 20g
- Sugars: 14g
(Note: Nutritional values may vary based on portions, brands, and specific ingredient types used.)
With all these delightful insights, tips, and a dash of nostalgia, your journey into the land of Strawberry Cheesecake Mousse should be a breeze. I can’t wait for you to try this recipe! Not only will it add a touch of sweetness to your life, but it will also create lasting memories filled with laughter and deliciousness. Happy cooking!
PrintStrawberry Cheesecake Mousse
A delightful, airy dessert combining creamy cheesecake and fresh strawberries, perfect for any occasion.
- Prep Time: 15 minutes
- Cook Time: 0 minutes
- Total Time: 60 minutes
- Yield: 4 servings 1x
- Category: Dessert
- Method: No-Bake
- Cuisine: American
- Diet: Vegetarian
Ingredients
- 1 cup heavy cream
- 8 oz cream cheese, softened
- 1/2 cup powdered sugar
- 1 tsp vanilla extract
- 1 cup strawberries, pureed
- Fresh strawberries for garnish
Instructions
- Prep your ingredients: Gather all your ingredients, ensuring the cream cheese is at room temperature.
- Whip the cream: In a mixing bowl, pour in the heavy cream and whip until stiff peaks form, about 3-5 minutes.
- Mix the cream cheese: In another large bowl, combine the softened cream cheese and powdered sugar, blending until smooth, about 2-3 minutes.
- Add vanilla and strawberries: Incorporate the vanilla extract and pureed strawberries into the cream cheese mixture, stirring gently.
- Fold in the whipped cream: Gently fold the whipped cream into the strawberry mixture using a spatula.
- Chill your mousse: Divide the mousse into serving dishes and refrigerate for at least 1 hour.
- Garnish and serve: Top each mousse with a fresh strawberry before serving.
Notes
Consider serving in clear glasses to showcase layers. Pair with shortbread cookies or graham crackers for added crunch.
Nutrition
- Serving Size: 1 serving
- Calories: 275
- Sugar: 14g
- Sodium: 200mg
- Fat: 20g
- Saturated Fat: 12g
- Unsaturated Fat: 8g
- Trans Fat: 0g
- Carbohydrates: 23g
- Fiber: 1g
- Protein: 5g
- Cholesterol: 40mg
Keywords: strawberry, cheesecake, mousse, dessert, no-bake
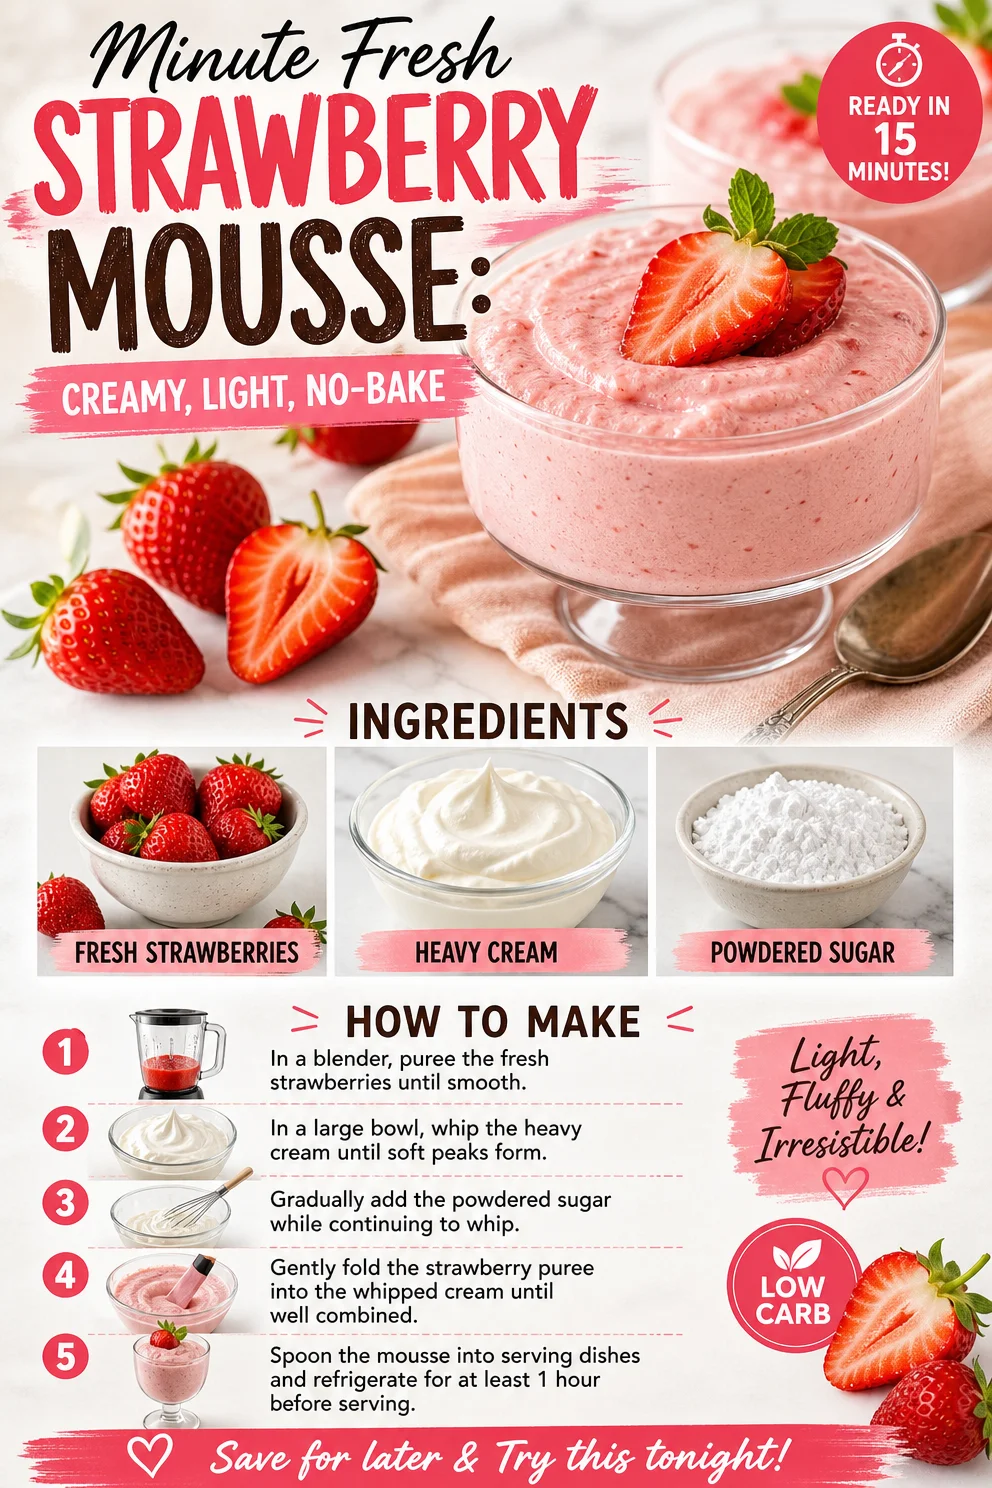
Minute Fresh Strawberry Mousse: Creamy, Light, No-Bake
Easy Fresh Strawberry Mousse: A Whip of Delight
Welcome, fellow food lovers! Today, I’m thrilled to share a delightful dish that’s equal parts nostalgia and decadence: Easy Fresh Strawberry Mousse. Picture a warm summer day, sunlight dancing through the leaves, and a sweet, fluffy dessert just waiting to be savored. With fresh strawberries as the star of this show, this mousse is creamy, airy, and the perfect end to any meal—or even a special snack during the day.
What I love most about this strawberry mousse is how incredibly simple it is to prepare. Seriously, with only three ingredients and some gentle folding action, you’ll create a dessert that’s sure to impress your family and friends. Not only does it taste amazing, but it also looks beautiful when served, making it a fantastic choice for gatherings, picnics, or simply treating yourself after a long day.
Whether you’ve got a lush batch of strawberries from your garden or picked up a fresh basket from the farmer’s market, this recipe is your new go-to. So, grab your mixing bowl and let’s whisk away!
A Sweet Scoop of Nostalgia
Let me share a little story from my childhood that’s forever tied to the joy of strawberry mousse. Growing up, my grandmother had the most stunning garden filled with vibrant strawberries. They were red and juicy, ready to be picked on sunny afternoons. Every summer, my cousins and I would race each other to see who could gather the most strawberries. With our puddle of sweet spoils in hand, we’d gather around Grandma’s kitchen as she whipped up her infamous strawberry desserts.
One of my favorites was her strawberry mousse, which she prepared using fresh berries, cream, and just a touch of sugar to enhance the flavor. I remember the laughter, the aroma of strawberries filling the air, and the way the mousse seemed to float off the spoon as we eagerly devoured it. Nostalgic comfort food at its finest! Now, I’m excited to share that legacy through this simple yet elegant recipe, making new memories for the next generations.
Ingredients You’ll Need
-
Fresh Strawberries:
- The star of the show! Choose ripe, juicy strawberries for a naturally sweet flavor. If fresh isn’t available, you can use frozen strawberries, but make sure to thaw and drain excess moisture.
-
Heavy Cream:
- This is what gives the mousse its luscious, creamy texture. If you need a lighter version, you can substitute it with coconut cream or a low-fat whipped topping, but the flavor will be slightly different.
-
Powdered Sugar:
- This sugar dissolves easily into the cream, giving it just the right amount of sweetness. If you’d like to keep it less sweet, feel free to reduce the amount or use an alternative sweetener like honey or agave. Just remember to adjust the quantities because honey is liquid.
With these three ingredients in hand, you’re halfway to a dessert that will become a star of any table!
Step-by-Step Instructions
Now, let’s get down to business and whip up this strawberry mousse!
-
Prepare Your Strawberries:
- Start by washing your fresh strawberries under cool water. Pat them dry with a paper towel—no one wants a soggy mousse! Remove the green tops and slice them in half. For a more intense strawberry flavor, you can toss them with a tablespoon of powdered sugar and let them sit for about 10 minutes. This will release their natural juices, making for a delightful syrup to fold into your mousse later.
-
Blend the Strawberries:
- Transfer the strawberry halves to a blender or food processor. Blend until smooth, but keep some chunks for texture if you prefer it that way. I like to leave a few small pieces for visual interest and extra bites of flavor! Set this berry goodness aside.
-
Whip the Cream:
- In a large mixing bowl, pour in the heavy cream. Using an electric mixer, beat the cream on medium-high speed until soft peaks form. This generally takes about 3-5 minutes. Be careful not to overwhip; we want to maintain that fluffy texture that makes mousse so airy and delightful. If you’ve never whipped cream before, start slow and gradually increase speed to prevent splatters.
-
Incorporate the Sugar:
- Once your cream has reached those glorious soft peaks, gradually add in the powdered sugar. Beat for an additional minute until the cream is firm and glossy. This will not only sweeten the cream but also help stabilize it.
-
Fold in the Strawberries:
- Now comes the magic part—gently fold the blended strawberries into the whipped cream. Use a rubber spatula and be gentle, as you want to retain all that lovely air you’ve just created. This should result in a beautiful pink mousse! If you want a more pronounced strawberry flavor, feel free to fold in some of the syrup you created earlier.
-
Chill and Set:
- Spoon your luscious mousse into individual serving cups or a larger bowl if you wish to share. Cover lightly with plastic wrap and refrigerate for at least 2 hours. This helps it set and allows those flavors to marry beautifully—though good luck waiting that long!
-
Serve and Savor:
- Once your mousse is chilled, serve it as is or garnish with extra strawberry slices, a sprig of mint, or a dollop of whipped cream for an extra touch. Trust me, it’s as good as it sounds.
Serving Suggestions
When it comes to presentation, strawberry mousse can be served in elegant dessert cups or fun mason jars for a rustic vibe. Maybe even layer it with some crushed shortbread cookies for added texture! Garnish each serving with a mint leaf, a few whole strawberries, or a sprinkle of crushed nuts for a delightful crunch. Not only does it make for an aesthetically pleasing dish, but those small touches also add an extra layer of flavor.
Recipe Variations
Now, let’s mix things up a bit! Here are some creative twists you can try:
-
Chocolate Strawberry Mousse:
- Stir in melted dark chocolate with the strawberry puree for a decadent chocolate-strawberry combination.
-
Citrus Zing:
- Add a splash of lemon or orange juice to the strawberry mixture for a zesty kick! This brightens the tones of the strawberries and adds a refreshing twist.
-
Balsamic Strawberry Mousse:
- Drizzle the strawberries with a touch of balsamic vinegar before blending. It enhances the sweetness and adds a sophisticated edge.
-
Nutty Crunch:
- Fold in some finely chopped almonds or pistachios to the mousse at the end for a delightful crunch.
-
Dairy-Free Version:
- Use coconut cream in place of heavy cream to create a dairy-free mousse that’s just as delicious!
Chef’s Notes
This strawberry mousse has traveled through time with me and has evolved along the way. I remember the first time I tried to make it on my own—let’s just say it didn’t go as planned! I overwhipped the cream and ended up with butter—not exactly the light dessert I was aiming for! But those little missteps are what make us better in the kitchen, right? Now, I’ve got the hang of it, and it brings me so much joy to see others enjoy this simple pleasure. Remember, it’s all about enjoying the process and sharing the sweet results with those you love.
FAQs and Troubleshooting
-
Why did my mousse not set?
- If your mousse doesn’t set, it may be due to not whipping the cream enough to reach the proper consistency. Ensure you achieve soft peaks before folding in the strawberries. Also, chilling the mousse for enough time is crucial!
-
Can I make this ahead of time?
- Absolutely! This mousse can be made a day in advance and stored in the fridge. Just make sure to cover it well so it doesn’t absorb any fridge odors.
-
What if I don’t have powdered sugar?
- You can make your own powdered sugar by blending granulated sugar in a blender until it becomes a fine powder. Use this as a substitute!
-
Can I use other fruits?
- Yes! This technique works wonderfully with raspberries, blueberries, or even peaches. Just adjust the sugar based on the fruit’s natural sweetness.
Nutritional Info
(Optional based on your preferences)
Making this mousse feels great, and guess what? It also has nutritional benefits! Strawberries are packed with vitamin C and antioxidants, while the heavy cream gives you a bit of fat that keeps you satisfied. Just remember to enjoy it in moderation as part of a balanced diet.
And there you have it, my friends! An easy fresh strawberry mousse that’s simple, delightful, and bursting with summer flavors. I hope this recipe brings you as much joy as it does for me. Now, let’s get into the kitchen and start whipping up some sweet memories together! 🍓
PrintEasy Fresh Strawberry Mousse
A simple and delightful strawberry mousse that brings nostalgia and elegance to any occasion with its creamy texture and fresh flavor.
- Prep Time: 15 minutes
- Cook Time: 0 minutes
- Total Time: 120 minutes
- Yield: 4 servings 1x
- Category: Dessert
- Method: No-Bake
- Cuisine: American
- Diet: Vegetarian
Ingredients
- 2 cups Fresh Strawberries, hulled and sliced
- 1 cup Heavy Cream
- 1/4 cup Powdered Sugar
Instructions
- Prepare your strawberries: Wash under cool water, pat dry, remove the green tops, and slice in half. Optionally, toss with a tablespoon of powdered sugar and let sit for 10 minutes.
- Blend the strawberries: Transfer strawberry halves to a blender and blend until smooth, leaving some chunks for texture.
- Whip the cream: In a bowl, beat the heavy cream on medium-high speed until soft peaks form, about 3-5 minutes.
- Incorporate the sugar: Gradually add in powdered sugar and beat for another minute until firm and glossy.
- Fold in the strawberries: Gently fold the blended strawberries into the whipped cream with a rubber spatula.
- Chill and set: Spoon the mousse into cups, cover with plastic wrap, and refrigerate for at least 2 hours.
- Serve and savor: Garnish the chilled mousse with extra strawberry slices or mint before serving.
Notes
Use ripe strawberries for the best flavor. The mousse can be made a day in advance and stored in the fridge.
Nutrition
- Serving Size: 1 serving
- Calories: 200
- Sugar: 15g
- Sodium: 30mg
- Fat: 10g
- Saturated Fat: 6g
- Unsaturated Fat: 4g
- Trans Fat: 0g
- Carbohydrates: 25g
- Fiber: 2g
- Protein: 2g
- Cholesterol: 30mg
Keywords: strawberry mousse, dessert, summer recipe, easy recipe, fresh strawberries
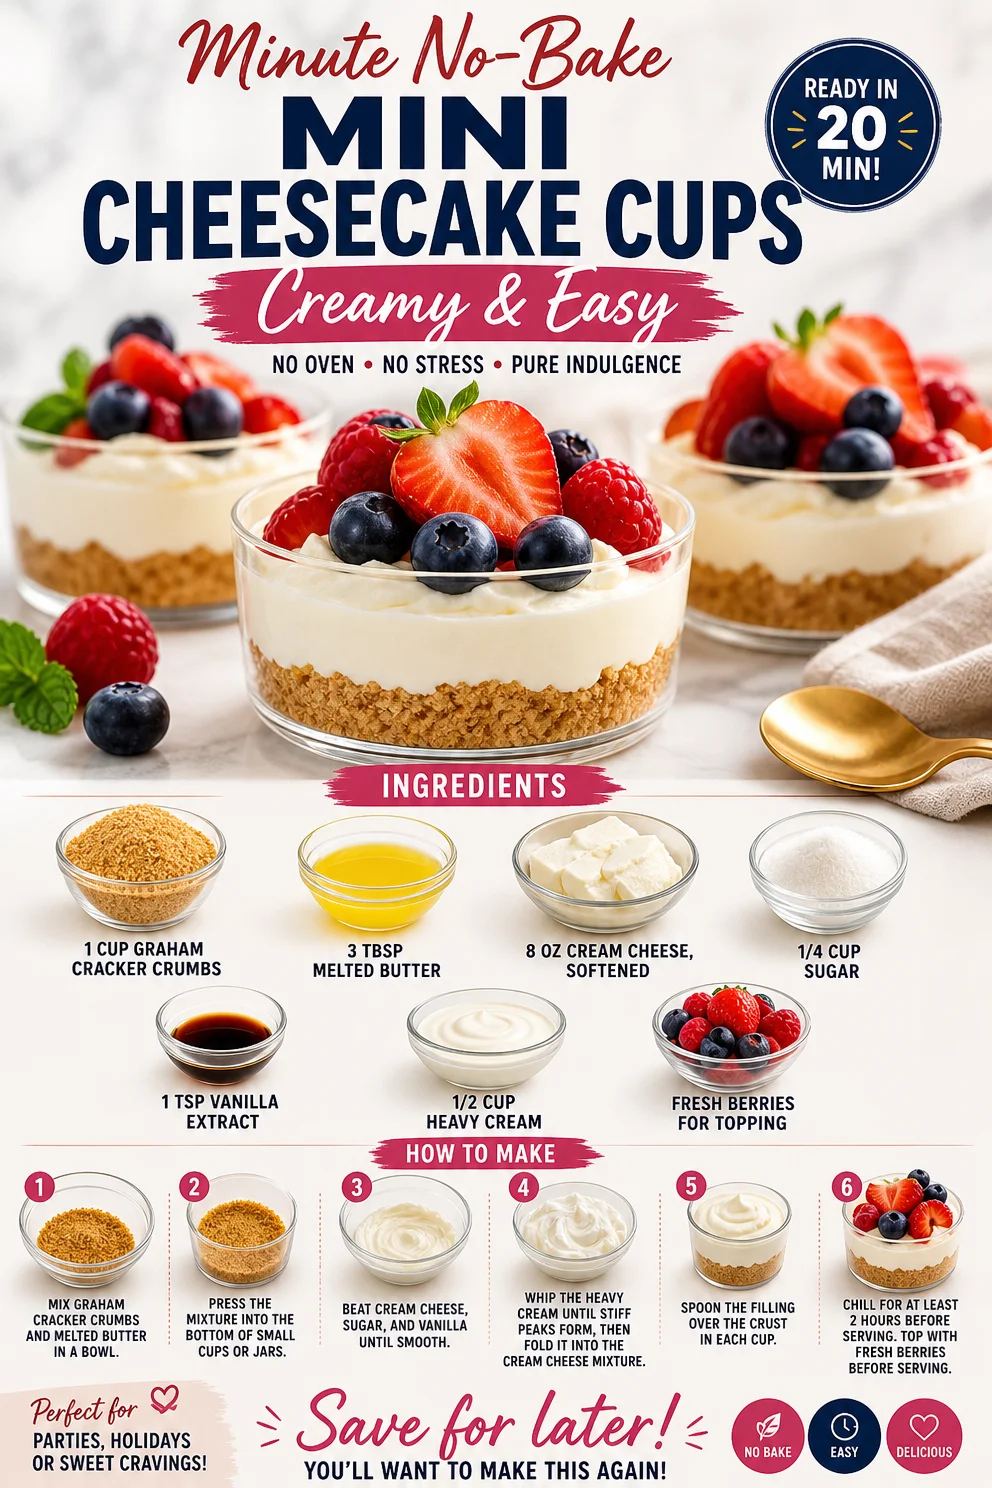
Minute No-Bake Mini Cheesecake Cups (Creamy & Easy)
Irresistible No-Bake Mini Cheesecake Cups in 15 Minutes
Introduction
Hey there, fellow food lovers! If you’re anything like me, you probably have a constant craving for something sweet, creamy, and utterly delicious. Lucky for you, I have just the treat in mind: No-Bake Mini Cheesecake Cups! These little gems are all about enjoying the rich, decadent flavor of cheesecake without the fuss of baking. And the best part? You can whip them up in just 15 minutes!
I’ve always been a huge fan of cheesecakes, but there’s something extra special about the mini version that brings a delightful playfulness to dessert time. Picture this: a buttery graham cracker crust cradling a velvety cream cheese filling, topped with fresh, juicy berries. It’s the kind of dessert that makes your taste buds dance and your heart sing.
Making these No-Bake Mini Cheesecake Cups is not only a treat for yourself but also a fantastic way to impress friends and family. Whether you’re hosting a casual gathering, celebrating a special occasion, or just need a sweet pick-me-up after a long day, these mini cheesecakes are about to become your go-to recipe.
In this post, I’ll share a little backstory that will take you on a trip down memory lane, guide you through the ingredients needed, and offer step-by-step instructions that will make you feel like a pro in the kitchen. So grab your apron, and let’s dive into the delicious world of no-bake cheesecake!
Personal Story
Let me take you back to a particularly memorable summer afternoon from my childhood. My grandmother, a passionate baker with an unbeatable sweet tooth, was preparing her famous cheesecake for our family BBQ. I can still picture the sun shining through the kitchen window, illuminating her apron as she expertly mixed cream cheese with sugar. The rich aroma filled the air, and I was captivated by the creamy filling as it piled up high in her springform pan.
However, in true grandma fashion, she insisted on letting it bake for hours before it was ready to serve, leaving me with a long wait—and an even longer craving! Fast forward to today, while I cherish her traditional recipe, I often find myself reminiscing about those lazy summers spent waiting for that first slice. The idea of a mini cheesecake that doesn’t require an oven was born out of my desire to indulge in that classic dessert quickly!
These No-Bake Mini Cheesecake Cups evoke those tender memories, allowing me to recreate the joy of cheesecake anytime I want without the long wait. Best of all, I can share this delightful treat with friends and family, just like my grandmother did with me. So, let’s create our own cherished moments together—one mini cheesecake cup at a time!
Ingredients
-
1 cup graham cracker crumbs
- This creates the crunchy crust! You can easily make your own by crushing whole graham crackers in a food processor or using store-bought crumbs for convenience.
-
3 tbsp melted butter
- The butter adds richness and helps bind the crust together. If you’re looking for a lighter option, you can swap it with coconut oil or even applesauce for a healthier twist.
-
8 oz cream cheese, softened
- The star of the show! Softening the cream cheese makes it easier to mix and creates that smooth, creamy texture we all crave. For a lighter version, try using low-fat cream cheese or yogurt.
-
1/4 cup sugar
- This adds sweetness to the filling. Feel free to adjust the sweetness based on your preference—honey or maple syrup can be great substitutes!
-
1 tsp vanilla extract
- Vanilla enhances the flavor, infusing it with warmth. If you’re feeling adventurous, consider adding a splash of almond or lemon extract for a unique twist.
-
1/2 cup heavy cream
- This is what gives our cheesecake filling its luscious texture. For a dairy-free alternative, you might opt for coconut cream instead.
-
Fresh berries for topping
- Berries not only enhance the aesthetics but also add a burst of freshness to each bite. Feel free to use strawberries, blueberries, raspberries, or whatever is in season!
Step-by-Step Instructions
-
Prepare the Crust:
Start by mixing the graham cracker crumbs and melted butter in a medium bowl until combined. You want the texture to resemble wet sand. If it feels too dry, drizzle in a bit more melted butter. This will help the crumbs stick together. -
Distribute into Cups:
Using a spoon or your fingers, press the crumb mixture firmly into the bottom of your mini dessert cups or muffin tins. Make sure to pack it tightly so your crust holds its shape. A flat-bottomed glass works wonders for this! -
Mix the Filling:
In another bowl, beat the softened cream cheese until smooth and creamy. I recommend using an electric mixer for this step to avoid any lumps. Gradually add the sugar and vanilla extract, mixing until fully incorporated. -
Whip the Cream:
In a separate bowl, whip the heavy cream until soft peaks form. This is where the magic happens! Gently fold the whipped cream into the cream cheese mixture. Use a spatula in a gentle upward motion to keep the mixture light and airy. -
Combine Fillings:
Once the whipped cream is incorporated, your cheesecake filling is ready! Spoon the mixture into your pre-prepared cups, filling each one generously. You can go as high as you want—these mini cheesecakes are meant to be decadent! -
Chill in the Fridge:
Cover your mini cheesecake cups with plastic wrap and let them chill in the fridge for at least 1 hour. This will help set the filling. If you’re in a rush, even 30 minutes will do the trick. -
Top with Berries:
Just before serving, load up each cheesecake with fresh berries. This not only looks beautiful but adds a refreshing touch to every rich bite.
And voilà! Your No-Bake Mini Cheesecake Cups are ready to dazzle your taste buds and impress your guests!
Serving Suggestions
To serve these adorable cheesecake cups, arrange them on a colorful platter for an eye-catching display. You can also drizzle some homemade berry sauce or a sprinkle of powdered sugar on top for added flair. If you want to create a more interactive experience, set out extra berries and toppings so your guests can customize their mini cheesecakes. Enjoy with a fork, or for the adventurous, dig in directly with a spoon!
Recipe Variations
-
Chocolate Lovers’ Delight:
Swirl in some melted chocolate into your cheesecake filling for a chocolate version! You can even top it with chocolate shavings. -
Citrus Twist:
Add a teaspoon of lemon or orange zest to the filling for a bright, zesty flavor that’ll perk up your palate. -
Nutty Crust:
Mix in crushed nuts, like pecans or almonds, with the graham cracker crumbs for a nutty crunch. You can also use crushed cookies like Oreos for a fun twist! -
Vegan Version:
Replace the cream cheese with a vegan cream cheese alternative, use coconut cream instead of heavy cream, and sweeten with maple syrup for a delicious dairy-free option. -
Mini Layered Cheesecake:
Layer the filling with different flavored yogurt for a fun and colorful presentation! Each layer can have a unique flavor profile that keeps things exciting.
Chef’s Notes
Food has a funny way of transporting us back in time. Whenever I make these Mini Cheesecake Cups, I think about my grandma’s kitchen, that summer day, and the family gatherings filled with laughter. This recipe has evolved over the years—what started as a simple cheesecake has transformed into a crowd-pleasing, no-bake delight that’s perfect for any occasion. Plus, it’s a time-saver that lets you focus on what really matters: savouring those sweet moments with loved ones.
FAQs and Troubleshooting
-
What if my cheesecake filling is lumpy?
Make sure you’re mixing the cream cheese until it’s really smooth before adding the sugar. If you find lumps after combining everything, you can quickly whip it with a blender! -
Can I make these ahead of time?
Absolutely! You can make them a day in advance. Just keep them in the fridge, covered, until you’re ready to serve them. -
What if I don’t have mini cups?
No worries! You can use a muffin tin or even a large dessert dish for a family-style cheesecake. Just adjust the chilling time accordingly. -
How long can I store these?
They’ll stay fresh in an airtight container in the fridge for about 3-4 days. Although, I doubt they’ll last that long—the taste is simply irresistible!
Nutritional Info
While I’m not a dietitian, I can tell you these No-Bake Mini Cheesecake Cups are a delightful treat worth enjoying in moderation! If you’re interested in specific nutritional info (calories, sugar content, etc.), feel free to use an online calculator based on the ingredients you choose.
So there you have it! No-Bake Mini Cheesecake Cups that are quick, easy, and utterly delicious. Now it’s your turn to create some sweet memories in the kitchen. Happy baking (or, should I say, chilling)! Enjoy!
PrintNo-Bake Mini Cheesecake Cups
Quick and easy no-bake mini cheesecake cups topped with fresh berries, perfect for satisfying your sweet cravings in just 15 minutes.
- Prep Time: 15 minutes
- Cook Time: 0 minutes
- Total Time: 75 minutes
- Yield: 4 servings 1x
- Category: Dessert
- Method: No-Bake
- Cuisine: American
- Diet: Vegetarian
Ingredients
- 1 cup graham cracker crumbs
- 3 tbsp melted butter
- 8 oz cream cheese, softened
- 1/4 cup sugar
- 1 tsp vanilla extract
- 1/2 cup heavy cream
- Fresh berries for topping
Instructions
- Prepare the crust: Start by mixing the graham cracker crumbs and melted butter in a medium bowl until combined.
- Distribute into cups: Press the crumb mixture firmly into the bottom of mini dessert cups or muffin tins.
- Mix the filling: Beat the softened cream cheese until smooth, then add the sugar and vanilla extract.
- Whip the cream: In a separate bowl, whip the heavy cream until soft peaks form, then fold into the cream cheese mixture.
- Combine fillings: Spoon the mixture into the prepared cups, filling each one generously.
- Chill in the fridge: Cover with plastic wrap and chill for at least 1 hour.
- Top with berries: Just before serving, add fresh berries on top of each cheesecake.
Notes
These mini cheesecakes can be made a day in advance and are perfect for any occasion.
Nutrition
- Serving Size: 1 cup
- Calories: 220
- Sugar: 10g
- Sodium: 200mg
- Fat: 14g
- Saturated Fat: 8g
- Unsaturated Fat: 6g
- Trans Fat: 0g
- Carbohydrates: 22g
- Fiber: 1g
- Protein: 3g
- Cholesterol: 40mg
Keywords: cheesecake, no-bake dessert, mini cheesecake, easy dessert, quick recipe