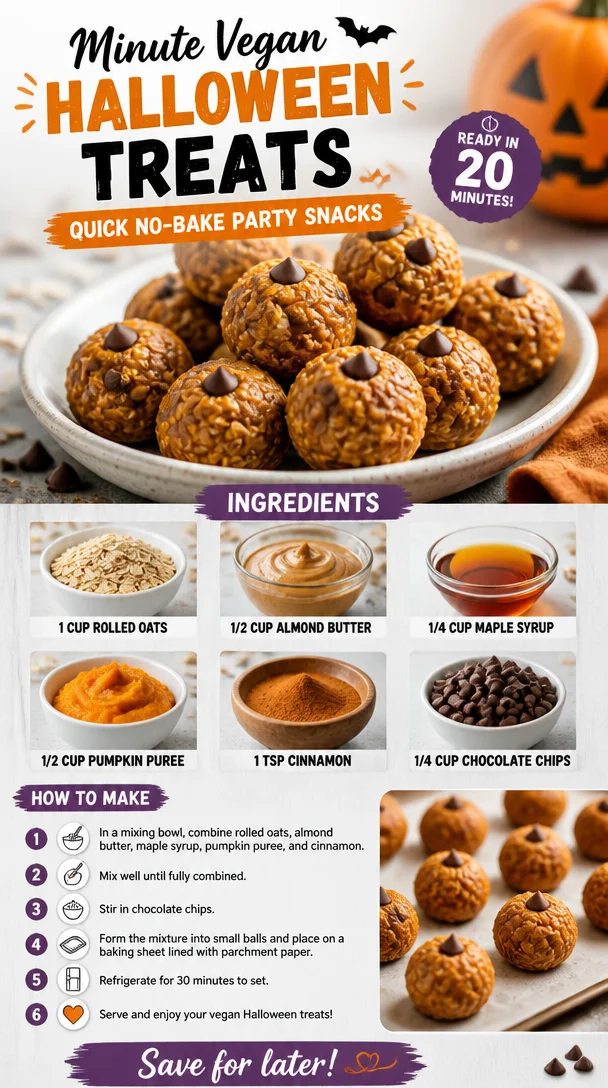
Minute Vegan Halloween Treats: Quick No-Bake Party Snacks
Spooktacular Vegan Halloween Treats: Your Go-To Recipe for Ghoulish Goodness
It’s that time of year again! The leaves are changing colors, the air is crisp, and a magical sense of mischief looms in the atmosphere. As Halloween approaches, our hearts—and stomachs—begin to yearn for delightful treats that bring us back to our childhood. I’m sure you can recall those carefree autumn days filled with pumpkin patches, spirited costume parties, and, of course, sweet indulgences. But what if I told you that delicious treats doesn’t have to mean sacrificing your health or your values? Whether you’re a die-hard vegan or just someone who loves tasty snacks, I’ve got a spooktacular recipe that’ll knock your socks off!
Welcome to Clean Plate Cravings, where fresh, feel-good food meets real life—even on Halloween! Today, we’re whipping up some delectable Vegan Pumpkin Oat Bites that are perfect for your Halloween festivities. These treats are not only easy to make but also pack a punch of flavor that everyone will adore. Plus, they’re made with wholesome ingredients like rolled oats, almond butter, and pumpkin puree, ensuring that your sweet tooth doesn’t get out of hand. So, grab your mixing bowl and let’s get started on this baking adventure that’s bound to impress friends and family alike.
A Sweet Memory from Halloween Past
I still remember my first Halloween party as a kid—it was nothing short of magical! We had all dressed up in our favorite costumes, ready to knock on doors and collect mountains of candy. Still, it was the food table that really stole the show. My mom, who had a knack for baking, prepared a smorgasbord of treats that were both delicious and a little creepy—think ghost-shaped sugar cookies and pumpkin spice cupcakes with ghoulish green frosting. I can still taste those delicate cupcakes.
Fast forward to today, and I strive to create that same joyous energy in my kitchen, but with a healthier twist. These Vegan Pumpkin Oat Bites are a nod to those delightful treats from my childhood, delivering all the nostalgic vibes without the guilt. They’re incredibly easy to whip up, and the best part? You won’t need to spend hours in the kitchen!
Ingredients
Here’s what you’ll need to make these delicious vegan pumpkin oatmeal bites:
-
1 cup rolled oats
Rolled oats are the star ingredient here. They provide a hearty texture and are packed with fiber, which keeps you feeling satisfied. If you don’t have rolled oats on hand, quick oats can work in a pinch, though they might alter the texture slightly. -
1/2 cup almond butter
Almond butter loves to add creaminess to our mixture and is a great source of healthy fats. Prefer peanut butter? Go for it! Just keep in mind that the flavor might change a little, but it’ll still be delicious. -
1/4 cup maple syrup
This liquid gold not only sweetens our bites but also gives them a lovely depth of flavor. If you’re looking for an alternative, agave syrup or date syrup could be great substitutes, providing similar sweetness. -
1/2 cup pumpkin puree
The pumpkin puree brings in that quintessential fall flavor. If you’re not a fan of pumpkin, mashed bananas can work for a sweeter twist, but they will change the taste profile. -
1 tsp cinnamon
Cinnamon adds a warm, aromatic touch that perfectly complements the pumpkin. Not a fan of cinnamon? You can swap it out for pumpkin spice for a delightful complexity of flavors. -
1/4 cup chocolate chips
A treat wouldn’t be complete without a touch of chocolate, right? You can use dark chocolate for a bittersweet flavor or go dairy-free with vegan chocolate chips. If you’re feeling adventurous, try dried fruit or nuts instead.
Let’s dive into making these bites of bliss!
Step-by-Step Instructions
-
Preheat your oven.
Set your oven to 350°F (175°C). Preheating ensures even cooking, so don’t skip this step! -
Mix your dry ingredients.
In a large mixing bowl, combine the rolled oats and cinnamon thoroughly. Stirring these together first helps ensure that the cinnamon is evenly distributed throughout the mixture, giving every bite a burst of flavor. -
Combine the wet ingredients.
In a separate bowl (or the same one if you’re feeling daring), mix together the almond butter, maple syrup, and pumpkin puree. You want these ingredients to blend together smoothly, creating a luscious, creamy mixture that will become the base of our bites. Use a hand mixer if you have one for a quick blend! -
Combine wet and dry.
Pour the wet mixture into the dry bowl of oats, giving it a good stir with a spatula or wooden spoon. You’ll want to mix until all the oats are coated, and you’ve created a dough-like consistency. If it feels a little dry, don’t be shy—add a splash of almond milk to loosen it up. -
Fold in the chocolate chips.
Now for the fun part! Gently fold in the chocolate chips (or your chosen mix-ins). This step adds delightful pockets of sweetness throughout, making every bite a surprise. -
Scoop onto a baking sheet.
Using a cookie scoop or just your hands, form small balls of dough and place them onto a lined baking sheet. Keep them about an inch apart; they won’t spread much, so you can fit a good number of them on one sheet! -
Bake until golden.
Pop your baking sheet into the preheated oven and let them bake for about 12-15 minutes. You’ll know they’re done when they start to turn golden brown and give off a mouthwatering aroma. -
Cool and devour.
Once out of the oven, allow the bites to cool on the baking sheet for about 5 minutes before transferring them to a wire rack. This step is crucial as it helps them firm up!
Serving Suggestions
When it comes to serving these Vegan Pumpkin Oat Bites, feel free to get a little creative! They make for a fabulous treat at Halloween parties, especially when arranged on a festive platter with some spooky decorations. Serve them with a side of dairy-free yogurt or a drizzle of more almond butter for added decadence. You can even garnish them with a sprinkle of pumpkin seeds or coconut flakes for a little extra flair!
Recipe Variations
Here are a few twists you can try with this recipe:
- Nut-Free Option: Replace almond butter with sunbutter for a school-safe snack that all kids can enjoy.
- Spooky Additions: Add in a few drops of orange food coloring to the mixture for a fun festive touch that makes them look even more like Halloween treats!
- Sweet and Spicy: Mix in 1 teaspoon of nutmeg or ginger for a spicier flavor profile. These spices elevate the seasonal vibe and can be a delightful surprise for your guests!
- Protein Boost: Stir in a scoop of your favorite plant-based protein powder for a pre- or post-workout snack that fuels your day.
Chef’s Notes
As I developed this recipe, I experimented with several different variations, and I can honestly say that these little bites have evolved over time. I started out with a more traditional cookie base, but discovered that these oat bites were not only healthier—they also had a unique texture that would make them a perfect snack to share with friends! The best part is the memories made while baking together as a family, laughing over the mess we create, and the aroma that fills the air as they bake. It’s these moments that make the kitchen feel like home.
FAQs and Troubleshooting
-
Q: My bites crumbled apart. What did I do wrong?
A: This could happen if you didn’t use enough binding ingredients like almond butter or pumpkin puree. Make sure to always measure accurately! Adding a little more almond butter could fix this issue. -
Q: Can I use quick oats instead of rolled oats?
A: Yes! Quick oats will work, but your bites may be a little softer due to the finer texture. However, they’ll still be delicious! -
Q: How long do these bites last?
A: They should keep well in an airtight container for about 5-7 days at room temperature or up to two weeks in the fridge. You can also freeze them for longer storage! -
Q: Can I add other ingredients?
A: Absolutely! Feel free to toss in dried fruit, chopped nuts, or seeds for added flavor and texture.
Nutritional Info
These Vegan Pumpkin Oat Bites are not only delicious but also nourishing! Each bite contains a robust mix of fiber and healthy fats, making them a satisfying snack. They contain about 120 calories, 4g protein, 8g fat, 10g carbohydrates, and a wholesome serving of vitamins from the pumpkin.
So there you have it, friends—your ultimate guide to creating these delightful Vegan Pumpkin Oat Bites for Halloween or any day of the week! Enjoy whipping these up in your kitchen, and may your Halloween be filled with laughter, joy, and, of course, fantastic food!
PrintVegan Pumpkin Oat Bites
Delicious and healthy Vegan Pumpkin Oat Bites, perfect for Halloween festivities, made with wholesome ingredients.
- Prep Time: 10 minutes
- Cook Time: 15 minutes
- Total Time: 25 minutes
- Yield: 24 bites 1x
- Category: Dessert
- Method: Baking
- Cuisine: Vegan
- Diet: Vegan
Ingredients
- 1 cup rolled oats
- 1/2 cup almond butter
- 1/4 cup maple syrup
- 1/2 cup pumpkin puree
- 1 tsp cinnamon
- 1/4 cup chocolate chips
Instructions
- Preheat your oven to 350°F (175°C).
- Mix your dry ingredients in a large bowl: rolled oats and cinnamon.
- Combine the wet ingredients in a separate bowl: almond butter, maple syrup, and pumpkin puree.
- Pour the wet mixture into the dry ingredients and mix until combined.
- Fold in the chocolate chips.
- Scoop small balls of dough onto a lined baking sheet.
- Bake for about 12-15 minutes until golden brown.
- Cool on the baking sheet for 5 minutes before transferring to a wire rack.
Notes
For added flair, serve with dairy-free yogurt or almond butter, and garnish with pumpkin seeds or coconut flakes.
Nutrition
- Serving Size: 2 bites
- Calories: 120
- Sugar: 5g
- Sodium: 50mg
- Fat: 8g
- Saturated Fat: 1g
- Unsaturated Fat: 7g
- Trans Fat: 0g
- Carbohydrates: 10g
- Fiber: 2g
- Protein: 4g
- Cholesterol: 0mg
Keywords: vegan treats, pumpkin recipes, Halloween snacks, healthy desserts
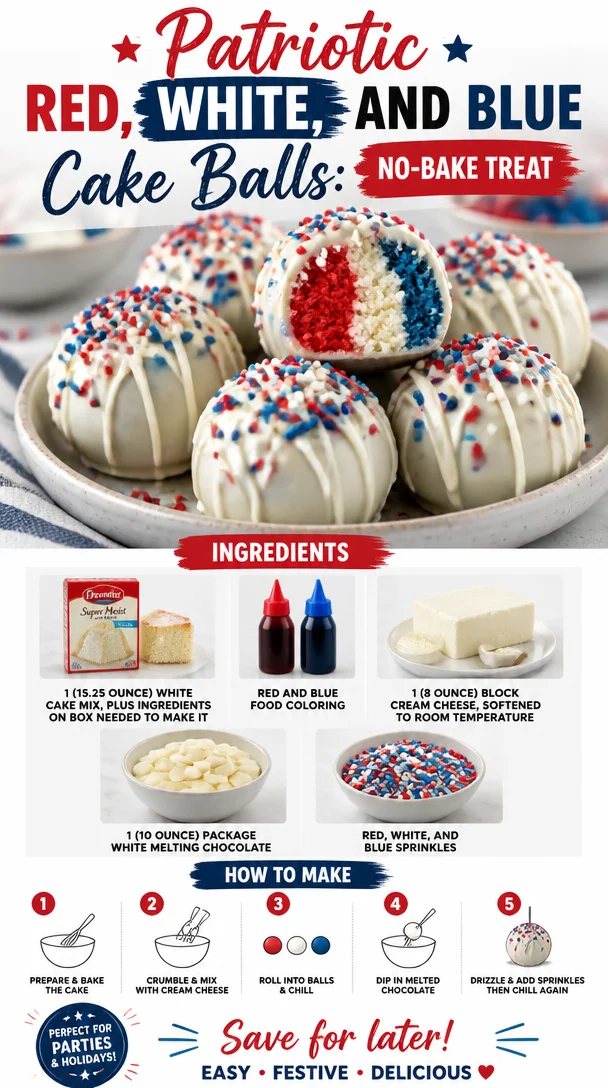
Patriotic Red, White, and Blue Cake Balls: No-Bake Treat
Red, White, and Blue Cake Balls: A Festive Treat for Every Celebration!
Welcome to Clean Plate Cravings! I’m Ava Carter, and today we’re diving into a delightful treat that’ll have you celebrating in style: Red, White, and Blue Cake Balls! Perfect for summer barbecues, Fourth of July gatherings, or just because you need a burst of festive fun in your day, these cake balls are as tasty as they are eye-catching. Picture this: a moist white cake transformed into luscious balls of joy, coated in velvety white chocolate, and sprinkled with all the patriotic flair your heart desires. Are you ready to roll up your sleeves and create something truly special? Let’s get started!
A Sweet Slice of Nostalgia
Let me take you back to a sun-drenched July afternoon when I was just a little girl, knees scraped from playing outside and a grin plastered on my face. Each year, my family would have a potluck for Independence Day, where everyone brought their favorite dish to share. My Aunt Linda was known for her incredible dessert table, and her pièce de résistance was a layered red, white, and blue cake.
I remember scampering around, stealing tastes of whipped cream and sneaking sprinkles whenever no one was looking. But it was her cake, bursting with flavor and patriotism, that always stole the show. Inspired by those joyful days, I wanted to create something that captured that same spirit but in a fun, bite-sized treat. Enter the Red, White, and Blue Cake Balls! A little piece of nostalgia packed with a whole lot of love.
Ingredients
Before we let the fun begin, let’s gather everything we need to whip up these dazzling cake balls:
-
1 (15.25-ounce) white cake mix
This is the base of the cake balls. Go for a box mix for convenience, or use your favorite homemade white cake recipe! -
Ingredients on box needed to make it
Usually, this includes eggs, oil, and water. Tweak the quantities as per your box instructions. -
Red and blue food coloring
Don’t be shy with the colors! This is what makes our cake balls eye-catching. You can use gel or liquid coloring based on what’s available. -
1 (8-ounce) block of cream cheese, softened to room temperature
This will give our cake balls a creamy texture and a deliciously tangy flavor. Want a lighter option? Swap it out for Greek yogurt! -
1 (10-ounce) package of white melting chocolate
This is the star of our outer coating, giving each cake ball a beautiful white shell. If you’re feeling adventurous, you can also try dark chocolate or yogurt-coating. -
Red, white, and blue sprinkles
These are perfect for the final touch! Use classic sprinkles or even themed edible glitter for extra sparkle.
Step-by-Step Instructions
Alright, let’s get baking! Grab your mixing bowl and let’s create these beauties step by step.
-
Bake the Cake
Preheat your oven according to the instructions on the cake mix box. Prepare your cake pans as directed (usually greasing and flouring them). Mix the cake batter following the box instructions, but leave out the food coloring for now. Pour the batter into the pan, and let it bake until golden brown and a toothpick inserted in the center comes out clean. While it bakes, take a moment to savor that smell wafting through your kitchen—it’s heavenly! -
Cool the Cake
Once the cake is out of the oven, allow it to cool in the pan for about 10-15 minutes. Then, turn it out onto a wire rack to cool completely. This is key because if the cake is warm, it’ll be harder to crumble without it clumping together later. Plus, nobody likes burnt fingers! -
Color the Cake
When the cake is cool, it’s time to crumble it up. Use your hands or a fork to break the cake into small crumbs. Next, divide the crumbs into two bowls: one for the red cake and one for the blue. Add the red and blue food coloring to their respective bowls, mixing until you achieve vibrant colors. This step is super fun—just like playing with dough as a kid! -
Create the Cake Mixture
Now, it’s time to incorporate the softened cream cheese! Add about half of the cream cheese to each bowl of crumbled cake. Mix thoroughly until all the ingredients are well combined. You want a consistency that’s moldable but not too wet. If it feels too dry, add a little more cream cheese until it holds together. -
Shape the Balls
Grab a tablespoon or a small cookie scoop, and form small balls of the cake mixture. Aim for about 1-inch bites; they will be adorably palm-sized! Roll them gently between your palms to smooth out any edges. Don’t forget to make some red and some blue ones—you’ll want a mix for the final display! -
Chill the Cake Balls
Place the cake balls onto a lined baking sheet and pop them into the fridge for about an hour to firm up. This is a crucial step since it will make coating them with chocolate much easier. If you’re short on time, just 20-30 minutes in the freezer will do the trick! -
Melt the White Chocolate
While the cake balls are chilling, get your melting chocolate ready! Follow the package instructions for melting in the microwave or using a double boiler. Be careful not to overheat the chocolate; it should be silky smooth and ready to coat! -
Coat the Cake Balls
Once your cake balls are well-chilled, it’s time for the best part! Dip each ball into the melted white chocolate, ensuring it’s fully coated. I like to use a fork to help lift the balls out of the chocolate and let the excess drip off. -
Add the Sprinkles
Immediately after coating each ball, place it back on the baking sheet and sprinkle with the festive red, white, and blue sprinkles. This step adds that perfect touch of flair, so don’t forget it! -
Chill Again
For the final lap, return the coated cake balls to the fridge for about 30 minutes to set the chocolate shell. This is when they firm up beautifully, making them ready to serve!
Serving Suggestions
Now that your Red, White, and Blue Cake Balls are cool and set, it’s time to show them off! Arrange them on a festive platter, adding some themed decor like mini flags or edible flowers for a gorgeous presentation. You could even serve them in cupcake liners for a cute, portable option. Perfect for summer parties, barbecues, and family gatherings—your guests will be delighted!
Recipe Variations
Feeling inspired? Here are some exciting twists you can try with these cake balls:
- Chocolate Cake Mix: Swap the white cake mix for a chocolate cake mix for a rich twist. The combo of colors will still be stunning!
- Cream Cheese Swirl: Add some raspberry or strawberry jam to the cream cheese for a fruity flavor burst.
- Nutty Delight: Mix in some finely chopped nuts for added texture and a nutty flavor.
- Flavor Infusions: Incorporate a teaspoon of vanilla or almond extract into the cake batter for an extra flavor kick.
- Dairy-Free Option: Use dairy-free cream cheese and melting chocolate to create a vegan-friendly version!
Chef’s Notes
As a chef who loves to experiment, this recipe holds a special place in my heart. I’ve made it repeatedly and can attest to how forgiving it is. You can always tweak the colors or flavors based on your mood and the season! I remember one time, I forgot to add the food coloring and ended up with a surprise white cake ball—delicious, but not quite as festive! So, keep the colors in mind, and feel free to get creative.
FAQs and Troubleshooting
Here are a few common questions and solutions if you encounter any hiccups as you make these delightful cake balls:
-
What if the cake balls are too dry?
If the mixture is crumbling apart, simply add more cream cheese gradually until the desired consistency is achieved. -
My chocolate is too thick! What should I do?
If your melting chocolate is too thick, you can add a small amount of coconut oil or shortening. This will help thin it out while still keeping it velvety. -
How do I store the cake balls?
Store any leftovers in an airtight container in the fridge for up to a week. They also freeze well, so you can enjoy them later! -
Can I use other food colorings?
Yes! Just make sure whichever food coloring you use is gel or liquid type and is safe for baking.
Nutritional Info
While enjoying these cake balls, keep in mind they’re meant as a delightful treat rather than a daily snack. A single ball has approximately 150 calories, but indulge in moderation, and savor each bite!
Now that you have a recipe to create these beautiful Red, White, and Blue Cake Balls, I’m excited to see how your creations turn out! Whether it’s a simple family gathering or a big summer celebration, these cake balls are sure to be a hit. Happy baking, and remember—keep it fresh, simple, and seriously delicious!
PrintRed, White, and Blue Cake Balls
Delightful cake balls perfect for summer barbecues and Fourth of July gatherings, combining moist white cake, creamy filling, and festive colors.
- Prep Time: 30 minutes
- Cook Time: 30 minutes
- Total Time: 60 minutes
- Yield: 24 servings 1x
- Category: Dessert
- Method: Baking
- Cuisine: American
- Diet: Vegetarian
Ingredients
- 1 (15.25-ounce) white cake mix
- Ingredients on box needed to make it (usually eggs, oil, and water)
- Red and blue food coloring
- 1 (8-ounce) block of cream cheese, softened
- 1 (10-ounce) package of white melting chocolate
- Red, white, and blue sprinkles
Instructions
- Preheat your oven according to the instructions on the cake mix box.
- Prepare your cake pans as directed.
- Mix the cake batter following the box instructions, leaving out the food coloring for now.
- Pour the batter into the pan and let it bake until golden brown and a toothpick comes out clean.
- Cool the cake in the pan for about 10-15 minutes, then turn it out onto a wire rack to cool completely.
- Crumble the cooled cake into small crumbs, dividing them into two bowls.
- Add red and blue food coloring to the respective bowls, mixing well.
- Create the cake mixture by adding half of the cream cheese to each bowl and mixing until combined.
- Form small balls of the cake mixture using a tablespoon or cookie scoop.
- Chill the cake balls on a lined baking sheet for about an hour in the fridge.
- Melt the white chocolate according to package instructions.
- Dip each chilled cake ball into the melted chocolate, ensuring it’s fully coated.
- Add the sprinkles immediately after coating.
- Chill again for about 30 minutes to set the chocolate shell.
Notes
These cake balls are perfect for summer parties and can be customized with different cake mixes and flavors.
Nutrition
- Serving Size: 1 cake ball
- Calories: 150
- Sugar: 10g
- Sodium: 160mg
- Fat: 7g
- Saturated Fat: 4g
- Unsaturated Fat: 2g
- Trans Fat: 0g
- Carbohydrates: 20g
- Fiber: 0g
- Protein: 2g
- Cholesterol: 20mg
Keywords: cake balls, red white blue, festive dessert, summer treats, Fourth of July treats