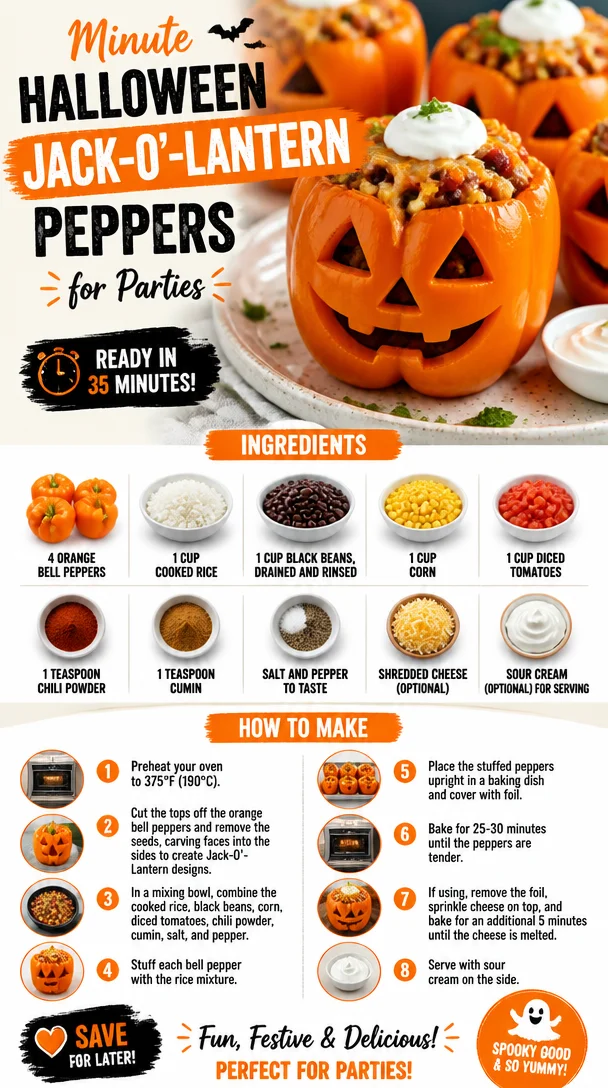
Minute Halloween Jack-O’-Lantern Peppers for Parties
Halloween Jack-O’-Lantern Peppers: A Spooky, Tasty Treat
Welcome, fellow foodies! As the leaves start to turn and the nights grow longer, there’s an undeniable magic in the air—Halloween season is upon us! There’s something truly enchanting about celebrating this time of year, especially when it comes to getting creative in the kitchen. Today, I want to share a festive dish that’s not only fun to make but also delicious and nutritious: Halloween Jack-O’-Lantern Peppers! 🎃
Imagine walking into your kitchen, the smell of spices wafting through the air, and out of the oven come adorable, glowing jack-o’-lanterns just bursting with flavor. These pepper creations are perfect for Halloween gatherings, cozy family dinners, or even just a cheerful weeknight meal. Plus, they are packed with wholesome ingredients that will keep you feeling energized and satisfied. So, grab your chef’s hat, and let’s dive into this spooky culinary adventure together!
A Personal Tale of Halloween and Food
Every Halloween, my family had a tradition that involved creativity and lots of laughter. I remember one year when I was in middle school; my mom decided we’d make Jack-O’-Lanterns, but instead of carving pumpkins, we turned to our vibrant orange bell peppers. As an ambitious foodie even back then, I was thrilled to add a culinary twist to our spooky decorations!
We spent the evening laughing, scooping out the insides, and designing silly faces to give each pepper its own unique personality. In between our creative bursts, we cooked up a delicious filling of rice, beans, and spices. I still remember the aroma of chili powder and cumin dancing around the kitchen, mixing with our giggles—it felt like pure magic. That night, we not only filled our bellies but also our hearts with joy and creativity.
Now, every October, I cherish those memories and carry that spirit into the kitchen. It’s a delightful reminder that cooking can be both nourishing and whimsical. So, let’s recreate that magic with these Jack-O’-Lantern Peppers!
Ingredients
Here’s what you’ll need to craft your own Halloween Jack-O’-Lantern Peppers:
-
4 orange bell peppers
Bright and cheerful, these peppers are perfect for carving spooky faces. Feel free to switch them out for yellow or red peppers if orange is out of season! -
1 cup cooked rice
Use any variety you prefer—white, brown, or even cauliflower rice for a lighter option. This serves as a hearty base for your filling while absorbing all those delicious flavors! -
1 cup black beans, drained and rinsed
High in protein and fiber, black beans add substance to your dish. If you don’t have them on hand, pinto beans or chickpeas will also work beautifully. -
1 cup corn
Sweet corn adds a pop of color and a bit of sweetness. Fresh, frozen, or even canned works here! Just make sure to drain and rinse if you’re using canned corn. -
1 cup diced tomatoes
These bring moisture and acidity to the filling. If fresh tomatoes aren’t available, canned diced tomatoes are a great alternative! -
1 teaspoon chili powder
Adds a warm, smoky flavor. If you like your food spicier, opt for a chipotle chili powder or add a shake of cayenne pepper! -
1 teaspoon cumin
Earthy and aromatic, cumin elevates the taste of your dish. Ground coriander is a nice substitute if you find yourself out of cumin. -
Salt and pepper to taste
Essential for rounding out the flavors of your dish. Don’t skip this step—it makes all the difference! -
Shredded cheese (optional)
For a cheesy layer on top, use cheddar, Monterey Jack, or a dairy-free alternative. -
Sour cream (optional)
A dollop on top adds creaminess and balances the flavors! Greek yogurt is a great swap for a healthier twist.
Step-by-Step Instructions
Step 1: Preheat your oven
Preheat your oven to 375°F (190°C). The perfect oven temperature for roasting the peppers to a tender finish and allowing the flavors to meld beautifully.
Step 2: Prepare the bell peppers
Cut the tops off the orange bell peppers and scoop out the seeds and membranes. Don’t toss those tops just yet! You can use them as “hats” for your pumpkins. Set the peppers upright in a baking dish. This is a great time to create your jack-o’-lantern faces—use a paring knife to carve silly or spooky expressions on the sides!
Step 3: Create the filling
In a large mixing bowl, combine cooked rice, black beans, corn, diced tomatoes, chili powder, cumin, salt, and pepper. This blend should be colorful and full of texture! Stir until everything is well combined. Chef Tip: Use the back of a fork to slightly mash the beans for a creamier filling!
Step 4: Fill those peppers!
Spoon the filling mixture into each bell pepper, packing it in gently but firmly. Don’t be shy—fill them to the brim! This is where the flavor all comes together. If you’re feeling adventurous, toss in some shredded cheese right in with the filling for an extra cheesy center!
Step 5: Bake the peppers
Place the stuffed peppers in the preheated oven and bake for about 30 minutes, or until the peppers are tender and slightly charred. Chef Hack: For a cheesy topping, sprinkle shredded cheese on top for the last 10 minutes of baking!
Step 6: Serve and enjoy
Once you pull them out of the oven, let them cool for a few minutes before serving.
Serving Suggestions
To plate these enchanting Jack-O’-Lantern Peppers, place each pepper on a colorful plate and drizzle with sour cream for a little extra flair. You could also serve them alongside a simple green salad or corn on the cob to keep the meal light and lively.
Recipe Variations
Feel free to get creative with these stuffed peppers! Here are a few tasty twists to consider:
- Mexican-Style Twist: Add taco spice mix or diced jalapeños to the filling for a spicy kick!
- Italian Flair: Use quinoa instead of rice, and mix in Italian herbs like oregano and basil.
- Veggie-Loaded: Add spinach or chopped zucchini to amp up the veggie content and add even more color.
- Meat Lover’s Delight: Mix in ground turkey or beef for a heartier filling amidst the beans and rice.
- Gluten-Free: Stick with rice or use gluten-free bread crumbs for a delightful twist!
Chef’s Notes
These Halloween Jack-O’-Lantern Peppers have gone through many iterations over the years! Initially, my filling consisted solely of rice and beans, but over time I discovered different ingredients that harmonized beautifully. The little nuances, like adding corn or tomatoes, have transformed them into a colorful fête of flavors. Plus, the happy grins on everyone’s faces while eating them make it all worthwhile!
FAQs and Troubleshooting
Q: Can I prepare the peppers in advance?
A: Absolutely! You can prepare the filling ahead of time, stuff the peppers, and refrigerate them until you’re ready to bake. Just add a few extra minutes to the baking time if cooking from cold.
Q: What if my filling is too dry?
A: If your filling is feeling a bit dry, add a splash of vegetable or chicken broth to moist it up. You want a nice, cohesive filling that holds together well.
Q: Can I use other colors of bell peppers?
A: For sure! Feel free to use green, yellow, or even mini peppers. Just keep in mind that green peppers tend to have a slightly more bitter flavor.
Q: How do I store leftovers?
A: These Peppers can be stored in an airtight container in the fridge for up to 3 days. Reheat in the oven or microwave until warm!
Nutritional Info
(Optional but helpful)
These Jack-O’-Lantern Peppers are packed with nutrients and flavor! Each pepper contains a wealth of vitamins, fiber, and protein. Nutritional values will vary based on variations and toppings—but you can expect a healthy dish that satisfies without guilt!
Embrace your Halloween spirit, gather your loved ones, and enjoy these delightful Jack-O’-Lantern Peppers! Cooking should always be filled with joy and creativity, just like the memories we make while doing it. Happy cooking, and enjoy the boo-tiful Halloween season! 🎃✨
PrintHalloween Jack-O’-Lantern Peppers
A festive and delicious treat for Halloween, these jack-o’-lantern stuffed peppers are filled with a tasty mixture of rice, beans, and spices.
- Prep Time: 15 minutes
- Cook Time: 30 minutes
- Total Time: 45 minutes
- Yield: 4 servings 1x
- Category: Main Course
- Method: Baking
- Cuisine: American
- Diet: Vegetarian
Ingredients
- 4 orange bell peppers
- 1 cup cooked rice
- 1 cup black beans, drained and rinsed
- 1 cup corn
- 1 cup diced tomatoes
- 1 teaspoon chili powder
- 1 teaspoon cumin
- Salt and pepper to taste
- Shredded cheese (optional)
- Sour cream (optional)
Instructions
- Preheat your oven to 375°F (190°C).
- Prepare the bell peppers by cutting the tops off and scooping out the seeds and membranes.
- Create the filling by combining cooked rice, black beans, corn, diced tomatoes, chili powder, cumin, salt, and pepper in a large mixing bowl.
- Fill each pepper with the mixture, packing it in gently.
- Bake the stuffed peppers for about 30 minutes, or until tender and slightly charred.
- Serve and enjoy after cooling for a few minutes.
Notes
Feel free to get creative with the filling by adding different spices or ingredients. Great for meal prep as the filling can be made ahead of time.
Nutrition
- Serving Size: 1 pepper
- Calories: 350
- Sugar: 5g
- Sodium: 400mg
- Fat: 12g
- Saturated Fat: 4g
- Unsaturated Fat: 6g
- Trans Fat: 0g
- Carbohydrates: 45g
- Fiber: 10g
- Protein: 15g
- Cholesterol: 30mg
Keywords: Halloween, stuffed peppers, vegetarian, spooky food, fall recipes
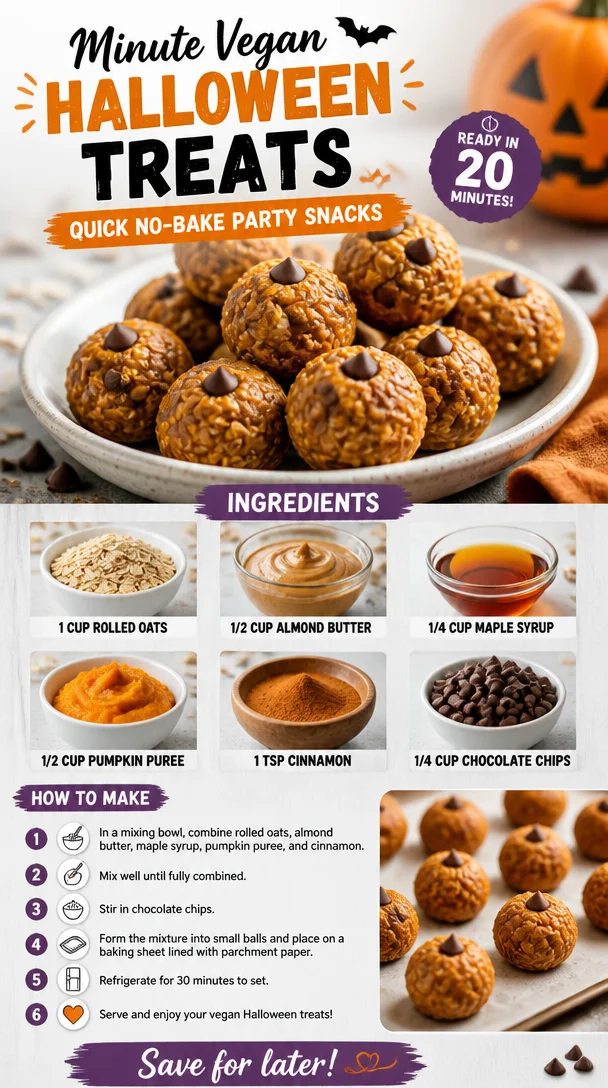
Minute Vegan Halloween Treats: Quick No-Bake Party Snacks
Spooktacular Vegan Halloween Treats: Your Go-To Recipe for Ghoulish Goodness
It’s that time of year again! The leaves are changing colors, the air is crisp, and a magical sense of mischief looms in the atmosphere. As Halloween approaches, our hearts—and stomachs—begin to yearn for delightful treats that bring us back to our childhood. I’m sure you can recall those carefree autumn days filled with pumpkin patches, spirited costume parties, and, of course, sweet indulgences. But what if I told you that delicious treats doesn’t have to mean sacrificing your health or your values? Whether you’re a die-hard vegan or just someone who loves tasty snacks, I’ve got a spooktacular recipe that’ll knock your socks off!
Welcome to Clean Plate Cravings, where fresh, feel-good food meets real life—even on Halloween! Today, we’re whipping up some delectable Vegan Pumpkin Oat Bites that are perfect for your Halloween festivities. These treats are not only easy to make but also pack a punch of flavor that everyone will adore. Plus, they’re made with wholesome ingredients like rolled oats, almond butter, and pumpkin puree, ensuring that your sweet tooth doesn’t get out of hand. So, grab your mixing bowl and let’s get started on this baking adventure that’s bound to impress friends and family alike.
A Sweet Memory from Halloween Past
I still remember my first Halloween party as a kid—it was nothing short of magical! We had all dressed up in our favorite costumes, ready to knock on doors and collect mountains of candy. Still, it was the food table that really stole the show. My mom, who had a knack for baking, prepared a smorgasbord of treats that were both delicious and a little creepy—think ghost-shaped sugar cookies and pumpkin spice cupcakes with ghoulish green frosting. I can still taste those delicate cupcakes.
Fast forward to today, and I strive to create that same joyous energy in my kitchen, but with a healthier twist. These Vegan Pumpkin Oat Bites are a nod to those delightful treats from my childhood, delivering all the nostalgic vibes without the guilt. They’re incredibly easy to whip up, and the best part? You won’t need to spend hours in the kitchen!
Ingredients
Here’s what you’ll need to make these delicious vegan pumpkin oatmeal bites:
-
1 cup rolled oats
Rolled oats are the star ingredient here. They provide a hearty texture and are packed with fiber, which keeps you feeling satisfied. If you don’t have rolled oats on hand, quick oats can work in a pinch, though they might alter the texture slightly. -
1/2 cup almond butter
Almond butter loves to add creaminess to our mixture and is a great source of healthy fats. Prefer peanut butter? Go for it! Just keep in mind that the flavor might change a little, but it’ll still be delicious. -
1/4 cup maple syrup
This liquid gold not only sweetens our bites but also gives them a lovely depth of flavor. If you’re looking for an alternative, agave syrup or date syrup could be great substitutes, providing similar sweetness. -
1/2 cup pumpkin puree
The pumpkin puree brings in that quintessential fall flavor. If you’re not a fan of pumpkin, mashed bananas can work for a sweeter twist, but they will change the taste profile. -
1 tsp cinnamon
Cinnamon adds a warm, aromatic touch that perfectly complements the pumpkin. Not a fan of cinnamon? You can swap it out for pumpkin spice for a delightful complexity of flavors. -
1/4 cup chocolate chips
A treat wouldn’t be complete without a touch of chocolate, right? You can use dark chocolate for a bittersweet flavor or go dairy-free with vegan chocolate chips. If you’re feeling adventurous, try dried fruit or nuts instead.
Let’s dive into making these bites of bliss!
Step-by-Step Instructions
-
Preheat your oven.
Set your oven to 350°F (175°C). Preheating ensures even cooking, so don’t skip this step! -
Mix your dry ingredients.
In a large mixing bowl, combine the rolled oats and cinnamon thoroughly. Stirring these together first helps ensure that the cinnamon is evenly distributed throughout the mixture, giving every bite a burst of flavor. -
Combine the wet ingredients.
In a separate bowl (or the same one if you’re feeling daring), mix together the almond butter, maple syrup, and pumpkin puree. You want these ingredients to blend together smoothly, creating a luscious, creamy mixture that will become the base of our bites. Use a hand mixer if you have one for a quick blend! -
Combine wet and dry.
Pour the wet mixture into the dry bowl of oats, giving it a good stir with a spatula or wooden spoon. You’ll want to mix until all the oats are coated, and you’ve created a dough-like consistency. If it feels a little dry, don’t be shy—add a splash of almond milk to loosen it up. -
Fold in the chocolate chips.
Now for the fun part! Gently fold in the chocolate chips (or your chosen mix-ins). This step adds delightful pockets of sweetness throughout, making every bite a surprise. -
Scoop onto a baking sheet.
Using a cookie scoop or just your hands, form small balls of dough and place them onto a lined baking sheet. Keep them about an inch apart; they won’t spread much, so you can fit a good number of them on one sheet! -
Bake until golden.
Pop your baking sheet into the preheated oven and let them bake for about 12-15 minutes. You’ll know they’re done when they start to turn golden brown and give off a mouthwatering aroma. -
Cool and devour.
Once out of the oven, allow the bites to cool on the baking sheet for about 5 minutes before transferring them to a wire rack. This step is crucial as it helps them firm up!
Serving Suggestions
When it comes to serving these Vegan Pumpkin Oat Bites, feel free to get a little creative! They make for a fabulous treat at Halloween parties, especially when arranged on a festive platter with some spooky decorations. Serve them with a side of dairy-free yogurt or a drizzle of more almond butter for added decadence. You can even garnish them with a sprinkle of pumpkin seeds or coconut flakes for a little extra flair!
Recipe Variations
Here are a few twists you can try with this recipe:
- Nut-Free Option: Replace almond butter with sunbutter for a school-safe snack that all kids can enjoy.
- Spooky Additions: Add in a few drops of orange food coloring to the mixture for a fun festive touch that makes them look even more like Halloween treats!
- Sweet and Spicy: Mix in 1 teaspoon of nutmeg or ginger for a spicier flavor profile. These spices elevate the seasonal vibe and can be a delightful surprise for your guests!
- Protein Boost: Stir in a scoop of your favorite plant-based protein powder for a pre- or post-workout snack that fuels your day.
Chef’s Notes
As I developed this recipe, I experimented with several different variations, and I can honestly say that these little bites have evolved over time. I started out with a more traditional cookie base, but discovered that these oat bites were not only healthier—they also had a unique texture that would make them a perfect snack to share with friends! The best part is the memories made while baking together as a family, laughing over the mess we create, and the aroma that fills the air as they bake. It’s these moments that make the kitchen feel like home.
FAQs and Troubleshooting
-
Q: My bites crumbled apart. What did I do wrong?
A: This could happen if you didn’t use enough binding ingredients like almond butter or pumpkin puree. Make sure to always measure accurately! Adding a little more almond butter could fix this issue. -
Q: Can I use quick oats instead of rolled oats?
A: Yes! Quick oats will work, but your bites may be a little softer due to the finer texture. However, they’ll still be delicious! -
Q: How long do these bites last?
A: They should keep well in an airtight container for about 5-7 days at room temperature or up to two weeks in the fridge. You can also freeze them for longer storage! -
Q: Can I add other ingredients?
A: Absolutely! Feel free to toss in dried fruit, chopped nuts, or seeds for added flavor and texture.
Nutritional Info
These Vegan Pumpkin Oat Bites are not only delicious but also nourishing! Each bite contains a robust mix of fiber and healthy fats, making them a satisfying snack. They contain about 120 calories, 4g protein, 8g fat, 10g carbohydrates, and a wholesome serving of vitamins from the pumpkin.
So there you have it, friends—your ultimate guide to creating these delightful Vegan Pumpkin Oat Bites for Halloween or any day of the week! Enjoy whipping these up in your kitchen, and may your Halloween be filled with laughter, joy, and, of course, fantastic food!
PrintVegan Pumpkin Oat Bites

Delicious and healthy Vegan Pumpkin Oat Bites, perfect for Halloween festivities, made with wholesome ingredients.
- Prep Time: 10 minutes
- Cook Time: 15 minutes
- Total Time: 25 minutes
- Yield: 24 bites 1x
- Category: Dessert
- Method: Baking
- Cuisine: Vegan
- Diet: Vegan
Ingredients
- 1 cup rolled oats
- 1/2 cup almond butter
- 1/4 cup maple syrup
- 1/2 cup pumpkin puree
- 1 tsp cinnamon
- 1/4 cup chocolate chips
Instructions
- Preheat your oven to 350°F (175°C).
- Mix your dry ingredients in a large bowl: rolled oats and cinnamon.
- Combine the wet ingredients in a separate bowl: almond butter, maple syrup, and pumpkin puree.
- Pour the wet mixture into the dry ingredients and mix until combined.
- Fold in the chocolate chips.
- Scoop small balls of dough onto a lined baking sheet.
- Bake for about 12-15 minutes until golden brown.
- Cool on the baking sheet for 5 minutes before transferring to a wire rack.
Notes
For added flair, serve with dairy-free yogurt or almond butter, and garnish with pumpkin seeds or coconut flakes.
Nutrition
- Serving Size: 2 bites
- Calories: 120
- Sugar: 5g
- Sodium: 50mg
- Fat: 8g
- Saturated Fat: 1g
- Unsaturated Fat: 7g
- Trans Fat: 0g
- Carbohydrates: 10g
- Fiber: 2g
- Protein: 4g
- Cholesterol: 0mg
Keywords: vegan treats, pumpkin recipes, Halloween snacks, healthy desserts

Patriotic 4th of July Cookies: 30-Minute Party-Ready Treats
Celebrate Independence Day with Delicious 4th of July Cookies
The 4th of July is just around the corner, and there’s nothing quite like a celebratory cookie to sweeten the occasion! Picture this: the sizzling summer sun, laughter echoing through the backyard as friends and family gather for a festive barbecue while fireworks twinkle in the twilight sky. Everyone is eagerly anticipating dessert, and what could be more perfect than a plate of vibrant, fun, and delectable 4th of July cookies? Not only do these cookies bring a pop of color, but they also infuse joy with each crunchy, chocolatey bite. So grab your apron, put on your favorite tunes, and let’s create a treat that will make your 4th of July extra special!
When I think back to my childhood celebrations, the 4th of July holds a treasure trove of happy memories. Each year, my family and I would set up a BBQ in our backyard, draping the picnic table in red, white, and blue decorations. My mom had this magical cookie recipe that she would whip up, filling the kitchen with the irresistible smell of freshly baked treats. I can still remember the triumphant moment when she pulled the cookies out of the oven, their golden edges crisp and their centers gooey with melted M&M’s. Together, we would decorate them with sprinkles, making them look as festive as a firework show. These cookies became a tradition, a tribute to the spirit of Independence Day, and they certainly delighted our taste buds year after year.
This year, I invite you to carry on that tradition—or perhaps start a new one—by making my 4th of July cookies! They’re chewy, buttery, and absolutely bursting with the colorful crunch of Red, White, and Blue M&M’s. With a sprinkle of festive joy on top, these easy-to-make cookies are just what you need to celebrate the occasion in style. So, let’s dive into the ingredients and get ready to bake some sweet memories!
Ingredients
-
2 cups all-purpose flour (250 grams)
The foundation of your cookies! If you want a gluten-free option, consider using almond flour or a gluten-free all-purpose mix. -
½ teaspoon baking soda
This will give your cookies a little lift. If you don’t have baking soda on hand, you can substitute it with baking powder (just use double the amount!). -
½ teaspoon baking powder
Adding extra lightness and fluffiness! It’s essential for achieving that perfect cookie texture. -
½ teaspoon salt
A little salt enhances the sweetness of your cookies. If you’re watching sodium intake, feel free to halve the amount. -
¾ cup unsalted butter, softened (1.5 sticks)
Buttery goodness is what makes these cookies melt in your mouth! If you need a dairy-free option, try vegan butter or coconut oil. -
¾ cup packed brown sugar
This adds moisture and a lovely rich flavor. If you’re out, you can substitute it with an equal amount of granulated sugar (though the flavor might be more one-dimensional). -
½ cup granulated sugar
Sweetness is important! Coconut sugar is a great substitute if you want a lower glycemic option. -
1 teaspoon vanilla extract
This is a must for that warm, inviting flavor. Feel free to use almond extract for a different twist! -
1 large egg
This binds the ingredients together. In a pinch, a flax egg (1 tablespoon ground flaxseed mixed with 2.5 tablespoons of water) works as a fantastic egg substitute. -
1 ¼ cups Red, White, and Blue M&M’s (10-ounce bag)
The star of our cookies! You can easily swap these out for your favorite chocolate candies or even chopped chocolate for a gourmet touch. -
2 tablespoons Red, White, and Blue Sprinkles
Because what’s a celebration without a little extra fun? Use any sprinkles you love for a festive touch.
Step-by-Step Instructions
-
Preheat Your Oven
Warm up that kitchen to 350°F (175°C). Preheating ensures your cookies bake evenly and come out perfectly golden. -
Prep Your Baking Sheets
Line two baking sheets with parchment paper. Not only does this prevent sticking, but it also makes for easy cleanup—an absolute chef hack! -
Combine Dry Ingredients
In a large bowl, whisk together the all-purpose flour, baking soda, baking powder, and salt. This step helps to evenly distribute the leavening agents and prevents clumps in your cookies. -
Cream Butter and Sugars
In a separate bowl, beat together the softened unsalted butter, packed brown sugar, and granulated sugar until the mixture is light and fluffy. This usually takes about 2-3 minutes with an electric mixer. Pro tip: let your butter sit out before mixing for a super creamy texture! -
Add the Egg and Vanilla
Mix in the egg and vanilla extract until combined. The batter will be slightly loose, and that’s exactly what you want! -
Incorporate Dry Ingredients
Gradually add the dry ingredient mixture into the wet mixture, stirring until just combined. Be careful not to overmix here—your cookies will thank you! -
Fold in M&M’s and Sprinkles
Gently fold in the Red, White, and Blue M&M’s and sprinkles. At this point, your dough should be vibrant and full of color! I like to reserve a few M&M’s and sprinkles to top the cookies before baking for that extra festive flair. -
Scoop the Dough
Using a cookie scoop or a tablespoon, drop rounded balls of dough onto the prepared baking sheets, leaving about 2 inches of space between each ball. This allows them room to spread out. -
Bake the Cookies
Pop them into the oven and bake for 10-12 minutes, or until the edges are lightly golden. They may look a little underdone in the center, but that’s perfect! They’ll continue to cook while cooling. -
Cooling Time
Let the cookies cool on the baking sheet for about 5 minutes, then transfer them to a wire rack to cool completely. This is the hardest part—waiting for the cookies to cool while trying to resist the sweet smell!
Serving Suggestions
For presentation, arrange the cookies on a beautiful platter or stack them high in a festive tin for a fun 4th of July treat! You can also serve them alongside a scoop of vanilla ice cream for a delightful dessert sundae that showcases the colors of the holiday. Enjoy these cookies throughout your backyard festivities, and don’t forget to snap some pictures to capture the sweet moments!
Recipe Variations
- Chocolate Chip Explosion: Swap out half of the M&M’s for semi-sweet chocolate chips for a richer, chocolatey flavor.
- Nutty Crunch: Add chopped nuts like pecans or walnuts for an extra crunch.
- Gluten-Free Delight: Use a gluten-free all-purpose flour blend to make these cookies gluten-free without sacrificing flavor.
- Holiday Twist: Change the M&M colors to make these cookies year-round with seasonal themes—not just for the 4th of July!
Chef’s Notes
These cookies have been a staple in my baking repertoire for years, evolving with little tweaks and adjustments over time. One year, I accidentally left out the baking soda and ended up with pancakes instead of cookies. Talk about a baking blunder! But they were delightful in their own way, and I still sometimes make a pancake version for breakfast!
When baking, remember that it’s all about creating joy in the kitchen. Lean into what works for you—whether that means using different mix-ins or even changing up the color palette to fit the season. Remember, the goal is to create not just cookies, but delightful memories!
FAQs and Troubleshooting
-
Why are my cookies spreading too much?
Ensure your butter isn’t too soft; if it’s melted, that could lead to overly flat cookies. Chill the dough for about 30 minutes before scooping if needed. -
How do I store leftover cookies?
To keep them fresh, store your cookies in an airtight container at room temperature for up to a week. If it’s really hot, you might want to refrigerate them! -
Can I freeze these cookies?
Absolutely! Freeze the cookies after baking by placing them in a single layer on a baking sheet. Once solid, transfer to a zip-top bag for up to 3 months. Thaw at room temperature when ready to enjoy.
Embrace your inner chef, and feel free to tweak the recipe to make it your own. Happy baking and have a wonderful 4th of July celebration with unforgettable, delicious cookies! 🎆🥳
Print4th of July Cookies

Celebrate Independence Day with these vibrant and festive 4th of July cookies made with colorful M&M’s and sprinkles!
- Prep Time: 15 minutes
- Cook Time: 12 minutes
- Total Time: 27 minutes
- Yield: 24 cookies 1x
- Category: Dessert
- Method: Baking
- Cuisine: American
- Diet: Vegetarian
Ingredients
- 2 cups all-purpose flour (250 grams)
- ½ teaspoon baking soda
- ½ teaspoon baking powder
- ½ teaspoon salt
- ¾ cup unsalted butter, softened (1.5 sticks)
- ¾ cup packed brown sugar
- ½ cup granulated sugar
- 1 teaspoon vanilla extract
- 1 large egg
- 1 ¼ cups Red, White, and Blue M&M’s (10-ounce bag)
- 2 tablespoons Red, White, and Blue Sprinkles
Instructions
- Preheat your oven to 350°F (175°C).
- Line two baking sheets with parchment paper.
- Whisk together the all-purpose flour, baking soda, baking powder, and salt in a large bowl.
- Beat together the softened unsalted butter, packed brown sugar, and granulated sugar until light and fluffy.
- Mix in the egg and vanilla extract until combined.
- Gradually add the dry ingredient mixture into the wet mixture, stirring until just combined.
- Fold in the Red, White, and Blue M&M’s and sprinkles.
- Scoop rounded balls of dough onto the prepared baking sheets, leaving about 2 inches of space between each.
- Bake for 10-12 minutes, or until the edges are lightly golden.
- Cool the cookies on the baking sheet for about 5 minutes before transferring them to a wire rack.
Notes
Store cookies in an airtight container at room temperature for up to a week. They can also be frozen for up to 3 months.
Nutrition
- Serving Size: 1 cookie
- Calories: 150
- Sugar: 12g
- Sodium: 100mg
- Fat: 8g
- Saturated Fat: 5g
- Unsaturated Fat: 3g
- Trans Fat: 0g
- Carbohydrates: 20g
- Fiber: 0g
- Protein: 2g
- Cholesterol: 30mg
Keywords: 4th of July, cookies, festive dessert, M&M's, baking