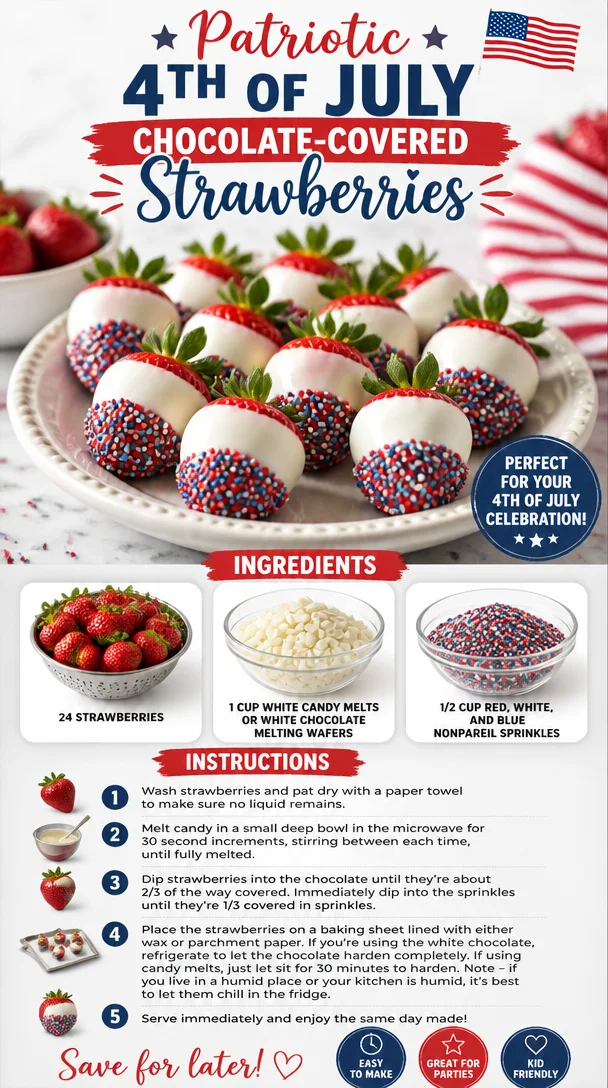
Patriotic 4th of July Chocolate-Covered Strawberries
Celebrate Independence Day with Festive Chocolate Covered Strawberries
When it comes to 4th of July festivities, nothing screams summer quite like a table laden with vibrant fruits and colorful treats. This year, I’m taking the celebration to the next level with a simple, yet stunning dessert: chocolate-covered strawberries! These berries are not only a delightful treat but they also embody the spirit of independence with their red, white, and blue decor—perfect for your summer gatherings or backyard barbecues.
What makes these chocolate-covered strawberries truly special isn’t just their picture-perfect presentation; it’s the fun that comes with making them. I have fond memories of preparing festive desserts with my family as a kid. I remember my mom melting chocolate in a double boiler while we’d eagerly await our turn to dip the strawberries in that luscious goodness. The kitchen would be filled with laughter and sweet scents, while our creativity flowed as we decorated them—tossing sprinkles like confetti. Those joyous moments are what inspired this recipe. They perfectly encapsulate the flavors of summer, as well as the spirit of togetherness. So let’s dive into this simple, healthy treat that will elevate your holiday gathering.
Here’s the beauty of chocolate-covered strawberries: they’re incredibly versatile and can be tailored to fit any celebration, but when they sport the colors of our flag? Pure magic! Your guests will love them, and you’ll love how easy they are to whip up. So, roll up your sleeves, and let’s savor the spirit of summer with these gorgeous, sweet bites!
Ingredients
To create the most delectable 4th of July chocolate-covered strawberries, you’ll need the following ingredients:
-
24 strawberries
Fresh strawberries are a must! Look for ones that are bright red, plump, and free of blemishes. If strawberries aren’t in season, you can substitute with other berries like blueberries or raspberries for their vibrant colors. Just remember that the dipping process may vary slightly based on the berry you use. -
1 cup white candy melts or white chocolate melting wafers
These sweet, creamy melts make for an easy and tasty coating. White chocolate can be a little finicky, so the melting wafers tend to provide a smoother finish that’s easier to work with. If you’re feeling extra adventurous, you can substitute with milk chocolate or dark chocolate for a twist on flavor. -
1/2 cup red, white, and blue nonpareil sprinkles
Sprinkles add that festive touch we all adore! Feel free to switch things up with any colored sprinkles, or even coconut flakes for a tropical vibe. Just keep in mind that coconut flakes won’t have the same colorful effect but will definitely bring some texture.
Step-by-Step Instructions
Ready to create some mouthwatering treats? Let’s get started! Here’s a step-by-step guide to making your chocolate-covered strawberries:
-
Prep Your Strawberries
Start by rinsing your strawberries gently under cold water. Pat them dry with a paper towel, making sure they’re completely dry before dipping. One little chef hack—avoid dipping wet strawberries in chocolate as it can lead to clumping and uneven coating. A dry berry means smooth chocolate bliss! -
Melt the Candy Melts
In a microwave-safe bowl, pour in your white candy melts or chocolate wafers. Heat in the microwave for 30 seconds at a time, stirring after each interval until smooth and completely melted. It’s crucial to keep an eye on your mixture—burnt chocolate is a no-go! If you’re using a double boiler, place the chocolate over simmering water and stir until melted. If it starts to seize, add a teaspoon of coconut oil or shortening to regain that silky texture. -
Dip the Strawberries
Hold a strawberry by its leafy green top and dip it into the melted chocolate, swirling gently to coat it evenly. Let the excess chocolate drip back into the bowl. It’s all about that perfect coating! If you find the chocolate thickening while you dip, just reheat it for a few seconds. -
Add the Sprinkles
Now comes the fun part! Before the chocolate sets, sprinkle your red, white, and blue nonpareils over the chocolate-covered strawberries. This is where you can really let your creativity shine. Don’t be shy! The more sprinkles, the better. You could even set up an assembly line and have your friends or kids help out. -
Let Them Set
Place your decorated strawberries on a baking sheet lined with parchment paper. Once all the strawberries are dipped and sprinkled, pop them into the fridge for about 30 minutes. This will help the chocolate firm up nicely, resulting in that satisfying crunch when you bite in.
Serving Suggestions
These chocolate-covered strawberries are not just delicious; they’re a visual delight too! When it’s time to serve, arrange them artfully on a platter or cake stand. You can even line them up in a flag pattern for that extra festive touch. For added elegance, you could drape a few mint leaves around the strawberries for a pop of green. Trust me, your guests will be snapping pictures before digging in!
Recipe Variations
Looking to add your unique twist? Here are a few variations to consider:
-
Chocolate Drizzle: After setting, melt some dark or milk chocolate and drizzle it over the white chocolate-covered strawberries for an elegant touch.
-
Nutty Delight: After dipping in chocolate, roll the strawberries in crushed nuts or shredded coconut for extra texture and flavor.
-
Flavor Explosion: Mix a few drops of mint or almond extract into your melted chocolate for a different flavor profile that will wow your guests.
-
Caramel Surprise: Before dipping in chocolate, drizzle melted caramel over the strawberries to offer a sweet surprise.
-
Fruit Medley: Experiment with other fruits like pretzel rods or bananas! Dip them in chocolate and decorate them in the same festive way.
Chef’s Notes
Over the years, my journey with chocolate-covered strawberries has evolved—from the clumsy, chocolate-smeared hands of childhood to being a weekend favorite at summer parties. I once had a mishap where I completely overlooked a berry’s wetness and ended up with a chocolate blob instead of that glossy finish I wanted. Instead of feeling defeated, we turned it into a game—how messy could we get while making desserts? That’s the joy of cooking: it’s full of surprises and laughter.
These strawberries represent more than just a treat. They symbolize good times, sharing, and delicious adventures in the kitchen with family and friends. So even if they don’t turn out picture-perfect, remember: it’s all about the fun you have along the way!
FAQs and Troubleshooting
-
What if my chocolate thickens or seizes?
This often happens when it overheats. If it thickens, try stirring in a little coconut oil or shortening to smooth it out. For seized chocolate, you can sometimes salvage it with a bit of cream, adding it slowly until you restore that melt-in-your-mouth texture. -
Can I use frozen strawberries?
It’s best to use fresh strawberries for this particular recipe, as frozen strawberries can release water and lead to a messy dipping situation. If you only have frozen on hand, thaw them thoroughly and dry them before dipping. -
How can I store leftover chocolate-covered strawberries?
Store them in an airtight container in the refrigerator for up to 2 days. Keep them in a single layer if possible; layering can lead to squished chocolate on the bottoms. If you notice any condensation, it might be best to let them sit at room temperature for a little while before serving. -
What if I can’t find the right sprinkles?
No worries! You can create your colorful mix using any sprinkles you have—just think outside the box. Crushed candies, colored sugar, or even edible glitter can work wonders!
Nutritional Info
While dessert isn’t usually a focus on nutrition, it’s good to know something like chocolate-covered strawberries has its advantages. Strawberries are rich in vitamins, especially Vitamin C, and antioxidants, and they’re low in calories. Keep in mind that the chocolate and sprinkles will add some sweetness and calories, so enjoy them in moderation!
So there you have it—a delicious recipe for chocolate-covered strawberries that will make your 4th of July celebration even more memorable! With minimal effort, you can impress your friends and family with this stunning dessert that captures the spirit of summer. Happy eating, and may your holiday be filled with laughter and joy!
PrintFestive Chocolate Covered Strawberries
Celebrate Independence Day with these vibrant and delicious chocolate-covered strawberries, perfect for summer gatherings.
- Prep Time: 15 minutes
- Cook Time: 10 minutes
- Total Time: 25 minutes
- Yield: 4 servings 1x
- Category: Dessert
- Method: No-Cook
- Cuisine: American
- Diet: Vegetarian
Ingredients
- 24 strawberries
- 1 cup white candy melts or white chocolate melting wafers
- 1/2 cup red, white, and blue nonpareil sprinkles
Instructions
- Prep your strawberries by rinsing gently under cold water and patting dry.
- Melt the candy melts in a microwave-safe bowl, heating in 30-second intervals, stirring until smooth.
- Dip the strawberries into the melted chocolate, holding by the leafy green tops.
- Add the sprinkles over the chocolate-covered strawberries before the chocolate sets.
- Let them set on a lined baking sheet in the fridge for about 30 minutes.
Notes
Experiment with different types of chocolate and toppings, such as crushed nuts or flavored extracts.
Nutrition
- Serving Size: 1 serving
- Calories: 150
- Sugar: 20g
- Sodium: 30mg
- Fat: 7g
- Saturated Fat: 4g
- Unsaturated Fat: 2g
- Trans Fat: 0g
- Carbohydrates: 20g
- Fiber: 2g
- Protein: 1g
- Cholesterol: 0mg
Keywords: chocolate-covered strawberries, festive dessert, 4th of July, summer treats, easy dessert
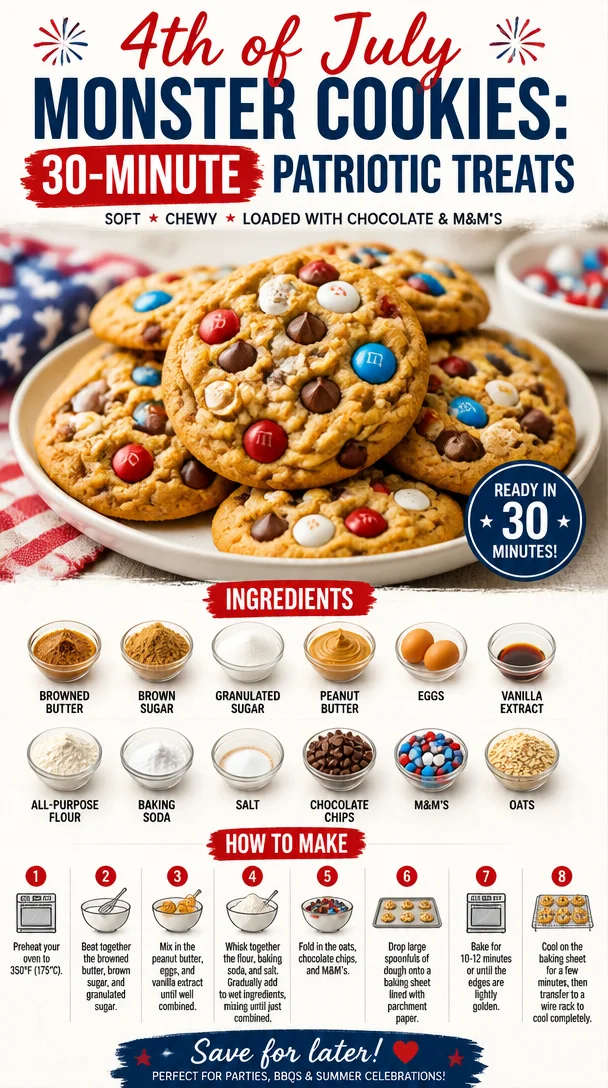
4th of July Monster Cookies: 30-Minute Patriotic Treats
4th of July Monster Cookies: A Sweet Celebration!
Happy 4th of July! It’s that time of year again when we gather with friends and family, fire up the grill, and celebrate our freedom under a sky filled with fireworks. While the hot dogs and burgers might be at the forefront of your July 4th menu, what about dessert? You can’t go wrong with a cookie that packs a punch, not just in flavor but in joy! Today, I’m thrilled to share my recipe for 4th of July Monster Cookies—the perfect sweet treat for your summer festivities.
These cookies are a delightful blend of gooey chocolate chips, vibrant M&M’s, and a hint of nostalgia that will bring you back to childhood days of baking with your parents or grandparents. With each bite, you’ll experience not only the flavors but also the chuckles and sweet memories of past celebrations. They’re easy to make, fun to eat, and visually striking—everything you need for a festive gathering.
Picture this: You and your loved ones lounging outside, the sun setting, laughter ringing through the air, and the aroma of freshly baked cookies wafting from the kitchen. Nothing beats that, right? So, roll up those sleeves, and let’s whip up a batch of these deliciously colorful Monster Cookies that will brighten your holiday and leave everyone asking for seconds.
A Whimsical Cookie Memory
When I think of cookies from my childhood, I am instantly transported to my grandma’s kitchen. Her small, cozy space was filled with the sweet aroma of baked goods, and her kitchen became a haven for creativity. One summer afternoon, I remember her introducing me to the magical world of cookies. Armed with a colorful bowl of sprinkles and a variety of tasty ingredients, we created a cookie explosion that looked like a party itself!
It was on that day—while I illegally snuck handfuls of chocolate chips and M&Ms—that the idea of Monster Cookies was born. Inspired by that spirit of joy, laughter, and indulgence, I developed this recipe that encapsulates all those feelings in one bite. Every time I take a warm cookie out of the oven, I’m flooded with memories of summer fun spent baking and enjoying the company of loved ones. And today, I want to pass that magic along to you!
Ingredients You’ll Need
Here’s what you’ll need to make these hearty, delightful Monster Cookies:
-
1 cup browned butter
- Browning the butter gives a nutty flavor that elevates these cookies. You can substitute with regular unsalted butter, but don’t miss out on that toasty goodness if you can help it!
-
1 cup brown sugar
- This helps create a chewy texture. You can replace it with coconut sugar for a lighter option, but the flavor will vary slightly.
-
1/2 cup granulated sugar
- Adds sweetness and contributes to the crunchy exterior. If you’re looking to cut down on sugar, feel free to reduce the amount but it might affect that crispy edge!
-
1 cup peanut butter
- Creamy or crunchy, it adds richness and flavor. Almond or sun butter can be used for a different taste.
-
2 large eggs
- They bind everything together and provide moisture. You can swap these with a flaxseed mixture if you want to go egg-free.
-
2 teaspoons vanilla extract
- This adds a warm, comforting aroma. Always opt for pure vanilla extract if possible for an authentic flavor.
-
3 cups all-purpose flour
- This forms the base of your cookies. Whole wheat flour can be used for a healthier twist but may affect the consistency a bit.
-
1 teaspoon baking soda
- A crucial ingredient for that pillowy texture. Make sure it’s fresh to achieve the best rise.
-
1/2 teaspoon salt
- Just a pinch balances all the sweetness. Feel free to use sea salt for extra flavor!
-
1 cup chocolate chips
- Semi-sweet or dark, they add a melty chocolatey goodness. Swap with white chocolate or butterscotch chips for a fun variation.
-
1 cup M&Ms
- These colorful candies bring the festive spirit for the 4th of July! To make them healthier, you can use dark chocolate or yogurt-covered variants.
-
1/2 cup oats
- Oats provide texture and a bit of heartiness. You can use quick oats or rolled oats, depending on what you have on hand.
Step-by-Step Instructions
Now let’s roll up our sleeves and get started! Follow these steps to create your own Monster Cookies.
-
Brown the Butter:
- In a saucepan over medium heat, melt the butter. Stir it frequently until it turns golden brown and you can smell that delicious nutty aroma. This will take about 5-7 minutes. Once browned, remove it from the heat and allow it to cool slightly. A little tip: don’t walk away from the stove, or your butter may burn!
-
Mix the Sugars:
- In a large mixing bowl, combine the browned butter, brown sugar, and granulated sugar. Use a mixer or a whisk and blend until it’s well combined and creamy. The mix should be a pale tan color; this is a good sign!
-
Add Peanut Butter & Eggs:
- Stir in the peanut butter until smooth, then add the eggs one at a time. Incorporate the vanilla extract until everything is mixed uniformly. A tip for easier mixing: make sure the peanut butter is at room temperature; it will blend in more easily.
-
Dry Ingredients:
- In a separate bowl, whisk together the flour, baking soda, and salt. Gradually add this mixture to your wet ingredients. Mix until just combined—over-mixing can lead to tough cookies, and we want them soft and chewy!
-
Add the Goodies:
- Fold in the chocolate chips, M&Ms, and oats gently. I love using a spatula for this step because it makes sure everything is evenly distributed without over-mixing. Trust me; every bite should have a bit of everything!
-
Chill the Dough:
- This step is optional but highly recommended! Place your dough in the fridge for at least 30 minutes. This helps the flavors meld together and results in thicker cookies.
-
Preheat the Oven:
- Preheat your oven to 350°F (175°C). Line a baking sheet with parchment paper—this will prevent sticking and make clean-up a breeze.
-
Scoop & Bake:
- Use a large cookie scoop (or a tablespoon) to portion out the dough onto the prepared baking sheet. Leave space between them as they will spread slightly. Bake for 10-12 minutes or until the edges are golden brown but the centers are still soft.
-
Cool & Enjoy:
- Remove from the oven, and let them cool for a few minutes on the baking sheet before transferring them to a wire rack. This allows them to firm up a bit, and you’ll get that perfect texture!
Serving Suggestions
When it comes to serving these Monster Cookies, let your creativity shine! You can stack them high on a decorative platter and place them front and center at your BBQ or picnic. Add in some fresh berries for a pop of color and a little freshness. You can also wrap them in clear cellophane for beautiful party favors that everyone will cherish. Pro tip: Serve them warm with a scoop of vanilla ice cream on top for the ultimate indulgence—think ice cream sandwich meets cookie heaven!
Recipe Variations
Get creative with these Monster Cookies! Here are some fun options:
- Nut Variations: Swap the peanut butter for almond or cashew butter for a unique twist.
- Flavor Additions: Add in some cinnamon or nutmeg for a warm, spiced flavor that contrasts beautifully with the chocolate.
- Dairy-Free Delight: Use dairy-free chocolate chips and nut butter for a tasty vegan option.
- Fruit Zests: Mix in some dried cranberries or chopped nuts to provide a different texture and flavor.
Chef’s Notes
Since I started baking Monster Cookies, they’ve evolved from simply being for the 4th of July to a year-round favorite at parties, picnics, and family gatherings. I’ve played with different flavor profiles, and each time I whip up a batch, it churns out new memories and laughter around the kitchen. Just the other day, my niece took it upon herself to add sprinkles to the cookie dough, turning these cookies into a rainbow celebration! It’s a reminder that baking is not just about the end product but also about the joy and memories we create along the way.
FAQs and Troubleshooting
Why are my cookies flat?
If your cookies spread too much, consider chilling your dough a bit longer or checking that the butter wasn’t too hot when combined with sugars.
Can I freeze these cookies?
Absolutely! You can freeze the cookies after baking. Make sure they’re completely cooled, then place them in an airtight container. They’ll last for up to three months.
How do I know when my cookies are done?
Look for a slightly golden edge but a soft center. Remember, they’ll continue to bake as they cool!
My dough seems too dry. What should I do?
If you find your dough is too dry, add a splash of milk or another egg to bring it together.
Nutritional Info
If you’re watching your calories, keep in mind that these cookies are rich and loaded with goodness! Each cookie (based on the recipe yielding about 24 cookies) contains roughly:
- Calories: 210
- Fat: 10g
- Carbohydrates: 30g
- Protein: 4g
Remember, these are indulgent treats meant to be enjoyed, so savor every bite!
Final Thoughts
I hope you’re as excited as I am to whip up a batch of these 4th of July Monster Cookies and create lasting memories with your loved ones. Baking is a beautiful way to share joy, and there’s nothing quite like that first bite of a warm, gooey cookie fresh from the oven. Whether you’re dressing them up for the holiday or enjoying them any old day, these cookies are sure to please. Happy baking, and remember, every day is worth celebrating—so let’s keep it fresh, simple, and seriously delicious!
Print4th of July Monster Cookies
Delightful cookies packed with chocolate chips and M&Ms, perfect for summer celebrations.
- Prep Time: 15 minutes
- Cook Time: 12 minutes
- Total Time: 45 minutes
- Yield: 24 cookies 1x
- Category: Dessert
- Method: Baking
- Cuisine: American
- Diet: Vegetarian
Ingredients
- 1 cup browned butter
- 1 cup brown sugar
- 1/2 cup granulated sugar
- 1 cup peanut butter
- 2 large eggs
- 2 teaspoons vanilla extract
- 3 cups all-purpose flour
- 1 teaspoon baking soda
- 1/2 teaspoon salt
- 1 cup chocolate chips
- 1 cup M&Ms
- 1/2 cup oats
Instructions
- Brown the butter: In a saucepan over medium heat, melt the butter. Stir it frequently until it turns golden brown and you can smell that delicious nutty aroma. This will take about 5-7 minutes. Once browned, remove it from the heat and allow it to cool slightly.
- Mix the sugars: In a large mixing bowl, combine the browned butter, brown sugar, and granulated sugar. Use a mixer or a whisk and blend until it’s well combined and creamy.
- Add peanut butter & eggs: Stir in the peanut butter until smooth, then add the eggs one at a time. Incorporate the vanilla extract until everything is mixed uniformly.
- Mix dry ingredients: In a separate bowl, whisk together the flour, baking soda, and salt. Gradually add this mixture to your wet ingredients. Mix until just combined.
- Add the goodies: Fold in the chocolate chips, M&Ms, and oats gently.
- Chill the dough: Place your dough in the fridge for at least 30 minutes.
- Preheat the oven: Preheat your oven to 350°F (175°C). Line a baking sheet with parchment paper.
- Scoop & bake: Use a large cookie scoop (or a tablespoon) to portion out the dough onto the prepared baking sheet. Bake for 10-12 minutes or until the edges are golden brown.
- Cool: Remove from the oven, and let them cool for a few minutes on the baking sheet before transferring them to a wire rack.
Notes
Serve with ice cream for an indulgent treat!
Nutrition
- Serving Size: 1 cookie
- Calories: 210
- Sugar: 14g
- Sodium: 150mg
- Fat: 10g
- Saturated Fat: 4g
- Unsaturated Fat: 6g
- Trans Fat: 0g
- Carbohydrates: 30g
- Fiber: 1g
- Protein: 4g
- Cholesterol: 30mg
Keywords: Monster Cookies, 4th of July, Cookies, Dessert, Summer Treat
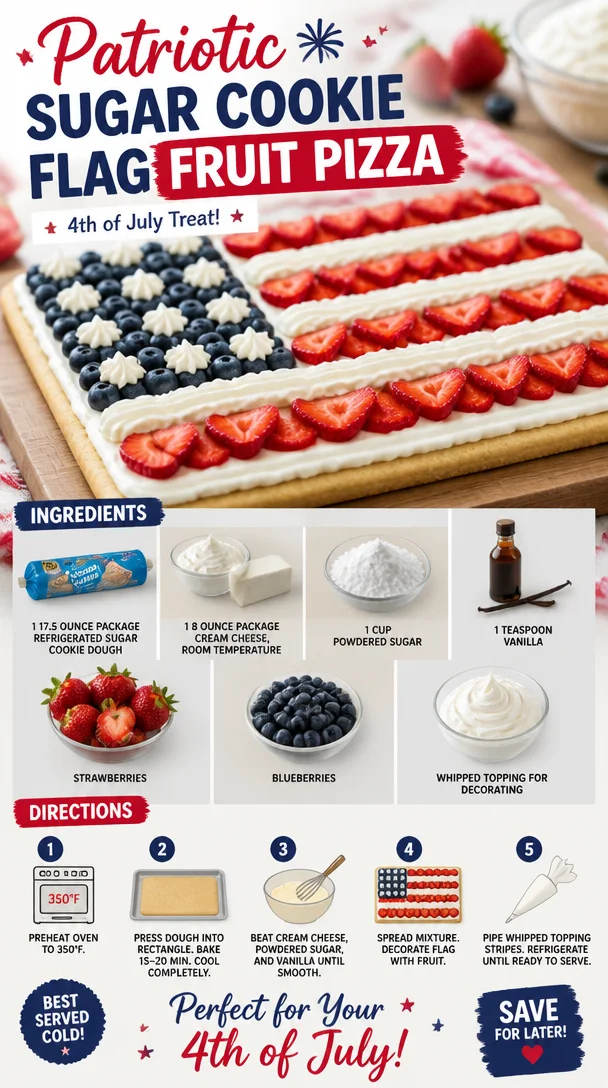
Patriotic Sugar Cookie Flag Fruit Pizza (4th of July Treat)
A Slice of Summer: Sugar Cookie Flag Fruit Pizza
As the sun begins to shine brighter and the days grow longer, we know one thing for sure: it’s time to celebrate! And what better way to celebrate summer gatherings, barbecues, and festive holidays than with a delicious, eye-catching dessert? Enter the Sugar Cookie Flag Fruit Pizza—a delightful twist on traditional fruit pizza that will have everyone raving about your kitchen prowess.
This dessert is not just about taste; it’s a vibrant centerpiece that captures the very essence of summer. It’s wonderfully easy to make, which makes it perfect for novice bakers and seasoned pros alike. Picture a buttery, sweet cookie crust topped with creamy frosting and finished off with a vibrant medley of fresh fruits arranged to create an American flag. The flavor is casual yet festive, and every bite feels like summer on your tongue.
Let’s face it: life can be hectic. But that doesn’t mean we can’t indulge in a delicious, homemade dessert! This recipe keeps things simple with minimal ingredients and maximum flavor. No fuss, no frills—just pure joy. Gather your friends and family around, because once you start making this colorful fruit pizza, you’ll want to whip it up again and again.
A Sweet Memory from My Childhood
Growing up, my summer weekends were filled with laughter, backyard barbecues, and of course, Grandma’s famous desserts. One summer, she decided to mix things up and introduced the family to a vibrant fruit pizza for an Independence Day celebration. I can still picture the stars and stripes of strawberries and blueberries, shining brightly on that creamy white canvas.
Grandma, with her infectious laughter and heartwarming stories, would proudly present her creation on a picnic table draped with a red, white, and blue tablecloth. As we dug in, my cousins and I debated who got to be the “flag builder” this year. Those sweet moments of joy and friendly competition are etched in my memory forever.
Seeing how a simple dish could bring family together made cooking more than just a chore—it became a cherished ritual. Now, as I put my own spin on that delightful recipe, I can’t help but pass along the same joy to you. Grab your favorite people, and let’s dive into this fun, colorful, and simple creation!
Ingredients to Create Kitchen Magic
Let’s break down the ingredients you’ll need for this scrumptious Sugar Cookie Flag Fruit Pizza:
-
1 17.5-ounce package refrigerated sugar cookie dough: This is your base—a soft, buttery cookie that will serve as the perfect canvas. If you’re feeling adventurous, you can make your own sugar cookie dough, but the refrigerated version saves time and keeps things easy!
-
1 8-ounce package cream cheese, room temperature: This will give your pizza a luscious, creamy layer. If you’re looking for a lighter option, feel free to use Neufchâtel cream cheese, which has less fat but still packs a delicious punch!
-
1 cup powdered sugar: This adds sweetness and helps achieve that creamy frosting texture. If you’re avoiding refined sugar, try using a powdered sugar substitute available in most health food stores.
-
1 teaspoon vanilla extract: A dash of vanilla adds a warm, sweet flavor that enhances all the other ingredients! If you’re out of vanilla, almond extract can work as an interesting and slightly nutty substitute.
-
Strawberries: The star of your flag! Fresh strawberries add sweetness, tartness, and a beautiful red hue. If strawberries aren’t in season, raspberries can also add a nice burst.
-
Blueberries: These little gems bring a refreshing note and add to the flag theme beautifully. They’re also super nutritious! If you want to mix things up, try using blackberries for a deeper flavor.
-
Whipped topping: Use this as an optional finishing touch for added lightness and creaminess. You can use homemade whipped cream or store-bought for convenience.
Step-by-Step Instructions: Baking Up a Storm!
Now that we’ve got our ingredients ready, let’s get those creative juices flowing! Follow these simple steps to create a fantastic fruit pizza that will have everyone clamoring for seconds.
-
Preheat your oven: Set your oven to 350°F (175°C). This ensures your sugar cookies bake to golden perfection.
-
Prepare the cookie crust: Open your package of refrigerated sugar cookie dough and slice it into rounds. Place those rounds on a lightly greased baking sheet, spacing them about 2 inches apart. Now, here’s a chef hack: use the bottom of a glass to gently press each round into a larger disk. This way, you’ll create a seamless crust!
-
Bake to golden goodness: Pop the baking sheet into the preheated oven and bake for about 10-12 minutes, or until the edges are lightly golden. Keep an eye on them—no one wants over-baked cookies! They will continue to firm up as they cool.
-
Make the frosting: While the cookies cool, grab a large mixing bowl. Combine your cream cheese, powdered sugar, and vanilla extract. Mix until the mixture is smooth and creamy—this is your luscious frosting! You can do this with an electric mixer, but a whisk works just fine if you’re feeling a bit like a strong chef today.
-
Spread the frosting: Once your cookies have cooled completely, carefully spread a generous layer of that creamy frosting across the cookie crust. You want to cover it fully for a beautiful surface for your toppings.
-
Create your flag: Now comes the fun part! Arrange the blueberries in the top left corner, creating a "star" field. Then, make rows of strawberries to form the stripes of the flag. This is where you can get creative—make each row perfectly straight or allow for some organic flair—it’s all about having fun!
-
Chill and Serve: Pop your beautiful fruit pizza into the fridge for about 30 minutes to allow the frosting to firm up slightly. Once you’re ready to serve, slice it into wedges just like pizza. Trust me, it’s way easier than cutting into squares!
Serving Suggestions: Presentation Matters
When it comes to serving this beauty, presentation is key! Slice the fruit pizza into triangles that resemble pizza slices, and place them on colorful dessert plates. You can even garnish the plate with a couple of extra berries or a sprig of mint for that pop of freshness. For a more festive touch, consider adding some star-shaped sprinkles or edible glitter for a special occasion.
Recipe Variations to Spice Things Up
Feeling a little adventurous with your fruit pizza? Here are a few creative variations to switch things up:
-
Chocolate Drizzle: Melt some dark or white chocolate and swirl it on top of your frosting for a decadent touch.
-
Seasonal Variations: Change the fruits depending on the season! Use peaches, kiwi, or raspberries for a summer vibe, or apples and pears in the fall.
-
Nutty Crunch: Sprinkle some chopped nuts, like pecans or walnuts, over the top for added crunch and flavor.
-
Herbal Infusion: Add a hint of freshness by layering on some finely chopped mint or basil between the fruit for an unexpected twist.
-
Gluten-Free Alternative: Swap the sugar cookie dough for a gluten-free version, and you can easily enjoy this treat while accommodating dietary needs.
Chef’s Notes: A Recipe that Dances Through Time
This recipe is a love letter to the sweetness of summer, but it’s also a reminder of how recipes can evolve over time. From my childhood memories with Grandma to my own family traditions, each version of the fruit pizza reflects the people, flavors, and moments that shape us.
I once tried to make a tropical version with mangoes and coconut cream, and while it never made it to the official recipe, it was a sweet mess that sparked laughter and creativity in the kitchen. Cooking should always be about discovery, so don’t be afraid to put your own spin on it!
FAQs and Troubleshooting
1. Can I make the cookie crust ahead of time?
Absolutely! You can prepare the sugar cookie crust in advance. Just store it in an airtight container for a couple of days, then frost and top it right before serving.
2. How can I prevent my fruit from getting soggy?
To keep things fresh, wait until serving time to slice your fruit and add it to the pizza. You can even toss the fruit in a little lemon juice to prevent browning.
3. My frosting is too runny; what can I do?
If your frosting is too runny, just add a bit more powdered sugar, a tablespoon at a time, until it reaches your desired consistency.
4. What if I don’t like cream cheese?
No problem! You can swap the cream cheese for Greek yogurt or a whipped mascarpone for a different flavor. You’ll still get that creamy base without the tanginess of cream cheese.
Nutritional Info (if applicable)
While indulging in sweet treats is all about balance, it’s worthwhile to know that each slice of this Sugar Cookie Flag Fruit Pizza is packed with vitamins from the fruit, and the recipe can easily be tailored to fit various dietary preferences. Adjust the sugar content and toppings as needed!
So there you have it—a delightful, festive Sugar Cookie Flag Fruit Pizza that is sure to become a summer staple in your kitchen. Embrace the sweetness of life, share this treat with loved ones, and, most importantly, keep those good memories rolling in the kitchen. After all, it’s not just about the food; it’s about the love and stories we create along the way. Let’s keep it fresh, simple, and seriously delicious!
PrintSugar Cookie Flag Fruit Pizza
A vibrant and delicious dessert featuring a buttery sugar cookie crust topped with creamy frosting and fresh fruits arranged to create an American flag.
- Prep Time: 15 minutes
- Cook Time: 12 minutes
- Total Time: 45 minutes
- Yield: 8 servings 1x
- Category: Dessert
- Method: Baking
- Cuisine: American
- Diet: Vegetarian
Ingredients
- 1 17.5-ounce package refrigerated sugar cookie dough
- 1 8-ounce package cream cheese, room temperature
- 1 cup powdered sugar
- 1 teaspoon vanilla extract
- 2 cups fresh strawberries
- 1 cup blueberries
- Whipped topping (optional)
Instructions
- Preheat your oven to 350°F (175°C).
- Prepare the cookie crust by slicing the refrigerated dough into rounds and placing them on a greased baking sheet.
- Bake for about 10-12 minutes, until the edges are lightly golden.
- Make the frosting by mixing cream cheese, powdered sugar, and vanilla until smooth.
- Spread the frosting over the cooled cookie crust.
- Arrange the blueberries in the top left corner to create a star field, and make rows of strawberries for the flag stripes.
- Chill in the fridge for about 30 minutes before slicing and serving.
Notes
For a creative twist, consider adding chocolate drizzle, seasonal fruits, or a sprinkle of nuts on top.
Nutrition
- Serving Size: 1 slice
- Calories: 250
- Sugar: 15g
- Sodium: 200mg
- Fat: 10g
- Saturated Fat: 5g
- Unsaturated Fat: 4g
- Trans Fat: 0g
- Carbohydrates: 35g
- Fiber: 2g
- Protein: 3g
- Cholesterol: 25mg
Keywords: fruit pizza, sugar cookies, summer dessert, festive dessert, patriotic dessert
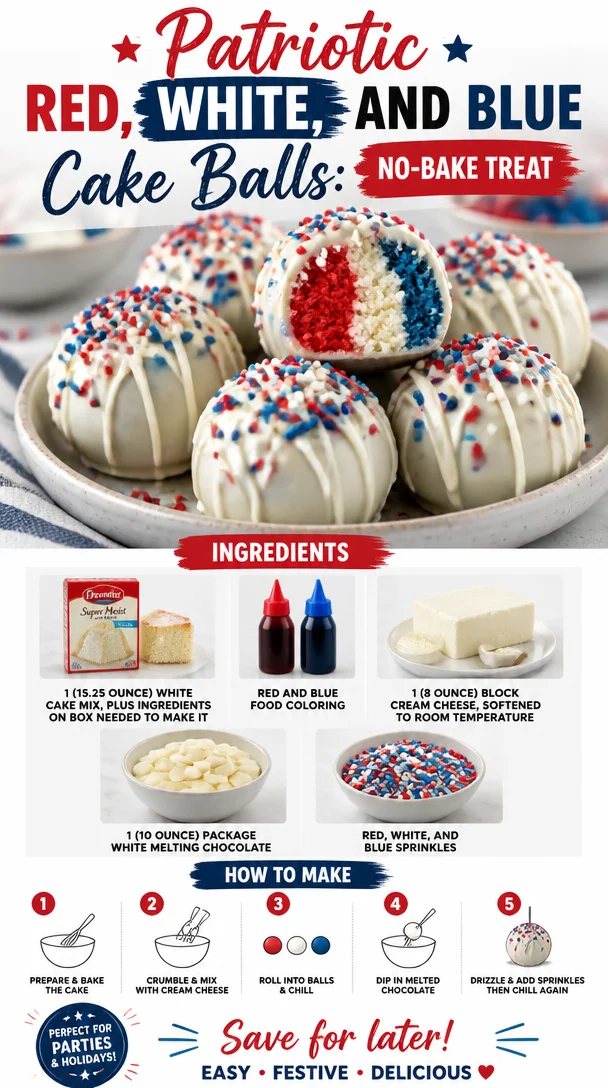
Patriotic Red, White, and Blue Cake Balls: No-Bake Treat
Red, White, and Blue Cake Balls: A Festive Treat for Every Celebration!
Welcome to Clean Plate Cravings! I’m Ava Carter, and today we’re diving into a delightful treat that’ll have you celebrating in style: Red, White, and Blue Cake Balls! Perfect for summer barbecues, Fourth of July gatherings, or just because you need a burst of festive fun in your day, these cake balls are as tasty as they are eye-catching. Picture this: a moist white cake transformed into luscious balls of joy, coated in velvety white chocolate, and sprinkled with all the patriotic flair your heart desires. Are you ready to roll up your sleeves and create something truly special? Let’s get started!
A Sweet Slice of Nostalgia
Let me take you back to a sun-drenched July afternoon when I was just a little girl, knees scraped from playing outside and a grin plastered on my face. Each year, my family would have a potluck for Independence Day, where everyone brought their favorite dish to share. My Aunt Linda was known for her incredible dessert table, and her pièce de résistance was a layered red, white, and blue cake.
I remember scampering around, stealing tastes of whipped cream and sneaking sprinkles whenever no one was looking. But it was her cake, bursting with flavor and patriotism, that always stole the show. Inspired by those joyful days, I wanted to create something that captured that same spirit but in a fun, bite-sized treat. Enter the Red, White, and Blue Cake Balls! A little piece of nostalgia packed with a whole lot of love.
Ingredients
Before we let the fun begin, let’s gather everything we need to whip up these dazzling cake balls:
-
1 (15.25-ounce) white cake mix
This is the base of the cake balls. Go for a box mix for convenience, or use your favorite homemade white cake recipe! -
Ingredients on box needed to make it
Usually, this includes eggs, oil, and water. Tweak the quantities as per your box instructions. -
Red and blue food coloring
Don’t be shy with the colors! This is what makes our cake balls eye-catching. You can use gel or liquid coloring based on what’s available. -
1 (8-ounce) block of cream cheese, softened to room temperature
This will give our cake balls a creamy texture and a deliciously tangy flavor. Want a lighter option? Swap it out for Greek yogurt! -
1 (10-ounce) package of white melting chocolate
This is the star of our outer coating, giving each cake ball a beautiful white shell. If you’re feeling adventurous, you can also try dark chocolate or yogurt-coating. -
Red, white, and blue sprinkles
These are perfect for the final touch! Use classic sprinkles or even themed edible glitter for extra sparkle.
Step-by-Step Instructions
Alright, let’s get baking! Grab your mixing bowl and let’s create these beauties step by step.
-
Bake the Cake
Preheat your oven according to the instructions on the cake mix box. Prepare your cake pans as directed (usually greasing and flouring them). Mix the cake batter following the box instructions, but leave out the food coloring for now. Pour the batter into the pan, and let it bake until golden brown and a toothpick inserted in the center comes out clean. While it bakes, take a moment to savor that smell wafting through your kitchen—it’s heavenly! -
Cool the Cake
Once the cake is out of the oven, allow it to cool in the pan for about 10-15 minutes. Then, turn it out onto a wire rack to cool completely. This is key because if the cake is warm, it’ll be harder to crumble without it clumping together later. Plus, nobody likes burnt fingers! -
Color the Cake
When the cake is cool, it’s time to crumble it up. Use your hands or a fork to break the cake into small crumbs. Next, divide the crumbs into two bowls: one for the red cake and one for the blue. Add the red and blue food coloring to their respective bowls, mixing until you achieve vibrant colors. This step is super fun—just like playing with dough as a kid! -
Create the Cake Mixture
Now, it’s time to incorporate the softened cream cheese! Add about half of the cream cheese to each bowl of crumbled cake. Mix thoroughly until all the ingredients are well combined. You want a consistency that’s moldable but not too wet. If it feels too dry, add a little more cream cheese until it holds together. -
Shape the Balls
Grab a tablespoon or a small cookie scoop, and form small balls of the cake mixture. Aim for about 1-inch bites; they will be adorably palm-sized! Roll them gently between your palms to smooth out any edges. Don’t forget to make some red and some blue ones—you’ll want a mix for the final display! -
Chill the Cake Balls
Place the cake balls onto a lined baking sheet and pop them into the fridge for about an hour to firm up. This is a crucial step since it will make coating them with chocolate much easier. If you’re short on time, just 20-30 minutes in the freezer will do the trick! -
Melt the White Chocolate
While the cake balls are chilling, get your melting chocolate ready! Follow the package instructions for melting in the microwave or using a double boiler. Be careful not to overheat the chocolate; it should be silky smooth and ready to coat! -
Coat the Cake Balls
Once your cake balls are well-chilled, it’s time for the best part! Dip each ball into the melted white chocolate, ensuring it’s fully coated. I like to use a fork to help lift the balls out of the chocolate and let the excess drip off. -
Add the Sprinkles
Immediately after coating each ball, place it back on the baking sheet and sprinkle with the festive red, white, and blue sprinkles. This step adds that perfect touch of flair, so don’t forget it! -
Chill Again
For the final lap, return the coated cake balls to the fridge for about 30 minutes to set the chocolate shell. This is when they firm up beautifully, making them ready to serve!
Serving Suggestions
Now that your Red, White, and Blue Cake Balls are cool and set, it’s time to show them off! Arrange them on a festive platter, adding some themed decor like mini flags or edible flowers for a gorgeous presentation. You could even serve them in cupcake liners for a cute, portable option. Perfect for summer parties, barbecues, and family gatherings—your guests will be delighted!
Recipe Variations
Feeling inspired? Here are some exciting twists you can try with these cake balls:
- Chocolate Cake Mix: Swap the white cake mix for a chocolate cake mix for a rich twist. The combo of colors will still be stunning!
- Cream Cheese Swirl: Add some raspberry or strawberry jam to the cream cheese for a fruity flavor burst.
- Nutty Delight: Mix in some finely chopped nuts for added texture and a nutty flavor.
- Flavor Infusions: Incorporate a teaspoon of vanilla or almond extract into the cake batter for an extra flavor kick.
- Dairy-Free Option: Use dairy-free cream cheese and melting chocolate to create a vegan-friendly version!
Chef’s Notes
As a chef who loves to experiment, this recipe holds a special place in my heart. I’ve made it repeatedly and can attest to how forgiving it is. You can always tweak the colors or flavors based on your mood and the season! I remember one time, I forgot to add the food coloring and ended up with a surprise white cake ball—delicious, but not quite as festive! So, keep the colors in mind, and feel free to get creative.
FAQs and Troubleshooting
Here are a few common questions and solutions if you encounter any hiccups as you make these delightful cake balls:
-
What if the cake balls are too dry?
If the mixture is crumbling apart, simply add more cream cheese gradually until the desired consistency is achieved. -
My chocolate is too thick! What should I do?
If your melting chocolate is too thick, you can add a small amount of coconut oil or shortening. This will help thin it out while still keeping it velvety. -
How do I store the cake balls?
Store any leftovers in an airtight container in the fridge for up to a week. They also freeze well, so you can enjoy them later! -
Can I use other food colorings?
Yes! Just make sure whichever food coloring you use is gel or liquid type and is safe for baking.
Nutritional Info
While enjoying these cake balls, keep in mind they’re meant as a delightful treat rather than a daily snack. A single ball has approximately 150 calories, but indulge in moderation, and savor each bite!
Now that you have a recipe to create these beautiful Red, White, and Blue Cake Balls, I’m excited to see how your creations turn out! Whether it’s a simple family gathering or a big summer celebration, these cake balls are sure to be a hit. Happy baking, and remember—keep it fresh, simple, and seriously delicious!
PrintRed, White, and Blue Cake Balls

Delightful cake balls perfect for summer barbecues and Fourth of July gatherings, combining moist white cake, creamy filling, and festive colors.
- Prep Time: 30 minutes
- Cook Time: 30 minutes
- Total Time: 60 minutes
- Yield: 24 servings 1x
- Category: Dessert
- Method: Baking
- Cuisine: American
- Diet: Vegetarian
Ingredients
- 1 (15.25-ounce) white cake mix
- Ingredients on box needed to make it (usually eggs, oil, and water)
- Red and blue food coloring
- 1 (8-ounce) block of cream cheese, softened
- 1 (10-ounce) package of white melting chocolate
- Red, white, and blue sprinkles
Instructions
- Preheat your oven according to the instructions on the cake mix box.
- Prepare your cake pans as directed.
- Mix the cake batter following the box instructions, leaving out the food coloring for now.
- Pour the batter into the pan and let it bake until golden brown and a toothpick comes out clean.
- Cool the cake in the pan for about 10-15 minutes, then turn it out onto a wire rack to cool completely.
- Crumble the cooled cake into small crumbs, dividing them into two bowls.
- Add red and blue food coloring to the respective bowls, mixing well.
- Create the cake mixture by adding half of the cream cheese to each bowl and mixing until combined.
- Form small balls of the cake mixture using a tablespoon or cookie scoop.
- Chill the cake balls on a lined baking sheet for about an hour in the fridge.
- Melt the white chocolate according to package instructions.
- Dip each chilled cake ball into the melted chocolate, ensuring it’s fully coated.
- Add the sprinkles immediately after coating.
- Chill again for about 30 minutes to set the chocolate shell.
Notes
These cake balls are perfect for summer parties and can be customized with different cake mixes and flavors.
Nutrition
- Serving Size: 1 cake ball
- Calories: 150
- Sugar: 10g
- Sodium: 160mg
- Fat: 7g
- Saturated Fat: 4g
- Unsaturated Fat: 2g
- Trans Fat: 0g
- Carbohydrates: 20g
- Fiber: 0g
- Protein: 2g
- Cholesterol: 20mg
Keywords: cake balls, red white blue, festive dessert, summer treats, Fourth of July treats
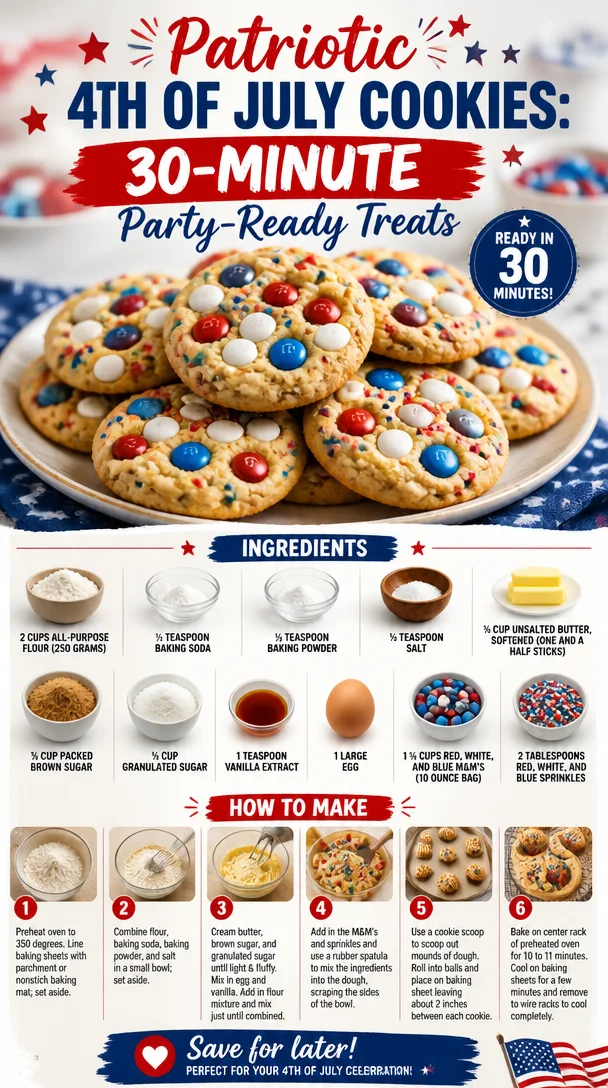
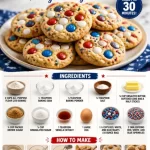
Patriotic 4th of July Cookies: 30-Minute Party-Ready Treats
Celebrate Independence Day with Delicious 4th of July Cookies
The 4th of July is just around the corner, and there’s nothing quite like a celebratory cookie to sweeten the occasion! Picture this: the sizzling summer sun, laughter echoing through the backyard as friends and family gather for a festive barbecue while fireworks twinkle in the twilight sky. Everyone is eagerly anticipating dessert, and what could be more perfect than a plate of vibrant, fun, and delectable 4th of July cookies? Not only do these cookies bring a pop of color, but they also infuse joy with each crunchy, chocolatey bite. So grab your apron, put on your favorite tunes, and let’s create a treat that will make your 4th of July extra special!
When I think back to my childhood celebrations, the 4th of July holds a treasure trove of happy memories. Each year, my family and I would set up a BBQ in our backyard, draping the picnic table in red, white, and blue decorations. My mom had this magical cookie recipe that she would whip up, filling the kitchen with the irresistible smell of freshly baked treats. I can still remember the triumphant moment when she pulled the cookies out of the oven, their golden edges crisp and their centers gooey with melted M&M’s. Together, we would decorate them with sprinkles, making them look as festive as a firework show. These cookies became a tradition, a tribute to the spirit of Independence Day, and they certainly delighted our taste buds year after year.
This year, I invite you to carry on that tradition—or perhaps start a new one—by making my 4th of July cookies! They’re chewy, buttery, and absolutely bursting with the colorful crunch of Red, White, and Blue M&M’s. With a sprinkle of festive joy on top, these easy-to-make cookies are just what you need to celebrate the occasion in style. So, let’s dive into the ingredients and get ready to bake some sweet memories!
Ingredients
-
2 cups all-purpose flour (250 grams)
The foundation of your cookies! If you want a gluten-free option, consider using almond flour or a gluten-free all-purpose mix. -
½ teaspoon baking soda
This will give your cookies a little lift. If you don’t have baking soda on hand, you can substitute it with baking powder (just use double the amount!). -
½ teaspoon baking powder
Adding extra lightness and fluffiness! It’s essential for achieving that perfect cookie texture. -
½ teaspoon salt
A little salt enhances the sweetness of your cookies. If you’re watching sodium intake, feel free to halve the amount. -
¾ cup unsalted butter, softened (1.5 sticks)
Buttery goodness is what makes these cookies melt in your mouth! If you need a dairy-free option, try vegan butter or coconut oil. -
¾ cup packed brown sugar
This adds moisture and a lovely rich flavor. If you’re out, you can substitute it with an equal amount of granulated sugar (though the flavor might be more one-dimensional). -
½ cup granulated sugar
Sweetness is important! Coconut sugar is a great substitute if you want a lower glycemic option. -
1 teaspoon vanilla extract
This is a must for that warm, inviting flavor. Feel free to use almond extract for a different twist! -
1 large egg
This binds the ingredients together. In a pinch, a flax egg (1 tablespoon ground flaxseed mixed with 2.5 tablespoons of water) works as a fantastic egg substitute. -
1 ¼ cups Red, White, and Blue M&M’s (10-ounce bag)
The star of our cookies! You can easily swap these out for your favorite chocolate candies or even chopped chocolate for a gourmet touch. -
2 tablespoons Red, White, and Blue Sprinkles
Because what’s a celebration without a little extra fun? Use any sprinkles you love for a festive touch.
Step-by-Step Instructions
-
Preheat Your Oven
Warm up that kitchen to 350°F (175°C). Preheating ensures your cookies bake evenly and come out perfectly golden. -
Prep Your Baking Sheets
Line two baking sheets with parchment paper. Not only does this prevent sticking, but it also makes for easy cleanup—an absolute chef hack! -
Combine Dry Ingredients
In a large bowl, whisk together the all-purpose flour, baking soda, baking powder, and salt. This step helps to evenly distribute the leavening agents and prevents clumps in your cookies. -
Cream Butter and Sugars
In a separate bowl, beat together the softened unsalted butter, packed brown sugar, and granulated sugar until the mixture is light and fluffy. This usually takes about 2-3 minutes with an electric mixer. Pro tip: let your butter sit out before mixing for a super creamy texture! -
Add the Egg and Vanilla
Mix in the egg and vanilla extract until combined. The batter will be slightly loose, and that’s exactly what you want! -
Incorporate Dry Ingredients
Gradually add the dry ingredient mixture into the wet mixture, stirring until just combined. Be careful not to overmix here—your cookies will thank you! -
Fold in M&M’s and Sprinkles
Gently fold in the Red, White, and Blue M&M’s and sprinkles. At this point, your dough should be vibrant and full of color! I like to reserve a few M&M’s and sprinkles to top the cookies before baking for that extra festive flair. -
Scoop the Dough
Using a cookie scoop or a tablespoon, drop rounded balls of dough onto the prepared baking sheets, leaving about 2 inches of space between each ball. This allows them room to spread out. -
Bake the Cookies
Pop them into the oven and bake for 10-12 minutes, or until the edges are lightly golden. They may look a little underdone in the center, but that’s perfect! They’ll continue to cook while cooling. -
Cooling Time
Let the cookies cool on the baking sheet for about 5 minutes, then transfer them to a wire rack to cool completely. This is the hardest part—waiting for the cookies to cool while trying to resist the sweet smell!
Serving Suggestions
For presentation, arrange the cookies on a beautiful platter or stack them high in a festive tin for a fun 4th of July treat! You can also serve them alongside a scoop of vanilla ice cream for a delightful dessert sundae that showcases the colors of the holiday. Enjoy these cookies throughout your backyard festivities, and don’t forget to snap some pictures to capture the sweet moments!
Recipe Variations
- Chocolate Chip Explosion: Swap out half of the M&M’s for semi-sweet chocolate chips for a richer, chocolatey flavor.
- Nutty Crunch: Add chopped nuts like pecans or walnuts for an extra crunch.
- Gluten-Free Delight: Use a gluten-free all-purpose flour blend to make these cookies gluten-free without sacrificing flavor.
- Holiday Twist: Change the M&M colors to make these cookies year-round with seasonal themes—not just for the 4th of July!
Chef’s Notes
These cookies have been a staple in my baking repertoire for years, evolving with little tweaks and adjustments over time. One year, I accidentally left out the baking soda and ended up with pancakes instead of cookies. Talk about a baking blunder! But they were delightful in their own way, and I still sometimes make a pancake version for breakfast!
When baking, remember that it’s all about creating joy in the kitchen. Lean into what works for you—whether that means using different mix-ins or even changing up the color palette to fit the season. Remember, the goal is to create not just cookies, but delightful memories!
FAQs and Troubleshooting
-
Why are my cookies spreading too much?
Ensure your butter isn’t too soft; if it’s melted, that could lead to overly flat cookies. Chill the dough for about 30 minutes before scooping if needed. -
How do I store leftover cookies?
To keep them fresh, store your cookies in an airtight container at room temperature for up to a week. If it’s really hot, you might want to refrigerate them! -
Can I freeze these cookies?
Absolutely! Freeze the cookies after baking by placing them in a single layer on a baking sheet. Once solid, transfer to a zip-top bag for up to 3 months. Thaw at room temperature when ready to enjoy.
Embrace your inner chef, and feel free to tweak the recipe to make it your own. Happy baking and have a wonderful 4th of July celebration with unforgettable, delicious cookies! 🎆🥳
Print4th of July Cookies
Celebrate Independence Day with these vibrant and festive 4th of July cookies made with colorful M&M’s and sprinkles!
- Prep Time: 15 minutes
- Cook Time: 12 minutes
- Total Time: 27 minutes
- Yield: 24 cookies 1x
- Category: Dessert
- Method: Baking
- Cuisine: American
- Diet: Vegetarian
Ingredients
- 2 cups all-purpose flour (250 grams)
- ½ teaspoon baking soda
- ½ teaspoon baking powder
- ½ teaspoon salt
- ¾ cup unsalted butter, softened (1.5 sticks)
- ¾ cup packed brown sugar
- ½ cup granulated sugar
- 1 teaspoon vanilla extract
- 1 large egg
- 1 ¼ cups Red, White, and Blue M&M’s (10-ounce bag)
- 2 tablespoons Red, White, and Blue Sprinkles
Instructions
- Preheat your oven to 350°F (175°C).
- Line two baking sheets with parchment paper.
- Whisk together the all-purpose flour, baking soda, baking powder, and salt in a large bowl.
- Beat together the softened unsalted butter, packed brown sugar, and granulated sugar until light and fluffy.
- Mix in the egg and vanilla extract until combined.
- Gradually add the dry ingredient mixture into the wet mixture, stirring until just combined.
- Fold in the Red, White, and Blue M&M’s and sprinkles.
- Scoop rounded balls of dough onto the prepared baking sheets, leaving about 2 inches of space between each.
- Bake for 10-12 minutes, or until the edges are lightly golden.
- Cool the cookies on the baking sheet for about 5 minutes before transferring them to a wire rack.
Notes
Store cookies in an airtight container at room temperature for up to a week. They can also be frozen for up to 3 months.
Nutrition
- Serving Size: 1 cookie
- Calories: 150
- Sugar: 12g
- Sodium: 100mg
- Fat: 8g
- Saturated Fat: 5g
- Unsaturated Fat: 3g
- Trans Fat: 0g
- Carbohydrates: 20g
- Fiber: 0g
- Protein: 2g
- Cholesterol: 30mg
Keywords: 4th of July, cookies, festive dessert, M&M's, baking