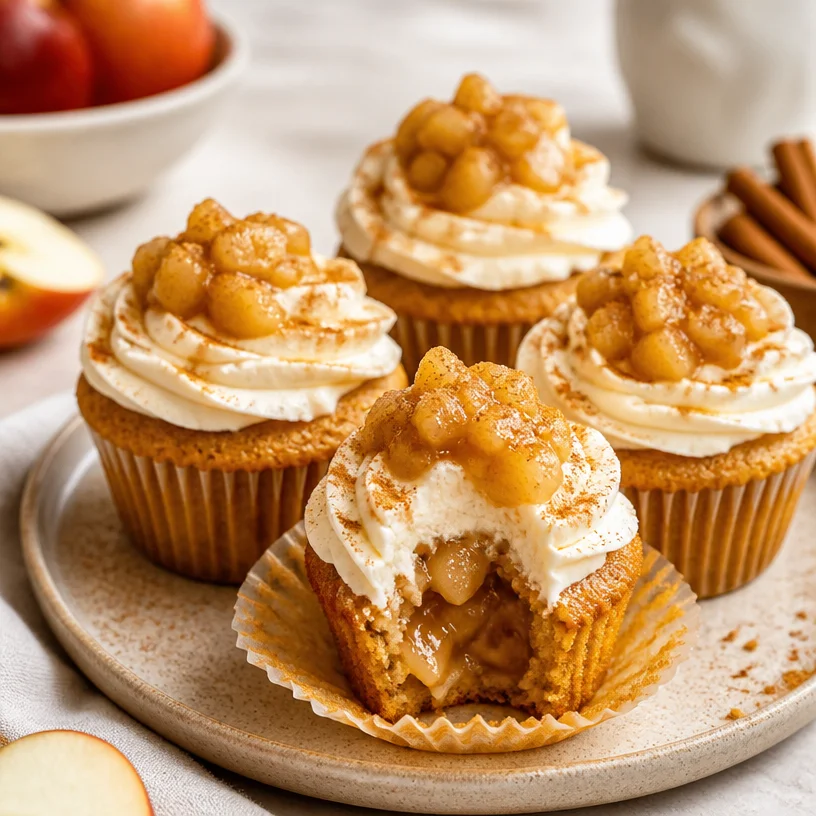
Minute Apple Pie Cupcakes for Busy Weeknights at Home
Apple Pie Cupcakes: A Deliciously Fluffy Twist on a Classic Favorite
Welcome back to Clean Plate Cravings! Today, I’m thrilled to share a recipe that combines two of life’s greatest pleasures: apple pie and cupcakes. Oh yes, my friends, we’re talking about Apple Pie Cupcakes! These delightful little treats are soft, fluffy, and bursting with cinnamon-sugar goodness. What’s not to love? Imagine diving into a warm, spiced cupcake with creamy frosting that tastes like apple pie filling. It’s like a cozy hug in dessert form!
When I think about apple pie, I’m immediately transported to my grandma’s kitchen. There she was, surrounded by flour, apples, and an uncanny ability to make the most mouth-watering desserts. I can still hear her laughter and the rhythmic sound of her rolling pin working its magic on the dough. Every fall, my sisters and I would line up, eager to help peel apples, sneak bites of the buttery crust, and, of course, indulge in her famous pie fresh out of the oven. Those beautiful moments shaped my love for baking and the joy it brings to family and friends.
One day, while I was craving that nostalgic flavor but wanted something a bit more approachable and fun, I hatched an idea. Why not combine the delightful essence of apple pie with the charm of a cupcake? And voilà, Apple Pie Cupcakes were born! Each bite reminds me of those joyful days in Grandma’s kitchen but offers a contemporary twist that makes them easy to whip up any day of the week.
Ready to dive in? Let’s get baking!
Ingredients
Here’s what you’ll need to create these scrumptious little delights. Each ingredient plays a key role in making these cupcakes not just tasty, but also memorable.
-
1 1/2 cups all-purpose flour
This is your base ingredient; it gives the cupcakes structure. If you’re looking to make them gluten-free, you can easily substitute with a 1:1 gluten-free flour blend. -
1/2 teaspoon baking powder
This helps the cupcakes rise, giving them that light, airy texture. If you’re out of baking powder, you could use baking soda, but then you’ll need to add a little acid (like buttermilk or vinegar). -
1/2 teaspoon baking soda
Another leavening agent that works alongside baking powder for optimal fluffiness. Make sure it’s fresh; old baking soda can lead to flat cupcakes! -
1/4 teaspoon salt
A little pinch of salt enhances the flavors of all the other ingredients. It’s like a secret weapon in baking! -
1/2 cup unsalted butter, softened
Butter adds richness and helps create that dreamy texture. If you’re dairy-free, coconut oil can be a fantastic substitute, just make sure it’s solid, not melted. -
1 cup granulated sugar
Sweet, sweet sugar not only sweetens the cupcakes but also contributes to their overall texture. You could swap half of it with brown sugar for a moister, richer flavor! -
2 large eggs
Eggs provide structure and act as a binding agent. For an egg-free version, try using flax eggs (1 tablespoon of ground flaxseed mixed with 2.5 tablespoons of water per egg). -
1 teaspoon vanilla extract
Pure vanilla extract elevates the flavor profile. In a pinch, almond extract or maple syrup can add a delightful twist! -
1/2 cup milk
Milk adds moisture to the batter. Use any type of milk you love—dairy, almond, or oat milk all work great! -
1 cup apple compote
This is the star of the show, lending flavors reminiscent of apple pie filling. You could easily make your own or find a quality jarred version if you’re short on time. -
1/2 cup cream cheese, softened
Perfect for creating a smooth, tangy frosting. For a lighter version, you could use Greek yogurt instead. -
1/4 cup powdered sugar
This sweetens the frosting and helps it achieve the right consistency. You can make your own by blending regular granulated sugar in a blender until fine! -
1 teaspoon cinnamon
The magical spice that creates that cozy apple pie aroma. Feel free to add more if you love cinnamon as much as I do!
Let’s get started on these delightful Apple Pie Cupcakes!
Step-by-Step Instructions
-
Preheat Your Oven
Start by preheating your oven to 350°F (175°C). This allows your cupcakes to bake evenly. While that’s warming up, you can prepare your cupcake tin by lining it with paper liners—this also makes for easy cleanup! -
Mix Your Dry Ingredients
In a medium bowl, whisk together the flour, baking powder, baking soda, salt, and cinnamon. It’s super important to truly mix these dry ingredients well; this ensures even distribution throughout your batter. Pro tip: Sifting can help eliminate any clumps! -
Cream the Butter and Sugar
In another large bowl, beat the softened butter and granulated sugar together until creamy and light in color—about 3-4 minutes with an electric mixer (a whisk will do in a pinch, just some extra elbow grease!). This step introduces air into the batter, giving you light cupcakes. -
Add the Eggs and Vanilla
Gradually add in the eggs one at a time, mixing well after each addition. Then stir in the vanilla extract—this is where the magic happens. Your kitchen will start to smell divine! -
Incorporate the Dry and Wet Ingredients
Next, add half of your dry ingredients to the butter-sugar mixture, mixing on low to combine, followed by the milk. Alternate adding the remaining dry ingredients with the apple compote until everything is just mixed—don’t over-mix here or your cupcakes may turn out dense. -
Fill the Cupcake Liners
Using a scoop or a spoon, fill each cupcake liner about two-thirds full with the batter. This gives them enough room to rise without spilling over. -
Bake, Baby, Bake!
Pop the filled cupcake tin in the oven and bake for about 18-20 minutes or until a toothpick inserted into the center comes out clean. Keep an eye on them during the last few minutes—cupcakes can go from perfect to overbaked pretty quickly! -
Cool the Cupcakes
Once baked, remove your cupcakes from the oven and let them cool in the tin for about 5-10 minutes. Then gently transfer them to a wire rack to cool completely. Don’t rush this step—frosting warm cupcakes is a recipe for a melty mess! -
Make the Frosting
While your cupcakes cool, let’s whip up the frosting! In a medium bowl, beat together the softened cream cheese and powdered sugar until smooth and fluffy. You can add more powdered sugar if you like it sweeter! -
Frost and Decorate
Once your cupcakes are completely cool, dollop or pipe the cream cheese frosting on top. Feel free to sprinkle with a touch of extra cinnamon, or even drizzle some caramel sauce over them for that extra wow factor!
Serving Suggestions
These Apple Pie Cupcakes are perfect for any occasion! Serve them at birthday parties, holiday gatherings, or simply as a delightful treat for an afternoon snack. For a fun presentation, arrange them on a lovely cake stand or plate and garnish with fresh apple slices adorned with a sprinkle of cinnamon. Enjoying them fresh is a must, but they also keep well, making them great for sharing!
Recipe Variations
Feeling creative? Here are a few ideas to switch things up:
- Caramel Apple Swirl: Add swirls of caramel sauce throughout the batter for an extra decadent treat.
- Nutty Crunch: Add chopped pecans or walnuts into the cupcake batter for a delightful crunchy texture.
- Spice it Up: Mix in some nutmeg or ginger along with the cinnamon for more warmth.
- Gluten-Free Option: Use a store-bought gluten-free flour blend for a gluten-free version of these cupcakes.
- Vegan Delight: Replace the butter with vegan butter and use flax eggs or applesauce in place of eggs. Coconut milk can be a delicious dairy-free substitute too.
Chef’s Notes
As with any recipe, I encourage you to let your personality shine through! This recipe has evolved over the years from just plain apple cupcakes to the cream cheese-frosted delight we have today. I originally made them for a friend’s birthday—let’s just say they vanished in no time! This is one of my go-to recipes, and I’m so glad to be sharing it with you.
Want a funny kitchen story? The last time I made these, I was so excited, I accidentally grabbed the salt instead of the sugar for the frosting. Let’s just say the flavors were a bit… unexpected! Always double-check, my friends!
FAQs and Troubleshooting
Q: My cupcakes are too dense, what went wrong?
A: This could be due to over-mixing or too much flour. It’s always a good idea to spoon your flour into the measuring cup rather than scooping straight from the bag.
Q: Can I use fresh apples instead of apple compote?
A: Absolutely! Just peel and finely chop fresh apples, then toss them in a bit of sugar and cinnamon to mimic that apple pie flavor.
Q: Why did my frosting turn out runny?
A: If your cream cheese wasn’t well-drained or overly soft, it can make the frosting runny. Using cold cream cheese can also help as it firms up more when mixed. Just re-whip with a touch more powdered sugar!
Q: Do these cupcakes freeze well?
A: Yes! You can freeze the cupcakes without frosting for up to three months. Frost them after thawing for a fresh taste.
Nutritional Info
While I always encourage treating yourself, I believe it’s also important to know what you’re consuming. Each cupcake (without frosting) comes in at approximately 180 calories, 5g of fat, 30g of carbs, and 2g of protein. Pair them with a hot cup of tea, and you’ve got yourself a deliciously cozy treat!
So, what are you waiting for? Let those apron strings fly and get ready to bake up a storm with these scrumptious Apple Pie Cupcakes! I can’t wait to hear how they turn out for you. Happy baking, friends, and remember—the kitchen is a place for love, laughter, and a little bit of chaos! 🍏🧁
PrintApple Pie Cupcakes
A delightful twist on classic apple pie, these fluffy cupcakes are bursting with cinnamon-sugar goodness and topped with creamy frosting.
- Prep Time: 20 minutes
- Cook Time: 20 minutes
- Total Time: 40 minutes
- Yield: 12 servings 1x
- Category: Dessert
- Method: Baking
- Cuisine: American
- Diet: Vegetarian
Ingredients
- 1 1/2 cups all-purpose flour
- 1/2 teaspoon baking powder
- 1/2 teaspoon baking soda
- 1/4 teaspoon salt
- 1/2 cup unsalted butter, softened
- 1 cup granulated sugar
- 2 large eggs
- 1 teaspoon vanilla extract
- 1/2 cup milk
- 1 cup apple compote
- 1/2 cup cream cheese, softened
- 1/4 cup powdered sugar
- 1 teaspoon cinnamon
Instructions
- Preheat your oven to 350°F (175°C) and prepare your cupcake tin with liners.
- Mix the flour, baking powder, baking soda, salt, and cinnamon in a bowl.
- Cream the butter and sugar until light and fluffy.
- Add the eggs one at a time, then stir in the vanilla extract.
- Incorporate the dry ingredients and milk alternately into the butter-sugar mixture and mix until just combined.
- Fill the cupcake liners two-thirds full with batter.
- Bake for 18-20 minutes or until a toothpick comes out clean.
- Cool the cupcakes in the tin for 5-10 minutes before transferring to a wire rack.
- Make the frosting by beating the cream cheese and powdered sugar until smooth.
- Frost the cooled cupcakes and add any desired toppings.
Notes
These cupcakes can be frozen without frosting for up to three months. Frost after thawing for the best flavor.
Nutrition
- Serving Size: 1 cupcake
- Calories: 180
- Sugar: 22g
- Sodium: 200mg
- Fat: 5g
- Saturated Fat: 3g
- Unsaturated Fat: 2g
- Trans Fat: 0g
- Carbohydrates: 30g
- Fiber: 1g
- Protein: 2g
- Cholesterol: 40mg
Keywords: apple pie, cupcakes, dessert, baking, fall recipes, sweet treats
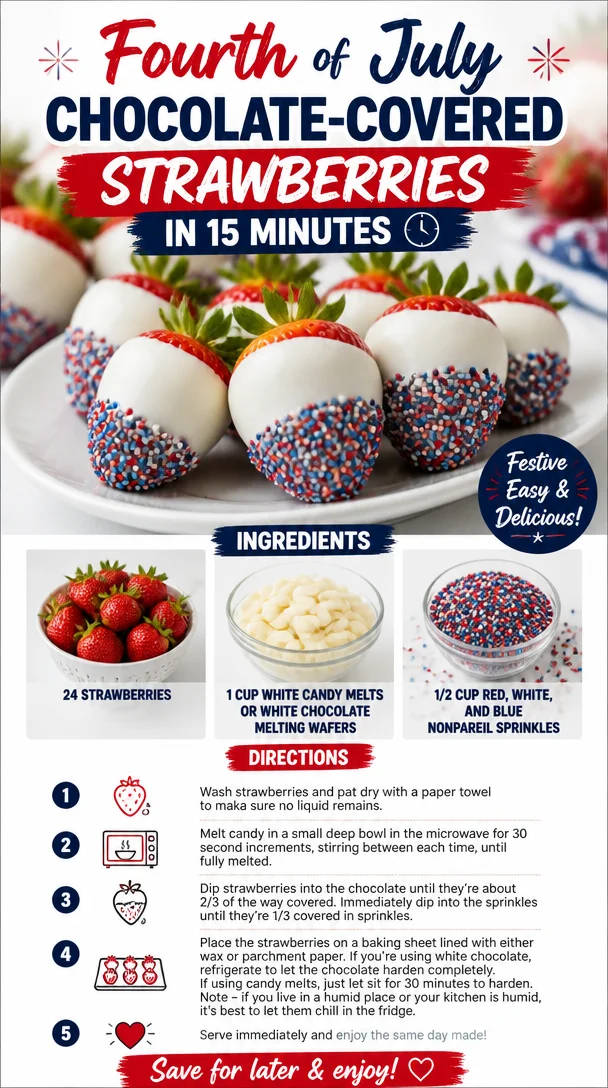
Fourth of July Chocolate-Covered Strawberries in 15 Minutes
4th of July Chocolate Covered Strawberries: A Festive Treat!
The 4th of July is that magical time of year when we gather with friends and family, deck the halls with red, white, and blue, and fire up the grill for some good old-fashioned outdoor fun! And what better way to celebrate than with a sweet treat that not only looks stunning but tastes divine? Today, we’re diving into the world of Chocolate Covered Strawberries, spruced up with festive sprinkles to match the holiday vibe. These beauties are not just a feast for the taste buds; they’re a treat for the eyes too!
Now, before we jump into the recipe, let me share a little personal story with you. Strawberry season is a cherished time for me. As a kid, my family would spend weekends visiting local farms, picking fresh strawberries right off the vine. Those sweet, juicy gems were the highlight of our summer. We’d often bring them home and dip them in chocolate or just enjoy them fresh, straight from the basket. The memory of sharing those strawberries over giggles and laughter while the summer sun warmed our cheeks is a reminder of how simple ingredients can create unforgettable moments.
This year, as we gear up to celebrate Independence Day, I wanted to capture that nostalgia in a festive way with Chocolate Covered Strawberries. They’re easy to make, incredibly delicious, and a perfect crowd-pleaser, giving everyone that sweet taste of summer while fitting right into our patriotic theme. Let’s get started, shall we?
Ingredients
-
24 Strawberries: The star of our show! Look for firm, ripe strawberries with bright green leaves. Freshness is key! If strawberries aren’t in season, you can use other berries like raspberries or blackberries for a delicious twist.
-
1 Cup White Candy Melts or White Chocolate Melting Wafers: These are so easy to work with! You’ll have rich, creamy melted chocolate once they’re heated. If you prefer dark chocolate or milk chocolate instead, feel free to swap!
-
1/2 Cup Red, White, and Blue Nonpareil Sprinkles: These add that festive flair! You can find them at most bakeries or online retailers. If you can’t locate the trio, choose any mix of colorful sprinkles to brighten up your dessert.
Step-by-Step Instructions
-
Prep Your Strawberries: Start by washing the strawberries under cold water. Pat them dry thoroughly with paper towels—this step is crucial because water can prevent the chocolate from adhering properly. Avoid letting them soak; we want them dry and ready for dipping!
Chef Tip: Look for strawberries that are larger and more plump for a fuller bite, plus they will look gorgeous once dipped!
-
Melt the Candy Melts: In a microwave-safe bowl, add the white candy melts. Heat them in the microwave in 30-second intervals, stirring in between, until completely melted and smooth. This usually takes about 2 minutes total.
Chef Hack: Make sure to stop heating as soon as the melts are mostly melted. Stirring helps to melt the remaining pieces without scorching.
-
Dip the Strawberries: Hold the strawberry by the green leaves, and dip it into the melted chocolate, swirling it 360 degrees to coat evenly. Let the excess chocolate drip back into the bowl.
Quick Tip: For a more even coat, dip twice! Just let the first coat set for a minute in the fridge before re-dipping.
-
Add the Sprinkles: While the chocolate is still wet, gently roll the chocolate-covered strawberry in the sprinkles, or spoon the sprinkles over the chocolate-covered part. This will ensure a festive finish!
Insider Note: Don’t hesitate to get creative here! Mix sprinkles for a whole new look or even use crushed nuts for a different texture.
-
Set the Strawberries: Place each dipped strawberry on a baking sheet lined with parchment paper or a decorative tray. Once you’ve dipped all the strawberries, pop them in the fridge for about 30 minutes to set.
Chef Secret: If you want an extra shine on your chocolate, let the dipped strawberries sit at room temperature for a few minutes before popping them into the fridge!
Serving Suggestions
Once your strawberries have set, arrange them on a beautiful platter with decorations that match your 4th of July theme—a few sparklers or even mini American flags will underscore the festive spirit. For an elegant touch, you can even drizzle melted dark chocolate over the sprinkles for that wow factor.
Recipe Variations
-
Chocolate Combo: Try using a combination of white chocolate and dark or milk chocolate. Swirl them together for a marbled effect!
-
Flavor Infusion: Add a few drops of peppermint extract to your melted chocolate for a refreshing twist.
-
Nutty Crunch: Instead of sprinkles, chop up nuts or use finely crushed graham crackers for a deliciously different texture.
-
Fruit Fusion: Experiment with other fruits like banana slices or pineapples for a tropical twist!
-
Sugar-Free Option: If you’re watching your sugar intake, opt for sugar-free candy melts.
Chef’s Notes
These Chocolate Covered Strawberries have come to mean a lot to me over the years. They’ve become a staple at every summer gathering! Whether it’s a 4th of July barbecue or a simple backyard picnic, they never fail to bring smiles. Originally, I started out making them just with chocolate, but as I started experimenting with sprinkles and toppings, they evolved into the fun, colorful treats we know today.
Funny enough, I once tried to make them with jelly-filled strawberries—let’s just say that was a total disaster! The jelly leaked everywhere and I needed a lot more chocolate to hide my mistakes. But as all great recipes do, that led me to devise the perfect method, ensuring every bite is as sweet as summer memories.
FAQs and Troubleshooting
1. Why isn’t the chocolate sticking to my strawberries?
Make sure the strawberries are completely dry before dipping! Any moisture can cause the chocolate to slide right off.
2. Can I make these ahead of time?
Absolutely! You can make these covered strawberries the night before your event. Just keep them refrigerated until you’re ready to serve.
3. What if the chocolate hardens and becomes clumpy?
If your chocolate starts to harden while you’re working, gently reheat it in short increments in the microwave, stirring frequently to regain the smooth texture.
4. My chocolate is too thick to dip. What should I do?
If your melted chocolate gets too thick, you can add a little bit of coconut oil or shortening to thin it out. Be sure to stir well until fully incorporated.
Nutritional Info (Optional)
Serving Size: 1 chocolate-covered strawberry
Calories: Approximately 50
Fat: 2g (Depends on choice of chocolate)
Carbohydrates: 8g
Sugar: 6g
Protein: 0.5g
There you have it, my fellow food enthusiasts! With just a few ingredients and easy steps, you can whip up these delightful Chocolate Covered Strawberries that everyone will adore. They’re perfect for getting into the holiday spirit while showcasing your culinary skills. Happy 4th of July, and here’s to many sweet memories ahead! Enjoy every bite, and don’t forget to share your creations! 🍓❤️💙
Print4th of July Chocolate Covered Strawberries
Delicious and festive chocolate covered strawberries, perfect for the 4th of July celebration!
- Prep Time: 15 minutes
- Cook Time: 5 minutes
- Total Time: 20 minutes
- Yield: 24 servings 1x
- Category: Dessert
- Method: No Cooking Required
- Cuisine: American
- Diet: Vegetarian
Ingredients
- 24 Strawberries
- 1 Cup White Candy Melts or White Chocolate Melting Wafers
- 1/2 Cup Red, White, and Blue Nonpareil Sprinkles
Instructions
- Prep your strawberries by washing and thoroughly drying them.
- Melt the candy melts in a microwave-safe bowl in 30-second intervals until smooth.
- Dip the strawberries into the melted chocolate, swirling to coat evenly.
- Add the sprinkles while the chocolate is still wet.
- Set the dipped strawberries on a baking sheet lined with parchment to cool in the fridge for 30 minutes.
Notes
For extra shine, let the dipped strawberries sit at room temperature for a few minutes before refrigerating.
Nutrition
- Serving Size: 1 chocolate-covered strawberry
- Calories: 50
- Sugar: 6g
- Sodium: 10mg
- Fat: 2g
- Saturated Fat: 1g
- Unsaturated Fat: 1g
- Trans Fat: 0g
- Carbohydrates: 8g
- Fiber: 0g
- Protein: 0.5g
- Cholesterol: 0mg
Keywords: chocolate strawberries, 4th of July dessert, festive treats, summer snacks