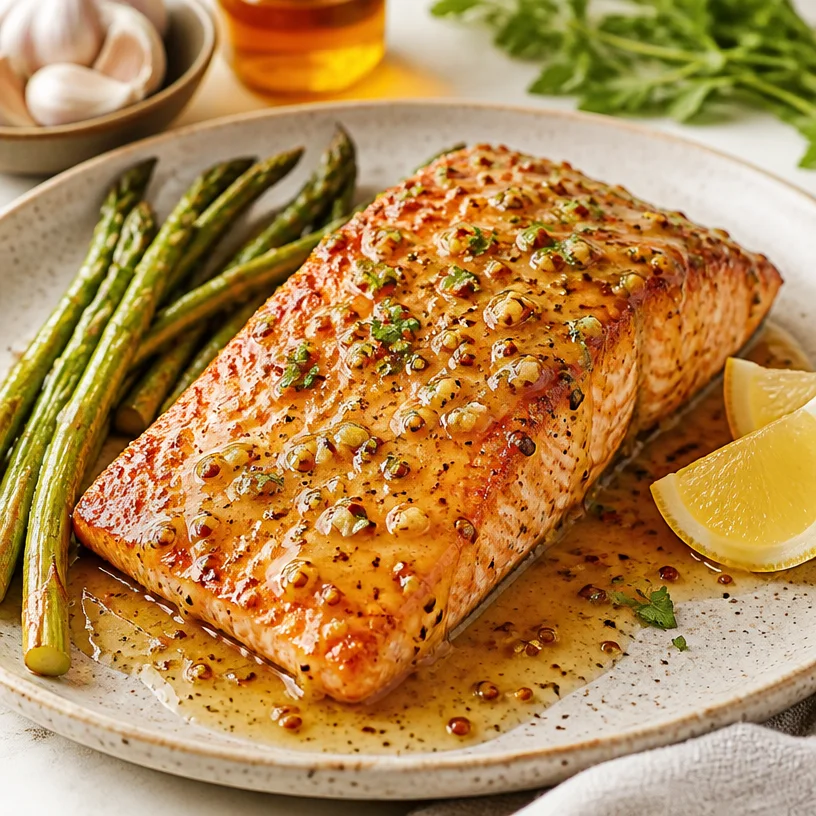
One-Pan Maple-Dijon Salmon: Weeknight Dinner in 20 Minutes
Maple Dijon Salmon: A Flavor-Packed Delight
Welcome to the vibrant world of Clean Plate Cravings, where I am excited to share with you one of my absolute favorites: Maple Dijon Salmon! If you’re anything like me, you crave meals that are not only delicious but make you feel good about what you’re eating. In this blog post, I’ll walk you through creating a sensational salmon dish that will elevate your weeknight dinners and impress your friends at gatherings.
Imagine succulent salmon fillets kissed by the sweetness of maple syrup and the zing of Dijon mustard, all finished with a hint of garlic. This dish is a perfect marriage of flavors that combines simplicity and sophistication. Whether you’re a seasoned home chef or just starting in the kitchen, trust me, this dish will have you feeling like a pro in no time.
What I love most about Maple Dijon Salmon is its versatility and ease. You can whip it up for a casual family dinner or serve it as a showstopper for your weekend guests. Pair it with a fresh side salad or steamed veggies, and you’ve got a meal that’s both hearty and healthful. Plus, it only takes about 30 minutes from start to finish—what’s not to love?
Let’s dive into this culinary adventure, where every step is infused with love and flavor. Prepare to wow your taste buds and make them shout for joy!
A Nostalgic Kitchen Adventure
One of my fondest memories in the kitchen revolves around my great-aunt Martha. She was a culinary wizard who made cooking seem like a magical art form. Growing up, I would often find myself perched on a stool, watching her concoct delightful dishes that danced with flavor. One of her favorites was a glaze she made for her salmon—a sweet and tangy number that always drew compliments from family and friends.
As I learned more about cooking, I tried to recreate her delicious meals. I wanted to capture that feeling of warmth and joy that came from sharing good food. After some experimentation in my kitchen, I stumbled upon the idea of combining maple syrup with Dijon mustard to create a glaze that not only honors Aunt Martha’s magic but adds my twist. The first time I made it for my family, they were blown away by how well the flavors blended. It reminded me of those joyful days with Aunt Martha, and for me, that’s the heart of cooking—bringing people together with deliciousness.
Ingredients
Let’s gather our ingredients! Here’s what you’ll need for this dazzling Maple Dijon Salmon:
-
Salmon Fillets: The star of this dish! Fresh, wild-caught salmon is ideal for flavor and health benefits. If you can’t find salmon, trout or any fatty fish can be excellent substitutes, offering similar taste and texture.
-
Maple Syrup: This natural sweetener not only adds a delightful sweetness but also complements the fish beautifully. If you don’t have maple syrup, honey or agave syrup could work in a pinch, though the flavor will vary slightly.
-
Dijon Mustard: This tangy condiment elevates the dish with its distinct kick. For a milder taste, you can swap in yellow mustard, or for something a bit spicier, whole grain mustard would add a fun texture.
-
Garlic: Fresh minced garlic gives this glaze its incredible aroma and depth. If you’re in a hurry, garlic powder can be a decent alternative, though fresh is always best!
These ingredients come together in a magical way, bringing health benefits and flavor in every bite. Now that we have our gear, let’s get to cooking!
Step-by-Step Instructions
-
Preheat the Oven: Start by preheating your oven to 400°F (200°C). A hot oven is essential for achieving that perfect caramelization on your salmon.
-
Prepare the Glaze: In a small mixing bowl, combine ¼ cup of maple syrup, 2 tablespoons of Dijon mustard, and 2 cloves of minced garlic. Whisk them together until smooth. Not only does this create a glossy glaze, but the whisking also infuses air into it, making it light and fluffy. A little chef tip: If you want a hint of spice, add a pinch of cayenne pepper!
-
Prepare the Salmon: Place your salmon fillets skin-side down on a lined baking sheet. Make sure to leave some space between each fillet for even cooking. Season the fillets lightly with salt and pepper to enhance the natural flavors of the fish.
-
Add the Glaze: Spoon the delicious maple Dijon mixture evenly over each salmon fillet. Don’t be shy—get that glaze on there! Use a pastry brush if you want a more polished finish.
-
Bake to Perfection: Slide the baking sheet into the oven and bake for about 15-20 minutes, or until the salmon flakes easily with a fork. You’ll know it’s ready when the edges turn golden and the glaze gets a bit bubbly. Chef’s hack: If you like a crispy top, broil the salmon for the last 2-3 minutes of cooking!
-
Let It Rest: Once the salmon is out of the oven, let it sit for a couple of minutes. This helps the juices redistribute, resulting in a moist and tender bite.
-
Ready to Serve: You can garnish with fresh herbs like parsley or chives for an extra pop of color and flavor. And voilà! You have a stunning Maple Dijon Salmon that’s ready to impress!
Serving Suggestions
To plate your Maple Dijon Salmon, serve it on a vibrant dinner plate with a fresh side salad or steamed vegetables. A sprinkle of sesame seeds or a squeeze of fresh lemon juice can brighten the dish even more. If you’re feeling adventurous, serve it alongside a creamy quinoa or warm brown rice to soak up all that fantastic glaze. Trust me; your guests will be clamoring for seconds!
Recipe Variations
Here are a few creative twists you can try with this recipe:
-
Spicy Maple Dijon: Add a teaspoon of sriracha or a dash of hot sauce to the glaze mix for a zesty kick.
-
Herby Delight: Fold in fresh herbs like dill or thyme into the glaze for an earthier flavor profile.
-
Citrus Twist: Squeeze some fresh lemon or orange juice into the glaze for a zesty flavor that pairs wonderfully with salmon.
-
Sweet Potato Side: Serve with roasted sweet potatoes drizzled with olive oil and a sprinkle of cinnamon for a comforting side.
-
Wrap it Up: Try this glaze on grilled chicken or tofu for an equally delicious meal that caters to different palates.
Chef’s Notes
One thing I love about this recipe is its evolution. Early on, I used way too much syrup, and it turned my dish into a sticky mess. I learned that balance is key! The beauty of cooking is that it allows you to experiment and discover what works best for you. As I’ve played around with the ratios, I’ve learned to appreciate the unique flavor profile created by each ingredient. It’s those small tweaks that lead to magic in the kitchen.
Every time I make this dish, I’m transported back to those cherished moments with Aunt Martha, reminding me that food is more than just sustenance—it’s an expression of love.
FAQs and Troubleshooting
1. How can I tell if the salmon is done?
You’ll know the salmon is cooked when it flakes easily with a fork and the flesh turns from translucent to opaque. Use a meat thermometer for precision—it should read 145°F (63°C).
2. What if I overcooked the salmon?
If your salmon is dry, try adding a squeeze of lemon or a drizzle of olive oil just before serving to help moisten the fish.
3. Can I use frozen salmon?
Absolutely! Just be sure to thaw it completely in the refrigerator before cooking to ensure even cooking.
4. How can I store leftovers?
Store leftover salmon in an airtight container in the refrigerator for up to 2 days. Reheat gently in the oven or microwave. To keep it moist, add a splash of water before reheating.
Nutritional Info
- Serving Size: 1 fillet
- Calories: Approximately 350
- Protein: 30g
- Carbohydrates: 15g
- Fat: 20g
- Fiber: 0g
- Sugars: 12g
Whether you’re whipping this up for a quick weeknight dinner or impressing friends at a weekend dinner party, this Maple Dijon Salmon is sure to be a hit. Remember, cooking is about enjoying the process and indulging your taste buds. So grab those ingredients, put on your favorite tunes, and get ready to create something magical in your kitchen! Happy cooking, my friends!
PrintMaple Dijon Salmon
A succulent salmon dish with a sweet maple glaze and a hint of Dijon mustard, perfect for any dinner occasion.
- Prep Time: 10 minutes
- Cook Time: 20 minutes
- Total Time: 30 minutes
- Yield: 4 servings 1x
- Category: Main Course
- Method: Baking
- Cuisine: American
- Diet: Pescatarian
Ingredients
- 4 Salmon fillets
- ¼ cup Maple syrup
- 2 tablespoons Dijon mustard
- 2 cloves Garlic, minced
- Salt and pepper, to taste
Instructions
- Preheat your oven to 400°F (200°C).
- Combine maple syrup, Dijon mustard, and minced garlic in a small bowl.
- Place salmon fillets skin-side down on a lined baking sheet.
- Season lightly with salt and pepper.
- Spoon the maple Dijon mixture over each salmon fillet.
- Bake for 15-20 minutes, until the salmon flakes easily with a fork.
- Let it rest for a couple of minutes before serving.
- Garnish with fresh herbs if desired and serve.
Notes
You can substitute salmon with trout or other fatty fish. Experiment with adding spices or fresh herbs for a twist on flavors.
Nutrition
- Serving Size: 1 fillet
- Calories: 350
- Sugar: 12g
- Sodium: 400mg
- Fat: 20g
- Saturated Fat: 3g
- Unsaturated Fat: 14g
- Trans Fat: 0g
- Carbohydrates: 15g
- Fiber: 0g
- Protein: 30g
- Cholesterol: 60mg
Keywords: salmon, maple glaze, Dijon mustard, quick dinner, healthy recipes
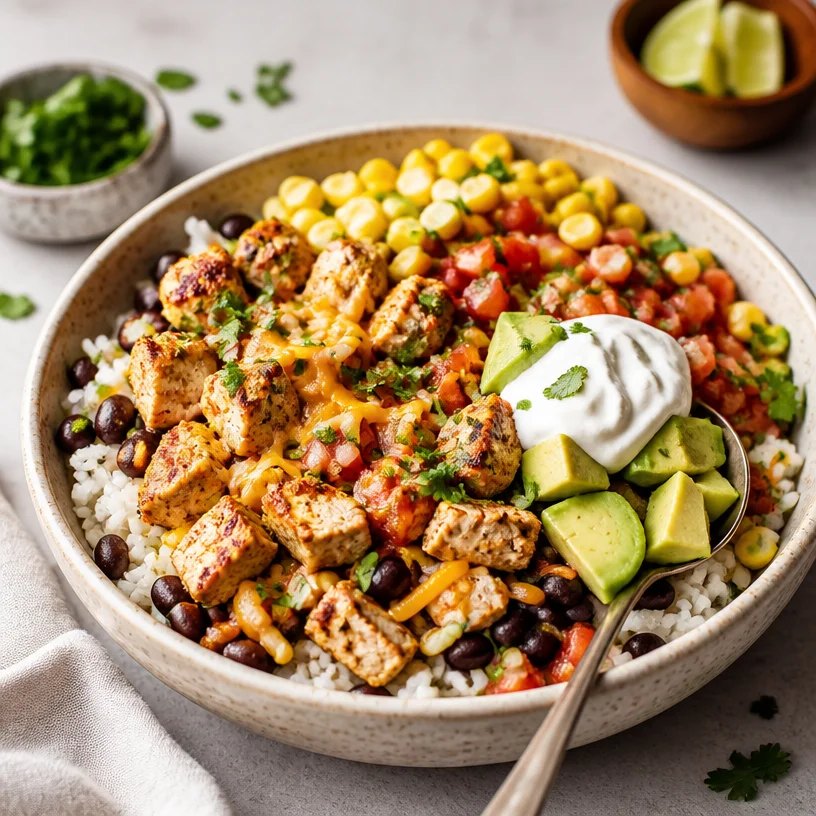
One-Pan Chicken Taco Bowl (15-Minute Weeknight Recipe)
Chicken Taco Bowl: A Vibrant Dish to Nourish Body and Soul
Welcome to Clean Plate Cravings! Today, we’re diving into a delightful, colorful dish that perfectly embodies the spirit of clean eating: the Chicken Taco Bowl. There’s something truly magical about bowls; they are like little culinary ecosystems, packed with flavors, colors, and textures all in one place. Whether you’re meal prepping for the week ahead or treating yourself to a fun weeknight dinner, this dish is as versatile as it is delicious.
Let’s face it—trying to eat healthier can sometimes feel like a chore, right? But that’s why I’m here! I believe that clean eating should be a celebration, not a restriction. Each bite of this scrumptious Chicken Taco Bowl brings together fresh ingredients, comforting flavors, and the kind of satisfaction that leaves you craving more.
A Flavorful Memory
As a child, tacos were a family favorite in my house. I can still recall the excitement building in the kitchen as my mom whipped up her famous taco sauce, the aroma wafting through the air and making our mouths water. Each taco was a masterpiece, filled to the brim with seasoned meat, crunchy lettuce, fresh tomatoes, and of course, a sprinkle of cheese. After dinner, we’d settle in front of the TV, bellies full, often discussing the day’s adventures or how many tacos we could fit in our hands.
These memories are what inspired me to create the Chicken Taco Bowl—bringing together the essence of those beloved tacos while making it a nourishing meal. With the heartiness of grilled chicken, fluffy rice, and a vibrant salsa, this bowl captures the joy of taco night but allows for a fresher, cleaner approach. Let’s step into the kitchen together and create this wholesome delight!
Ingredients
Here are the essential ingredients for your Chicken Taco Bowl, along with some chef insights and substitution tips:
-
Chicken (boneless, skinless breast or thighs): This is the star of the show! Chicken is lean, versatile, and loaded with protein. If you’re looking for a quick swap, turkey or even tofu works well for a vegetarian option.
-
Rice (white or brown): A fluffy base for your bowl. Brown rice adds extra fiber and nutrients, while white rice brings a softer texture. For a low-carb option, try cauliflower rice!
-
Beans (black beans or pinto beans): These add creaminess and heartiness to the bowl. Not a bean lover? Quinoa or corn can bring that same satisfying quality without the beans.
-
Salsa (store-bought or homemade): The zesty finishing touch that brings everything together! For a milder option, pico de gallo is fantastic. You can also blend in some avocado or mango for a tropical twist.
Step-by-Step Instructions
Alright, it’s time to roll up those sleeves and cook! Follow these step-by-step instructions to assemble your delicious Chicken Taco Bowl:
-
Cook the Rice:
- Start by rinsing your rice under cold water to remove excess starch—this ensures fluffy grains.
- In a medium pot, combine the rinsed rice with water in a 1:2 ratio (1 cup rice to 2 cups water).
- Bring to a boil, then reduce to low heat, cover, and let simmer for 15-20 minutes. Pro tip: Let it sit, covered for 5 minutes after cooking for perfect texture!
-
Prepare the Chicken:
- While the rice cooks, season your chicken. A mix of chili powder, cumin, garlic powder, salt, and pepper works wonders for flavor.
- In a skillet, heat a tablespoon of olive oil over medium-high heat. Once hot, add the chicken and cook for about 6-7 minutes per side or until fully cooked (the internal temperature should reach 165°F). Don’t forget to let it rest for a few minutes before slicing; it helps keep the juices locked in.
-
Warm the Beans:
- Open your can of beans (or cook your dried beans ahead of time), drain, and rinse to reduce sodium content.
- In a small saucepan, heat the beans over medium-low heat until warmed through—about 5-7 minutes. Stir in some cumin or lime juice for added zest if you’re feeling fancy.
-
Assemble the Bowl:
- Start with a generous scoop of rice at the bottom of your bowl.
- Next, layer on the sliced chicken, followed by a scoop of beans, and finish with salsa. Drizzle with some avocado or a sprinkle of cheese if you like.
-
Garnish and Enjoy:
- Top with fresh cilantro, diced avocado, sliced jalapeños, or even a dollop of Greek yogurt to add creaminess. The choices are endless!
Serving Suggestions
Presentation matters, even in the most casual meals! Serve your Chicken Taco Bowl nestled in a vibrant bowl, showcasing the colorful layers. Add a lime wedge on the side for that extra zing as you eat, and don’t shy away from garnishing with fresh herbs—it’s all about creating that visual appeal while elevating the flavors!
Recipe Variations
- Veggie Taco Bowl: Swap out the chicken for grilled vegetables like zucchini, bell peppers, and corn for a delicious vegetarian option.
- Spicy Chicken Bowl: For those who love heat, incorporate some diced chipotle peppers in adobo sauce into the chicken marinade for a smoky kick.
- Tropical Twist: Add pineapple salsa for a sweet and savory combo. The juicy pineapple brings a refreshing element to the dish!
- Mediterranean Flavor: Replace the taco spices with Italian herbs, add feta cheese, olives, and a drizzle of balsamic glaze for an outstanding Mediterranean Chicken Bowl experience.
Chef’s Notes
This Chicken Taco Bowl recipe has had a few fun iterations throughout the years in my kitchen. One time, I accidentally used coconut milk instead of water for rice while distracted by my favorite podcast—yikes! Although it felt like a major mishap at first, it turned out to be an exotic twist that we now often recreate. So, embrace your kitchen blunders—they can lead to delightful surprises!
Another thing to keep in mind is that this recipe is endlessly adaptable. You can load it up with all your favorite tacos ingredients or make it your own with whatever pantry staples you have on hand. That’s what I love about cooking—there’s always room for creativity!
FAQs and Troubleshooting
-
Q: How can I make this dish in advance?
A: Absolutely! Prepare your chicken, rice, and beans ahead of time and store them separately in the fridge. When you’re ready to eat, simply reheat and assemble! -
Q: My chicken turned out dry. What went wrong?
A: Overcooking is often the culprit! Make sure to monitor your cooking time closely, and using a meat thermometer can help avoid this in the future—165°F is your magic number! -
Q: Can I use frozen chicken?
A: Yes, just ensure to fully thaw it before cooking. You may need to adjust cooking time if starting from frozen. -
Q: What can I do with leftovers?
Transform leftovers into delicious burritos, salads, or even quesadillas for the next day’s lunch. No flavor goes to waste!
Nutritional Info
(Optional based on your preference)
Each serving of Chicken Taco Bowl (with standard ingredients) contains approximately:
- Calories: 540
- Protein: 40g
- Carbohydrates: 60g
- Fat: 15g
With this Chicken Taco Bowl recipe, you’re not just feeding your belly; you’re nourishing your spirit with vibrant flavors and heartwarming memories. Let’s keep our cooking adventures fresh and fun! Happy cooking, my foodie friends!
PrintChicken Taco Bowl
A colorful Chicken Taco Bowl that embodies clean eating with grilled chicken, fluffy rice, and vibrant salsa.
- Prep Time: 15 minutes
- Cook Time: 30 minutes
- Total Time: 45 minutes
- Yield: 4 servings 1x
- Category: Main Course
- Method: Sautéing
- Cuisine: Mexican
- Diet: Gluten-Free, High Protein
Ingredients
- 1 lb Chicken (boneless, skinless breast or thighs)
- 1 cup Rice (white or brown)
- 1 can Beans (black beans or pinto beans)
- 1 cup Salsa (store-bought or homemade)
- 1 tablespoon Olive oil
- Spices: chili powder, cumin, garlic powder, salt, and pepper
- Optional toppings: cilantro, diced avocado, sliced jalapeños, Greek yogurt
Instructions
- Rinse the rice under cold water to remove excess starch.
- Combine the rinsed rice with water in a 1:2 ratio (1 cup rice to 2 cups water).
- Bring to a boil, then reduce to low heat, cover, and let simmer for 15-20 minutes. Let it sit for 5 minutes after cooking for perfect texture.
- Season your chicken with a mix of chili powder, cumin, garlic powder, salt, and pepper.
- Heat olive oil in a skillet over medium-high heat. Once hot, add chicken and cook for 6-7 minutes per side until fully cooked (internal temperature should reach 165°F).
- Open the can of beans, drain, and rinse.
- Heat the beans in a small saucepan over medium-low heat for 5-7 minutes; stir in cumin or lime juice for added flavor.
- Start with rice at the bottom of your bowl, then layer sliced chicken, beans, and finish with salsa.
- Top with fresh cilantro, diced avocado, sliced jalapeños, or Greek yogurt.
Notes
This recipe is endlessly adaptable; you can load it up with your favorite taco ingredients or use whatever you have on hand.
Nutrition
- Serving Size: 1 bowl
- Calories: 540
- Sugar: 2g
- Sodium: 400mg
- Fat: 15g
- Saturated Fat: 2g
- Unsaturated Fat: 8g
- Trans Fat: 0g
- Carbohydrates: 60g
- Fiber: 8g
- Protein: 40g
- Cholesterol: 80mg
Keywords: chicken taco bowl, clean eating, meal prep, healthy dinner