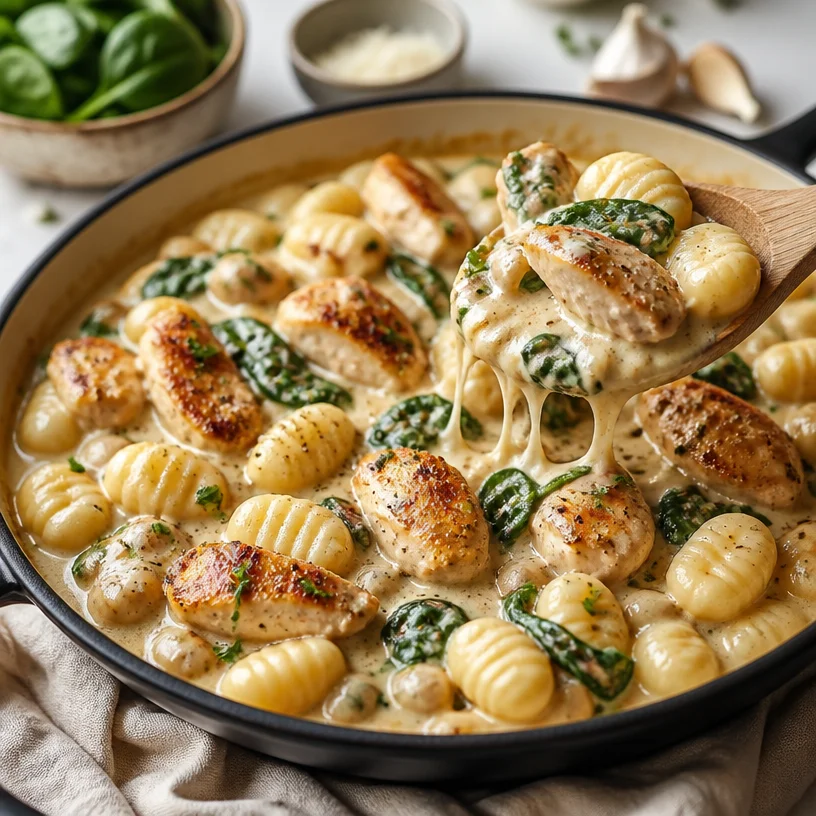
One-Pan Creamy Chicken Gnocchi Skillet (15-Minute Weeknight)
Chicken Gnocchi Skillet: A Deliciously Cozy Dish
Welcome back, food lovers! Today, I’m thrilled to share one of my absolute favorite recipes with you: the Chicken Gnocchi Skillet. This dish is a celebration of flavors that comes together in one pan, making for an easy weeknight dinner or a delightful meal to impress your friends and family. With tender pieces of chicken, pillowy gnocchi, and vibrant spinach, all enveloped in a creamy sauce, this dish is bound to become a staple in your kitchen. So, let’s dive into this flavorful adventure together!
When I first stumbled upon this dish years ago, I was instantly enchanted by its simplicity and the depth of flavor it offers. One evening, I found myself at a cozy little restaurant while on a weekend getaway with friends. I was feeling adventurous and decided to try something new: gnocchi! It was then that I experienced the heavenly combination of tender pasta and rich, creamy sauce. As soon as I took my first bite, I was hooked! The warm flavors wrapped around me like a soft blanket, and I knew I had to recreate that experience at home. Fast forward to today, and here I am, ready to share my version of the Chicken Gnocchi Skillet with you!
Ingredients
Let’s talk about what you’ll need for this mouthwatering dish:
-
Chicken Breast: The star of our dish! I recommend using boneless, skinless chicken breasts for ease of cooking. For a juicy alternative, try thighs. You can also substitute with tofu for a vegetarian twist.
-
Gnocchi: These delightful little potato dumplings are the heart of this dish. You can find them in most grocery stores, either fresh or shelf-stable. If you’re feeling adventurous, try making your own from scratch!
-
Fresh Spinach: A vibrant addition that brings both color and nutrition to the skillet. If you don’t have fresh spinach, feel free to swap it out for kale or other leafy greens.
-
Cream: This is what gives our dish that rich, velvety sauce. You can substitute with half-and-half or even a dairy-free cream (like coconut or cashew cream) for a lighter twist.
-
Garlic: Because what’s better than the aroma of sautéed garlic? Fresh garlic cloves are best, but pre-minced or garlic powder can work in a pinch.
-
Chicken Broth: Adds depth and richness to our sauce. You can use low-sodium broth or vegetable broth if you prefer.
-
Parmesan Cheese: For that final touch of flavor and creaminess. If you’re counting calories or avoiding dairy, nutritional yeast makes a fantastic substitute!
Step-by-Step Instructions
Ready to get cooking? Let’s whip up this delicious Chicken Gnocchi Skillet together!
-
Prep Your Chicken: Begin by cutting the chicken breasts into bite-sized pieces. Season them with salt and pepper. (Chef’s tip: Letting the seasoned chicken sit for a few minutes helps the flavors meld!)
-
Sauté the Chicken: Heat a tablespoon of olive oil in a large skillet over medium heat. Add the chicken pieces and cook for about 5-7 minutes until they’re golden brown and cooked through. (Remember, we want that lovely sear for depth of flavor.) Once cooked, transfer the chicken to a plate and set aside.
-
Cook the Gnocchi: In the same skillet, add a little more oil if needed and toss in the gnocchi. Sauté for about 3-4 minutes until they start to brown slightly. (Chef hack: This extra step gives the gnocchi a nice texture!)
-
The Flavor Base: Add minced garlic to the skillet and cook for about 30 seconds until fragrant. Be cautious not to burn it, or you’ll end up with a bitter taste. (A little garlic goes a long way, so adjust based on your preference!)
-
Bring in the Cream: Pour in the chicken broth, followed by the cream. Stir everything together, scraping up any bits stuck to the bottom of the pan. This is where the magic happens!
-
Combine and Simmer: Return the chicken to the skillet and throw in the fresh spinach. Lower the heat and let everything simmer for about 5-7 minutes, allowing the flavors to meld beautifully. (Don’t forget to keep an eye on it—nobody likes a burnt sauce!)
-
Finish it off: Once the spinach is wilted and the sauce is slightly thickened, stir in the grated Parmesan cheese until melted. (Pro tip: Save a little cheese for garnishing when you serve!)
-
Serve and Enjoy: That’s it! Your Chicken Gnocchi Skillet is ready to be devoured. Garnish with extra cheese and a sprinkle of black pepper for a lovely finish.
Serving Suggestions
For a beautiful presentation, plate your Chicken Gnocchi Skillet family-style right in the pan. Serve it with a fresh green salad and some crusty bread to soak up that delicious sauce. Pair it with a light white wine or sparkling water for a refreshing complement to this creamy dish!
Recipe Variations
Feeling creative? Here are a few delicious twists you can put on this Chicken Gnocchi Skillet:
- Add Veggies: Toss in some cherry tomatoes, bell peppers, or zucchini for added color and nutrition.
- Herby Goodness: Infuse fresh herbs like basil or thyme into your cream for a burst of fresh flavor.
- Spicy Kick: Sprinkle in some red pepper flakes for a touch of heat!
- Pesto Swirl: Stir in a couple of tablespoons of pesto just before serving for a unique and vibrant flavor.
Chef’s Notes
This Chicken Gnocchi Skillet has journeyed with me through many kitchen experiments. Originally, I made it with just cream and cheese, but over time I found that including broth added a lovely depth of flavor. One funny kitchen story I have is the time I accidentally used vanilla almond milk instead of cream—let’s just say that wasn’t my best idea! But those little mishaps only enhance our cooking adventures, right?
FAQs and Troubleshooting
Q: Can I use frozen gnocchi?
Absolutely! Just toss them in the skillet without thawing. They may take a minute longer to cook, but they’ll turn out just as delicious.
Q: My sauce is too thin; how can I thicken it?
No worries! You can let it simmer a bit longer to reduce. Alternatively, whisk a little cornstarch with cold water and add it to the sauce to thicken it up.
Q: Can I make this dish ahead of time?
Yes, you can! Just store it in an airtight container in the fridge. When you’re ready to eat, reheat it gently in a skillet, adding a splash of broth or cream to loosen it up.
Q: What can I do with leftovers?
You can enjoy them as is, or toss them into a wrap or use them as a filling for a baked potato or omelette for a delicious twist!
Nutritional Info
(This information is approximate and can vary based on ingredients used.)
- Calories: ~450 per serving
- Protein: ~30g
- Fat: ~20g
- Carbohydrates: ~40g
- Fiber: ~3g
And there you have it—my delightful Chicken Gnocchi Skillet! A cozy, comforting meal that brings the flavors of my early culinary adventures into your kitchen. Whether you’re looking for simplicity or a dash of creativity, this recipe is adaptable, delicious, and totally satisfying. Get ready to savor each bite! Happy cooking, friends!
PrintChicken Gnocchi Skillet
A deliciously cozy dish featuring tender chicken, pillowy gnocchi, and vibrant spinach in a creamy sauce.
- Prep Time: 15 minutes
- Cook Time: 30 minutes
- Total Time: 45 minutes
- Yield: 4 servings 1x
- Category: Main Course
- Method: Sautéing
- Cuisine: Italian
- Diet: Gluten-Free
Ingredients
- 1 lb boneless, skinless Chicken Breast, cut into bite-sized pieces
- 1 lb Gnocchi
- 2 cups Fresh Spinach
- 1 cup Cream (or half-and-half)
- 2 cloves Garlic, minced
- 1 cup Chicken Broth
- 1/2 cup Parmesan Cheese, grated
- 1 tbsp Olive Oil
- Salt and pepper to taste
Instructions
- Prep your chicken by cutting it into bite-sized pieces and seasoning with salt and pepper.
- Sauté the chicken in a skillet with olive oil over medium heat for 5-7 minutes until golden brown and cooked through. Transfer to a plate.
- Cook the gnocchi in the same skillet for about 3-4 minutes until they start to brown slightly.
- Add minced garlic to the skillet and cook for about 30 seconds until fragrant.
- Pour in the chicken broth and cream, stirring to combine and scraping any bits off the bottom of the pan.
- Combine the chicken and fresh spinach, then let everything simmer for 5-7 minutes.
- Stir in the grated Parmesan cheese until melted and creamy.
- Serve the Chicken Gnocchi Skillet, garnished with extra cheese and black pepper if desired.
Notes
For added flavor, you can incorporate vegetables or fresh herbs, and reheating can be done gently on the stove with a splash of broth.
Nutrition
- Serving Size: 1 serving
- Calories: 450
- Sugar: 5g
- Sodium: 600mg
- Fat: 20g
- Saturated Fat: 10g
- Unsaturated Fat: 8g
- Trans Fat: 0g
- Carbohydrates: 40g
- Fiber: 3g
- Protein: 30g
- Cholesterol: 90mg
Keywords: chicken, gnocchi, skillet, creamy sauce, comfort food
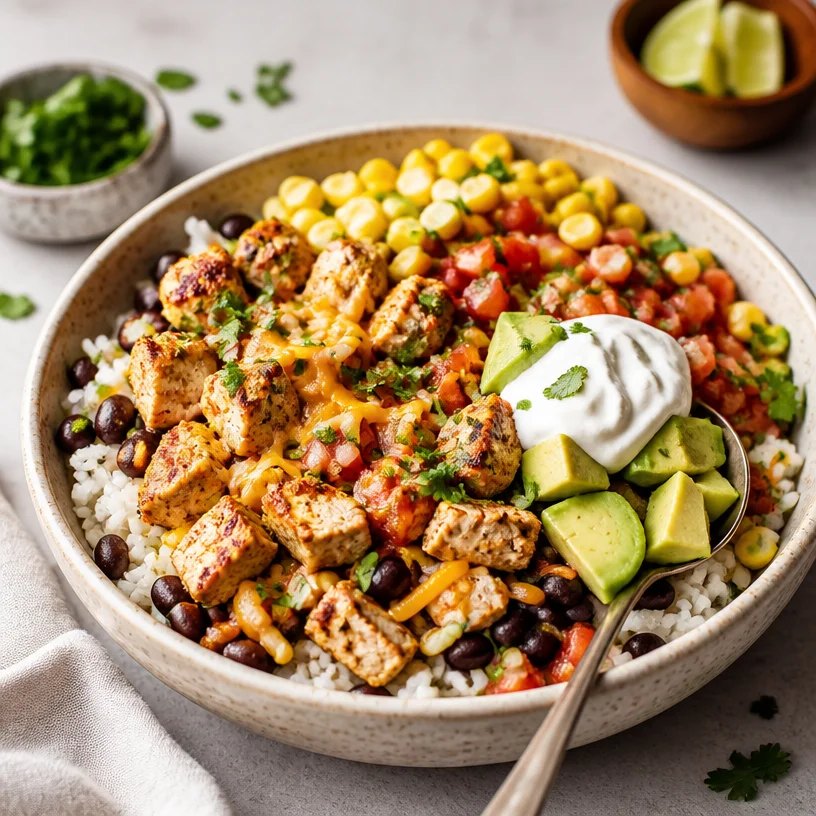
One-Pan Chicken Taco Bowl (15-Minute Weeknight Recipe)
Chicken Taco Bowl: A Vibrant Dish to Nourish Body and Soul
Welcome to Clean Plate Cravings! Today, we’re diving into a delightful, colorful dish that perfectly embodies the spirit of clean eating: the Chicken Taco Bowl. There’s something truly magical about bowls; they are like little culinary ecosystems, packed with flavors, colors, and textures all in one place. Whether you’re meal prepping for the week ahead or treating yourself to a fun weeknight dinner, this dish is as versatile as it is delicious.
Let’s face it—trying to eat healthier can sometimes feel like a chore, right? But that’s why I’m here! I believe that clean eating should be a celebration, not a restriction. Each bite of this scrumptious Chicken Taco Bowl brings together fresh ingredients, comforting flavors, and the kind of satisfaction that leaves you craving more.
A Flavorful Memory
As a child, tacos were a family favorite in my house. I can still recall the excitement building in the kitchen as my mom whipped up her famous taco sauce, the aroma wafting through the air and making our mouths water. Each taco was a masterpiece, filled to the brim with seasoned meat, crunchy lettuce, fresh tomatoes, and of course, a sprinkle of cheese. After dinner, we’d settle in front of the TV, bellies full, often discussing the day’s adventures or how many tacos we could fit in our hands.
These memories are what inspired me to create the Chicken Taco Bowl—bringing together the essence of those beloved tacos while making it a nourishing meal. With the heartiness of grilled chicken, fluffy rice, and a vibrant salsa, this bowl captures the joy of taco night but allows for a fresher, cleaner approach. Let’s step into the kitchen together and create this wholesome delight!
Ingredients
Here are the essential ingredients for your Chicken Taco Bowl, along with some chef insights and substitution tips:
-
Chicken (boneless, skinless breast or thighs): This is the star of the show! Chicken is lean, versatile, and loaded with protein. If you’re looking for a quick swap, turkey or even tofu works well for a vegetarian option.
-
Rice (white or brown): A fluffy base for your bowl. Brown rice adds extra fiber and nutrients, while white rice brings a softer texture. For a low-carb option, try cauliflower rice!
-
Beans (black beans or pinto beans): These add creaminess and heartiness to the bowl. Not a bean lover? Quinoa or corn can bring that same satisfying quality without the beans.
-
Salsa (store-bought or homemade): The zesty finishing touch that brings everything together! For a milder option, pico de gallo is fantastic. You can also blend in some avocado or mango for a tropical twist.
Step-by-Step Instructions
Alright, it’s time to roll up those sleeves and cook! Follow these step-by-step instructions to assemble your delicious Chicken Taco Bowl:
-
Cook the Rice:
- Start by rinsing your rice under cold water to remove excess starch—this ensures fluffy grains.
- In a medium pot, combine the rinsed rice with water in a 1:2 ratio (1 cup rice to 2 cups water).
- Bring to a boil, then reduce to low heat, cover, and let simmer for 15-20 minutes. Pro tip: Let it sit, covered for 5 minutes after cooking for perfect texture!
-
Prepare the Chicken:
- While the rice cooks, season your chicken. A mix of chili powder, cumin, garlic powder, salt, and pepper works wonders for flavor.
- In a skillet, heat a tablespoon of olive oil over medium-high heat. Once hot, add the chicken and cook for about 6-7 minutes per side or until fully cooked (the internal temperature should reach 165°F). Don’t forget to let it rest for a few minutes before slicing; it helps keep the juices locked in.
-
Warm the Beans:
- Open your can of beans (or cook your dried beans ahead of time), drain, and rinse to reduce sodium content.
- In a small saucepan, heat the beans over medium-low heat until warmed through—about 5-7 minutes. Stir in some cumin or lime juice for added zest if you’re feeling fancy.
-
Assemble the Bowl:
- Start with a generous scoop of rice at the bottom of your bowl.
- Next, layer on the sliced chicken, followed by a scoop of beans, and finish with salsa. Drizzle with some avocado or a sprinkle of cheese if you like.
-
Garnish and Enjoy:
- Top with fresh cilantro, diced avocado, sliced jalapeños, or even a dollop of Greek yogurt to add creaminess. The choices are endless!
Serving Suggestions
Presentation matters, even in the most casual meals! Serve your Chicken Taco Bowl nestled in a vibrant bowl, showcasing the colorful layers. Add a lime wedge on the side for that extra zing as you eat, and don’t shy away from garnishing with fresh herbs—it’s all about creating that visual appeal while elevating the flavors!
Recipe Variations
- Veggie Taco Bowl: Swap out the chicken for grilled vegetables like zucchini, bell peppers, and corn for a delicious vegetarian option.
- Spicy Chicken Bowl: For those who love heat, incorporate some diced chipotle peppers in adobo sauce into the chicken marinade for a smoky kick.
- Tropical Twist: Add pineapple salsa for a sweet and savory combo. The juicy pineapple brings a refreshing element to the dish!
- Mediterranean Flavor: Replace the taco spices with Italian herbs, add feta cheese, olives, and a drizzle of balsamic glaze for an outstanding Mediterranean Chicken Bowl experience.
Chef’s Notes
This Chicken Taco Bowl recipe has had a few fun iterations throughout the years in my kitchen. One time, I accidentally used coconut milk instead of water for rice while distracted by my favorite podcast—yikes! Although it felt like a major mishap at first, it turned out to be an exotic twist that we now often recreate. So, embrace your kitchen blunders—they can lead to delightful surprises!
Another thing to keep in mind is that this recipe is endlessly adaptable. You can load it up with all your favorite tacos ingredients or make it your own with whatever pantry staples you have on hand. That’s what I love about cooking—there’s always room for creativity!
FAQs and Troubleshooting
-
Q: How can I make this dish in advance?
A: Absolutely! Prepare your chicken, rice, and beans ahead of time and store them separately in the fridge. When you’re ready to eat, simply reheat and assemble! -
Q: My chicken turned out dry. What went wrong?
A: Overcooking is often the culprit! Make sure to monitor your cooking time closely, and using a meat thermometer can help avoid this in the future—165°F is your magic number! -
Q: Can I use frozen chicken?
A: Yes, just ensure to fully thaw it before cooking. You may need to adjust cooking time if starting from frozen. -
Q: What can I do with leftovers?
Transform leftovers into delicious burritos, salads, or even quesadillas for the next day’s lunch. No flavor goes to waste!
Nutritional Info
(Optional based on your preference)
Each serving of Chicken Taco Bowl (with standard ingredients) contains approximately:
- Calories: 540
- Protein: 40g
- Carbohydrates: 60g
- Fat: 15g
With this Chicken Taco Bowl recipe, you’re not just feeding your belly; you’re nourishing your spirit with vibrant flavors and heartwarming memories. Let’s keep our cooking adventures fresh and fun! Happy cooking, my foodie friends!
PrintChicken Taco Bowl
A colorful Chicken Taco Bowl that embodies clean eating with grilled chicken, fluffy rice, and vibrant salsa.
- Prep Time: 15 minutes
- Cook Time: 30 minutes
- Total Time: 45 minutes
- Yield: 4 servings 1x
- Category: Main Course
- Method: Sautéing
- Cuisine: Mexican
- Diet: Gluten-Free, High Protein
Ingredients
- 1 lb Chicken (boneless, skinless breast or thighs)
- 1 cup Rice (white or brown)
- 1 can Beans (black beans or pinto beans)
- 1 cup Salsa (store-bought or homemade)
- 1 tablespoon Olive oil
- Spices: chili powder, cumin, garlic powder, salt, and pepper
- Optional toppings: cilantro, diced avocado, sliced jalapeños, Greek yogurt
Instructions
- Rinse the rice under cold water to remove excess starch.
- Combine the rinsed rice with water in a 1:2 ratio (1 cup rice to 2 cups water).
- Bring to a boil, then reduce to low heat, cover, and let simmer for 15-20 minutes. Let it sit for 5 minutes after cooking for perfect texture.
- Season your chicken with a mix of chili powder, cumin, garlic powder, salt, and pepper.
- Heat olive oil in a skillet over medium-high heat. Once hot, add chicken and cook for 6-7 minutes per side until fully cooked (internal temperature should reach 165°F).
- Open the can of beans, drain, and rinse.
- Heat the beans in a small saucepan over medium-low heat for 5-7 minutes; stir in cumin or lime juice for added flavor.
- Start with rice at the bottom of your bowl, then layer sliced chicken, beans, and finish with salsa.
- Top with fresh cilantro, diced avocado, sliced jalapeños, or Greek yogurt.
Notes
This recipe is endlessly adaptable; you can load it up with your favorite taco ingredients or use whatever you have on hand.
Nutrition
- Serving Size: 1 bowl
- Calories: 540
- Sugar: 2g
- Sodium: 400mg
- Fat: 15g
- Saturated Fat: 2g
- Unsaturated Fat: 8g
- Trans Fat: 0g
- Carbohydrates: 60g
- Fiber: 8g
- Protein: 40g
- Cholesterol: 80mg
Keywords: chicken taco bowl, clean eating, meal prep, healthy dinner
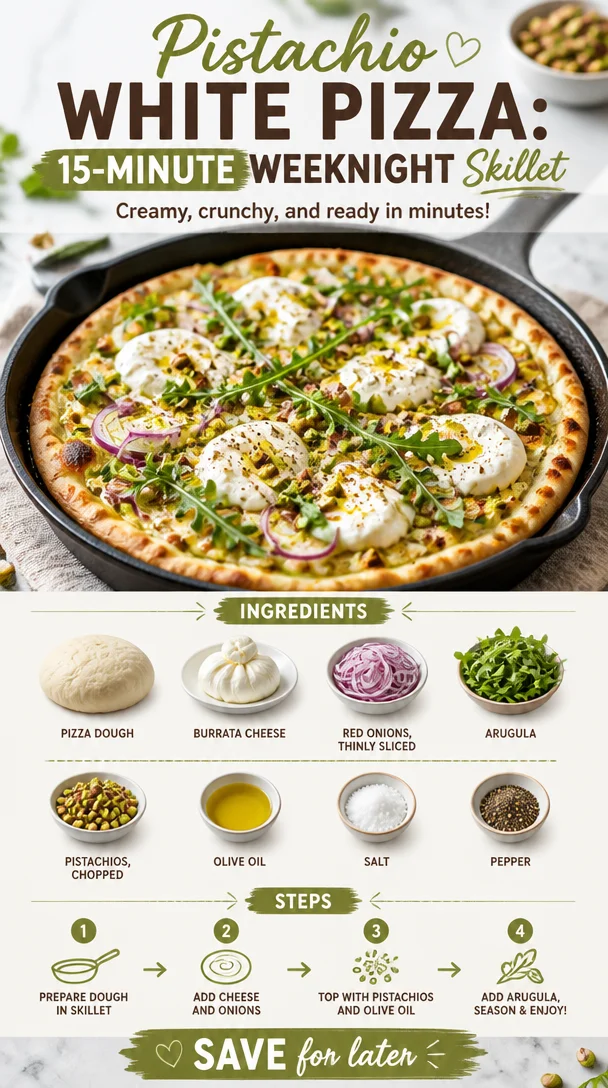
Pistachio White Pizza: 15-Minute Weeknight Skillet
A Slice of Happiness: Pistachio White Pizza Recipe
Ah, pizza—the universal comfort food that brings people together, conjures smiles, and satisfies cravings like no other. But let’s take a little detour today, shall we? Instead of the classic tomato sauce and mozzarella, I’m diving into the vibrant world of a Pistachio White Pizza! This delightful creation will have your taste buds dancing and your heart singing. Think creamy burrata, crunchy pistachios, and a zesty arugula salad on top. It’s a beautiful balance of flavors and textures that will elevate your pizza game to gourmet levels, all while feeling light and fresh.
Picture this: It’s a sunny Saturday afternoon, the aroma of freshly baked dough wafts through your home, and friends gather around the kitchen island, laughter filling the air. That’s the kind of vibe this recipe embodies—simple, delicious, and fun! Whether you’re hosting friends, indulging in a cozy night in, or simply wanting to treat yourself to something special, this Pistachio White Pizza promises to bring joy to your table.
Forget about the ordinary—let’s dive into creating this pizza masterpiece that not only looks stunning but tastes even better. Trust me; it’s about to become your new favorite!
A Nostalgic Kitchen Memory
I remember the first time I encountered the idea of a white pizza. I was visiting a quaint little pizzeria that had a rustic, warm atmosphere. The moment I walked in, the smell of fresh dough and bubbling cheese wrapped around me like a comforting blanket. I spotted a special on the menu called "Pistachio White Pizza," and I was immediately intrigued.
It arrived at the table, a work of art: a golden crust topped abundantly with melted burrata, speckled with vibrant green pistachios, and garnished with an explosion of peppery arugula. One bite, and I was hooked! The creaminess of the cheese combined with the unexpected crunch of pistachios gave each mouthful an entirely new dimension. The freshness of arugula was the perfect zesty compliment.
That day, I left the pizzeria feeling inspired, realizing that pizza doesn’t have to be boring or predictable. It can be a canvas for creativity, much like a painter expresses themselves on their palette. Since then, I’ve made it a tradition to reinvigorate classic dishes with fresh and unexpected ingredients. And that’s exactly what I’m encouraging you to do too. So grab your apron, and let’s whip up this fantastic Pistachio White Pizza together!
Ingredients
Before we get our hands doughy, let’s gather all the goodies we’ll need for this masterpiece.
-
Pizza Dough
- A fresh, homemade dough is always the best, but store-bought works wonders too! Look for high-quality options that are par-baked or even raw.
-
Burrata Cheese
- Creamy, rich, and decadently satisfying, burrata elevates any dish. If burrata isn’t in your fridge, fresh mozzarella is a great substitute—just make sure to drain it well!
-
Red Onions (thinly sliced)
- These add a lovely sweetness and crunch. If you prefer a milder flavor, soak them in cold water for 10 minutes before using.
-
Arugula
- This peppery green is a must-have for freshness and color. If you’re not a fan, baby spinach or mixed greens can also work nicely.
-
Chopped Pistachios
- Crunchy and slightly sweet, they give our pizza an unexpected twist. No pistachios? Feel free to swap in walnuts or pine nuts for a similar texture.
-
Olive Oil
- A drizzle of good quality olive oil brings all the flavors together beautifully. You can also try using flavored oil, like garlic or chili-infused.
-
Salt & Pepper
- Essential for seasoning! Always season where needed to highlight the dish’s natural flavors.
Each of these ingredients plays a pivotal role in crafting a pizza that is not only visually stunning but also bursts with flavor. Feel free to personalize them! Remember, cooking is all about experimenting and making it your own.
Step-by-Step Instructions
Let’s get into the nitty-gritty of making our Pistachio White Pizza. Here’s how to whip up magic in your kitchen:
-
Preheat Your Oven
- First things first! Set your oven to the highest temperature, usually around 475°F (245°C). This high heat will help us achieve that crispy crust we crave.
-
Prepare the Dough
- If you’re using store-bought dough, follow the package instructions for resting it. If making your own, roll it out on a floured surface to your desired thickness—thin for a crispy base, or thicker for a chewier bite. Transfer the rolled out dough to a baking sheet or pizza stone, and I like to sprinkle a little cornmeal on the bottom—it helps prevent sticking and adds texture!
-
Stretch It Out
- Using your fingers, gently stretch the dough from the center outward. Don’t worry if it doesn’t look perfect—rustic is beautiful! Remember, it’s all about the love you put into your cooking.
-
Add the Cheese
- Tear the burrata into chunks and distribute it evenly over the dough. If you’re using fresh mozzarella, tear it into smaller pieces and scatter it around. The cheese will melt beautifully, creating ooey-gooey goodness.
-
Season It
- Sprinkle a pinch of salt and pepper over the cheese. This step is crucial—seasoning allows each flavor to shine and brings everything to life.
-
Slice the Onions
- In a small bowl, toss those thinly sliced red onions in a splash of olive oil and a pinch of salt. This will soften their bite and sweeten the flavor. Scatter the onions over the cheese.
-
Bake to Perfection
- Slide your masterpiece into the preheated oven. Bake for about 10-12 minutes, or until the crust is golden brown and the cheese is bubbly and slightly blistered. If you have access to a pizza stone, use it for an extra crispy crust!
-
Top with Pistachios and Arugula
- Once out of the oven, immediately sprinkle chopped pistachios over the hot pizza. Then, add a handful of fresh arugula on top—this adds a fantastic peppery crunch and a beautiful pop of green.
-
Finish with Olive Oil
- Drizzle a touch of good quality olive oil over the top to enhance the flavors and add a glossy finish.
-
Slice and Serve
- Allow it to cool for a few minutes—if you can wait that long! Then, slice into wedges and enjoy every bite!
Feel free to invite family or friends to help you with this part. Cooking is always more fun when shared with loved ones!
Serving Suggestions
Once your Pistachio White Pizza is ready, plate it up with care. You can serve it straight on a wooden pizza board for that rustic feel or on a vibrant platter. Pair it with a zesty salad dressed in lemon vinaigrette, and perhaps a crisp white wine or sparkling water to keep the meal refreshing.
For a finishing touch, consider a sprinkle of extra pistachios or a few flakes of sea salt right before serving to catch the eye and excite the palate.
Recipe Variations
Now that you have the basics down, let’s get creative! Here are a few variations to explore:
-
Herbed Variations: Add fresh herbs like basil or thyme for a fragrant twist. You can toss them with the arugula or sprinkle them on top after baking.
-
Add Some Heat: If you love a kick, consider topping the pizza with red pepper flakes or even drizzle some spicy olive oil over it before serving.
-
Mushroom Magic: Sauté some mixed mushrooms with garlic and toss them on top before baking for an earthy flavor that complements the cheese beautifully.
-
Sweet Touch: Drizzle a little honey or fig jam over the top once it comes out of the oven for a sweet-savory experience.
-
Dairy-Free Option: For a dairy-free version, try using cashew cheese or a vegan ricotta. The flavors will still shine!
The possibilities are endless, and that’s what makes cooking so exciting!
Chef’s Notes
This Pistachio White Pizza is very much a love letter to simplicity and flavor. I’ve played around with it over the years—experimenting with different toppings, ensuring the right balance between creamy and crunchy. One of my first favorites was adding honey, which just elevated the flavors to a whole new level!
I also love to share this recipe with friends who are intimidated by making pizza at home. It’s always a hit and proves that you can create restaurant-quality dishes right in your kitchen without fussing over complicated techniques.
Every time I make it, it brings back that first memory of biting into that divine pizza at the pizzeria. And you know what? It always manages to create new memories around the table.
FAQs and Troubleshooting
1. Why is my crust soggy?
- If your pizza crust is soggy, ensure your oven is preheated correctly and that you’ve baked it long enough. Also, consider pre-baking your dough for a few minutes before adding toppings!
2. Can I make this pizza gluten-free?
- Absolutely! Use a gluten-free pizza dough, and you’ll be enjoying a scrumptious pizza without the gluten.
3. Can I prepare this ahead of time?
- You can prep the dough and toppings ahead of time! Just store the raw pizza in the fridge, and pull it out when you’re ready to bake.
4. What’s the best way to store leftovers?
- Place any leftover pizza in an airtight container in the refrigerator. You can reheat it in the oven or stovetop for the best taste, avoiding the microwave if possible, as it can make the crust chewy.
Nutritional Info
While I always recommend enjoying pizza as an indulgence, it’s also great to know what you’re feeding your body. This Pistachio White Pizza is rich in protein from the burrata, healthy fats from the pistachios, and fiber from the arugula.
Don’t hesitate to adapt the recipe to suit your nutritional needs, and remember that balance is key!
And there you have it! A delightful Pizza Pistachio White that brings joy and flavor with every slice. Whether you’re sharing it with friends or enjoying it solo, it’s a dish made with love and creativity. So roll up your sleeves and let the magic happen in your kitchen! Happy cooking, fellow foodies! 🍕✨
PrintPistachio White Pizza
A delightful Pistachio White Pizza topped with creamy burrata, crunchy pistachios, and zesty arugula for a fresh and gourmet twist on traditional pizza.
- Prep Time: 15 minutes
- Cook Time: 12 minutes
- Total Time: 27 minutes
- Yield: 4 servings
- Category: Main Course
- Method: Baking
- Cuisine: Italian
- Diet: Vegetarian
Ingredients
- Pizza Dough
- Burrata Cheese
- Red Onions (thinly sliced)
- Arugula
- Chopped Pistachios
- Olive Oil
- Salt & Pepper
Instructions
- Preheat your oven to the highest temperature, around 475°F (245°C).
- Prepare the dough by following the package instructions or rolling out homemade dough on a floured surface.
- Stretch the dough gently from the center outward.
- Add torn burrata pieces evenly over the dough.
- Season with a pinch of salt and pepper.
- Slice red onions and toss them in olive oil and salt.
- Bake for 10-12 minutes until the crust is golden and cheese is bubbly.
- Top with chopped pistachios and fresh arugula.
- Finish with a drizzle of olive oil.
- Slice and serve warm.
Notes
Feel free to personalize the ingredients to your liking. Consider adding fresh herbs, spices, or alternative toppings for variety.
Nutrition
- Serving Size: 1 slice
- Calories: 350
- Sugar: 3g
- Sodium: 400mg
- Fat: 18g
- Saturated Fat: 6g
- Unsaturated Fat: 10g
- Trans Fat: 0g
- Carbohydrates: 40g
- Fiber: 2g
- Protein: 12g
- Cholesterol: 25mg
Keywords: pizza, white pizza, pistachio, gourmet pizza, vegetarian pizza
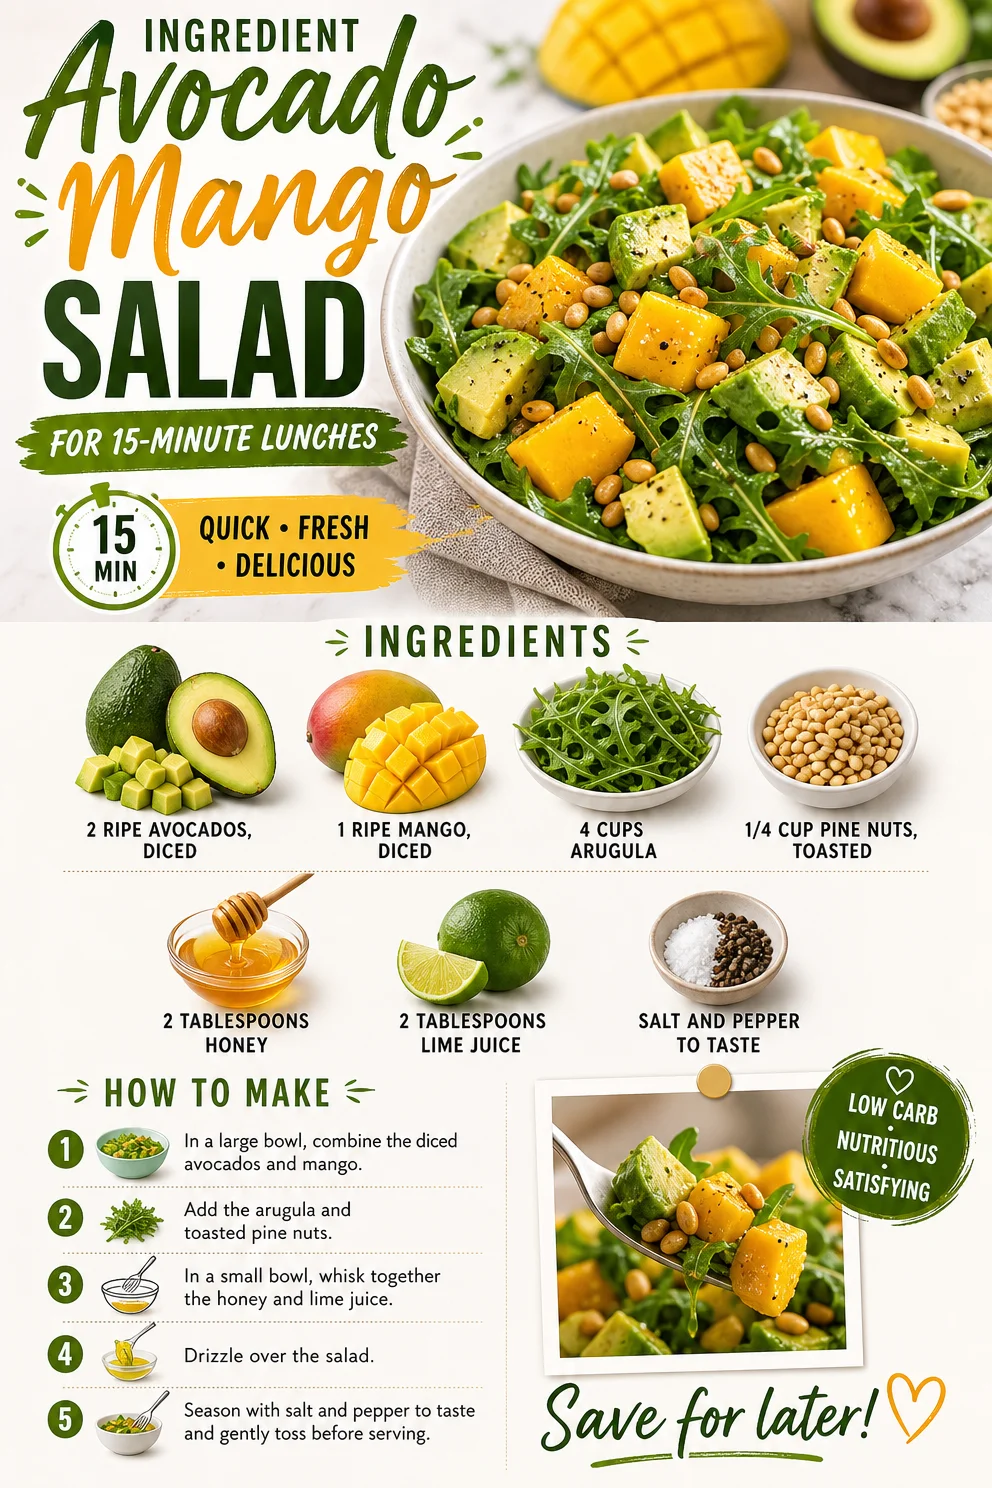
Ingredient Avocado Mango Salad for 15-Minute Lunches
Avocado Mango Healthy Salad: A Fresh Spin on Flavor
Welcome back, food lovers! Today, we’re diving into a recipe that’s as vibrant as it is nutritious—the Avocado Mango Healthy Salad. This dish is much more than just a salad; it’s a celebration of fresh, wholesome ingredients coming together to create magic on your plate. If you’re looking for a dish that’s bursting with flavor and will make your taste buds dance, you’re in the right place.
If there’s anything I love as much as cooking, it’s crafting meals that spark joy and togetherness. Imagine sitting outdoors on a sunny afternoon, perhaps under the shade of a tree, with a plate of this incredible salad in front of you. The juicy sweetness of ripe mango and the creamy goodness of avocado create a flavor combination that’s simply out of this world. Add in the peppery bite of arugula and the crunch of toasted pine nuts, and you’ve got an experience that’s truly delightful.
What makes this salad even better is how quick and easy it is to whip up. Whether you’re prepping a refreshing lunch, a light dinner, or a side dish for a barbecue, this Avocado Mango Healthy Salad is perfect. Plus, it’s packed with healthy fats, vitamins, and minerals, so you’ll feel great enjoying it. No more boring green salads—this dish will make you actually crave wholesome food!
So grab your cutting board and your favorite knife, and let’s create a colorful masterpiece that’s as good for your body as it is for your soul. You’re going to love it!
Personal Story
Growing up, our family gatherings always centered around food, and no dish was ever as highly anticipated as my mom’s summer salads. Every May, she’d hit the farmers’ market and come home with bags brimming with the freshest summer produce. I distinctly remember that one year when we had an abundant supply of avocados and ripe mangoes. My mom, ever experimental, decided to combine these two gems into a salad for a family BBQ.
As she sliced the avocados and cubed the mangoes, the sweet, fruity aroma filled the kitchen, and my excitement built. I can still see our entire family sitting around the picnic table, laughter echoing through the air as we tossed the salad together. That day, I learned that food is more than just sustenance; it’s a canvas for memories, laughter, and connection. Those vibrant flavors and colorful ingredients danced in our mouths as the sun set, marking that summer day as one of my favorites.
This Avocado Mango Healthy Salad is my homage to that sweet summer nostalgia. It reminds me of the simple joy of good food, shared company, and carefree afternoons. Each bite transports me back to those beautiful moments, and I can’t wait for you to experience it too!
Ingredients
-
2 ripe avocados, diced
Avocados are rich in healthy fats and provide a creamy texture that makes any salad feel luxurious. When selecting avocados, look for ones that yield slightly to pressure—this indicates ripeness. If you can’t find ripe avocados, you can speed up the ripening process at home by placing them in a brown paper bag with a banana! -
1 ripe mango, diced
Mangoes are not only delicious but also packed with vitamins A and C. Make sure to choose a mango that’s slightly soft when you press it. If you can’t find a ripe mango, consider using peaches or ripe nectarines for a similar sweetness. -
4 cups arugula
This peppery green adds a lovely bite to the salad, complementing the creaminess of the avocado. If arugula isn’t your thing, swap it out for spinach or mixed greens instead! -
1/4 cup pine nuts, toasted
Toasting the pine nuts brings out their rich flavor and adds a satisfying crunch. If you’re not a fan of pine nuts, try substituting walnuts or sunflower seeds for a different texture and taste. -
2 tablespoons honey
Honey adds a natural sweetness that balances the flavors of the salad beautifully. For a vegan alternative, feel free to use agave nectar or maple syrup. -
2 tablespoons lime juice
A squeeze of lime juice brightens up the salad, enhancing all the flavors. Freshly squeezed lime juice is always best, but bottled juice will do in a pinch. -
Salt and pepper to taste
Simple seasonings can make a huge impact. Always taste as you go to ensure you’ve reached that delicious balance!
Step-by-Step Instructions
-
Prepare Your Ingredients
Start by gathering all your ingredients and washing them thoroughly. Dice the avocados and mango into bite-sized pieces. A sharp knife will make this task easier, especially when it comes to the mango’s slippery skin! -
Toast the Pine Nuts
In a dry skillet over medium heat, add the pine nuts. Toast them for about 3-5 minutes until they’re golden and fragrant, stirring frequently to prevent burning. This step is simply magical—those little nuts will transform with a warm, nutty flavor! -
Combine the Greens
In a large mixing bowl, add the arugula. If you love a well-dressed salad, a bowl with a wide opening will allow for easier tossing. -
Mix the Avocado and Mango
Gently add the diced avocado and mango to the arugula. Be careful not to stir too aggressively, as the avocados can break apart easily. Instead, use a big spoon and fold the ingredients together. -
Add Honey and Lime Juice
In a small bowl, whisk together the honey and lime juice until smooth. Pour this delightful mixture over your salad. It’s where the magic happens—this dressing is going to bring everything together beautifully. -
Season
Season your salad with salt and pepper to taste. I always recommend starting with a pinch and adding more as you go. The right seasoning can elevate the flavors immensely. -
Fold It All Together
Gently toss everything together, ensuring every leaf is coated in that vibrant dressing and the ingredients mingle beautifully. You want to maintain the integrity of the avocados, so be gentle here! -
Serve Immediately
This salad is best when served right away, so plate it up while the flavors are fresh. Presentation can elevate any meal—consider serving it in a large bowl in the center of the table and let everyone dig in!
Serving Suggestions
When it comes to serving this gorgeous salad, feel free to get a little creative! You can serve it family-style in a large bowl or individually plated for a more refined touch. Drizzle a little extra lime juice over each serving for a zesty finish and scatter the toasted pine nuts on top for that added crunch and visual allure. Pair it with a refreshing beverage like sparkling water infused with lime or a light white wine for an elevated dining experience.
Recipe Variations
-
Grilled Chicken Avocado Mango Salad
For a heartier option, toss in some sliced, grilled chicken. The smokiness of the grilled meat pairs beautifully with the fresh ingredients. -
Quinoa Base
Want to add some whole grains? Serve the salad over a bed of cooked quinoa. It brings a nice chewiness and turns this light salad into a filling meal. -
Replace Pine Nuts with Feta Cheese
If you’re in the mood for a savory twist, crumble some feta cheese over the top before serving. The salty bite complements the sweetness of the mango perfectly. -
Add Some Heat
Spice things up! Toss in some chopped fresh jalapeños or a sprinkle of red pepper flakes for a pop of heat that will wake up your palate. -
Herb Infusion
Incorporate fresh herbs like cilantro or mint to add a fresh layer of flavor and aroma. They make the salad feel even more vibrant and alive!
Chef’s Notes
Cooking is such a beautiful and fluid art form! While my mom inspired my love for this salad, I’ve continued to evolve it over the years. Sometimes, I’ll switch up the fruits based on the seasons or even add more nuts for crunch. The variations are endless, and that’s what makes it so fun.
I remember one time I invited friends over for a picnic, and we ended up having an impromptu salad bar, where everyone could customize their plate with different toppings. We ended up with the most colorful spread, and it turned out to be such a hit! This salad became a staple in our get-togethers, reminding me that food is meant to be shared and enjoyed—while also sparking imagination in the kitchen!
FAQs and Troubleshooting
-
Can I prepare this salad ahead of time?
While it’s best enjoyed fresh, you can prep the ingredients a few hours in advance and keep them separately in the refrigerator. Just wait until serving time to assemble and dress the salad—this keeps the arugula crisp! -
What if my avocados aren’t ripe?
If you find yourself with unripe avocados, don’t fret! You can either let them ripen at room temperature or use them in a different dish where they’ll be blended or cooked, such as in smoothies or guacamole. -
How do I toast pine nuts without burning them?
It’s all about keeping an eye on them! Stir them frequently, and as soon as you start smelling their nutty aroma and they turn golden, remove them from the heat immediately. They can go from perfect to burnt in seconds! -
Can I use frozen mango?
Absolutely! Frozen mango is a great alternative; just make sure it’s thawed and drained before adding it to your salad. It might be a bit softer than fresh, but the flavor remains delicious!
This Avocado Mango Healthy Salad is not just a dish; it’s an experience. It’s the perfect blend of fresh ingredients, crunchy textures, and sweet flavors that dance together on the plate. I hope this recipe brings you as much joy as it has brought me and my loved ones. Enjoy each bite, the memories made around the table, and remember—you’re doing great just by nourishing your body and soul. Happy cooking!