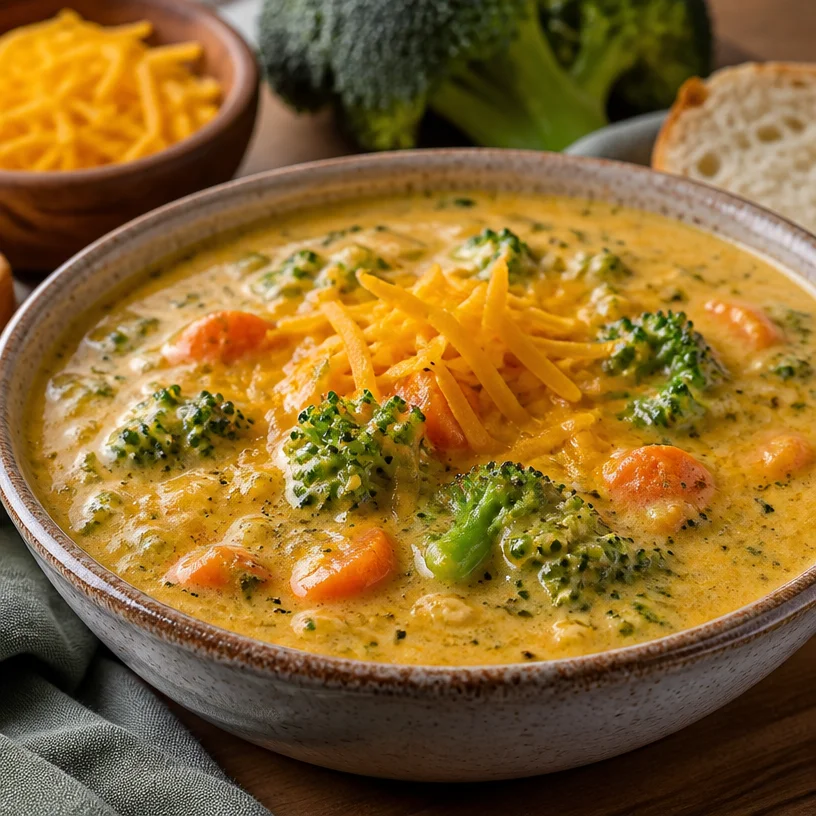
Creamy Broccoli Cheddar Soup: 20-Minute Weeknight Comfort
The Comfort of Broccoli Cheddar Soup: A Heartwarming Recipe
Welcome, fellow food lovers! Today, we’re diving into a dish that wraps you up like a cozy blanket on a chilly day—Broccoli Cheddar Soup. If you’ve ever found yourself wanting something warm and delightful, this creamy bowl of goodness is your answer. Not only is it rich and cheesy, but it embodies that perfect balance of comfort food and healthy eating, making it a popular favorite.
Now, if you’re anything like me, the thought of broccoli might have conjured up memories of being a kid at the dinner table, eyeing that plate of steamed greens with a mix of disdain and apprehension. But let me tell you, we’re here to change that narrative! This dish takes humble little broccoli and elevates it into something absolutely magical. So grab your apron, and let’s get cooking!
A Spoonful of Nostalgia
Growing up, my kitchen was bustling with the aromas of homemade meals that brought my family together. One of my fondest memories is when my mom would whip up her famous Broccoli Cheddar Soup on cold winter evenings. The kitchen was filled with laughter and chatter as she guided us through the process, allowing us to help with stirring and grating cheese.
I can still smell the savory scent of sautéing onions mingling with the earthy aroma of broccoli, which always seemed to make the world outside feel a little less daunting. My brothers and I would sneak spoonfuls of the soup while it simmered, fighting over who could stir the pot last. Those moments turned a simple soup into a cherished family tradition, turning tired evenings into gatherings filled with warmth and love. Today, I carry that same spirit into my kitchen, sharing this broccoli cheddar joy with all of you.
Ingredients
Let’s gather our ingredients! Here’s what you’ll need to create our cozy bowl of Broccoli Cheddar Soup:
-
Broccoli: The star of our show! Packed with vitamins and minerals, fresh broccoli will give our soup a beautiful texture. If you can’t find fresh broccoli, frozen works as a great substitute—just remember to thaw it first.
-
Carrots: These bright orange beauties add sweetness and color. They’re perfect for balancing the rich flavors. If you’re in a pinch, you can use frozen carrots or even a dash of carrot juice!
-
Cheddar cheese: The magic ingredient that brings creaminess and flavor. I recommend using sharp cheddar for a more robust taste. Not a fan of cheddar? Try Gruyère or even a dairy-free cheese blend for a different spin.
-
Cream: This gives the soup that luxurious, velvety texture. You can swap it out for half-and-half or even milk, but keep in mind, the soup will be less creamy.
-
Onions: They form the foundation of flavor for our soup. If you’re looking for a milder taste, shallots can be a delightful substitute.
-
Garlic: A little bit of minced garlic adds depth and aroma to the dish. If you adore garlic, feel free to throw in more!
-
Vegetable broth: This liquid gold provides the base of the soup and enhances all the flavors. If you’re in a hurry, water can work in a pinch, but broth adds a richer taste.
-
Spices: A pinch of salt, black pepper, and maybe a dash of nutmeg to elevate those flavors. Replace nutmeg with cayenne for a slight kick!
Step-by-Step Instructions
Ready to bring this soup to life? Here’s how you do it:
-
Prep Your Veggies: Start by washing and chopping your broccoli into bite-sized pieces and peeling and dicing the carrots. This prep work is key because it ensures even cooking. And hey, kitchen prep is like a warm-up before the big game!
-
Sauté the Aromatics: In a large pot or Dutch oven, melt a tablespoon of butter over medium heat. Add diced onions and cook until translucent—about 5 minutes. Then toss in minced garlic and cook for an additional minute until fragrant. This step creates a wonderful aroma that will make your kitchen feel like a cozy cafe.
-
Add the Carrots and Broccoli: Stir in your chopped carrots and broccoli, mixing them with the onions and garlic. Let them cook for about 5 minutes. This step partly cooks the veggies while retaining their vibrant color. Plus, it makes stirring feel like a mini workout—win-win!
-
Pour in the Broth: Now it’s time to add in your vegetable broth! Bring the mixture to a gentle boil, then reduce the heat and let it simmer for about 15-20 minutes, or until the broccoli and carrots are tender. If you want a chunkier soup, make sure not to overcook the vegetables.
-
Blend It Up!: Using a hand blender (or transferring to a stand blender in batches), gently purée the soup until it’s nice and creamy. If you prefer a less smooth texture, feel free to blend just half of it—this way, you’ll have some chunky bits for texture.
-
Stir in the Cream and Cheese: Return the blended soup to the pot and stir in the heavy cream. Gradually add in the shredded cheddar cheese, stirring until it’s melted and fully incorporated. This is the moment where you can’t help but taste test. The cheese should create a bubbly, gooey delight!
-
Season to Taste: Give it a taste and adjust the seasoning with salt and pepper. A dash of nutmeg is optional, but it adds an unexpected warmth—you’ll thank me later!
-
Serve Warm: Ladle the soup into bowls and serve it immediately. If you have any extra cheese, sprinkle it on top for that extra cheesy touch.
Serving Suggestions
When it comes to serving this delicious Broccoli Cheddar Soup, presentation is key! Serve it in hearty bowls with a sprinkle of fresh chives or crispy croutons on top to add a little crunch. And don’t forget some warm, crusty bread on the side for dipping. The combination is sheer perfection!
Recipe Variations
Feel free to get creative with this recipe! Here are a few twists to consider:
-
Spicy Broccoli Cheddar Soup: Add a pinch of red pepper flakes or diced jalapeños for a kick!
-
Herbed Variation: Throw in fresh thyme or basil to elevate the flavor profile.
-
Loaded Broccoli Cheddar: Add cooked bacon bits or ham for a savory twist.
-
Vegan Version: Use plant-based cheddar cheese, coconut cream, and vegetable broth to make this soup vegan-friendly!
-
Add Potatoes: Diced potatoes will add heartiness, making this a one-pot meal!
Chef’s Notes
Ah, the memories this recipe brings back! I’ll never forget how my little brother, who notoriously rejected anything green, took an enormous spoonful of this soup and declared it “the best ever.” You could have knocked me over with a feather! This recipe has evolved over the years; sometimes I’d cook it with beer for a little depth, or other times, I’d add seasonal vegetables based on what was fresh.
It’s funny how food can create such vibrant memories and connections. I’ve seen friends bond over a bowl of this soup and families smile with every hearty serving. I believe that’s the real magic of cooking!
FAQs and Troubleshooting
1. Can I freeze the soup?
Absolutely! Just make sure to let it cool completely before transferring to airtight containers. It’ll last up to 3 months in the freezer. When you reheat, be prepared to add a splash of broth or cream for the best texture.
2. My soup is too thick, what should I do?
If your soup turns out a bit thicker than you’d like, simply add more broth or cream until you reach your desired consistency. Stir while heating it up to blend it well!
3. Why is my soup not cheesy enough?
If you find your soup lacks cheese flavor, consider using a sharper cheddar variety or adding a bit more cheese! Freshly shredded cheese usually melts better and tastes more intense.
4. Can I use different vegetables?
Of course! Feel free to add spinach, cauliflower, or even sweet potatoes for a unique twist. Just keep in mind that cooking times may vary depending on the veggies you use.
Nutritional Info
While I won’t bombard you with detailed nutritional breakdowns, I can give you a rough idea: a cup of this delightful broccoli cheddar soup generally contains about 250-300 calories, depending on the proportions of cheese and cream. It’s a comforting way to enjoy some veggies while indulging a little!
So there you have it—my take on a classic Broccoli Cheddar Soup that’s filled with warmth, coziness, and love. I hope you’ll make this dish to share with your family and friends, creating your own treasured memories along the way. Happy cooking, and here’s to keeping our plates clean and craving more delicious food!
PrintBroccoli Cheddar Soup

A cozy and creamy broccoli cheddar soup that balances comfort with healthy eating, perfect for chilly days.
- Prep Time: 15 minutes
- Cook Time: 30 minutes
- Total Time: 45 minutes
- Yield: 4 servings 1x
- Category: Soup
- Method: Stovetop
- Cuisine: American
- Diet: Vegetarian
Ingredients
- 1 head of broccoli, chopped
- 2 carrots, diced
- 2 cups sharp cheddar cheese, shredded
- 1 cup heavy cream
- 1 onion, diced
- 2 cloves garlic, minced
- 4 cups vegetable broth
- Salt and pepper to taste
- A pinch of nutmeg (optional)
Instructions
- Prep your veggies: Start by washing and chopping your broccoli into bite-sized pieces and peeling and dicing the carrots.
- Sauté the aromatics: In a large pot, melt butter over medium heat, then add onions and cook until translucent, about 5 minutes. Stir in garlic and cook for an additional minute.
- Add the carrots and broccoli: Stir in chopped carrots and broccoli, cooking for about 5 minutes.
- Pour in the broth: Add vegetable broth, bring to a gentle boil, then reduce heat and simmer for about 15-20 minutes until veggies are tender.
- Blend it up: Purée the soup with a hand blender until creamy, leaving some chunks for texture if desired.
- Stir in the cream and cheese: Return the blended soup to pot, stir in cream and cheddar until melted.
- Season to taste: Adjust with salt, pepper, and nutmeg if using.
- Serve warm: Ladle into bowls and serve immediately, optionally topping with extra cheese.
Notes
Serve with warm, crusty bread and a sprinkle of fresh chives or croutons. You can also freeze leftovers for up to 3 months.
Nutrition
- Serving Size: 1 serving
- Calories: 300
- Sugar: 6g
- Sodium: 700mg
- Fat: 20g
- Saturated Fat: 10g
- Unsaturated Fat: 6g
- Trans Fat: 0g
- Carbohydrates: 24g
- Fiber: 3g
- Protein: 12g
- Cholesterol: 50mg
Keywords: broccoli cheddar soup, comfort food, vegetarian soup, cozy recipes, easy soup recipes
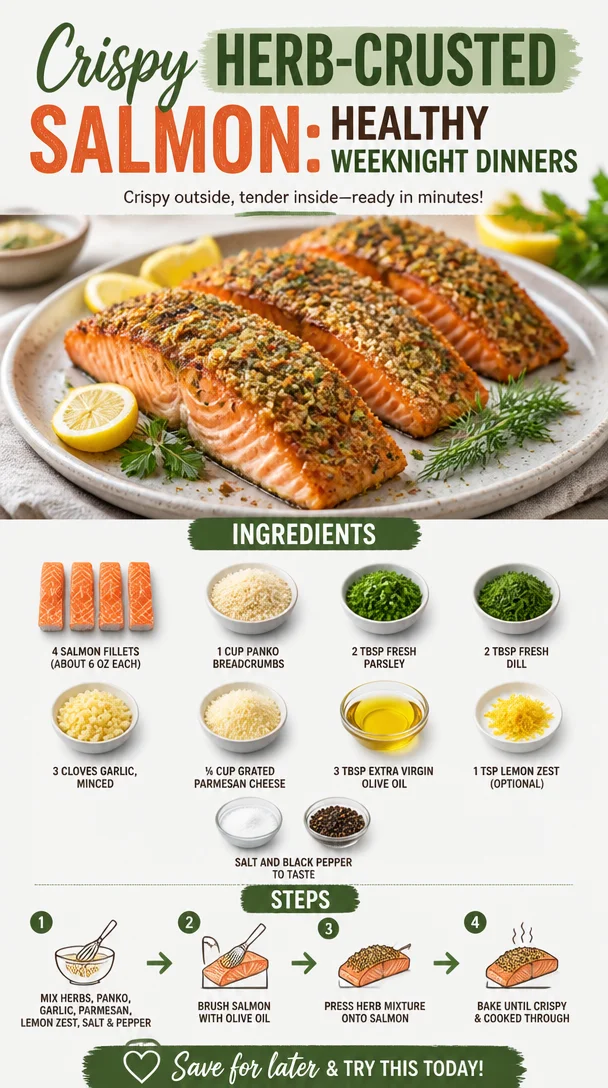
Crispy Herb-Crusted Salmon: Healthy Weeknight Dinners
Extra-Crispy Oven-Baked Salmon Recipe with Herb Crust for Healthy Dinners
Introduction
Hey there, fellow food lovers! If you’re anything like me, you know that life can get busy, and sometimes whipping up a delicious dinner feels like an Olympic event. But, what if I told you that you can nail a healthy, gourmet meal without spending hours in the kitchen? You’ve come to the right place!
Today, I’m thrilled to share one of my all-time favorite recipes: Extra-Crispy Oven-Baked Salmon with an Herb Crust. This dish is perfect for those nights when you want to impress yourself (and maybe a few friends or family members) without breaking a sweat. It’s simple, vibrant, and packed with flavor, not to mention incredibly good for you!
Salmon is a true superstar in the world of healthy eating. It’s rich in omega-3 fatty acids, which are essential for heart health. Plus, when you add a crunchy herb crust made with panko breadcrumbs and a medley of fresh herbs, you bring out flavors that are just downright delightful!
Imagine pulling a perfectly golden salmon fillet out of your oven, the aroma wafting through your kitchen, and your taste buds dancing with anticipation. This recipe will have you feeling like a kitchen rockstar in no time. So, roll up your sleeves, grab your apron, and let’s dive into this mouthwatering dish that’s sure to become a staple in your home!
Personal Story
Oh, how I cherish my memories of the first time I made a crispy herb-crusted salmon! I was living in a tiny apartment, juggling a full-time job and my love for cooking. One evening, I had some friends over for dinner, and I wanted to serve something that would wow them without leaving me trapped in the kitchen during the whole gathering.
So, after a few trial and errors, I finally hit the jackpot when I decided to coat my salmon in that delightful crust. As the salmon went into the oven, my friends arrived, and I was greeted by the savory aroma that spread through every corner of my little apartment.
We gathered around the table, and as I served up that beautifully baked salmon, there were gasps of delight as everyone took their first bite. Suddenly, my friends felt like they were dining at a gourmet restaurant instead of my cozy kitchen! That night was not just about good food; it was about connection, laughter, and love shared over a meal. And let me tell you, we’ve made it a tradition to cook this dish together ever since. There’s something genuinely magical about gathering around a well-prepared meal, and I can’t wait for you to experience it too!
Ingredients
Here’s what you’ll need to create this extra-crispy herb-crusted salmon:
- 4 salmon fillets (about 6 oz each): Fresh or thawed, skin-on or skinless. Salmon is a fantastic source of protein and healthy fats! If you’re looking for a vegan-friendly option, try using marinated tofu for a similar texture.
- 1 cup panko breadcrumbs: These give a wonderfully crisp texture. If you’re gluten-free, no problem! Gluten-free panko works perfectly here.
- 2 tablespoons fresh parsley, finely chopped: This adds a bright, fresh flavor. You can substitute it with cilantro or basil for a different twist!
- 2 tablespoons fresh dill, finely chopped: Dill pairs beautifully with salmon. If you don’t have dill on hand, thyme is a great substitute.
- 3 cloves garlic, minced: Garlic infuses the dish with warmth and depth. If you’re short on fresh garlic, one teaspoon of garlic powder will do the trick.
- ¼ cup grated Parmesan cheese: This adds a delicious salty kick. Looking for a dairy-free option? Nutritional yeast is a fantastic substitute that brings a nutty flavor.
- 3 tablespoons extra virgin olive oil: A drizzle of this adds richness and helps the crust brown beautifully. Avocado oil is an excellent alternative if you prefer a higher smoke point.
- 1 teaspoon lemon zest (optional): This brightens everything up! Feel free to leave it out if citrus isn’t your jam.
- Salt and black pepper to taste: Essential for bringing all the flavors together. Don’t be shy; season generously!
Step-by-Step Instructions
Now, let’s get cooking! Here’s how to prepare your Extra-Crispy Oven-Baked Salmon:
-
Preheat the Oven: Start by preheating your oven to 400°F (200°C). This temperature is perfect for achieving a beautifully crispy outside while keeping the salmon tender and flaky on the inside.
-
Prepare the Baking Dish: Line a baking sheet with parchment paper or aluminum foil for easy cleanup. You can also lightly grease it with a touch of olive oil to prevent sticking.
-
Make the Herb Crust: In a large mixing bowl, combine the panko breadcrumbs, chopped parsley, dill, minced garlic, grated Parmesan cheese, and lemon zest if using. Add a generous drizzle of olive oil and season with salt and pepper. Mix everything until well combined and the breadcrumbs are coated with the oil.
-
Prepare the Salmon Fillets: Pat your salmon fillets dry with paper towels. This step is crucial for getting that crispy crust! Place the fillets skin-side down on the prepared baking sheet. Drizzle the tops with a bit of olive oil and sprinkle with salt and pepper.
-
Crust the Salmon: Now comes the fun part! Take a handful of your herb crumb mixture and press it onto the top of each salmon fillet, ensuring it sticks nicely. Use your fingers to shape it, making sure to cover the entire surface for maximum crunch.
-
Bake the Salmon: Once all the fillets are coated, transfer the baking sheet to your preheated oven. Bake for about 12-15 minutes, or until the crust is golden brown and the salmon flakes easily with a fork. Keep an eye on it towards the end—you want it crispy, not burnt!
-
Serve it Up: Remove the baking sheet from the oven and let the salmon rest for a minute. This allows the juices to redistribute, making every bite tender and juicy. Plate up the salmon alongside your favorite sides, and get ready to dig in!
Serving Suggestions
To make this dish even more delightful, consider plating your crispy salmon with a side of roasted vegetables or a refreshing salad. Nothing beats a vibrant mix of greens and colorful veggies to complement the richness of the salmon! A squeeze of lemon over the top just before serving adds a burst of brightness.
Recipe Variations
Want to mix things up? Here are a few creative variations to keep your salmon exciting!
- Spicy Kick: Add crushed red pepper flakes to the herb crust for a hint of heat that’ll tantalize your taste buds.
- Asian Flair: Replace the parsley and dill with chopped green onions and sesame seeds, resulting in a delicious twist on the classic.
- Mediterranean Sunshine: Incorporate chopped sun-dried tomatoes and olives into the herb crust for a burst of Mediterranean flavors.
- Nutty Crunch: Mix chopped almonds or walnuts into your panko for an extra layer of texture and flavor.
- Citrusy Herb Fusion: Try using lime zest instead of lemon for a zesty kick, pairing beautifully with a cilantro garnish.
Chef’s Notes
Each time I make this Extra-Crispy Salmon, I’m reminded of the joy it brings both in taste and presentation. I’ve experimented with different herbs and flavors over the years, and it’s fascinating how a simple recipe can evolve! The best part? It never fails to impress. Whether it’s a casual weeknight dinner or a fancy gathering, this salmon dish always fits the bill.
And let me tell you, there have been a few kitchen bloopers along the way! Like that time I accidentally grabbed the cayenne instead of the paprika—oh boy, spicy salmon for dinner! But hey, every cooking adventure is a lesson learned, and they always make for a great story around the dinner table.
FAQs and Troubleshooting
Can I use frozen salmon?
Absolutely! Just make sure it’s fully thawed and patted dry before coating it with the herb crust for best results.
What if I don’t have panko breadcrumbs?
No worries! Regular breadcrumbs will work too, but panko gives you that extra crunch that takes this dish to the next level.
How do I know when the salmon is done?
The salmon is cooked perfectly when it flakes easily with a fork and has reached an internal temperature of 145°F (63°C). If you’re unsure, using a meat thermometer can be a great help.
Can I make the herb crust ahead of time?
Definitely! You can prepare the herb crust mixture a day in advance and keep it in an airtight container in the fridge. Just coat your salmon when you are ready to bake.
Nutritional Info
Though this recipe can vary, here’s a rough nutritional breakdown for one salmon fillet (without additional sides):
- Calories: 350
- Protein: 34g
- Fat: 21g
- Carbohydrates: 10g
- Fiber: 1g
There you have it! An easy, flavorful recipe with a crisp herb crust that’s perfect for healthy dinners. I can’t wait to hear how yours turns out, so don’t forget to come back and share your kitchen triumphs! Happy cooking, foodies!
PrintExtra-Crispy Oven-Baked Salmon with Herb Crust
A delicious and healthy oven-baked salmon with a crispy herb crust, perfect for impressing your guests without the fuss.
- Prep Time: 10 minutes
- Cook Time: 15 minutes
- Total Time: 25 minutes
- Yield: 4 servings 1x
- Category: Main Course
- Method: Baking
- Cuisine: American
- Diet: Healthy
Ingredients
- 4 salmon fillets (about 6 oz each)
- 1 cup panko breadcrumbs
- 2 tablespoons fresh parsley, finely chopped
- 2 tablespoons fresh dill, finely chopped
- 3 cloves garlic, minced
- ¼ cup grated Parmesan cheese
- 3 tablespoons extra virgin olive oil
- 1 teaspoon lemon zest (optional)
- Salt and black pepper to taste
Instructions
- Preheat the oven to 400°F (200°C).
- Prepare a baking sheet with parchment paper or aluminum foil.
- Make the herb crust by mixing panko breadcrumbs, parsley, dill, garlic, Parmesan cheese, and lemon zest in a bowl. Drizzle with olive oil and season with salt and pepper.
- Pat the salmon fillets dry and place them skin-side down on the baking sheet. Drizzle with olive oil and season with salt and pepper.
- Crust the salmon by pressing the herb mixture onto the top of each fillet.
- Bake for about 12-15 minutes, until the crust is golden brown and the salmon flakes easily with a fork.
- Serve the salmon alongside your favorite sides.
Notes
Consider pairing with roasted vegetables or a refreshing salad for a complete meal.
Nutrition
- Serving Size: 1 fillet
- Calories: 350
- Sugar: 1g
- Sodium: 350mg
- Fat: 21g
- Saturated Fat: 4g
- Unsaturated Fat: 15g
- Trans Fat: 0g
- Carbohydrates: 10g
- Fiber: 1g
- Protein: 34g
- Cholesterol: 70mg
Keywords: salmon, herb crust, healthy dinner, baked salmon, panko breadcrumbs
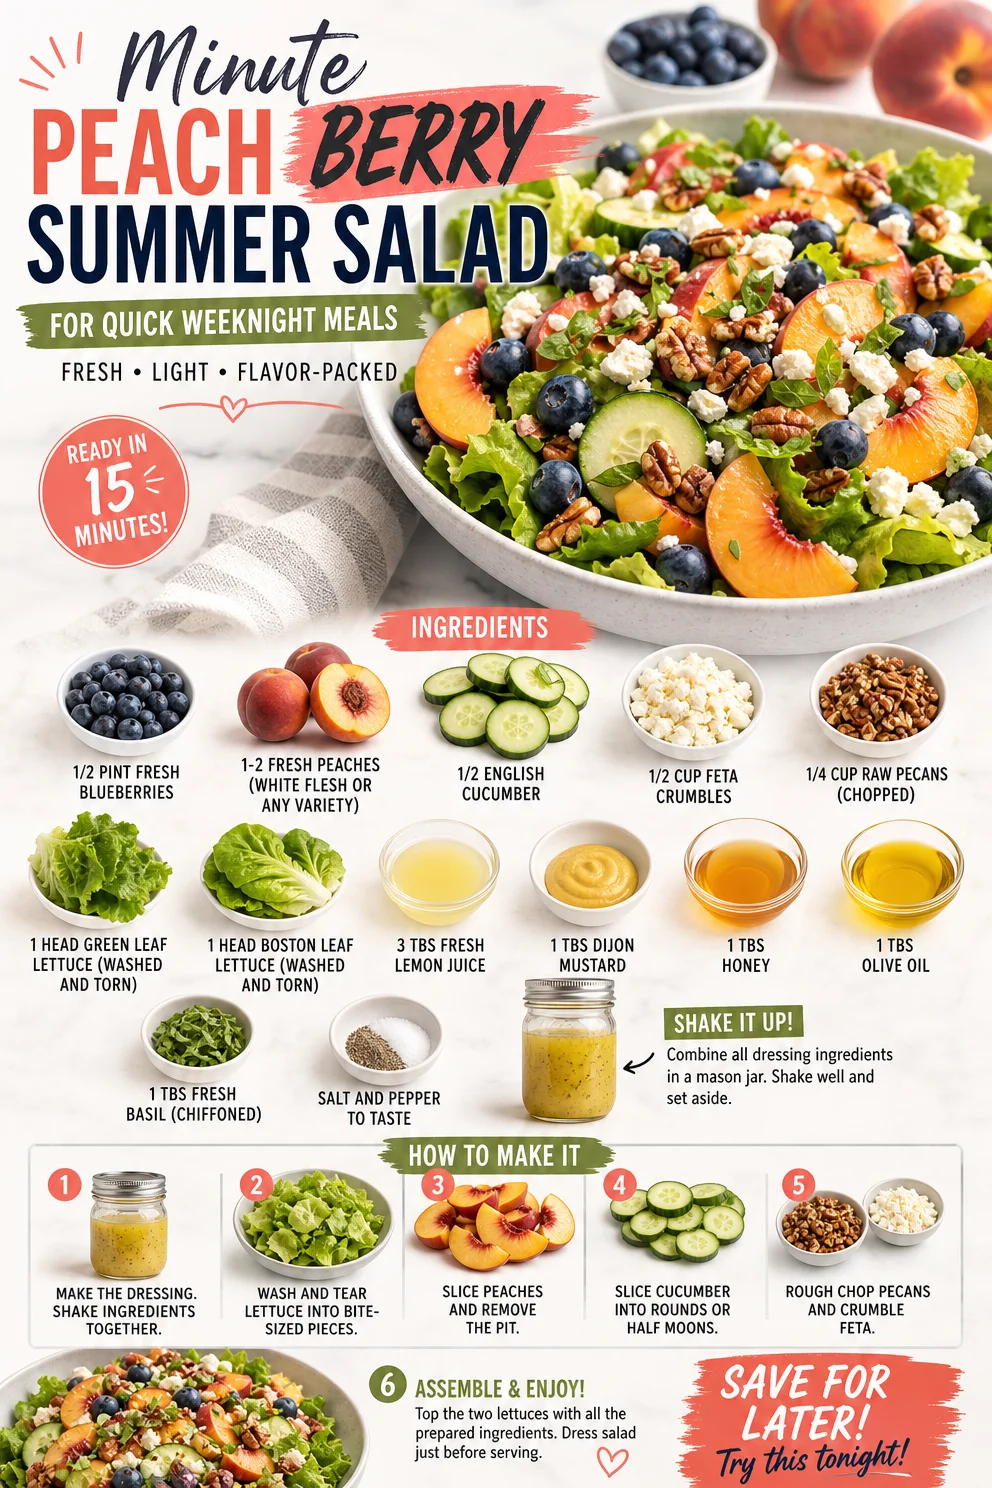
Minute Peach Berry Summer Salad for Quick Weeknight Meals
Peach Berry Summer Salad: A Fresh Take on Seasonal Flavors
Ah, summer—a time for sunshine, warmth, and, of course, the juiciest fruits of the season! Nothing quite compares to biting into a perfectly ripe peach or plucking sweet blueberries fresh from the vine. At Clean Plate Cravings, we’re all about celebrating these delightful ingredients in a way that’s both delicious and nutritious. Today, we’re whipping up a vibrant Peach Berry Summer Salad that’s not only a feast for the senses but also a meal that’s uncomplicated and bursting with flavor.
Imagine bringing together the juicy sweetness of sun-kissed peaches with the tartness of blueberries, all complemented by crunchy cucumbers, creamy feta, and toasted pecans. I mean, talk about summer on a plate! This salad is perfect for those casual backyard barbecues, a light lunch, or a fresh side dish at your next gathering. Let’s dive into this recipe and transform your kitchen into a summer oasis where every bite is a celebration!
A Taste of Nostalgia: My Peachy Summer Memories
When I think of peaches, I’m immediately transported to my childhood summers spent at my grandmother’s house. She had the most magical garden you could imagine, bursting with color and life. The peach tree stood like the monarch of her backyard, heavy with fruit that begged to be picked. Every July, my siblings and I would race each other to see who could reach the juiciest peach first. We’d devour them right there, juice dribbling down our chins, leaving us giggling and sticky.
It was in her kitchen that I first learned the value of fresh ingredients. Grandma would toss together vibrant salads using whatever she had on hand, often inspired by her garden’s bounty. That spirit of joy and simplicity has stuck with me through the years and inspired this Peach Berry Summer Salad. It’s all about using the freshest flavors to create something that tastes like sunshine—and, trust me, you’ll want to share it with everyone, just like I did back then!
Ingredients
Let’s gather the vibrant, fresh ingredients for our salad! Here’s what you’ll need:
-
1/2 pint fresh blueberries
These little gems are not just delicious; they’re packed with antioxidants. If you can’t find blueberries, feel free to substitute with raspberries or sliced strawberries for that sweet-tart flavor. -
1-2 fresh peaches (white flesh or any variety)
I love white peaches for their sweetness, but any ripe peach will do. Look for peaches that are slightly soft to the touch; that’s a sign they’re perfect for eating! -
1/2 cucumber (English cucumber preferred)
A crunchy cucumber adds a refreshing crispness to the salad. If you only have regular cucumbers, just peel the skin to avoid bitterness. -
1/2 cup feta crumbles
Soft, creamy feta is a match made in heaven with sweet fruit. If you’re not a fan of feta, goat cheese works wonderfully too. -
1/4 cup raw pecans (chopped)
The toasty crunch of pecans brings a lovely texture. If you’re nut-free, sunflower seeds are a fantastic alternative. -
1 head green leaf lettuce (washed and torn)
This lettuce adds a tender base for our salad. You could also use arugula for a peppery spin! -
1 head Boston leaf lettuce (washed and torn)
Boston lettuce is mild and buttery, but any leafy green will work. Think spinach or mixed greens if that’s what you have on hand. -
3 Tbs fresh lemon juice
Bright and zesty, lemon juice elevates all the flavors. Lime juice can be a fantastic substitution if you’re looking for a twist! -
1 Tbs Dijon mustard
This provides a creamy, tangy backdrop that binds the salad together. If you don’t have Dijon, yellow mustard will do in a pinch. -
1 Tbs honey
Adding just a touch of sweetness, honey balances the tang of the mustard. Maple syrup is a great vegan alternative. -
1 Tbs olive oil
A drizzle of good-quality olive oil brings everything together beautifully. Feel free to swap this out for avocado oil if you enjoy its mild flavor. -
1 Tbs fresh basil (chiffonade)
Fresh basil adds an aromatic note. Don’t have any? Mint or cilantro can add an intriguing twist. -
Salt and pepper to taste
Essential for bringing all the flavors to life. Always taste as you go!
Step-by-Step Instructions
Ready to create this stunning salad? Follow these simple steps to master the Peach Berry Summer Salad:
-
Prep Your Produce
Begin by washing all your fresh veggies and fruits thoroughly. I like to soak my berries in a bowl of water with a splash of vinegar for a few minutes to make sure they’re super clean. This little hack ensures that any pesky pesticides or residues are washed away! -
Slice Those Peaches
Whether you’re using one or two, slice your peaches into wedges or cubes—whichever you prefer! Don’t you love the way fresh peaches smell? It’s a reminder that summertime is truly the best time for fresh fruit. -
Chop the Cucumber
Slice your English cucumber in half lengthwise and then cut it into thin crescent shapes. The cucumber adds such a satisfying crunch. You can peel it if you’d like, but I usually leave the skin on for that bright color and nutrients! -
Mix the Greens
In a large salad bowl, toss together your washed and torn green leaf and Boston lettuce. This leafy foundation is where all the magic happens! -
Add the Berries and Peaches
Gently fold the sliced peaches and fresh blueberries into the greens. Look at those colors; it’s like a celebration right in your bowl! -
Sprinkle on the Feta and Pecans
Add your feta crumbles and chopped pecans, distributing them evenly over the salad. I love to toast my pecans in a dry skillet for a few minutes to enhance their natural flavors. Just be sure to keep a close eye on them—burnt nuts are a kitchen tragedy! -
Create the Dressing
In a small bowl, whisk together the fresh lemon juice, Dijon mustard, honey, and olive oil until combined. This simple dressing ties all the ingredients together beautifully. Taste it—it should be bright, tangy, and just a little sweet. Adjust with extra honey or lemon juice as desired! -
Dress the Salad
Drizzle your dressing generously over the salad, and season with salt and pepper to taste. Toss gently to combine, ensuring that every ingredient is coated in that yummy dressing. Remember, gentle is key; we want to preserve the integrity of those beautiful berries and peaches! -
Give it a Moment
Allow the salad to rest for a few minutes to let the flavors meld. This step is especially important if you’ve added salt, as it helps draw out some of the juices from the veggies and fruits for extra flavor! -
Serve and Enjoy!
Serve this gorgeous salad immediately for the freshest experience, or refrigerate it for up to an hour if you’re planning to serve it at a gathering. But honestly, I find it’s best enjoyed right after you make it!
Serving Suggestions
To plate the Peach Berry Summer Salad, use a large, shallow bowl to showcase the colorful layers. You can even arrange the salad in a winding design for a more artistic touch. A slice of crusty bread or grilled chicken on the side fully rounds off the experience! For an extra indulgent moment, consider drizzling a little extra honey or a sprinkle of fresh herbs on top just before serving.
Recipe Variations
Feeling adventurous? Here are a few variations to keep things fresh and exciting:
-
Grilled Peach Twist: Get that smoky flavor by grilling the peach slices for a few minutes. This adds a lovely char and enhances sweetness.
-
Dairy-Free Delight: Swap feta for a scoop of creamy avocado for that buttery texture without the dairy!
-
Add Ins: Toss in some grilled chicken or shrimp for a protein-packed twist that makes this salad a complete meal.
-
Dress it Up: Enhance the dressing with a splash of balsamic vinegar for a richer flavor profile.
-
Tropical Flair: Trade peaches for mango or add some sliced strawberries for a fun, tropical vibe!
Chef’s Notes
This salad has evolved throughout the years in my kitchen and has become a staple in my summer repertoire—perfect for potlucks and family gatherings. I can’t count the number of compliments I’ve received, often accompanied by requests for the recipe! Sometimes, I even challenge myself to change it up and incorporate whatever is fresh at the farmers’ market. It’s always a delight to see how versatile a simple salad can be.
Remember, cooking is all about experimentation and joy. So, feel free to switch in your favorite fruits or nuts, and don’t hesitate to make this salad your own!
FAQs and Troubleshooting
1. Can I make this salad ahead of time?
While I recommend serving it fresh, you can prepare all the ingredients and store them separately in the fridge for a day. Just mix them together before serving, and drizzle the dressing at the last minute to prevent sogginess!
2. What can I use instead of honey?
You can substitute honey with agave syrup, maple syrup, or a few drops of stevia for a sugar-free option.
3. Why is my feta crumbly?
If your feta is too crumbly, it may be an indication that it’s been over-processed or too old. Opt for a fresher block of feta and crumble it yourself for a creamier texture.
4. How can I keep the salad fresh longer?
If preparing in advance, keep the dressing in a separate container until you’re ready to serve. This way, the salad remains crisp and vibrant!
Nutritional Info
While I didn’t provide exact nutritional stats for this salad, it’s a wholesome dish packed with vitamins and minerals. Each serving is loaded with antioxidants from the berries, healthy fats from the pecans, and a delicious source of protein from the feta cheese.
There you have it! A vibrant and luscious Peach Berry Summer Salad that embodies everything we love about summer. What are you waiting for? Let’s get chopping and enjoy the season’s best produce together! Happy cooking, friends!